Gaggia Carezza Series User manual

,,
,,
I,,,
\
Instructions
a.Sb%a
,,
Mode d’emploi
,’
,I
lnstrucciones de
us0

7
5
a
L
I2
II
IO
9
-
“Off” position
-
Position “6teint”
-
Posicibn “Off’
I
-%
-
Press here to remove grating
-
Appuyer ici pour
Gter
la grille
-
“0
n” position
-
Position
“allumC”
-
Posicibn “On”
-
Apretar aqui para quitar la rejilla

,
READ THIS FIRST!
For
GAGGIA~~spressolCappuccino
Makers
BEFORE making espresso the first time, you MUST prime the pump!
Here’s how to do it:
1. Plug the electrical cord into a live outlet.
2. Fill the water reservoir. (Filtered water is better.)
3. Place an empty filter into the black handled filter holder.
4. Attach the filter holder to the machine.
5. Turn on the power switch.
6. Allow the machine to heat up for 6 minutes.
7. Open the steam valve all the way.
8. Place an empty steam pitcher or mug under the steam tube.
9. Turn on the coffee switch and the steam switch.
10. Water will come out of the steam tube.
11. Allow about a cup of water to come out into the pitcher.
12. Turn off the coffee and steam switches.
13. Close the steam valve.
14. Place an empty cup under the coffee filter.
15. Turn on the “coffee” switch.
16. Fill the cup with water.
17. Turn off the “coffee” switch.
YOU ONLY NEED TO PRIME THE PUMP AGAIN ONLY IF NO WATER
COMES OUT OR THE PUMP IS MAKING TOO MUCH NOISE.
Now you are ready to make espresso!!! Here’s how:
1. Remove the black handled filter holder.
2. Using the measure provided, place one or two measures of finely
ground espresso coffee in the filter basket.
(The large filter holds two measures for two cups,
the small filter is for one cup.)
3. Using the tamper provided, gently press and twist the tamper on the
surface of the ground coffee to pack it down.
4. Brush off any grounds on the rim with the palm of your hand.
5. Attach the filter holder firmly to the machine.
6. Place empty cup (or cups) under the filter holder spouts.
7. Turn on the “coffee” switch.

8. The pump sound will change in a few seconds and espresso
will start to flow into the cups.
9. When the streams of espresso turn light in color,
TURN OFF the “coffee” switch.
10. You may now remove the cups of espresso and serve them.
11. Before making more espresso, remove the filter holder and
knock out the used grounds. DO NOT rinse the filter or filter holder at
this time as it will cool them and make the next batch taste bitter.
TO MAKE CAPPUCCINO
1. Turn on the steam switch.
2. Put cold milk (skim, 1%, 2%, Regular, Half
&
Half)
into a steaming pitcher only one-third full.
3. Place an empty mug under the steam tube and open the steam
valve part way to remove any accumulated water from the steam tube.
4. Close the steam valve.
5. Hold the pitcher with milk in it so that the end of the steam tube
is below the surface of the milk but not so deep to block the air intake.
6. Open the steam valve all the way.
7. As the froth forms, raise the pitcher so that the steam tube
goes deeper into the pitcher over the air intake.
8. When the froth is near the top of the pitcher, turn off the steam valve.
(the froth may not come to the top if you are using a large
pitcher with less milk in it.)
9. Turn off the “Steam” switch.
10. Remove the cups of espresso from the drip pan grid.
11. Spoon some froth from the pitcher on the espresso in the cup(s),
I
then pour the hot milk in until the froth reaches the top of the cup(s).
12. If desired, sprinkle shaved chocolate or cinamon on top of the froth.

I.On-Off switch
10.
Filter basket 1 or
2
cups
2
.
Steam switch
II
. Tamper
3.
Hot water/brew switch (Pump)
12.
Shower head
3
TZ
Temperature ready-light
‘13.
Shower-holder
4.
Power-on light
14
.
Filterholder seal
5
.
Reservoir cover
15
.
Brew head
6
.
Removable water knob
7.
Steam/hot
water knob
16.
trip
tray
17.
Drip plate
6
.
Turbo
brother
steam nozzle
(removeable)
9
. Filterholder
18.
Measuring Tab
18
.
Power cable and plug
Ins
Regarding Your Cord Set:
A.
B.
C.
A
short
power-supply cord is provided to reduce risks resulting
horn
becoming
entangled in or tripping over a longer cord. ONLY FOR TWO
WIREiS
POWER
SUPPLY CORD: This appliance has a polarized plug (one blade is
vvider
than the
other). As a safety feature, this plug will fit in a polarized outlet only one way. If
fhe
plug does not fit fully in the outlet, reverse the plug.
Ifit
still does not fit, contact a
qual&ed
electrician. Do not attempt to defeat the safety feature.
Longer extension cords are available and may be used if
care
is exercised in their use.
If a long extension cord is used,
I. the marked electrical rating of the extension cord should be at least as great as the
electrical rating of the appliance,
2.
if the appliance is of the grounded
type,
the extension cord should be a grounding
9p
e
3-wire
cord, and
.
the longer
cord should be arranged so that it
will
not drape over the counter top
dr
table top where it can be pulled on by
child.ren
or tripped over.

As the
P
roud owner or the Gaggia Carezza, you can now experience the
taste o
a delicious cup of espresso or cappuccino in the comfort of your
own home. Congratulations on making a wise decision!Espresso coffee, originally
created in Italy, is made by rapidly
forcin
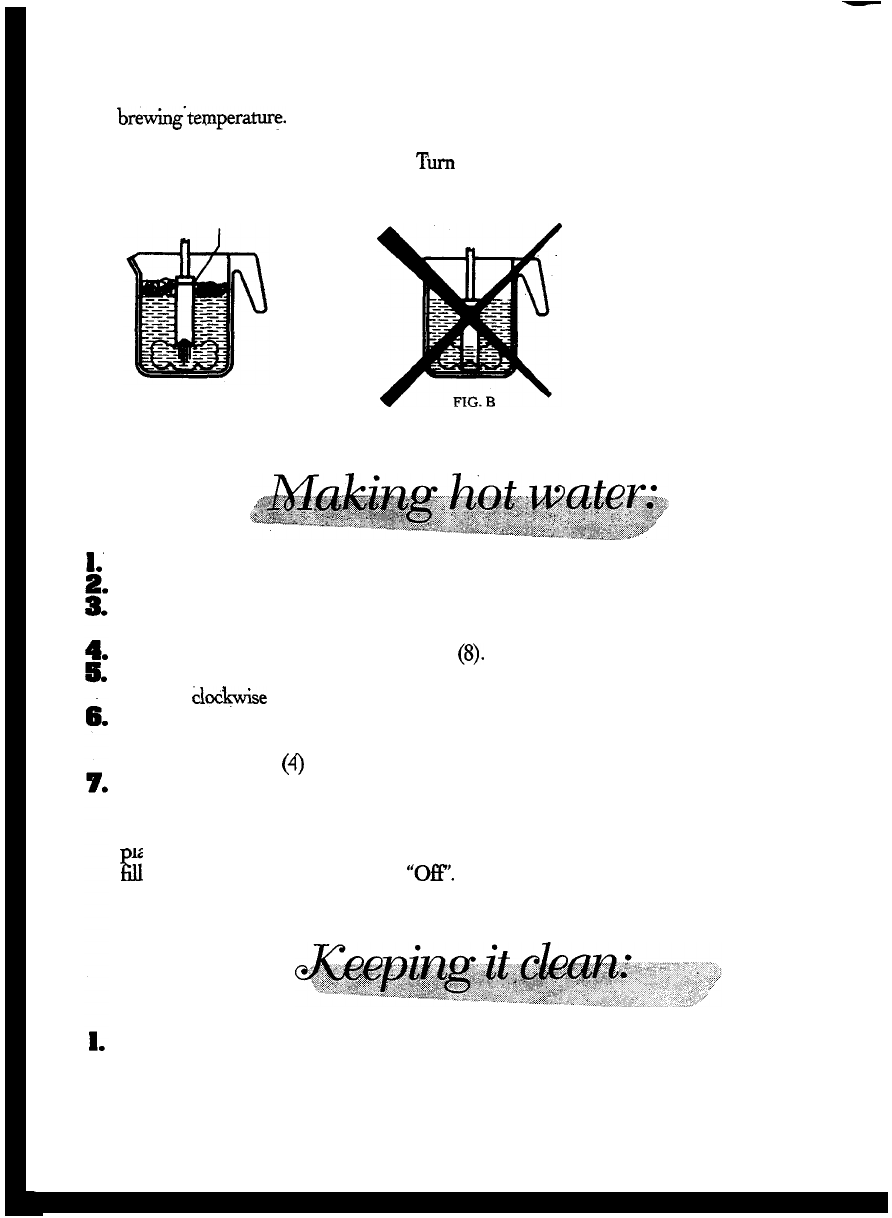
water that has been heated to the correct
brewing temperature, through a
speci
J
finely ground coffee. The heart of the
Carezza Gaggia is a precision engineered pump. The pump and water flow is easily
controlled with just a flick of the switch.
Making espresso or cappuccino is very different from using a
coventional
coffee maker. The Carezza Gaggia operates with pressure and steam and it is,
therefore, important to read all the instructions before using. Become familiar with
all parts of the machine before operating the unit.
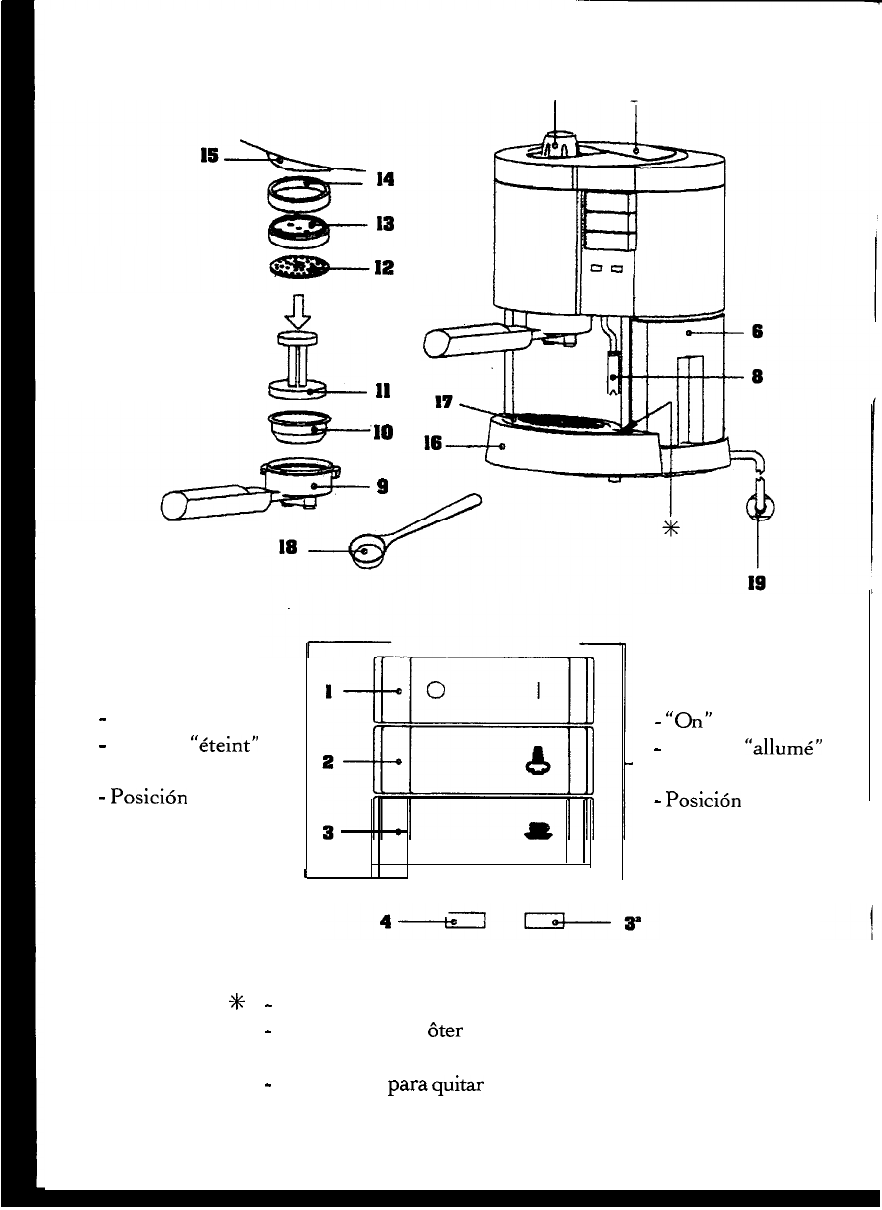
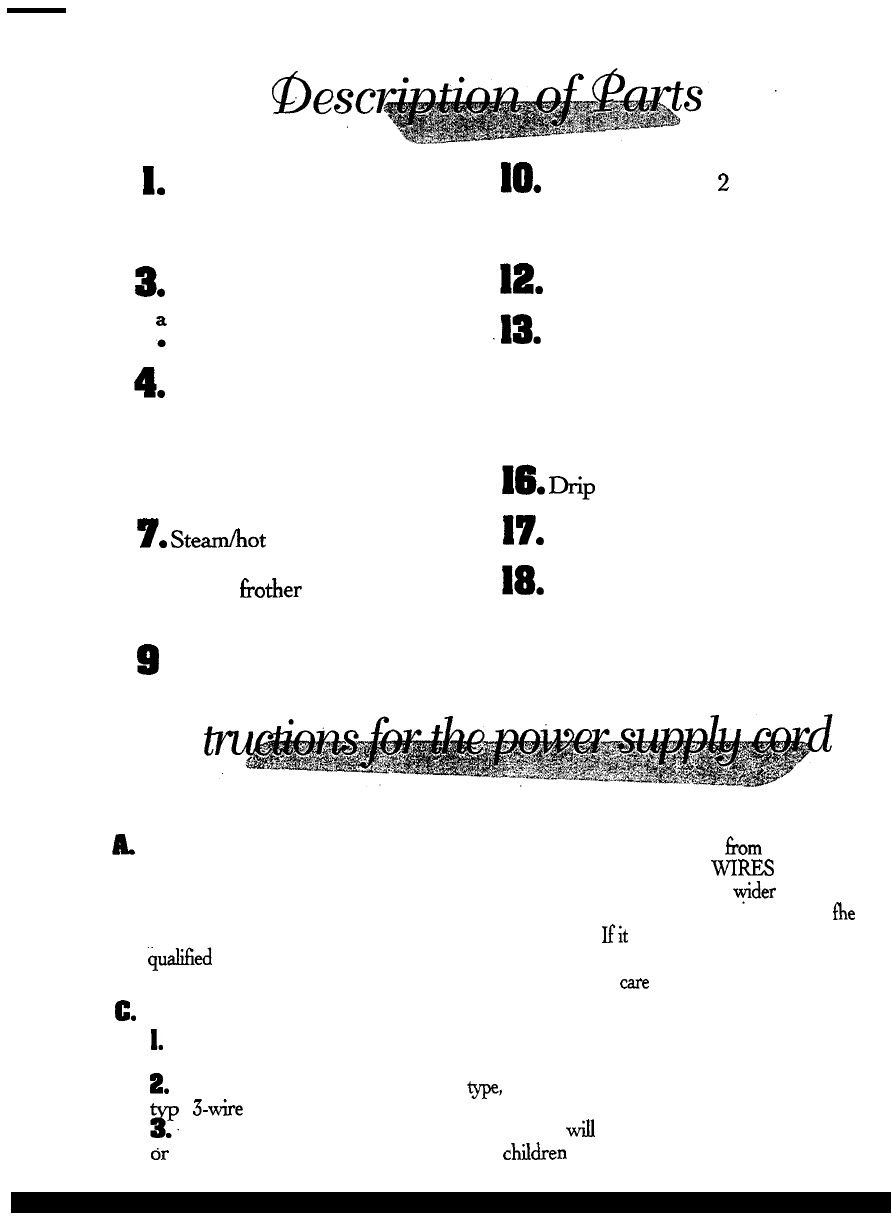
1.
2.
3.
4.
8.
6.
The taste
ofyour
coffee depends on the characteristics of the beans
from
which it
is made, the type of bean, where it was grown and processed. The special flavor of
a coffee bean is determined by many factors, but its taste and aroma are the result
of the roasting
to a moderate
recess.
Most coffees purchased from the supermarket are roasted
B
egree. Those beans are light in color and have a dry, rather than an
oily surface. This is known as the American roast
(m
USA). The coffee beans that
are roasted for a longer period of time and at higher tern
eratures
will be much
darker in color. Darker beans will produce a more flavo
If5
lightly-roasted beans. cup of coffee than the
A variety of dark roasts is available from which you can choose to brew your
espresso. Examples: Vienna roast, French roast, Italian roast, etc.
Each
of these
roasts is a blend of coffee beans that are roasted at a
specific
temperature producing
a s
ca.E
ciftc
type of f&or. There are decaffeinated beans that have up to 98% of the
eine content removed. The next time you purchase coffee for your espresso
maker, experiment with one of the many kinds of coffee being sold. You may just
find that it tastes better than the blend you have been using.
A fine “espresso grind” for pump-driven machines must be used. Be sure to ask for
this when buying coffee or when having beans ground. Do not use a blade-type
grinder because it makes too much coffee dust and produces an irregular grind.
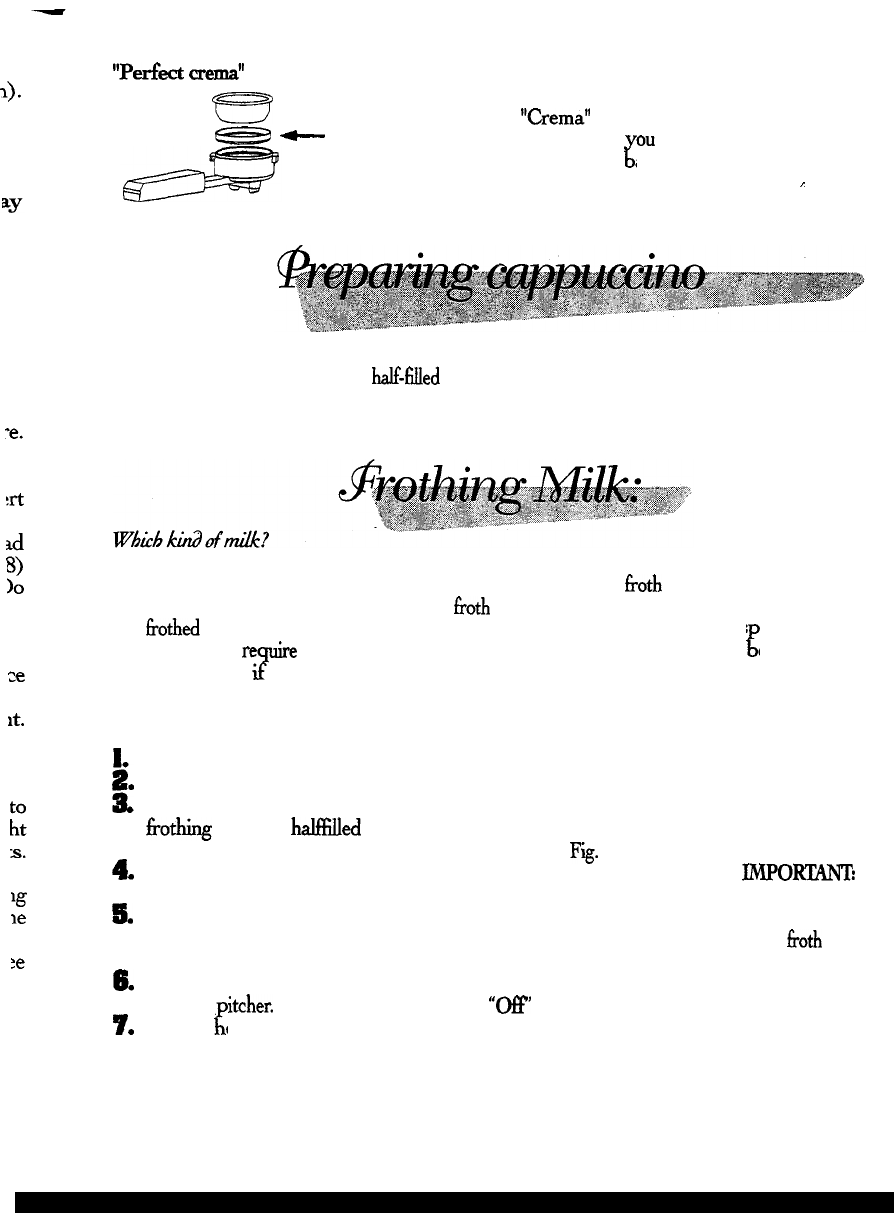
The mark of real espresso is its dark color, rich taste and the light brown, natural
froth called “crema” in Italian.
Cappuccino is simply a combination of espresso and hot, frothy milk. Equal amounts
of espresso, froth and hot milk are recommended. Cappuccino is usually topped with
cinnamon, nutmeg or chocolate shavings.
Espresso coffee should be served immediately after it is made.

;;J:
:ct
he
JY
lal
is,
th
it
of
lit
:d
In
at
:h
ie
lr
se
‘g
ie
50
st
x
)e
d
S
h
9.
8.
9.
1.
2.
3.
4.
Espresso is served in 2 to 2
l/2
oz. demitasse cups. A 4 or 6 oz. cup or glass is used
for cappuccino.
Ideally, coffee beans should be ground immediately before using. Remember, it
must be an “espresso grind” for pump-driven machines.
It’s best to store ground coffee or beans in an airtight container in the freezer of
your refrigerator. Ground coffee readily picks up food flavors.
Raise the water reservoir cover (5) and fill with cold water to the MAX
line
indicated on reservoir (6). For best taste, the use of bottled water is recommended.
The water reservoir (6) can be removed by filling it.
IMPORTANT: When replacing reservoir, be certain that suction tube is inside the
reservoir and not kinked or blocked.
Insert plug (19) into a suitable wall outlet (see point (1) under “caution”).
Turn the power switch (1) to “On”. The power-on indicator light (4) will light up.
Make certain that the hot water/brew switch (3) is in the “Off’ position. If you hear
a noise it means the pump is on, turn it off immediately with the brew switch.
Priming.the
pump: This procedu-re prepares the pump and fills the water boiler
with fresh water. This should be done whenever the machine is switched on.
This machine features a self-priming pump. Place an empty cu on the
drip-
plate, do not insert filter holder into brew head and press hot water/co
&!
ee switch (3).
You will hear the sound of the operating pum
get out from the brewing head. Once cup is and after few seconds, water will start to
&
ed, set coffee switch (3) onto pos. “Off’.
Carezza Gaggia in now ready to be used.
Note: It may happen that the
self-priming
feature of the pump does not temporarily
work due to an air lock. In this case water does not get out
fi-om
brewing head, and the
following procedure should be followed:’
(a) Place a small frothing pitcher or mug under the steam nozzle (8).
(b)
Turn the steam knob (7)
on the side counter-clockwise to open the steam/hot water
valve, and turn the hot water/brew switch (3) to “On”. You will hear the sound of
the pump.
(c) After a few seconds, a steady stream of water will emerge from the steam nozzle.
Allow about one cup of water to fill the pitcher. Shut the steam/hot water valve and
turn hot water/brew switch to “Off”. The Carezza Gaggia has been primed.
NOTE: The temperature ready-light
(3”>
will automatically go on-and-off as the
machine’s boiler heats. When the light goes on, the correct water temperature for
brewing (and steaming) has been reached. Wait at least 6 minutes for the machine to
reach its full ‘operating temperature (during this time, the indicator light will go on and
off frequently).

Another feature of the machine is the “no-drip system”, eliminating most of
dripping from brewing head (that is normal and due to the pump pressure in the system).
The feature “no-drip system” causes a light gurgle, for the return of hot water into the
tank. After coffee brewing, however, a little dripping may occur due to wet coffee grinds
in the filter-holder.
Caution: Never
opera&
pump without water in machine as damage to
the
pump may
occur. Damage of pump
run
without water is not covered by
warranty.
f
.
3.
4.
5.
5.
1.
8.
Follow the procedure described under Preparation.
Allow about 6 minutes for the machine to reach its proper operating temperature.
(Use this time to set table, prepare cups, coffee, milk, etc.).
Select the correct filter basket (10)
an
d
insert it in the filter holder (9). Use the small
filter basket for 1 cup and the large filter basket for 2 cups of espresso. Then insert
the filter holder (9) into the brew head (15) to warm-up.
After the warm-up period, remove the warm filter-holder (9) from the brew-head
(15) and fill with correctly ground espresso coffee using the measuring spoon (18)
provided. Place one level measure of coffee in basket for each cup of espresso. Do
not overfill. Gently tamp down coffee with the tamper (11) provided. Do not
compress too firmly.
Clean any excess coffee from the rim of filter holder (9). Insert filter holder into brew
head (15) by holding handle approximately 45 degrees to the left as you face
machine. When properly aligned, move handle firmly to the right to lock into
position. The handle should point to the front of the machine or
slightly
to the right.
Place one or two espresso cups on the drip plate (17) to line up with the spouts of
the filter holder. Depress hot water/brew switch (3) to “On” position. Espresso will
start to flow into cups.
When cups are
3/4
full, release brew switch to “Off’. The more water you allow to
flow, the weaker the coffee. When properly made, the espresso will have a light
brown foam “crema” floating on the top. If not, refer to
Troubleshooting
Hints.
Remove cups and serve.
To make more- espresso, carefully and slowly remove the filter holder by moving
handle to the left. Use care as hot water will be on top of the coffee grinds in the
holder. Some water will continue to drip’ from brew head as filter holder is removed.
That is normal and due to the pump pressure in the system. Knock out used coffee
grinds from filter basket and rinse. For more espresso repeat steps 4 to 8 above.

of
9.
he
ds
-e.
all
!rt
;(:
10
ot
W
x
to
It.
of
ill
‘g
le
d.
:e
"PlZIfkCt
mema”
device
B
A unique disc fitted into the filter-holder will produce coffee
EE5’
C-
giving the perfect
“Crema”
essential for the authentic
espresso, whatever type of grind
need only use the two-cup filter
ou
use. Furthermore, you
c
asket even when brewing
for one person (one level measure of coffee only).
I
When preparing to make cappuccino, have all of the ingredients at hand as well
as a frothing pitcher (or mug)
halGilled
with skimmed or low-fat milk and cups that are
larger (6 oz.) than those used for espresso.
The less fat content in the milk the denser the froth will be. Skimmed or low-fat
(2%) milk will provide a thick foam. With regular milk the
both
will quickly collapse.
The Turbo-Frother will give you all the
froth
required but don’t let milk come to a boil.
Let
I+othed
milk stand for about 30 seconds before spooning in onto the es
resso.
It may
re
at frothing milk
*
P
uire
two or three tries to ‘become an expert” but you will
l!
e successful
you give it a chance. Swivel the Turbo-Frother steam nozzle slightly
outward so that you can get the frothing pitcher under the nozzle without hitting the
base of the machine.
1.
.
4.
5.
8.
7.
Make espresso (in a large cups) as described above.
Depress steam switch (2) to “On”.
After 10 to 15 seconds or, when temperature ready-light (33 goes on, place the
fi-othing
pitcher
haBilled
with
1
ow-fat milk under Turbo Frother steam nozzle so
that tip is just under the surface of the milk. See
Fii.
A.
Slowly turn steam valve knob (7) counter clockwise to release steam.
IMPORTANTr
The more you turn the knob, the greater the steam pressure for frothing.
Move pitcher in circular motion keeping the tip of steam nozzle just under surface
of milk as it begins to froth. Do not let milk come to a boil since it will not
froth
When
you
have made enough froth, turn steam knob clockwise to shut off steam and
remove
itcher.
Put steam switch (2) to
“OR
position.
Spoon tKe froth onto the espresso in each cup and gently pour the hot milk along the
side of the cup. Top each cup of cappuccino with a dash of cinnamon, cocoa, nutmeg
or chocolate shavings. Serve.

a.
NOTE: If you want to make more espresso immediately after steaming milk, the
machine’s boiler must be refilled with water and temperature brought down to a
brewing’temperature.
Otherwise, espresso may taste “burned”. To do this: place an
empty cup on drip plate. Do not insert filter holder. Turn hot water/brew switch (3)
to “On” letting cup fill with water.
Turn
brew switch “Off”. You many now proceed
to make more espresso.
AIR HOLE
FIG. A
Follow the procedure described under preparation.
Turn the steam switch (2) to “On”.
Allow about 10 to 15 seconds for the machine to reach its proper operating tempe-
rature.
Place a pitcher under the steam nozzle (8).
Turn the hot water/brew switch (3) to “On” and slowly turn steam valve knob. (7)
counter
&&wise
to release hot water.
When you have made the desired quantity of hot water, turn steam knob clockwise
and hot water/brew switch to “Off” to shut off hot water and remove pitcher.
Put steam switch (4) to “Off’.
NOTE: If you want to make espresso immediately after making hot water, the
temperature of the machine boiler must be brought down to a brewing temperature.
Otherwise, espresso may taste ‘burned”. To do this: place an empty cup on drip
late. Do not insert filter holder. Turn hot water/brew switch (3) to “On” letting cup
Ll
with water. Turn brew switch “Off”. You may now proceed to make espresso.
IMPORTANT: The steam nozzle should be cleaned after each use in order to avoid
build up of milk deposits that are very d&cult to clean. Cleaning is made easy as can

he
‘a
an
3>
cd
be seen in the Description of Parts. The outer jacket of nozzle can be removed by
pulling downward.
The steam jet is cleaned by nmning a shot of steam through it. A cleaning needle
has been supplied to clear any obstruction. Outside of steam pipe can be cleaned with a
damp cloth. Hole in steam nozzle must be kept open. A needle may be used.
2.
3.
4.
5.
6.
*
7.
8.
C-
7)
se
he
-e.
iP
IP
id
m
Glean filter holder and filter basket in warm water after use.
Wipe bod
of machine with a damp cloth as required.
Remove CL
‘p tray and plate (16, 17)
an
d
wash in warm soapy water. Use sponge to
clean out drip area.
Ground coffee will adhere to the seal (14) inside of the brew head
(I5).
Keep it clean.
The shower head (12) should b
e
unscrewed and cleaned periodicaIly depending on
frequency of use.
After long periods of non-use, drain stale water from machine b
&l
turning hot
water/brew switch to “On”. However, do this only after you have
ed reservoir
with fresh water. Never operate pump unless there is water in reservoir
(6)
NOTE: It is very normal for an espresso machine to emit steam and drip
occasionally as the water pressure changes during use. Be certain to empty drip tray
(16) as required.
In hard water areas, minerals found in the water will accumulate and affect
operation of the unit. Approximately every four months (this can vary dependin
on use
and water condition), clean the machine with Gaggia descaler (in which case fo
&
ow the
instructions on the packet).
Remove shower head (12)
an
d
1
c ean.
Pour solution into reservoir and turn on
pump for 15 seconds.
Allow solution to flow through brew head and steam nozzle for several seconds.
Wait 20 minutes and repeat.
Re
machine
&roughly
by eat process until solution has been run through. Rinse
running p
ain
cold water through machine. Replace shower head.
7
NOTE: Product &&me due to scale
accumulation is not covered b
fy
warranq.
No
other servicing should be attempted by the user. Use “Gaggia cleaner”
or best results.
When using electrical appliances, basic safety precautions should always
be followed to reduce the risk of fire, electric shock, and/or injury to persons,
including the following:

Read all instructions and information in this instruction book and any other
literature included in this carton referring to this product before operating or
using this appliance.
Do not touch hot surfaces. Use handles or knobs.
To protect against fire, electric shock and personal injury do not immerse cord,
plugs, or appliance in water or other liquid.
Close su
Ul
F
ervision is necessary when.any ap liance is used by or near children.
np ug ram outlet when not in use and be
F
ore cleaning. Allow to cool before
putting on or taking off parts, and before cleaning the appliance.
Do not operate any appliance with a damaged cord or plug or after the
appliance malfimctions or has been damaged in any manner. Return appliance
to the nearest authorized service center for examination, repair or adjustment.
The use of accessory attachments not recommended by the appliance
manufacturer may result in fire, electric shock or personal injury.
Do not use outdoors.
Do
‘not
let cord hang over edge of table or counter, or touch hot surfaces.
IO.
Do not place on or near a hot gas or electric burner, or in a heated oven.
II. Always turn appliance “Off”, then plug cord into the
wail
outlet. To
disconnect, turn switch to “,Off’, then remove plug from wall outlet.
I&Do
not use appliance for other than intended household use.
1
13.u xt
se e
reme caution when using hot steam.
Save these instructions
This appliance is for household use. Any servicing, other than cleaning
and user maintenance, should be performed by an authorized service center. Do
not immerse base in water. To reduce the risk of fire or electric shock, do not
disassemble the base. No user serviceable parts inside. Repair should be done by
authorized service personnel only.
1.
Ch k
It
ec vo age to be sure that the voltage indicated on the name plate agrees
with your voltage.
2.
Never use warm or hot water to fill the water reservoir. Use cold water only.
3. Keep your hands and the cord away from hot parts of the appliance during
~.
Feration.
ever clean with scouring powders or hard implements.
.o avoid your machine scaling up, use purified or bottled water.

‘0
g
0
,t
Y
!S
iT*
g
Prodlem:Coffee
does not flow
Check:
Cl
For water in reservoir
CI
Filter basket clogged because coffee
is too fine or compressed too firmly
c1
Shower head requires cleaning
Probhn:
Coffee flows too quickly
Check:
Cl
Coffee is ground too coarsely
Cl
Coffee not pressed down with
tamper
Problem:
Pump makes loud noise
Check:
0
water in reservoir
i
Fump
not primed
Q
Coffee is ground too coarsely
Problem:
Water leaking excessively
from filter holder
D
Gasket in brew head dirty or worn
Cl
Coffee ‘grinds not cleaned off the
rim of filter holder
Problem:
Espresso has little crema froth
Check:
0
Coffee is ground too coarsely
0
Coffee is not pressed down with
tamper
Cl
Coffee is too old or dried out
Problem:
Espresso is too cold
Check:
LI
Machine not warmed up (6 min.)
Cl
Coffee flows through too
quickly-
coffee is ground too coarsely
Problem
Not enough milk froth
-Check:
D
Use skimmed or low-fat milk
Cl Steam nozzle and/or air intake hole
Check:
Cl
Filter holder
in brew head
clogged
not properly inserted
D
Milk is too hot
Table of contents
Other Gaggia Coffee Maker manuals

Gaggia
Gaggia 9334GB0B0011 User manual

Gaggia
Gaggia 10002533 User manual

Gaggia
Gaggia cubika plus User manual

Gaggia
Gaggia BABY DOSATA User manual

Gaggia
Gaggia 10001460 User manual

Gaggia
Gaggia 10001965 User manual

Gaggia
Gaggia ANIMA PRESTIGE User manual

Gaggia
Gaggia Evolution Espresso User manual

Gaggia
Gaggia Baby Dose Series User manual

Gaggia
Gaggia Baby Gaggia User manual

Gaggia
Gaggia CLASSIC User manual

Gaggia
Gaggia MDF User manual

Gaggia
Gaggia KIII-D User manual

Gaggia
Gaggia VIVA GAGGIA User manual

Gaggia
Gaggia Achille User manual

Gaggia
Gaggia Ruby PRO User manual

Gaggia
Gaggia 10002511 User manual

Gaggia
Gaggia 9315GB0B0000 User manual

Gaggia
Gaggia 10001858 User manual

Gaggia
Gaggia Baby Gaggia User manual