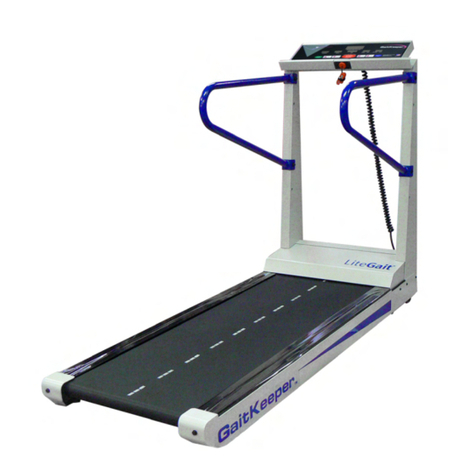
GaitKeeper GK1800T User manual

Brought to you by Mobility Research, INC.
GK1800T/2000T
Treadmill Owner’s Manual
Motorized Walking Surface used to Stimulate Walking Pattern


litegait.com / 800.332.WALK / 480.829.1727 3
Table of contents
Chapter 1: Assembly Instructions.................................................5
Chapter 2: Safety Instructions........................................................9
Chapter 3:Treadmill Overview......................................................13
Chapter 4: Display Console.............................................................15
Chapter 5: Operation.........................................................................17
Chapter 6: Care & Maintenance.....................................................19
Chapter 7:Troubleshooting............................................................23
Chapter 8: Additional Information...............................................25
IMPORTANT:
Product specifications, features & software are subject to change without notice.


litegait.com / 800.332.WALK / 480.829.1727 5
Chapter 1: Assembly Instructions
Chapter 2: Safety Instructions
Chapter 3 Treadmill Overview
Chapter 4: Display Console
Chapter 5: Operation
Chapter 6: Care & Maintenance
Chapter 7: Troubleshooting
Chapter 8: Additional Information

litegait.com / 800.332.WALK / 480.829.1727 6
Assembly instructions
Basic Guidelines for Setting Up Your Treadmill
After removing the treadmill from the packaging, place your treadmill on a clean, level surface. Make sure the electrical cord
easily reaches a grounded three-pronged outlet and has enough slack to allow the deck to incline without tightening the cord.
Do not allow the treadmill assembly to rest on the cord.
Important Electrical Requirements 110V s
nothing else can be plugged into the same circuit. Most power circuits are rated for this 110V AC 15 amp requirement, but you
must ensure the treadmill does not share the circuit with anything else.
Important Electrical Requirements 220V (INTERNATIONAL ONLY)
ns
nothing else can be plugged into the same circuit.
Danger: Do not use an extension cord or ungrounded outlet.
The ground helps prevent electrical damage to your treadmill and enhances your safety by helpingto prevent shock. Check with
a qualified electrician or serviceman if you are in doubt as to whether the treadmill is properly grounded. Do not modify the plug
provided with the treadmill if it will not fit the outlet. Have a proper outlet installed by a qualified electrician.
Component Checklist
ITEM DESCRIPTION QTY
A Console 1
B Frame 1
C Pedestal 1
D Hand Rails 2
E Magnetic Safety Key 1
F - 4
G - 4
H -16 Lock Nut 4
I 4
J Hex Key 1
A
B
C
D
E F G
H I
J
Hardware Kit

litegait.com / 800.332.WALK / 480.829.1727 7
TOOL REQUIREMENTS
5/32 Hex Key (included)
9/16 Open End Wrench (not included)
Assembly Instructions - 110V Models
1. Removethe protectivepackagingmaterials anddiscard.
2. Position the Pedestal such that the pedestal is between motor cover and
-20 x ½ Allen screws
NOTE: Make sure pedestal is firmly attached to base.
Figure 1
3. Remove plastic from hand rails and discard. Fit rails onto pedestal. Be sure
that all screw holes areproperly aligned (Figure 2).
Figure 2
4. Insert long screw withbolt head on outside of the pedestal at both the
upper and lower bracket with the nut on the inside of Pedestal. Tighten
Figure 3
5. Attach console panel to Pedestal sliding into the bracket on the top of the
Pedestal (Figure 4).
Figure 4
NOTE: Do not lift the treadmill by the motor when removing from carton!

litegait.com / 800.332.WALK / 480.829.1727 8
1. Remove theprotective packaging materialsand discard.
2. Position the Pedestal such that the pedestal is between motor cover and
-20 x ½ Allen screws
(Figure1).
NOTE: Make sure pedestal is firmly attached to base.
Figure 1
3. Connect cord from lower hood to upper hood (Figure2).
WARNING: Do Not Connect short cord to power outlet
Figure 2
4. Remove plastic from hand rails and discard. Fit rails onto pedestal. Be sure
that all screw holes areproperly aligned (Figure 3).
Figure 3
5. Insert long screw withbolt head on outside of the pedestal at both the
upper and lower bracket with the nut on the inside of Pedestal. Tighten
Figure 4
6. Attach Console panel to Pedestal sliding into the bracket on the top of the
Pedestal (Figure 5).
Figure 5
TOOL REQUIREMENTS
5/32 Hex Key (included)
9/16 Open End Wrench (not included)
Assembly Instructions - 220V Models
NOTE: Do not lift the treadmill by the motor when removing from carton!

litegait.com / 800.332.WALK / 480.829.1727 9
Chapter 2: Safety Instructions
Chapter 1: Assembly Instructions
Chapter 2: Safety Instructions
Chapter 3 Treadmill Overview
Chapter 4: Display Console
Chapter 5: Operation
Chapter 6: Care & Maintenance
Chapter 7: Troubleshooting
Chapter 8: Additional Information

litegait.com / 800.332.WALK / 480.829.1727 10
Chapter 2: Safety Instructions
IMPORTANT SAFETY INSTRUCTIONS
CAUTION: Health related injuries may result from incorrect or excessive use of exercise equipment.
MOBILITY RESEARCH STRONGLY recommends seeing a physician for a complete medical exam before undertaking an exercise pro-
gram, particularly if the user has a family history of high blood pressure or heart disease, is over the age of 45, smokes, has high cho-
lesterol, is obese or has not exercised regularly in the past year. MOBILITY RESEACH also recommends consulting a fitness profes-
sional on the correct use of this product. If at any time while exercising the user experiences faintness, dizziness, pain or shortness of
breath, he of she must stop immediately.
This equipment GK1800T / GK 2000T Light Commercial Treadmills are intended for light commercial use.
WARNING: READ ALL INSTRUCTIONS BEFORE USING THE TREADMILL.
WARNING: Do not move the treadmill by lifting the console. Do notuse the console as a handlebar during a workout.
WARNING: To reduce the risk of electrical shock, always unplug this product before cleaning or attempting any maintenance activity.
DANGER: To reduce the risk of electricshock,always unplug the treadmill before cleaning.
WARNING: To reduce the risk of burns, fires and electric shock or injury to persons, follow these instructions.
Attach the safety clip to your clothing before each workout and treadmill is in use.
Avoid exiting treadmill while leaving the tread belt in motion.
Never walk or jog backwards on the treadmill without the aid ofa physician and support from LiteGait®
This equipment should never be left unattended when plugged in.
To avoid injury stand onthe straddle covers before starting the treadmill.
Do not exceed maximum weight as outlined in the product specification section of this manual
Wear shoes with rubber or high traction soles. Do not use shoes with heels, leather soles, cleats or spikes. Make sure no
stones are embedded in the soles. Do not use this product in bare feet. Keep all loose clothing, shoelaces and towels
away from moving parts.
Do not operate the treadmill while being covered with a blanket, plastic, or anything that insulates or stops airflow.
Close supervision is necessary if the treadmill is used by children, or used near children. Also applies to disabled persons.
Use this treadmill only for its intended use as described in thismanual.
Do not use attachments not recommended by the manufacturer.
Never operate this treadmill if it has a damaged power cord or plug, if it is not working properly, if it has been damaged or
dropped, or if it has been submerged in water. In these cases, a qualified service technician should examine this treadmill.
Do not use the power cord asahandle for transporting.
Do not run the power cord along the side or under the treadmill.
Keep the power cord away from heated surfaces.

litegait.com / 800.332.WALK / 480.829.1727 11
Never operate the equipment with the air vents blocked. Keep air vents free from clogs.
Never drop or insert any object into any opening.
Do not reach into or underneath the unit, or tipit on its side during operation.
Use the side handrails whenever additional stability is required. In case of emergency, such as tripping, the side handrails should
be grabbed and the user should place his/her feet on the straddle covers.The fronthandlebars should be used to grasp the heart
rate sensors or to rest the hand on while operating the activity zone keys, but not for stability, emergency, or continuous use.
Use indoors only.
Do not operate where aerosol (spray) products are being used or where oxygen is being administered.
To disconnect power cord, first turn power switch to the off position, then remove plug from outlet.
Allow only trained personnel to service this equipment.
Never use near water or while wet. Using this treadmill around a pool, hot tub or sauna will void the warranty.
Avoid the possibility of bystanders being struck or caught between moving parts by making sure that they are out of reach
of the treadmill while it is in operation.
Never place liquids of any type directly on the unit except in the accessory tray or bottle holders. Containers with lids are
recommended.
Consult your physician before beginning any exercise program
Do not use ifyou have acold or fever.
GROUNDING INSTRUCTIONS
WARNING: To reduce the risk of burns, fire, electric shock or injury, it is imperative to connect each product to a properly grounded
ck with a
qualified electrician if you are unsure about proper grounding techniques. Do not modify the plug provided with this product. If it will
not fit an electrical outlet, have a proper outlet installed by a qualified electrician. Your Mobility Research product must be properly
grounded to reduce risk of shock if the treadmill malfunctions. Your treadmill is equipped with an electrical cord, which includes an
equipment grounding conductor and a grounding plug. The plug must be inserted into an outlet that has been properly installed and
grounded in accordance with all local codes and ordinances. A temporary adapter cannot be used to connect this plug to a two-pole
receptacle in North America. If a properly grounded 120 Volt/20 Amp outlet is not available, a qualified electrician must install one.

litegait.com / 800.332.WALK / 480.829.1727 12
POWER REQUIREMENTS FOR GAITKEEPER PRODUCTS
Read and understand all instructions on this sheet
power cord into an electrical outlet. This informa-
tion sheet will help you identify the voltage and
cords you need where you live and will outline
requirements for:
Voltage
Power cords
Power adapters
Extension cords
NOTE:
DANGER! Improper connection of the equipment-
grounding conductor can result in risk of electric
shock. Check with qualified electrician or service
provider if you are in doubt as to whether the
equipment is properly grounded or installed on a
dedicated line. Seek qualified electrician to per-
form any modifications to the cord or plug. Mobil-
ity Research is not responsible for any injuries or
damages as a result of cord or plug modification.
CAUTION! Place cords away from heat (such as baseboards).
Use care to arrange any cord so it does not be-
come an obstacle.
Extension Cords
Do not use an extension cord to supply power to
any GaitKeeper product.
GaitKeeper equipment must be grounded. If it
should malfunction or break down, grounding
provides a path of least resistance for electric cur-
rent to reduce the risk of electric shock. Gait-
Keeper cords (except for cycle adapters) have an
equipment grounding conductor and a ground-
ing plug. The plug must be plugged into an ap-
propriate outlet that is properly installed and
grounded in accordance with all local codes and
ordinances where you live. Do not use a ground
plug adapter to adapt the power cord to a non-
grounded outlet. Do not use a GFCI outlet or GFCI
circuit breaker. A dedicated line will assure that
adequate power is available for safe operation
over the life of your GaitKeeper Product
Voltage
Voltage required for your unit is located on the
serial number decal (usually on the front of the
unit). Depending on where you live voltage re-
quirements differ.
and 2000T treadmills require a dedicated circuit rated 115
VAC, 60 Hz and 15 amps. See Figure 1. However, a home
typically has 15 amp outlets. See Figure 2.
Figure 1
Figure 2
Figure 3
15

litegait.com / 800.332.WALK / 480.829.1727 13
Chapter 1: Assembly Instructions
Chapter 2: Safety Instructions
Chapter 3 Treadmill Overview
Chapter 4: Display Console
Chapter 5: Operation
Chapter 6: Care & Maintenance
Chapter 7: Troubleshooting
Chapter 8: Additional Information
Chapter 3: Treadmill Overview
CONSOLE
HAND RAILS
BELT
STRADDLE COVERS
BELT ADJUSTMENT
SAFETY KEY

14
Page Left Blank Intentionally

litegait.com / 800.332.WALK / 480.829.1727 15
Chapter 4: Display Console
Chapter 1: Assembly Instructions
Chapter 2: Safety Instructions
Chapter 3 Treadmill Overview
Chapter 4: Display Console
Chapter 5: Operation
Chapter 6: Care & Maintenance
Chapter 7: Troubleshooting
Chapter 8: Additional Information

litegait.com / 800.332.WALK / 480.829.1727 16
Chapter 4: Display Console
Main Window
Shows distance travelled in feet during treadmill operation up to 9999 feet (1.89 miles), then
reverts to oval trackdisplay
Speed
Miles per hour in
0.10increments
Pace
Time per mile
atcurrent
speed.
Quick Start button
Reduce Speed
Increase Grade
Increase Speed
Decrease Grade
Makes Selection
Once to Pause, Twice
to Stop
KeyPad Button Functions
Calories
Estimated
total calories
burned
Grade
Incline in percent grade
in 0.5%increments
Distance
Miles, traveled in
0.01 mile incre-
ments
METs
Energy
expenditure
rate
STOP/PAUSE
Press STOP/PAUSE key once to pause
workout all data will remaindisplayed.
Press and hold STOP key for 3 seconds to
reset.
Speed Keys
Press the minus key to decreasespeed.
Press the plus key to increase speed
Grade Keys
Press the up arrow to increase grade.
Press the downarrow to decrease
grade
Quick Start
Press the start button for
quick start program.
Time
Elapsed time of your
workout, on start up
shows entered user
weight.

litegait.com / 800.332.WALK / 480.829.1727 17
Chapter 5: Operation
Chapter 1: Assembly Instructions
Chapter 2: Safety Instructions
Chapter 3 Treadmill Overview
Chapter 4: Display Console
Chapter 5: Operation
Chapter 6: Care & Maintenance
Chapter 7: Troubleshooting
Chapter 8: Additional Information

litegait.com / 800.332.WALK / 480.829.1727 18
To adjust inclinepress or
To adjust speed press or
Treadmill will beep three times and then start at 0.1mph
Begin a manual workout by pressing
Straddle treadbelt by standing on straddle covers.
Connect red magneticsafety key to upper console.
Chapter 5: Operation
Operation:
Treadmill Use Preparation
Program Start:
Attach red magneticsafety key lanyard to clothing via clip.
Quick Start:
This allows for the presetting of the following parameters: speed,grade, time and distance.
Input settings by pressing
To set initial speedpress or
To set initial incline press or
Togglesetting parametersby pressing
To set workout timerpress or
To set maximum distance or
Begin preset workout bypressing

litegait.com / 800.332.WALK / 480.829.1727 19
Chapter 6: Care & Maintenance
Chapter 1: Assembly Instructions
Chapter 2: Safety Instructions
Chapter 3 Treadmill Overview
Chapter 4: Display Console
Chapter 5: Operation
Chapter 6: Care & Maintenance
Chapter 7: Troubleshooting
Chapter 8: Additional Information

litegait.com / 800.332.WALK / 480.829.1727 20
Chapter 6: Care & Maintenance
Care & Maintenance
It is important to perform the minor maintenance tasks described in this section. Failure to maintain the
treadmill as described here could void the Warranty. To reduce the risk of electrical shock, always unplug the
unit from its powersource before cleaning or performing anymaintenance tasks.
Inspection:
Inspect the treadmill daily. Look and listen for loose fasteners, unusual noises, worn or frayed power cords, and
any other indications that the equipment may be in need of service. If you notice any of these, obtain service.
IMPORTANT: If you determine that the treadmill needs service, make sure that the treadmill cannot be used
inadvertently. Turn the unit Off, and then let users know that the treadmill needs service.
Cleaning the Equipment:
MOBILITY RESEARCH recommends the treadmill be cleaned before and after each workout. Use mild soap and
water to dampen asoft cloth and wipe all exposed surfaces. Thishelps remove any dust or dirt.
Clean the display console regularly with mild soap and water or a mild household cleaner. DO NOT use paper
towels, ammonia oracid based cleaners. *
CAUTION: Do not use any acidic cleaners. Doing so will weaken the paint or powder coatings and may void the
Warranty. Never pour water or spray liquids on any part of the treadmill. Allow the treadmill to dry completely
before using. Frequently vacuum the floor underneath the unit to prevent the accumulation of dust and dirt,
which canaffect the smooth operation of the unit.
*When cleaning the exterior of the unit, a non-abrasive cleaner and soft cotton cloth are strongly recommended. At no time should cleaner be
applied directly to any part of the equipment; use nonabrasive cleaner of soft cloth and then wipe the unit.
Long Term Storage:
When the treadmill is not in use for any length of time, turn it off. Make sure the power cord is unplugged from
the power source and position the power and data cords so that they will not become damaged or interfere
withpeople or otherequipment.
TREADBELT LUBRICATION
For average use of the treadmill, we recommend you lubricate under the tread belt once per year. For heavy
use, which is more than 10 hours per week, we recommend that you lubricate every six months. Contact
MOBIITY REASEARCH forpurchaseof lubrication.Only uselubricationprovided byMOBILITY RESEARCH.
This manual suits for next models
1
Table of contents
Other GaitKeeper Treadmill manuals