Galaxy Galaxy 790.61301 User manual

Galaxy
GAS RANGE
Use & Care Guide
ESTUFA A GAS
Manual del Usuario
Model No.
790.61301
Sears Roebuck and Co., Hoffman Estates, IL 60179 U.S.A. PIN 316258027(0301)
www.sears.com

Table of Contents Product Record
Free-Standing Range Warranty ............................................ 2
Product Record .................................................................. 2
Serial Plate Location .......................................................... 2
IMPORTANT SAFETY INSTRUCTIONS ....................... 3-5
Master Protection Agreements .......................................... 6
Setting Surface Controls .................................................... 7
Before Setting Oven Controls ............................................ 8
Setting Oven Controls ........................................................ 9
Care & Cleaning ......................................................... 10-13
Before You Make a Service Call ................................. 14-15
Sears Service ................................................... Back cover
EspaSol ...................................................................... 17-32
In this space below, record the date of purchase, model and
serial numberofyour product. You will find the model and serial
number printed on an identification plate. See the bottom of
the page for the serial plate location.
Model No. 790.
Serial No..................................
Date of Purchase
Save these instructions and your sales receipt for future
reference.
Free-Standing Range Warranty
FULL ONE YEAR WARRANTY ON ALL PARTS
If, within one year from the date of installation, any part fails to function properly due to a defect in material or workmanship,
Sears wilt repair or replace it, at our option, free of charge.
If the product is subjected to other than private family use, the above warranty is effective for only 90 days.
WARRANTY SERVICE IS AVAILABLE BY CONTACTING THE NEAREST SEARS SERVICE CENTER IN THE UNITED
STATES.
This warranty gives you specific legal rights, and you may also have other rights which vary from state to state.
Sears Roebuck and Co., Dept. 817WA Hoffman Estates, IL 60179
SERIAL
PLATE
LOCATION
You will find the model and
serial number printed on the
serial plate.
Please refer to the illustration(s)
shown at right to locate the
serial plate on your range.
Remember to record the serial
number under Product Record
on this page for future
reference.
®©
E
2

Important Safety Instructions
Read all instructions before using this appliance.
Save these instructions for future reference.
This Use & Care guide contains important safety symbols and instructions. Please pay attention to these symbols and follow all
instructions given.
_'|VAV'__:t_II_[_Iif the information in this manual is not
followed exactly, afire or explosion may result causing
property damage, personal injury or death.
r|VAV-'I;t#II# [{
FOR YOUR SAFETY:
-- Do not store or use gasoline or other flammable
vapors and liquids in the vicinity of this or any
otherappliance.
-- WHAT TO DO IF YOU SMELL GAS:
Do not try to light any appliance.
Do not touch any electrical switch; do not use any
phone in your building.
Immediatelycallyourgas supplier from a neighbor's
phone. Follow the gas supplier's instructions.
Ifyou cannot reach you rgas supplier, call the fire
department.
-- Installation and service must be performed by a
qualified installer, servicer orthe gas supplier.
• Remove all tape and packaging before using the range. Destroy
the carton and plastic bags after unpacking the range. Never
allow children to play with packaging material.
• Proper Installation--Be sure your appliance is properly
installed and grounded by aqualified technician in accordance
with the National Fuel Gas Code ANSI Z223.- latest edition, or
in Canada CAN/CGA B14g.1, and CAN/CGA B149.2, and the
the National Electrical Code ANSlINFPA No.70-1atest edition,
or in Canada CSA Standard C22.1, Canadian Electrical Code,
Part 1, and local code requirements. Install only per installation
instructions provided in the literature package for this range.
Ask your dealer to recommend a qualified technician and an
authorized repair service. Know how to disconnect the power to
the range at the circuit breaker or fuse box in case of an emergency.•
User Servicing--Do not repair or replace any part of the
appliance unless specifically recommended in the manuals.
To reduce the risk of personal injury and damage tothe range, all
other servicing should be done only by a qualified technician.
•Never modify or alter the construction of a range by removing
leveling legs, panels, wire covers, anti-tip brackets/screws, or
any other part of the product.
All ranges can tip.
injury to persons could result.
install anti-tip device packed with range.
See Installation instructions.
®
®
To reduce the risk of tipping,
the range must be secured by properly installed
anti-tip bracket provided with the range. To
check if the bracket is installed properly, grasp
the top rear edge of the range and carefully
attempt to tilt it forward. Refer to the Installation
instructions for proper anti-tip bracket
installation.
Stepping, leaning or sitting on the doors or
drawers of this range can result in serious injuries and also
cause damage to the range. Do not allow children toclimb or play
around the range. The weight of achild on an open door may cause
the range to tip, resulting in serious burns or other injury.
Do not use the oven or broiler drawer for storage.
_IF_'=!_'_I_ Do not store items of interest to children in the
cabinets above a range or on the backguard of a range. Children
climbing on the range to reach items could be seriously injured.
Never Use Your Appliance for Warming or
Heating the Room.
•Storage in or on ApplianceiFlammable materials should not
be stored in an oven, near surface burners or in the broiler
drawer. This includes paper, plastic and cloth items, such as
cookbooks, plasticware and towels, as well as flammable liquids.
Do not store explosives, such as aerosol cans, on or near the
range.
3

Important Safety Instructions
•DO Not Leave Children AloneiChildren should not be left
alone or unattended in the area where appliance is in use. They
should never be allowed to sit or stand on any part of the
appliance.
• DO NOT TOUCH SURFACE BURNERS, AREAS NEAR THESE
BURNERS, OVEN BURNERS OR INTERIOR SURFACES OF
THE OVEN. Both surface and oven burners may be hot even
though flames are not visible. Areas near surface burners may
become hot enough to cause burns. During and after use, do not
touch, or let clothing or other flammable materials touch these
areas until they have had sufficient time to cool. Among these
areas are the cook top, surfaces facing the cook top, the oven vent
openings and surfaces near these openings, oven door and
window.
• Wear Proper Apparel--Loose-fitting or hanging garments
should never be worn while using the appliance. Do not let
clothing or other flammable materials contact hot surfaces.
• Do Not Use Water or Flour on Grease Fires--Smother the fire
with apan lid, or use baking soda, adry chemical or foam-type
extinguisher.
•When heating fat or grease, watch it closely. Fat orgrease may
catch fire if allowed to become too hot.
•Use Only Dry Potholders--Moist or damp potholders on hot
surfaces may result in burns from steam. Do not let potholders
touch hot heating elements. Do not use a towel orother bulky cloth
instead of a potholder.
•Do Not Heat Unopened Food ContainersiBuildup of pressure
may cause container to burst and result in injury.
•Remove the oven door from any unused range if it is to be
stored or discarded.
IMPORTANTiELECTRIC IGNITION MODELS ONLY: Do not
attempt to operate the oven during a power failure. If the power fails,
always turn off the oven. If the oven is not turned off and the power
resumes, the oven will begin to operate again. Once the power
resumes, reset the clock and oven function.
IMPORTANTINSTRUCTIONS FOR USING YOUR COOKTOP
[IrlvJv-_:I_ll_[_l Use Proper Flame Size--Adjust flame size so it
does not extend beyond the edge of the utensil. The use of
undersized utensils will expose a portion of the burner flame to
direct contact and may result in ignition of clothing. Proper
relationship of utensil to flame will also improve efficiency.
•Know which knob controls each surface burner. Place apan of
food on the burner before turning it on, and turn the burner off
before removing the pan.
•Always turn knob to the full LITE position when igniting top
burners. Visually check that burner has lit. Then adjust the flame
so it does not extend beyond the edge of the utensil.
•Utensil Handles Should Be Turned Inward and Not Extend Over
Adjacent Surface Burners--To reduce the risk of burns, ignition
of flammable materials, and spillage due to unintentional contact
with the utensil, the handle of the utensil should be positioned so
that it is turned inward, and does not extend over adjacent surface
burners.
• Never Leave Surface Burners Unattended at High Heat
Settings--Boilovers cause smoking and greasy spillovers that
may ignite, or a pan that has boiled dry may melt.
• Protective Liners--Do not use aluminum foil to line surface
burner pans, or oven bottom, except as suggested inthis manual.
improper installation of these liners may result in risk of electric
shock, or fire.
• Glazed Cooking Utensils--Only certain types of glass, glass/
ceramic, ceramic, earthenware, or other glazed utensils are
suitable for cook top service without breaking due to the sudden
change in temperature. Check the manufacturer's
recommendations for cook top use.
• When flaming foods under aventilating hood, turn the fan on.
IMPORTANT INSTRUCTIONS FOR USING YOUR OVEN
• Use Care When Opening Oven Door--Stand to the side of the
range when opening the door of a hot oven. Let hot air or steam
escape before you remove or replace food in the oven.
•Keep Oven Vent Ducts Unobstructed. The oven vent is located
below the backguard. Touching the surfaces in this area when the
oven is operating may cause severe burns. Also, do not place
plastic or heat-sensitive items on or near the oven vent. These
items could melt or ignite.
•Placement of Oven Racks. Always place oven racks in desired
location while oven is cool. If rack must be moved while oven is
hotuse extreme caution. Use potholders and grasp the rack with
both hands to reposition. Do not let potholders contact the hot
heating elements in the oven. Remove all utensils from the rack
before moving.
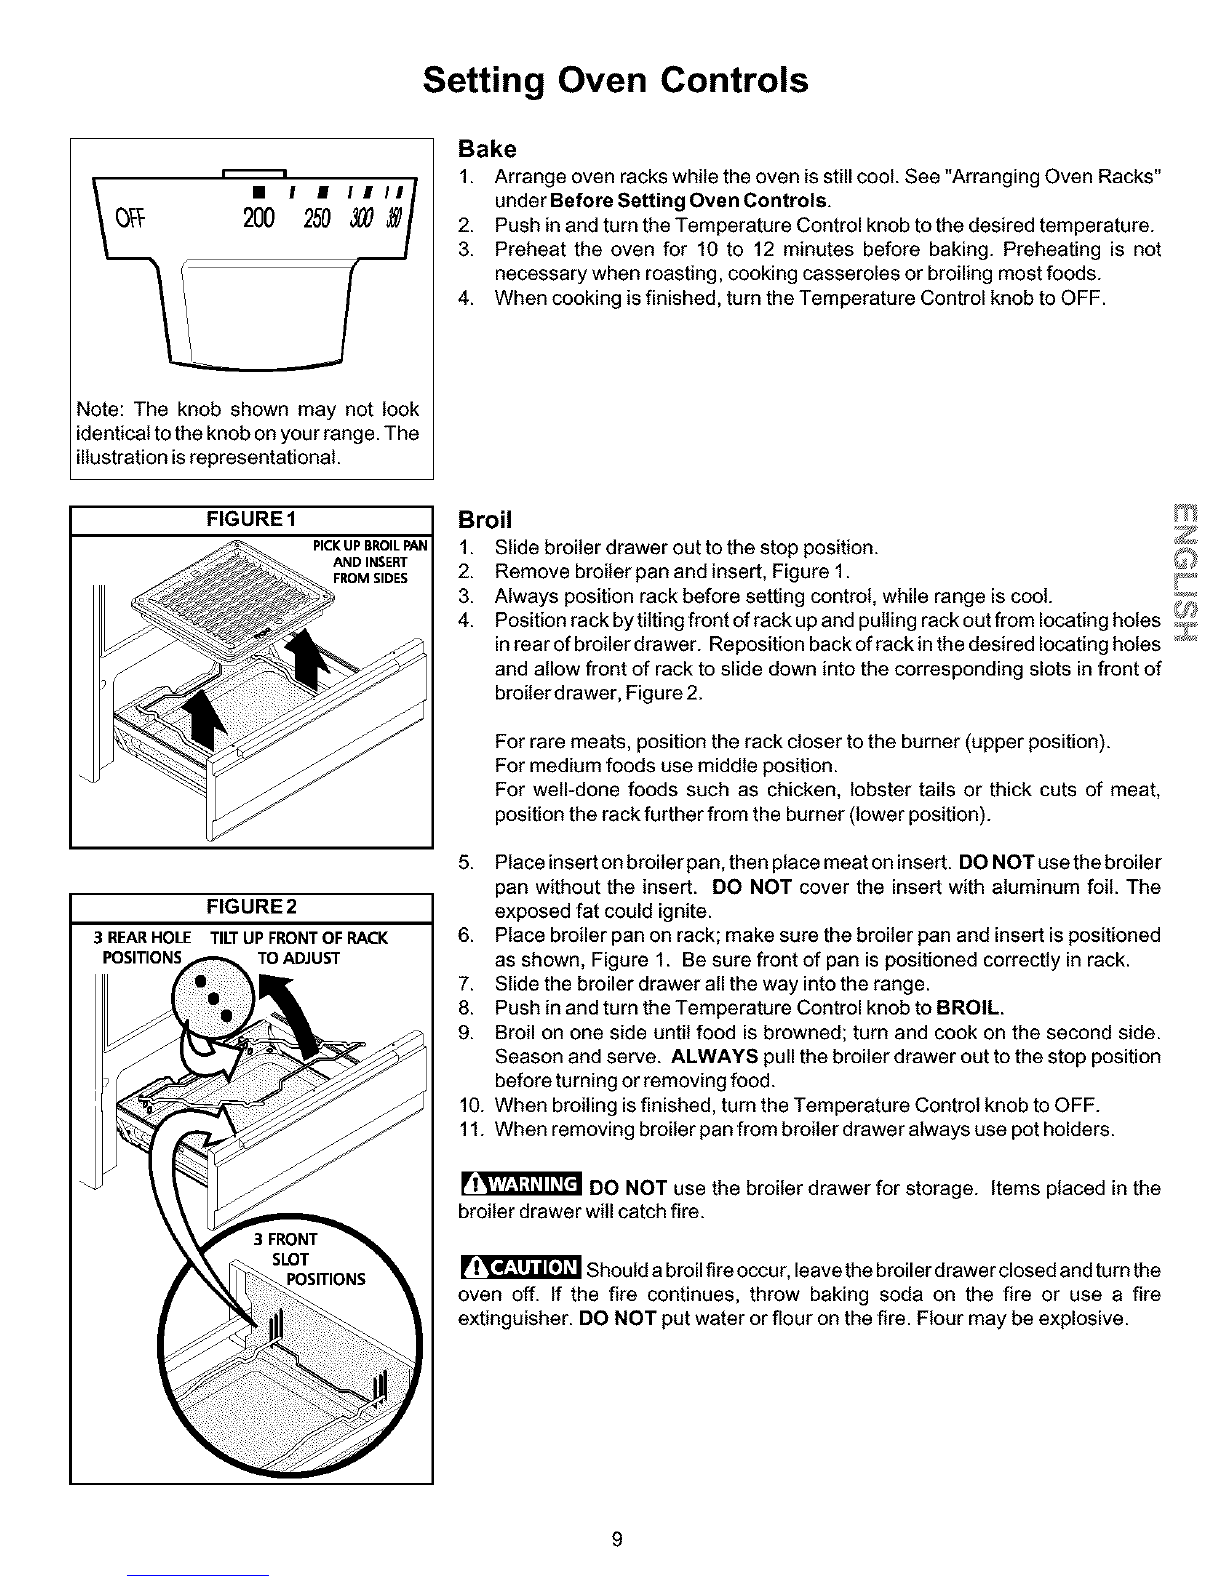
• Do not use the broiler pan without its insert. The broiler pan and
its insert allow dripping fat to drain and be kept away from the high
heat of the broiler.
• Do not cover the broiler insert with aluminum foil. Exposed fat
and grease could ignite.
IMPORTANT INSTRUCTIONS FOR CLEANING
YOUR RANGE
•Clean the range regularly to keep all parts free of grease that
could catch fire. Pay particular attention to the area underneath
each surface element. Do not allow grease to accumulate. Refer
to the range manufacturer's instructions for cleaning.
•Kitchen cleaners and aerosols--Always follow the
manufacturer's recommended directions for use. Be aware
that excess residue from cleaners and aerosols may ignite
causing damage and injury.
4

Important Safety Instructions
Grounding type
wall receptacle
Do not, under any
circumstance,cut,
remove,or bypass
the grounding prong.
Power supply cord
with 3-prong
grounding plug
See the INSTALLATION INSTRUCTIONS packaged with this
range for complete installation and grounding instructions.
GROUNDING INSTRUCTIONS
(electric ignition models only)
Avoid fire hazard or electrical shock. Do not use
an adapter plug, an extension cord, or remove grounding prong
from electrical power cord. Failure to follow this warning can cause
serious injury, fire or death.
This appliance is equipped with a 3-prong
grounding plug for your protection against shock hazard and
should be plugged directly into a properly grounded receptacle.
DO NOT cut or remove the grounding prong from this plug.
For personal safety, the range must be properly grounded. For
maximum safety, the power cord must be plugged into an electrical
outlet that is correctly polarized and properly grounded.
If a 2-prong wall receptacle is the only available outlet, it is the
personal responsibility of the consumer to have it replaced with a F_
properly grounded 3-prong wall receptacle installed by a qualified _i
electrician.
IMPORTANT SAFETY NOTICE
The California Safe Drinking Water and Toxic Enforcement Act requires the Governor of California to publish alistof substances known
to the state to cause cancer, birth defects or other reproductive harm, and requires businesses to warn customers of potential exposure
to such substances.
5

PROTECTION AGREEMENTS
In the U.S.A.
Master Protection Agreements
Congratulations on making a smart purchase. Your new
Kenmore® appliance is designed and manufactured for
years of dependable operation. But like all products, it
may require preventive maintenance or repair from time to
time. That's when having a Master Protection Agreement
can save you money and aggravation.
Purchase a Master Protection Agreement now and protect
yourself from unexpected hassle and expense.
The Master Protection Agreement also helps extend the
life of your new appliance. Here's what's included in the
Agreement:
_Expert service by our 12,000 professional repair
specialists
5i_Unlimited service and no charge for parts and labor on
all covered repairs
_"No-iemon" guarantee - replacement of your covered
product if more than three product failures occur within
twelve months
5i_Product replacement if your covered product can't be
fixed
_Annual Preventive Maintenance Check at your request
- no extra charge
5_Fast help by phone - non-technical and instructional
assistance on products repaired in your home, plus
convenient repair scheduling
5_Power surge protection against electrical damage due
to power fluctuations
_Rental reimbursement if repair of your covered product
takes longer than promised
In Canada
Maintenance Agreements
Your purchase has added value because you can depend on
Sears HomeCentral@ for service. With over 2400 Service
Technicians and access to over 900,000 parts and
accessories, we have the tools, parts, knowledge and skills
to ensure our pledge: We Service What We Sell.
Your Kenmore® appliance is designed, manufactured and
tested to provide years of dependable operation. Yet any
major appliance may require service from time to time. The
Sears Maintenance Agreement offers you an outstanding
service program, affordably priced.
The Sears Maintenance Agreement
Is your way to buy tomorrow's service at today's price.
•Eliminates repair bitls resultingfrom normal wear and tear.
•Provides for non-technical and instructional assistance.
•Even ifyou don't need repairs, provides an annual
Preventive Maintenance Check, at your request, to ensure
that your appliance is in proper running condition.
Some limitations apply. For information concerning
Sears Canada Maintenance Agreements, call
1-800-361-6665.
Once you purchase the Agreement, a simple phone call is
all that it takes for you to schedule service. You can call
anytime day or night, or schedule a service appointment
online.
Sears has over 12,000 professional repair specialists,
who have access to over 4.5 million quality parts and
accessories. That's the kind of professionalism you can
count on to help prolong the life of your new purchase for
years to come. Purchase your Master Protection
Agreement today!
Some limitations and exclusions apply.
For prices and additional information,
call 1-800-827-6655.
Sears Installation Service
For Sears guaranteed professional installation of home
appliances and items like garage door openers and water
heaters, in the U.S.A. call 1-800-4-MY-HOME@

Setting Surface Controls
Do not place plastic
items such as salt and pepper shakers,
spoon holders or plastic wrappings
on top of the range when it is in use,
These items could melt or ignite.
Potholders, towels or wood spoons could
catch fire if placed too close to a flame.
ELECTRIC IGNITION MODELS ONLY
Inthe event ofan electrical power outage,
the surface burners can be lit manually.
To light a surface burner, hold a lit match
to the burner head, then slowly turn the
Surface Control knob to LITE. After burner
lights push in and turn knob to desired
setting. Use CAUTION when lighting
surface burners manually.
Always select cookware that is suitable for the amount and type of food being
prepared. Select aburner and flame size appropriate to the pan. Never allow flames
to extend beyond the outer edge of the pan.
Each burner lights automatically from either an electric ignitor or standing pilot,
depending on your model. Standing pilots must be lit initially. Refer to your
installation instruction book for directions on lighting the standing pilot. Standing
pilots will remain lit when the burners are turned off. Models with electric ignitors
light automatically each time a control knob is turned to the LITE position.
I
Operating the Surface Burners
1.
2.
.
.
Place cooking utensil on surface burner.
Push the surface control knob in and turn counterclockwise out of the OFF
position.
Release the knob and rotate to the LITE position.Ifyour range isequipped with
electronic ignitors, all four ignitorswill spark at the same time. However, only
the burner you are turning on wilt ignite.
Visually check that the burner has lit.
Push the control knob in and turn counterclockwise tothe desired flame size. _'>
Thecontrolknobsdonothavetobesetataparticularsetting. Usetheguides _,p,_
and adjust the flame as needed. DO NOT cook with the surface control knob !_f
in the LITE position. (The electronic ignitor will continue to spark if the knob
is left in the LITE position.)
Setting Proper Surface Burner Flame Size
Formost cooking, start on the highest control setting and then turn to a lower one
to complete the process. Use the recommendations below as a guide for
determining proper flame size for various types of cooking. The size and type of
utensil used and the amount offood being cooked will influence the setting needed
for cooking.
WRONG
For deep fat frying, use a thermometer and adjust the surface control knob
accordingly. If the fat is too cool, the food will absorb the fat and be greasy. If the
fat is too hot, the food will brown so quickly that the center will be undercooked.
Do not attempt to deep fat fry too much food at once as the food will neither brown
nor cook properly.
Never extend the flame beyond the outer
edge of the utensil. A higherflame simply I
wastes heat and energy, and increases
your r sk of be ng burned by the fame.
*Flame Size
High Flame
Medium Flame
Low Flame
Type of Cooking
Start most foods; bring water to a boil; pan broiling.
Maintain a slow boil; thicken sauces, gravies; steaming.
Keep foods cooking; poach; stewing.
*These settings are based on using medium-weig ht metal or aluminum pans with lids. Settings may va ry when using
other types of pans. The coloroftheflame isthe key to properburner adjustment. A good flame isclear, blue and hardly visible
in a well-lighted room. Each cone offlame should be steady and sharp. Adjust or clean burner if flame isyellow-orange.
7

Before Setting Oven Controls
Oven Vent Oven Vent Location
The oven vent islocated at the rear center of the cook top.
When the oven ison, warm air is released through this vent.
This venting isnecessary for proper air circulationinthe oven
and good baking results. DO NOT BLOCKTHE OVEN VENT.
Arranging Oven Racks
ALWAYS ARRANGE OVEN RACKS WHEN THE OVEN IS
COOL (PRIOR TO OPERATING THE OVEN). Always use
oven mitts when using the oven.
Removing & Replacing Oven Racks
To remove, pull the rack forward until it stops. Lift up front of
rack and slide out. To replace, fit the rack onto the guides on
the oven walls. Tilt the front of the rack upward and slide the
rack back into place.
Arranging Oven Racks with 6 Rack Positions
To bake on a single rack, place the rack on position 3 or 4.
To bake on 2 racks, place the racks on positions 3 and 5.
Rack RECOMMENDED RACK POSITIONS FOR
BROILING, BAKING & ROASTING
Food Rack Position
Broiling meats, chicken or fish 1 or 2
Cookies, cakes, pies, biscuits & muffins 3 or 4
Frozen pies, angel food cake, yeast, bread, 5
casseroles, small cuts of meat or poultry
Turkey, roast or ham 6
Note: Always use caution when removing food from the lower rack
positions.

Setting Oven Controls
Note: The knob shown may not look
identicalto the knob on your range. The
illustration isrepresentational.
Bake
1. Arrange oven racks while the oven is still cool. See "Arranging Oven Racks"
under Before Setting Oven Controls.
2. Push in and turn the Temperature Control knob to the desired temperature.
3. Preheat the oven for 10 to 12 minutes before baking. Preheating is not
necessary when roasting, cooking casseroles or broiling most foods.
4. When cooking is finished, turn the Temperature Control knob to OFF.
FIGURE 1
PICKUP BROILPAN
AND INSERT
FROM SIDES
FIGURE2
3 REARHOLE TILTUP FRONTOF RACK
POSITIONS TOADJUST
Broil
1. Slide broiler drawer out tothe stop position.
2. Remove broiler pan and insert, Figure 1. _,_,_
3. Always position rack before setting control, while range is cool. _'._
4. Position rack by tilting front of rack up and pulling rack out from locating holes _,
in rear of broiler drawer. Reposifion back of rack in the desired locating holes _'_'_"
and allow front of rack to slide down into the corresponding slots in front of
broiler drawer, Figure 2.
For rare meats, position the rack closer to the burner (upper position).
For medium foods use middle position.
For well-done foods such as chicken, lobster tails or thick cuts of meat,
position the rack further from the burner (lower position).
5. Place insert on broilerpan, then place meat on insert. DO NOT use the broiler
pan without the insert. DO NOT cover the insert with aluminum foil. The
exposed fat could ignite.
6. Place broiler pan on rack; make sure the broiler pan and insert is positioned
as shown, Figure 1. Be sure front of pan is positioned correctly in rack.
7. Slide the broiler drawer all the way into the range.
8. Push in and turn the Temperature Control knob to BROIL.
9. Broil on one side until food is browned; turn and cook on the second side.
Season and serve. ALWAYS pull the broiler drawer out to the stop position
before turning or removing food.
10. When broiling is finished, turn the Temperature Control knob to OFF.
11. When removing broiler pan from broiler drawer always use pot holders.
_!_,1..I:_11_[€11DO NOT use the broiler drawer for storage. Items placed in the
broiler drawer will catch fire.
Should a broil fire occur, leave the broiler drawer closed and turn the
oven off. If the fire continues, throw baking soda on the fire or use a fire
extinguisher. DO NOT put water or flour on the fire. Flour may be explosive.
9

Care & Cleaning
Followthese cleaning precautions:
Allow the oven tocool before cleaning.
Wear rubber gloves when cleaning
the appliance manually.
[Fi_r'_'_l'_'_'tl'_Ammonia must be rinsed
before operating the oven. Provide
adequatevent at on.
DO NOT line the oven
walls, bottom, racks or any other part
of the appliance with aluminum foil.
Doing sowill destroy heat distribution,
produce poor baking resultsand cause
permanent damage tothe oven interior
(aluminum foil will melt to the interior
surface of the oven).
REMOVE SPILLOVERS AND HEAVY
SOILING AS SOON AS POSSIBLE.
REGULAR CLEANINGS WILL REDUCE
THE EFFORT REQUIRED FOR MAJOR
CLEANINGS LATER.
Porcelain Enamel Oven and Broiler Drawer
The oven interior is porcelain on steel, it issafe to clean using oven cleaners.
General Cleaning
Remove soils using hot, soapy water. Do not allow food spills with a high sugar
or acid content (such as milk, tomatoes, saukerkraut, fruit juices or pie filling) to
remain on the surface as they may cause a dull spot even after cleaning.
To Remove Heavy Soil
1. Allow a dish of ammonia to sit inthe oven overnight or for several hours with
the oven door closed. Clean softened dirt spots using hot, soapy water. Rinse
well with water and a clean cloth.
2. If soil remains, use a soap-flied scouring pad or a nonabrasive cleaner. If
necessary, use an oven cleaner following manufacturer's instructions. DO
NOT mix ammonia with other cleaners.
3. Clean any soil from the oven frame, the door liner outside the oven door gasket
and the small area at the front center ofthe oven bottom. Clean with hot, soapy
water. Rinse welt using clean water and a cloth.
Adhere to the following precautions when using oven cleaners:
1. DO NOT spray cleaner on the electrical controlsorswitches because itcould
cause a short circuit and result in sparking or fire.
2. DO NOT allow a fitm from the cleaner to build up on the temperature sensing
bulb; it could cause the oven to heat improperly. (The bulb is located in the
rear of the oven.) Carefully wipe the bulb clean after each oven cleaning, being
careful not to move the bulb. A change in its position could affect how the oven
bakes. Avoid bending the bulb and capillary tube.
3. DO NOT spray any cleaner on the oven door trim or gasket, broiler drawer
glides, handles or any exterior surfaces of the range, plastic or painted
surfaces. The cleaner can damage these surfaces.
To Clean the Oven Bottom
The oven bottom is porcelain enamel and can be removed for easier
cleaning. Clean using hot, soapy water, a mildabrasive cleanser, a soap-flied
abrasive pad or oven cleaner following manufacturer's instructions.
10

Care & Cleaning
Cleaning Various Parts of Your Range
Before cleaning any part of the range, be sure all controls are turned OFF and the range isCOOL. REMOVE SPILLOVERS AN D
HEAVY SOILING AS SOON AS POSSIBLE. REGULAR CLEANiNGS WILL REDUCETHE EFFORT REQUIRED FOR MAJOR
CLEANiNGS LATER.
Surfaces How to Clean
Aluminum (Trim Pieces) &Vinyl Use hot, soapy water and a cloth. Dry with a clean cloth.
Glass, PaintedandPlasticBody Forgeneralcleaning, usehot, soapywaterandactoth. Formoredifficultsoilsandbuilt-up
Parts, Control Knobs and grease, apply a liquid detergent directly onto the soil. Leave on soil for 30 to 60 minutes.
Decorative Trim Pieces Rinse with a damp cloth and dry. DO NOT use abrasive cleaners on any of these materials;
they can scratch these surfaces.
Control Panel
Porcelain Enamel
BurnerGrates, Cooktop Surface,
Below Cooktop, Broiler Pan &
Insert, Broiler Drawer, Door Liner
and Oven Bottom
Stainless Steel, Chrome Parts,
Drip Pans
Oven Racks
Surface Burners
Oven Door
Before cleaning the control panel turn all controls to OFF and remove the control knobs.
To remove, pull each knob straight off the shaft. Clean as instructed above. Squeeze
excess water from the cloth before wiping the panel; especially when wiping around the
controls. Excess water in or around the controls may cause damage to the appliance. To
replace knobs after cleaning, line upthe flat sides of both the knob and the shaft, then push
the knob(s) into place.
Clean burner grates, broiler pan and insert in the dishwasher and dry upon removal. If soils
are not removed, follow the cooktop cleaning instructions below.
Gentle scouring with a soapy scouring pad will remove most spots. Rinse with a 1:1solution
of clean water and ammonia. If necessary, cover difficult spots with an ammonia-soaked
paper towel for 30 to 40 minutes. Rinse with clean water and a damp cloth, then scrub with
a soap-filled scouring pad. Rinse and wipe dry with a clean cloth. Remove all cleaners or
the porcelain may become damaged during future heating. DO NOT use spray oven
cleaners on the range top.
Clean with hot, soapy water and a dishcloth. Rinse with clean water and a cloth. Cover
stubborn spots with an ammonia-soaked paper towel for 30-40 minutes. Rinse. Cleaners
made especially for stainless steel are recommended. Be sure to rinse the cleaners as
bluish stains may occur during heating and cannot be removed.
Remove racks. See "Removing and Replacing Oven Racks" under Before Setting Oven
Controls. Use a mild, abrasive cleaner, following manufacturer's instructions. Rinse with
clean water and dry. After cleaning the racks, rub the sides of the racks with wax paper or
a cloth containing a small amount ofbaby oilor salad oil (this will make the racks glide easier
into the rack positions).
The holes in the burners of your range must be kept clean at all times for proper ignition
and a complete, even flame. Clean the burner holes routinely with a small gauge wire or
needle and especially after bad spiliovers which could clog these holes.
Toremove andreplace bumerunits per your model, see"To Remove and Replace Burners"
under Care & Cleaning. To clean, soak the burners ina 1:1 solution of ammonia and water
for 30 to 40 minutes. For stubborn stains, scrub with soap and water or a mild abrasive
cleanser and adamp cloth. Dry the burners thoroughly in a warm oven for 30 minutes. Then
replace them, making sure they are properly seated and level. DO NOT wash burner units
in the dishwasher.
To clean oven door, wash with hot, soapy water and a clean cloth. DO NOT immerse the
door in water.
DO NOT clean the oven door gasket. The oven door gasket is made of a silicone rubber
material which is essential for a good seal. Care should be taken not to rub, damage or
remove the gasket.
11

Care & Cleaning
To Raise and Lower the Top for Cleaning
1. Remove burner grates and spitlover bowls. Set aside.
2. Grasp the sides of the cooktop and then lift from the front.
3. Lift thetop high enough to allowthe support rods to snap into place. The Lift-up rods will support the top in its raised position.
4. Clean underneath using hot, soapy water and a clean cloth; then, dry.
5. To lower the range top, grasp the front corner of each side of the top while pushing back on each rod with the heel of your
hand. This will release the notched support. Hold the range top and gently slide the range top down to the range.
_!_,,AV.,!;t_ll_[cllWhen lowering the top,
grasp the sides with fingertips only. Be
careful not to pinch fingers. Also, DO
NOT drop or bend the rangetop when
raising or lowering. This could damage
the surface.
Main Top
Support
Bar
To Remove and Replace Burners for Cleaning
To Remove Burners
1. Remove shipping screws with a Phillips Head screwdriver. See illustrationfor screw locations.
2. Tilt the burner at the end closest to the support bar until the locator tab isreleased (front burners tiltright, rear burners tilt
left). Move the burner toward the back of the range. This will separate itfrom the gas valve at the front of the range.
To Replace Burners
1. S_idethe bumer tube _ver the gas va_veat the fr_nt _f the range (fr_nt burners fit __er the dght _a_ve_rear burners _t _ver
the left valve on each side of the range).
2. Ti_tbumers_thatthe__catingtabwi__s_ideint_thes__t_nthesupp_rtbar_Makesureburnersarepr_per_yseated_nsupp_rt
bar and are level.
3. Replace shipping screws ifdesired.
_!,'AV.,!;t_11_[€11DO NOT turn the burners on when the cooktop is raised for cleaning. Be sure that the top iscompletely lowered
and securely in place before turning on the burners.
12

Fig. 1
or
use
a Nail
Fig.2
Hinge
Fig.3
Care & Cleaning
Removing and Replacing the Oven Door
r_ "J_'_IT_'_'_!IThe door is heavy. For safe, temporary storage, lay the door flat
with the inside of the door facing down.
To Remove Oven Door:
1. Open oven door completely (horizontal with floor- See Fig. 1).
2. Remove 2 screws located on the inside of the oven door liner (See A Fig. 2)
3. insert the 2 screws into the door hinge holes located on the side of the hinge arm, one
into each hinge (See B Fig. 2).
4. Close oven door until the door stops (Do notforce the door to close any further). The
placement of these screws should keep door open in about a 45 degree position.
5. Grasp ovendoor firmlyon both sides and slide door upand offhinges atthe same angle.
(See Fig. 3)
6. To clean oven door, follow the instructions in the Care & Cleaning table (page 11).
To Replace Oven Door:
1. Be sure the hinge arms remain atthe 45 degree angle position. Be sure the screws are
still locking the hinge arms from moving. If the screws fall out of the hinge holes, the _¢t
hinge(s) may snap back against the oven frame and could pinch fingers or chip the _
porcelain finish on the oven front frame.
2. Holddooratthesidesnearthetopwhilerestingthelowerfrontofdooronyourknee. _"*_
insert the door channels at the bottom of door over the door hinges, (See Fig. 3). _
3. Allowthedoortoslidedownintothedoorhingesevenlyatthesame45degreeangle. _J¢,.,
The hinge arms should be inserted into the bottom corners as far as they can go.
4. Open door completely (horizontal with floor) and remove both screws from holes in
door hinges.
5. Reinstall the 2 screws into the door liner (See C Fig. 2).
6. if the door is not in alignment with the oven frame, remove door and repeat the above
steps.
13

Before You Call
Before you call for service, review this list. It may save you time and expense. The list includes common occurrences that
are not the result of defective workmanship or materials in this appliance.
OCCURRENCE
Range is not level.
Cannot move appliance easily. Appliance
must be accessible for service.
POSSIBLE CAUSE/SOLUTION
Poor installation. Place oven rack in center of oven. Place a level on the oven rack. Adjust
leveling legs at base of range until the rack is level. When range is level, cooktop may
appear out of alignment if countertop is not level.
Weak, unstable floor. Be sure floor is level and can adequately support range. Contact
a carpenter to correct sagging or sloping floor.
Kitchen cabinet misalignment may make range appear to be unlevel. Be sure cabinets
are square and have sufficient room for range clearance.
Cabinets not square or are built in too tight. Contact a cabinet maker to correct the
problem.
Contact builder or installer to make appliance accessible.
Carpeting interferes with range. Provide sufficient space so range can be lifted over
carpet.
Gas line is hard-plumbed. Have a flexible A.G.A./C.G.A. approved metal appliance
connector installed.
Surface burners do not light. Surface Control knob has not been completely turned to LITE. Push in and turn the
Surface Control knob to LITE until burner ignites and then turn control knob to desired
flame size.
Surface burner flame burns halfway around.
Burner ports are clogged. With the burner off, use asmall-gauge wire or needle to clean
ports. See "Surface Burners" in the cleaning chart under Care & Cleaning for additional
cleaning instructions.
Range power cord is disconnected from outlet (Electric Ignition Models only). Be sure
cord is securely plugged into the outlet. Pilot ignition models - is pilot lit.
Electrical power outage (electric ignition models only). Burners can be lit manually. See
Setting Surface Controls.
Burner ports are clogged. With the burner off, clean ports by using a small-gauge wire
or needle.
Moisture is present after cleaning. Lightly fan the flame and allow burner to operate until
flame is full. Dry the burners thoroughly following instructions in the Care & Cleaning
section.
Surface burner flame is orange. Dust particles in main line. Allow the burner to operate a few minutes until flame turns
blue.
Oven does not operate.
Entire appliance does not operate.
In coastal areas, a slightly orange flame is unavoidable due to salt air.
Be sure the oven controls are set correctly for the desired function. See Setting Oven
Controls or Entire Appliance Does Not Operate (see below).
Be sure regulator gas valve is "ON". See installation instructions.
Make sure electrical cord/plug is plugged tightly into outlet (electric ignition models only).
Service wiring not complete. Contact your authorized Sears Service Center for
assistance.
Electrical power outage (electric ignition models only). Check house lights to be sure.
Call your local electric company for service. Surface burners can be lit manually. See
Setting Surface Controls.
Be sure gas supply is turned on.
14

Before You Call
Oven smokes excessively during broiling. Meat too close to the broil burner. Reposition the rack to provide more clearance between
the meat and the broiler.
Poor baking results.
Meat not properly prepared. Remove excess fat from meat. Slash remaining fatty edges
to prevent curling, but do not cut into the lean.
Broiler pan used without grid or grid covered with foil. DO NOT use the broiler pan without
the grid or cover the grid with foil.
Broiler drawer needs to be cleaned. Excessive smoking is caused by a build up of grease
or food spatters. If the broiler is used often, clean on a regular basis.
Broiler drawer is open. Drawer/door should be closed when broiling.
Many factors affect baking results. Make sure the proper rack position is used. Center
food in the oven and space pans to allow air to circulate. Allow the oven to preheat to
the set temperature before placing food in the oven. Try adjusting the recipe's
recommended temperature or baking time.
15

Your Home
For repair-in your home-of all major brand appliances,
lawn and garden equipment, or heating and cooling systems,
no matter who made it, no matter who sold it!
For the replacement parts, accessories and
owner's manuals that you need to do-it-yourself.
For Sears professional installationof home appliances
and items like garage door openers and water heaters.
1-800-4-MY-HOME ®(1-800-469-4663)
Call anytime, day or night(U.S.A. and Canada)
www.sears.com www.sears.ca
Our Home
For repair of carry-in items like vacuums, lawn equipment,
and electronics, call or go on-linefor the locationof your nearest
Sears Parts & Repair Center.
To purchase a protectionagreement (U.S.A.)
or maintenance agreement (Canada) on a product serviced by Sears:
1-800-827-6655 (U.S.A.) 1-800-361-6665 (Canada)
Para pedir servicio de reparacibn
a domicilio,y para ordenar piezas:
l"888"SU'HOGAR sM
(1-888-784-6427)
Au Canada pour service en fran_ais:
1-800-LE-FOYER "c
(1-800-533-6937)
3_1 SM
®Registered Trademark ITrademark IService Mark of Sears, Roebuck and Co.
I_A SM
®Mama Registrada /Mama de Fdbrica/Mama de Servicio de Sears, Roebuck and Co.
MC MD
Marque de commerce/Marque d6poe6e de Sears, Roebuck and Co. ©Sears, Roebuck and Co.
Table of contents
Other Galaxy Range manuals

Galaxy
Galaxy 790.6000 Series User manual

Galaxy
Galaxy 79060702901 User manual

Galaxy
Galaxy 790.6004 Series User manual

Galaxy
Galaxy Galaxy Top mount User manual

Galaxy
Galaxy 790.60301 User manual

Galaxy
Galaxy 790.60201 User manual

Galaxy
Galaxy 790.6071 Series User manual

Galaxy
Galaxy 790.61031 User manual

Galaxy
Galaxy 880.5000* User manual
Popular Range manuals by other brands

Whirlpool
Whirlpool YSF315PEG Use & care guide

Samsung
Samsung FX510BGS/XAA user manual

KitchenAid
KitchenAid YKDRS807SS01 installation instructions

Electrolux
Electrolux Wave-Touch CEW30GF6GBA Quick reference guide

GE
GE Profile P2S975 installation instructions

GE
GE Profile JS900SKSS Dimensions and installation information