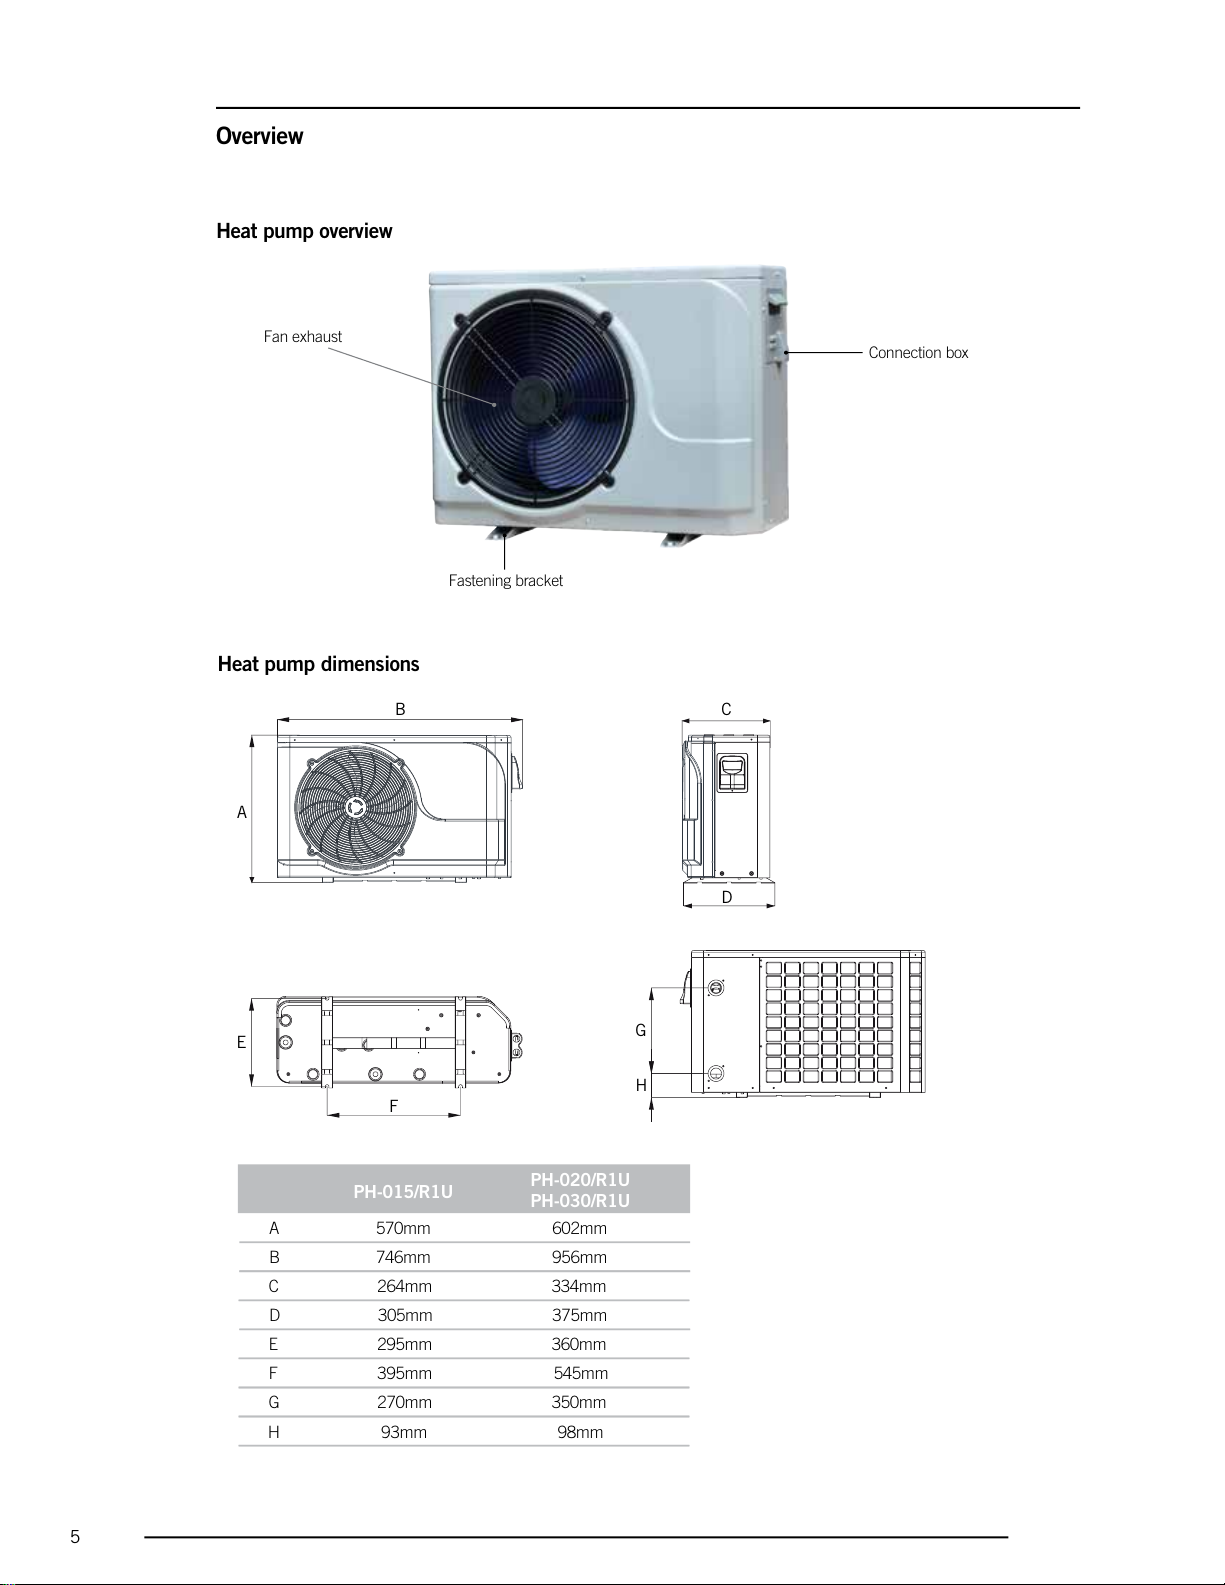
GalaxySpas PH-015/R1U User manual

TECHBOOK
A new way to regulate the water of your spa
HEAT PUMP
plug and play solution
benefit from energy savings
a total flexibility that can also
cool down water

Heat pump dimensions
1
Safety instructions ........................................................................................................................................................... 2
Warnings ......................................................................................................................................................................... 3
Introduction ..................................................................................................................................................................... 3
Overview .......................................................................................................................................................................... 5
-Heat pump overview .......................................................................................................................................... 5
-..................................................................................................................................... 5
Connections..................................................................................................................................................................... 6
Installation ....................................................................................................................................................................... 7
Operating modes ............................................................................................................................................................. 9
Maintenance ................................................................................................................................................................. 10
Steps to winterize your heat pump ................................................................................................................................ 11
Troubleshooting ............................................................................................................................................................. 11
Table of contents

2
Safety instructions
IMPORTANT SAFETY INSTRUCTION:
For your own safety pleaseread the followingimportant safety instruction carefully before attempting to
connect this unit to the main power supply. They will also allow you to get the best performance and prolong
thelife of the unit.
*READ THESE INSTRUCTIONS.
*KEEP THESE INSTRUCTIONS.
*HEED ALL WARNINGS.
*FOLLOWALL INSTRUCTIONS.
*CLEAN ONLY WITH DRYCLOTH. BEWARETHEAPPLICATION OF SOME PRODUCTS COMMONLY USED AGAINST
CORROSION (SUCH AS WD-40 FAMILY PRODUCTS) AS THEY COULD DAMAGE THE ENCLOSURE, DUE TO A NEGATIVE
CHEMICAL REACTION BETWEEN SOMEINDUSTRIALOILS AND ITS PLASTIC ENCLOSURE. ANY OTHER MATERIALS WHICH
MAY COME IN CONTACT WITH THE ENCLOSUREMUST BE CAREFULLY EVALUATED UNDER END USE CONDITIONS FOR
COMPATIBILITY.
*DO NOTINSTALL NEAR ANY HEAT SOURCES. CLEARANCE AND MINIMUM DISTANCE BETWEEN THE VARIOUS PARTS OF
THE APPLIANCE AND THESURROUNDING STRUCTURE ARE NOTSPECIFIED AS LONG AS THEY ARE SUFFICIENT SO THAT
THE AMBIENT TEMPERATURE AROUND THE APPARATUSDOESNOTEXCEED 140°F (60°C).
*ONLY USE ATTACHMENTS/ACCESSORIES SPECIFIED BY THE MANUFACTURER.
*REFER ALL SERVICING TO QUALIFIED SERVICE PERSONNEL. SERVICING IS REQUIRED WHEN THE APPARATUSHAS BEEN
DAMAGED IN ANY WAY, SUCH AS POWER-SUPPLY CORD OR PLUG IS DAMAGED,LIQUID HAS BEEN SPILLED OR OBJECTS
HAVE FALLEN INTO THE APPARATUS, DOES NOTOPERATENORMALLY, OR HAS BEEN DROPPED.
CAUTION: TO REDUCE THE RISK OF ELECTRIC SHOCK, DO NOTDISMANTLE THE UNIT. THERE ARE NO
USER SERVICEABLE PART INSIDE. REFER SERVICING TO QUALIFIED SERVICE PERSONNEL.
Thelightning flash with the arrowhead symbol within an equilateral triangle is intended to alert the user to
thepresence of uninsulated "dangerous voltage" within the product's enclosure that maybe of sufficient
magnitude to constitute a risk of electric shock to persons.
Theexclamation point within an equilateral triangle is intended to alert the user to the presence of important
operating and maintenance (servicing) instructions in the service literature accompaning this appliance.
CAUTION
RISK OF ELECTRIC SHOCK
DO NOT OPEN

3
WARNINGS:
Before installing or connecting the unit, please read the following
* DO NOTDISASSEMBLE OR ALTER THEAPPARATUS
* DO NOTUSE FOAM TO ISOLATE THE UNIT
* TURN POWER OFF BEFOREMODIFYING ANY CABLE CONNECTION IN THIS UNIT
* TURN POWER OFF BEFORE CLEANING OR SERVICING THISUNIT
* PRODUCTMUSTBE DISPOSED OFSEPARATELY FROM NORMAL HOUSEHOLD IN ACCORDANCE WITH LOCAL
WASTE DISPOSAL LEGISLATION
* DO NOTSERVICE THISPRODUCT YOURSELF
Warnings
Heat pump
A new way to regulate the water
of your spa
Here comes new heat pump solution. Using our Heat
pump has never been so easy ! Simply connect it to a
Yseries control that supports it and you’re good to go !
Are you looking for the most energy efficient form of
heating water? Our heat pump is the perfect solution !
Air sourced heat pumps will allow youtosave up to 75%
energyconsumption in comparisonwith eletric elements.
The icing on the cake: It’s also uses an ecofriendly
refrigerant.
Withheat pump,you can choose one of its six modes of
operation that suits you the best, depending on your
climate. Smart modes let you taking full advantage of
your Heat pump to optimizeyour savings.
Introduction

This document
This document includes the necessary information to safely install and maintain your Heat pump. Please read this
manual carefully before you operate the unit.
The Heat pump
TheHeat pump is one of themost economical ways of heating your spa efficientlyUsing the free renewable
energy from theair,itis over 4/5 time more efficient than traditional heating. The Heat pump gives you comfort at
highlevel so you can enjoy your spanot only in summer, but alsoinspring, fall and evenwinter time.
ECO Friendly
TheHeat pump uses a refrigerant whichis ozone friendly and dramatically reduces Carbon Emissions.
Titanium heat exchanger
Theadvanced titanium heat exchanger guarantees alonger lifespan, free of corrosion. It can be used with all types of
water treatment including chlorine, iodine,bromine and salt water.
Multiple functions
- Cooling and heatingfunctions available
- Auto operation, Auto-restart, Auto defrost
- No human attendance is required
- Wide ambient working range: -7°C to 43°C
Reliable operation
TheHeat pump has several builtinsafety features, which include insufficient water flow protection, high/low pressure
protection,overload protection, compressorprotection.
Self-diagnosis
When there is malfunction, the Heat pump will make self-diagnosis by displaying an error code on the spa keypad.
To identify the problem, please refer to ERROR CODES pages in this manual.
Introduction
4

Overview
Heat pump overview
Heat pump dimensions
PH-015/R1U PH-020/R1U
PH-030/R1U
A570mm 602mm
B C
D
E
F
G
H
A
Connection box
Fastening bracket
B746mm 956mm
C264mm 334mm
D305mm 375mm
E295mm 360mm
F395mm 545mm
G270mm 350mm
H93mm 98mm
Fanexhaust
5

6
System connection
Thecommunication cable providedwith the heat pump must be connected to the RS485 communication port of the
spacontrol.
External breaker
TheHeat pump is intended tobe powered by an external circuit breaker.
If an external circuit breaker is used to power the Heat pump, make sure the cord used comply with all local regulation.
To avoid unnecessary shedding of accessories when the Heat pump or a different heat pump is not powered by the
spa control, set the heat pump current to zero (0) through your spa user interface.
Terminal box
Theterminal box is located behind the terminal cover and allows access tothe communication and power connections
Heat Pump
.
Connections
Turn off power before connecting theHeat pump tothe spa control system.
Control system
External power RS485 communication Cable
RS485 port (P83)
Terminal ID
No use
Wire color
SignalPump Cat5e terminal 4-core cable
No use
1 2
Brown Blue Green/
Yellow
220 V~240 V, 50 Hz
L N

7
CAUTION
Do notinstall the unit in a place where flammable gas leak can occur.
All plumbing connections should be carried out as per the instructions inthis manual.
Failure to do so could result inwater damage to property.
Avoid contact with the fan when the unitis operating as this will cause serious injury.
Ensure the Heat pump is correctly grounded to earth withthe power cable.
Locating the Heat pump
TheHeat pump should NOT be installed in an airtight location or confined space, such as a basement or garage.
TheHeat pump requires good air ventilation. It will discharge cold air when it is heating and hot air when it is
cooling, and its efficiency depends on its ability to draw normal ambient temperature air and discharge the
cold or hot air well away fromthe unit. It is recommended to install the Heat pump away from any other home
appliances, to avoidthe chance of electromagnetic interference. Please refer to the "Air space requirements"
section ofthis manual.
Theunitshould be located on a solid flat surface with a slight rearward slope. Ensure 3 meters (9feet) of free airflow to
thedischarge panel and1meter (3 feet) to the inlet panel as well as free airflow to all sidesof the unit. Ensure adequate
access for maintenance purposes.
In cold climates, the Heat pump should be installed at least 46 cm (18'') above the ground level on an open metal frame
in orderto prevent the accumulation of iceat the base of the unit caused by condensation. Your Heat pump specialist
may recommend adedicated frame rusted proof. See alsorecommendations inthe Condensation section further.
Air space requirements
Installation
0,5 m (20")
3 m(9')
0,5 m (20")*
Air inlet
Airoutlet
* Top clearance is only a recommendation to ease service.
1 m (3')

8
Installation
Precautions
• Avoid locating the unit close to bedrooms or othernoisesensitive areas.
• Avoid a location which could create vibration(e.g. secured toasolidwall).
• The fan should not blow towards windows,walls or spaces likely to be inhabited by people or animals.
• Do not install where the Heat pump is likely to be subjected to polluted air, dust or debris, etc.
• Avoid directing fan output against the dominant wind directions.
• Protectthe heat pump from possible snow fall.
• Minimise exposure to environmental conditions as much as possible and never block the airflow.
Securing the Heat pump
TheHeat pump should be securely fixed. The four included rubber mounts should be installed to absorb
high-frequency vibrations.
Piping
A bypass, consisting of threevalves, must be installed to adjustwater flow to the Heat pump and to isolate the
apparatus for maintenance purpose.
Fora more stable flow in the heat exchanger, itis recommended to install the Heat pump on the pressure side of the
main pump.
If your installation is equipped withawater treatment system (chlorine, bromine, salt, etc.) the bypass must beinstalled
before the watertreatment, with a checkvalve between the bypass and water treatment system.
Condensation
Theair drawn intothe Heat pump is strongly cooled by the operation ofthe Heat pump for heating thespa water, which
maycause condensation on the fins ofthe evaporator. The amount of water may be as muchas several liters per hour
at high relative humidity. This is sometimes mistakenly regarded as awater leak.
Since water generated by condensation will be evacuated at the bottom of the Heat pump, it is better to provide a slight
rearward slope when installing the Heat pump to allow this water toflow freely on the ground. It must also be ensured
that this evacuation of water will not affect any components around the Heat pump like electrical circuit and material like
wood ormetal that can be weakened by water That said, be aware that water will flow under the Heat pump in normal
operation.
spa circulation/
main pump spa control
input valve
bypass valve
outputvalve
water in
waterout
spa equipment bay
Heat pump
In order to limit the heat loss from the piping,
it is recommended to install the heat pump as close
as possible to the spa. A 16 foot (5 m) cord is provided.
communication portRS485
Power

9
Operating modes
Theoperating mode can be changed through the spa user interface.
Six different operating modes are available:
1) EcoHeat(EcoH)
2) Smart Heat (HEAT)
3) Cool (COOL)
4) EcoAuto(AUTO)
5) Smart Auto (SMRT)
6) Electric(ELEC)
Eco Heat (EcoH)
In this mode, the Heat pump is used asthe unique source
of heating. Theheating element is kept off and the Heat
pump is not usedtocool the watershould its temperature
rise above the current set point.
Smart Heat (HEAT)
This mode uses the Heat pump as the main heating
source. Theheatingelement is turned on only if thereis
alarge temperaturedifference between the water and the
set point orifthe ambient temperature gets too low. The
Heat pump is not used to cool the water inthis mode.
Cool (COOL)
This mode uses the Heat pump in cooling mode only.
TheHeat pump is not used as a heatingsource and the
heating element is never activated.
Eco Auto (AUTO)
This mode borrows functionality from both Eco Heat
andCool modes and has the ability to select the proper
Heat or Cool mode automatically according to the water
temperature. The heating element is neveractivated in
this mode.
Smart Auto (SMRT)
This mode borrows functionality from both Smart Heat
andCool modes and has the ability to select the proper
Heat or Cool mode automatically according to the water
temperature. The heating element is activated only if there
is a large temperature difference between the water and
the set point or if the ambient temperature gets too low.
Electric(ELEC)
This mode keeps the heat pump off and uses only the
heating element to regulate water temperature.
FreezeProtection
In cold weather,ifit becomes impossible for the Heat pump to keep the water temperature above freezing point, the
help of theheatingelement might be required even if its use should be prohibited by the operating mode or conditions.
At any time, if the water temperature drops too close to the freezing point, the operating mode will be switched
temporarily to“Smart Heat” andthe system will heatuntil the minimum allowed set point hasbeen reached before
reverting to its previous operating mode and resume normal operation.
Three minutes waiting time
In any circumstances, when the Heat pump is shutdown, pleasebe aware that there is forced waiting time of three
minutes before the Heat pump can operate again. This is so to prevent damage to the equipment. For example, if the
operating mode has been changed from Cold to Hotsucceeding an increase of the setpoint, the Heat pump will be
allowed to start only after a delay of three minutes.

10
To protectthe paintwork, avoid leaning or putting objects on the shell. Heat pump parts can be wiped with adamp cloth
and domestic cleaner. (Warning: Never use cleaning agents containing sand, soda, acid or chloride as these can
damage the surfaces.)
To prevent clogging in the titanium heat exchanger, ensure that the system incorporatesa water and filter treatment
equipment. In theevent ofaproblem occurring due to contamination, the system should be cleaned as described
below. (Warning: the fins on the finned tube heat exchanger are sharp!).
Cleaning the Heat Exchanger and Pipework
Contamination in the pipes and heat exchanger can reduce the performance of the Heat pump. If this is the case, the
pipe system andheat exchanger must be cleaned by a technician. Use only pressurized drinking water for cleaning.
Cleaning the air system
Thefinnedheat exchanger, fan and condenser outflow should be clear of all obstructions(leaves, twigs, etc.) before
each new heating season. These canbe manually removed using compressed air orby flushing with clean water.
It may be necessary to remove the unit cover and air inlet grid first.
Warning: Beforeopening the unit, ensure that all electrical supplies are protected from human access.
To prevent the evaporator and the condenser tray from being damaged, do not use hard or sharp objectsfor cleaning.
Under extreme weather conditions (e.g. snow drifts), ice may form on the airintake and exhaust air outlet grids.
If this happens, the icemust be removed in the vicinity ofthe airintake and exhaust air outlet grids to ensure that
theminimum air flow rate is maintained.
Winter Shutdown
To prevent frost damagetothe unit when not in use the Heat pump should be drained of all water. If the Heat pump
cannot be winterized, anotherform of frost protection should be considered.
Warning: The warranty does not cover damage caused by inadequate frost protection measuresduring the winter.
Maintenance

11
Steps to winterize your Heat pump
• Turn offall electrical power to the Heat pump.
• Turn offthe circulation pump.
• Disconnect thewater piping inlet and outlet from the Heat pump.
• Remove the drain plug and make sure the heat exchanger drains out.
• TheHeat pump should be blown out with airtoensure no water is left inside. A compressed airline should be placed
into thewater outlet line to blow air through the unit.
• Loosely reconnect the plumbing connection and drain plug to allow any remaining waterto drain but block insects
anddebris.
• Cover the Heat pump with a protective tarp to prevent snow and other debris from going in the fan grill.
• Finally,ensure that all plumbing going from the Heat pump tothe spa hasbeen emptied from all water.
Troubleshooting
Error codes
If a protection kicks in or if an error is detected in the heat pump, an error code will be reported on the spa keypad.
If more than one error is detected, only the error with the highest priority will be displayed.
All error codesare listed below in priority order.
Error code Error description
HP99 Communication error
HP05 Coil temperature sensor failure
HP18 Water outlet temperaturesensor failure
HP42 System 1 high pressure protection
HP46 System 1 low pressure protection
HP41 Water flow protection
HP01 System 1 exhaust temperature sensorfailure
HP19 Water inlet temperature sensor failure
HP09 System 1 returngas temperature failure
HP22 Ambient temperature sensor failure
HP65 Ambient temperature toolow protection
HP55 Water inlet/outlet temperature difference protection
HP51 System 1 exhaust temperature too high protection
HP63 Water outlet temperature toolow protection when defrosting
HP56 Water outlet too coldfor cooling
HP57 Standby freeze protection
This manual suits for next models
2
Table of contents
Other GalaxySpas Heat Pump manuals
Popular Heat Pump manuals by other brands

Aqua PRO
Aqua PRO ECO900 Installation and user manual

Aqua Logic
Aqua Logic DSHP Series Installation & operating instructions

Water Furnace
Water Furnace Envision NRAC026 installation manual

Hillphoenix
Hillphoenix CO2One manual

Mark
Mark HKEU 353 Technical manual

alphainnoTec
alphainnoTec LW A operating manual

Dimplex
Dimplex SIW 6TES Installation and operating instructions

alphainnoTec
alphainnoTec WWC H/X Series operating manual

Daikin
Daikin EPRA10EAV3 Installer's reference guide

Vaillant
Vaillant aroTHERM plus quick guide

Energie
Energie ECO 250esm Assembly and user's manual

Lailey abd Coates
Lailey abd Coates LC-07 Product installation manual