GalaxySpas Venus User manual

Your Spa Pool Guide
Venus • Aquila II • Orion • Hydra

2
Introduction
2
This document will guide you
through the process of becoming a
Galaxy spa owner, preparing you for
the delivery and installation of your
spa pool and its accessories.
Many important considerations and
actions are required so please read
this guide thoroughly and refer to
the pre-delivery checklist before the
arrival of your spa.
You can nd a wide range of support
content and videos for spa owners on
our website’s support page.

3
Contents
04
Venus
05
Aquila II
3
Pre-Delivery Guide 08
Delivery Options 09
Choosing Your Spa’s Placement 10
Positioning Requirements 11
Foundation Requirements 13
Building Regulations and Consent 14
Pre-Delivery Checklist 15
Installation Guide 16
First Steps 17
Hard Cover Installation 18
Cover Lifter Installation 19
Electrical Installation 25
Filling Your Spa 27
Draining Your Spa 28
SpaTech Touchpad Start Up Guide 29
Water Guide 32
Galaxy Super Chlor Start Up Kit 33
simplesilver™ 37
Safety Information 40
06
Orion
07
Hydra

4
Acrylic Cabinet
Sterling silver Slate grey
Venus RESTORE SERIES
People Insulation Pumps AmpsJetsSize (m)
343 4 layer 2 + 1 Circ 25-322 x 1.74 x 0.82
Relax together in the Galaxy Venus, the perfect
couple’s spa pool. A step up on the Ceres in terms of
hydrotherapy, the Venus boasts 43 jets congured
for a restorative massage. With two loungers, a single
seated position and a cool-off step, the Venus is a
great option for couples and compact spaces. An
ultra-quiet circulation pump and premium insulation
are just some of the features that reduce the day-to-
day running costs of this energy efcient spa pool.
Seating Size (m) Controller Pool body
3 people 2 x 1.74 x 0.82 Spa tech controller 4 layer insulation
Treated timber frame
ABS base
Horizontal cabinet
Jets Water capacity Lighting
43 massage jets 540L Water level lighting
Weight dry Weight lled Pumps Filtration
304kg 844kg 2 x 3hp massage pump
Circulation pump
Ozone and Venturi
Heater Amps Jet system Optional extras
3kW 25-32 Starry sky jets and ttings 2-tier steps
Warranty
Structural Acrylic Heaters & jets Equipment
10
YEARS 5
YEARS 5
YEARS 2
YEARS

5
Acrylic Cabinet
Sterling silver Slate grey
Aquila II RESTORE SERIES
People Insulation Pumps AmpsJetsSize (m)
541 4 layer 2 + 1 Circ 25-322 x 2 x 0.82
The Aquila II spa is a best seller similar to the
AquilaI, but with a step up in hydrotherapy
capability. An additional massage pump powers
41 jets placed throughout two loungers and three
seated positions, providing superior massage
pressure. Energy efciency is optimised through
the ultra-quiet circ pump and premium insulation
keeps your water hot day-to-day, making this an
economical favourite.
Seating Size (m) Controller Pool body
5 people 2 x 2 x 0.82 Spa tech controller 4 layer insulation
Treated timber frame
ABS base
Horizontal cabinet
Jets Water capacity Lighting
41 massage jets 960L Water level lighting
Weight dry Weight lled Pumps Filtration
334kg 1,294kg 2 x 3hp massage pump
Circulation pump
Ozone and Venturi
Heater Amps Jet system Optional extras
3kW 25-32 Starry sky jets and ttings 2-tier steps
Warranty
Structural Acrylic Heaters & jets Equipment
10
YEARS 5
YEARS 5
YEARS 2
YEARS

6
Acrylic Cabinet
Sterling silver Slate grey
Orion RESTORE SERIES
People Insulation Pumps AmpsJetsSize (m)
545 4 layer 2 + 1 Circ 25-322.12 x 2.12 x 0.92
The Galaxy Orion is a midsized, dual lounger spa
pool with extra depth to cater to taller people.
45 jets provide incredible hydrotherapy, with the
coveted Captain’s Chair providing targeted, deep
tissue neck and shoulder massage. This family
favourite includes features that reduce day-to-day
running costs, such as premium insulation and an
ultra-quiet circ pump. For a step up in hydrotherapy,
explore our Transform Series.
Seating Size (m) Controller Pool body
5 people 2.12 x 2.12 x 0.92 Spa tech controller 4 layer insulation
Treated timber frame
ABS base
Vertical cabinet
Jets Water capacity Lighting
45 massage jets 1,160L Water level lighting
Weight dry Weight lled Pumps Filtration
376kg 1,536kg 2 x 3hp massagepump
Circulation pump
Ozone and Venturi
Heater Amps Jet system Optional extras
3kW 25-32 Starry sky jets and ttings 2-tier steps
Warranty
Structural Acrylic Heaters & jets Equipment
10
YEARS 5
YEARS 5
YEARS 2
YEARS

7
Acrylic Cabinet
Sterling silver Slate grey
Hydra RESTORE SERIES
People Insulation Pumps AmpsJetsSize (m)
646 4 layer 2 + 1 Circ 25-322.18 x 2.18 x 0.92
The Galaxy Hydra is a step up in size and
performance from the Jupiter. Perfect for a larger
family or entertainers. It features 46 powerful jets
and the sought after Captain’s Chair, which delivers
targeted, deep tissue neck and shoulder massage.
An ultra-quiet circulation pump keeps this spa quiet
when not in use and energy efciency is optimised
through premium insulation. For a step up in
hydrotherapy, explore our Transform Series.
Seating Size (m) Controller Pool body
6 people 2.18 x 2.18 x 0.92 Spa tech controller 4 layer insulation
Treated timber frame
ABS base
Horizontal cabinet
Jets Water capacity Lighting
46 massage jets 1,480L Water level lighting
Weight dry Weight lled Pumps Filtration
369kg 1,869kg 2 x 3hp massage pump
Circulation pump
Ozone and Venturi
Heater Amps Jet system Optional extras
3kW 25-32 E-Style jets and ttings 2-tier steps
Warranty
Structural Acrylic Heaters & jets Equipment
10
YEARS 5
YEARS 5
YEARS 2
YEARS

8
Pre-Delivery Guide
SECTION 1.
8
Everything you need to plan and consider before
your Galaxy spa arrives.

9
Delivery Options
Your spa consultant will speak with you about where you would like to place
your spa pool and about access for delivery. Together you will decide which
delivery method is best suited. Once you have purchased your spa, your
consultant will hand you over to Galaxy’s fullment team. One of our fullment
managers will then be your point of contact and support to coordinate delivery.
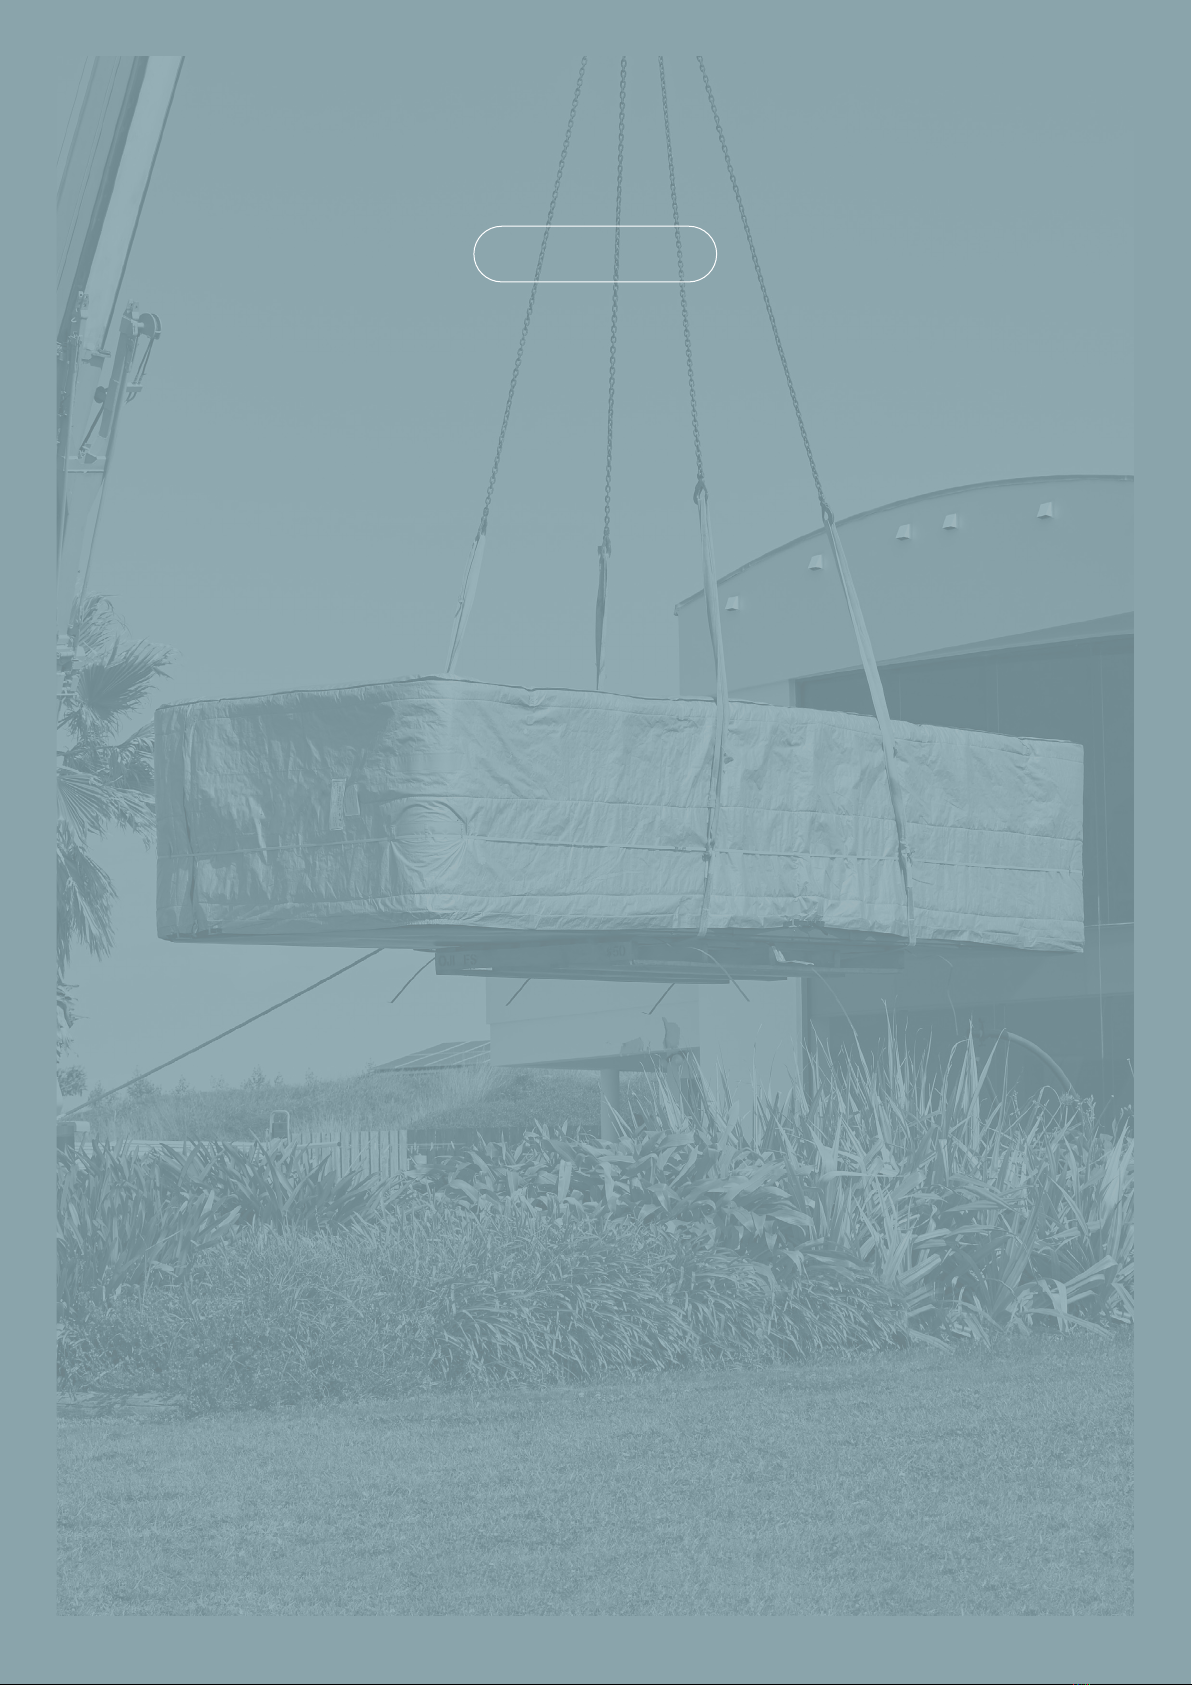
Into position delivery.
A HIAB is the most common delivery method for a spa pool, consisting of a large delivery
truck with a crane arm that can reach 7m long and 2m high, capable of lifting your spa into
position from your driveway or street front. Manpower is used when a HIAB cannot reach your
desiredposition.
Bespoke delivery.
A more complex delivery may require bespoke methods, usually utilising a combination of
HIAB, manpower, crane or helicopter. To coordinate this, we will ask you to provide specic
details about your property via descriptions and images. Factors such as powerlines, road and
driveway access and natural obstacles will be considered. If needed, we will arrange a site check
andquote.
Kerbside delivery.
If you are looking for a more economical option or are not ready to have your spa put into
position, we can coordinate delivery to your kerbside. The spa will arrive on its side, in its
packaging and then you will be responsible for moving it from here. We recommend talking to
us about the best way to move it safely.
Pick up.
In certain scenarios, pick up from the nearest depot can be organised.
Requirement to inspect the spa upon delivery.
When your spa is delivered, you need to be present and do a thorough inspection of the spa
before accepting delivery. This includes removing the outer packaging and ensuring no damage
has occurred during freight. Claims for damage can only be accepted if issues are written on the
consignment / delivery note you’ll be asked to sign and communicated to Galaxy Spas within 24
hours of delivery.

1010
Choosing Your Spa’s Placement
For the best spa experience, the placement and orientation of your new pool
should be carefully planned. There are important positioning, foundational and
electrical requirements outlined in this section to ensure smooth delivery and
installation. Refer to the checklist on page 15.
Whether to ensure a private sanctuary, have line of sight to supervise your kids in the spa, or
to entertain guests easily, here are our top three considerations when designing your outdoor
spaspace.
1. View
What would you like to look at while you soak, relax and connect with loved ones?
Ifyour chosen spa has loungers, where or what would you want them to face?
2. Privacy
If privacy is important to you, think about the most private place for your pool.
Consider neighbours, somebody coming to the door and sight lines of people
walking or driving past.
3. Weather
Where is the most sheltered spot you can place your spa? Out of the wind and in
the sun is ideal and not too far from the house for those chilly nights. If you are
in a particularly hot and sunny climate, a slightly more sheltered spot is advised
to reduce prolonged high UV exposure, to protect both those in the spa and the
spa itself.

11
Positioning Requirements
Fencing
To keep you and your loved ones safe, most councils have rules around fencing requirements for
spa pools.
Above ground
+ No fencing is required if your spa pool is
above 0.76m high.
+ Spa pools are required to have a hard,
lockable cover.
+ Any permanent structures near the spa
(such as a heat pump) are classed as
climbable surfaces and must be placed at
least 1.2m away.
Venus and Aquila II - At 0.82m deep,
nofencing is required.
Orion and Hydra - At 0.92m deep,
nofencing is required.
Below ground
If you are sinking your spa pool into the
ground or decking, a fence is required for
safety compliance.
We recommend contacting your council
to discuss any fencing requirements for
your region. Fencing is the homeowner’s
responsibility and we want you to have the
safest spa environment and adhere to any
local spa fencing bylaws.
See page 14 for further details on building
consent.
Electricity
Important Considerations.
+ Does your home have the electrical capacity to run a 25-32 amp spa?
+ Based on proximity to your power supply, are there particular areas you can or cannot place
your spa? This may be an important consideration if you have a large property.
+ Your spa will need to be hardwired by an electrician and does not come with a power cord.
See page 25 for full electrical installation guidelines.
Service Area
Your spa’s panels may need to be removed during servicing, so you must ensure there is enough
room for a technician to access and remove them to complete the work. 50cm is the minimum
requirement.

12
Cover Lifter
A cover lifter is an accessory that attaches to the spa pool and supports removing the cover. Not
only does it help get the spa cover off quickly and easily, it also protects the cover from getting
damaged during the process. See the below details for model-specic clearance.
Venus, Aquila II, Orion and Hydra
50cm rear and 10cm side clearance is required (5cm on each side).
You will need to lift your empty spa slightly to install the cover lifter correctly. Once lled with
water, it will be too heavy.
Spa
Cover Lifter
Cover Locks
+ The spa cover requires 32.5cm of space from the top of the installed cover down each side of
the cabinet to the lock clips.
+ This space is required. Not providing the necessary clearances will mean you cannot install
your cover properly or lock it.
+ Even when your spa is fenced, we recommend locking your cover locks to prevent the wind
from dislodging the cover and unattended children from entering the spa.

13
Foundation Requirements
Once full, your new Galaxy spa pool can weigh over two tonnes, so it needs to sit
on a level surface that supports the entire base.
Concrete Foundation
We recommend a cured concrete pad with a minimum thickness of 10cm, slightly larger than
your spa’s dimensions.
Decking
It is common to place a spa pool on a deck or patio. If doing so, you must ensure that an
engineer or builder checks the deck load rating before placing the spa pool.
Spa Steps
Steps need a at, level foundation to sit on.
Do not x them in place, as they are then
deemed a climbable object.
Two tier steps dimensions:
+ Length: 60cm
+ Width: 58cm
+ Height: 30cm
Drainage
Water splashing over the side of a spa pool is very common. Children playing or having a spa
pool full of people is all part of the experience.
+ Drainage must be considered to prevent water from pooling around the spa’s base. Flooding
issues are not covered under warranty. We recommend incorporating drainage channels
into your foundation to direct water away from the spa pool.
+ You will also need to consider drainage when changing your spa’s water. A hose attachment
comes with your spa. We recommend having a dedicated piece of hose long enough to
reach your wastewater or garden.
+ If you are draining the water onto your grass or garden area, remember to let the water
temperature drop rst.

14
Building Regulations and
Consent
Building Code Compliance
As the homeowner, you are responsible for understanding and complying with legislation and
local bylaws related to installing a spa pool.
+ Your local council may have additional rules and regulations you must adhere to.
+ Building consent is required for some installation applications (outlined below).
Placement and Landscaping Considerations
Above ground installation.
This is the most common installation form, where the spa is placed on a concrete foundation.
In ground installation.
If you choose to sink the spa below the ground or build a deck around it, there are a few
considerations you will need to take into account.
+ Building consent - you will need to install a fence around your spa and deck to prevent
unaccompanied minors and animals from climbing onto / into the spa. The fence will
require building consent.
+ Clearance - ensure decking supports are positioned 50cm away from the side of the spa.
Itis common to install removable decking around the spa for this purpose.
+ In ground installation considerations:
‐How will you access your drain valve at the base of your spa? This will need to be
accessible to drain your spa pool.
‐Is there sufcient space / clearance for the servicing area, desired accessories (steps,
cover lifter) and clips for the lockable cover?
‐If the clearance for the cover clips cannot be achieved, consider clipping the cover into
the deck.

15
Pre-Delivery Checklist
1. Have you checked your property’s access and discussed delivery access with
ourteam?
2. Have you considered your chosen spa placement’s view, privacy and
weatherconditions?
3. Have you checked if you need to fence your spa?
4. Do you need to arrange any electrical requirements before delivery?
5. Have you considered the service area, cover lifter and cover clip clearances?
6. Do you have a concrete pad foundation with room for steps?
OR
Has the deck load rating been checked if the spa is being placed on a deck?
7. Is your spa’s fencing or decking building code compliant?
8. Have you planned for adequate drainage solutions?
9. Have you arranged to be on site during delivery and do you understand the
obligation to inspect your spa before signing the consignment / delivery note?
10. Have you read the Installation Guide below and completed any pre-delivery or at
the point of delivery actions?
Notes:

16
Installation Guide
SECTION 2.
16
Everything you need to know once your spa pool arrives.

17
First Steps
1. Remove the spa’s packaging.
This includes the plastic outer and the thermal wrapping, which you may wish to save for
future use.
2. Assemble your cover lifter.
Once the spa is full, it will be too heavy to lift and you will not be able to t your cover lifter.
We recommend assembling the cover lifter before delivery so that you can attach it once
thespa is placed into position.
See full instructions on page 14.
3. Assemble your spa steps.
Your spa steps will not be xed to the spa, so you can assemble these at any time.
Full instructions will arrive with your steps.

18
Hard Cover Installation
1. Position the spa cover on the spa, ensuring that the spa skirt is smooth and not folded in
any location.
2. Pull the spa strap tightly downward, then press the buckle against the spa cabinet.
3. Whilst holding the buckle against the cabinet, release the top strap from the buckle by
pressing the sides and unclipping. Mark the three mounting locations where you will screw
the base of the buckle onto the cabinet.
4. Use the supplied screws to secure the base of the buckle onto the cabinet.
5. Repeat steps two-four for the remaining straps.
6. You should now be able to tightly and safely secure your spa cover to the cabinet.
Cover Care
+ Avoid exposing the cover to excessive chemicals. Always remove the cover when adding your
spa chemicals. Any texture change or extreme discolouration of the base material indicates a
chemical burn.
+ Use a mild detergent and water solution to clean the vinyl portion monthly. Keep the cover
clean and free of dirt and debris to avoid colour leaching.
+ Avoid water and snow from accumulating. These can cause the cover to sag and become
water-logged, which will deteriorate the cover.
+ Avoid scraping the cover on rough surfaces. Avoid jerking or pulling the cover, especially
when vinyl is soft from heat, to prevent threads from tearing the vinyl.
+ Always unfasten all hardware before opening the cover. Gently fold down the cover onto itself.
+ Do not sit, walk, or lay on the spa cover. Avoid placing any heavy objects on the cover.

19
Cover Lifter Installation
Before Starting
+ You will need a drill and a tape measure.
+ Please ensure all parts listed are present in preparation for the assembly of your cover lifter.
+ All left-to-right instructions are from standing in front of the spa.
+ Ensure your spa is placed onto a level surface, such as a concrete pad or load-checked decking.
+ Ensure you have the necessary clearances for your cover lifter as set out in your spa manual.
+ Ensure your cover is placed properly on your spa, centred and without folds in the cover skirt.
Parts List

20
Instructions
Step 1.
The cover lifter must be assembled to the dimensions of
your spa.
If your spa is square, you can choose the orientation of
your cover and the side on which you install the lifter.
The framing tubes are slidable. Use your spa dimensions
and add 5cm on each side to allow space for movement,
as indicated by the table below. This is explained further
in step 5.
Note, If your spa is rectangular, install the cover lifter on
the shortest side (the width).
Spa Pool Model Spa Pool Dimensions
(length x width x depth)
Total Cover Lifter Width
Venus 2m x 1.74m x 0.82m 1.74cm + 10cm = 184cm
Aquila II 2m x 2m x 0.82 200cm + 10cm = 210cm
Orion 2.12m x 2.12m x 0.92m 212cm + 10cm = 222cm
Hydra 2.18m x 2.18m x 0.92m 2.18cm + 10cm = 228cm
Step 2.
Place the base brackets on the ground with the at
side facing the spa. You can either slide them under the
base of the spa or prop your empty spa up slightly.
Note, it does not matter exactly where they are placed,
as long as they are square to the spa, as a tube will go
through them.
This manual suits for next models
3
Table of contents
Other GalaxySpas Hot Tub manuals