ITA FUNZIONI TIMER
REGOLAZIONE DELL’ORA (Nota: L’orologio è in formato 24 ore)
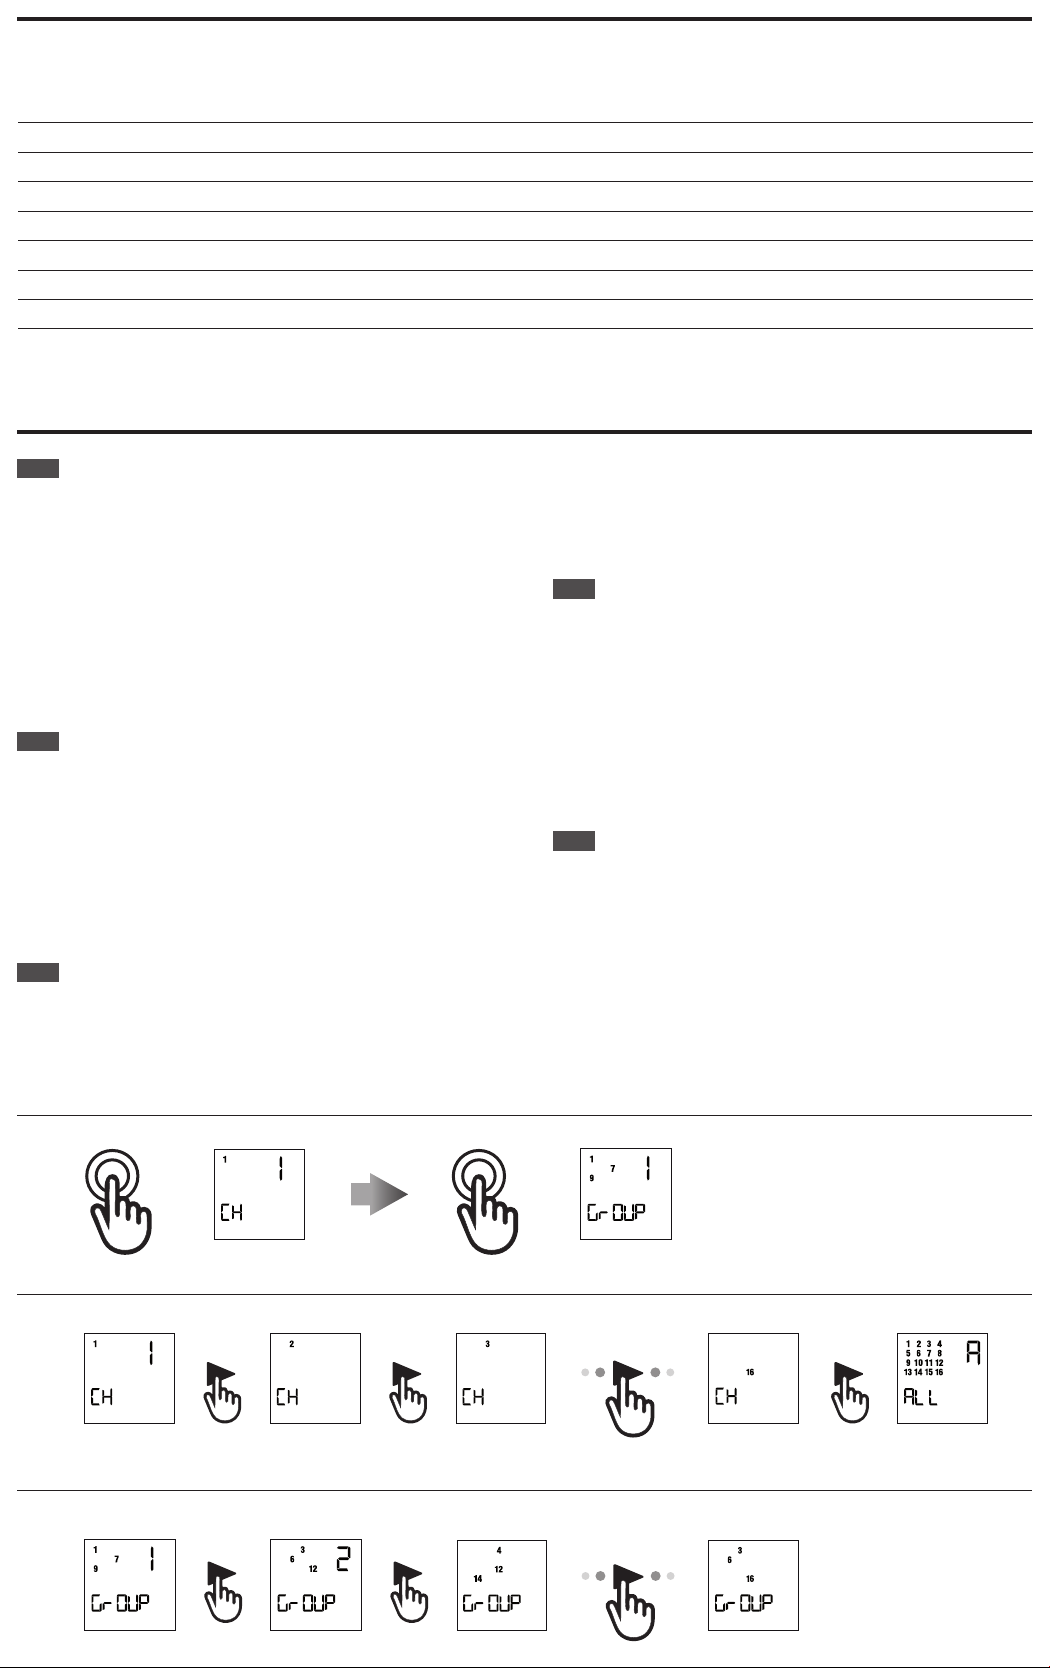
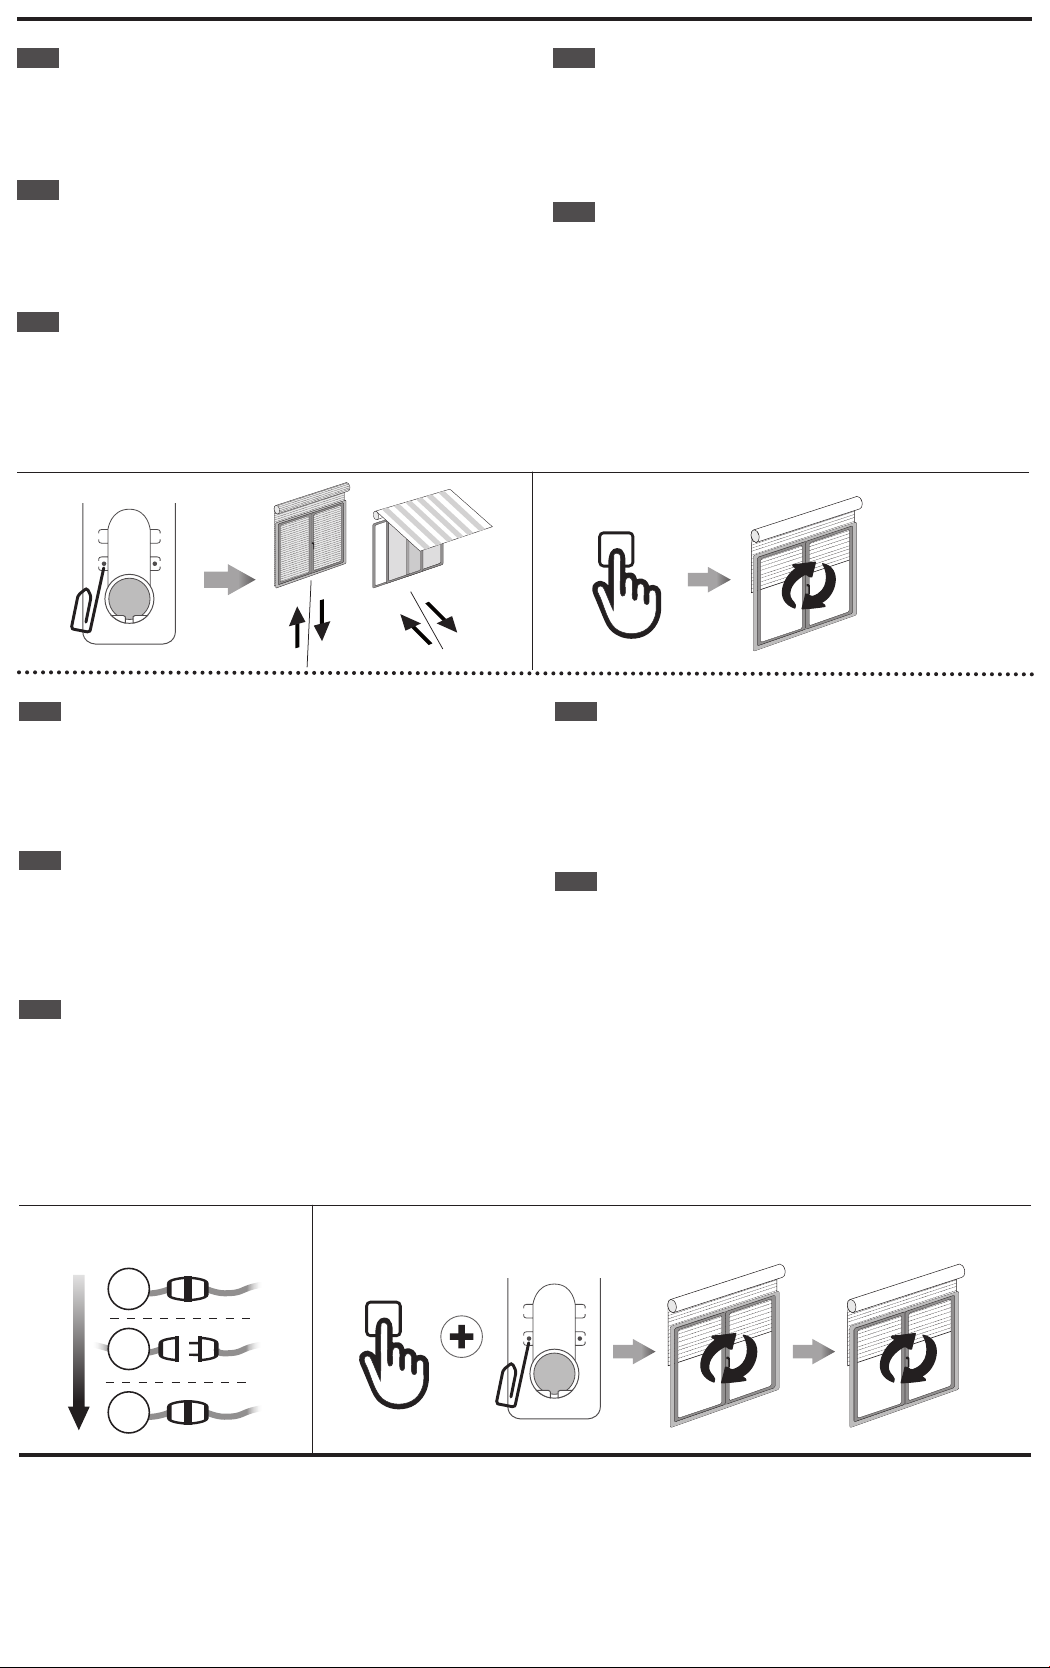
1. Dalla schermata dei canali o dei gruppi, premere e tenere premuto il pulsante circolare
fino a quando o appare sullo schermo. Premere nuovamente il pulsante
circolare e apparirà la schermata del timer/orologio.
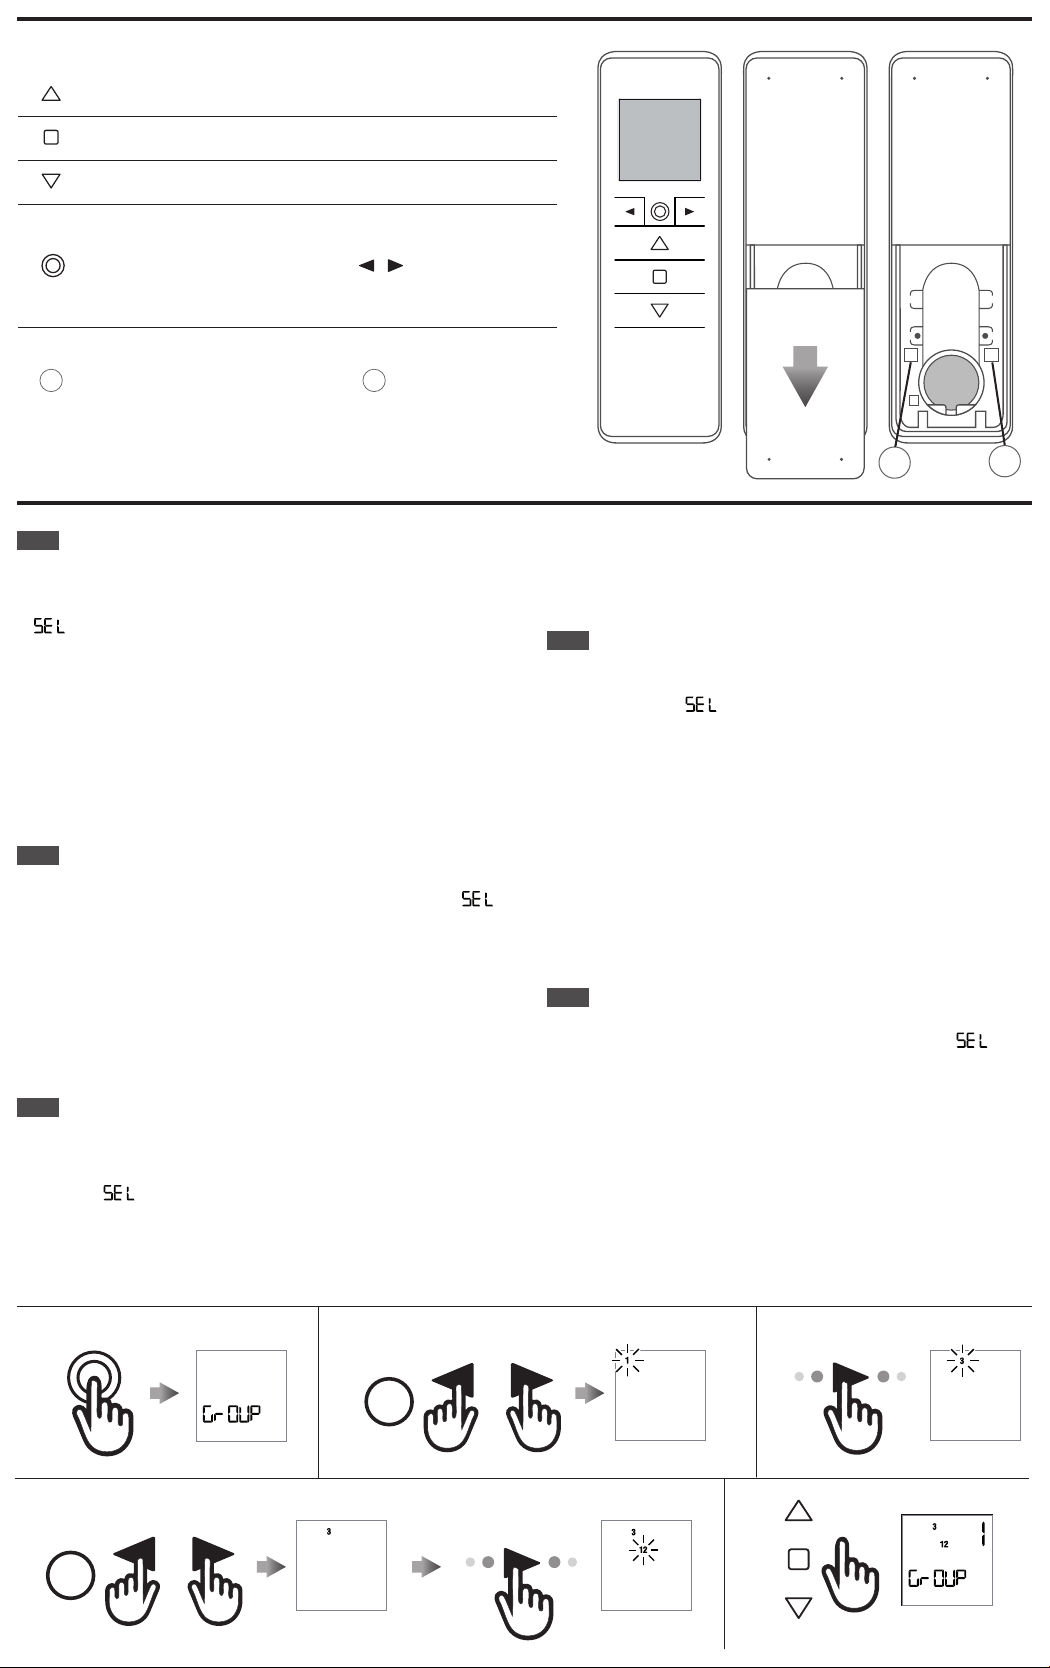
2. Premere il tasto STOP per entrare nel menu.
3. Impostare l’ora con i tasti SALITA / DISCESA e premere il tasto STOP per confermare.
4. Impostare i minuti con i tasti SALITA / DISCESA e premere il tasto STOP per confermare.
5. Selezionare il giorno della settimana con i tasti freccia (◄/►) e premere il tasto STOP per
confermare. appare sullo schermo. Usando i tasti freccia (◄/►) è possibile scorre-
re tra e per scegliere se visualizzare o meno l’orologio in modalità stand-by.
Nota: Durante il funzionamento, l’orologio viene mostrato solo in modalità automa-
tica o casuale (vedi sezione: “Comprendere e cambiare la modalità operativa”)
CREARE O MODIFICARE UN PROGRAMMA
1. Dopo aver impostato l’orologio, dalla schermata dei canali o dei gruppi, premere e tenere
premuto il pulsante circolare fino a quando o appare sullo schermo.
Premere nuovamente il pulsante circolare due volte fino a quando appare .
Premere il tasto STOP per entrare nel menu.
2. Ora è possibile scegliere i 6 orari:
3. Usare i tasti freccia (◄/►) per selezionare il programma da creare o modificare. Una
volta selezionata la pianificazione, premere il tasto STOP per confermare.
4. Usare i tasti freccia (◄/►) per selezionare il giorno della settimana:
5. Premere i tasti SALITA / DISCESA per selezionare o deselezionare uno o più giorni della
settimana. Una volta selezionati il giorno o i giorni della settimana, premere il tasto
STOP per confermare.
Nota: quando il giorno della settimana lampeggia lentamente, il giorno non
è selezionato, e quando il giorno della settimana lampeggia velocemente, il
giorno è stato selezionato.
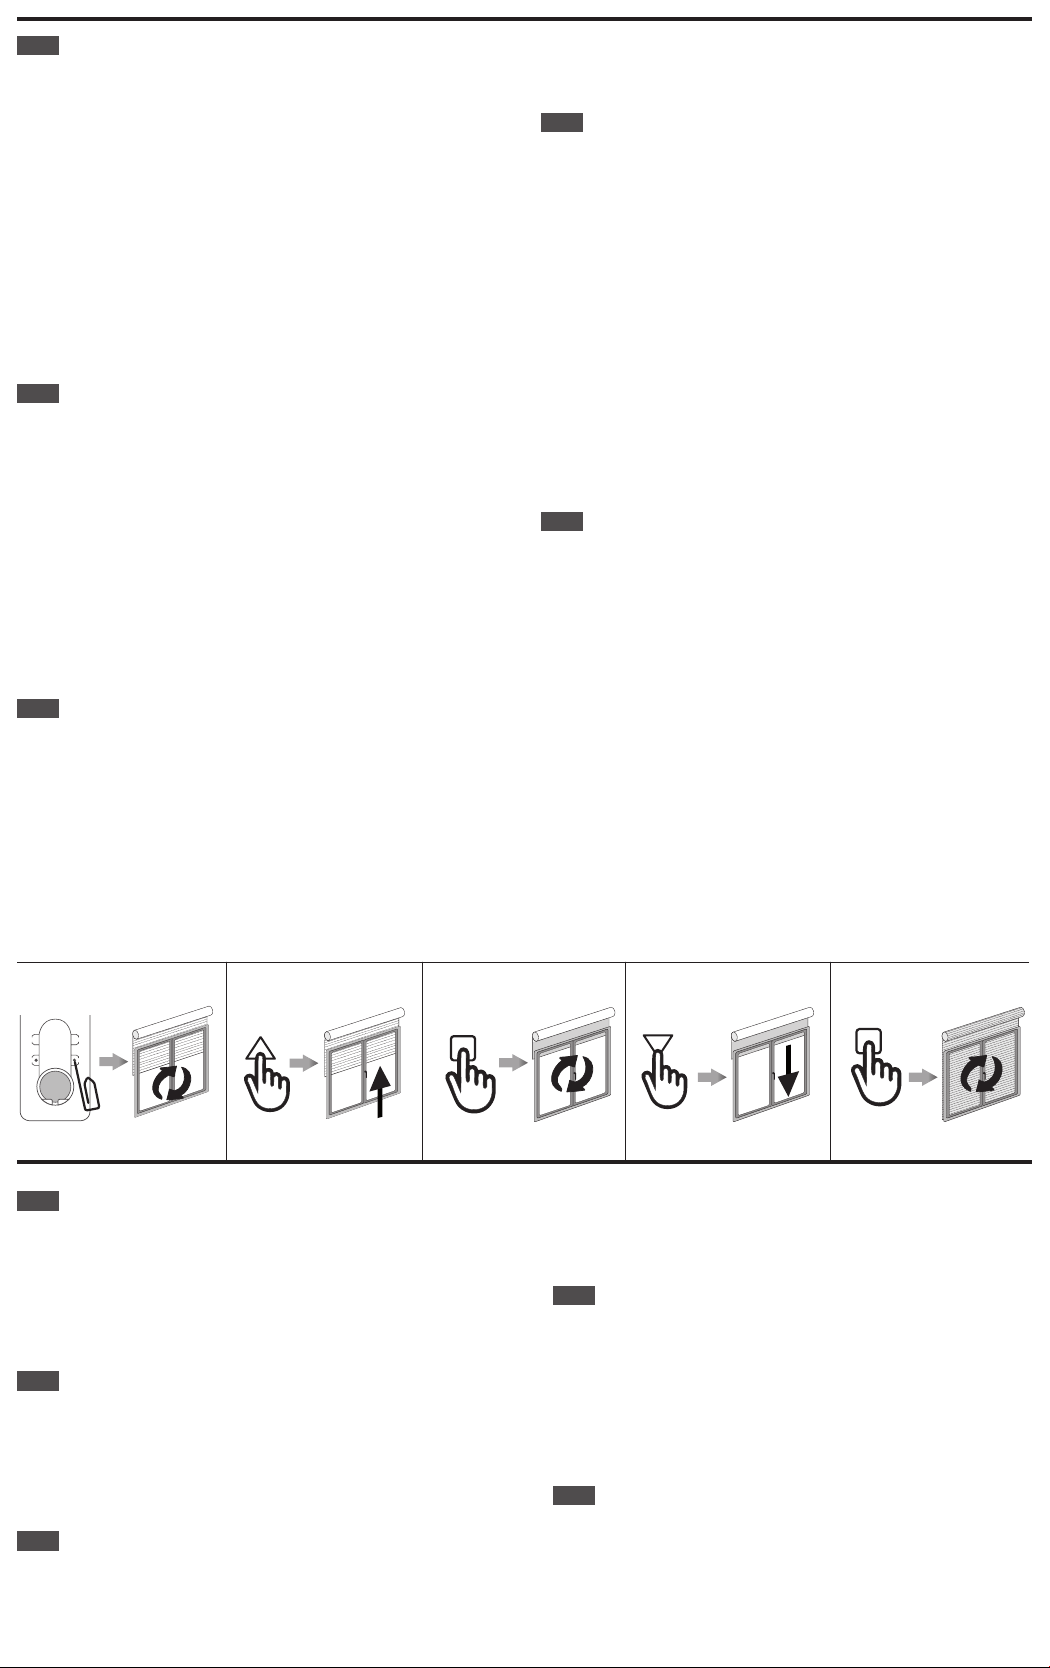
6. Con i tasti SALITA / DISCESA selezionare l’ora. Premere il tasto STOP per confermare.
7. Con i tasti SALITA / DISCESA selezionare l’ora. Premere il tasto STOP per confermare.
8. Scegliere il comando da inviare. Usare i tasti SALITA / DISCES per selezionare tra il
comando SALITA, DISCESA e Posizione intermedia. Premere il tasto STOP per confermare.
9. Scegliere i canali da aggiungere al palinsesto. Usare i tasti freccia (◄/►) per
spostarsi tra i canali e i tasti SALITA / DISCESA per selezionare o deselezionare il canale.
Premere il tasto STOP per creare la programmazione.
Nota: Quando il canale lampeggia lentamente, il canale non è selezionato, e
quando il canale lampeggia velocemente, il canale è stato selezionato.
Il programma è stato creato.
CANCELLAZIONE DEL PROGRAMMA
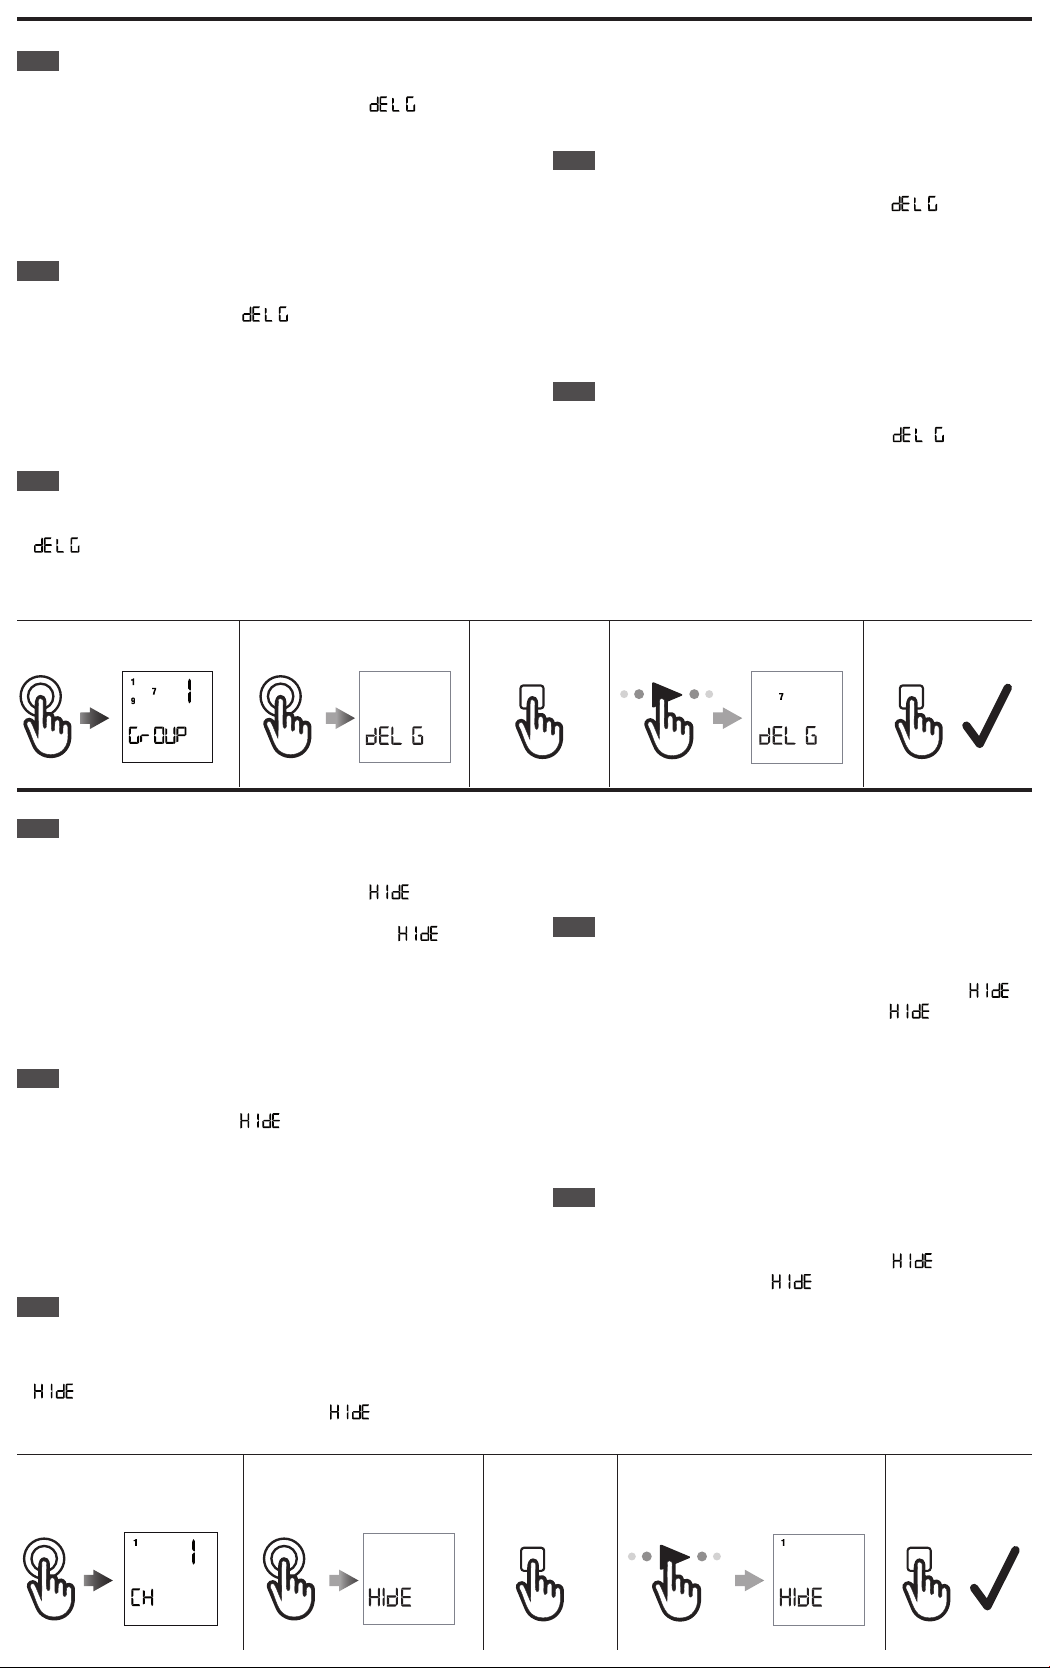
1. Dalla schermata dei canali o dei gruppi, premere e tenere premuto il pulsante circolare
fino a quando o appare sullo schermo. Premere di nuovo il pulsante
circolare tre volte fino a quando appare sullo schermo.
2. Premere il tasto STOP per entrare nel menu.
3. Selezionare il programma da cancellare e premere il tasto STOP per confermare.
Il programma è ora cancellato.
COMPRENDERE E CAMBIARE LA MODALITÀ OPERATIVA
La modalità operativa remota può essere cambiata tra la modalità Automatica [ AUT ],
modalità Casuale [ ] e modalità Manuale [ nessuna icona ].
La modalità operativa può essere cambiata premendo rapidamente e simultaneamente i
tasti freccia (◄/►). Ad ogni pressione del tasto, il trasmettitore passa da manuale ad
automatico, a casuale, a manuale, ecc. In modalità automatica e casuale, sullo schermo
apparirà l’orologio al posto delle lettere del canale o del gruppo.
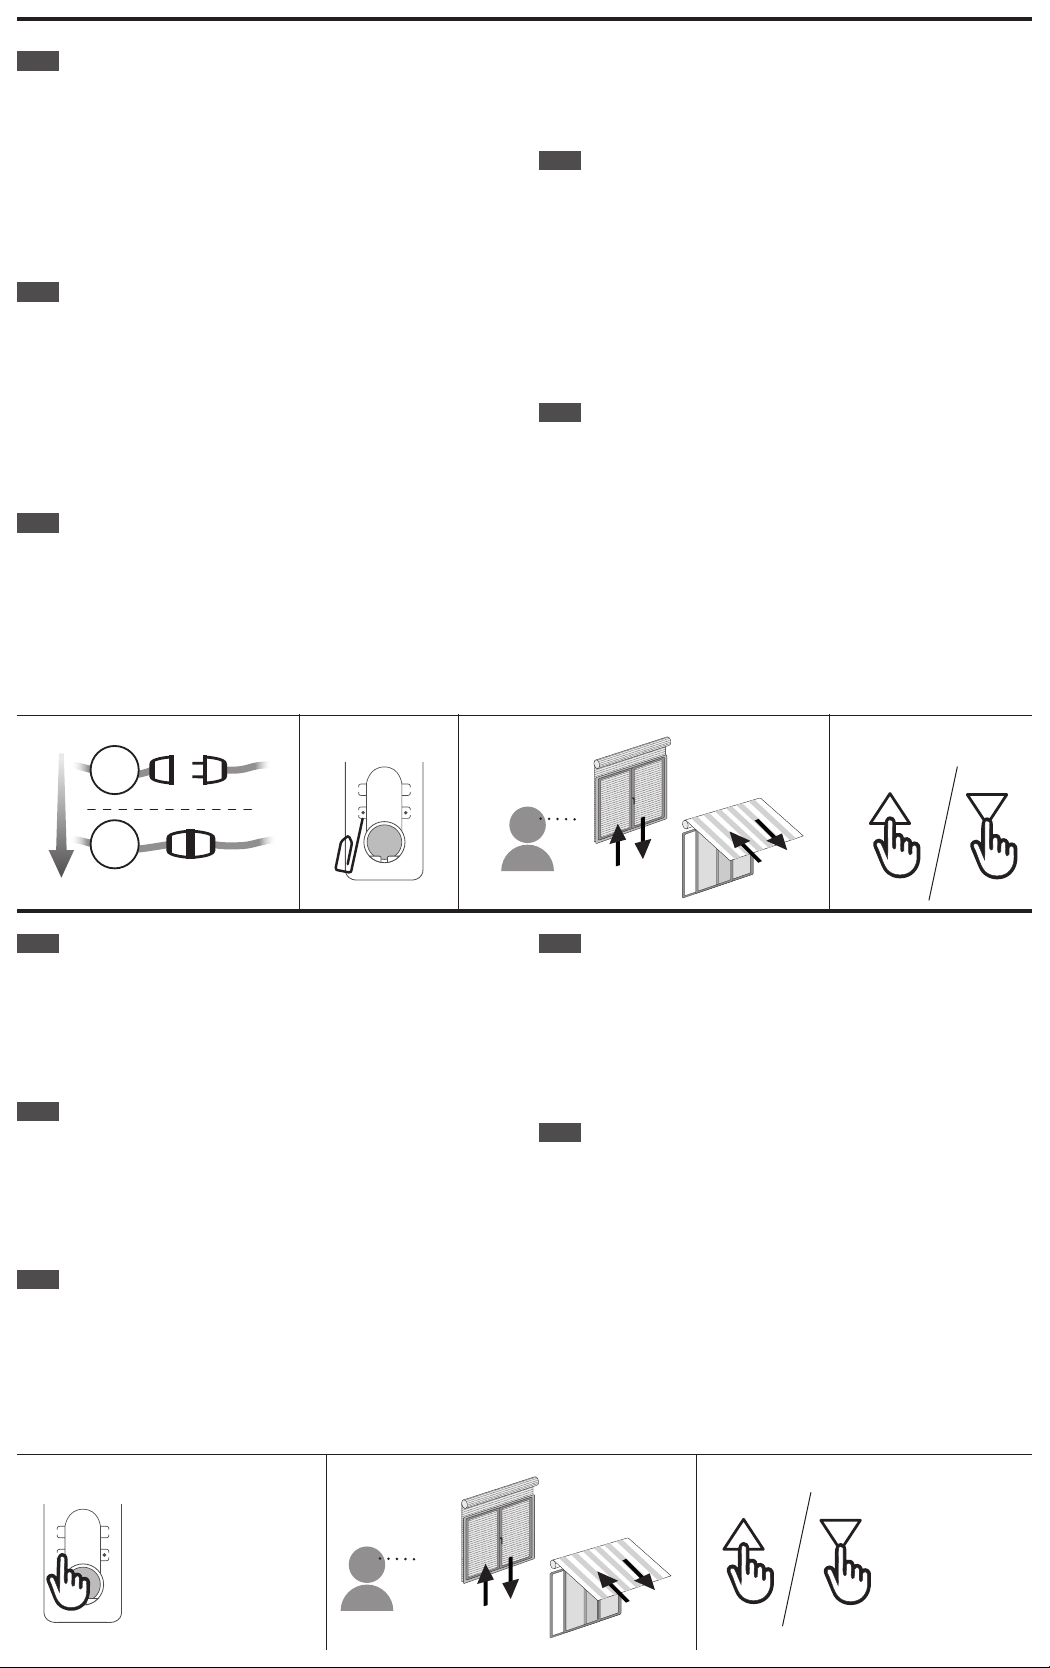
Modalità Manuale: Il trasmettitore funziona solo inviando comandi di salita e discesa ai
canali o ai gruppi premendo manualmente il pulsante sul trasmettitore.
Modalità Casuale: Il trasmettitore funzionerà con il controllo manuale e l’esecuzione
automatica delle programmazioni.
Modalità casuale: Il trasmettitore funzionerà con controllo manuale e tutti gli orari
saranno eseguiti con un ritardo da 0 a 30 minuti. Ad esempio, se il programma è impostato
per partire alle 8:00, quando è in modalità casuale il programma si spegnerà in qualsiasi
momento tra le 8:00 e le 8:30.
EN TIMER FUNCTIONS
CLOCK SET-UP (Note: The clock is in 24-hour format)
1. From the channels or groups screen, press and hold the circle button until
or appears on the screen. Press the circle button again and the timer/
clock screen will appear.
2. Press the STOP button to enter the menu.
3. Set the hour by using the UP / DOWN buttons and press the STOP button to confirm.
4. Set the minutes by using the UP / DOWN buttons and press the STOP button to
confirm.
5. Select the day of the week using the arrow buttons (◄/ ►) and press STOP
button to confirm. Clock is now set.
6. now appears on screen. By using the arrow buttons (◄+ ►) you can
scroll between and to choose between having the clock displayed or
not in stand-by mode.
Note: During operation, the clock is shown only in Automatic Mode or Random
Mode (see section: “Understanding and changing the operational mode”)
CREATING OR EDITING A SCHEDULE
1. After setting the clock, from either the channels or groups screen, press and hold
the circle button until or appears on the screen. Press the
circle button again two times until the screen is reached. Press the STOP
to enter the menu.
2. The 6 schedules can now be chosen:
3. Use the arrow buttons (◄/ ►) to select the schedule to be created or edited.
Once the schedule is selected, press the STOP button to confirm.
4. Use the arrow buttons (◄/ ►) to select the day of the week:
5. Press the UP / DOWN buttons to select or deselect one or multiple days of the
week. Once the day or days of the week have been selected, press the STOP to
confirm.
Note: When the day of the week is blinking slow, the day is not selected,
and when the day of the week is blinking fast, the day has been selected.
6. Use the UP / DOWN buttons to select the hour. Press the STOP to confirm.
7. Use the UP / DOWN buttons to select the minutes. Press the STOP to confirm.
8. Choose the command to be sent. Use the UP / DOWN buttons to select between
the UP command, DOWN command, and Intermediate Position command. Press the
STOP to confirm.
9. Choose the channels to add to the schedule. Use the arrow buttons (◄/ ►)
to move between channels, and the UP / DOWN buttons to select or deselect the
channel. Press the STOP button to create the schedule.
Note: When the channel is blinking slow, the channel is not selected, and
when the channel is blinking fast, the channel has been selected.
The schedule is now created.
SCHEDULE DELETION
1. From the channels or groups screen, press and hold the circle button until
or appears on the screen. Press the circle button again three times until
appears on screen.
2. Press the STOP button to enter the menu.
3. Select the schedule to be deleted and press the STOP button to confirm.
The schedule is now deleted.
UNDERSTANDING AND CHANGING THE OPERATIONAL MODE
The remote operational mode can be changed between Automatic Mode [ AUT ],
Random Mode [ ] and Manual mode [ no icon ].
The operational mode can be changed by quickly pressing the arrow buttons
(◄/ ►) simultaneously. With each press of the button, the transmitter will change
from manual to automatic, to random, to manual, etc. In automatic mode and random
mode, the clock will appear on the screen instead of the channel or group lettering.
Manual Mode: The transmitter works only by sending up stop and down commands to
channels or groups by manually pressing the button on the transmitter.
Automatic Mode: The transmitter will operate with manual control as well as
executing schedules automatically.
Random Mode: The transmitter will operate with manual control and all schedules
will execute with a delay from 0-30 minutes. For example, if the schedule is set to go
off at 8:00, when in random mode, the schedule will go off anywhere between 8:00
and 8:30.