GAPOSA Emitto Smart Line User manual

Battery 3V mod. CR2032
Channels 1/5
Encoding RC Gaposa
Battery life 2 years
Frequency 434,15 MHz
Radiated power 0,150 mW
Protection rate IP40
Coverage (int/ext) 65 ft / 656 ft
Working temperature 23°F / 104°F
TECHNICAL DETAILS
CAUTION: Please don’t use these transmitters in areas with risks of radio
disturbs over the norm (i.e. airports or radio repeaters). These transmitters
may also be disturbed by telecommunication and/or transceiver systems
with the same frequency.
NOTE: If the LED doesn’t blink after the button pressure, then the battery
has to be replaced.
The users manual or instruction manual for an intentional or unintentional remote control shall caution
the user that changes or modifications not expressly approved by the party responsible for compliance
could void the user’s authority to operate the equipment. In cases where the manual is provided only in
a form other than paper, such as on a computer disk or over the Internet, the information required by
this section may be included in the manual in that alternative form, provided the user can reasonably be
expected to have the capability to access information in that form.

QCTZ..W
QCTZ..HQCTZ..K
QCTZ..D (Dekora)
QCTZ..Y
Wall affixing
holes
Wall affixing
holes
Magnet
Press to remove
the push-bottons Press to remove
the push-bottons Wall affixing
holes Frame
WALL MOUNTED
VERSION
PORTABLE/WALL MOUNTED
VERSION
PORTABLE
VERSIONS
BRACKETS
WALL INSTALLATION
Attach the support to the wall with
screws (not included). Mount the
pushbutton at the support lightly
pressing until you hear a “click”.
[D version] Mount the frame at
the support lightly pressing until
you hear a “click”.
WALL INSTALLATION
Attach the magnetic wall support to
the wall with screw (not included).
Press to remove the
push-bottons
Press to remove the
push-bottons

PROGRAMMING TRANSMITTER
CAUTION: If more motors with receiver have to be installed, it is important to power up only one
motor at time during the first programming session, in order to avoid any interferences with
others.
1Power up the motor to be programmed.
OFF
ON
2Press and hold the SYNC button until
the motor starts moving.
3Check the rotation of the motor, then
release SYNC (the motor stops).
4
Within 5 seconds press the
corresponding button (i.e. UP if the
motor rotates upwards or DOWN if
vice versa). The transmitter has been
programmed and the rotation of the
motor has been synchronized.
PROGRAMMING

PROGRAMMING
ADDING TRANSMITTER
1
Press and Hold the SYNC button of a
transmitter already paired until the
motor starts moving.
2
Check the rotation of the motor, then
release the SYNC button (the motor
stops).
3
Within 5 seconds press the correspon-
ding button (i.e. UP if the motor rotates
upwards or DOWN if vice versa) on the
new transmitter being added.
The new transmitter has been
programmed and the rotation of the
motor has been synchronized.

PROGRAMMING
CHECKING/CHANGING DIRECTION
IMPORTANT: change direction must be performed before starting limit setting otherwise limits
must be reset.
Press UP or DOWN the motor should go UP or DOWN, otherwise to change direction:
1Press and hold the SYNC button until
the motor starts moving
2
Press STOP: The motor makes a brief
jog. Direction of the motor has been
reversed.

PROGRAMMING
ERASING TRANSMITTER
RESET MOTOR MEMORY
Push simultaneously the SYNC button and STOP
of the transmitter until the motor makes a brief
movement in both directions.
Only the transmitter used for this procedure has
been deleted from motor memory.
OPTION 1 - Using an already programmed transmitter
Press and hold both the SYNC and STOP buttons
until the motor makes first a brief jog and, after
a while, a second, long jog. Memory is now
empty. x2
OPTION 2 - Without an already programmed transmitter
1Switch the motor power supply OFF.
Then switch it ON. OFF
ON
ON
2
Within 8 seconds, using any Gaposa
transmitter, press and hold both the
SYNC and STOP buttons until the
motor makes a long jog.
Memory is now empty.

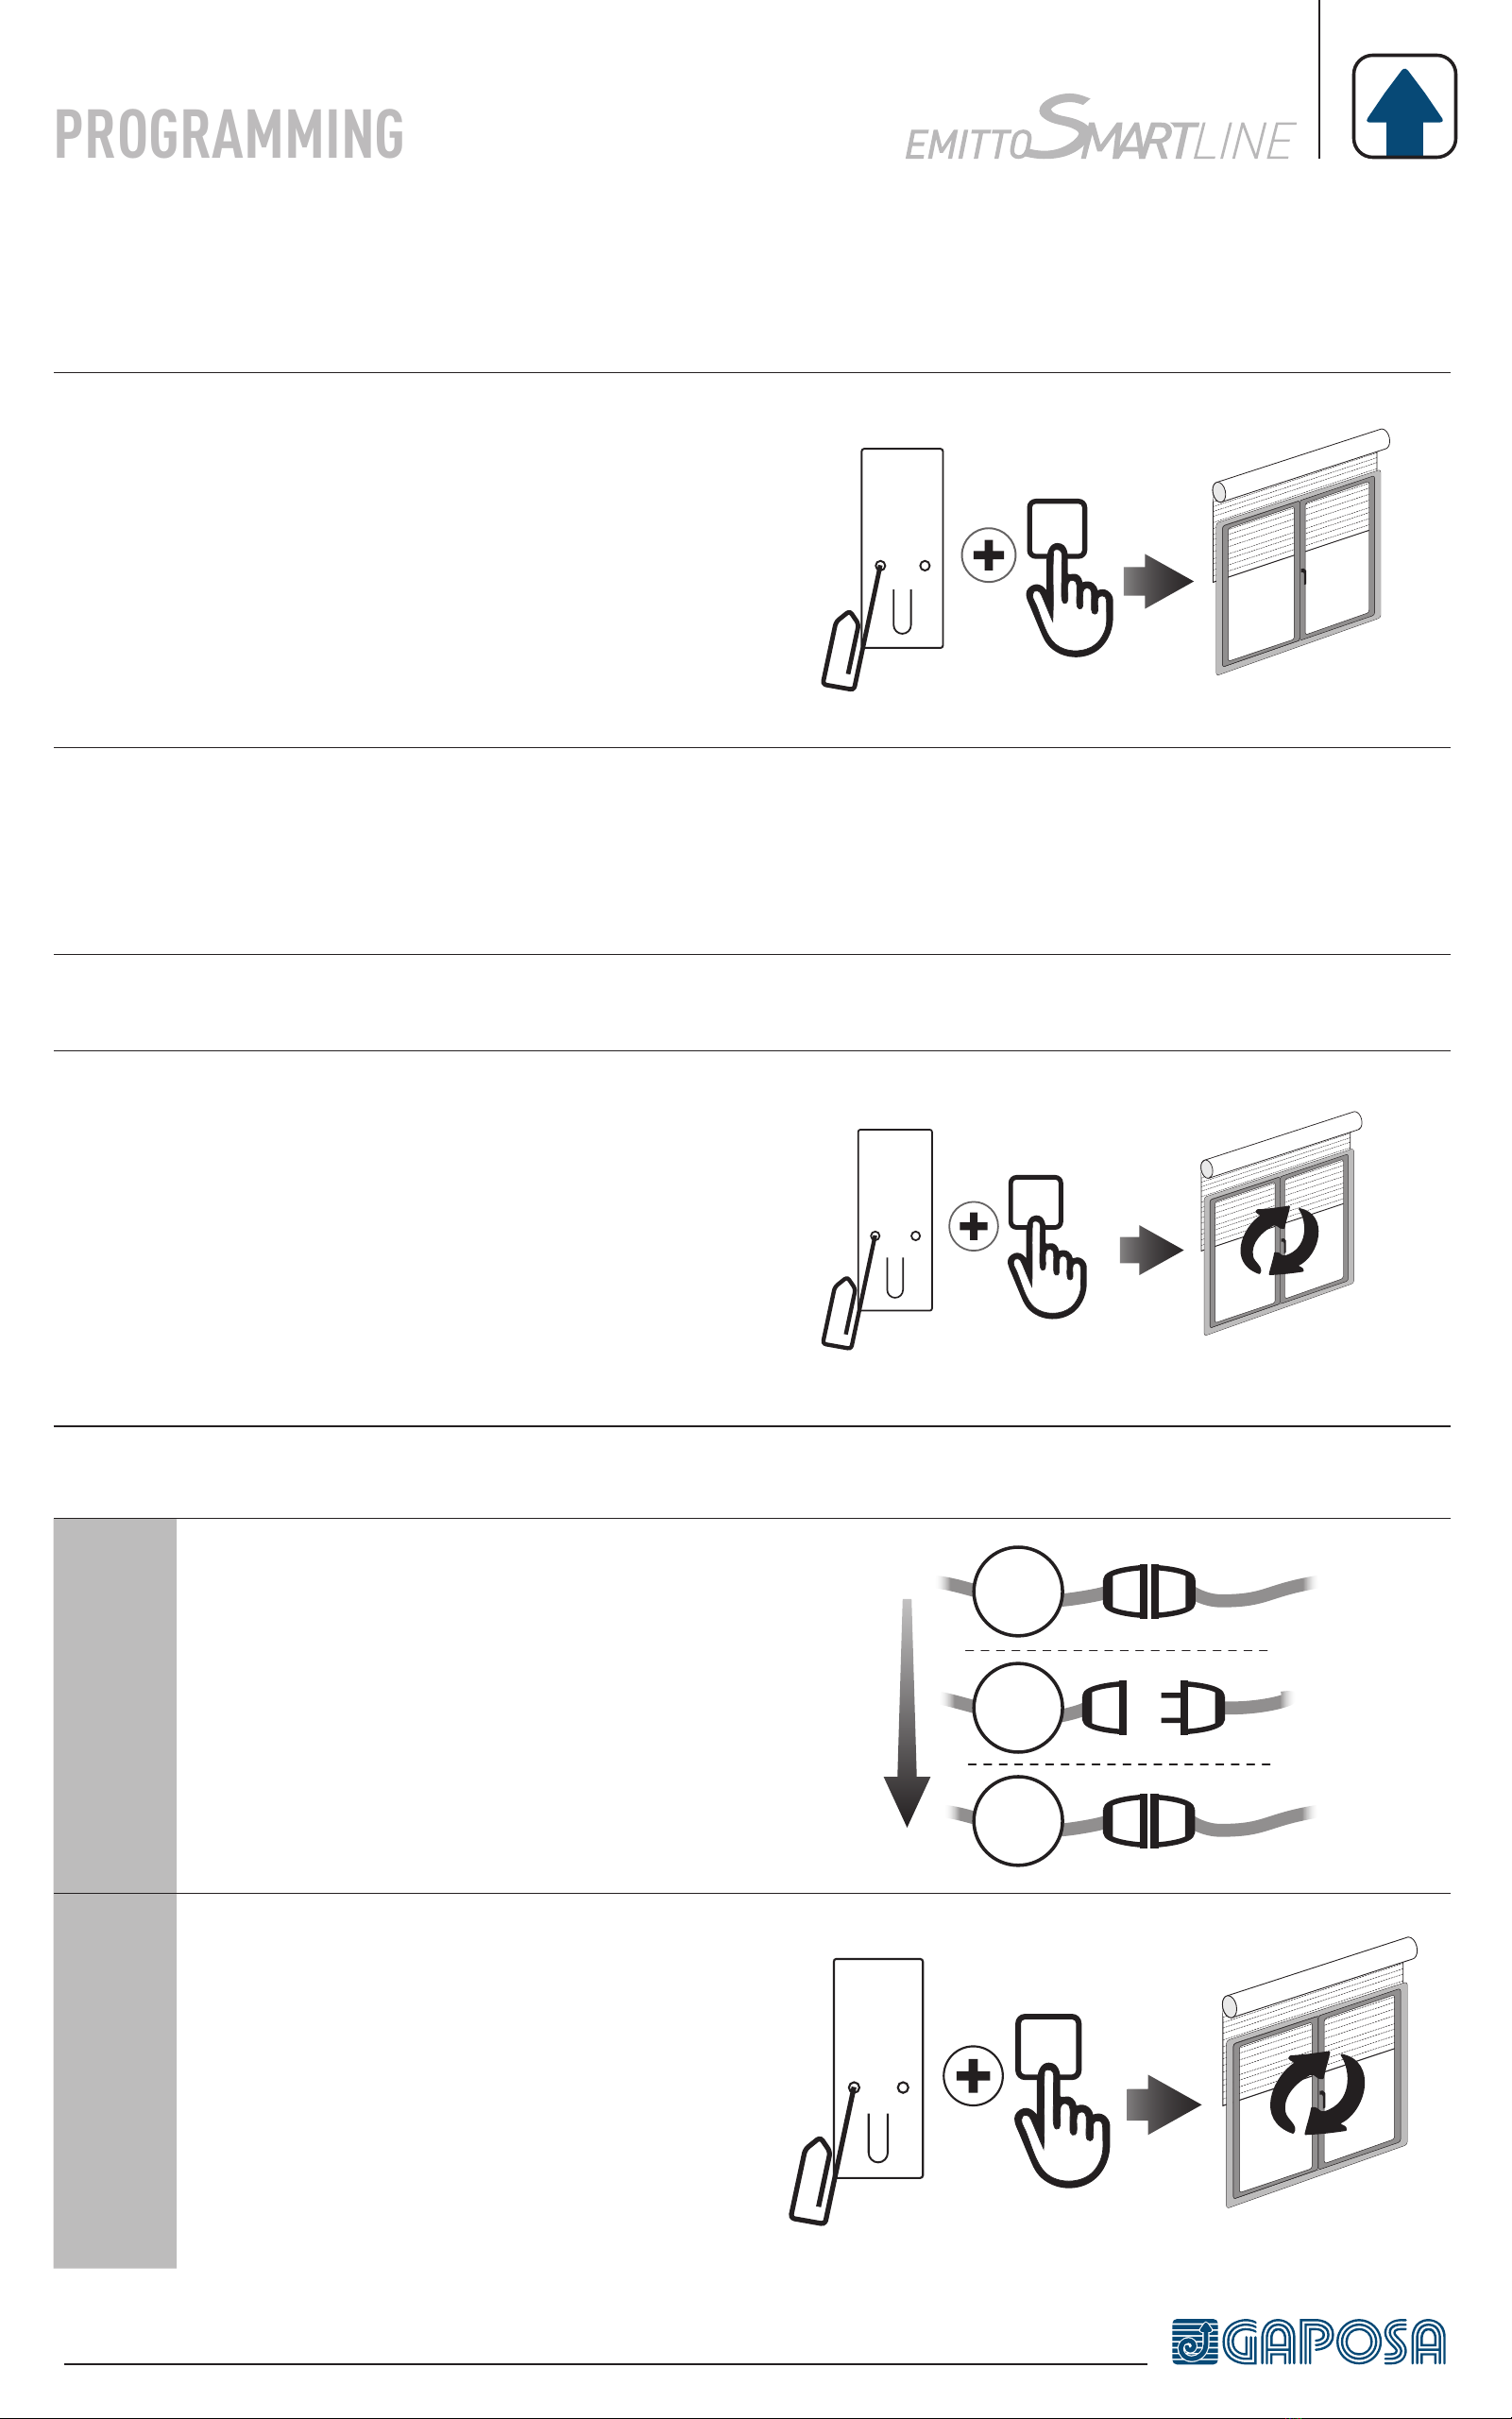
LIMIT SWITCH SETUP(Just for motors with electronic limit switch)
ATTENTION: ALWAYS SET THE UP LIMIT FIRST
1
Push the LIMIT button until the motor makes a
brief jog.
Note: during “programming mode” the
operations are in “deadman control”
2Press and hold the UP button and run the motor to
the desired UP limit position.
3Press STOP to set the UP limit position. The motor
makes a brief jog.
4Press and hold the DOWN button and run the
motor to the desired DOWN limit position.
5Press STOP to set the DOWN limit position.
The motor makes a brief jog.
Note: accurate limit setting can be performed when UPWARD or DOWNWARD by pressing the
LIMIT button a second time. The motor then moves slowly in steps towards the desired limit.
Always press STOP button to set the limit position.
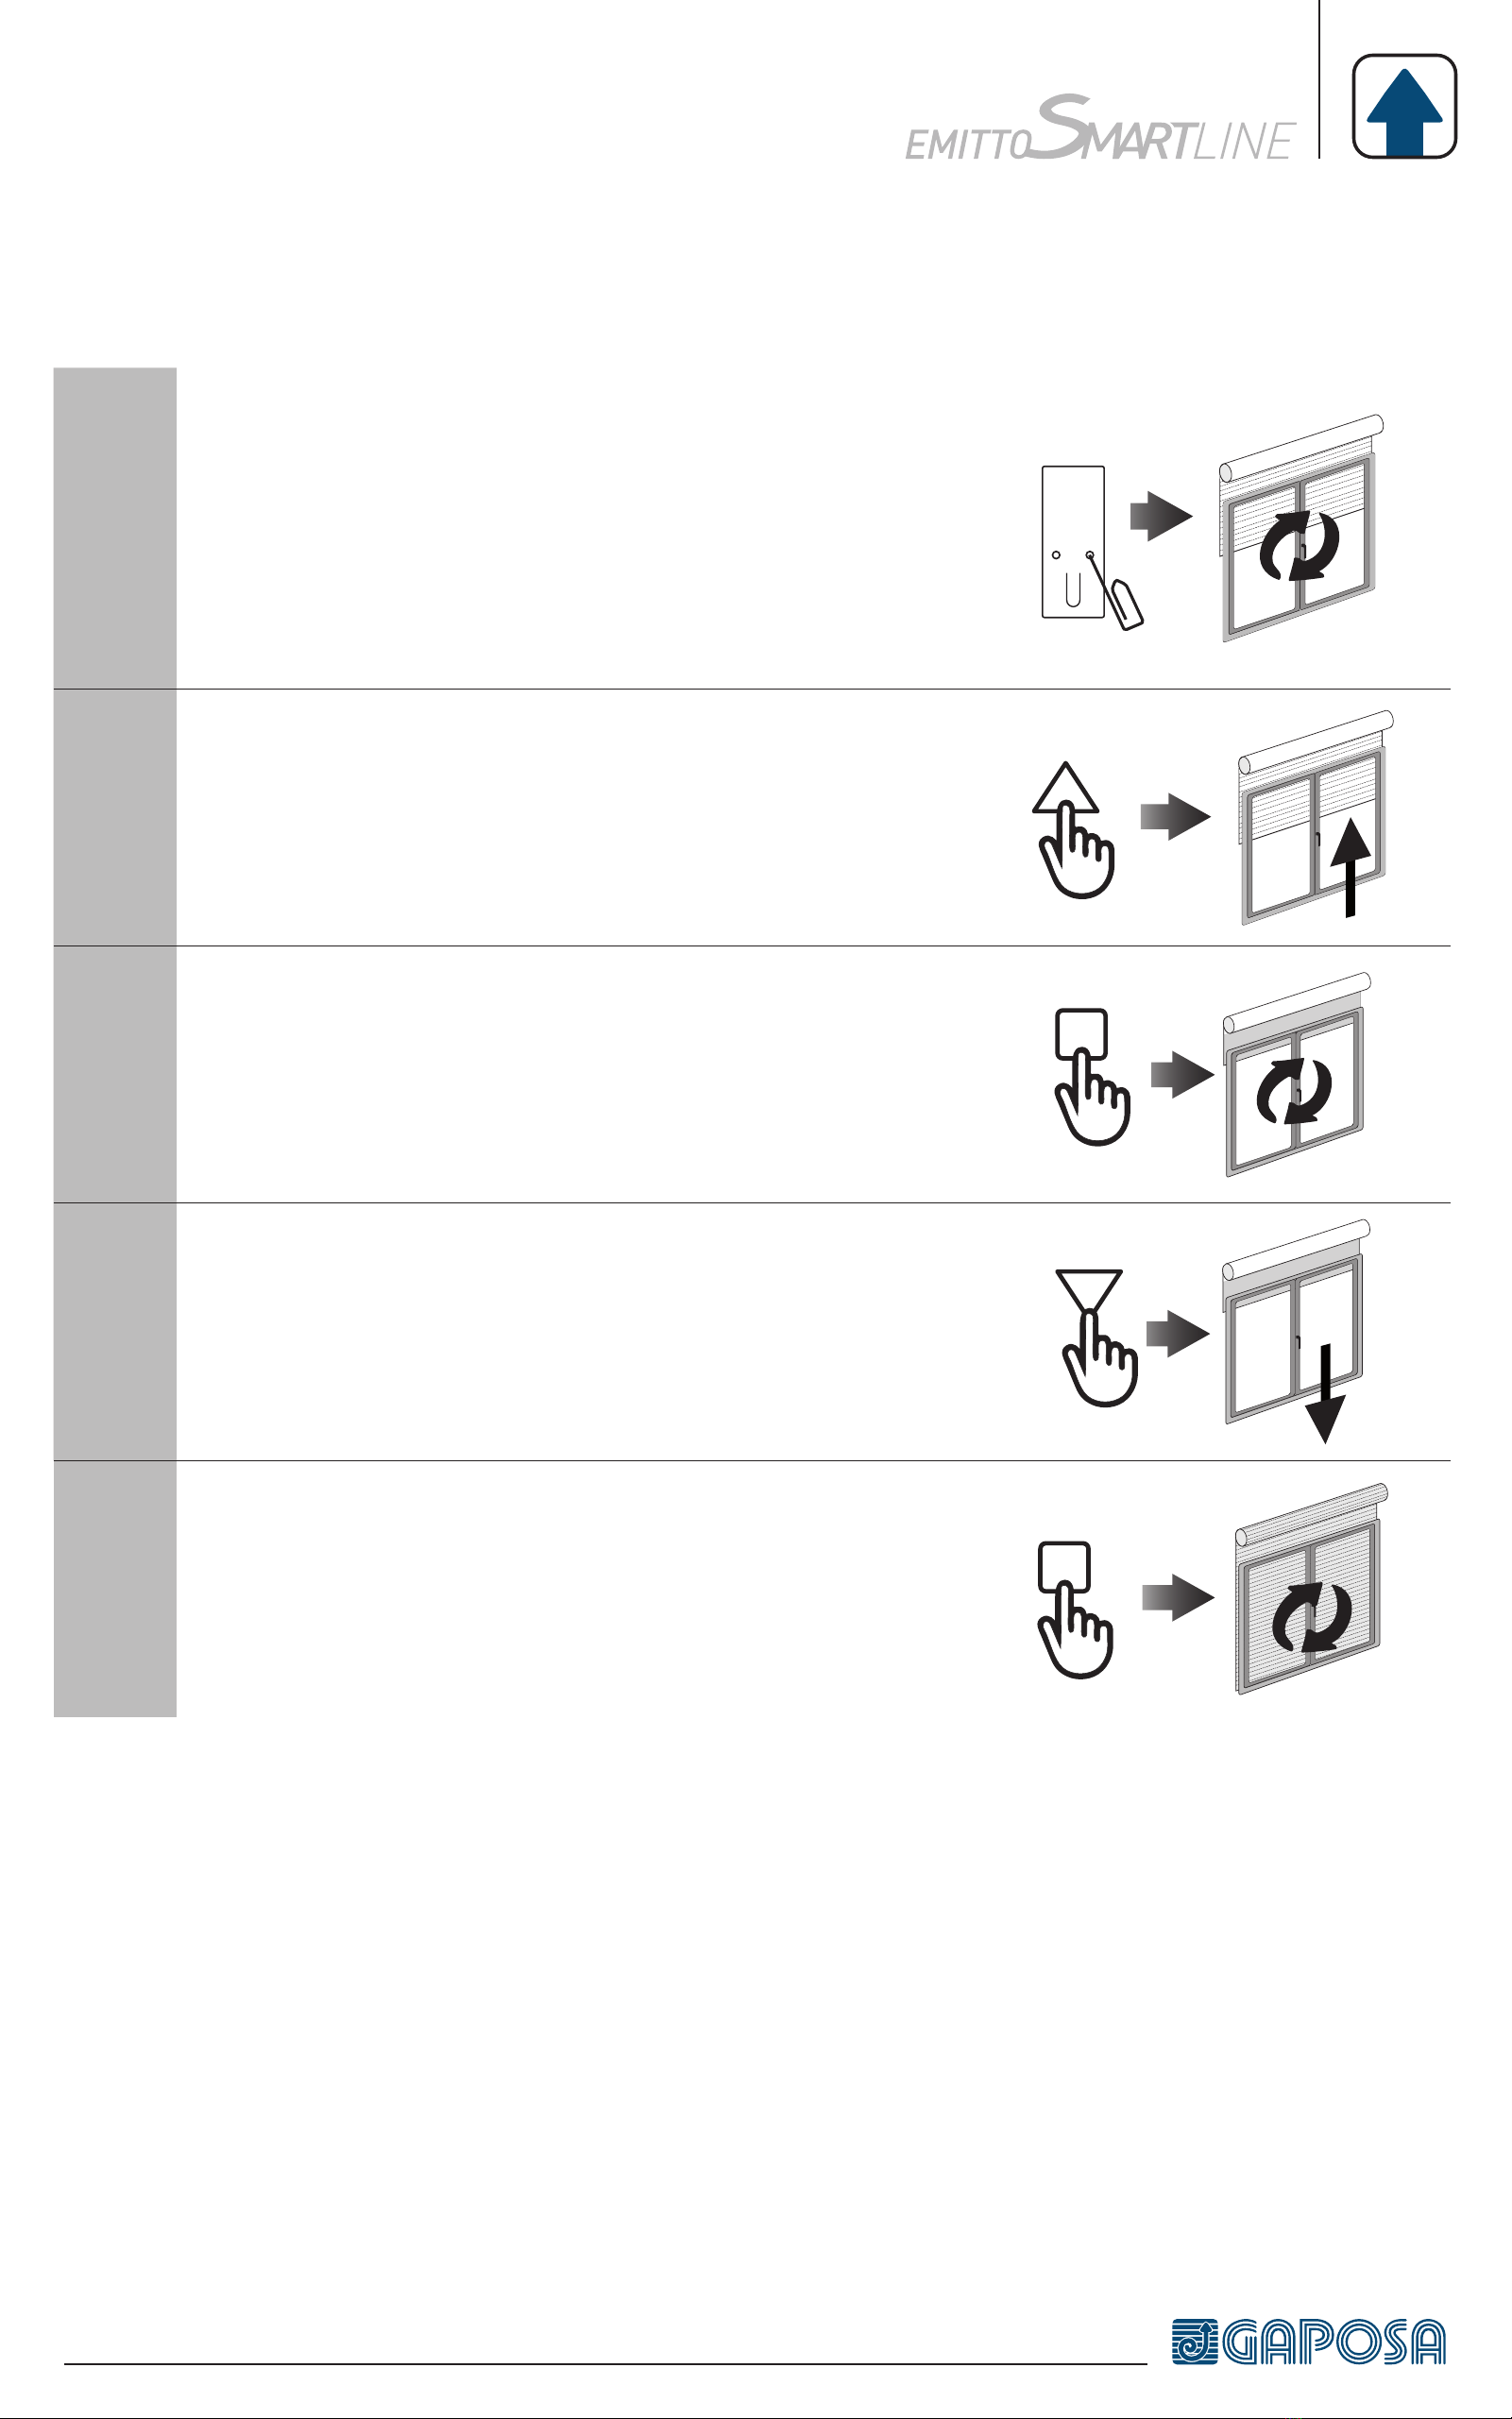
AUTOMATIC SETTING OF THE LIMITS
For limits set with torque sensor ( mechanical stop of shutters or cassette awnings/shades), press
and hold UP button until the bottom bar hits the cassette or shutter box.
A short jog will indicate that the UP position has been memorized. The same procedure can be
followed for DOWN limit but only for roller shutters.
LIMIT SWITCH

INTERMEDIATE POSITION SETUP
(Just for motors with electronic limit switch)
RECALLING THE INTERMEDIATE POSITION
ERASING THE INTERMEDIATE POSITION
Press simultaneously, both the UP and
DOWN buttons until the motor makes a brief
movement in both directions.
[QCTZ01/04] Keep the STOP button pressed
at least for at least 3 seconds.
[QCTZ02/03] Press the PRESET button. 3”
QCTZ01 QCTZ02
QCTZ04 QCTZ03
1Stop the shutter/awning in the desired
intermediate position.
2
Press simultaneously the UP and DOWN
buttons until the motor makes a brief
movement in both directions.
The intermediate position has been setup.
INTERMEDIATE
POSITION

CHANNEL MANAGEMENT [5 channel version]
The channels are selected by pressing buttons 1, 2, 3, 4, 5 and are indicated by the corresponding
LEDs. You can select multiple channels and memorize them by pressing STOP.
Once the selected channel / group has been selected, you can run the corresponding motor
drive with the UP, STOP and DOWN keys. The emitters can memorize up to 8 channel group
combinations. Storing additional groups involves the cancellation of channels already
stored starting from the earliest.
SELECTING A MEMORIZED GROUP OF CHANNELS
With all LEDs off, press the ALL button to select all channels.
Pressing the ALL key again in sequence will repeat the last 8 selected groups according to this
sequence:
All channels
1st group memorized
All channels
2nd group memorized
All channels
3rd group stored
...
...
8th group memorized
Once the selected group has been selected, you can run the corrsponding motors with the UP,
STOP, DESCENT buttons.
CHANNELS

Ver Y
A
+
B
GAPOSA Inc.
300 Schell Lane Suite 306 - Phoenixville, PA 19460 USA
www.gaposa.com
BATTERY
SUBSTITUTION
IMPORTANT: Battery contains polluting substances. After removing, throw
it in the designated batteries collection points.
1. Remove the push-bottons (or the back cover in case of Y version) then remove the exhausted
battery.
2. Insert the new battery respecting the correct polarity.
Table of contents
Other GAPOSA Transmitter manuals