Garden Igloo V2 User manual

V2
OWNER’S COMMERCIAL UTILIZATION,
WARNINGS & MAINTENANCE MANUAL

CONTACT US VIA E-MAIL AT:
Other pages:
Installation/Instruction Manual: https://gardenigloousa.com/pages/manuals
Spec-Sheet: https://gardenigloousa.com/pages/spec-sheet
Spare Parts Form: https://gardenigloousa.com/pages/spare-parts
Return Policy: https://gardenigloousa.com/pages/returns-policy
GARDENIGLOO USA LLC

Congratulations on acquiring your Gardenigloo!
We are confident that the Gardenigloo will prove to be
beneficial to you throughout the seasons.
This manual contains:
instructions, warnings, case scenarios and procedures
regarding using the Gardenigloo in a Commercial setting.
As a business owner and/or manager, please be sure to read all warnings on
PAGE 2 of the Gardenigloo Instruction Manual.
https://gardenigloousa.com/pages/manuals


CONTENTS
Chapter 1
INSTALLING and COMMERCIAL USE WARNINGS...................................................1
1.1 Awareness of Installing the Gardenigloo with Personnel, Employees or Handymen
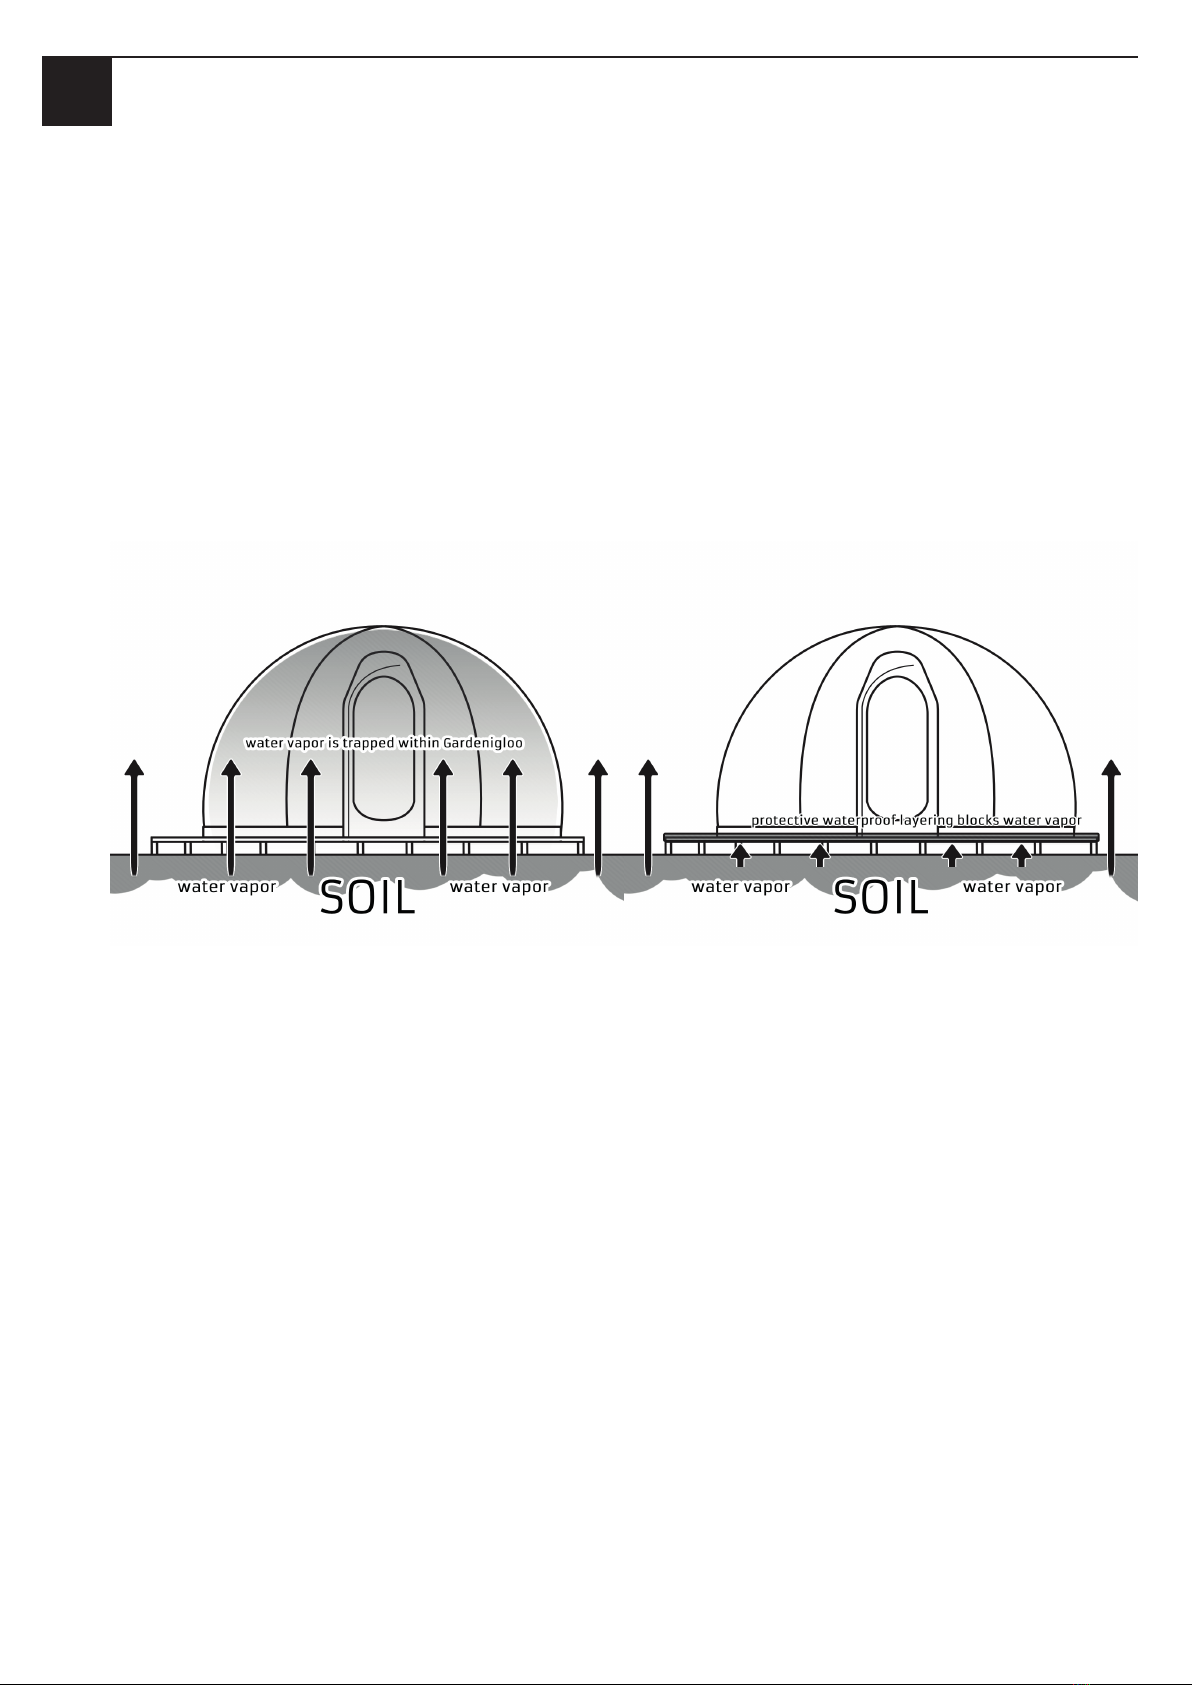
1.2 Choosing a Surface to install the Gardenigloo on
1.3 Anchorage Kit and Installing the Gardenigloo onto a Surface
1.3.1 Weight Bags and Soft Surface Installation
1.3.2 Metal Clamps and Hard Surface installation
Chapter 2
COMMERCIAL USAGE and WARNINGS...................................................................7
2.1 Permissions, State Officials, Flammability & Classification of the Gardenigloo (FOR COMMERCIAL USERS)
2.1.1 Possible Commercial usage Permissions and communication with State Officials
2.1.2 Fire Departments and Gardenigloo Fire Retardancy
2.1.3 Local Building Councils and possible regulations
2.2 Weather Monitoring and Weather precautions regarding the Gardenigloo
2.3 Customer, Wildlife and Customer Behavior
2.4 Heating in Cold temperatures
2.5 Severe Rain and Air vents
2.6 Humidity, Condensation, Interior Heat and Air vents
2.7 Dealing with Hot days with direct sunlight
2.8 Storing your Gardenigloo
2.8.1 Removing the Gardenigloo cover
2.8.2 Storing your joints and Struts separately
2.9 Notes decorations and Ornamentation
2.9.1 In regard to lighting
2.9.2 In regard to weighted attachments onto Gardenigloo structure
Chapter 3
ROUTINE MAINTENANCE CHECK-UPS and WARNINGS......................................16
3.1 Routine Joint-Strut connection Check-ups
3.2 Snowfall and Snow load
3.3 Cleaning methods
3.3.1 WARNING: Do not use the following materials!
3.3.2 Surface Cleaning
3.3.3 Disinfecting with Alcohol
3.4 Counter-Wrinkling
3.5 Patching holes/tears
3.6 Routine Zipper Maintenance
Chapter 4
APPLYING FOR WARRANTY AND SERVICES..........................................................20
4.1 Applying for warranty
4.1.1 – Warranty clarifications: On what is covered
4.1.2 – How to make a warranty inquiry
4.1.3 – What to include in visual information / photos
4.1.4 – What to include in climate data (if needed)
4.2 Applying for a Spare parts request


1. INSTALLING and COMMERCIAL USE WARNINGS
Awareness of Installing the Gardenigloo with Personnel,
Employees or Handymen
OWNER’S MAINTENANCE MANUAL -1-
Note: for installation, see the Gardenigloo Owners Instruction Manual
The Gardenigloo is made of several “Struts” and “Joint” pieces, that form the Structure of the Gardenigloo.
Via the provided Instruction manual and pieces, it would take approximately 2 hours with 2 people to form
the Gardenigloo structure.
If you or your team, handymen, or employees are tasked with installing the Gardenigloo, please first
ensure that all who will work to install the Gardenigloo:
• Has properly read the entire Gardenigloo manual.
• Has properly watched the Gardenigloo installation videos.
• That all members are aware of the following warnings regarding installation of pieces, anc
horage and weather conditions.
• That all members are focused and are indeed aware of the process during installation.
The Gardenigloo takes approximately 2 hours (more or less) to fully install. If installing for the first time,
do not rush the process. Rushing may lead to misplaced pieces, loss of pieces or breaking of pieces.
Please take your time in installing your Gardenigloo. Please view the
supplementary installation videos to assist visualizing the installation process.
https://gardenigloousa.com/pages/videos
TO AVOID POTENTIAL RUSHING-INDUCED MISTAKES,
PLEASE ALLOCATE ENOUGH AMOUNT OF TIME TO YOUR EMPLOYEES TO
INSTALL THE GARDENIGLOO.
(With two people: Minimum 2 and a half hours per Gardenigloo)
1.1

-2- OWNER’S MAINTENANCE MANUAL
The pieces provided with the Gardenigloo has a factory quality control. No broken, missing, or incorrect
pieces can be included within the Gardenigloo package. However, it is possible to acquire spare parts within
a delivery time frame of 5-7 business days from date of confirmation. Please note that if the circumstances
are outside warranty, parts are to be purchased.
See: https://gardenigloousa.com/pages/spare-parts
The packaging process of your Gardenigloo can also be re-assessed and monitored via the Serial number
provided with each Gardenigloo set, for a manufactural review.
• The pieces provided with the Gardenigloo under no normal circumstances should ever arrive broken
or easily break during installation. In most cases, improper installation or rushing or forceful insertion
of pieces is the lead cause of installation complications.
• The struts and joints must fit into each other completely.
• DO NOT PULL OUT ALL PIECES AT ONCE. Pull only the required amount and type of pieces for the
related installation step.
Double-check to ensure you have picked out the correct number and type of pieces.
Once again, double-check to ensure you have picked the correct piece and placed
it in the correct location.
Each individual strut has a letter inscribed at its end. Such as A, B, C, and the like.
STRUTS
30x 42x 64x 4x 8x 8x 2x 2x 2x 2x 1x 2x
JOINTS
2x 13x 6x 37x 2x 2x 2x

OWNER’S MAINTENANCE MANUAL -3-
• Have a center guide and mark the location of the entrance to ease the installation process.
• Ensure that you are holding the correct piece and attaching it to the correct location.
• The Gardenigloo is a symmetrical structure, one side should mirror the other.
• During installation, if a wrong piece has been attached elsewhere, in future steps of installation some
parts may eventually come too short and/or build stress on the structure, at the risk of
breaking or cracking.
• When inserting a Strut piece into a joint connector, do not force or bend the joint into a perpendicular
angle to the joint. This may risk breaking.
• Using WD-40 as lubricant may assist you to install your Gardenigloo in case you are having trouble
getting the struts/joints to connect completely.
CENTER
ENTRANCE

Choosing a Surface to install the Gardenigloo on
When installing the Gardenigloo, please consider natural elements such as water vapor, overnight
condensation, rainfall, and flooding.
• Please be cautious and do not install the Gardenigloo on a surface susceptible to flooding.
• Please install the Gardenigloo on a flat, levelled, and stable surface.
In any case you may be installing directly onto soil or a deck/platform that is above soil:
• Please be aware that soil will naturally generate water vapor.
• This water vapor may leave the soil, enter and become trapped in the Gardenigloo causing
condensation.
To avoid water from entering the Gardenigloo, place waterproof tarp beneath the platform or
indoor/outdoor carpeting directly beneath the Gardenigloo.
Blocking the entry of water vapor from underneath the Gardenigloo will assist in avoiding condensation
within the Gardenigloo.
1.2
-4- OWNER’S MAINTENANCE MANUAL

1.3.1 Weight Bags and Soft Surface Installation
To stabilize the Gardenigloo structure against wind forces, it is mandatory to install the provided
anchorage kit. We provide 14 weight bags (to be filled with sand, 30 lbs each) 28 Velcro straps.
Anchorage Kit and Installing the Gardenigloo onto a
Surface
OWNER’S MAINTENANCE MANUAL -5-
1.3
It is mandatory to install ALL 14 weight bags. Skipping this step or implementing
the weight bags poorly will jeopardize your Gardenigloo’s wind resistance.
The Gardenigloo’s wind resistance is limited at wind speed of 31 MPH.
Please remove your cover in case you expect winds exceeding this limit.
Always fill up your weight
bags with dry, fine sand.
Weight (each):
approx. 30 lbs when filled
Weight (total kit):
approx. 420 lbs when filled
Position the weight bags as shown in
the figure. Cover the base struts for even
weight distribution.
Tie each bag to the base struts at two
points with velcro straps. Weight bags
connect to the frame with velcros when in
use to prevent movement/lifting.
BASE WEIGHT BAGS
1 2 3
14 X

1.3.2 Metal Clamps and Hard Surface installation
We also provide 20 metal clamps and 40 screws to be installed on surfaces where applicable.
These clamps and the weight bags are used on the bottommost ring of the Gardenigloo Structure,
alongside the weight bags.
Installing the anchorage kit in its entirety will assist in maximizing the potential
wind resistance.
However, please be sure to always monitor the local weather conditions for
wind speeds.
-6- OWNER’S MAINTENANCE MANUAL
20x

2. COMMERICAL USAGE and WARNINGS
Permissions, State Officials, Flammability & Classification
of the Gardenigloo (FOR COMMERCIAL USERS)
OWNER’S MAINTENANCE MANUAL -7-
Note: for installation, see the Gardenigloo Owners Instruction Manual
Throughout the span of distributing the Gardenigloo to the USA and Canada from 2016 to 2020,
we have rarely seen interference from outside parties. However, Local Fire Departments and
Building Councils may take notice. Naturally, they may be concerned about the Gardenigloo.
Throughout our experiences with Owners of the Gardenigloo and local officials, we have encountered
subjects such as:
1. Fire Retardancy, Flammability
(For more information, see: 2.1.2 - Fire Departments and Gardenigloo Fire Retardancy: NFPA
701 Regulated Fire testing)
2. Snow load
(For more information, see: 2.3.3 - Snowfall and Snow load: Technicalities regarding snow load
calculation)
3. Material, dimensions, and object/ structure classification
(For more information, see: 2.1.3 - Local Building Councils and possible regulations: Material and
Classification)
4. Wind resistance
(For more information, see: 2.2.2 - Wind Resistance: Utilize the Anchorage kit against the wind!)
What is important that the user acknowledges that they utilize the Gardenigloo in a commercial
setting at their own risk: This being that the Gardenigloo can be placed in an environment where it
could be subject to third-party damages. (I.E: The Gardenigloo Cover being stabbed by a child
customers fork)
2.1
2.1.1 Possible Commercial usage Permissions and communication with
State Officials

For Fire Departments, NFPA Fire Regulations are crucial. Presenting Fire testing documentations is
critical. Therefore, we shall share with Owners of the Gardenigloo previous testing of the Gardenigloo.
(see attached documents)
We as Gardenigloo USA LLC are always willing to cooperate with any Fire Department/Local Council
to ease concerns regarding the Gardenigloo and its Fire Retardancy to the best of our ability.
NFPA 701 Regulated Fire testing
The Fire Testing conducted at SGS NY Laboratories has concluded that the Gardenigloo’s material
has passed NFPA 701 Test Method 2 (related to flammability, result: non-flammable) and ASTM 84.
(related to fire-spread, result: CLASS A or CLASS I rating.) **
For Building Councils, each State has their own restrictions and classifications. Be wary of the clas-
sification of the Gardenigloo and compare it to the regulations in your local area. What is important
to know is that Building Councils/Regulators will only approach you if they presume your utilization
of the Gardenigloo is a threat to public safety.
Height, material, purpose, and fire-exit positioning are key points to be aware of-although very rarely
problematic and enforced.
Material and Classification
The Material of the Gardenigloo is PVC and is classified as a "Tent". The PVC is used for the transparent
cover of the PVC-plastic frames forming together to form a geodesic dome. The geodesic dome is
used as a gazebo, conservatory, dining tent and greenhouse.
Related dimension/height/area information is included on the spec-sheet* of the Gardenigloo website,
outside of detailed engineering/design information. **
2.1.2 Fire Departments and Gardenigloo Fire Retardancy
2.1.3 Local Building Councils and possible regulations
NOTE: **Related Fire testing documents available upon occasion and request. Contact us via E-mail.
NOTE: *Link to spec-sheet: https://gardenigloousa.com/pages/spec-sheet
**Gardenigloo USA LLC cannot provide the engineering spec and dimensions of the
Gardenigloo. Such information is reserved by the Manufacturer.
-8- OWNER’S MAINTENANCE MANUAL

Weather Monitoring and Weather precautions regarding the
Gardenigloo
2.2
OWNER’S MAINTENANCE MANUAL -9-
As a Commercial user: Please be sure to constantly monitor the weather
conditions in your area.
Weather or related environmental damages are not
covered in the warranty.
• Please ensure that all 14 weight bags (and if applicable metal clamps and screws) are
completely installed onto the Gardenigloo as noted in the Instruction manual.
(No less than 14 weight bags)
• If local wind speeds exceed 31 MPH, please remove the cover. Otherwise, your Gardenigloo
(Cover or Structure) may be subject to damage.
• If local weather shows intense hailstorms or tornados or risk of flying blunt objects, please
remove your Gardenigloo. Objects may fly into the Gardenigloo and thus may be subject to
damage.
• If the local temperature exceeds +50 degrees Fahrenheit, the interior of the Gardenigloo
may spike up to 140 degrees Fahrenheit. Under direct sunlight, this heat may distort objects
within the Gardenigloo and damage furniture. This may also harm plant life, animals,
children, or yourself and your Gardenigloo.
• During snowfall, please be sure to regularly broom off excess snow from the top of the
Gardenigloo. The Gardenigloo’s snowload capacity is 90 lbs.

Customer, Wildlife and Customer Behavior
2.3
-10- OWNER’S MAINTENANCE MANUAL
As a Commercial user: Please be sure to monitor customer and customer
behavior within the Gardenigloo. We advise to have cameras on site.
Please be wary of customers/persons whom:
Customer or third-party related or wild-life damages
are not covered in the warranty.
• If children attempt to use the Gardenigloo as a jungle gym and end up breaking furniture or
pieces of the Gardenigloo.
• If children using (but not limited to) kitchen utensils attempt to stab at the Gardenigloo cover.
• If customers have difficulty with the Gardenigloo’s zipper door. (see 3.5)
• If customers break the zipper door of the Gardenigloo and do no notify you of the problem.
• If the customer attempts or directly/indirectly causes any damage to the Gardenigloo under
the influence of alcohol.
• If the customer’s pet or wildlife attempts or directly/indirectly causes any damage to the
Gardenigloo.
• If the Gardenigloo is placed where automobile vehicular traffic is nearby.
• If the Gardenigloo may be susceptible to damage by acts of vandalism.
In rapid temperature drops, water may enter the zipper teeth and freeze,
causing jams.
In such circumstances, careless customers may force the zipper several
times a day. This potentially risk of them eventually breaking or damaging
the zipper. In cold temperatures please ensure to check for zipper jam-
ming for each Gardenigloo and regularly use WD-40 to lubricate the
zipper to avoid any freezing/jamming related zipper damages.

OWNER’S MAINTENANCE MANUAL -11-
Heating in Cold temperatures
2.4
We as Gardenigloo USA LLC always urge Owners to use outdoor type,
electrical space heaters.
Never use*:
•Propane or gas-based heaters
•Open fire heating sources
•Charcoal or coal-based heating
NOTE: *We urge Owners of the Gardenigloo to not to use gas-based or fire-based heating sources
due to the risk of Carbon monoxide poisoning and smoke-fume poisoning they may create in
a closed environment. The Gardenigloo structure and cover is not flammable, however Carbon
monoxide poisoning is a risk that we must mention. Please use your Gardenigloo responsibly.

Severe Rain and Air vents
2.5
Humidity, Condensation, Interior Heat and Air vents
2.6
-12- OWNER’S MAINTENANCE MANUAL
In the case scenario of rain, severe rainfall, it would be a wiser to pick a location not susceptible to
potential flooding.
Throughout usage in the winter, or with the rising temperatures in spring, humidity may become an
issue. To deal with increasing humidity and/ or vapor condensation inside of the Gardenigloo: We
urge you to open your Air vents momentarily.
Furthermore, cold air in the Gardenigloo (at night) may turn condensate into water in the morning
depending on the climate & humidity of your area. We urge you to open an air vent very slightly if
this happens consistently. Please watch for wild animals, or curious individuals who would attempt to
always force entry from the air vents.
In any instance of condensation, we urge you to use a Microfiber towelette to wipe off any accumulated
water droplets on the Gardenigloo cover. Please be sure to mop the surface where the Gardenigloo is
installed or dry it to get rid of any water.
If constant condensation is an issue, worst case scenario, we would recommend a dehumidifier.
However, please be aware that the Gardenigloo is not designed to
deal with flooding from underneath.
It would be advised to anticipate cases of water puddles building up, and to
install the Gardenigloo to a relatively higher ground level.
Depending on how and where the Gardenigloo is installed, elements such
as grass, plants, human breath, water droplets from clothes and the soles of
boots, puddles/mud seeping underneath into the Gardenigloo -- shall cause
condensation in the Gardenigloo.
In short, any introduction of water or water vapor inside the
Gardenigloo may naturally cause condensation.

Dealing with Hot days with direct sunlight
2.7
The transparent cover is not designed for outdoor use throughout the year. It can withstand tempera-
tures between –4°F (outer temperature.) and +140°F (inner temperature.) and sunlight up to level 5
in the UV index.
On sunny spring/summer days with an outdoor temperature of over +50°F: The temperature inside
the Gardenigloo can quickly rise up to +140°F and above. This can damage you, other users,
your animals, the various furniture, and plants, as well as your Gardenigloo.
By protecting the cover from strong UV rays in this way, the service life-of-expectancy of the cover will
also be prolonged.
FURTHER INSTRUCTIONS:
• Monitor the outdoor temperature if it is above +50°F.
• Open the vents for the air to circulate and exit. At indoor temperatures of +140°F and over,
you should remove the transparent cover.
• As an alternative: Relocating your Gardenigloo to a more shaded area or blocking direct sun
light to the Gardenigloo is also helpful. However, please be sure to monitor the outdoor heat.
This alternative is not a definite solution.
OWNER’S MAINTENANCE MANUAL -13-

To remove your Gardenigloo cover, follow the installation steps on page 23-24 of the
“Gardenigloo’s Owners Instruction Manual” in reverse. Once completed and folded accordingly,
keep your cover in a safe waterproof room with consistent room temperature.
Please avoid storage of the PVC cover in direct sunlight, high temperatures and/ or high humidity.
Our recommendation for storage conditions is between 10-30 degrees Celsius (50-86 degrees
Fahrenheit) and less than 50% humidity.
2.8.1 Removing the Gardenigloo cover
The Gardenigloo comes with several struts and joint pieces. All struts have a letter inscribed to their
ends, such as A, B, C, and the like.
To make things easier for future installation, we urge you to group these pieces separately. Such as
grouping all “A Struts” with a rubber band, and placing all “Joint #4” s in a separate bag.
2.8.2 Storing your joints and Struts separately
Storing your Gardenigloo
2.8
STRUTS
30x 42x 64x 4x 8x 8x 2x 2x 2x 2x 1x 2x
JOINTS
2x 13x 6x 37x 2x 2x 2x
-14- OWNER’S MAINTENANCE MANUAL
Table of contents
Other Garden Igloo Lawn And Garden Equipment manuals