How the Solar Cattail Light Works
The Solar Cattail Light includes
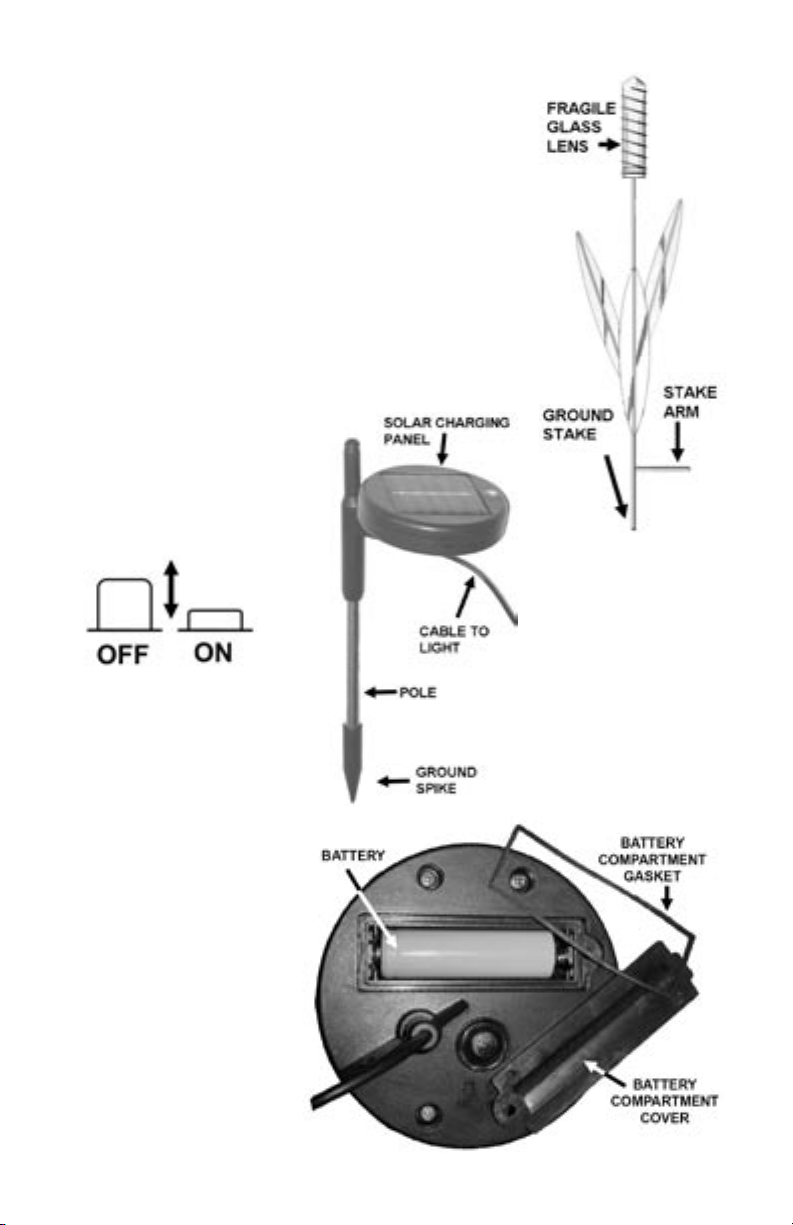
a Cattail Light and Solar Charging
Panel with an attached ground
stake. During the day, the Solar
Charging Panel converts sunlight
into electricity and recharges the
Cattail Light’s battery. At night,
the stored electricity automatically
powers the Light Emitting Diode
(LED) inside the Light.
The number of hours the LED
is illuminated depends upon
your geographical location,
weather conditions and seasonal
lighting availability. The more
sunlight received during the day,
the longer the light will operate
that night. The solar light will
use all available energy from the
battery each night. Under
normal conditions, if the Solar
Charging Panel is charged in
full sunlight for 6-8 hours a
day the Solar Cattail Light
should illuminate for up to 6
hours at night. Keep in mind
that cloudy or shady conditions
may affect charging effective-
ness; therefore, the unit will
not be fully charged for maxi-
mum operation under such
conditions.
The battery included with your
Solar Charging Panel is a recharge-
able AA Nickel Metal Hydride
(Ni-Mh) battery and will need to
be replaced when the charging
ability is decreased. The battery
should be replaced approximately
every two years.
Handling Precautions
• Handle the Solar Cattail Light
with caution (especially all glass
parts) to avoid breakage.
• The LED has an estimated life
of 50,000 hours and should never
be tampered with.
•Ensure that you do not scratch
the surface of the Solar Charging
Panel and ensure the top of the
charging unit is free of dirt or any
matter that may impair passage of
light to the solar cell.
Choosing a Location for the
Solar Charging Panel
Choose an outdoor location
within 10 feet of the Solar
Cattail Light which receives at
least 6-8 hours of direct sunlight
each day. Placing the Solar
Charging Panel in a shaded loca-
tion will not allow the battery to
charge fully and will reduce the
hours of nighttime illumination.
The selected location for your
Solar Charging Panel should not
be near nighttime light sources
such as street or porch lighting as
these may cause the Cattail Light
to turn off automatically.
Choosing a Location
for the Solar Cattail Light
Although the Solar Charging
Panel must be placed in a location
that receives at least 6-8 hours of
direct sunlight each day, the Solar
Lights can be positioned in shaded
areas of your garden.
Solar Cattail Light
PHONE ORDERS: 1-800-427-3363 CUSTOMER SERVICE: 1-800-876-5520
#36-513
5. Remove the old battery and
replace it with a new rechargeable
600 mA/Hr Ni-Mh AA battery. You
may replace the used battery with
a higher capacity battery such as a
900 mA/Hr battery but not a lower
capacity battery.
6. Ensure that the + and -
terminals of the battery have been
inserted correctly as indicated.
7. Replace the cover, ensur-
ing the switch is aligned with the
switch opening in the cover.
8. Insert the four (4) screws
removed in step 3 and tighten.
9. Gently push the assembled
Solar Charging Panel back into the
ground.
10. Repeat steps in the “Before
First Time Use of the Solar Cattail
Light” section to ensure the new
battery is fully charged.
Note: Properly dispose of the used
battery. Do not dispose by general
household refuse. Consult your local
municipality for correct disposal or
recycling of rechargeable batteries.
Cleaning and Care Instructions
For best results, wipe the surface
of the Solar Cattail Light with a
damp sponge or rag and a mild
detergent to remove any dirt.
Store the Cattail light indoors
during freezing weather or when
not in use.