Garmin Descent MK1 Instruction manual

DESCENT™ MK1

Quick Start Manual 4
Manuel de démarrage rapide 17
Manuale di avvio rapido 34
Schnellstartanleitung 50
Guía de inicio rápido 68
Manual de início rápido 84

© 2017 Garmin Ltd. or its subsidiaries
Garmin®, the Garmin logo, and ANT+® are trademarks of Garmin
Ltd. or its subsidiaries, registered in the USA and other countries.
Descent™, Garmin Connect™, and QuickFit™ are trademarks of
Garmin Ltd. or its subsidiaries. These trademarks may not be used
without the express permission of Garmin.
The Bluetooth® word mark and logos are owned by the Bluetooth
SIG, Inc. and any use of such marks by Garmin is under license.
Advanced heartbeat analytics by Firstbeat. Wi‑Fi® is a registered
mark of Wi-Fi Alliance Corporation. Other trademarks and trade
names are those of their respective owners.
El número de registro COFETEL/IFETEL puede ser revisado en el
manual a través de la siguiente página de internet.
DESCENT™ MK1
Quick Start Manual
Device Overview
WARNING
See the Important Safety and
Product Information guide in
the product box for product
warnings and other important
information.
À
LIGHT
Select to turn the
backlight on and
off.
Hold to view the
controls menu.
Hold to turn the
device on.
NOTE: While
diving, hold
functions are
disabled.
4 Quick Start Manual

ÁSelect to view the
activity list and start
or stop an activity.
Select to choose an
option in a menu.
Select for the dive
compass,
stopwatch, or gas
switching during a
dive.
Â
BACK
Select to return to
the previous
screen.
Select to record a
lap, rest, or
transition during a
multisport activity.
NOTE: While
diving, key presses
are disabled.
Quick Start Manual 5

Ã
DOWN
Select to scroll
through the widget
loop and menus.
Select to scroll
through the data
screens during a
dive.
Hold to view the
watch face from
any screen.
Ä
UP
Select to scroll
through the widget
loop and menus.
Hold to view the
menu.
NOTE: While
diving, key presses
are disabled.
ÅDouble tap the
device to scroll
through the data
screens during a
dive.
Pairing Your
Smartphone with Your
Device
To use the connected
features of the Descent™
device, it must be paired
directly through the Garmin
Connect™ Mobile app, instead
of from the Bluetooth®
settings on your smartphone.
1From the app store on
your smartphone, install
6 Quick Start Manual
and open the Garmin
Connect Mobile app.
2Bring your smartphone
within 10 m (33 ft.) of
your device.
3Hold LIGHT to turn on
the device.
The first time you turn on
the device, it is in pairing
mode.
4Follow the instructions in
the app to complete the
pairing and setup
process.
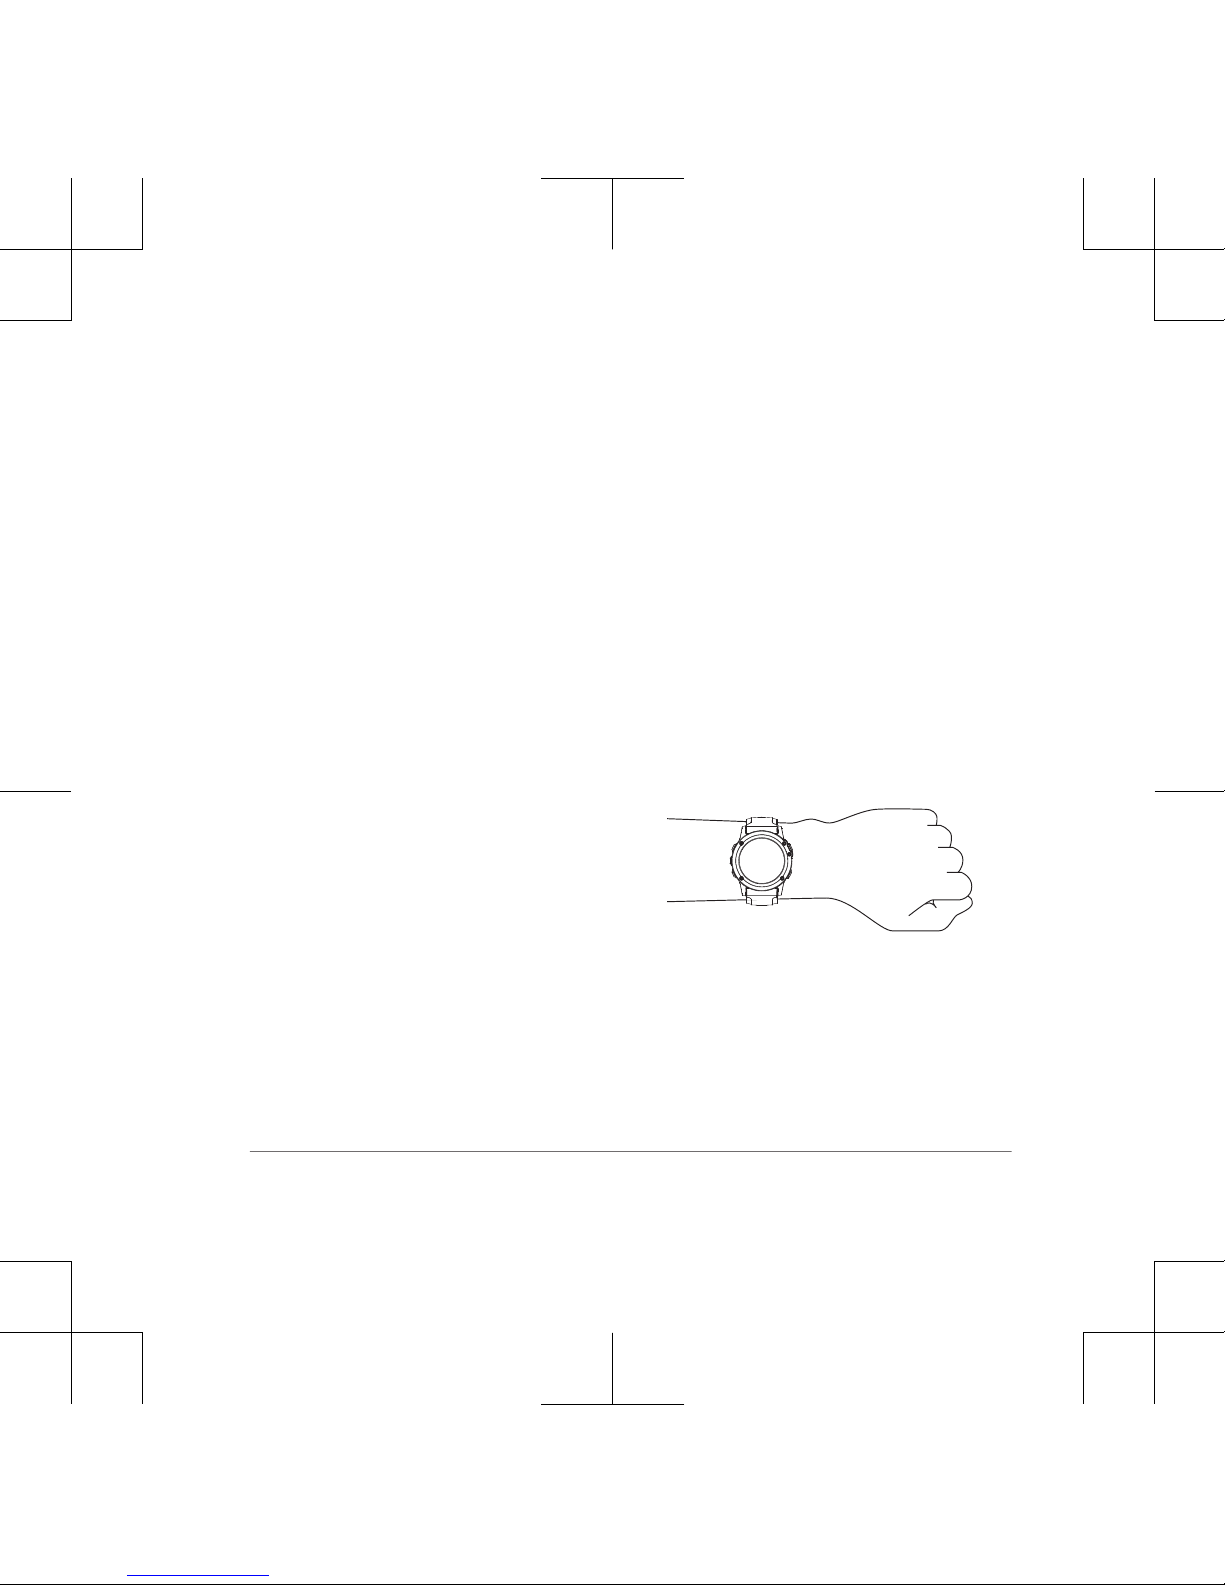
Wearing the Device and
Heart Rate
• Wear the Descent Mk1
device above your wrist
bone.
NOTE: The device
should be snug but
comfortable, and it should
not move while running or
exercising.
NOTE: While diving, the
device should stay in
contact with your skin,
and it should not bump
Quick Start Manual 7

into other wrist-worn
devices.
NOTE: The heart rate
sensor is located on the
back of the device.
• See the owner's manual
for more information
about wrist-based heart
rate.
Diving
Dive Warnings
WARNING
• The diving features of this
device are for use by
certified divers only. This
device should not be
used as a sole dive
computer. Failure to input
the appropriate dive-
related information into
the device can lead to
serious personal injury or
death.
• Make sure that you fully
understand the use,
displays, and limitations
of your device. If you
have questions about this
manual or the device,
always resolve any
discrepancies or
confusion before diving
with the device. Always
remember that you are
responsible for your own
safety.
8 Quick Start Manual

• There is always a risk of
decompression sickness
(DCS) for any dive profile
even if you follow the dive
plan provided by the dive
tables or a diving device.
No procedure, diving
device, or dive table will
eliminate the possibility of
DCS or oxygen toxicity.
An individual's
physiological make up
can vary from day to day.
This device cannot
account for these
variations. You are
strongly advised to
remain well within the
limits provided by this
device to minimize the
risk of DCS. You should
consult a physician
regarding your fitness
before diving.
• Do not dive with a gas if
you have not personally
verified its contents and
input the analyzed value
to the device. Failure to
verify tank contents and
input the appropriate gas
values to the device will
result in incorrect dive
planning information and
could result in serious
injury or death.
• Diving with more than
one gas mixture presents
Quick Start Manual 9

a much greater risk than
diving with a single gas
mixture. Mistakes related
to the use of multiple gas
mixtures may lead to
serious injury or death.
• Always ensure a safe
ascent. A rapid ascent
increases the risk of
DCS.
• Disabling the deco
lockout feature on the
device can result in an
increased risk of DCS,
which can result in
personal injury or death.
Disable this feature at
your own risk.
•Violating a required
decompression stop may
result in serious injury or
death. Never ascend
above the displayed
decompression stop
depth.
• Always perform a safety
stop between 3 and 5
meters for 3 minutes,
even if no decompression
stop is required.
Dive Modes
The Descent Mk1 device
supports five dive modes.
Each dive mode has four
phases: dive pre-check,
10 Quick Start Manual

surface display, in-dive, and
post-dive.
Single-Gas: Allows you to
dive with a single gas
blend.
Multi-Gas: Allows you to
configure multiple gas
blends and switch gases
during your dive. This
mode supports one
bottom gas, and up to
five additional gases for
decompression or
backup.
NOTE: Backup gases are
not used in no-
decompression limit
(NDL) and time to surface
(TTS) decompression
calculations until you
activate them during a
dive.
Gauge: Allows you to dive
with basic bottom timer
features.
NOTE: After diving in
gauge mode, the device
can only be used in
gauge or apnea mode for
24 hours.
Apnea: Allows you to free
dive with apnea-specific
dive data. This mode has
a higher data refresh
rate.
Apnea Hunt: Similar to the
Apnea dive mode, but
Quick Start Manual 11

tuned specifically for
spearfishers. Start and
stop tones are disabled.
Dive Setup
You can customize the dive
settings based on your
needs. Not all settings are
applicable for all dive modes.
You can also edit the settings
before you start a dive.
Hold UP, and select Dive
Setup.
See the owner's manual for
more information.
Starting a Dive
1From the watch face,
select .
2Select a dive mode
(page 10).
3If necessary, select
DOWN to edit the dive
settings, such as the
gases, water type, and
alerts.
4Select .
5Descend to start your
dive.
The activity timer starts
automatically when you
reach a depth of 1.2 m (4
ft.).
6Select DOWN to scroll
through the data screens
and dive compass.
12 Quick Start Manual

When you return to the
surface, the device
automatically ends and saves
the dive.
Navigating with the Dive
Compass
1During a dive, scroll to
the dive compass.
The compass indicates
your directional heading
À.
2Select to set the
heading.
The compass indicates
deviations Á from the
set heading Â.
3Select for more
options.
Viewing the Surface
Interval Widget
The widget displays your
surface interval time, tissue
load, and central nervous
system (CNS) oxygen toxicity
percentage.
1From the watch face,
select UP.
2Select to view tissue
details and oxygen
tolerance units (OTU).
Quick Start Manual 13

Viewing the Dive Log
Widget
The widget displays a brief
summary of your last
recorded dive.
1From the surface interval
widget, select UP.
2Select to view more
information about a dive.
3Select a dive.
4Select an option.
Device Information
Changing the QuickFit™
Bands
Extra Long Diving Band
Your device comes with an
extra long band you can wear
over a thick exposure suit.
14 Quick Start Manual

Metal Watch Band
Adjustment
If your watch includes a metal
watch band, you should take
your watch to a jeweler or
other professional to adjust
the length of the metal band.
Charging the Device
NOTICE
To prevent corrosion,
thoroughly clean and dry the
contacts and the surrounding
area before charging or
connecting to a computer.
Refer to the cleaning
instructions in the owner's
manual.
The device is powered by a
built-in lithium-ion battery that
you can charge using a
standard wall outlet or a USB
port on your computer.
1Plug the USB end of the
cable into an AC adapter
or a computer USB port.
2If necessary, plug the AC
adapter into a standard
wall outlet.
3Pinch the sides of the
charging cradle À to
open the arms on the
cradle.
Quick Start Manual 15

4With the contacts aligned,
place the device into the
cradle Á and release the
arms to hold the device in
place.
When you connect the
device to a power source,
the device turns on, and
the battery charge level
appears on the screen.
5Charge the device
completely.
Specifications
Operating temperature
range: From -20º to 50ºC
(from -4º to 122ºF)
Under water operating
temperature range:
From 0º to 40ºC (from
32º to 104ºF)
Charging temperature
range: From 0º to 45ºC
(from 32º to 113ºF)
Wireless frequencies/
protocols: ANT+® 2.4
GHz @ -1 dBm nominal,
Bluetooth 2.4 GHz @ 0
16 Quick Start Manual

dBm nominal, Wi‑Fi® 2.4
GHz @ 12 dBm nominal
Troubleshooting
Resetting Your Device
1Hold LIGHT for at least
25 seconds.
2Hold LIGHT for one
second to turn on the
device.
Getting the Owner's
Manual
The owner's manual includes
instructions for using device
features and accessing
regulatory information.
Go to garmin.com
/manuals/DescentMk1.
DESCENT™ MK1
Manuel de
démarrage rapide
Présentation de
l'appareil
AVERTISSEMENT
Consultez le guide
Informations importantes sur
le produit et la sécurité inclus
dans l'emballage du produit
pour prendre connaissance
des avertissements et autres
informations sur le produit.
Manuel de démarrage rapide 17
À
LIGHT
Appuyez sur ce
bouton pour activer
et désactiver le
rétroéclairage.
Maintenez ce
bouton enfoncé
pour afficher le
menu des
commandes.
Maintenez ce
bouton enfoncé
pour allumer
l'appareil.
REMARQUE :
pendant la plongée,
les fonctions de
maintien sont
désactivées.
18 Manuel de démarrage rapide

ÁAppuyez sur ce
bouton pour
afficher la liste des
activités et
démarrer ou arrêter
une activité.
Appuyez sur ce
bouton pour choisir
une option dans le
menu.
Sélectionnez le
compas de
plongée, le
chronomètre ou le
changement de gaz
pendant une
plongée.
Â
BACK
Appuyez sur ce
bouton pour revenir
à l'écran précédent.
Appuyez sur ce
bouton pour
enregistrer un
circuit, une période
de repos ou une
transition au cours
d'une activité
multisport.
REMARQUE : lors
d'une plongée, les
appuis sur les
boutons sont
désactivés.
Manuel de démarrage rapide 19

Ã
DOWN
Appuyez sur ce
bouton pour faire
défiler les pages de
widgets et les
menus.
Appuyez sur ce
bouton pour faire
défiler les écrans
de données lors
d'une plongée.
Maintenez ce
bouton enfoncé
pour afficher le
cadran de montre à
partir de n'importe
quel écran.
Ä
UP
Appuyez sur ce
bouton pour faire
défiler les pages de
widgets et les
menus.
Maintenez ce
bouton enfoncé
pour afficher le
menu.
REMARQUE : lors
d'une plongée, les
appuis sur les
boutons sont
désactivés.
20 Manuel de démarrage rapide
Other manuals for Descent MK1
1
Table of contents
Languages:
Other Garmin Diving Instrument manuals


