Garmin DESCENT 12 User manual

DESCENT™T2
Owner’s Manual

© 2023 Garmin Ltd. or its subsidiaries
All rights reserved. Under the copyright laws, this manual may not be copied, in whole or in part, without the written consent of Garmin. Garmin reserves the right to change
or improve its products and to make changes in the content of this manual without obligation to notify any person or organization of such changes or improvements. Go to
www.garmin.com for current updates and supplemental information concerning the use of this product.
Garmin®, the Garmin logo, and ANT® are trademarks of Garmin Ltd. or its subsidiaries, registered in the USA and other countries. Descent™, Garmin Dive™, Garmin Express™, and
SubWave™ are trademarks of Garmin Ltd. or its subsidiaries. These trademarks may not be used without the express permission of Garmin.
The BLUETOOTH® word mark and logos are owned by the Bluetooth SIG, Inc. and any use of such marks by Garmin is under license. Other trademarks and trade names are those of
their respective owners.
M/N: A04770

Table of Contents
Introduction......................................1
Installation and Setup....................... 1
Transceiver Position Tips....................... 1
Installing the Transceiver on Your Tank
Regulator..................................................4
Installing the Transceiver on a High
Pressure Hose Extension....................... 5
Diving............................................... 7
Dive Warnings..........................................8
Waking the Transceiver from Low Power
Mode........................................................ 8
Pairing the Transceiver with a Descent
Watch....................................................... 9
Viewing Transceiver Data During a
Dive........................................................ 11
Updating the Transceiver Software Using
Your Watch............................................ 11
Pairing the Transceiver with the Garmin
Dive App................................................. 12
Device Information......................... 12
Replacing the Descent T2 Transceiver
Battery....................................................12
Descent T2 Device Care....................... 13
Specifications........................................13
Troubleshooting............................. 14
Getting More Information..................... 14
Dive Product and Feature
Compatibility......................................... 14
Dive Terminology.................................. 14
Transceiver Alerts................................. 15
My transceiver and watch lose
connection underwater......................... 15
My transceiver battery is draining
rapidly.................................................... 16
My transceiver makes an audible noise
while diving............................................ 16
Table of Contents i


Introduction
WARNING
See the Important Safety and Product Information guide in the product box for product warnings and other
important information.
Installation and Setup
CAUTION
To ensure proper setup and best performance, it is strongly recommended that you complete the first time
installation and setup at a dive shop. You should fully test the transceiver installation above and below water
before using it during a dive.
Transceiver Position Tips
The transceiver communicates wirelessly with your compatible watch. On the surface, it uses ANT® technology.
Underwater, it uses the SubWave™ sonar network. Your body, drysuit, and dive equipment can obstruct the
signal, particularly while underwater. For the best reception, all transceivers in your group should have clear
lines of sight to the watch. To help prevent blocking the signal with your body or equipment, you should follow
these tips.
• You should install the transceiver on the same side of the tank as the wrist wearing your watch. For example,
if you wear your watch on your left wrist, you should install the transceiver on the left side of the tank
regulator.
Introduction 1
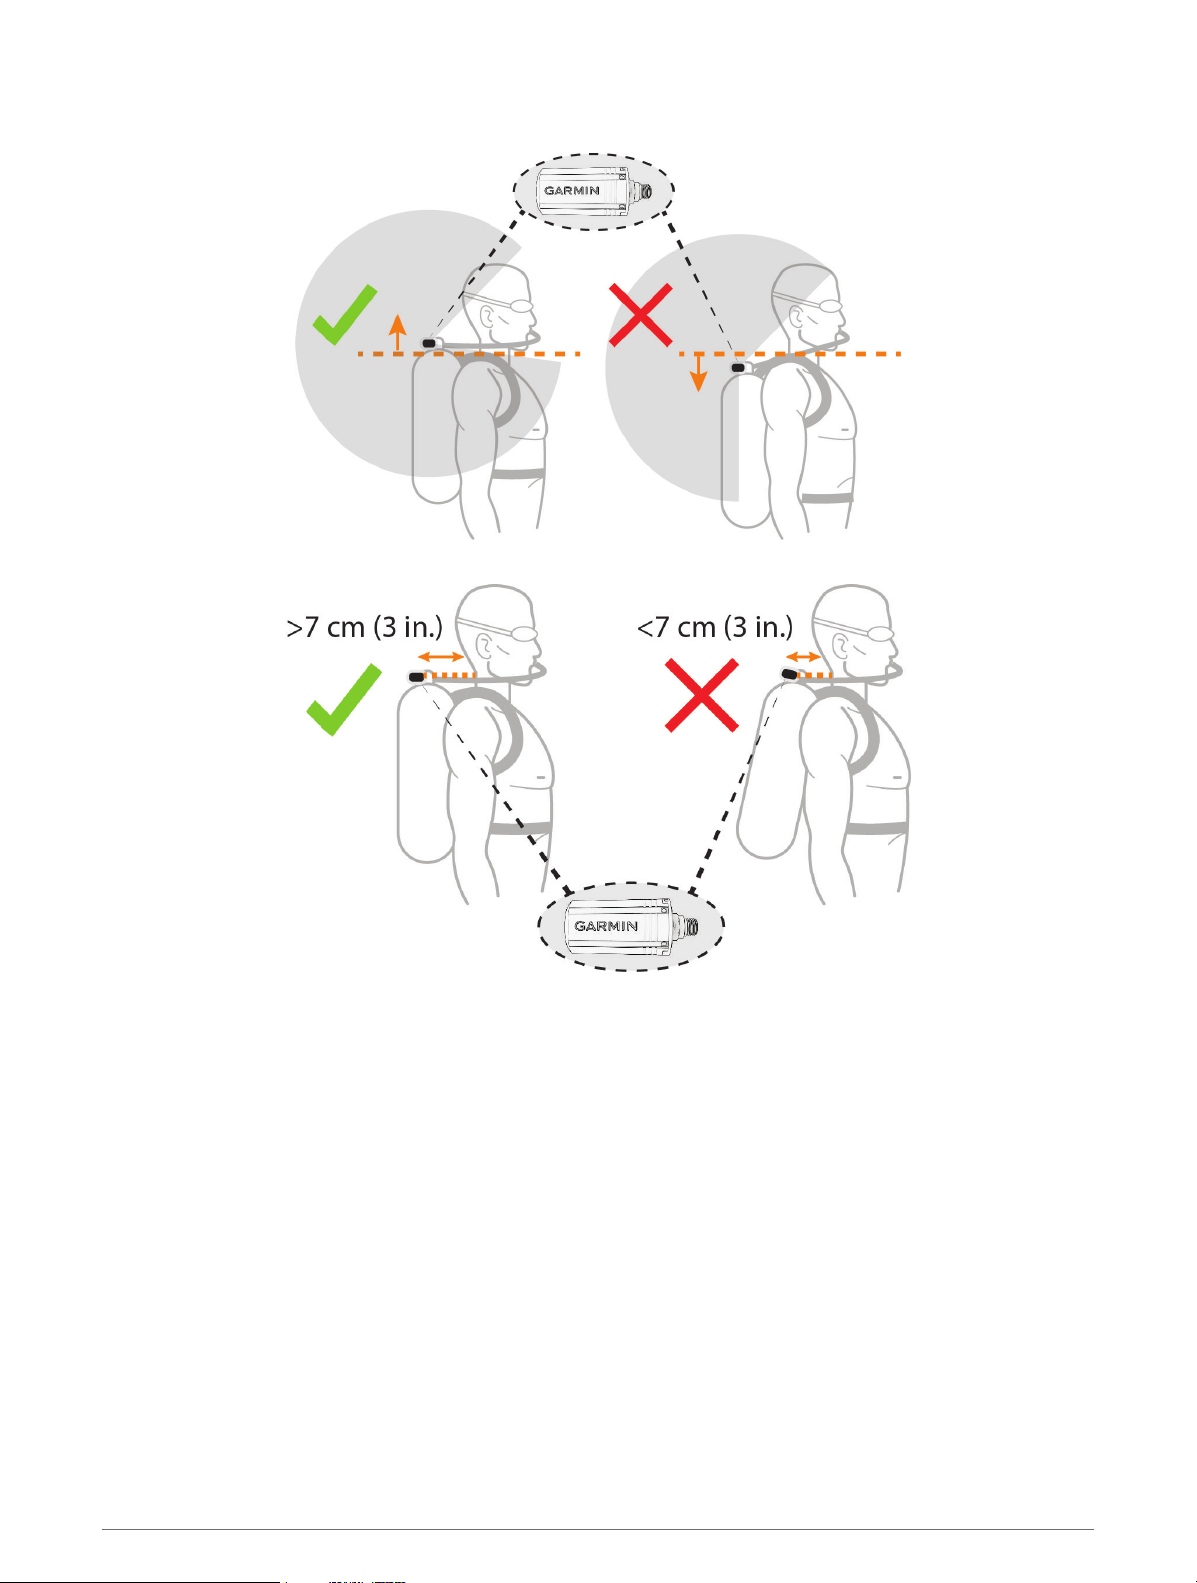
• For the best reception, you should wear the tank high on your back. This allows the transceiver to have a clear
line of sight over your shoulders.
• You should install the transceiver at least 7cm(3in.)from your body.
• If you wear your tank inverted with the regulator at the bottom, you can use a high-pressure hose to relocate
the transceiver to have a clear line of sight over your shoulders.
• If you lose the signal from your transceiver, you should move your arm until the signal is restored.
• If you lose the signal from another diver, you should change your body position until the signal is restored. If
your body is between the watch and another diver, it may obstruct the signal from that diver's transceiver.
2 Installation and Setup

Installation and Setup 3

Installing the Transceiver on Your Tank Regulator
WARNING
Always use the pre-installed flow restrictor when using the transceiver directly attached to your regulator.
Always use the included air spool when connecting the transceiver to a high pressure hose extension (Installing
the Transceiver on a High Pressure Hose Extension, page5). Using the transceiver without either the flow
restrictor or air spool could result in serious injury or death from an air pressurization failure.
Before you install the transceiver on your tank regulator, you should read the transceiver position tips and
choose the port position that provides the best line of sight to the watch (Transceiver Position Tips, page1).
1Detach the first-stage regulator from the scuba cylinder and second-stage regulator.
2Remove the port plug from the high-pressure output port.
3Confirm the flow restrictor is installed in the transceiver, and screw it into the high-pressure output port until
it is secure.
WARNING
Verify the installed transceiver does not physically interfere with any hoses or other tank assemblies.
NOTICE
To prevent damage to the transceiver and possible loss of function, do not overtighten. Do not grip the regulator
or the transceiver to move, carry, or adjust the tank.
4 Installation and Setup

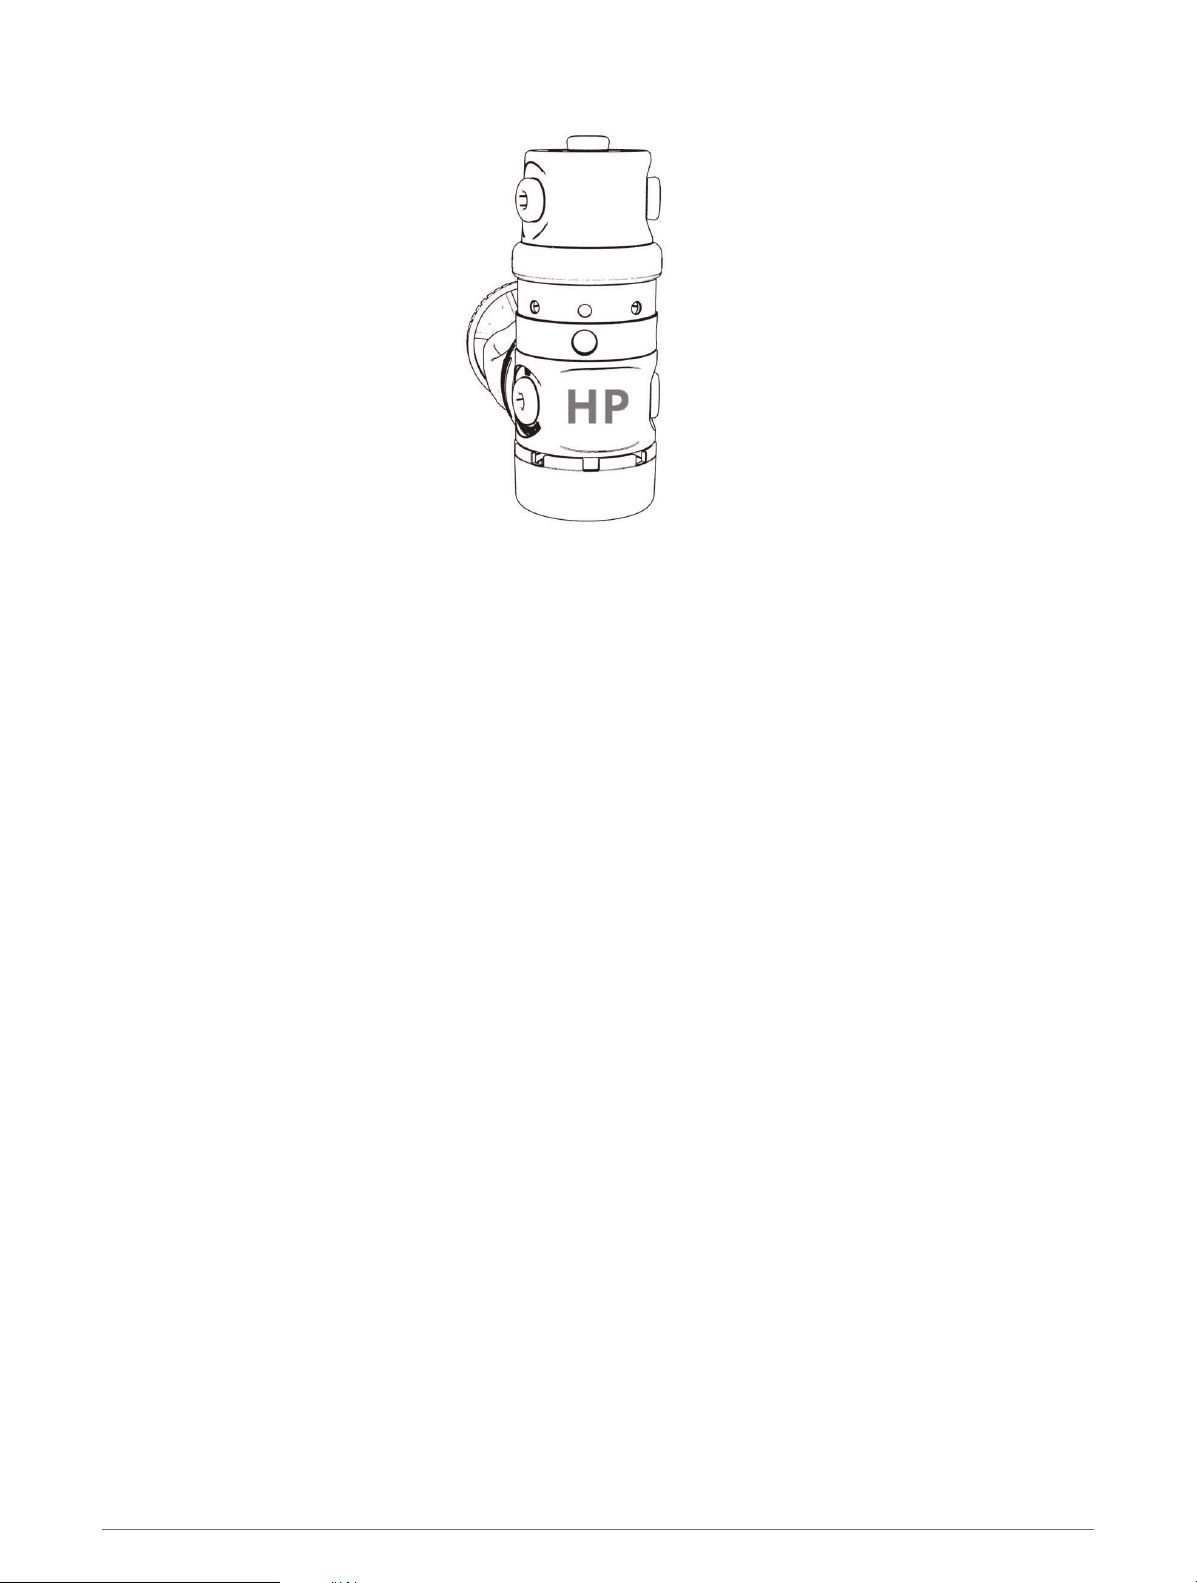
Installing the Transceiver on a High Pressure Hose Extension
WARNING
Always use the pre-installed flow restrictor when using the transceiver directly attached to your regulator
(Installing the Transceiver on Your Tank Regulator, page4). Always use the included air spool when connecting
the transceiver to a high pressure hose extension. Using the transceiver without either the flow restrictor or air
spool could result in serious injury or death from an air pressurization failure.
Before you install the transceiver on a high pressure hose extension certified to the EN 250:2014 standard, you
should read the transceiver position tips and choose a position that provides the best line of sight to the watch
(Transceiver Position Tips, page1).
To install the transceiver, you need anopen-ended wrench and a small flat screwdriver or flat-nose pliers.
1Use a screwdriver or pliers to carefully remove the flow restrictor from the transceiver.
NOTICE
Use care when removing the flow restrictor to avoid damaging the device.
2Insert the large end of the air spool into the transceiver.
Installation and Setup 5
3Detach the first-stage regulator from the scuba cylinder and second-stage regulator.
4Remove the port plug from the high-pressure output port.
5Connect a high-pressure hose extension to the high-pressure output port.
6 Installation and Setup

6Screw the transceiver onto the high pressure hose extension until you feel resistance.
WARNING
Verify the installed transceiver does not physically interfere with any hoses or other tank assemblies.
7Use an open-ended wrench to tighten the transceiver until it is secure.
NOTICE
To prevent damage to the transceiver and possible loss of function, do not overtighten. Do not grip the regulator
or the transceiver to move, carry, or adjust the tank.
You must remove the air spool and reinstall the flow restrictor before installing the transceiver on your tank
regulator.
Diving
You can use a compatible Descent watch paired with your Descent T2 transceiver to start a diving activity. See
your Descent watch owner's manual for more information.
Diving 7

Dive Warnings
WARNING
• This device is for use by certified divers only.
• This device should not be used as the only source of pressure information. Always use backup instruments,
including a depth gauge, submersible pressure gauge, and timer or watch.
• Make sure that you fully understand the use, displays, and limitations of your device. If you have questions
about this manual or the device, always resolve any discrepancies or confusion before diving with the device.
Always remember that you are responsible for your own safety.
• The dive computer can calculate your surface air consumption rate (SAC) and air time remaining (ATR).
These calculations are an estimate and should not be relied on as the only source of information.
• Perform pre-dive safety checks, such as checking proper device function and settings, display function,
battery level, tank pressure, and bubble checks to check hoses for leaks.
• If a tank pressure warning or battery warning appears on the dive computer, terminate the dive immediately
and safely return to the surface. Disregarding the alarm may result in serious injury or death.
• For safety reasons, you should never dive alone. Dive with a designated buddy. You should also stay with
others for an extended time after a dive, because the potential onset of decompression illness (DCI) may be
delayed or triggered by surface activities.
• This device is not intended for commercial or professional dive activities. It is for recreational purposes only.
Commercial or professional dive activities can expose the user to extreme depths or conditions that increase
the risk of DCI.
• The transceiver is not an oxygen cleaned product. Do not use the transceiver with anything greater than 40%
oxygen.
Waking the Transceiver from Low Power Mode
Out of the box, the transceiver is in low power mode. You must wake the transceiver from low power mode to
pair and connect to it.
Select an option:
• Install the transceiver on the first-stage regulator, and gradually open the tank valve to pressurize the
regulator (Installing the Transceiver on Your Tank Regulator, page4).
NOTE: This option is not available for Bluetooth® pairing. Bluetooth technology is disabled when the
transceiver is pressurized.
• Twist the battery cover counter-clockwise 270 degrees, wait 30 seconds, then twist the battery cover
clockwise until it is secure.
The transceiver plays a tone when it wakes from low power mode and is ready to connect to your Descent
watch (Pairing the Transceiver with a Descent Watch, page9) or phone (Pairing the Transceiver with the
Garmin Dive App, page12).
8 Diving

Pairing the Transceiver with a Descent Watch
Before you use the transceiver for the first time, you must pair it with the a compatible Descent watch using
ANT technology.
For more information about compatible watch models, go to the Descent T2 transceiver product page on
garmin.com.
1Wake the transceiver from low power mode (Waking the Transceiver from Low Power Mode, page8).
2On your Descent watch, hold MENU, and select Dive Setup > Dive Network & Air Integration > Transmitters >
Add New.
The watch starts searching and displays a list of nearby transceivers.
3From the list of transceivers, select the transceiver ID you want to pair.
The transceiver ID is printed on the housing.
When the pairing process is complete, the transceiver begins sending data, and it is ready to use on a dive. The
next time the transceiver and watch are turned on and within wireless range, they connect automatically when
you start a dive.
If you are diving with a group, you can pair up to 8 Descent transceivers with the watch.
Transceiver Settings
You can customize the settings for paired transceivers prior to a dive.
On the paired Descent watch, hold MENU, select Dive Setup > Dive Network & Air Integration > Transmitters,
and select a transceiver.
Status: Enables a connection to the transceiver, and shows the current connection status.
Placement: Sets the transceiver location as either your own tank or that of another diver.
Public Tank Name: Allows you to associate a name with your transceiver, which will be visible to your dive
group.
NOTE: If you customize this name, another option appears in the list to clear the name.
Nickname: Allows you to associate a nickname with another user's transceiver, which will be visible on your dive
data screens.
NOTE: If you customize this name, another option appears in the list to clear the name.
Identify: Plays a tone on the selected paired transceiver. This helps you to identify the transceiver without
needing to look at the transceiver ID printed on the transceiver housing.
Working Pressure: Sets how much pressure the tank has when full. This value is used to determine the upper
end of the pressure gauge, and to calculate respiratory minute volume (RMV) for tanks using psi units.
Reserve Pressure: Sets the threshold values for reserve pressure and critical pressure alerts to appear on the
watch.
Volume: Allows you to enter the air volume of the tank. You can use the Reset Volume option if you move the
transceiver to a different size tank.
NOTE: This value is required to calculate volumetric surface air consumption (SAC) and respiratory minute
volume (RMV) (Selecting the Gas Consumption Rate Metric, page10).
SAC/RMV/ATR: Enables the transceiver to be included in volumetric surface air consumption (SAC), respiratory
minute volume (RMV), and air time remaining (ATR) estimates (Including Transceivers in Gas Consumption
Calculations, page10).
Set Transmit Power: Allows you to adjust the power setting if your transceiver is losing connection with the
paired watch underwater.
About: Displays the transceiver ID, software version, and battery status.
Remove: Allows you to remove a paired transceiver.
Diving 9

Selecting Transceivers to View During a Dive
You can view two paired transceivers at-a-glance on the primary dive data screen. You can customize which
paired transceivers appear on the screen. By default, the first and second transceivers that you pair appear
(Viewing Transceiver Data During a Dive, page11).
1On the paired Descent watch, hold MENU.
2Select Dive Setup > Dive Network & Air Integration > Display Setup.
3Select a field to customize.
4Select a paired transceiver.
Selecting the Gas Consumption Rate Metric
1On the paired Descent watch, hold MENU.
2Select Dive Setup > Dive Network & Air Integration > Display Setup > Gas Consumption Rate.
3Select an option.
NOTE: The watch can estimate volumetric surface air consumption (SAC) or respiratory minute volume
(RMV) only if the air volume of the tank is entered in the watch (Transceiver Settings, page9). The watch can
estimate pressure-based surface air consumption (PSAC) with or without the air volume of the tank.
Including Transceivers in Gas Consumption Calculations
Gas consumption and air time remaining estimates are calculated using the tank pressure from the included
transceivers. By default, the first transceiver that you pair with your compatible dive computer is included. You
can include additional paired transceivers in gas consumption calculations.
1On the paired Descent watch, hold MENU.
2Select Dive Setup > Dive Network & Air Integration > Transmitters.
3Select a paired transceiver.
4Select the SAC/RMV/ATR toggle switch to include the transceiver in gas consumption calculations.
5If necessary, repeat steps 2 through 4 to include additional paired transceivers in gas consumption
calculations.
10 Diving

Viewing Transceiver Data During a Dive
1During a dive, press DOWN on your paired Descent watch to view the data screen.
TIP: You can customize the dive data screens to view the transceiver and diver dashboard data on dedicated
data screens.
The gas consumption estimate for the selected transceivers.
NOTE: You can customize the transceivers used for gas calculations (Including Transceivers in Gas
Consumption Calculations, page10).
The air time remaining (ATR) estimate for the selected transceivers.
Your primary and secondary transceivers and their tank pressure values.
NOTE: You can customize which transceivers are displayed (Selecting Transceivers to View During a
Dive, page10).
2Press START, and select Divers to view the tank pressure values and approximate depths of the paired
Descent transceivers in the network.
Updating the Transceiver Software Using Your Watch
Before you can update the software, you must pair your Descent T2 transceiver to a compatible Descent watch.
1Select an option to sync your watch:
• Sync your watch with the Garmin Dive™ app.
• Connect the watch to your computer using the USB cable, and sync with the Garmin Express™ application.
The Garmin Dive app and Garmin Express application automatically look for software updates. When you
sync with the Garmin Dive app, you will be prompted to apply the update at a later time. When you sync with
the Garmin Express application, the update is applied immediately to your watch.
2Wake the transceiver from low power mode (Waking the Transceiver from Low Power Mode, page8).
3On the paired Descent watch, hold MENU, select Dive Setup > Dive Network & Air Integration > Transmitters,
and select your transceiver.
4Wait for the transceiver to connect to your watch.
Connected appears on the watch screen.
5Select Update Available, press START, and select Install Now.
NOTE: The Update Available option may take up to a minute to appear while the watch determines the
transceiver's software version and battery status. If the battery status is low or critically low, you must
replace the battery before you can install the update.
6Keep the watch near the transceiver until the software update is complete.
Diving 11
Pairing the Transceiver with the Garmin Dive App
You can pair the transceiver with the Garmin Dive app to receive software updates using Bluetooth technology.
1Wake the transceiver from low power mode (Waking the Transceiver from Low Power Mode, page8).
2Scan the QR code on the transceiver with the camera on your phone, and follow the on-screen instructions to
complete the pairing and setup process.
The transceiver is in pairing mode for two minutes, then it goes back into low power mode.
Device Information
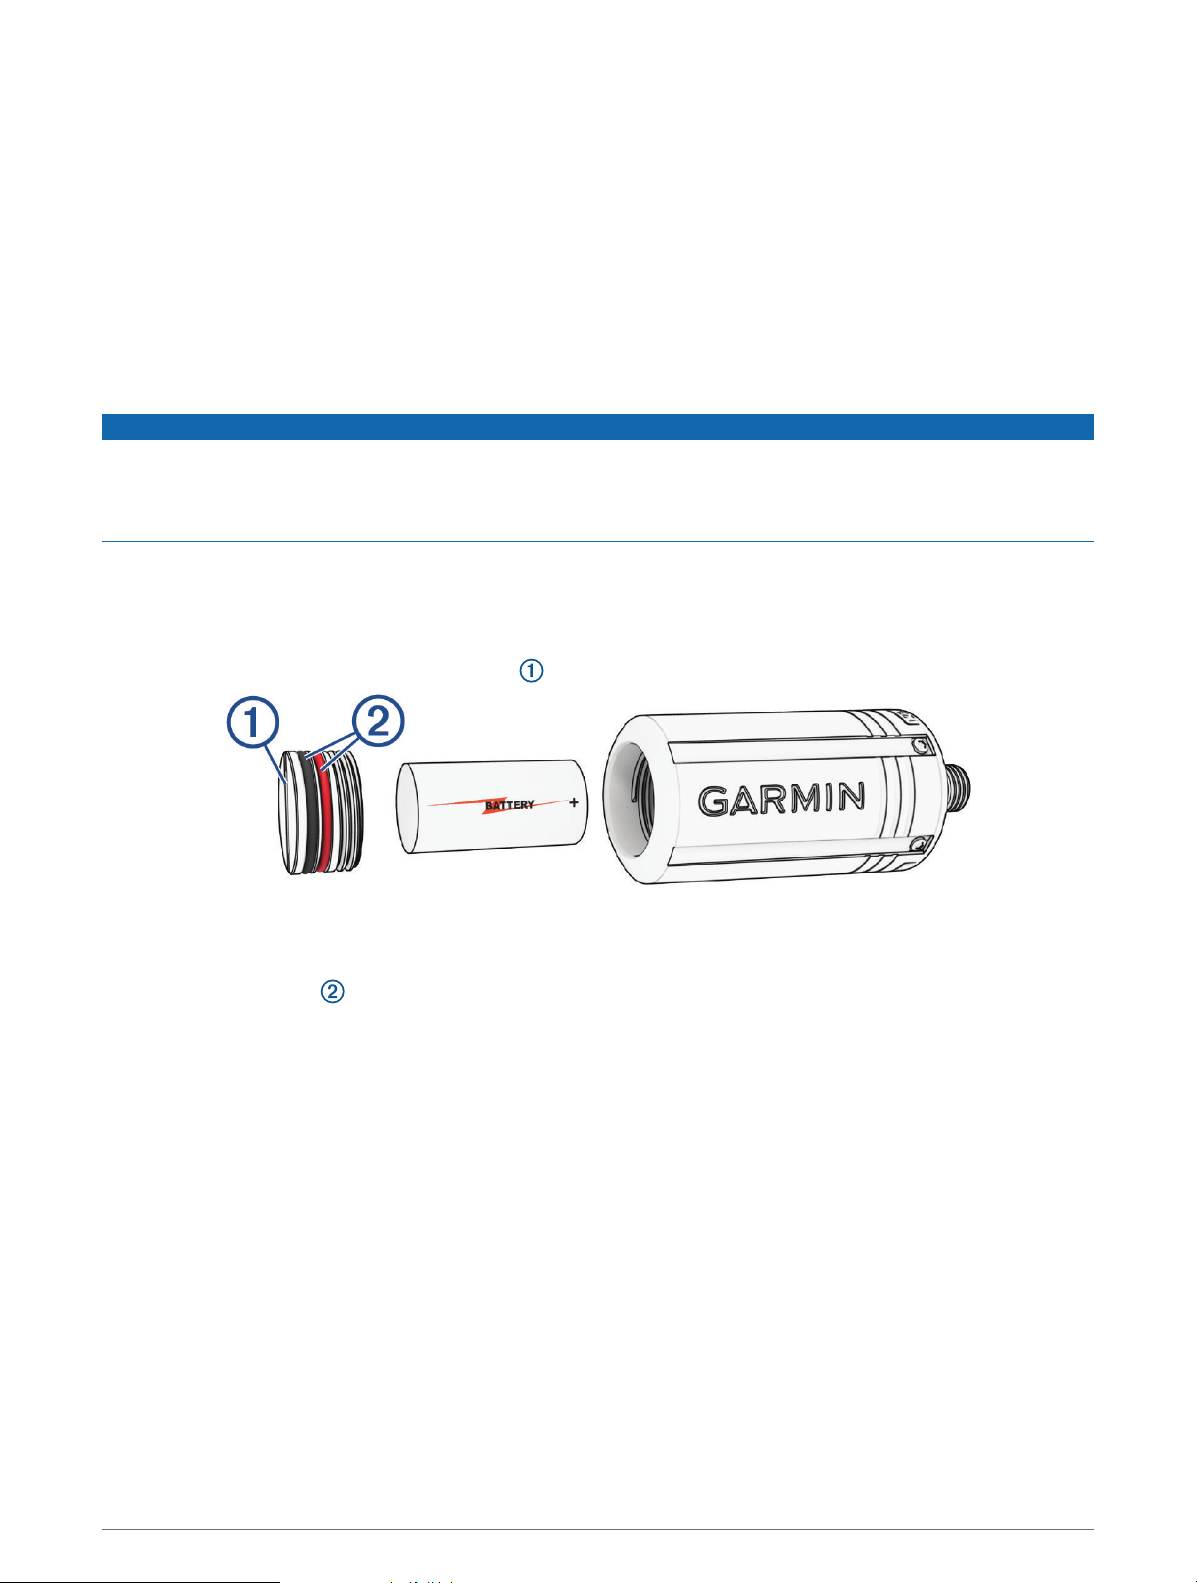
Replacing the Descent T2 Transceiver Battery
NOTICE
You should purchase a replacement battery only from a high-quality manufacturer and a reputable vendor.
Using a low-quality battery could result in poor product performance and reduced battery life, especially
at low temperatures. Do not use rechargeable batteries. Rechargeable batteries may have a higher voltage
specification and can cause permanent damage to the device.
To replace the battery, you need a coin or flat screwdriver, a new 3 V CR123A lithium battery, and waterproof
silicone grease. You may also need a replacement battery cap accessory.
The transceiver is powered by a 3V CR123A lithium battery. A battery is pre-installed at the factory. You must
carefully follow the battery replacement instructions to preserve the transceiver's waterproofing.
1Insert a coin or flat screwdriver into the slot , and rotate counter-clockwise to unscrew the battery cap.
2Remove the battery cap and battery.
3Insert the new battery in the transceiver, with the positive pole facing into the transceiver and the negative
pole facing the battery door.
4Inspect both gaskets to verify they are clean, undamaged, and fully seated in the grooves.
If the gaskets appear worn or damaged, you can purchase a replacement battery cap kit, including a cap,
gaskets, and silicone grease. Go to the Descent T2 product page on garmin.com to purchase accessories.
5Apply a thin layer of waterproof silicone grease to both gaskets.
6Replace the battery cap into the transceiver, and fully tighten it.
12 Device Information

Descent T2 Device Care
NOTICE
Do not grip the regulator or the device to move, carry, or adjust the air tank.
Do not remove the safety plug from the base of the device.
Do not use a sharp object to clean the device.
Avoid chemical cleaners, solvents, and insect repellents that can damage plastic components and finishes.
Thoroughly rinse the device with fresh water after exposure to chlorine, salt water, sunscreen, cosmetics,
alcohol, or other harsh chemicals. Prolonged exposure to these substances can damage the case.
Avoid extreme shock and harsh treatment, because it can degrade the life of the product.
Do not store the device where prolonged exposure to extreme temperatures can occur, because it can cause
permanent damage.
Discontinue use if the device is damaged or if it is stored at a temperature outside the specified storage
temperature range.
Discontinue use if there is water ingress into the battery compartment. Even small amounts of water can cause
corrosion of the electrical contacts.
Cleaning the Transceiver
1After each dive, rinse the transceiver with fresh water to remove salt and debris.
2If necessary, clean the transceiver with a soft cloth.
Replacement Parts
Replacement parts are available for this device. Contact your Garmin® dealer or go to garmin.com for more
information.
Specifications
Battery 3V CR123A lithium
Battery life Up to 100 hr.
Thread type 7/16 in. (20 UNF)
Operating temperature range From -20 to 60°C (from -4 to 140°F)
Underwater operating temperature range From 0 to 40°C (from 32 to 104°F)
Storage temperature range From -30 to 70°C (from -22 to 158°F)
Wireless frequency 2.4GHz @ 5.22dBm maximum
Surface transmission range (ANT and
Bluetooth technology) Up to 10m (33ft.)
Underwater transmission range (SubWave
sonar network) Pressure and depth data: up to 10m (33ft.)
Water rating 20ATM1
Pressure rating 300 bar (4351 psi)
Inspection interval Inspect parts before each use for damage. Replace parts as
needed.2
1 The device withstands pressure equivalent to a depth of 200m. For more information, go to www.garmin.com/waterrating.
2 Aside from normal wear and tear, performance is not affected by aging.
Device Information 13
Troubleshooting
Getting More Information
You can find more information about this product on the Garmin website.
• Go to support.garmin.com for additional manuals, articles, and software updates.
• Go to buy.garmin.com, or contact your Garmin dealer for information about optional accessories and
replacement parts.
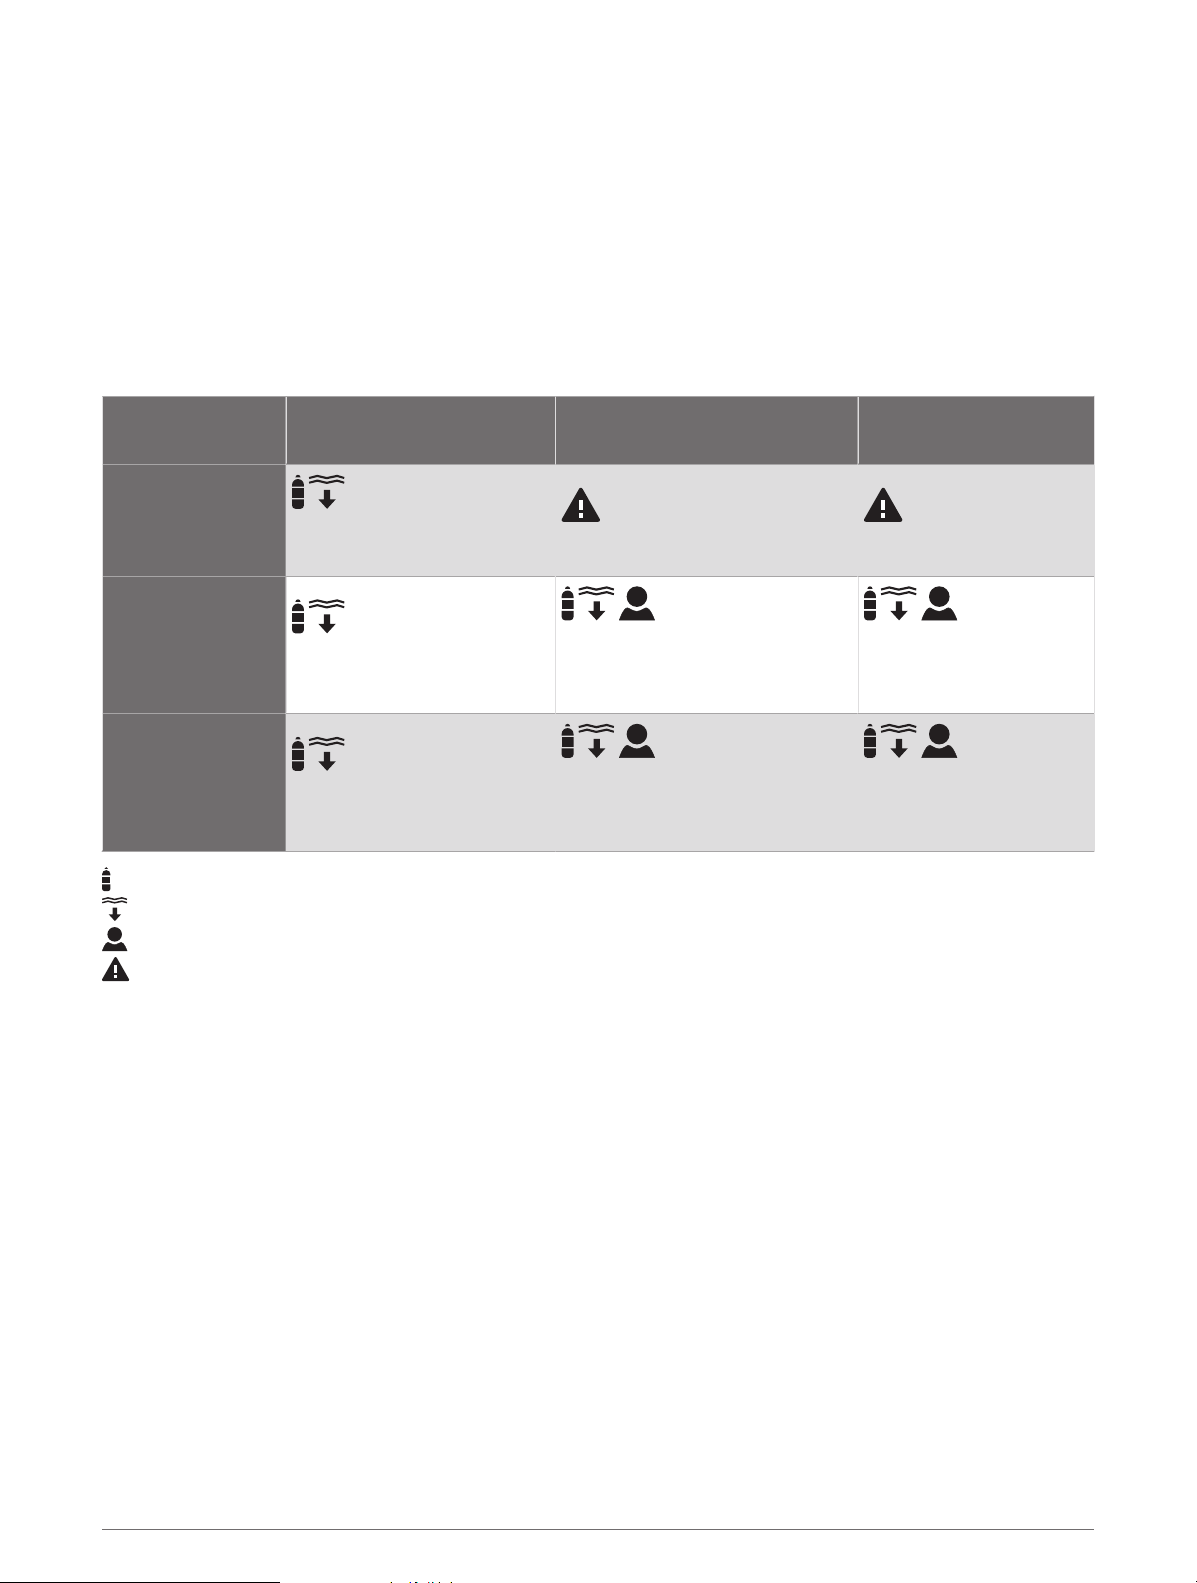
Dive Product and Feature Compatibility
You can pair multiple Descent devices to form a dive network for you and your fellow divers.
Descent T1 with 2.xx
software or earlier
Descent T1 with 3.xx software
or later Descent T2
Descent Mk2i with
20.40 software or
earlier
• View tank pressure
• View diver depth • No network connection • No network connection
Descent Mk2i with
22.00 software or
later
• View tank pressure
• View diver depth
• View tank pressure
• View diver depth
• View public tank name
• View tank pressure
• View diver depth
• View public tank name
Descent Mk3i
• View tank pressure
• View diver depth
• View tank pressure
• View diver depth
• View public tank name
• View tank pressure
• View diver depth
• View public tank name
: View tank pressure for yourself and connected divers.
: View diver depth for connected divers.
: View the public transceiver names for yourself and connected divers.
: No dive network connection. You should update both of your devices to the latest software versions.
The following alert appears on the watch: Transmitter %1 failed to connect.. "%1" is replaced with the
transceiver name.
Dive Terminology
Air time remaining (ATR): The time you may remain at the current depth until an ascent at 9 m/min. (30
ft./min.) would result in surfacing with the reserve pressure.
Pressure-based surface air consumption (PSAC): The change in pressure over time, normalized to 1 ATM.
Respiratory minute volume (RMV): The change in gas volume at ambient pressure over time.
Volumetric surface air consumption (SAC): The change in gas volume over time, normalized to 1 ATM.
14 Troubleshooting

Transceiver Alerts
Alert Message Cause Device Action
None Your paired watch has lost communication
with the transceiver for 30 seconds. The tank pressure value flashes yellow.
%1 is below
reserve pressure.
Your tank pressure is below the reserve
pressure level. "%1" is replaced with the
transceiver name.
The tank pressure value turns yellow.
The paired watch vibrates and plays a
warning tone.
%1 pressure is
critically low.
Your tank pressure is below the critical
pressure level. "%1" is replaced with the
transceiver name.
The tank pressure value flashes red.
The paired watch vibrates and plays a
warning tone.
%1 has a low
battery.
Fewer than 20 hours of dive time remain.
"%1" is replaced with the transceiver name.
The transceiver name flashes BATT. LOW
when the battery is critically low.
The paired watch vibrates and plays a
warning tone.
NO COMMS Your paired watch has lost communication
with the transceiver for 60 seconds.
The transceiver name flashes NO COMMS,
dashed lines replace the tank pressure
value, and the tank pressure value flashes
red.
The paired watch vibrates and plays a
warning tone if connection alerts are
enabled.
Transmitter %1
failed to connect.
Your paired watch cannot connect to the
transceiver. You should update both devices
to the latest software version. "%1" is
replaced with the transceiver name.
The paired watch vibrates and plays a
warning tone.
Enabling Lost Transceiver Alerts
Your paired watch can lose communication with the transceiver when the transceiver is out of range, when
the transceiver signal is blocked by your body or that of another diver, and when the transceiver loses battery
power. You can enable an alert that notifies you when your paired watch has lost communication with the
transceiver for 60 seconds.
1On the paired watch, hold MENU.
2Select Dive Setup > Dive Network & Air Integration > Connection Alert.
My transceiver and watch lose connection underwater
If your watch and transceiver communicate on the surface but lose communication underwater, you can try
these tips.
• Increase the transceiver power setting (Adjusting the Transceiver Power Setting, page16).
• Install the transceiver on a high pressure hose extension to improve the line of sight between the transceiver
and the watch (Installing the Transceiver on a High Pressure Hose Extension, page5).
• Follow the transceiver position tips to achieve the best line of sight between the watch and the transceiver
(Transceiver Position Tips, page1).
Troubleshooting 15

Adjusting the Transceiver Power Setting
NOTE: Increasing the power setting increases the audible noise and transmission range of the transceiver and
decreases its battery life.
1Hold MENU.
2Select Dive Setup > Dive Network & Air Integration > Transmitters.
3Select a paired transceiver.
4Select Set Transmit Power.
5Enter the transceiver ID.
NOTE: The transceiver ID is printed on the housing.
6Select an option.
My transceiver battery is draining rapidly
If your transceiver battery is draining faster than the expected battery life (Specifications, page13), you should
make sure the transceiver is returning to low power mode after a dive.
When you return to the surface after a dive, depressurize your regulator.
The installed transceiver enters low power mode after two minutes have elapsed.
My transceiver makes an audible noise while diving
The transceiver makes an audible noise when transmitting data over the SubWave sonar network during normal
operation. Sonar signals are noticeable while diving, and because sound travels better through water than radio
waves, the SubWave sonar network has longer range than traditional radio-based products. The SubWave sonar
network uses a lower power signal (1 W to 10 W) than traditional marine sonar systems (around 1000 W).
Testing has not indicated any disturbance to sea life.
You can decrease the power setting to reduce the audible noise from the transceiver (Adjusting the Transceiver
Power Setting, page16).
16 Troubleshooting
Table of contents
Other Garmin Diving Instrument manuals


