Garmin Astro 430 User manual

Astro® 430
Owner’s Manual
June 2016 190-02079-00_0A

All rights reserved. Under the copyright laws, this manual may not be copied, in whole or in part, without the written consent of Garmin. Garmin reserves the
right to change or improve its products and to make changes in the content of this manual without obligation to notify any person or organization of such
changes or improvements. Go to www.garmin.com for current updates and supplemental information concerning the use of this product.
Garmin®, the Garmin logo, ANT+®, Astro®, BlueChart®, City Navigator®, and TracBack® are trademarks of Garmin Ltd. or its subsidiaries, registered in the USA
and other countries. BaseCamp™ and chirp™ are trademarks of Garmin Ltd. or its subsidiaries. These trademarks may not be used without the express
permission of Garmin.
Windows® is a registered trademark of Microsoft Corporation in the United States and/or other countries. Mac® is a trademark of Apple Inc., registered in the
USA and other countries. microSD™ and the microSD logo are trademarks of SD-3C, LLC.
Other trademarks and trade names are those of their respective owners.

Table of Contents
Introduction.....................................................................1
Setting Up the System................................................................ 1
Device Overviews....................................................................... 1
Astro 430 Handheld Device................................................... 1
Keypad................................................................................... 1
Dog Collar Device.................................................................. 1
Installing Batteries...................................................................... 1
Charging the Dog Collar Device................................................. 1
Turning On the Devices.............................................................. 2
Turning Off the Devices.............................................................. 2
Acquiring Satellite Signals.......................................................... 2
Adjusting the Backlight Brightness............................................. 2
Fitting the Collar on Your Dog.................................................... 2
Using the On-Screen Keyboard.................................................. 2
Dog Tracking.................................................................. 2
Tracking Your Dog on the Map................................................... 2
Navigating to Your Dog...............................................................2
Viewing Dog Status................................................................2
Dog Status Icons....................................................................3
Location Alerts............................................................................ 3
Setting a Geofence Alert........................................................ 3
Setting a Radius Alert............................................................ 3
Editing Location Alerts........................................................... 3
Dog Information.......................................................................... 3
Hunt Metrics........................................................................... 3
Resetting a Dog's Statistics and Track.................................. 3
Changing the Length of the Dog's Track............................... 3
Changing a Dog Name.......................................................... 3
Changing the Color of the Dog's Track.................................. 3
Changing the Dog Type......................................................... 3
Setting Dog Alerts.................................................................. 4
Removing a Dog.................................................................... 4
Pairing a Dog Collar to the Astro Device.................................... 4
Adding a Dog Using the Track and Control Codes................ 4
Assigning a Dog ID Manually................................................. 4
Changing the Update Rate.................................................... 4
Communication with the Collar................................................... 4
Tracking with BaseCamp™ BaseStation.................................... 4
Waypoints, Routes, and Tracks.................................... 4
Waypoints................................................................................... 4
Marking Your Vehicle Location.............................................. 4
Marking Your Current Location.............................................. 5
Marking a Covey.................................................................... 5
Marking a Waypoint Using the Map....................................... 5
Navigating to a Waypoint....................................................... 5
Editing a Waypoint................................................................. 5
Moving a Waypoint on the Map............................................. 5
Repositioning a Waypoint to Your Current Location.............. 5
Increasing the Accuracy of a Waypoint Location................... 5
Projecting a Waypoint............................................................ 5
Deleting a Waypoint............................................................... 5
Routes........................................................................................ 5
Creating a Route.................................................................... 5
Navigating a Saved Route..................................................... 5
Editing a Route...................................................................... 5
Viewing the Active Route....................................................... 5
Reversing a Route................................................................. 5
Deleting a Route.................................................................... 6
Deleting All Routes................................................................ 6
Tracks......................................................................................... 6
Recording Track Logs............................................................ 6
Viewing the Elevation Plot of a Track.................................... 6
Viewing Details about the Track............................................ 6
Saving the Current Track....................................................... 6
Marking a Location on a Saved Track................................... 6
Navigating to the Start of a Track.......................................... 6
Archiving a Track Manually.................................................... 6
Sending and Receiving Data Wirelessly..................................... 6
Sharing Dog Information........................................................ 6
Receiving Dog Information.....................................................6
Navigation....................................................................... 6
Map............................................................................................. 6
Enabling the Map Data Fields................................................ 7
Compass.....................................................................................7
Calibrating the Compass........................................................7
Navigating with the Bearing Pointer....................................... 7
Course Pointer....................................................................... 7
Find Menu................................................................................... 7
Finding a Waypoint by Name................................................. 7
Navigating with Sight 'N Go........................................................ 7
Viewing the Elevation Plot.......................................................... 7
Calibrating the Barometric Altimeter...................................... 7
Navigating to a Point on the Plot........................................... 7
Changing the Plot Type......................................................... 7
Trip Computer............................................................................. 7
Resetting the Trip Computer.................................................. 7
Applications.................................................................... 8
Setting a Proximity Alarm........................................................... 8
Calculating the Size of an Area.................................................. 8
Viewing the Calendar and Almanacs.......................................... 8
Setting an Alarm......................................................................... 8
Geocaches..................................................................................8
Downloading Geocaches Using a Computer......................... 8
Finding a Geocache............................................................... 8
Filtering the Geocache List.................................................... 8
chirp™....................................................................................8
Opening the Stopwatch.............................................................. 8
Satellite Page..............................................................................8
Changing the Satellite View................................................... 8
Turning Off GPS.................................................................... 9
Simulating a Location.............................................................9
Disabling Dog Data Broadcast....................................................9
Enabling Bark Detection............................................................. 9
Enabling Rescue Mode...............................................................9
VIRB® Remote........................................................................... 9
Customizing Your Device.............................................. 9
Customizing the Main Menu....................................................... 9
Customizing the Data Fields....................................................... 9
Profiles........................................................................................ 9
Creating a Custom Profile...................................................... 9
Editing a Profile Name........................................................... 9
Deleting a Profile....................................................................9
System Settings.......................................................................... 9
Dog Settings............................................................................... 9
Display Settings........................................................................ 10
Setting the Device Tones..........................................................10
Map Settings............................................................................. 10
Advanced Map Settings....................................................... 10
Tracks Settings......................................................................... 10
Changing the Units of Measure................................................ 10
Time Settings............................................................................ 10
Position Format Settings...........................................................10
Heading Settings...................................................................... 10
Altimeter Settings......................................................................10
Geocaching Settings.................................................................11
Routing Settings....................................................................... 11
Marine Map Settings................................................................. 11
Setting up Marine Alarms.....................................................11
Table of Contents i

Device Information....................................................... 11
Viewing Device Information...................................................... 11
Support and Updates................................................................ 11
Support and Updates........................................................... 11
Updating the Software......................................................... 11
Device Care.............................................................................. 11
Cleaning the Device............................................................. 11
Cleaning the Screen............................................................ 11
Astro 430 Handheld Device Specifications............................... 12
T5 Dog Collar Device Specifications........................................ 12
T5 mini Dog Collar Device Specifications................................. 12
Battery Information................................................................... 12
Long-Term Storage.............................................................. 12
Data Management.................................................................... 12
File Types............................................................................ 12
Installing a Memory Card..................................................... 12
Connecting the Handheld Device to a Computer................ 12
Connecting the Collar to a Computer.................................. 13
Transferring Dog Tracks to BaseCamp............................... 13
Deleting Files....................................................................... 13
Disconnecting the USB Cable..............................................13
Appendix....................................................................... 13
Accessories and Replacement Parts........................................ 13
Purchasing Accessories.......................................................13
Dog Device Battery Replacement Instructions.................... 14
Replacing the T5 mini Dog Collar Device Battery................ 14
Replacing the Collar Strap................................................... 15
VHF Radio Information........................................................ 15
Replacing the VHF Antenna in the Handheld Device.......... 15
Replacing the VHF Antenna in the Dog Collar Device........ 15
Changing the Fuse in the Vehicle Power Cable.................. 15
Data Fields................................................................................15
Troubleshooting........................................................................ 16
My handheld device is not responding................................ 16
My dog collar devices have conflicting IDs.......................... 16
My handheld device does not report barks.......................... 16
Getting More Information.......................................................... 17
Registering Your Device...................................................... 17
Index.............................................................................. 18
ii Table of Contents

Introduction
WARNING
See the Important Safety and Product Information guide in the
product box for product warnings and other important
information.
Setting Up the System
You must set up the handheld device and the dog collar device
before you can use the devices.
1Install batteries in the handheld device (Installing Batteries,
page 1).
2Charge the dog collar device (Charging the Dog Collar
Device, page 1).
3Turn on the devices (Turning On the Devices, page 2).
4If necessary, add the dog collar device to the handheld
device (Pairing a Dog Collar to the Astro Device, page 4).
5Acquire satellite signals (Acquiring Satellite Signals,
page 2).
Device Overviews
Astro 430 Handheld Device
NOTICE
Avoid using a high-powered radio (greater than 5 watts) in close
proximity to the handheld device. It may cause irreversible
damage to the handheld device.
ÀGPS antenna
ÁVHF antenna
ÂPower key
ÃDisplay
ÄKeypad
ÅUSB port (under weather cap)
ÆmicroSD™ card slot (under battery door)
ÇMounting spine
ÈBattery cover D-ring
Keypad
IN Select to zoom in on the map.
OUT Select to zoom out on the map.
MAP Select to view the map.
MENU Select to open the menu for the active page.
Select twice to open the main menu.
ENTER Select to select options and acknowledge messages.
BACK Select to cancel data entry or return to the previous menu or
page.
MARK Select to mark your current location.
DOG Select to view the dog tracking page.
Select to view or scroll through options and to move the map
pointer.
Locking the Keypad
1Select .
2Select OUT.
Dog Collar Device
NOTE: Your dog collar device may look different than the device
pictured.
ÀVHF antenna
ÁGPS antenna
ÂPower key
ÃStatus LED and flashing beacon LEDs
Installing Batteries
The handheld device operates on two AA batteries (not
included). Use NiMH or lithium batteries for best results.
1Turn the D-ring counter-clockwise, and pull up to remove the
cover.
2Insert two AA batteries, observing polarity.
3Replace the battery cover, and turn the D-ring clockwise.
4Hold .
5Select Setup > System > Battery Type.
6Select Alkaline, Lithium, or Rechargeable NiMH.
Charging the Dog Collar Device
NOTICE
To prevent corrosion, thoroughly dry the contacts on the collar
and the surrounding area before connecting the charging clip.
NOTE: Your dog collar device may look different than the device
pictured.
Introduction 1
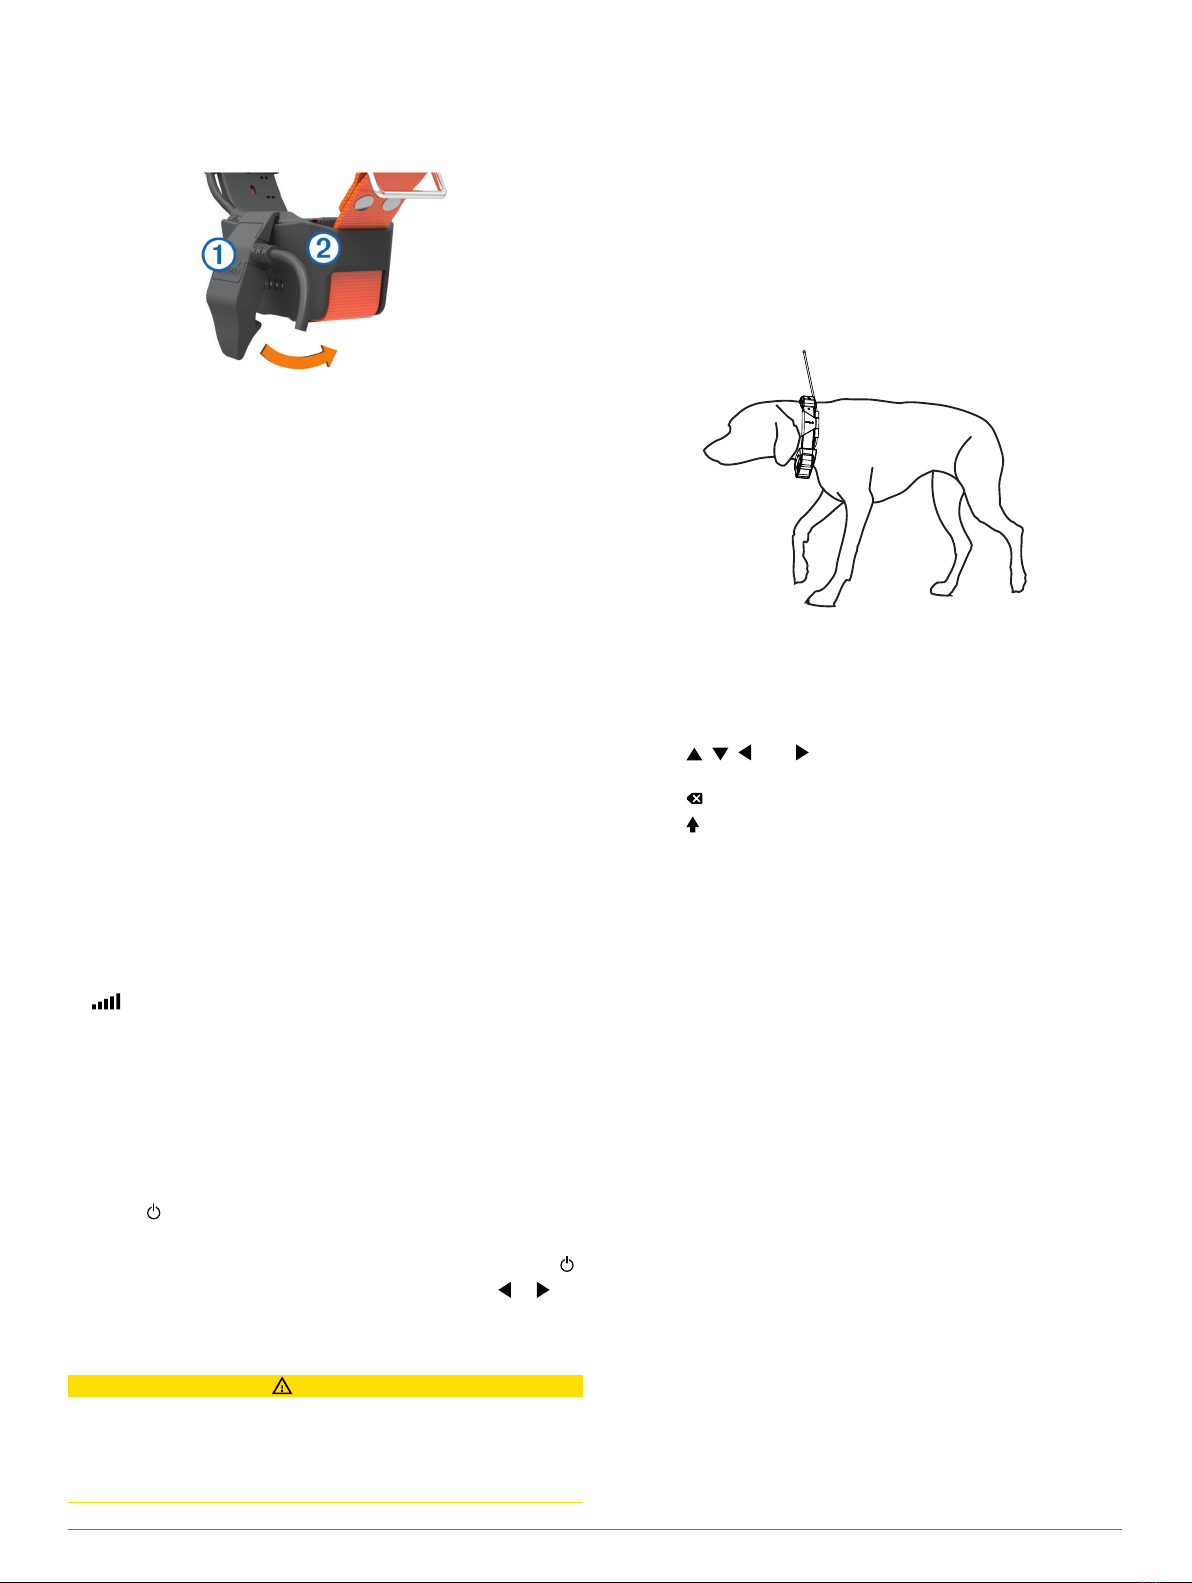
You should fully charge the battery before you use the device for
the first time. Charging a fully depleted battery takes about five
hours.
1Snap the charging clip À onto the device Á.
2Plug the small end of the power cable into the mini-USB port
on the charging clip cable.
3Plug the power cable into a power source.
The status LED is solid red when the collar is charging.
4After the status LED turns solid green, remove the charging
clip from the collar.
Turning On the Devices
• On the handheld device, hold the power key until the
LCD display turns on.
• On the dog collar device, hold the power key until the status
LED flashes and the collar beeps.
Turning Off the Devices
• On the handheld device, hold the power key until the
LCD screen turns off.
• On the dog collar device, hold the power key until the status
LED turns red.
Acquiring Satellite Signals
Both the collar and handheld device must acquire satellite
signals before you put the collar on your dog. Acquiring satellites
can take a few minutes.
1Go outdoors to an open area.
2Turn on both devices (Turning On the Devices, page 2).
3Select the power key on the handheld device.
shows the GPS signal strength.
When the collar has acquired satellite signals, the status LED
flashes a double-blink or triple-blink in green.
Adjusting the Backlight Brightness
NOTE: The backlight brightness may be limited when the
battery strength is low.
Extensive use of screen backlighting can significantly reduce
battery life.
1Select .
2Select an option:
• To change between the preset brightness levels, select .
• To adjust the brightness levels manually, select or .
3Select ENTER.
Fitting the Collar on Your Dog
CAUTION
Do not spray the device or collar with harsh chemicals including
but not limited to flea or tick spray. Always ensure that any flea
or tick spray that is applied to the dog is completely dry before
placing the collar on the dog. Small amounts of harsh chemicals
can damage the plastic components and collar laminate.
Before you can put the collar on the dog, you must pair the
handheld device and collar (Pairing a Dog Collar to the Astro
Device, page 4), and acquire satellite signals (Acquiring
Satellite Signals, page 2).
1Position the collar with the VHF whip antenna pointing up, the
GPS antenna facing up, and the LEDs facing forward.
2Place the collar around the middle of the dog's neck.
3Tighten the strap so it is snug around the dog's neck.
NOTE: The collar should fit tightly and should not be able to
rotate or slide on the dog's neck. The dog must be able to
swallow food and water normally. You should observe your
dog's behavior to verify the collar is not too tight.
4If the strap is too long, cut off the excess, leaving at least
7.62 cm (3 in.) to spare.
Using the On-Screen Keyboard
A keyboard appears when you enter text.
• Select , , , and to select a character, and select
ENTER.
• Select to backspace.
• Select to shift.
• Select IN or OUT to change the character mode of the
keyboard.
• Select Done to save the text and close the keyboard.
Dog Tracking
The handheld device allows you to track your dog, using the
tracking compass or map. The map displays your location and
your dog's location and tracks. The compass pointer indicates
the direction of the dog's current location.
Tracking Your Dog on the Map
Before you can track a dog on the map, you must add them to
the handheld device (Pairing a Dog Collar to the Astro Device,
page 4).
You can view the dog's location on the map.
1Select MAP.
2Select IN and OUT to zoom in and out of the map.
Navigating to Your Dog
1Select Dog List.
2Select the dog.
3Select Show Info > Go.
The map opens.
4Follow the magenta line to the dog.
Viewing Dog Status
You can view your dog's status, such as the direction and
distance to the dog from the handheld device. To determine if
2 Dog Tracking

your dog is barking, you must first enable bark detection
(Enabling Bark Detection, page 9).
1From the main menu, select DOG to view the dog tracking
page.
2If you have additional dogs, scroll through the list to find the
dog.
The handheld device can track up to 20 dogs.
3Select ENTER.
Dog Status Icons
Sitting
Running
On point
Treed
Unknown*
*The unknown status icon indicates that the collar has not
acquired a satellite signal and that the handheld device cannot
determine the location of the dog.
Location Alerts
Location alerts notify you when your dogs enter or exit a
particular location. You can create a custom geofence or use a
radius around your current location.
A geofence is an invisible boundary around an area and is
created using points on the map. The virtual boundaries of a
geofence are accurate up to approximately 3 m (10 ft.).
Geofences perform best when sized to cover an area
encompassing an average sized backyard (approximately
¼ acre).
Setting a Geofence Alert
1Select Setup > Location Alerts > Add Alert > Geofence.
2On the map, select a point for the first corner of the geofence,
and select ENTER.
3Select additional points to define the geofence boundary.
You must select at least 3 points, and you can select up to 10
points.
4Select BACK.
Setting a Radius Alert
You can receive an alert when a dog or contact moves within or
beyond a specified distance from you.
1Select Setup > Location Alerts > Add Alert > Radius.
2Select the unit of measurement.
3Enter the radius distance, and select Done.
Editing Location Alerts
1Select Setup > Location Alerts.
2Select an alert.
3Select an option:
• Select Disable to turn off notifications for this alert.
• Select Set Alert Type to set the way the device notifies
you for this alert.
• Select Set Alert Mode to set the notification to sound on
exit, entrance, or both.
• Select Delete to remove the alert.
Dog Information
The handheld device assigns a default name, "Dog," to the dog
collar device if it was packaged with the handheld device.
Hunt Metrics
Hunt metrics provides a collection of data that helps you
understand the hunting patterns and behaviors of your dog. The
hunt metrics reset automatically at the beginning of each new
hunt.
Data Fields
Barks: The number of times the dog barks during the hunt. Bark
alerts are triggered by low intensity level barks. This data
field requires bark detection to be enabled (Enabling Bark
Detection, page 9).
NOTE: This feature is not available in all areas.
Bays: The number of times the dog bays during the hunt. Bay
alerts are triggered by high intensity level barks. This data
field requires bark detection to be enabled (Enabling Bark
Detection, page 9).
NOTE: This feature is not available in all areas.
Distance: The total distance the dog traveled.
Dog Score: A combination of metrics that indicates how well a
dog performed on a hunt.
On Point: The number of times and the locations where the dog
pointed during the hunt.
Time: The amount of time the dog was afield.
Treed: The number of times and locations where the dog treed
during the hunt.
Resetting a Dog's Statistics and Track
You might want to clear the dog statistics and track before a
new hunt.
1Select Dog List.
2Select a dog.
3Select Show Info > Reset > Yes.
Changing the Length of the Dog's Track
You can adjust the length of time the dog track appears on the
map. Reducing the duration of the track can reduce the clutter
on the map. Changing the map does not affect the tracks stored
in the handheld device.
1Select Setup > Dogs > Dog Track Length on Map.
2Select an option.
3Select Map.
Changing a Dog Name
1Select DOG > ENTER.
The dog information appears.
2Select the name field.
The on-screen keyboard appears (Using the On-Screen
Keyboard, page 2).
3Enter the name of the dog.
Changing the Color of the Dog's Track
You can change the track color of the dog. It is helpful to have
the track color match the color of the collar strap, if possible.
1Select Dog List.
2Select a dog.
3Select Show Info.
4Select the colored square next to the dog’s name.
5Select a color.
Changing the Dog Type
Before you can change the dog type, you must turn on the dog
collar device and bring it within 3 m (10 ft.) of the handheld
device.
You can assign a dog type so the appropriate dog status
symbols appear.
Dog Tracking 3

1Select DOG > ENTER > MENU.
2Select Change Dog Type.
3Select a type.
Setting Dog Alerts
You can adjust how the handheld device alerts you to certain
actions of the dog.
1Select Setup > Dogs > Dog Alerts.
2Select an action.
3Select the method the device uses to alert you for this action.
4Repeat steps 2 and 3 as needed.
Removing a Dog
1Select Dog List.
2Select a dog.
3Select Remove.
Pairing a Dog Collar to the Astro Device
Before you can pair devices to the handheld device, the
handheld device must be close enough to the dog collar device
to touch it.
The handheld device can track up to 20 dogs with dog collar
devices. If you purchase additional dog collar devices, you can
link them to the handheld device.
1Select DOG.
2Select Add Dog.
3Turn off the dog collar device.
4Follow the on-screen instructions.
By default, the new dog is named “Dog” and an ID number is
randomly assigned.
An error message could appear if there is a conflict with the
ID number of another dog.
After pairing is complete, you can add the dog collar device to
additional handheld devices using the dog collar device track
code or control code.
Adding a Dog Using the Track and Control Codes
NOTE: This feature varies based on dog collar device type and
feature availability in your area.
Before you can add a dog using the track and control codes, the
dog owner must find the track and control codes (Finding the
Dog ID and Track and Control Codes, page 4) and tell them
to you.
You can use track and control codes to authorize a handheld
device to interact with your dog collar device. If you are not near
the dog you want to add or you cannot put the collar into pairing
mode, you can add the dog using the track and control codes.
1Select DOG > Add Dog.
2When asked if you are near the collar, select No.
3When asked if you know the track and control codes, select
Yes.
4Enter the track or control code for the collar, and select
Done.
The dog’s track code allows you to track the dog. The dog’s
control code allows you to both track the dog and access the
collar settings.
5Enter the name of the dog, and select Done > OK.
Finding the Dog ID and Track and Control Codes
You can share a dog’s track code so another person can track
your dog. Also, you can share a dog's control code so another
person can track your dog and access the collar settings.
1Select Dog List.
2Select a dog.
3Select Show Info.
Assigning a Dog ID Manually
Before you can assign a dog ID manually, you must turn on the
dog collar device and bring it within 3 m (10 ft.) of the handheld
device. You must assign a new ID number to the dog.
1Select DOG.
2Select a dog.
3Select Show Info > MENU > Change ID.
4Select an unassigned and nonconflicting ID.
Changing the Update Rate
You can select a longer duration for the update rate to conserve
battery power. The 30-second and 2-minute rates reduce battery
drain, but they record less-detailed dog tracks and statistics.
1Bring the handheld device within a few feet of the dog collar
device.
2Select DOG.
3Select a dog.
4Select Show Info > MENU > Change Update Rate.
5Select an update rate.
Communication with the Collar
You should keep an unobstructed line of sight between your
handheld device and the dog collar device to produce the best
communication signal. To achieve the best line-of-sight
conditions, you should move to the highest elevation point in
your area (for example, on the top of a hill).
Best
Good
Poor
Tracking with BaseCamp™ BaseStation
Before you can track your dogs using BaseCamp, you must
download BaseCamp to your computer (www.garmin.com
/basecamp).
The BaseStation feature of BaseCamp allows you to track your
dogs in real-time on a computer. For more information on using
BaseCamp, see the help file in the application.
1Select Setup > System > BaseCamp Basestation >
Prompted.
2Open BaseCamp.
3Follow the on-screen instructions.
Waypoints, Routes, and Tracks
Waypoints
Waypoints are locations you record and store in the device.
Waypoints can mark where you are, where you are going, or
where you have been. You can add details about the location,
such as name, elevation, and depth.
Marking Your Vehicle Location
You can mark the location of your vehicle so you can navigate
back to your vehicle after a hunt.
4 Waypoints, Routes, and Tracks

1From the main menu, select MARK.
2Follow the on-screen instructions.
Marking Your Current Location
1Select MARK.
2Select an option:
• Select New.
• Select a default location name, such as Truck or Camp.
3Edit the location information (optional).
4Select Done.
Marking a Covey
You can mark a covey location and enter the estimated number
of birds flushed and the number of birds taken.
1Select MARK > Covey.
2Enter the number of birds flushed, the number of birds taken,
and select OK.
3Review and edit location information (optional).
4Select Done.
Marking a Waypoint Using the Map
1Select MAP.
2Select a location on the map.
3Select ENTER > MENU > Save as Waypoint.
Navigating to a Waypoint
1From the main menu, select Tools > Find > Waypoints .
2Select a waypoint.
3Select Go.
Editing a Waypoint
Before you can edit a waypoint, you must create a waypoint.
1From the main menu, select Tools > Waypoint Mgr..
2Select a waypoint.
3Select an item to edit, such as the name.
4Enter the new information.
Moving a Waypoint on the Map
1From the main menu, select Tools > Waypoint Mgr..
2Select a waypoint.
3Select MENU > Move Waypoint.
4Select a location on the map.
5Select ENTER.
Repositioning a Waypoint to Your Current Location
You can change the position of a waypoint. For example, if you
move your vehicle, you can change the location to your current
position.
1Select Tools > Waypoint Mgr..
2Select a waypoint.
3Select MENU > Reposition Here.
The waypoint position changes to your current location.
Increasing the Accuracy of a Waypoint Location
You can refine a waypoint location for more accuracy. When
averaging, the device takes several readings at the same
location and uses the average value to provide more accuracy.
1Select Tools > Waypoint Mgr..
2Select a waypoint.
3Select MENU > Average Location.
4Move to the waypoint location.
5Select Start.
6Follow the on-screen instructions.
7When the confidence status bar reaches 100%, select Save.
For best results, collect 4 to 8 samples for the waypoint, waiting
at least 90 minutes between samples.
Projecting a Waypoint
You can create a new location by projecting the distance and
bearing from a marked location to a new location.
1From the main menu, select Tools > Waypoint Mgr..
2Select a waypoint.
3Select MENU > Project Waypoint.
4Follow the on-screen instructions.
5Select an option:
• To save the waypoint information, select Save.
• To save and edit the waypoint information, select Save
and Edit.
Deleting a Waypoint
1From the main menu, select Tools > Waypoint Mgr..
2Select a waypoint.
3Select MENU > Delete > Yes.
Routes
A route is a sequence of waypoints or locations that leads you to
your final destination.
Creating a Route
1Select Tools > Route Planner > Create Route > Select
First Point.
2Select a category.
3Select the first point on the route.
4Select Use > Select Next Point.
5Select a point.
6Repeat steps 3 through 5 to add all the points in the route.
Navigating a Saved Route
1Select Tools > Route Planner.
2Select a route.
3Select View Map > Go.
4Navigate using the compass (Navigating with the Bearing
Pointer, page 7) or map (Map, page 6).
Editing a Route
1Select Tools > Route Planner.
2Select a route.
3Select Edit Route.
4Select a point.
5Select an option:
• To view the point on the map, select Review.
• To change the order of the points on the route, select
Move Up or Move Down.
• To insert an additional point on the route, select Insert.
The additional point is inserted before the point you are
editing.
• To remove the point from the route, select Remove.
Viewing the Active Route
1Select Tools > Active Route.
2Select a point in the route to view additional details.
Reversing a Route
1Select Tools > Route Planner.
2Select a route.
3Select Reverse Route.
Waypoints, Routes, and Tracks 5

Deleting a Route
1Select Tools > Route Planner.
2Select a route.
3Select Delete Route > Yes.
Deleting All Routes
1From the main menu, select Tools > Route Planner.
2Select MENU > Delete All > Yes.
Tracks
A track is a recording of your path. The track log contains
information about points along the recorded path, including time,
location, and elevation for each point.
Recording Track Logs
1From the Main Menu, select Setup > Tracks > Track Log.
2Select Record, Do Not Show or Record, Show On Map.
If you select Record, Show On Map, a line on the map
indicates your track.
3Select Record Method.
4Select an option:
• To record tracks at a variable rate that creates an
optimum representation of your tracks, select Auto.
• To record tracks at a specified distance, select Distance.
• To record tracks at a specified time, select Time.
5Select Recording Interval.
6Complete an action:
• If you selected Auto for the Record Method, select an
option to record tracks more or less often.
NOTE: Using the Most Often interval provides the most track
detail, but fills up the device memory quicker.
• If you selected Distance or Time for the Record Method,
enter a value.
As you move with the device turned on, a track log is created.
Viewing the Elevation Plot of a Track
1Select Tools > Track Manager.
2Select a track.
3Select Elevation Plot.
Viewing Details about the Track
1Select Tools > Track Manager.
2Select a track.
3Select View Map.
The beginning and the end of the track are marked by flags.
4Select the information bar at the top of the screen.
Information about the track appears.
Saving the Current Track
1Select Tools > Track Manager.
2Select a track.
3Select an option:
• To save the entire track, select Save Track.
• To save part of the track, select Save Portion, and select
the part to save.
Marking a Location on a Saved Track
1From the main menu, select Tools > Track Manager.
2Select a track.
3Select View Map.
4Select a location on the track.
5Select MARK > New.
6Edit the location information (optional).
Navigating to the Start of a Track
You can navigate back to the beginning of a track. This can be
helpful when finding your way back to camp or the trail head.
1Select Tools > Track Manager > Current Track > View
Map.
2Select TracBack.
The map page opens with your route marked with a magenta
line.
3Navigate using the map (Map, page 6) or the compass
(Navigating with the Bearing Pointer, page 7).
Archiving a Track Manually
You can archive saved tracks to save memory space.
1Select Tools > Track Manager.
2Select a track.
3Select Archive.
Archiving Tracks Automatically
1Select Setup > Tracks > Auto Archive.
2Select an option.
Sending and Receiving Data Wirelessly
Before you can share data wirelessly, you must be within 3 m
(10 ft.) of a compatible Garmin® device.
You can share waypoints, geocaches, routes, and tracks
wirelessly.
1Select Tools > Share Wirelessly.
2Select Send or Receive.
3Follow the on-screen instructions.
Sharing Dog Information
Before you can share dog information with another handheld
device user, the user must enable their handheld device to
receive wirelessly and bring it within range of the sending device
and dog collar device.
1From the dog list page, select DOG.
2Select a dog.
3Select Share Wirelessly.
4Select an option:
• To share the dog's track only, select Track Only.
• To share the dog's track and the collar's settings, select
Track and Control.
Your device sends the dog name, unit ID, and update rate
information.
Receiving Dog Information
From the dog tracking page, select DOG > MENU > Receive
Wirelessly.
Navigation
You can navigate routes and tracks, to a waypoint, geocache,
photo, or any saved location in the device. You can use the map
or the compass to navigate to your destination.
Map
represents your location on the map. As you travel, the icon
moves and leaves a track log (trail). Waypoint names and
symbols appear on the map. When you are navigating to a
destination, your route is marked with a magenta line on the
map.
When the map orientation is Track Up, objects on the map
appear to rotate around your position. As you travel, the entire
6 Navigation
map reorients in the direction you are facing. You can stabilize
the objects by setting the orientation to North Up (Map Settings,
page 10.
To open the map, select MAP.
Enabling the Map Data Fields
1Select MAP > MENU > Setup Map > Data Fields.
2Select an option.
Compass
The handheld device has a 3-axis, tilt-compensated compass.
You can use a bearing pointer or a course pointer to navigate to
your destination.
Calibrating the Compass
NOTE: You must calibrate the electronic compass outdoors. Do
not stand near objects that influence magnetic fields, such as
cars, buildings, or overhead power lines.
The device has a 3-axis electronic compass. You should
calibrate the compass after moving long distances, experiencing
temperature changes, or changing the batteries.
1Select DOG > MENU.
2Select Calibrate Compass > Start.
3Follow the on-screen instructions.
Navigating with the Bearing Pointer
When navigating to a destination, points to your destination,
regardless of the direction you are moving.
1While navigating to a destination, select Tools > Compass
2Turn until points toward the top of the compass, and
continue moving in that direction to the destination.
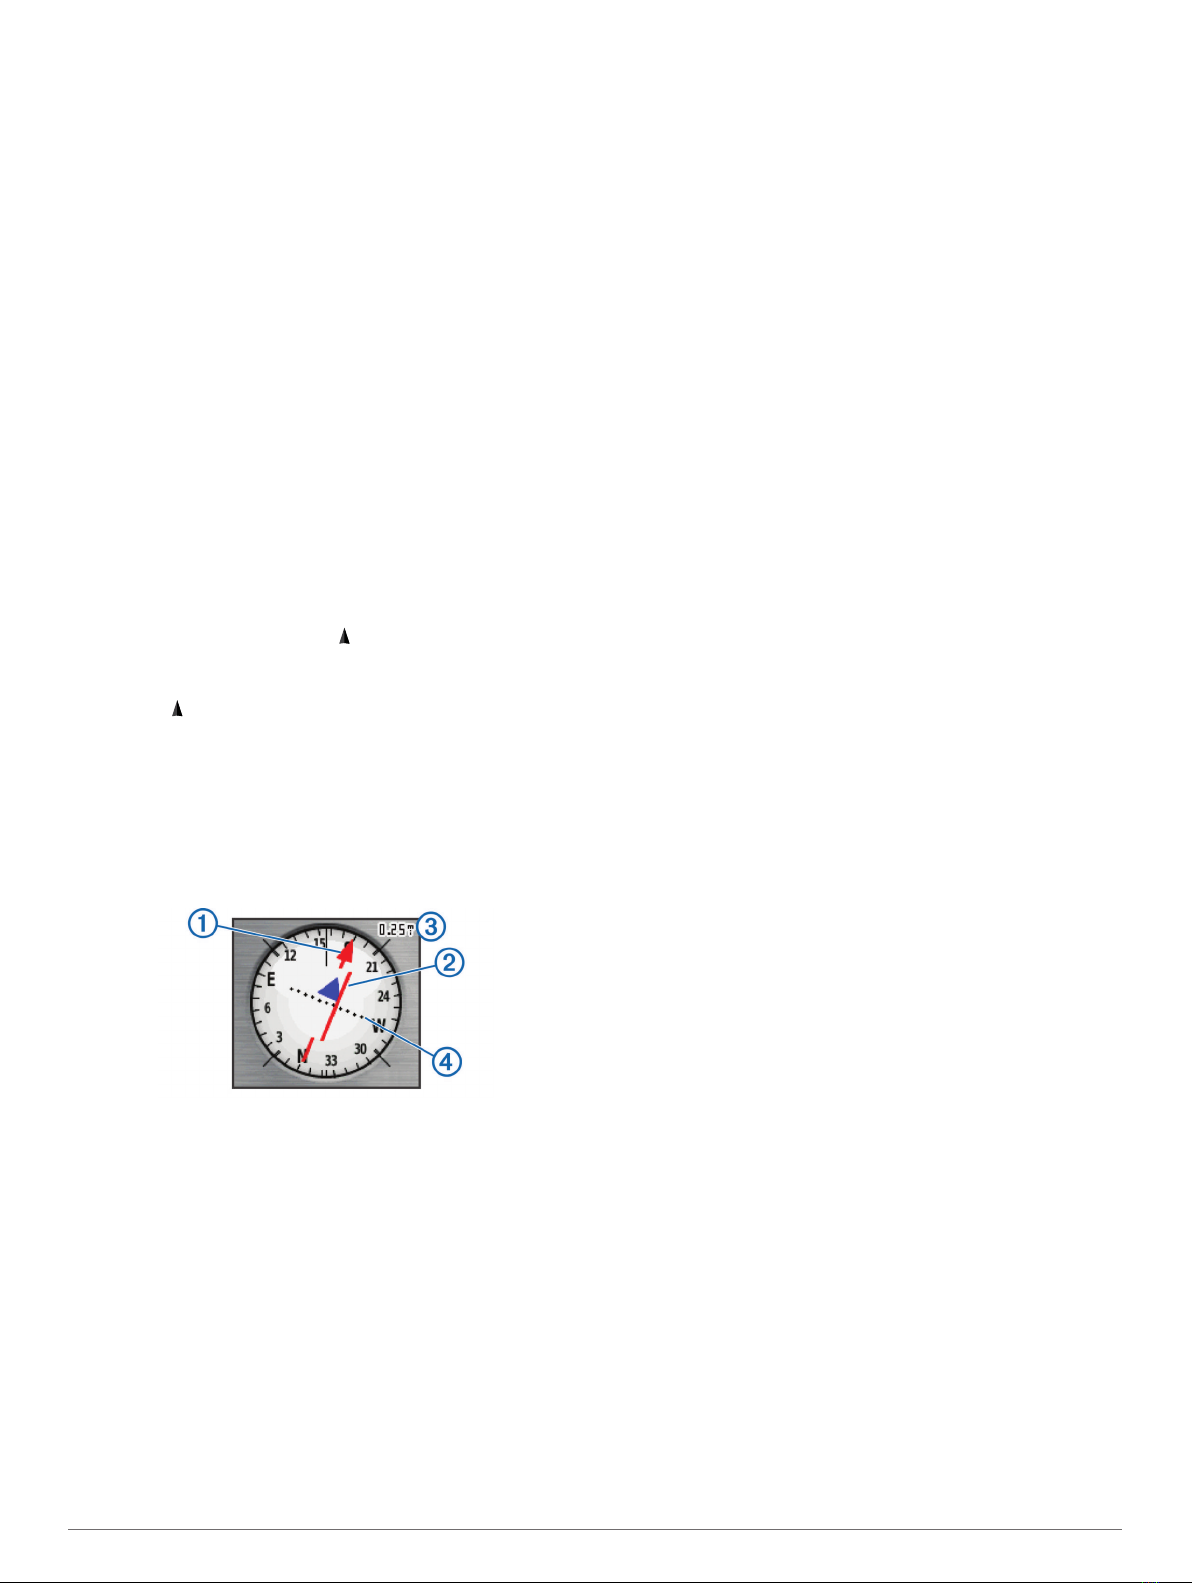
Course Pointer
The course pointer is most useful if you are navigating on water
or where there are no major obstacles in your path. It can also
help you avoid hazards near the course, such as shoals or
submerged rocks.
To enable the course pointer, from the compass, select MENU >
Setup Heading > Go To Line (Pointer).
The course pointer À indicates your relationship to the course
line leading to the destination. The course deviation indicator
(CDI) Á provides the indication of drift (right or left) from the
course. The scale  refers to the distance between dots à on
the course deviation indicator, which tell you how far off course
you are.
Find Menu
You can use the find menu to search for waypoints, cities, and
coordinates. You can download and navigate to photos, tracks,
and geocaches. Additional categories appear if you have
optional, compatible detailed maps loaded on the device. When
you open a category, the list contains items near your current
location or the map pointer (if active).
Finding a Waypoint by Name
1From the main menu, select Tools > Find > Waypoints >
MENU > Spell Search.
2Enter the name.
Matches appear as you select characters in the name.
3Select the waypoint.
Finding a Waypoint Near Another Waypoint
1From the main menu, select Tools > Waypoint Mgr..
2Select a waypoint.
3Select MENU > Find Near Here.
4Select a category.
The list includes waypoints near the original waypoint.
Navigating with Sight 'N Go
You can point the device at an object in the distance, lock in the
direction, and navigate to the object.
1Select Tools > Sight 'N Go
2Point the device at an object.
3Select Lock Direction > Set Course.
4Navigate using the compass (Navigating with the Bearing
Pointer, page 7) or map (Map, page 6).
Viewing the Elevation Plot
By default, the elevation plot displays the elevation for an
elapsed time. You can customize the plot (Changing the Plot
Type, page 7) and the data fields (Customizing the Data
Fields, page 9).
Select Tools > Elevation Plot.
Calibrating the Barometric Altimeter
You can calibrate the barometric altimeter manually if you know
the correct elevation or the correct barometric pressure.
1Go to a location where the elevation or barometric pressure
is known.
2Select Tools > Elevation Plot > MENU > Calibrate
Altimeter.
3Follow the on-screen instructions.
Navigating to a Point on the Plot
1Select Tools > Elevation Plot.
2Select a point on the plot.
Details about the point appear in the upper-left corner of the
plot.
3Select MENU > View Map.
4Select the information bar at the top of the screen.
5Select Go.
6Navigate using the compass (Navigating with the Bearing
Pointer, page 7) or map (Map, page 6).
Changing the Plot Type
You can change the elevation plot to display pressure and
elevation over time or distance.
1Select Tools > Elevation Plot > MENU > Change Plot
Type.
2Select an option.
Trip Computer
The trip computer displays your current speed, average speed,
maximum speed, trip odometer, and other helpful statistics. You
can customize the trip computer layout, dashboard, and data
fields (Customizing the Data Fields, page 9).
To open the trip computer, select Tools > Trip Computer.
Resetting the Trip Computer
For accurate trip information, you can reset the trip information
before beginning a trip.
1Select Tools > Trip Computer.
Navigation 7

2Select MENU > Reset > Reset Trip Data.
Applications
Setting a Proximity Alarm
Proximity alarms alert you when you or your dogs are within a
specified range of a particular location. A tone sounds when you
enter the designated radius.
1Select Tools > Proximity Alarms.
2Select Create Alarm.
3Select a category.
4Select a location.
5Select Use.
6Enter a radius.
When you enter an area with a proximity alarm, the device
sounds a tone.
Calculating the Size of an Area
1Select Tools > Area Calculation > Start.
2Walk around the perimeter of the area you want to calculate.
3When finished, select Calculate.
Viewing the Calendar and Almanacs
You can view device activity, such as when a waypoint was
saved, and almanac information for the sun and moon, and
hunting and fishing.
1Select Tools.
2Select an option:
• To view device activity for specific days, select Calendar.
• To view the sunrise, sunset, moonrise, and moonset
times, select Sun and Moon.
• To view the predicted best times for hunting and fishing,
select Hunt and Fish.
3If necessary, select or to view a different day.
Setting an Alarm
1Select Tools > Alarm Clock.
2Enter the time.
3Select Turn Alarm On.
4Select an option.
The alarm sounds at the selected time. If the device is off at the
alarm time, the device turns on and sounds the alarm.
Geocaches
Geocaching is a treasure hunting activity in which players hide
or search for hidden caches using clues and GPS coordinates.
Downloading Geocaches Using a Computer
You can load geocaches manually onto your device using a
computer (Connecting the Handheld Device to a Computer,
page 12). You can place the geocache files into a GPX file
and import them into the GPX folder on the device. With a
premium membership to geocaching.com, you can use the
"pocket query" feature to load a large group of geocaches onto
your device as a single GPX file.
1Connect the device to your computer using a USB cable.
2Go to www.geocaching.com/play .
3If necessary, create an account.
4Sign in.
5Follow the instructions at geocaching.com to find and
download geocaches to your device.
Finding a Geocache
Before you can navigate to a geocache, you must have one or
more geocaches loaded on your device.
1From the main menu, select Tools > Geocaches.
2Select a geocache.
3Select Go.
When a geocache is found, the handheld device marks the
cache as found, logs an entry into the calendar, and shows the
nearest cache.
Filtering the Geocache List
You can filter your geocache list based on certain factors, such
as the level of difficulty.
1From the main menu, select Tools > Find > Geocaches >
MENU > Apply Filter > Quick Filter.
2Select items to filter.
3Select Search.
Editing a Custom Geocache Filter
1Select Setup > Geocaches > Filter Setup.
2Select a filter.
3Select an item to edit.
Creating and Saving a Geocache Filter
You can create and save custom filters for geocaches based on
specific factors. After you set up the filter, you can apply it in the
geocaches list.
1Select Setup > Geocaches > Filter Setup > Create Filter.
2Select items to filter.
3Select an option:
• To apply the filter to the geocache list, select Search.
• To save the filter, select BACK. After it is saved, the filter
is automatically named. You can access the custom filter
from the geocaches list.
chirp™
A chirp is a small Garmin accessory that is programmed and left
in a geocache. You can use your device to find a chirp in a
geocache. For more information about the chirp, see the chirp
Owner's Manual at www.garmin.com.
Enabling chirp Searching
1Select Setup > Geocaches.
2Select chirp Searching > On.
Finding a Geocache with a chirp
1From the main menu, select Tools > Find > Geocaches >
MENU > Show chirp Details > Go.
2Begin navigating to a geocache.
When you are within 10 m (33 ft.) of the geocache that
contains a chirp device, details about the chirp device
appear.
3If available, select Go to navigate to the next stage of the
geocache.
Opening the Stopwatch
Select Tools > Stopwatch.
Satellite Page
The satellite page shows your current location, GPS accuracy,
satellite locations, and signal strength.
Changing the Satellite View
The default satellite view has north at the top of the screen. You
can change the orientation of the satellite view to place your
current track toward the top of the screen.
1Select Tools > Satellite.
8 Applications

2Select MENU > Track Up.
Turning Off GPS
1Select Tools > Satellite.
2Select MENU > Use With GPS Off.
Simulating a Location
Before you can simulate a location, you must turn off GPS.
1Select Tools > Satellite.
2Select MENU > Set Location On Map.
3Select a location.
4Select Use.
Disabling Dog Data Broadcast
By default, the handheld device broadcasts dog data to
compatible devices. You can disable data broadcasting to keep
your data from being seen on other compatible devices. See the
owner's manual for your compatible device for more information.
Select Setup > Dogs > Broadcast Dog Data > Off.
Enabling Bark Detection
NOTE: This feature is not available in all areas.
Select Setup > Dogs > Bark Detection.
A barking icon appears on the dog tracking page and the map
page.
When the dog collar device is active and properly fitted on the
dog (Fitting the Collar on Your Dog, page 2), it detects barks
automatically. After bark detection is enabled, you can set up a
bark alert (Setting Dog Alerts, page 4).
Enabling Rescue Mode
Before you can enable rescue mode, you must turn on the dog
collar device and bring it within 3 m (10 ft.) of the handheld
device.
If you are concerned about your dog becoming lost and running
the battery down, you can enable rescue mode. Rescue mode
extends the battery life of the collar to allow for more time to
locate the dog. You can preserve the battery life of your dog
collar device by enabling a low power, battery-saving mode from
your handheld device. This reduces the frequency that the collar
updates its position to the handheld device.
1From the dog tracking page, select a dog.
The dog information page appears.
2Select MENU > Rescue Mode.
3Wait until the confirmation message appears before you
release your dog.
VIRB® Remote
The VIRB remote function allows you to control your VIRB
action camera using your device. Go to www.garmin.com/VIRB
to purchase a VIRB action camera.
Customizing Your Device
Customizing the Main Menu
You can move, add, and delete items in the main menu.
1From the main menu, select MENU > Change Item Order.
2Select a menu item.
3Select an option:
• Select Move to change the placement of the item in the
list.
• Select Insert to add a new item to the list.
• Select Remove to delete an item from the list.
Customizing the Data Fields
Before you can customize the data fields on the map, you must
enable the data fields (Enabling the Map Data Fields, page 7).
You can customize the data fields and dashboards of the map,
compass, elevation plot, and trip computer.
1Open the page for which you will change the data fields.
2Select MENU > Change Data Fields.
3Select a data field to customize.
4Select the new data field.
For data field descriptions, see Data Fields, page 15.
Profiles
Profiles are a collection of settings that optimize your device
based on how you are using it. For example, the settings and
views are different when you use the device for hunting than
when geocaching.
Profiles are associated with the activity screens, including the
home screen.
When you are using a profile and you change settings, such as
data fields or units of measurement, the changes are saved
automatically as part of the profile.
Creating a Custom Profile
You can customize your settings and data fields for a particular
activity or trip.
1From the main menu, select Tools > Profile Change.
2Select MENU > Setup Profiles > Create Profile > OK.
3Customize the settings as necessary.
4Customize the data fields as necessary.
Any changes you make to the settings, dashboards, and data
fields are automatically saved to the active profile.
Editing a Profile Name
1From the main menu, select Tools > Profile Change >
MENU > Setup Profiles.
2Select a profile.
3Select Edit Name.
4Enter the new name.
Deleting a Profile
1From the main menu, select Tools > Profile Change >
MENU > Setup Profiles.
2Select a profile.
3Select Delete.
System Settings
Select Setup > System.
GPS: Sets the GPS to Normal, WAAS/EGNOS (Wide Area
Augmentation System/European Geostationary Navigation
Overlay Service), or Demo Mode (GPS off). For more
information about WAAS, go to www.garmin.com/aboutGPS
/waas.html.
Language: Sets the text language on the device.
NOTE: Changing the text language does not change the
language of user-entered data or map data, such as street
names.
Battery Type: Allows you to select the type of AA battery you
are using.
BaseCamp Basestation: Sets how the device connects to
BaseCamp when the device is connected to the computer.
Dog Settings
Select Setup > Dogs.
Customizing Your Device 9

Dog Track Length on Map: Sets the length of time the dog
track appears on the map. Reducing the duration of the track
can reduce the clutter on the map.
Zoom Map To Dogs: Automatically zooms the map to show all
of the dogs' locations and your location unless you manually
pan the map. This feature can help you locate your dogs
quickly.
Broadcast Dog Data: Automatically sends dog data to
compatible devices (Disabling Dog Data Broadcast, page 9).
Dog Alerts: Sets how you are alerted to certain actions (Setting
Dog Alerts, page 4).
Bark Detection: Enables your device to detect barks.
NOTE: This feature is not available in all areas.
Display Settings
Select Setup > Display.
Backlight Timeout: Adjusts the length of time before the
backlight turns off.
Battery Save: Saves the battery power and prolongs the battery
life by turning off the screen when the backlight times out.
Screen Capture: Allows you to save the image on the device
screen.
Colors: Changes the appearance of the display background and
selection highlight.
Setting the Device Tones
You can customize tones for messages, keys, warnings, and
alarms.
1Select Setup > Tones.
2Select a tone for each audible type.
Map Settings
Select Setup > Map.
Orientation: Adjusts how the map is shown on the page. North
Up shows north at the top of the page. Track Up shows a top-
down view with your current direction of travel toward the top
of the page. Automotive Mode shows an 3D automotive view
with the direction of travel at the top.
Guidance Text: Sets when the guidance text appears on the
map.
Data Fields: Customizes the data fields and dashboards of the
map, compass, elevation plot, and trip computer.
Map Information: Enables or disables the maps currently
loaded on the device.
Advanced Map Settings
Select Setup > Map > Advanced Map Setup.
Auto Zoom: Automatically selects the appropriate zoom level
for optimal use on your map. When Off is selected, you must
zoom in or out manually.
Zoom Levels: Adjusts the zoom level at which map items will
appear. The map items will not appear when the map zoom
level is higher than the selected level.
Text Size: Selects the text size for map items.
Detail: Selects the amount of detail shown on the map. Showing
more detail may cause the map to redraw more slowly.
Shaded Relief: Shows detail relief on the map (if available) or
turns off shading.
Tracks Settings
Select Setup > Tracks.
Track Log: Turns track recording on or off.
Record Method: Sets a track recording method. Auto records
the tracks at a variable rate to create an optimum
representation of your tracks.
Recording Interval: Sets a track log recording rate. Recording
points more frequently creates a more-detailed track, but fills
the track log faster.
Auto Archive: Sets an automatic archive method to organize
your tracks. Tracks are saved and cleared automatically.
Color: Changes the color of the track line on the map.
Changing the Units of Measure
You can customize units of measure for distance and speed,
elevation, depth, temperature, and pressure.
1Select Setup > Units.
2Select a measurement type.
3Select a unit of measure for the setting.
Time Settings
Select Setup > Time.
Time Format: Sets the device to show time in a 12-hour or 24-
hour format.
Time Zone: Sets the time zone for the device. Automatic sets
the time zone automatically based on your GPS position.
Position Format Settings
NOTE: Do not change the position format or the map datum
coordinate system unless you are using a map or chart that
specifies a different position format.
Select Setup > Position Format.
Position Format: Sets the position format for the location
information.
Map Datum: Sets the coordinate system on which the map is
structured.
Map Spheroid: Shows the coordinate system the device is
using. The default coordinate system is WGS 84.
Heading Settings
You can customize the compass settings.
Select Setup > Heading.
Display: Sets the type of directional heading shown on the
compass.
North Reference: Sets the north reference used on the
compass.
Go To Line (Pointer): Sets the behavior of the pointer that
appears on the map. Bearing points in the direction of your
destination. Course shows your relationship to the course line
leading to the destination.
Compass: Automatically switches from an electronic compass
to a GPS compass when you are traveling at a higher rate of
speed for a period of time.
Calibrate Compass: Calibrates the compass (Calibrating the
Compass, page 7).
Altimeter Settings
Select Setup > Altimeter.
Auto Calibration: Automatically calibrates the altimeter each
time the device is turned on.
Barometer Mode: Sets how the device measures barometric
information. Variable Elevation allows the barometer to
measure changes in elevation while you are moving. Fixed
Elevation assumes the device is stationary at a fixed
elevation, so the barometric pressure should change only
due to weather.
10 Customizing Your Device

Pressure Trending: Sets how the device records pressure
data. Save Always records all pressure data, which can be
helpful when you are watching for pressure fronts.
Plot Type: Sets the type of data recorded and displayed in the
plot. Records elevation changes over a period of time or
distance, records barometric pressure over a period of time,
or records ambient pressure changes over a period of time.
Calibrate Altimeter: Calibrates the altimeter.
Geocaching Settings
Select Setup > Geocaches.
Geocache List: Allows you to display the geocache list by
names or codes.
Found Geocaches: Allows you to edit the number of geocaches
found. This number automatically increases as you log a find.
Filter Setup: Allows you to create and save custom filters for
geocaches based on specific factors (Creating and Saving a
Geocache Filter, page 8).
chirp Searching: Allows the device to search for a geocache
containing a chirp accessory (Enabling chirp Searching,
page 8).
Program chirp: Programs the chirp accessory. See the chirp
owner's manual at www.garmin.com.
Routing Settings
The device calculates routes optimized for the type of activity
you are doing. The routing settings available vary based on the
activity selected.
Select Setup > Routing.
Guidance Method: Sets the preference for optimizing route
calculation based on distance, time, on-road, or off-road
routing.
Calculate Routes for: Sets the mode of transportation for which
to calculate routes.
Lock On Road: Locks the position icon, which represents your
position on the map, onto the nearest road.
Off Road Transitions: Sets how the device routes from one
point on the route to the next. This setting is available only for
some activities. Distance routes you to the next point on the
route when you are within a specified distance of your current
point.
Avoidance Setup: Sets the road types to avoid while
navigating. This setting is available only for some activities.
Marine Map Settings
Select Setup > Marine.
Marine Chart Mode: Sets the type of chart the device uses.
Nautical displays various map features in different colors so
the marine POIs are more readable and so the map reflects
the drawing scheme of paper charts. Fishing (requires marine
maps) displays a detailed view of bottom contours and depth
soundings and simplifies map presentation for optimal use
while fishing.
Appearance: Sets the appearance of marine navigation aids on
the map.
Marine Alarm Setup: Sets alarms for when you exceed a
specified drift distance while anchored, when you are off
course by a specified distance, and when you enter water of
a specific depth.
Setting up Marine Alarms
1From the main menu, select Setup > Marine > Marine Alarm
Setup.
2Select an alarm type.
3Select On.
4Enter a distance.
Device Information
Viewing Device Information
You can view the unit ID, software version, and license
agreement.
Select Setup > About.
Support and Updates
• You can update software and maps for your handheld device
using Garmin Express™.
• You can update software for your dog collar device using
Garmin WebUpdater.
Support and Updates
Garmin Express ( www.garmin.com/express ) provides easy
access to these services for Garmin devices.
• Product registration
• Product manuals
• Software updates
• Map, chart, or course updates
Setting Up Garmin Express
1Connect the device to your computer using a USB cable.
2Go to www.garmin.com/express.
3Follow the on-screen instructions.
Updating the Software
Before you can update the handheld device or collar software,
you must connect the handheld device (Connecting the
Handheld Device to a Computer, page 12) or the collar
(Connecting the Collar to a Computer, page 13) to the
computer.
You must update the software on the handheld device and collar
separately.
NOTE: Updating the software does not erase any of your data
or settings.
1Go to www.garmin.com/products/webupdater.
2Follow the on-screen instructions.
Device Care
NOTICE
Avoid chemical cleaners, solvents, and insect repellents that can
damage plastic components and finishes.
Do not store the device where prolonged exposure to extreme
temperatures can occur, because it can cause permanent
damage.
The device is water resistant to IEC Standard 60529 IPX7. It can
withstand accidental immersion in 1 meter of water for 30
minutes. Prolonged submersion can cause damage to the
device. After submersion, be certain to wipe dry and air dry the
device before using or charging.
Cleaning the Device
1Wipe the device using a cloth dampened with a mild
detergent solution.
2Wipe it dry.
After cleaning, allow the device to dry completely.
Cleaning the Screen
Before you can clean the screen, you should have a soft, clean,
lint-free cloth and water, isopropyl alcohol, or eyeglass lens
cleaner.
Device Information 11
Apply the liquid to the cloth, and gently wipe the screen with the
cloth.
Astro 430 Handheld Device Specifications
Water rating IEC 60529 IPX7*
Battery type Two 1.5 V AA batteries (alkaline, NiMH,
or lithium)
Alkaline battery life Up to 15 hr., typical usage
NiMH or lithium battery life Up to 20 hr., typical usage
Operating temperature range From -20° to 70°C (from -4° to 158°F)
Charging temperature range From 0° to 50°C (from 32° to 122°F)
ANT+® wireless range 2 m (12 in.) or closer
VHF radio range (standard
antenna)
30 M (33 yd.)
VHF radio range (extended
antenna)
50 M (54 yd.)
*The device withstands incidental exposure to water of up to 1 m
for up to 30 min. For more information, go to www.garmin.com
/waterrating.
T5 Dog Collar Device Specifications
Battery type Internal rechargeable lithium-ion battery
Battery life From 20 to 40 hr.
Operating temperature range From -20° to 60°C (from -4° to 140°F)
Charging temperature range From 0° to 40°C (from 32° to 104°F )
ANT® wireless range Up to 10 m (32.8 ft.)
VHF radio range Up to 14.48 km (9 mi.)
Water rating 1 ATM*
*The device withstands pressure equivalent to a depth of 10 m.
For more information, go to www.garmin.com/waterrating.
T5 mini Dog Collar Device Specifications
Battery type Rechargeable, replaceable lithium-ion
Battery life Up to 16 to 30 hr., typical use
Operating temperature range From -20° to 60°C (from -4° to 140°F)
Charging temperature range From 5° to 40°C (from 41° to 104°F)
ANT wireless range Up to 5 m (16.4 ft.)
VHF radio range Up to 6.44 km (4 mi.)
Water rating 1 ATM*
*The device withstands pressure equivalent to a depth of 10 m.
For more information, go to www.garmin.com/waterrating.
Battery Information
WARNING
This product contains a lithium-ion battery. To prevent the
possibility of personal injury or product damage caused by
battery exposure to extreme heat, store the device out of direct
sunlight.
Do not use a sharp object to remove batteries.
The temperature rating for the device may exceed the usable
range of some batteries. Alkaline batteries can rupture at high
temperatures.
CAUTION
Contact your local waste disposal department to properly
recycle the batteries.
NOTICE
Alkaline batteries lose a significant amount of their capacity as
the temperature decreases. Use lithium batteries when
operating the device in below freezing conditions.
Long-Term Storage
NOTICE
The normal long-term decrease in the charging capacity of
lithium-ion batteries can be accelerated by exposure to elevated
temperatures. Storing a fully charged device in a location with a
temperature outside the long-term storage temperature range
can significantly reduce its recharging capacity.
When you do not plan to use the handheld device for several
months, the battery should be removed. Stored data is not lost
when the battery is removed.
When you do not plan to use the collar for several months, the
battery should be charged to about 50%. The device should be
stored in a cool, dry place with temperatures around the typical
household level. After storage, the collar should be fully
recharged before use.
Data Management
You can store files on your device. The device has a memory
card slot for additional data storage.
NOTE: The device is not compatible with Windows® 95, 98, Me,
Windows NT®, and Mac® OS 10.3 and earlier.
File Types
The handheld device supports these file types.
• Files from BaseCamp. Go to www.garmin.com/trip_planning.
• JPEG photo files.
• GPX geocache files. Go to www.geocaching.com/play .
• GPI custom POI files from the Garmin POI Loader. Go to
www.garmin.com/products/poiloader.
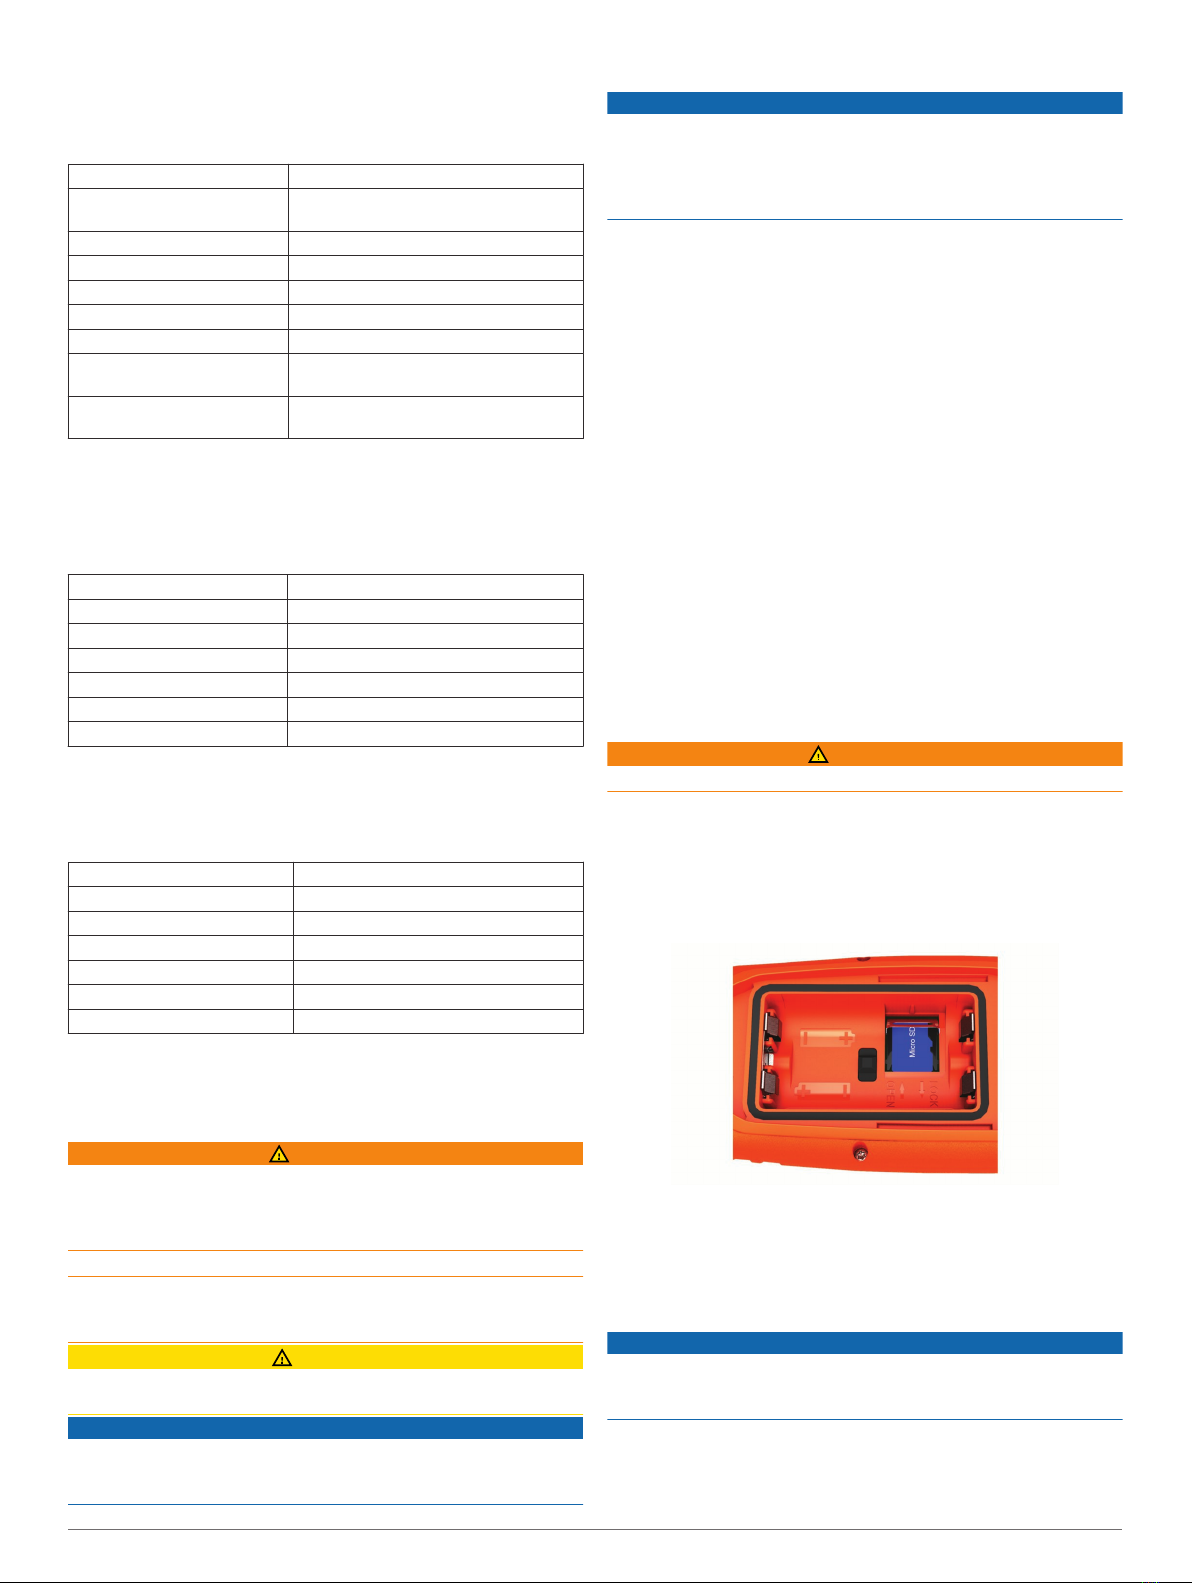
Installing a Memory Card
WARNING
Do not use a sharp object to remove user-replaceable batteries.
You can install a microSD memory card in the handheld device
for additional storage or pre-loaded maps.
1Turn the D-ring counter-clockwise, and pull up to remove the
cover.
2Remove the battery.
3Slide the card holder to the left and lift up.
4Place the memory card with the gold contacts facing down.
5Close the card holder.
6Slide the card holder to the right to lock it.
7Replace the battery and cover.
Connecting the Handheld Device to a Computer
NOTICE
To prevent corrosion, thoroughly dry the USB port, the weather
cap, and the surrounding area before charging or connecting to
a computer.
1Lift the weather cap À.
12 Device Information

2Plug the small end of the USB cable into the mini-USB
connector Á on the device.
3Plug the other end of the USB cable into an available USB
port on the computer.
Your device and memory card (optional) appear as
removable drives in My Computer on Windows computers
and as mounted volumes on Mac computers.
Connecting the Collar to a Computer
NOTICE
To prevent corrosion, you should dry the contacts on the collar
and the surrounding area before connecting the charging clip.
You can connect the collar to your computer to use with
programs like BaseCamp. The collar is not a mass storage
device.
1Snap the charging clip onto the collar.
2Plug the small end of the USB cable into the mini-USB port
on the charging clip cable.
3Plug the other end of the USB cable into a USB port on the
computer.
Transferring Dog Tracks to BaseCamp
You can transfer the dog tracks to BaseCamp.
1Connect the collar to the computer (Connecting the Collar to
a Computer, page 13).
The collar turns on automatically.
2Select .
3Open BaseCamp.
BaseCamp recognizes and transfers the collar's internal track
log.
Deleting Files
NOTICE
If you do not know the purpose of a file, do not delete it. Your
device memory contains important system files that should not
be deleted.
1Open the Garmin drive or volume.
2If necessary, open a folder or volume.
3Select a file.
4Press the Delete key on your keyboard.
Disconnecting the USB Cable
If your device is connected to your computer as a removable
drive or volume, you must safely disconnect your device from
your computer to avoid data loss. If your device is connected to
your Windows computer as a portable device, it is not necessary
to safely disconnect.
1Complete an action:
• For Windows computers, select the Safely Remove
Hardware icon in the system tray, and select your device.
• For Mac computers, drag the volume icon to the trash.
2Disconnect the cable from your computer.
Appendix
Accessories and Replacement Parts
Purchasing Accessories
Go to garmin.com/accessories.
Optional Maps
You can use additional maps with the device, such as BirdsEye
satellite imagery, BlueChart® g2, and City Navigator® detailed
maps. Detailed maps may contain additional points of interest,
such as restaurants or marine services. For more information,
go to http://buy.garmin.com or contact your Garmin dealer.
About Memory Cards
You can purchase memory cards from an electronics supplier,
or purchase pre-loaded Garmin mapping software
(www.garmin.com). In addition to map and data storage, the
memory card can be used to store files such as maps, images,
geocaches, routes, waypoints, and custom POIs.
Optional Fitness Accessories
You can use optional fitness accessories including a heart rate
monitor or a cadence sensor with your device. These
accessories use ANT+ wireless technology to send data to the
device.
Before you can use the fitness accessory with your device, you
must install the accessory according to the instructions included
with the accessory.
Using Optional Fitness Accessories
1Bring the device within range 3 m (10 ft.) of the ANT+
accessory.
2Select Setup > ANT Sensor.
3Select Heart Rate Monitor, Bike Cadence Sensor, or
Tempe Sensor.
4Select On, Off, or Search For New.
5Customize the data fields to view the heart rate or cadence
data (Customizing the Data Fields, page 9.
Tips for Pairing ANT+ Accessories with Your Garmin Device
• Verify that the ANT+ accessory is compatible with your
Garmin device.
• Before you pair the ANT+ accessory with your Garmin
device, move 10 m (32.9 ft.) away from other ANT+
accessories.
• Bring the Garmin device within range 3 m (10 ft.) of the ANT+
accessory.
• After you pair the first time, your Garmin device automatically
recognizes the ANT+ accessory each time it is activated. This
process occurs automatically when you turn on the Garmin
device and only takes a few seconds when the accessories
are activated and functioning correctly.
• When paired, your Garmin device receives data from only
your accessory, and you can go near other accessories.
Appendix 13
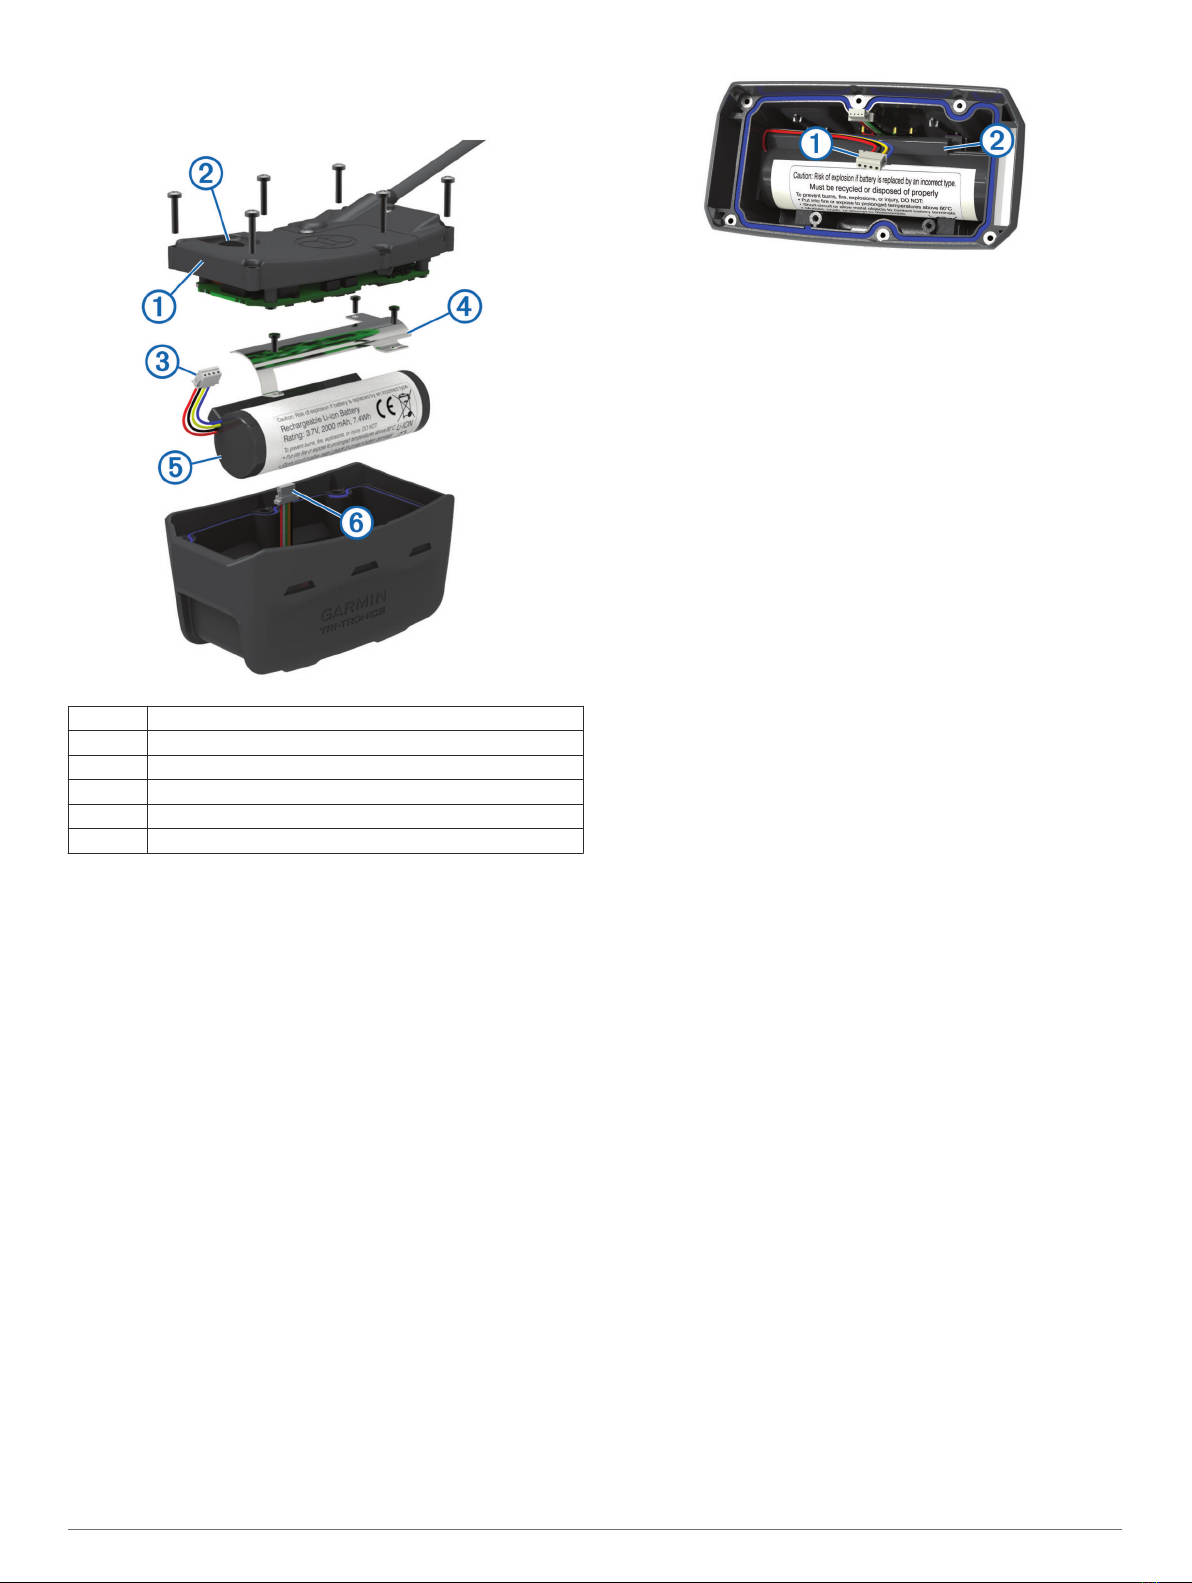
Dog Device Battery Replacement Instructions
T5 Components
ÀBack plate
ÁPower key
ÂBattery connector
ÃBattery cover
ÄBattery
ÅPower connector
Removing the Old Battery
Before you replace the battery, you must remove all dirt, water,
and debris from the device. You must also have a small Phillips
screwdriver.
1Remove the six screws from the outer edges of the back
plate.
NOTE: You should leave the two inner screws in place.
2Pry off the back plate.
3Disconnect the battery connector and power connector.
4Remove the screws that secure the battery cover.
5Remove the battery cover and the battery.
Remember the orientation of the battery. You must install the
new battery the same way.
After you remove the old battery, contact your local waste
disposal department to properly recycle the battery.
Installing the New Battery
Before you replace the battery, you must remove the old battery
(Removing the Old Battery, page 14). You also must have a
small Phillips screwdriver. You may need a small flat
screwdriver.
1Install the new battery using the same orientation as the old
battery.
The connector À should face the end nearest the power key,
and the bump Á where the wires connect to the battery
should face toward the side with the charging clip contacts.
2Replace the battery cover.
3Replace the screws to secure the battery cover.
4Connect the battery connector and power connector.
You may need to use a flat screwdriver to help secure the
connectors.
5Select the power key to test the connections.
When properly connected, a tone is emitted and the status
LED blinks green.
6Turn off the device.
7Verify the gasket located inside the bottom cover is fully
seated.
8Replace the back plate.
9Replace the six screws to secure the back plate.
After you install the new battery, charge the collar completely.
Replacing the T5 mini Dog Collar Device Battery
Before you can replace the battery, you must remove all dirt,
water, and debris from the device. You also need a small
Phillips screwdriver and the security screwdriver included in the
battery replacement kit.
1Remove the screws from the L-shaped cover over the VHF
antenna.
2Pry off the L-shaped cover.
3Remove the screws from the outer edges of the back plate.
4Pry off the back plate.
5Grip the battery connector wires close to the connector, and
pull the connector perpendicular to the circuit board to
disconnect the battery connector from the device.
6Grip the power connector wires close to the connector, and
pull the connector parallel to the circuit board to disconnect
the power connecter from the device.
7Remove the screws from the battery plate.
8Remove the battery plate.
9Remove the battery.
The battery fits tightly. It may be necessary to pry the battery
out of the back plate using a non-sharp, non-metal object.
10Install the new battery into the front enclosure with the label
side of the battery facing up, and the leading edge of the
battery placed under the charging contact ledge of the
device.
11Replace the battery plate, and replace and tighten the two
screws.
14 Appendix
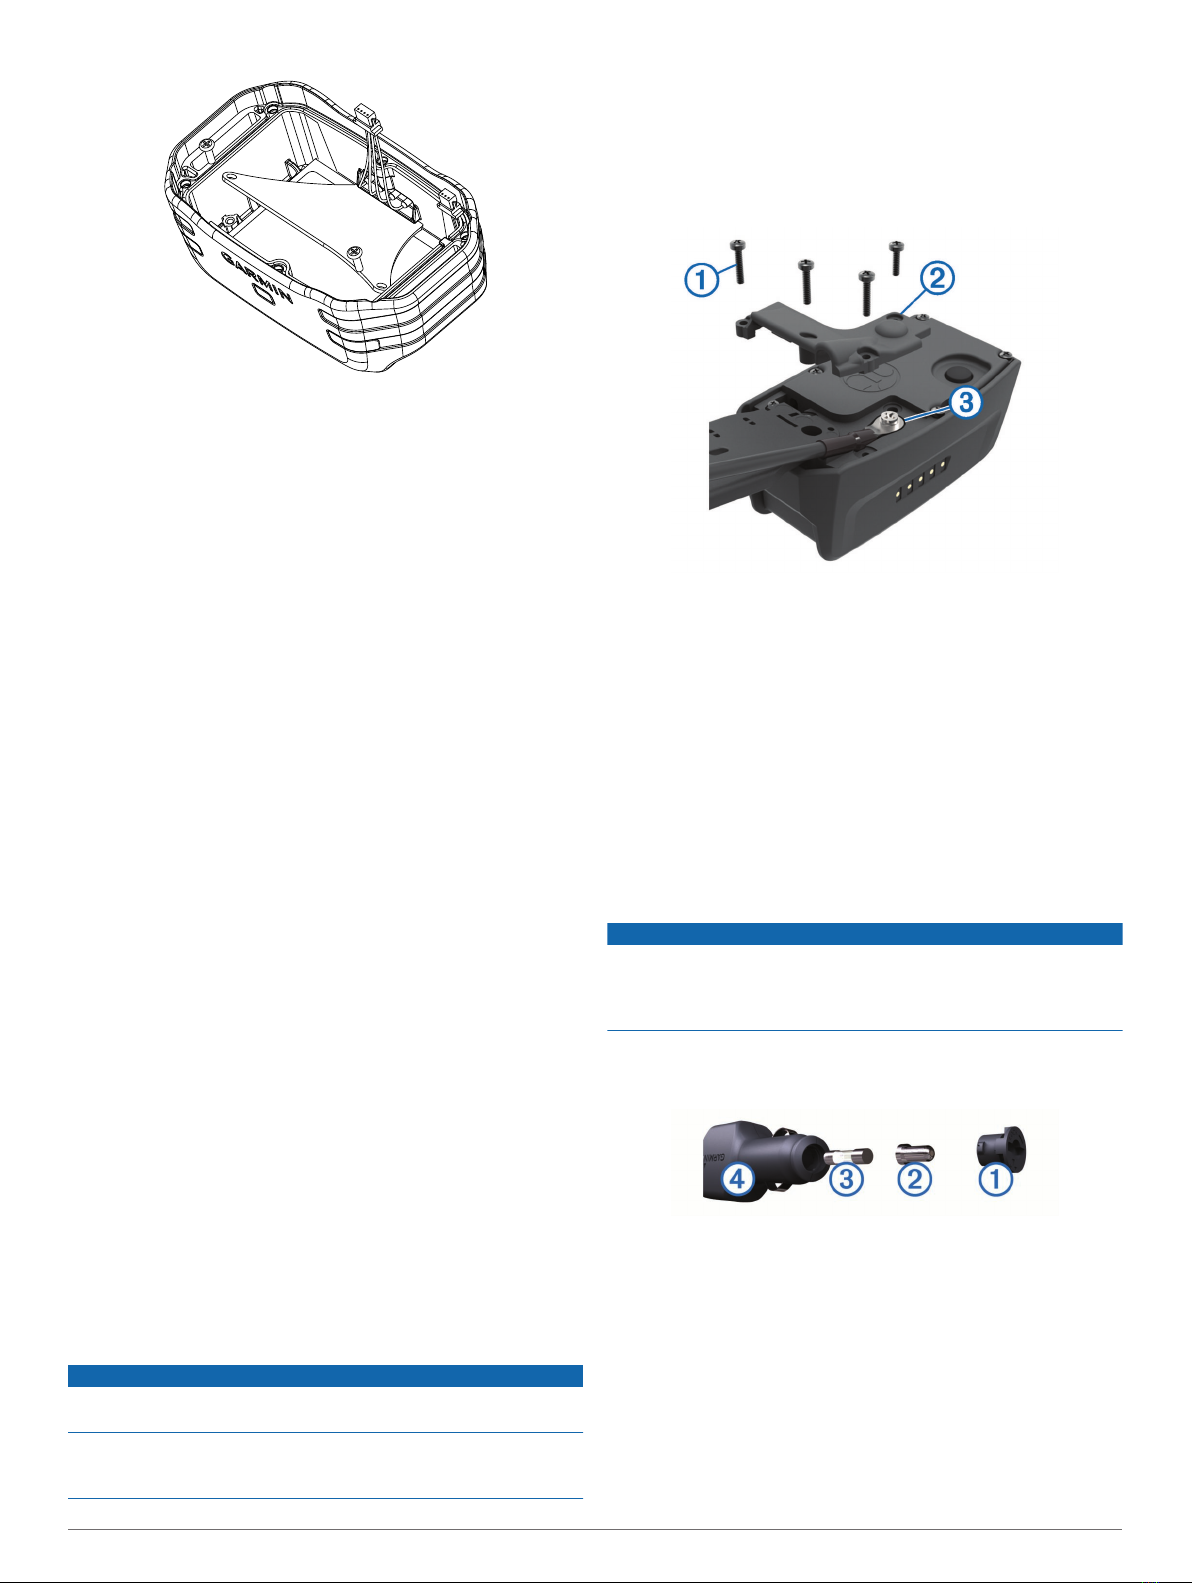
12Verify the gasket is not damaged and is completely seated in
the groove.
13Connect the battery connector and the power connector to
the device.
When properly installed, the connector plugs snap into the
ports.
14Replace the back plate, and replace and tighten the screws
to secure the back plate.
15Replace the L-shaped cover, and replace and tighten the
screws to secure the L-shaped plate.
16Verify the gasket is not sticking out of the device.
Replacing the Collar Strap
Before you replace the collar strap, you must remove all dirt,
water, and debris from the device (Cleaning the Device,
page 11).
1Pull the collar strap out of the GPS antenna, VHF antenna
guide, and the dog device.
You may need to push and pull the collar strap to properly
remove it. You may need to loosen the screw on the GPS
antenna case, but do not remove them.
2Thread the new collar strap through the dog device, VHF
antenna guide, and GPS antenna.
3If necessary, tighten the screws that secure the GPS antenna
case.
VHF Radio Information
This product may be used only on specific radio frequencies,
which vary depending on the country of use. The handheld
device and the dog device allow the user to install a different
antenna. Changing the antenna can result in improved radio
performance and higher radiated power. You must not use the
device with a third party antenna or an antenna not approved by
Garmin. Go to www.garmin.com/tracking-legal for details about
the performance and radio frequency of this product, lawful
accessories, and power limits for countries.
Replacing the VHF Antenna in the Handheld Device
1Locate the VHF antenna (Astro 430 Handheld Device,
page 1).
2Rotate the VHF antenna counter-clockwise until it comes free
from the device.
3Insert the replacement VHF antenna into the antenna port
and rotate the antenna clockwise by hand until it stops.
Replacing the VHF Antenna in the Dog Collar Device
NOTICE
Do not excessively bend the band that connects the main device
case with the GPS antenna.
When the cover is removed, do not disturb the sealant opposite
the VHF antenna, because this can damage the waterproof seal
of the dog collar device.
Before you replace the VHF antenna, you must remove all dirt,
water, and debris from the device. Also, you need a small
Phillips screwdriver.
1Remove the 4 screws À from the cover over the VHF
antenna.
NOTE: You should note the location of the one short screw
Á.
2Pry off the cover.
3Remove the screw  securing the VHF antenna to the back
plate.
4Pull the length of the antenna from the antenna guide to
remove the old antenna.
5Loop the antenna guide around the collar strap, and thread
the new VHF antenna through the guide.
This helps to point the antenna up.
6Replace the screw securing the VHF antenna to the back
plate.
7Replace the cover over the VHF antenna.
8Replace the 4 screws on the cover, replacing the short screw
in the correct location.
Changing the Fuse in the Vehicle Power Cable
NOTICE
When replacing the fuse, do not lose any of the small pieces
and make sure they are put back in the proper position. The
vehicle power cable does not work unless it is assembled
correctly.
If your device does not charge in your vehicle, you may need to
replace the fuse located at the tip of the vehicle adapter.
1Rotate the end piece À counter clockwise to unlock it.
TIP: You may need to use a coin to remove the end piece.
2Remove the end piece, the silver tip Á, and the fuse Â.
3Insert a new fast-blow fuse that has the same current, such
as 1 A or 2 A.
4Place the silver tip in the end piece.
5Push in the end piece and rotate it clockwise to lock it back
into the vehicle power cable Ã.
Data Fields
Accuracy of GPS: The margin of error for your exact location.
For example, your GPS location is accurate to within +/- 12 ft.
(3.65 m).
Appendix 15

Ambient Pressure: The uncalibrated environmental pressure.
Ascent - Average: The average vertical distance of ascent
since the last reset.
Ascent - Maximum: The maximum rate of ascent in feet per
minute or meters per minute since the last reset.
Ascent - Total: The total elevation distance ascended since the
last reset.
Barometer: The calibrated current pressure.
Battery Level: The remaining battery power.
Bearing: The direction from your current location to a
destination. You must be navigating for this data to appear.
Cadence: The number of revolutions of the crank arm or
number of strides per minute. Your device must be
connected to a cadence accessory for this data to appear.
Course: The direction from your starting location to a
destination. Course can be viewed as a planned or set route.
You must be navigating for this data to appear.
Descent - Average: The average vertical distance of descent
since the last reset.
Descent - Maximum: The maximum rate of descent in feet per
minute or meters per minute since the last reset.
Descent - Total: The total elevation distance descended since
the last reset.
Distance to Dest.: The remaining distance to the final
destination. You must be navigating for this data to appear.
Distance to Next: The remaining distance to the next waypoint
on the route. You must be navigating for this data to appear.
Elevation: The altitude of your current location above or below
sea level.
Elevation - Maximum: The highest elevation reached since the
last reset.
Elevation - Minimum: The lowest elevation reached since the
last reset.
ETA at Destination: The estimated time of day when you will
reach the final destination (adjusted to the local time of the
destination). You must be navigating for this data to appear.
ETA at Next: The estimated time of day when you will reach the
next waypoint on the route (adjusted to the local time of the
waypoint). You must be navigating for this data to appear.
Glide Ratio: The ratio of horizontal distance traveled to the
change in vertical distance.
Glide Ratio to Dest: The glide ratio required to descend from
your current position to the destination elevation. You must
be navigating for this data to appear.
GPS Signal Strength: The strength of the GPS satellite signal.
Heading: The direction you are moving.
Heart Rate: Your heart rate in beats per minute (bpm). Your
device must be connected to a compatible heart rate monitor.
Location (lat/lon): The current position in latitude and longitude
regardless of the selected position format setting.
Location (selected): The current position using the selected
position format setting.
Odometer: A running tally of distance traveled for all trips. This
total does not clear when resetting the trip data.
Off Course: The distance to the left or right by which you have
strayed from the original path of travel. You must be
navigating for this data to appear.
Pointer: An arrow points in the direction of the next waypoint or
turn. You must be navigating for this data to appear.
Speed: The current rate of travel.
Speed - Maximum: The highest speed reached since the last
reset.
Speed - Moving Avg.: The average speed while moving since
the last reset.
Speed - Overall Avg.: The average speed while moving and
stopped since the last reset.
Sunrise: The time of sunrise based on your GPS position.
Sunset: The time of sunset based on your GPS position.
Time of Day: The current time of day based on your current
location and time settings (format, time zone, daylight saving
time).
Time to Destination: The estimated time remaining before you
reach the destination. You must be navigating for this data to
appear.
Time to Next: The estimated time remaining before you reach
the next waypoint in the route. You must be navigating for
this data to appear.
To Course: The direction in which you must move to get back
on the route. You must be navigating for this data to appear.
Trip Odometer: A running tally of the distance traveled since
the last reset.
Trip Time - Moving: A running tally of the time spent moving
since the last reset.
Trip Time - Stopped: A running tally of the time spent not
moving since the last reset.
Trip Time - Total: A running tally of the total time spent moving
and not moving since the last reset.
Turn: The angle of difference (in degrees) between the bearing
to your destination and your current course. L means turn
left. R means turn right. You must be navigating for this data
to appear.
Update Rate: The frequency at which the collar sends data to
the handheld device.
Velocity Made Good: The speed at which you are closing on a
destination along a route. You must be navigating for this
data to appear.
Vertical Speed: The rate of ascent or descent over time.
Vertical Speed to Dest: The rate of ascent or descent to a
predetermined altitude. You must be navigating for this data
to appear.
Waypoint at Dest: The last point on the route to the destination.
You must be navigating for this data to appear.
Waypoint at Next: The next point on the route. You must be
navigating for this data to appear.
Troubleshooting
My handheld device is not responding
If your handheld device stops responding, you can reset the
device.
NOTE: This does not erase any of your data or settings.
1Remove the batteries.
2Reinstall the batteries (Installing Batteries, page 1).
My dog collar devices have conflicting IDs
Each dog you track has its own ID number. If two dogs within
range of the handheld device have the same ID, the handheld
device warns you of a conflicting ID signal. Follow the on-screen
instructions to resolve the conflict.
When possible, you should allow the handheld device to
automatically assign IDs. If necessary, you can manually assign
a new ID number to a dog.
My handheld device does not report barks
NOTE: This feature is not available in all areas.
The bark detection feature does not work if the dog collar device
is not fitted correctly. You should position the device near the
16 Appendix
Other manuals for Astro 430
1
Table of contents
Other Garmin Portable Radio manuals


