GARZ&FRICKE GUF-Yocto-34.0-r5756-0-VINCELL User manual

Yocto
User Manual
GUF-Yocto-34.0-r5756-0
VINCELL
Built on 11.02.2016

GUF-Yocto-34.0-r5756-0
VINCELL
User Manual
Important hints
Thank you very much for purchasing a Garz & Fricke product. Our products are dedicated to professional use
and therefore we suppose extended technical knowledge and practice in working with such products.
The information in this manual is subject to technical changes, particularly as a result of continuous
product upgrades. Thus this manual only reflects the technical status of the products at the time
of printing. Before design-in the device into your or your customer’s product, please verify that this
document and the therein described specification is the latest revision and matches to the PCB
version. We highly recommend contacting our technical sales team priorto any activity of that kind. A
good way getting the latest information is to check the release notes of each product and/or service.
Please refer to the chapter [
I
11 Related documents and online support].
The attached documentation does not entail any guarantee on the part of Garz & Fricke GmbH with
respect to technical processes described in the manual or any product characteristics set out in the
manual. We do not accept any liability for any printing errors or other inaccuracies in the manual
unless it can be proven that we are aware of such errors or inaccuracies or that we are unaware
of these as a result of gross negligence and Garz & Fricke has failed to eliminate these errors or
inaccuracies for this reason. Garz & Fricke GmbH expressly informs that this manual only contains
a general description of technical processes and instructions which may not be applicable in every
individual case. In cases of doubt, please contact our technical sales team.
In no event, Garz & Fricke is liable for any direct, indirect, special, incidental or consequential damages
arising out of use or resulting from non-compliancy of therein conditions and precautions, even if
advised of the possibility of such damages.
Before using a device covered by this document, please carefully read the related hardware manual
and the quick guide, which contain important instructions and hints for connectors and setup.
Embedded systems are complex and sensitive electronic products. Please act carefully and ensure
that only qualified personnel will handle and use the device at the stage of development. In the event
of damage to the device caused by failure to observe the hints in this manual and on the device
(especially the safety instructions), Garz & Fricke shall not be required to honour the warranty even
during the warranty period and shall be exempted from the statutory accident liability obligation.
Attempting to repair or modify the product also voids all warranty claims.
Before contacting the Garz & Fricke support team, please try to help yourself by the means of this
manual or any other documentation provided by Garz & Fricke or the related websites. If this does not
help at all, please feel free to contact us or our partners as listed below. Our technicians and engineers
will be glad to support you. Please note that beyond the support hours included in the Starter Kit,
various support packages are available. To keep the pure product cost at a reasonable level, we have
to charge support and consulting services per effort.
Shipping address:
Garz & Fricke GmbH
Tempowerkring 2
21079 Hamburg
Germany
Support contact:
Phone +49 (0) 40 / 791 899 - 30
Fax +49 (0) 40 / 791 899 - 39
Email
I
suppor[email protected]
URL
I
www.garz-fricke.com
© Copyright 2016 by Garz & Fricke GmbH. All rights are reserved.
Copies of all or part of this manual or translations into a different language may only be made
with the prior written approval.
2

Contents
Important hints 2
1 Introduction 4
2 Overview 5
2.1 The bootloader 5
2.2 The Linux kernel 5
2.3 The root file system 5
2.4 The partition layout 6
2.5 Further information 6
3 Accessing the target system 7
3.1 Serial console 7
3.2 SSH console 8
3.3 Telnet console 8
3.4 Uploading files with TFTP 9
3.5 Uploading files with SFTP 9
4 Services and utilities 11
4.1 Services 11
4.1.1 Udev 12
4.1.2 D-Bus 13
4.1.3 SSH service 13
4.1.4 Telnet service 14
4.1.5 Module loading 15
4.1.6 Network initialization 15
4.1.7 Garz & Fricke shared configuration 15
4.1.8 Autocopy 16
4.1.9 Autostart 18
4.1.10 Cron 19
4.2 Utilities 20
4.2.1 Garz & Fricke system configuration 20
4.2.2 Power down mode 20
4.2.3 Sendmail 21
5 Add-On Packages 22
5.1 Chromium 22
5.1.1 Installation 22
5.1.2 Deinstallation 23
5.1.3 Manual Start/Stop of Chromium 23
5.1.4 "Kiosk"-Mode 23
5.1.5 Configuration 23
5.1.6 Soft-Keyboard 24
6 Accessing the hardware 25
6.1 Digital I/O 25
6.2 Serial interfaces (RS-232 / RS-485 / MDB) 26
6.3 Ethernet 26
6.4 Real Time Clock (RTC) 26
6.5 SPI 27
6.6 I2C 27
6.7 CAN 28
6.8 USB 29
6.8.1 USB Host 29
6.8.2 USB Device 29
6.9 Display power 30
6.10 Display backlight 30
6.11 SD cards and USB mass storage 30
6.12 Temperature Sensor 31
6.13 Touchscreen 31
3

GUF-Yocto-34.0-r5756-0
VINCELL
User Manual
6.14 Audio 31
6.15 SRAM 32
6.16 HDMI 32
6.16.1 HDMI as primary display 32
6.16.2 HDMI as secondary display 33
6.16.3 HDMI as mirror of the internal display 33
6.16.4 HDMI XML configuration 33
7 Building and running a user application 35
7.1 SDK installation 35
7.2 Simple command-line application 35
7.3 Qt-based GUI user application 36
7.4 Using the Qt Creator IDE 37
7.4.1 Configuring Qt Creator 37
7.4.2 Developing with Qt Creator 40
7.5 Autostart mechanism for user applications 41
7.6 Configuring the Qt Webkit demo 43
8 Building a Garz & Fricke Yocto Linux system from source 44
8.1 General information about Garz & Fricke Yocto Linux systems 44
8.2 Download and install the Garz & Fricke Yocto BSP 45
8.3 Building the BSP for the target platform with Yocto 45
9 Deploying the Linux system to the target 46
10 Securing the device 48
10.1 Services 48
10.2 User permissions concept 48
10.2.1 Root password 48
10.2.2 Non root user 49
10.2.3 super user privileges for non root user 49
10.3 autostart 50
10.4 Flash-N-Go System 50
10.5 Networking 50
10.5.1 Firewall - netfilter/iptables 50
10.5.2 Using secure network protocols 51
10.6 Restrict physical access 51
10.7 Application security 51
11 Related documents and online support 52
A GNU General Public License v2 53
A.1 Preamble 53
A.2 TERMS AND CONDITIONS FOR COPYING, DISTRIBUTION AND MODIFICATION 53
A.3 END OF TERMS AND CONDITIONS 56
A.3.1 How to Apply These Terms to Your New Programs 56
4

GUF-Yocto-34.0-r5756-0
VINCELL
User Manual
1 Introduction
Garz & Fricke systems based on Freescale i.MX53 can be used with an adapted version of Linux, a royalty-
free open-source operating system. The Linux kernel as provided by Garz & Fricke is based on extensions by
Freescale that currently have not been contributed back into the mainline kernel. Furthermore, Garz & Fricke has
made several modifications and extensions to the kernel which are currently not contributed back to the mainline
kernel as well. Nevertheless, the full source code is available as a board support package (BSP) from Garz &
Fricke.
A Garz & Fricke device normally comes with a pre-installed Garz & Fricke Linux operating system. However, since
Linux is an open source system, the user is able to build the complete BSP from source, modify it according to
his needs and replace the pre-installed Linux system with a custom one.
This manual contains information about the usage of the Garz & Fricke Linux operating system for VINCELL, as
well as the build process of the Garz & Fricke Linux BSP and the integration of custom software components.
The BSP can be downloaded from the Garz & Fricke support server:
I
http://support.garz-fricke.com/projects/Vincell/Linux-Yocto/Releases/
It does not include the complete source code to all packages. Instead, several external packages are downloaded
from third party online sources and from the Garz & Fricke packages mirror during the build process: If third party
souces are not available anymore at the former location there should be a backup available at:
I
http://support.garz-fricke.com/mirror
Modifications to these packages are provided as source code patches, which are part of the BSP.
Please note that Linux development at Garz & Fricke is always in progress. Thus, there are new releases of the
BSP at irregular intervals. Due to differences between the various Linux BSP platforms and versions, a separate
manual is available for every platform/version. To avoid confusion, the version number of the manual exactly
matches the BSP version number.
In addition to this manual, please also refer to the dedicated hardware manuals which can be found on the Garz
& Fricke website as well.
5

GUF-Yocto-34.0-r5756-0
VINCELL
User Manual
2 Overview
A Garz & Fricke Linux System generally consists of four basic components:
the bootloader
the Linux kernel
the root file system
the device configuration
These software components are usually installed on separate partitions on the backing storage of the embedded
system.
Newer Garz & Fricke devices are shipped with a separate small ramdisk-based Linux system called Flash-N-Go
System which is installed in parallel to the main operating system. The purpose of Flash-N-Go is to provide the
user a comfortable and secure update mechanism for the main operating system components.
2.1 The bootloader
There are several bootloaders available for the various Linux platforms in the big Linux world. For desktop PC
Linux systems, GRUB or LILO are commonly used. Those bootloaders are started by hardwired PC-BIOS.
Embedded Systems do not have a PC-like BIOS. In most cases they are started from raw flash memory or an
eMMC device. For this purpose, there are certain open source boot loaders available, like RedBoot, U-Boot or
Barebox. Furthermore, Garz & Fricke provides its own bootloader called Flash-N-Go Boot for its newer platforms
(e.g. SANTARO).
VINCELL uses the bootloader RedBoot.
2.2 The Linux kernel
The Linux OS kernel includes the micro kernel specific parts of the Linux OS and several internal device and
subsystem drivers.
2.3 The root file system
The root file system is simply a file system. It contains the Linux file system hierarchy folders and files. Depending
on the system configuration, the root file system may contain:
system configuration files
shared runtime libraries
dynamic device and subsystem drivers - so called loadable kernel modules - in contrast to kernel-included
device and subsystem drivers
executable programs for system handling
fonts
etc.
Usually, a certain standard set of runtime libraries can be found in almost every Linux system, including standard
C/C++ runtime libraries, math support libraries, threading support libraries, etc.
Embedded Linux systems principally differ in dealing with the graphical user interface (GUI). The following list
gives some examples for GUI systems that are commonly used in embedded Linux systems:
no GUI framework
Qt Embedded on top of a Linux frame buffer device
Qt Embedded on top of DirectFB graphics acceleration library
Qt Embedded on top of an X-Server
GTK+ on top of DirectFB graphics acceleration library
GTK+ on top of a X-Server
Nano-X / Microwindows on top of a Linux frame buffer device
Some system may additionally be equipped with a window manager of small footprint or a desktop system like
KDE ore GNOME. However, in practice most embedded Linux Systems are running only one GUI application and
a desktop system generates useless overhead.
VINCELL is equipped with Qt5.
6

GUF-Yocto-34.0-r5756-0
VINCELL
User Manual
2.4 The partition layout
As already stated in chapter [
I
2 Overview], the different components of the embedded Linux system are stored
in different partitons of the backing-storage. The backing-storage type of VINCELL is NAND Flash. In addition
to the partitions for the basic Linux components there may be some more partitions depending on the system
configuration.
The partition layout for the VINCELL platform is:
RedBoot bootloader binary image
FIS directory XML configuration parameters
Redundant FIS mirrored XML configuration parameters
logo.png boot logo in PNG format
kernel kernel binary image
rootfs root file system
RedBoot can start the following Linux kernel image types:
zImage: compressed image
Image: uncompressed image
2.5 Further information
For readers who are not familar with Linux in general, the following link may be helpful:
I
http://tldp.org/LDP/intro-linux/html
Information regarding embedded Linux systems can be found in the following book:
"Building Embedded Linux systems 2nd Edition", Karim Yaghmour, John Masters, Gilad Ben-Yossef, Philippe
Gerum, O’Reilly, 2008, ISBN: 978-0-596-52968-0
Information regarding Linux infrastructure issues in general can be found at:
I
http://tldp.org/LDP/Pocket-Linux-Guide/html
I
http://www.linuxfromscratch.org
Information about Qt/Embedded can be found at:
I
http://directfb.org
Information about the X window system can be found at:
I
http://www.freedesktop.org
Information about Qt/Embedded can be found at:
I
http://qt-project.org
Information about Nano-X / Microwindows can be found at:
I
http://www.microwindows.org
Information about GTK+ can be found at:
I
http://www.gtk.org
Information about U-Boot can be found at:
I
http://www.denx.de/wiki/U-Boot
Information about the RedBoot can be found at:
I
http://ecos.sourceware.org/docs-latest/redboot/redboot-guide.html
Information about the Yocto Project can be found at:
I
https://www.yoctoproject.org
Documentation of the Yocto Project can be found at:
I
https://www.yoctoproject.org/documentation/current
7
GUF-Yocto-34.0-r5756-0
VINCELL
User Manual
3 Accessing the target system
A Garz & Fricke hardware platform can be accessed from a host system using the following technologies:
Serial console console access over RS-232
Telnet console access over Ethernet
SSH encrypted console access and file transfer over Ethernet
TFTP file downoad over Ethernet
SFTP file upload and download over Ethernet
Each of the following chapters describes one of these possibilities and, where applicable, gives a short example
of how to use it. For all examples, the Garz & Fricke target system is assumed to have the IP address 192.168.1.1.
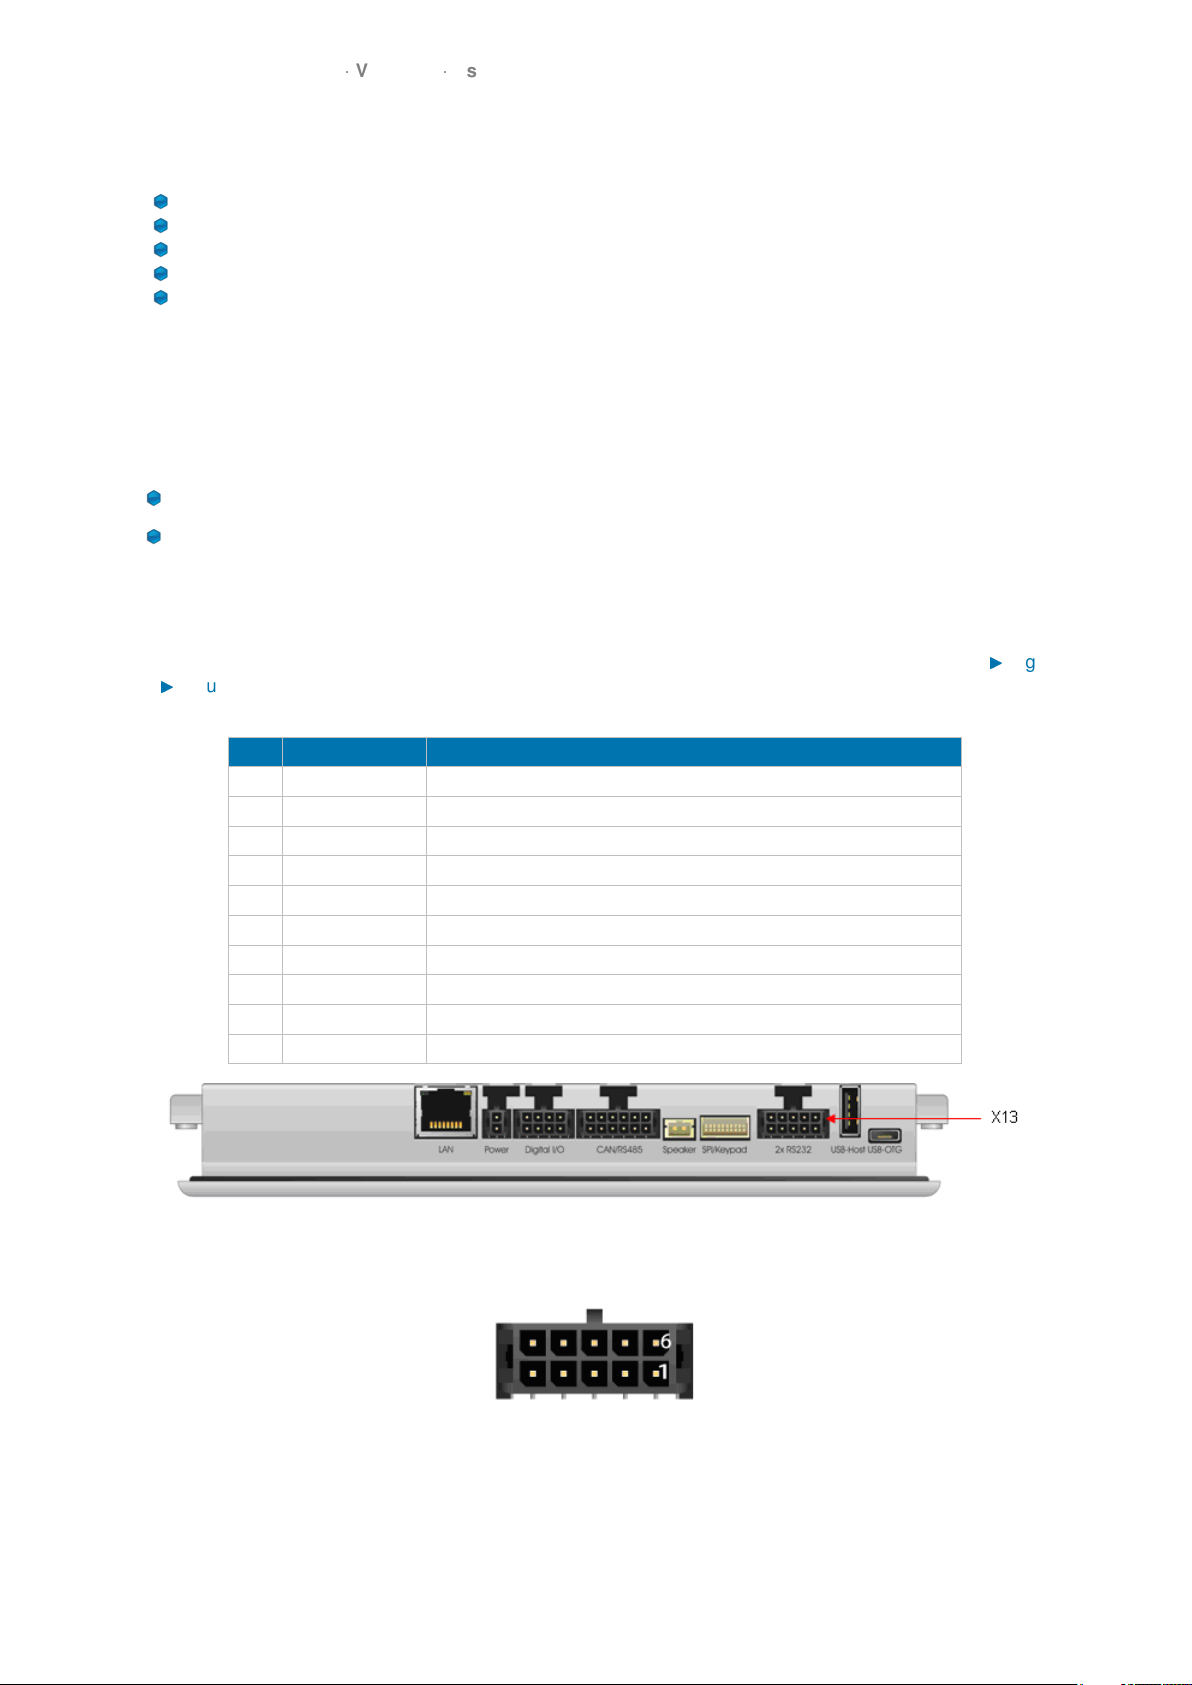
3.1 Serial console
The easiest way to access the target is via the serial console. There are two way to connect the serial console:
RS232 on connector X13
Virtual console over USB
To use the RS232 connection, connect the first RS-232 port of your target system using to a COM port of your
PC or a USB-to-RS232 converter using a null modem cable.
For a working connection, the signals TXD and RXD have to be connected cross-over in the same way like a null
modem cable does. The location of the X13 connector and the necessary pins can be found in figure [
I
Figure
1],[
I
Figure 2] below. If you received your system as part of a starter kit, this kit should also contain a cable to
be used for this connection.
Pin Name Description
1 GND Ground
2 RS232_TXD1 Port#1: Transmit data (Output)
3 RS232_RXD1 Port#1: Receive data (Input)
4 RS232_RTS1 Port#1: Request-to-send (Output)
5 RS232_CTS1 Port#1: Clear-to-send (Input)
6 GND Ground
7 RS232_TXD2 Port#2: Transmit data (Output)
8 RS232_RXD2 Port#2: Receive data (Input)
9 RS232_RTS2 Port#2: Request-to-send (Output)
10 RS232_CTS2 Port#2: Clear-to-send (Input)
Figure 1: Location of the X13 connector
Figure 2: Pinning of the X13 connector
To use the serial console provided over USB, connect a Micro-USB cable to the USB-OTG connector of the
target. When this USB cable is connected to a Windows PC, a driver is installed and a new COM port is created.
Its name can be seen in the device manager.
8
GUF-Yocto-34.0-r5756-0
VINCELL
User Manual
Note: Although the serial connection over USB is easy to setup, there are some disadvantages over the RS232
connection: The output of the bootloader and the boot messages are not shown. The first thing you see is the
login shell. This way it is not usable for system updates.
With the serial connection set up start your favourite terminal program (e.g. minicom) with the following settings:
115200 baud
8 data bits
no parity
1 stop bit
no hardware flow control
no software flow control
If you are using the RS232 connection, you should see debug messages in the terminal from the very first moment
when the target is powered. After the boot process has finished, you will see the Linux login shell:
Garz & Fricke Yocto BSP (based on Poky) @VERSION@ vincell /dev/ttymxc0
vincell login:
You can log in as user root without any password by default.
3.2 SSH console
Using SSH, you can access the console of the device and copy files to or from the target. Please note that SSH
must be installed on the host system in order to gain access.
To login via SSH, type on the host system:
The first time you access the target system from the host system, the target is added to the list of known hosts.
You have to confirm this step in order to establish the connection.
The authenticity of host '192.168.1.1 (192.168.1.1)' can't be established.
RSA key fingerprint is e5:86:89:19:50:a5:46:52:15:35:e5:0e:d2:d1:f9:62.
Are you sure you want to continue connecting (yes/no)? yes
Warning: Permanently added '192.168.1.1' (RSA) to the list of known hosts.
root@vincell:~#
To return to your host system’s console, type:
root@vincell:~# exit
You can use secure copy (scp) on the device or the host system to copy files from or to the device.
Example: To copy the file myapp from the host’s current working directory to the target’s /usr/bin directory, type
on the host’s console:
To copy the target’s /usr/bin/myapp file back to the host’s current working directory, type:
3.3 Telnet console
Telnet can be used to access the console. Please note that Telnet must be installed on the host system in order
to gain access.
To login via Telnet, type on the host system:
9

GUF-Yocto-34.0-r5756-0
VINCELL
User Manual
$ telnet 192.168.1.1
The login prompt appears and you can login with username and password:
Trying 192.168.1.1...
Connected to 192.168.1.1.
Escape character is '^]'.
vincell login: root
Password: [Enter password]
root@vincell:~#
3.4 Uploading files with TFTP
You can copy files from the host system to the target system using the target’s TFTP client. Please note that
a TFTP server has to be installed on the host system. Usually, a TFTP server can be installed on every Linux
distribution. To install the TFTP server under Debian based systems with apt, the following command must be
executed on the host system:
$ sudo apt-get install xinetd tftpd tftp
The TFTP server must be configured as follows in the /etc/xinetd.d/tftpd file on the host system in order to
provide the directory /srv/tftp as TFTP directory:
service tftp
{
protocol = udp
port = 69
socket_type = dgram
wait = yes
user = nobody
server = /usr/sbin/in.tftpd
server_args = /srv/tftp
disable = no
}
The /srv/tftp directory must be created on the host system with the following commands:
$ sudo mkdir /srv/tftp
$ sudo chmod -R 777 /srv/tftp
$ sudo chown -R nobody /srv/tftp
After the above modification the xinetd must be restarted on the host system with the new TFTP service with the
following command:
$ sudo service xinetd restart
From now on, you can access files in this directory from the target.
Example: Copying the file myapp from the host system to the target’s /usr/bin directory. To achieve this, first
copy the file myapp to your TFTP directory on the host system:
$ cp ./myapp /srv/tftp/
The host system is assumed to have the ip address 192.168.1.100. On the target system, type:
root@vincell:~# tftp -g 192.168.1.100 -r myapp -l /usr/bin/myapp
3.5 Uploading files with SFTP
You can exchange files between the host system and the target system using an SFTP (Secure FTP) client on
the host system. Simply choose your favourite SFTP client (e.g. FileZilla) and connect to sftp://192.168.1.1 with
10

GUF-Yocto-34.0-r5756-0
VINCELL
User Manual
user root and no password.
11

GUF-Yocto-34.0-r5756-0
VINCELL
User Manual
4 Services and utilities
The Garz & Fricke Linux BSP includes several useful services for flexible application handling. Some of them are
just run-once services directly after the OS has been started, others are available permanently.
4.1 Services
The services on Garz & Fricke Yocto Linux systems are usually started with start scripts. This is a very common
technique on Linux systems. Yocto uses the /etc/init.d/rc script for this purpose. This script is run by the init
process after parsing the /etc/inittab file:
[...]
# The default runlevel.
id:5:initdefault:
# Boot-time system configuration/initialization script.
# This is run first except when booting in emergency (-b) mode.
si::sysinit:/etc/init.d/rcS
# What to do in single-user mode.
~~:S:wait:/sbin/sulogin
# /etc/init.d executes the S and K scripts upon change
# of runlevel.
#
# Runlevel 0 is halt.
# Runlevel 1 is single-user.
# Runlevels 2-5 are multi-user.
# Runlevel 6 is reboot.
l0:0:wait:/etc/init.d/rc 0
l1:1:wait:/etc/init.d/rc 1
l2:2:wait:/etc/init.d/rc 2
l3:3:wait:/etc/init.d/rc 3
l4:4:wait:/etc/init.d/rc 4
l5:5:wait:/etc/init.d/rc 5
l6:6:wait:/etc/init.d/rc 6
[...]
As the comments in the file tell, the first script to be run on boot is /etc/init.d/rcS, which executes all start scripts
in /etc/rcS.d. Afterwards, the default runlevel (5) is entered, which makes the start scripts in /etc/rc5.d being
executed.
All scripts starting with the character Sare executed with the argument start appended, while all scripts starting
with the character Kare executed with the argument stop appended. Furthermore, the naming convention states
that the S/K character is followed by a number which determines the (numeric) execution order.
The actual scripts live in the directory /etc/init.d (e.g. /etc/init.d/myapp) while the /etc/rc* folders contain links
to those scripts (e.g. /etc/rc5.d/S95myapp).
Those script having the following basic layout, though not all scripts in the image contain the header between ###
BEGIN and ### END. Further documentation for the script format can be found here:
I
https://wiki.debian.org/LSBInitScripts .
#!/bin/sh
### BEGIN INIT INFO
# Provides: myapp
# Required-Start: $all
# Required-Stop:
# Default-Start: 2 3 4 5
# Default-Stop: 0 1 6
# Short-Description: Start myapp at boot time
# Description:
### END INIT INFO
12

GUF-Yocto-34.0-r5756-0
VINCELL
User Manual
. /etc/profile
case "$\$$1" in
start)
# Add here command that should execute during system startup.
;;
stop)
# Add here command that should execute during system shutdown.
;;
*)
echo "Usage: ... " >&2
exit 1
;;
esac
To create the startup links, put the above script into /etc/init.d/myapp execute:
root@gufboardll:~# update-rc.d myapp defaults 95 05
Adding system startup for /etc/init.d/myapp.
Here 95 is the startup level (late) and 05 is the stop level (early). If those numbers are omitted the level are
determined by the dependencies given in the header of the init script.
Make sure the executable bit is set with:
root@gufboardll:~# chmod +x /etc/init.d/myapp
It is also possible to create the individual links with:
root@gufboardll:~# ln -s /etc/init.d/myapp /etc/rc5.d/S95myapp
A service is disabled using:
root@gufboardll:~# update-rc.d -f myapp remove
update-rc.d: /etc/init.d/myapp exists during rc.d purge (continuing)
Removing any system startup links for myapp ...
/etc/rc0.d/K20myapp
/etc/rc1.d/K20myapp
/etc/rc2.d/S20myapp
/etc/rc3.d/S20myapp
/etc/rc4.d/S20myapp
/etc/rc5.d/S20myapp
/etc/rc6.d/K20myapp
In chapter [
I
7.5 Autostart mechanism for user applications] this mechanism will be used for automatic application
start up.
4.1.1 Udev
The udev service dynamically creates the device nodes in the /dev directory on system start up, as they are
reported by the Linux kernel.
Furthermore, udev is user-configurable to react on asynchronous events from device drivers reported by the Linux
kernel like hotplugging. The according rules are located in the root file system at /lib/udev/rules.d.
Additionally, udev is in charge of loading firware if a device driver requests it. Drivers that use the firmware
subsystem have to place their firmware in the folder /lib/firmware.
The udev service has a startup link that points to the corresponding start script:
/etc/rcS.d/S04udev -> /etc/init.d/udev
13

GUF-Yocto-34.0-r5756-0
VINCELL
User Manual
Udev can be configured in /etc/udev/udev.conf.
More information about udev can be found at:
I
https://www.kernel.org/pub/linux/utils/kernel/hotplug/udev/udev.html
4.1.2 D-Bus
The dbus service is a message bus system, a simple way for applications to communicate with each another.
Additionally, D-Bus helps coordinating the process lifecycle: it makes it simple and reliable to code a single
instance application or daemon, and to launch applications and daemons on demand when their services are
needed.
Garz & Fricke systems are shipped with dbus bindings for glib and Qt. Therefore, the corresponding APIs can
be used for application programming. Furthermore, Garz & Fricke systems are configured to support HALD that
allows to detect hotplugging events in applications asynchronously.
The dbus service has a startup link that points to the corresponding start script:
/etc/rc5.d/S02dbus-1 -> /etc/init.d/dbus-1
More information about dbus can be found at:
I
http://www.freedesktop.org/wiki/Software/dbus
More information about the Qt dbus bindings can be found at:
I
http://qt-project.org/doc/qt-4.7/intro-to-dbus.html
More information about the glib dbus bindings can be found at:
I
http://dbus.freedesktop.org/doc/dbus-glib
4.1.3 SSH service
The ssh service allows the user to log in on the target system. Futhermore, the SFTP and SCP functionalities
are activated to allow secure file transfers. The communication is encrypted.
The ssh service has a startup link that points to the corresponding start script:
/etc/rc5.d/S09sshd -> /etc/init.d/openssh
The startup script simply starts /usr/sbin/sshd as a daemon. The sshd configuration can be found in the target’s
root file system at /etc/ssh/sshd_config.
More information about OpenSSH can be found at:
I
http://www.openssh.org
Login Garz & Fricke devices are configured to use passwords for authentication also on the ssh service. As
there is no password set for root by default, this is a widely open door for attackers. See the [
I
10 Securing the
device] chapter how to handle this issue.
SSH Keys The Garz & Fricke yocto images are containing default SSH Keys that are the same on every image.
Those keys are used to identify the device when connecting to it from a remote host, to make sure you send
your password to the correct device ( and not some Man-in-the-middle ). To make use of this feature you should
generate your own keys with:
root@gufboardll:~# rm /etc/ssh/ssh_host_*key*
root@gufboardll:~# /etc/init.d/sshd restart
generating ssh RSA key...
generating ssh ECDSA key...
generating ssh DSA key...
14

GUF-Yocto-34.0-r5756-0
VINCELL
User Manual
generating ssh ED25519 key...
Restarting OpenBSD Secure Shell server: sshdstopped /usr/sbin/sshd (pid 1108)
root@gufboardll:~# ll /etc/ssh/*key*
-rw------- 1 root root 668 Sep 23 13:06 /etc/ssh/ssh_host_dsa_key
-rw-r--r-- 1 root root 607 Sep 23 13:06 /etc/ssh/ssh_host_dsa_key.
,
!
pub
-rw------- 1 root root 227 Sep 23 13:06 /etc/ssh/ssh_host_ecdsa_key
-rw-r--r-- 1 root root 179 Sep 23 13:06 /etc/ssh/ssh_host_ecdsa_key.
,
!
pub
-rw------- 1 root root 411 Sep 23 13:06 /etc/ssh/
,
!
ssh_host_ed25519_key
-rw-r--r-- 1 root root 99 Sep 23 13:06 /etc/ssh/
,
!
ssh_host_ed25519_key.pub
-rw------- 1 root root 1675 Sep 23 13:06 /etc/ssh/ssh_host_rsa_key
-rw-r--r-- 1 root root 399 Sep 23 13:06 /etc/ssh/ssh_host_rsa_key.
,
!
pub
root@gufboardll:~#
For more information see the official OpenSSH documentation. The ssh keys can also be used as replacement
for the password authentication of the remote user. Please see the official documention for this feature.
SFTP only with restricted folder visibility Sometimes it is enough, when a remote user is able to download
log files or change config files in one specific folder. To reduce the security risk of a open remote service, it is
possible to restrict the ssh service access to the SFTP feature, locking the user into for example his home folder.
Folowing steps are needed for setup:
Create the user:
root@vincell:~# adduser service
Change the owner of his home directory to root (needed by sftp changeroot):
root@vincell:~# chown -R root:service /home/service
Edit the ssh config:
root@vincell:~# /etc/ssh/sshd_config
In the config file, change the sftp subsystem:
# override default of no subsystems
# Subsystem sftp /usr/lib/openssh/sftp-server
Subsystem sftp internal-sftp
And append the following to the configuration:
Match User service
ChrootDirectory /home/service
ForceCommand internal-sftp
AllowTCPForwarding no
X11Forwarding no
Now it is possible to use for example filezilla to access the device with the new user and its password but the root
folder shown in filezilla is the home folder on the device.
Note: By default the user is also able to login using telnet or the serial console with access to the
complete root filesystem. If this is not desired, further configuration steps are needed.
4.1.4 Telnet service
The telnet service allows the user to log in on the target system.
15

GUF-Yocto-34.0-r5756-0
VINCELL
User Manual
Note: Due to the fact that telnet does not use encryption, it is recommended to deactivate this service
in final products in order to avoid security leaks. Disabling services is described in the chapter [
I
4.1
Services].
The telnet service has a startup link that points to the corresponding start script:
/etc/rc.d/S20telnet -> /etc/init.d/telnet
The startup script simply starts /usr/sbin/telnetd as a daemon. The usage of telnetd is shown by executing:
root@vincell:~# telnetd --help
BusyBox v1.22.1 (2015-09-17 20:08:55 CEST) multi-call binary.
Usage: telnetd [OPTIONS]
Following options are available and configured directly in the start script /etc/init.d/telnet:
Options:
-l LOGIN Exec LOGIN on connect
-f ISSUE_FILE Display ISSUE_FILE instead of /etc/issue
-K Close connection as soon as login exits
(normally wait until all programs close slave pty)
-p PORT Port to listen on
-b ADDR[:PORT] Address to bind to
-F Run in foreground
-i Inetd mode
-w SEC Inetd 'wait' mode, linger time SEC
-S Log to syslog (implied by -i or without -F and -w)
4.1.5 Module loading
The modules service is responsible for external module loading at system startup. It has a startup link that points
to the corresponding start script:
/etc/rcS.d/S05modutils.sh -> /etc/init.d/modutils.sh
The startup script simply looks which modules are listed in /etc/modules and loads them using /sbin/modprobe.
To ensure that the module loading works correctly, the module dependencies in /lib/modules/<kernel ver-
sion>/modules.dep have to be consistent.
4.1.6 Network initialization
The network initialization service is responsible for initializing all network interfaces at system startup. Garz &
Fricke systems use ifplugd to detect if an ethernet cable or an WLAN stick is plugged.
The network interfaces are listed on the target system in the configuration file /etc/network/interfaces. On
conventional Linux systems, the user configures the network interfaces by hand using this file. On Garz & Fricke
systems, there is a service called sharedconf as described in [
I
4.1.7 Garz & Fricke shared configuration] that
generates this file automatically according to the settings in the global XML configuration.
If the user wants to change the network settings, it is recommended to use the sconfig script as described in [
I
4.2.1 Garz & Fricke system configuration].
Note: Changes that are made to /etc/network/interfaces directly will be overwritten by the sharedconf
service on the next system startup and have no effect.
4.1.7 Garz & Fricke shared configuration
The sharedconf service reads shared configuration settings from the XML configuration and configures the
Linux system accordingly. This includes network (as described in [
I
4.1.6 Network initialization]) and touch
configuration.
The sharedconf service has a startup link that points to the corresponding start script:
16
GUF-Yocto-34.0-r5756-0
VINCELL
User Manual
/etc/rcS.d/S24sharedconf -> /etc/init.d/sharedconf
4.1.8 Autocopy
This service is executed after the OS has booted and when a storage medium has been inserted. It is triggered
together with the the Autostart service (see chapter [
I
4.1.9 Autostart]) via UDEV. Autocopy always runs before
Autostart.
The Autocopy service provides a comfortable installation and/or update functionality as well as copy mechanism
for specific files that are not included in the OS (e.g. for runtime libraries).
Subfolders and files within a folder named autocopy on a USB stick, SD card or in the NAND flash will be copied
to the root of the device resp. its equivalent targets. Non-existing folders will be created automatically.
The autocopy mechanism includes the following components:
/etc/udev/rules.d/automount.rules: UDEV rule that triggers the mount.sh script
when a storage media is plugged/unplugged
/etc/udev/scripts/mount.sh: Script that implements the autocopy and automount
functionality.
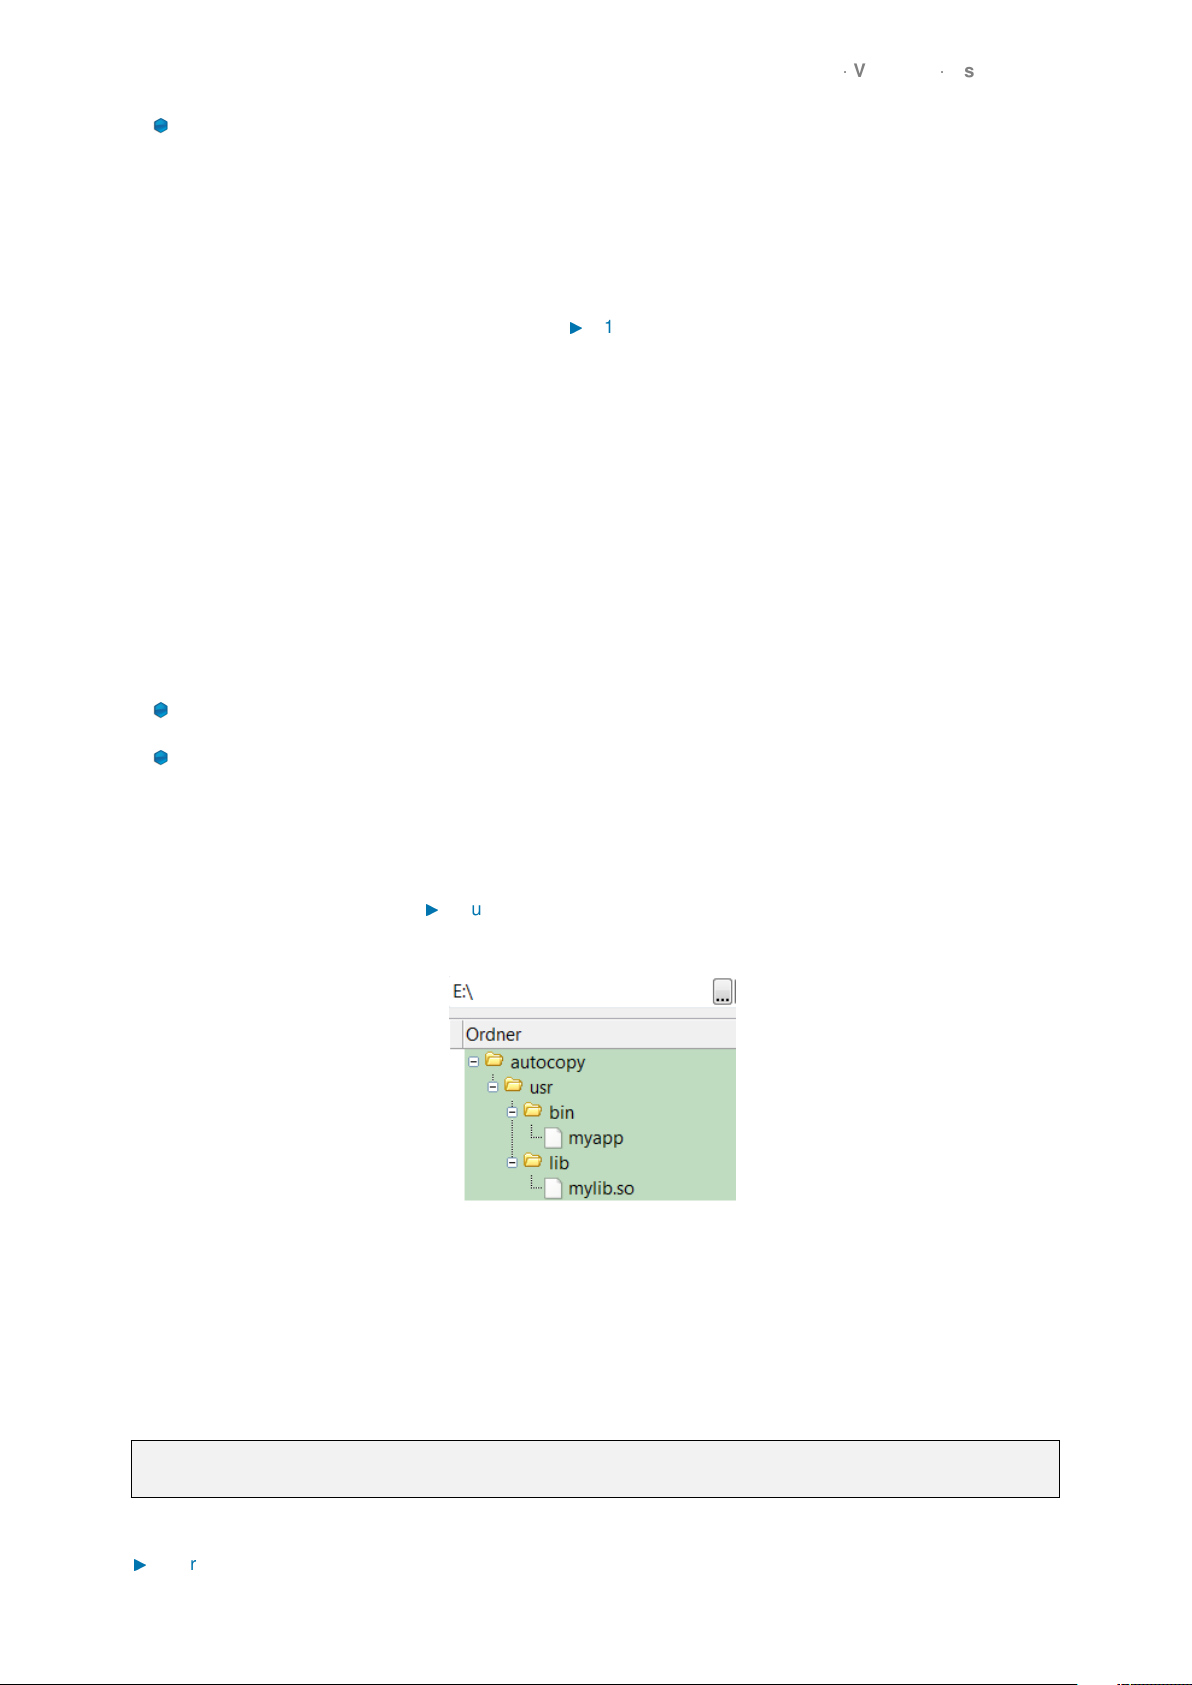
Example: The user has created and application myapp that should be installed to /usr/bin/myapp on the target
and a library mylib.so used by this application that should be installed to /usr/lib/mylib.so. The layout of the
storage medium is shown in figure [
I
Figure 4.1.8].
Figure 3: Layout of the storage medium after preperation with the custom files
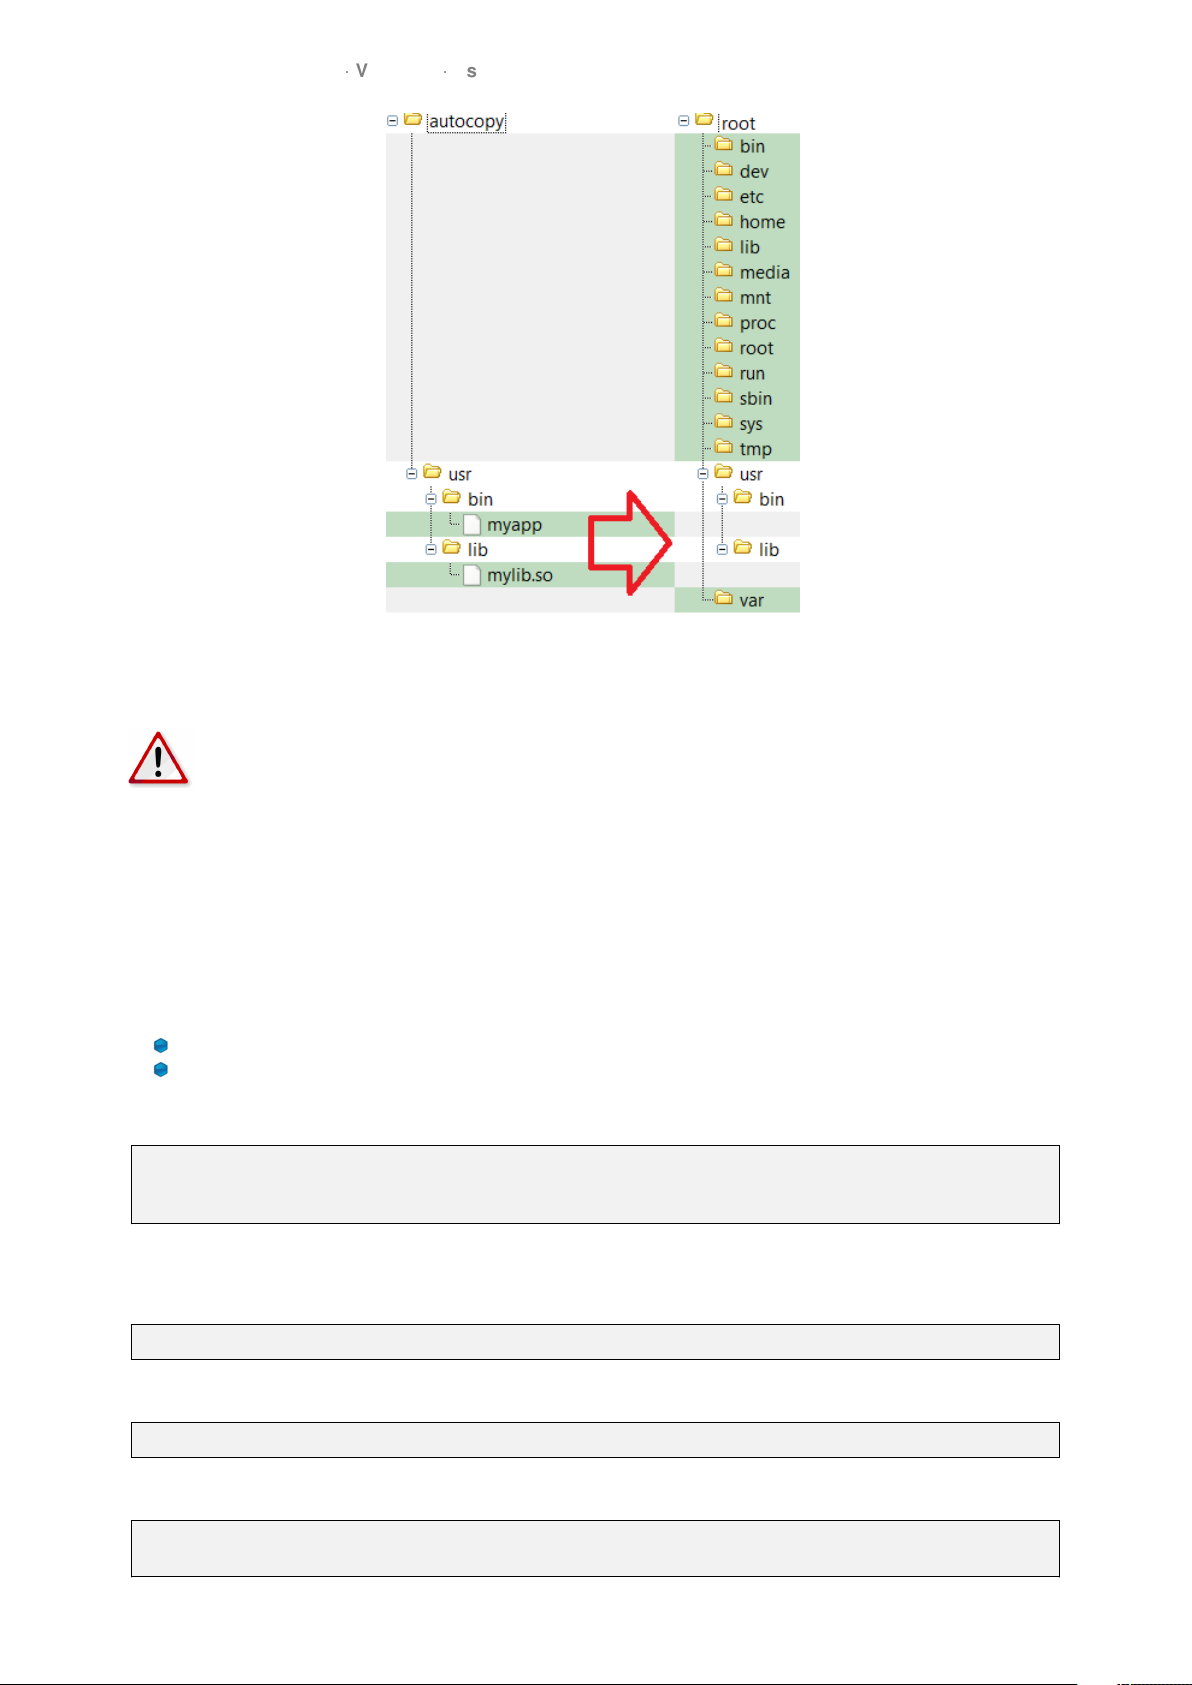
After the target device is up and the storage media is plugged, the following message on the target’s console is
shown:
mount.sh/automount Auto-mount of [/media/sda1] successful
mount.sh/automount Found an autocopy folder. Copying files...done
[
I
Figure 4] illustrates what happens in background. The files are properly transferred to the target.
17
GUF-Yocto-34.0-r5756-0
VINCELL
User Manual
Figure 4: Automatic transfer process from storage medium (left hand) to the targets root file system (right hand)
after plugging the storage
Warning: The user should be carefull by copying system files that may lead to an unusable system.
Garz & Fricke refuses to carry responsibility for damages caused by the users copying process. Fur-
ther, the user should consider to disable or restrict this mechanism to copy only carefully selected
files by customizing the /etc/udev/scripts/mount.sh script in the field to prevent missuse. Again, the
responsibility is up to the user.
Enabling/Disabling: Starting with OS Release 33 and newer the autocopy function may be enabled/disabled
via XML-configuration and the sconfig tool.
For backward compatibility the autocopy function is still enabled by default if the XML-configuration contains no
explicit setting for this function. To be able to configure each of the autojob functions individually, you may have
to install an XML-configuration file specifying explicit state-settings for the autojob functions. At least two such
configuration files are available from Garz & Fricke:
rbcfg-enable-autojobs.xml: Enables all autojob functions (default behaviour).
rbcfg-disable-autojobs.xml: Disables all autojob functions.
These may be installed like all other XML-configuration files via the xconfig tool, e.g.:
root@santaro:~# export TFTP=172.20.0.146
root@santaro:~# curl tftp://$TFTP/rbcfg-enable-autojobs.xml > /tmp/cfg.xml
root@santaro:~# xconfig import -y /tmp/cfg.xml
Afterwards you can query and enable/disable each autojob individually using sconfig.
Enable autocopy function:
root@santaro:~# sconfig autocopy all
Disable autocopy function:
root@santaro:~# sconfig autocopy off
Query current state of autocopy function:
root@santaro:~# sconfig autocopy
off
18

GUF-Yocto-34.0-r5756-0
VINCELL
User Manual
Notes:
If sconfig replies with its usage-information you still have an OS installed, which doesn’t support en-
abling/disabling individual autojob functions. Please update your OS in this case.
If querying an autojob function returns no reply, at all, your XML-configuration probably doesn’t contain
explicit settings for the autojob functions, yet. Please install one of the provided XML-configuration files as
shown above.
The possible values of all and off have been chosen on purpose to allow future extension to enable/disable
the functions for different storage media individually. When this extension will be implemented and how
exactly the syntax for this will look like is still to be defined.
4.1.9 Autostart
The autostart service on Garz & Fricke Linux platforms uses nearly the same mechanism as autocopy described
in chapter [
I
4.1.8 Autocopy] except for the autostart specific part in /etc/udev/scripts/mount.sh.
The autostart simply searches for an autostart folder in the root directory of the storage media. If found, the
executable files are executed in alphabetic order. Filenames starting with digits are executed before those starting
with letters in numeric order. Files in subfolders of the autostart are ignored.
The execution of the autostart files is shown in the Linux console during start up:
mount.sh/automount Auto-mount of [/media/sda1] successful
mount.sh/automount Found an autostart folder. Executing files...
mount.sh/automount Executing /media/sda1/autostart/test.sh...
Finished executing autostart files
As already stated in [
I
4.1.8 Autocopy] autocopy is executed before autostart.
The user may desire to autostart an application from a storage media with command line args. In this case a
start script can be placed in the autostart folder that starts the aplication itself in a subfolder of autostart with the
desired command line args. It is important to place the application itself in a subfolder. Otherwise the autostart
mechanism will try to start this application without the command line args in parallel to the start script.
Example: The user created a Qt application (e.g. myapp) to run on X Server. This makes it necessary to
set the environment variable DISPLAY=:0.0 before calling myapp. The application is placed e.g. in the folder
/autostart/custom on the storage media. Consequently, the start script (e.g. myapp.sh) must have the following
contents:
#!/bin/sh
export DISPLAY=:0.0
./custom/myapp
The start script must be placed in the folder /autostart on the storage media. The layout of the storage medium
is shown in figure [
I
Figure 5].
Figure 5: Layout of the storage medium after preperation with the custom files
After plugging the storage media into the target system. The start script and the apllication should start properly.
Enabling/Disabling: Starting with OS Release 33 and newer the autostart function may be enabled/disabled
via XML-configuration and the sconfig tool.
For backward compatibility the autostart function is still enabled by default if the XML-configuration contains no
explicit setting for this function. To be able to configure each of the autojob functions individually, you may have
to install an XML-configuration file specifying explicit state-settings for the autojob functions. At least two such
configuration files are available from Garz & Fricke:
19

GUF-Yocto-34.0-r5756-0
VINCELL
User Manual
rbcfg-enable-autojobs.xml: Enables all autojob functions (default behaviour).
rbcfg-disable-autojobs.xml: Disables all autojob functions.
These may be installed like all other XML-configuration files via the xconfig tool, e.g.:
root@santaro:~# export TFTP=172.20.0.146
root@santaro:~# curl tftp://$TFTP/rbcfg-enable-autojobs.xml > /tmp/cfg.xml
root@santaro:~# xconfig import -y /tmp/cfg.xml
Afterwards you can query and enable/disable each autojob individually using sconfig.
Enable autostart function:
root@santaro:~# sconfig autostart all
Disable autostart function:
root@santaro:~# sconfig autostart off
Query current state of autostart function:
root@santaro:~# sconfig autostart
off
Notes:
If sconfig replies with its usage-information you still have an OS installed, which doesn’t support en-
abling/disabling individual autojob functions. Please update your OS in this case.
If querying an autojob function returns no reply, at all, your XML-configuration probably doesn’t contain
explicit settings for the autojob functions, yet. Please install one of the provided XML-configuration files as
shown above.
The possible values of all and off have been chosen on purpose to allow future extension to enable/disable
the functions for different storage media individually. When this extension will be implemented and how
exactly the syntax for this will look like is still to be defined.
4.1.10 Cron
The cron service allows execute commands automatically to a given time.
The crond service has a startup link that points to the corresponding start script:
/etc/rc5.d/S20crond -> /etc/init.d/crond
The startup script simply starts /usr/sbin/crond as a daemon.
The cron task are configured with crontab.
crontab -e
An example script is shown in the editor and can be modified.
#------------------------------------------------------------------------------------
# Shell variable for cron
SHELL=/bin/bash
# PATH variable for cron
PATH=/usr/local/bin:/usr/local/sbin:/sbin:/usr/sbin:/bin:/usr/bin:/usr/bin/X11
#------------------------------------------------------------------------------------
# Minute Hour Day of Month Month Day of Week Command
# (0-59) (0-23) (1-31) (1-12 or Jan-Dec) (0-6 or Sun-Sat)
#*/10 * * * * date > /root/
,
!
crontest
#------------------------------------------------------------------------------------
See the official cron documentation for syntax of this file.
20
Table of contents
Popular Industrial PC manuals by other brands

LGX
LGX AU957 SERIES user manual

National Instruments
National Instruments VXIpc-871-700 user manual

Advantech-DLoG
Advantech-DLoG DLT-V83 Series operating instructions

Advantech
Advantech TREK-510 user manual

Lenovo
Lenovo ThinkCentre M90q Hardware Maintenance Manual

AXIOMTEK
AXIOMTEK IPC910H Series user manual


IBASE Technology
IBASE Technology SI-61S-AI user manual

JHCTech
JHCTech SIGM-3250 Series user manual

EDA
EDA ED-IPC2600 Series user manual

Siemens
Siemens SIMATIC IL43 operating instructions

IBASE Technology
IBASE Technology SI-58 Series user manual

IEI Technology
IEI Technology ECN-360A-ULT3-C/4G-R10 user manual