gascraft OIL DRUM CHARCOAL User manual

•For outdoor use only. Not for commercial use.
•Read instructions before using this appliances. Failure to follow instructions could result
in death, serious bodily injury and/or property loss.
•Warning: Accessible parts may be ery hot. Keep young children and pets away.
•Do not mo e the appliance during use.
•Any modification of the appliance, misuse, or failure to follow the instructions may be
dangerous and will in alidate your warranty. This does not affect your statutory rights.
•Retain these instructions for future reference.
•THIS BBQ MUST NEVER BE LEFT UNATTENDED WHEN LIT AND IN USE.
WARNING

1
Safety And Care Advice
Important - Please read this instructions fully before starting assembly
Warning: While every effort has been made in the manufacture of this BBQ to remove any sharp edges, care
should be taken in handling to avoid any accidental injury.
• Assembly time; approx 30 minutes.
• Ma e sure the assembly instructions have been followed correctly.
• Set the Charcoal BBQ in a suitable position on a level surface away from areas li ely to catch fire. The base of
the Charcoal BBQ will become hot so ensure it stands on a suitable non-combustible surface.
• Always stand your BBQ outdoors and on level ground away from trees and wooden fencing. Ensure there is at
least 1 metre clearance around all sides of the Charcoal BBQ. Keep away from fences, over-hanging branches
and other combustible materials.
• Use only charcoal, and a suitable lighting method.
• Do not coo before the fuel has a coating of ash.
• WARNING! This barbecue becomes very hot. Do not move it during operation.
• Do not use indoors.
• WARNING! Do not use spirit or petrol for lighting or relighting. Use only firelighters complying to EN 1860-3.
• WARNING! Keep children and pets away.
LIGHTING THE BBQ
Method 1 – Charcoal and Lighting Fluid/Gel
• Set up your BBQ in a safe place. Place enough charcoal in the charcoal grate to reach a depth of 3-5cm.
• Ta ing care not to spill any fluid or gel on your hands or clothes, apply it carefully over the charcoal.
• If using fluid, wait 30-45 seconds for the fluid to soa into the charcoal.
• Do not light the charcoal if you have spilt fluid or gel onto your clothes. Light the charcoal with a long taper or
BBQ lighter. The charcoal will burn with flames for a period.
• When the flames die down, chec that the charcoal is starting to glow red. If the coals have gone out, open all
vents and allow the charcoal to go out completely before trying to apply more lighting fluid.
• CAUTION: Apply lighter fluid/gel carefully in small amounts. Over-application can be dangerous.
• DO NOT squirt liquid onto burning charcoal.
• After lighting, the fire should be ready for coo ing in 30-40 minutes, or when an even layer of grey ash is
visible by day, or an even red glow is visible by night.
Method 2 – Firelighter blocks
• Place 3 or 4 firelighter bloc s in the center of the charcoal grate and light with a match or lighter.
• Place pieces of charcoal around each firelighter. Add more charcoal as required, in a pyramid formation.
• When burning is established, spread the fuel out evenly. After lighting, the fire should be ready for coo ing in
30-40 minutes, or when an even layer of grey ash is visible by day, or an even red glow is visible by night.
PREPARING FOR COO ING
• Ma e sure the coo ing grill is fully located into the grille support so that the crossbar supports loc behind the
retaining edges.
• When the charcoal is alight, the smo e and flames have died down and the charcoal has an even layer of grey
ash, ra e the charcoal into an even layer on the grate.
• Small quantities of fresh charcoal can be added on top of the burning charcoal layer prior to coo ing to extend
coo ing time.
• To help prevent food stic ing, apply a thin coating of coo ing oil to the grill prior to coo ing.
• To adjust the airflow using the air vents, use a heat resistant glove.
• ALWAYS WEAR OVEN GLOVES WHEN HANDLING THE CHARCOAL BBQ.

2
CAREANDMAINTENANCE
Itisrecommendedthatamaximumof1.5kgofcharcoalisusedonthecharcoalgrate.Excessiveamountsof
charcoalwillmaketheBBQtoohotforcooking.
EnsuretheBBQhascooleddowncompletelybeforeremovingtheash,andputtheashintoametal
containeruntilitisfullycoldbeforedisposingofit.
TomakeeasiertocleanyourCharcoalBBQafteruse,linethefirebowlwithaluminiumcookingfoil,shinysideup.
Remembertoleaveventilationholesclearbypiercingthefoilwherenecessary.Thisprocesswilllengthenthelife
ofyourCharcoalBBQ.
Charcoalisavailableinlumpwood(largeirregularpieces)andasbriquettes(uniformlysizedpieces).Pleaseuse
onlycharcoal–donotusewoodorcoalorothersolidfuels.
ItisnotadvisabletocompletelyfillthefirebowlastheBBQmaybecomefartoohottocooksuccessfully.Asa
guide,a3kgbagofcharcoalbriquettesshouldlastforatleast2fullBBQfires.
Ifthefiresflaresupduetodrippingfat,thencontroltheflamescarefullywithafinewaterspray.
WhenyouhavefinishedusingtheCharcoalBBQ,neverpourcoldwaterdirectlyonthecoalstoextinguishthem
asthismaydamageyourCharcoalBBQ.Letthemburnoutuntilcold.Useoldcinders,sandorafinewaterspray
tospeedtheprocess.
Emptythebottombowlofashesonlywhentheyarecompletelycold.
TocleanyourCharcoalBBQ,soakthecookinggrillandtoolsinhotsoapywaterassoonaspossibleafteruse.Dry
thoroughlyandstoreinadryplace.DonotleaveyourCharcoalBBQoutsideunprotected
Thoroughlydefrostfrozenmeatandpoultryintherefrigeratorbeforecooking.Keeprawmeatandpoultry
separatefromcookedfood.
Ensurethatthegrillisthoroughlycleanedbeforecookingandlightingthebarbecue.
Alwayswashhandsafterhandlingrawmeatandpoultrybeforehandlinganyreadytoeatfood.
Wipeanddisinfectsurfacesthathavebeenincontactwithrawmeatandpoultry.
Whenbarbecuingmeatandpoultry,makesurethebarbecueisreallyhot,Placethelarger,thickerportions
furthestawayfromthemostintenseheattoensurethoroughcookingwithoutburningandturnregularly.
Useseparateutensilsforhandlingrawmeatorpoultryandcookedfoodonthebarbecue,orwashthem
thoroughlybetweenuse.
Tocheckwhethermeat,particularlypoultry,iscooked,piercethefleshwithaskewerorfork‐thejuicesshould
runclear.Ensuretheproductispipinghotthroughout.Useameatthermometerifavailable.
Attention!ThisBBQwillbecomeveryhot–donotmoveitduringoperation.DoNOTuseindoors.
Warning!Keepchildrenandpetsaway!
Caution!Donotusespiritorpetrolforlightingorrelighting.Useonlyapprovedlightingfirelighters.
WARNING!Donotusespiritorpetrolforlightingorre‐lighting!UseonlyfirelighterscomplyingtoEN1860‐3.
Donotusethebarbecueinaconfinedand/orhabitablespace,e.g.houses,tent,caravans,motorhomes,orboats.
Thereisadangerofcarbonmonoxidepoisoningfatality.
FOODSAFETY


5
Step 1
Fix the left leg support
and the right leg support
to the firebowl
using 40mm bolts
and M6 nuts
Step 2
2
11
11
Insert the left legs and the
right legs into the left leg
support and the right leg
support
Ensure the axle spacer on the
front leg faces forwards, and
the axle spacer on the rear leg
faces back, as shown.
3
4
3
A
9
A
A
C
C
C
3
4
4
2
9
9
.
11
FRONT
11
9
Left ea leg:
Axle space is facing back
Left f ont leg:
Axle space is facing f ont
FRONT
Back
Assembly instructions
.

6
B
3
7
B
7
J
J
3
Step 3
Fix the left legs
and the right legs
to the firebowl
using 40mm bolts
and M6 nuts
Step 4
A
C
.
Fix the wheels to the left
legs using the axles
and R pins
Ensure the axle spacer on the
front leg faces forwards, and
the axle spacer on the rear leg
faces back, as shown.
B
J
J
.
7
3
3
4
2
A
A
C
C
3
3
C
C
A
A
FRONT
4
4
2
FRONT
Left f ont leg:
Axle space is facing f ont
Left ea leg:
Axle space is facing back
Assembly Instructions

7
Step 5
Step 6
Fix the leg braces
to the right and left legs
using 40mm bolts
and M6 nuts
10
A
C
A
C
A
C
.
1
Fix the lid supports on the
lid using 15mm
bolts
and M6
nuts
C
C
I
I
F
I
1
C
.
C
C
A
A
F
FRONT
10
10
3
3
4
4
I
F
F
Assembly Instructions

8
Step 7
Step 8
Put the washer between
the lid handle and the lid
Then fix the lid handle on
the lid using 10mm bolts
H
6
E
H
H
E
E
6
1
1
.
Fix the dampers on the lid
using 10mm bolts and
M5 nuts
8
H
D
D
D
8
8
.
H
H
.
6
1
1
1
Assembly Instructions
9
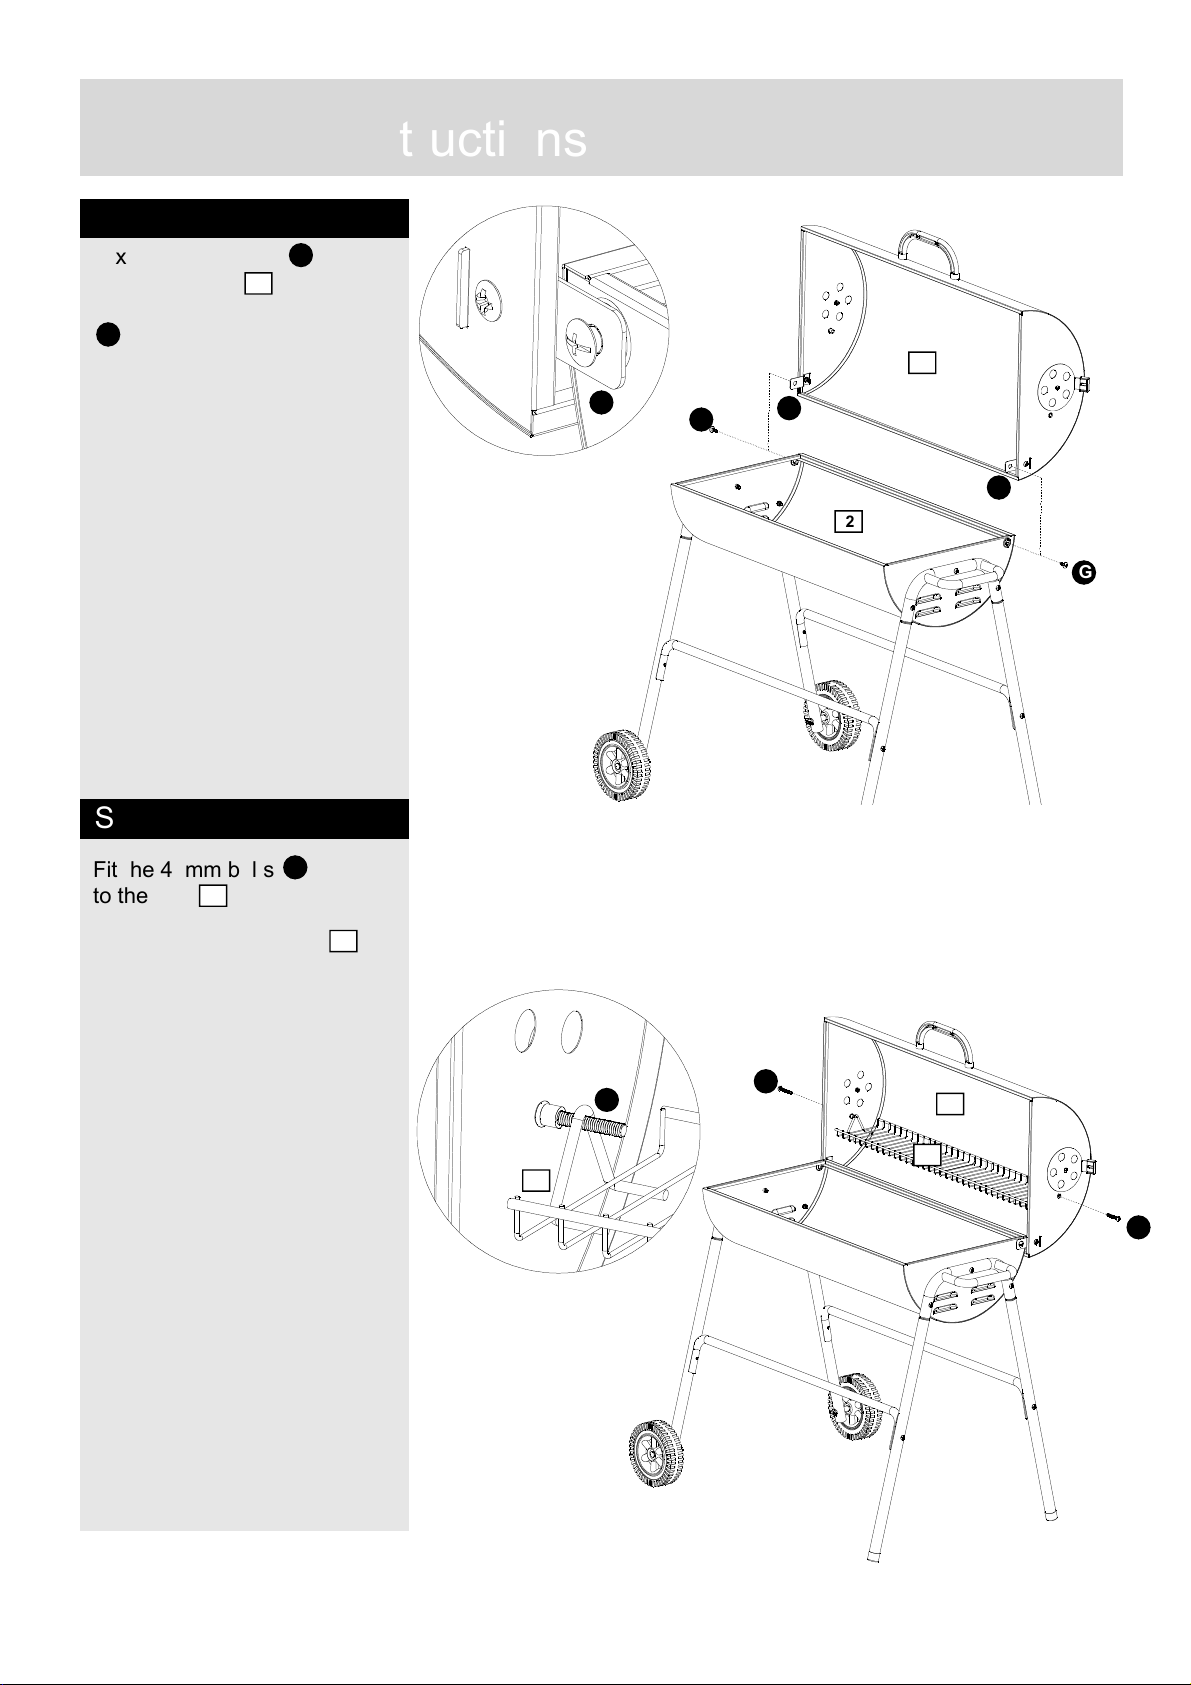
Step 9
Step 10
Fix the lid supports
to the firebowl
using 15mm shoulder bolts
G
G
G
.
2
2
Fit the 40mm bolts
to the lid
And tighten firmly.
Hang the warming rack
on the bolts.
5
A
A
5
5
A
A
I
I
I
I
1
1
1
Assembly Instructions

10
Step 11
Step 12
Put the charcoal grate
into the firebowl
Set the lower cooking grill
and the upper cooking grill
on the firebowl.
12
13
12
Assembly is complete.
13
2
14
14
.
2
Manufactu ed in China fo :
The Wa ehouse Ltd
0800-422-274
Assembly Instructions
Table of contents
Other gascraft Smoker manuals

Popular Smoker manuals by other brands


Char-Broil
Char-Broil DIGITAL ELECTRIC VERTICAL SMOKER 725 operating instructions

Outdoor Leisure
Outdoor Leisure Smoke Hollow Smoke-Tronix D4015SS Assembly, care & use manual

Yoder Smokers
Yoder Smokers S Series installation instructions

Mac's BBQ
Mac's BBQ ProQ quick start guide

Mustang
Mustang 300560 manual

Heinzelmann
Heinzelmann HMSG01 User instructions


