Long-nose Gas Match Lighting
1. Repeat steps 1 thru 5 of the Ignitor
Procedures above.
2. Remove the Wood Chip Tray from
inside the smoker. Insert a long nose gas
lighter next to the burner drum, making
sure it sits over the burner. Quickly turn
the control knob to the light position. If
the burner does not light within 4 or 5
seconds, turn the control knob o, wait 5
minutes, and repeat the process.
Shutting the Smoker O
CAUTION: The smoker can become
very hot while in use. Do not touch any
portion of the smoker except for the door
handle and burner control knob. It may
be necessary to use protective gloves.
Turn the burner control knob o by
pushing in and rotating clockwise. The
burner ame should then go out.Turn o
the LP cylinder valve by turning the knob
clockwise until it stops.
Following all warnings and safety
precautions before removing meat from
the smoker or preparing the unit for
storage.Followinstructionsinthismanual
for proper storage procedures and the
important warnings and safeguards on
pages.
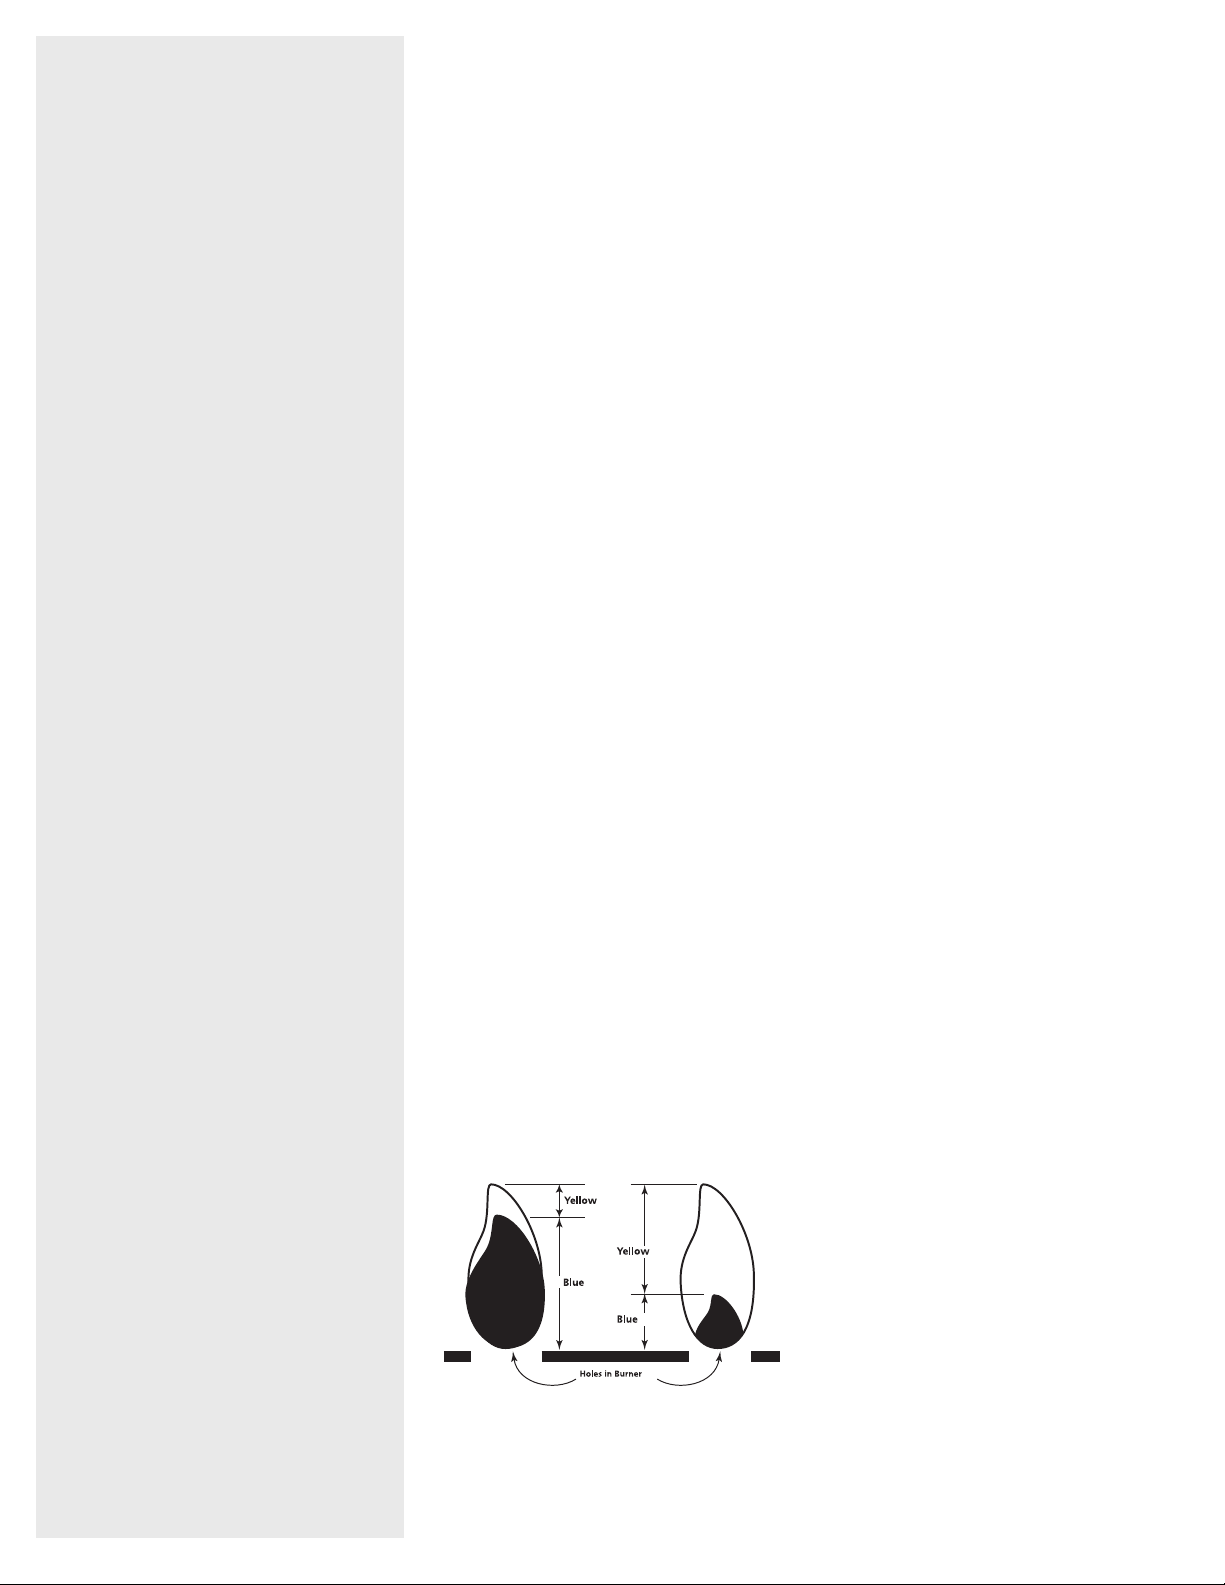
Burner Flame Check
• Light burner; rotate knob(s) from HIGH
to LOW. You should see a smaller ame
in LOW position than seen on HIGH.
Always check ame prior to each use. A
blue ame with little or no yellow ame
provides the best heat. If you have a
yellow ame clean the unit following the
Cleaning instructions on the back of this
instruction manual.
If the ame is accidentally extinguished,
turn the appliance o and wait 5 minutes
before attempting to ignite.
Cooking Instructions
Fill the wood chip box with avoring
wood chips and place the box inside the
smoker as instructed in the assembly
section of this manual. Refer to the
section that explains avoring wood for
recommended use of avoring wood.
Place the water tray inside the smoker
in the lowest rack position as explained
in the assembly section of this manual.
Carefully ll the water tray with water or
marinade up to 1 inch below the rim.
A full tray will last for approximately 2-3
hours. Do not overll or allow water to
overow from the water tray.
You are now ready to light the burner.
Refer to the Lighting Procedure on the
previous pages of this manual. The heat
fromthe burnerwill allowthe woodchips
to burn, causing the avoring smoke
to accumulate. Adjust the dampers to
control the heat.
Place the food on the cooking grids in
a single layer with space between each
piece. This will allow smoke and hot
moisture to circulate evenly around all
the food pieces.
Smoking for 2 to 3 hours at the ideal
constant cooking temperature of 200°F
to 225°F will get the best results. This
temperature is according to the heat
indicator mounted on the front of the
smoker. For more tender and heavily
smoked meat, a lower temperature may
be preferred. If time is critical, a higher
temperature range is recommended.
Check water level periodically and add
water if low. For best results and to
retain heat, avoid opening the door of
the smoker while in use. When the door
must be opened, only open it briey.
The smoker will quickly resume cooking
temperature after the door is closed.
Always use a meat probe thermometer
to ensure food is fully cooked before
removing it from the smoker.
After each use, and after the smoker is
cooled, carefully remove the grease pan
from the bottom of the smoker, empty
the grease, and clean the grease pan.
Ideas For Wood/Meat Combinations:
Fish: Alder Cherry Cedar
Pork: Apple Mesquite Cherry Oak
Maple Peach Pecan
Beef: Hickory Mesquite Pecan Cherry
Poultry: Alder Oak Maple Peach
Cooking Tip - Flavoring Wood:
• Medium-large wood chips work best
inside the wood chip box.
• Use dry hardwoods such as hickory,
pecan, apple, cherry or mesquite.
• Most fruit or nut tree woods produce
excellent smoking avoring.
• Do not use resinous woods such as pine
or plywood. These usually produce
unpleasant avoring.
• Let your taste be your guide -
experiment with dierent types and
quantities of wood chunks, chips or
sticks. You can even mix woods.
• To produce more smoke and to prevent
fast burning, pre-soak the wood chips in
a separate bowl of water for at least 30
minutes. To extend the chip burning
time, cover the chip tray with aluminum
foil. Pierce several holes throughout the
foil to allow smoke to escape.
• Most smoke avoring occurs within the
rst hour of cooking. Adding wood chips
after the rst hour is typically not
necessary unless extra avoring is
desired.
Low Temperature Smoking:
• When smoking at low temperatures for
jerky of sh, use a tuna can or tin foil to
place the chips in and set directly over
the burner. You will need to soak the
chips and cover with foil to keep from
burning.
• Use wood shavings instead of chips or
chunks. Leave door open and turn on
high for several minutes until chips
begin to smoke. Then turn down to
cooking temperature.
This may have to be repeated several
times during the cooking process in
order to keep the shavings smoking.