Gavita Pro SL2 Series User manual
Pro line
1 Introduction
Thank you for purchasing the Gavita®SL2 1000e 208-240 V. This manual describes the mounting and installing of the product
and also describes how to use the product. Please read and understand this manual completely before using the product. Only
use the product as specified in this manual.
1.1 Used Symbols
Warning! A warning indicates severe damage to the user and/or product may occur when a procedure is not carried
out as described.
Caution! A caution sign indicates problems may occur if a procedure is not carried out as described. It may also serve
as a reminder to the user.
Note: A note gives additional information, e.g. fo r a procedure.
This symbol indicates that the reflector and lamp can reach very high temperatures (>85 °Celsius / >185 °Fahrenheit).
Observe a cool down period before performing maintenance.
This symbol is an internationally recognized symbol used to designate recyclable materials.
This symbol is an authorized use mark employed on electronic products manufactured or sold in the United States
which indicates that the electromagnetic emissions from the device is under limits published by the Federal
Communications Commission. The FCC logo is a mark that declares that the equipment is authorized to market and
operate under the FCC's SDOC procedure.
This symbol shows that a product has been independently tested and certified to meet recognized standards for safety.
The symbol on the material, accessories or packaging indicates that this product may not be discarded as household
waste. By disposing of the equipment in the proper way, you will be helping to prevent possible risks to the environment
and public health, which might otherwise be caused by improper handling of the discarded equipment. Recycling of
materials contributes to the conservation of natural resources. Therefore, please do not dispose of your old electronics
and electrical appliances via household waste.
This symbol indicates the minimum distance (B) between the fixture (A) and the lit surface.
Photobiological Safety
These photobiological safety markings are based on testing of the light output characteristics of a single horticultural
luminaire. Increased exposure risk to facility personnel may be present depending upon the number of horticultural
luminaires and their placement "and/or" positioning within the plant growth facility. It is the responsibility of the plant
growth facility to address these risks at the facility level and to ensure that people entering the plant growth areas
while the lights are on, are aware of these risks and that appropriate safeguards are in place.
A
B
Gavita®SL2 1000e 208-240 V
WARNING - POSSIBLE RISK OF INJURY TO EYES AND SKIN
• Hazardous optical radiation may be emitted from the light source. Do not stare at operating
lamp. May be harmful to the eyes.
• UV may be emitted from the light source. Eye or skin irritation may result from exposure.
Use appropriate sheilding.
• IR may be emitted from the light source. Do not stare at operating lamp.
AVERTISSEMENT – RISQUE DE BLESSURE POSSIBLE AUX YEUX ET À LA PEAU
• Un rayonnement optique dangereux peut être émis par la source lumineuse. Ne regardez pas
la source lumineuse quand elle est allumée. Peut être nocif pour les yeux.
• La source lumineuse peut émettre des rayons UV. L’exposition peut provoquer une irritation
des yeux ou de la peau. Utilisez un écran approprié.
• La source lumineuse peut émettre des rayons infrarouges. Ne regardez pas la source
lumineuse quand elle est allumée.
2 Product description
The Gavita®SL2 1000e 208-240 V is an adjustable horticultural fixture. The Gavita®SL2 1000e 208-240 V can be used to drive
a double ended 1000 W 400 V high frequency (electronic) high pressure sodium lamp. The Gavita®SL2 1000e 208-240 V is an
e-series product. It can be remotely switched and adjusted by a Gavita Master controller (sold separately). The controller can
automatically switch the fixture on and off during a 24 hour cycle. The controller also offers a temperature safety feature: auto-
dimming or switching off connected fixtures when the temperature in a climate room becomes too high. The product can also
be controlled by conventional timers in combination with a contactor. Make sure the dummy RJ plug sits in the IN port. If not,
the fixture will not operate. In this manual, the Gavita®SL2 1000e 208-240 V will be referred to as: “the fixture".
3 Product information and specifications
3.1 General product information
Product name Gavita®SL2 1000e 208 - 240 V
Manufacturer Gavita®International bv
UPC HGC906730-01 849969033953
UPC HGC906732-01 849969033960
UPC HGC906736-01 849969033908
Part number HGC906730-01
Part number HGC906732-01
Part number HGC906736-01
Plug type Nema 6-15P
3.2 Technical specifications
Input voltage 208-240 V
Input watts 525-1200 W
Heat load 3,600 btu/hr
Current - 100% 208 V: 5.1 A 240 V: 4.4 A
Current - 110% 208 V: 6.6 A 240 V: 5.7 A
Inrush current < 27 A
Frequency 50/60 Hz
Power factor (cosø): > 0.98
Voltage THD 208 V: 0.22% 240 V: 0.20%
Current THD 208 V: 8.40% 240 V: 10.20%
Ambient temp 32-104º F (0-40º C)
Environmental rating Damp locations
Control 0-10 V DC source (11.5 V DC @ 115%)
Mounting Eye bolts included (Other options available)
Product weight 8.4 lbs (3.8 kg)
Dimensions (L*W*H) 22.2 in x 9.7 in x 7.8 in (56.5 cm x 24.5 cm x 19.5 cm) (height excl. mounting hooks)
Certification UL 1598, ANSI/CAN/UL 8800, CSA C22.2 No. 250.0, FCC Part 18, Non-consumer
3.3 Compatible products and accessories (sold separately).
Product name Gavita part number
Compatible controllers Gavita®EL1 Master controller HGC906120
Gavita®EL2 Master controller HGC906121
Replacement reflector
Gavita®1000 DE HR96 Reflector HGC906022
Gavita®W 150 DE HGC906179
Gavita®Intensity Optic DE HGC906318
Compatible lamps Gavita®Pro Plus 1000 W EL DE HPS HGC906025
Compatible power cord Gavita®e-Series 240V IEC Power Cord HGC906051
Compatible interconnect cable Interconnect cable RJ9 to RJ14 CB6633610
Additional controller cable Repeater bus connection kit HGC906170
3.4 Environment
The product is intended to be used in greenhouses and climate rooms. The product can be used in damp environments.
The product may not be used in wet environments or outdoors. This luminaire is suitable for operation in an ambient not
exceeding 40°C. This should be the maximum sustained temperature of the installed environment (ambient temperature) that
will ensure safe operation of the lighting equipment. To prevent sustained temperatures above a 40°C ambient a mechanical
ventilation or cooling system is required to maintain the temperature within the growing space at or below 40°C when the
luminaire is in operation.

3.5 Legal
This device complies with Part 18 of the FCC Rules. This product may cause interference
to radio equipment and should not be installed near maritime safety communications equipment or
other critical navigation or communication equipment operating between 0.45-30 MHz. A simple measure
to correct interference is to add ferrites to the ends of power cords and/or lengths of communication cables.
4 Safety recommendations and warnings
Recommandations en matière de sécurité et avertissements!
Warning! Carefully read the warnings below before using or working with the product!
Avertissement! Veuillez lire attentivement les avertissements ci-dessous avant de travailler avec le produit ou de l’utiliser!
• Always adhere to the local rules and regulations when installing or using the fixture.
Se conformer en tout temps aux règlements locaux lors de l’installation ou de l’utilisation du dispositif.
• Do not open or disassemble the fixture, it contains no servicable parts inside. Opening the fixture can be dangerous and will
void the warranty.
Ne pas ouvrir ni démonter le dispositif; il ne contient aucune pièce réparable à l’intérieur. Ouvrir le dispositif peut s’avérer
dangereux et annulera la garantie.
• Do not use the fixture when either its lamp or its power cord are damaged. Replace the power cord only with original
certified cords. Replace the lamp only with lamps specified by Gavita (see paragraph 3.3).
Ne pas utiliser le dispositif lorsque sa lampe ou son cordon d’alimentation est endommagé. Remplacez le cordon
d’alimentation uniquement par des cordons originaux certifiés. Remplacez la lampe uniquement par des lampes spécifiées
par Gavita (voir paragraphe 3.3).
• The use of other lamps may damage the product and lamp and will void the warranty.
L’utilisation d’autres lampes peut endommager le produit et la lampe et annulera la garantie.
• Modifications to the cords can lead to unwanted electromagnetic effects, which makes the product not comply with legal
requirements.
Des modifications aux cordons peuvent entraîner des effets électromagnétiques non désirés, rendant le produit non
conforme aux exigences légales.
• Do not expose the fixture to: / Ne pas exposer le dispositif à:
- condensing humidity, heavy mist, fog or direct spray; / de l’humidité avec condensation, une brume épaisse, du brouillard
ou une vaporisation directe;
- (ambient) temperatures outside the specified range; / des températures (ambiantes) au-delà de la plage spécifiée;
- dust and contamination; / la poussière et à la contamination;
- direct sunlight during use or HID light that could heat up the ballast. / la lumière directe du soleil ou à la lumière à DHI
pendant l’utilisation, car cela pourrait faire chauffer le ballast.
• Always disconnect the fixture from mains before performing any maintenance.
Toujours débrancher le dispositif du conducteur principal avant d’effectuer tout entretien.
• Always allow for a cool down period of at least 30 minutes before touching the lamp or reflector. Touching the lamp or the
reflector when the lamp is lit or immediately afterwards will result in severe burns!
Toujours prévoir une période de refroidissement d’au moins 30 minutes avant de toucher la lampe ou le réflecteur. Toucher
la lampe ou le réflecteur lorsque la lampe est allumée ou immédiatement après l’avoir éteinte peut entraîner des
brûlures sévères!
• Never touch the lamp with bare hands as this will cause damage to the lamp.
Ne jamais toucher la lampe à mains nues, sous peine de l’endommager.
• Do not use the fixture near flammable, explosive or reactive substances. The lamp and the reflector of the fixture reach
temperatures of >85 °Celsius / 185 °Fahrenheit.
Ne pas utiliser le dispositif près de substances inflammables, explosives ou réactives. La lampe et le réflecteur du dispositif
atteignent des températures supérieures à 85 °C (185 °F).
• Do not use sulfur vaporizers or water misters. Sulfur and calcium deposits on your reflector will decrease its efficiency.
Ne pas utiliser de pulvérisateurs de soufre ni de brumisateurs. Des dépôts de soufre et de calcaire sur votre réflecteur en
réduiront son rendement.
• The installation and use of the fixture is the responsibility of the end user. Incorrect use or installation can lead to failure
and damage to the fixture. Damage to the fixture and electronic circuitry as a result of incorrect installation and use revokes
the warranty.
L’installation et l’utilisation du dispositif sont la responsabilité de l’utilisateur final. Une mauvaise utilisation ou installation
peut entraîner une défaillance et endommager le dispositif. Des dommages au dispositif et aux circuits électroniques
résultant d’une mauvaise installation ou utilisation révoqueront la garantie.
Be sure cord sets or wiring harnesses:
1) Are not concealed or extended through a wall, floor, ceiling, or other parts of the building structure;
2) Are not located above a suspended ceiling or dropped ceiling;
3) Are not permanently affixed to the building structure;
4) Are routed so that they are not subject to strain and are protected from physical damage;
5) Are visible over their entire length; and
6) Are used within their rated ampacity as determined for the maximum temperature of the installed environment
specified in the instructions.

5 Contents (1)
A. Gavita SL2 1000e 208-240 V fixture
1. Electronic ballast
2. Pro-line bracket
3. Lever to unlatch reflector
4. Lamp sockets
5. Reflector Gavita HR96 DE*
6. Mounting points
*The reflector is delivery dependent,
it may differ from the image
B. Gavita Pro Plus 1000 W EL 400 V lamp*
Lamp may vary depending on fixture
C. Interconnect cable (RJ/RJ )
Cable length: 2.5 m / 8 ft
D. Power cord with NEMA 6-15P plug
E. Dummy plug
6 Controls, connections and
indications (2)
A. IEC C13 connection
B. Gavita 2xRJ connector
1. RJ IN
2. RJ OUT
C. Status LED
7 Installation / Installation
Warning! Avoid coiled cords. Coiled cords may lead to electromagnetic interference.
Avertissement! Évitez que les cordons ne s’enroulent. Les cordons enroulés peuvent causer des interférences
électromagnétiques.
Warning! Always install the lamp before connecting the fixture to the mains.
Avertissement! Toujours installer une lampe avant de brancher le dispositif au conducteur principal.
Warning! When connecting the fixture to the controller it may ignite. Make sure either power is disconnected or the
controller is switched off.
Avertissement! Le dispositif peut s’enflammer lors du branchement au régulateur. Assurez-vous d’éteindre l’alimentation
ou d’éteindre le régulateur.
Warning! Ensure the local cabling can support the voltage and current requirements of the fixture.
Avertissement! Assurez-vous que le câblage local peut soutenir la tension et les exigences actuelles du dispositif.
7.1 Preparing the fixture for use
• Switch off mains power.
• Install the lamp in the fixture (see paragraph 10.1).
• Hang the lamp by its two mounting points (3). The mountings point are spaced 407 mm / 16 inches apart.
These fixtures are intended to be hung in the open with
adequate space around the fixture. In the case of limited space
be sure to provide at least 6 inches to any combustible ceiling
and 12 inches to any combustible wall or partition, and at least
24 inches between fixtures. This will prevent overheating of
both the lighting fixture and any combustible structure within
the installation environment.
407 mm / 16 inch
1000W
1 m -
40 in
750W
0.75 m -
30 in
3. 4.
A6
A1
A3
A5
A4
A2
B
CC
CE
C
D
Gavita
HR96 DE
Gavita
Intensity
Optic
Gavita W
150 DE
1.
C
B
A
B1 B2
2.
Gavita 2xRJ
NEMA
6-15P

7.2 Repeater bus connection kit (optional)
The repeater bus connection kit contains the following items:
1. (1x) 25 m/82 ft cable
2. (8x) Modular jack 6P6C
3. (4x) 3-way splitter 6P6C gray
4. (2x) Snap-on ferrite black
5. (4x) Snap-on ferrite gray
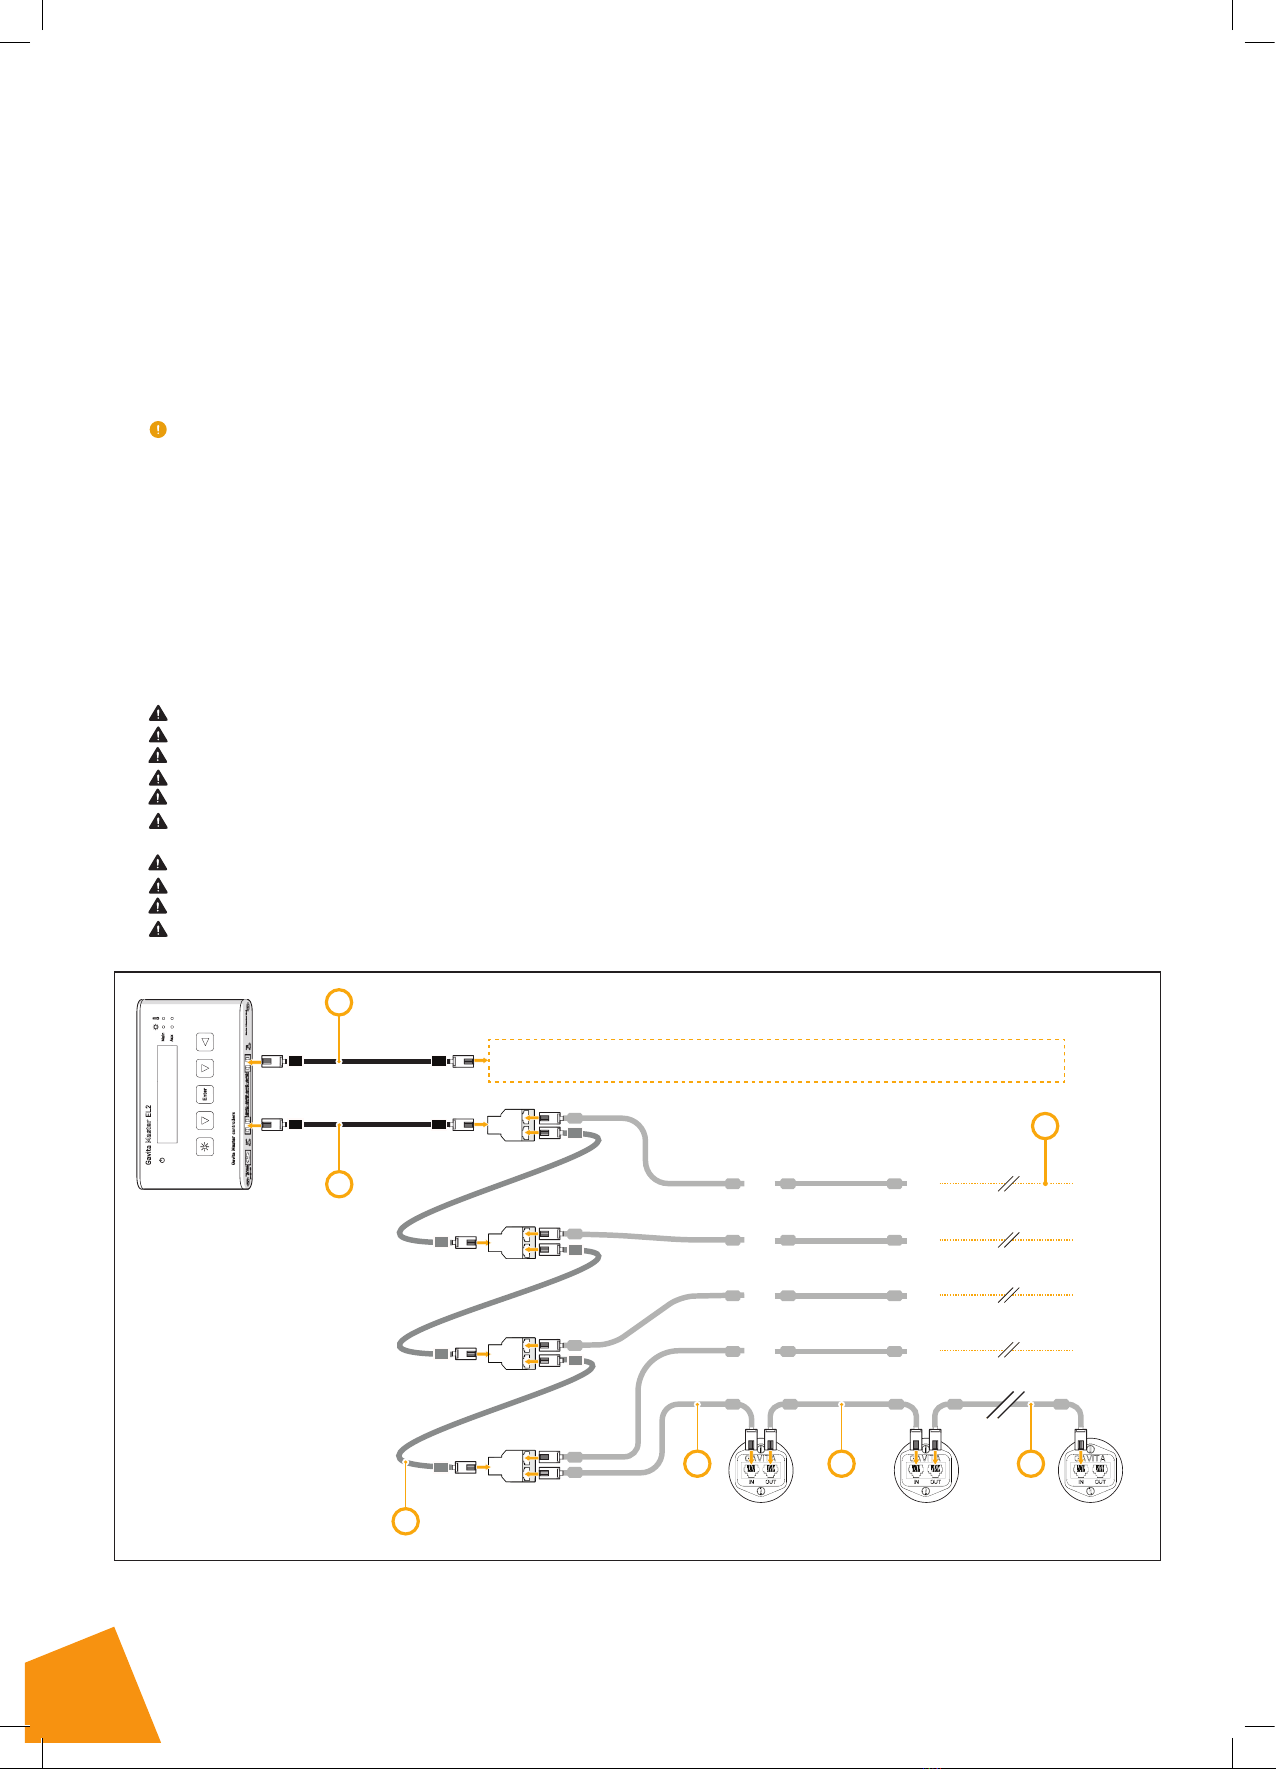
7.3 Preparation for use with a controller
Using a daisy chain setup, a maximum of 100 fixtures can be connected to one controller. Up to 500 fixtures per daisy chain can
be connected when using splitters. See section 7.4 and 7.5 of this manual and the manual of the controller.
• Take the unstripped black interconnect cable.
• Cut the cable (supplied with controller) to the desired length and strip both ends using a crimp tool (5).
• Insert the cable end in the RJ14 connectors (6) and use the crimp tool to finish the assembly.
• Mount ferrite cores (item 1. mentioned in Content) to both cable ends close to the RJ14 connectors (7).
7.4 Connecting up to 100 fixtures
• Remove the dummy from the input port on the first fixture (8).
Note: Keep the dummy in a safe place! The dummy is necessary to operate the fixture in standalone mode.
• Use the black controller cable (item is supplied with controller) to connect the controller input port on the first fixture (9A).
• Remove the dummy from the input port on the second fixture.
• Use a grey 6PC6 modular jack interconnect cable (item 3.) with integrated ferrite cores to connect the output port of the first
fixture to the input port of the second fixture (9B). The indicator light will blink when the connection is successful.
• Repeat these steps to connect up to 100 fixtures (9C).
Warning! Ensure the power cord and the controller cables do not touch any of the reflectors.
Avertissement! Assurez-vous que le cordon d’alimentation et que les câbles de contrôle ne touchent aucun des réflecteurs.
5. 6. 7.
4.
1 2 max. 100
A B C
9.8.
7.5 Connecting up to 500 or 1000 fixtures
Using a setup with daisy chained splitters, up to 500 fixtures on EL1 and 1000 fixtures on EL2 (over two channels) can be
connected as shown in fig. 10.
• Use the black controller cable (item comes with the controller) to connect the primary channel of the controller to the input
port of the first splitter (10A).
• Remove the dummy from the input port of the fixtures (8).
Note: Keep the dummy in a safe place! The dummy is necessary to operate the fixture in standalone mode.
• Use a grey 6PC6 modular jack interconnect cable (item 3.) to connect the output port of the splitter to the input port of the
first fixture (10C).
• Use a grey 6PC6 modular jack interconnect cable (item 3.) to connect the output port of the first fixture to the input port of
the second (10D).
• Repeat these steps to connect up to 100 fixtures per splitter output port (10E). Up to 500 fixtures can be connected to the
primary channel.
• Snap-on two grey ferrite cores (item 4.) on the grey interconnect cable (item 3.) close to the 6P6C plugs.
• Use the grey 6PC6 modular jack interconnect cables (item 3.) to connect the outport of a splitter to the inport of the next
(10B).
• Use the black secondary channel (item comes with controller) (10G) to connect another 500 fixtures, in the same way the
fixtures are connected to the primary channel.
Warning! Ensure the power cord and the controller cables do not touch any of the reflectors.
Avertissement! Assurez-vous que le cordon d’alimentation et que les câbles de contrôle ne touchent aucun des réflecteurs.
Warning! Distribute number of fixtures evenly over daisy chains.
Avertissement! Distribuez uniformément le nombre de dispositifs sur les chaînettes en sangle.
Warning! Ensure the repeater bus connections are integrated in a correctly set up installation for best results.
Avertissement! Assurez-vous que les raccordements de barres omnibus répéteurs sont adéquatement intégrés dans les
limites d'une bonne installation pour obtenir les meilleurs résultats.
Warning! Boosters should never be used to expand.
Avertissements! Ne jamais utiliser survolteurs pour étendre.
Warning! The maximum cable length per splitter is 250m (100 interconnect cables).
Avertissement! La longueur maximale de câblage par séparateur est de 250 m (100 câbles de liaison).
1 2 100
C D E
101 102 200
201 202 300
401 402 500
F
301 302 400
501 - 1000
B
A
G
10.
7.6 Connecting the fixture to the mains
Warning! Ensure the cord is not coiled and does not touch any hot surfaces.
Avertissement! Assurez-vous que le cordon n’est pas enroulé et qu’il n’est pas en contact avec des surfaces chaudes.
Warning! If external switching gear is used to switch the fixture, ensure it can cope with the inrush current of the fixture
(see paragraph 3.2). Always use a double pole contactor suitable of switching a capacitive load. Never use household
timers to switch the fixture!
Avertissement! Si vous utilisez de l'équipement de commutation externe pour commuter le dispositif, assurez-vous qu'il
peut soutenir l'appel de courant du dispositif (voir paragraphe 3.2). Utiliser en tout temps un contacteur bipolaire
convenant à la commutation d’une charge capacitive. Ne jamais utiliser une minuterie maison pour commuter le
dispositif!
• If a controller is used, ensure the controller is connected to the fixture.
• Plug the power cord into the mains.
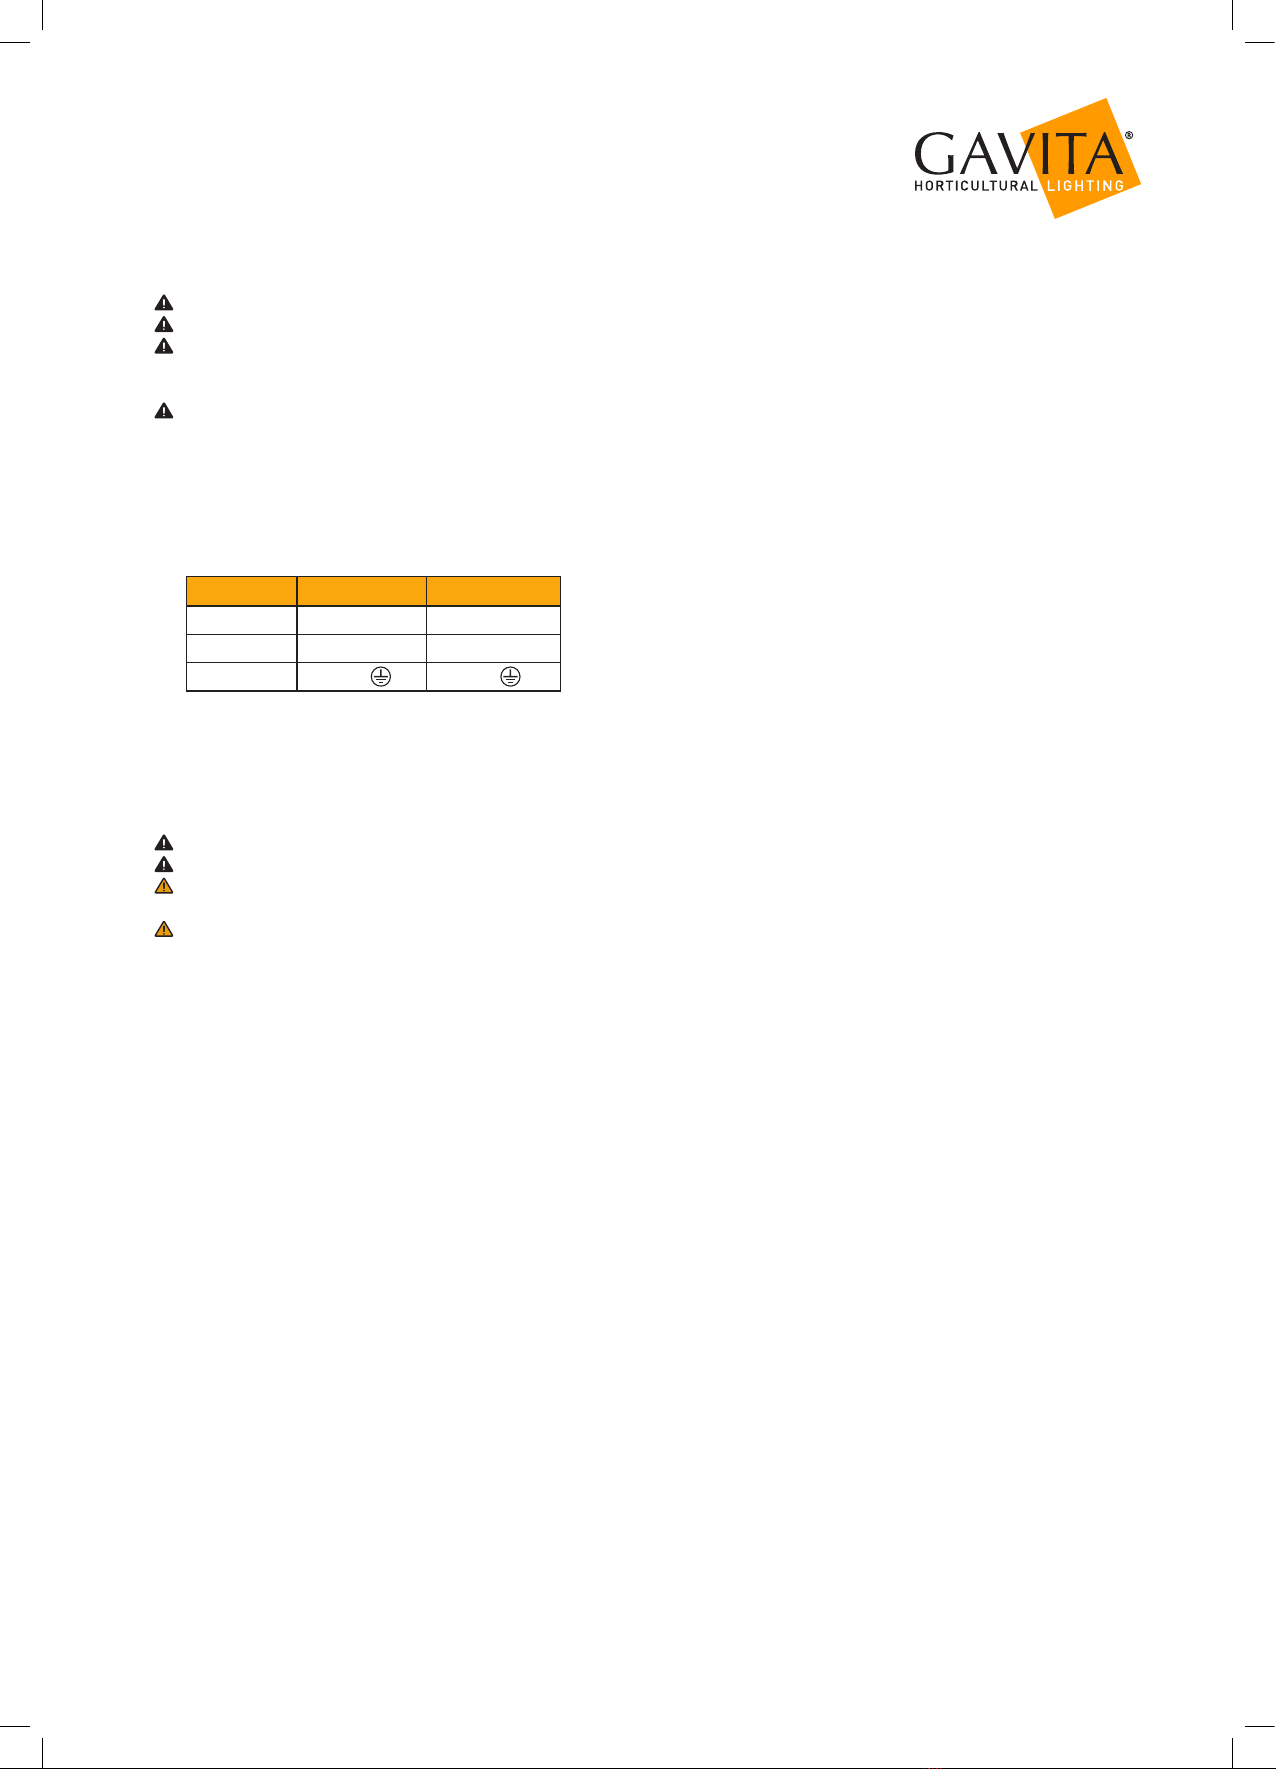
Cable description for HGC906730 & HGC906732
Wire 208V 240V
White Neutral (N) Phase (L)
Black Phase (L) Phase (L)
Green Ground ( ) Ground ( )
• Switch on mains power.
8 Product use / Utilisation du produit
Warning! Never use the fixture without a lamp or reflector!
Avertissement! Ne jamais utiliser le dispositif sans lampe ni réflecteur!
Caution! Before you dim or boost your HPS lamp, make sure that you run it at nominal value (100%) for at least 100 hours
to stabilize the lamp. Failing to do so may lead to sub-optimal light levels and premature end of life failure of your lamp.
Mise en garde! Avant de diminuer ou d’augmenter l’intensité de la lampe à vapeur de sodium haute pression, assurez-
vous de faire fonctionner la lampe à une valeur nominale (100 %) pendant au moins 100 heures afin de la stabiliser.
Le non-respect de cette précaution peut mener à des niveaux d’éclairage sous-optimaux et peut entraîner la défaillance
prématurée en fin de vie de votre lampe.
8.1 Using the controller to adjust the output of the lamp
The output of the lamp is steplessly variable from 50-115% when connected to a controller. Consult the controller manual for
more information on controlling the output of the lamp.
9 Inspection, maintenance and repair
Warning! Disconnect the product from mains before performing any
maintenance or repairs.
Avertissement! Débranchez le produit du conducteur principal avant d’effectuer tout
entretien ou toute réparation.
Warning! Do not open or disassemble the fixture, it contains no servicable parts
inside. Opening the fixture can be dangerous and will void the warranty.
Avertissement! Ne pas ouvrir ou démonter le dispositif; il ne comprend aucune pièce
réparable à l’intérieur. Ouvrir le dispositif peut s’avérer dangereux et annulera la
garantie.
Warning! Always allow for a cool down period of at least 30 minutes before
touching the lamp or reflector.
Avertissement! Toujours prévoir une période de refroidissement d’au moins 30
minutes avant de toucher la lampe ou le réflecteur.
Caution! Do not clean the fixture with detergents, abrasives or other agressive
substances.
Mise en garde! Ne pas nettoyer le dispositif avec des détergents, des substances
abrasives ou autres substances agressives.
Caution! Do not touch the inside of the reflector during installation and do not
use water, abrasives or detergents to clean it. This will damage the reflective
surface.
Mise en garde! Ne pas toucher l’intérieur du réflecteur pendant l’installation et
ne pas utiliser d’eau, de substances abrasives ou de détergent pour le nettoyer.
Cela pourrait endommager la surface réflectrice.
• Regularly check the fixture for dust or dirt buildup. Clean if necessary.
Contamination may couse overheating and decreased performance.
-Clean the inside of the reflector only with a soft, dry cloth;
-Clean the electronic ballast and the outside of the fixture using a dry or damp
cloth.
• Check the lamp monthly for discolorations or black markings. Always replace a
damaged lamp.
Note: Before initial use, the lamp could have black markings. This will disappear
when the lamp runs on full power. If not, replace the lamp.
• Regularly check the wiring of the product to ensure it is undamaged.
9.1 Placement and replacement of the lamp
Warning! Always allow for a cool down period of at least 30 minutes before
touching the lamp or reflector.
Caution! Do not touch the lamp with bare hands as this will damage the lamp.
Always use a fabric glove to handle the lamp.
Caution! Only use lamps specified by Gavita (see paragraph 3.3).
Note: The lamp must be replaced every year or after 5000 lighting hours,
whichever one comes first.
• Switch off mains power.
• Hold the lamp with a fabric glove to prevent it from falling. Use a protective glove
if the lamp is damaged.
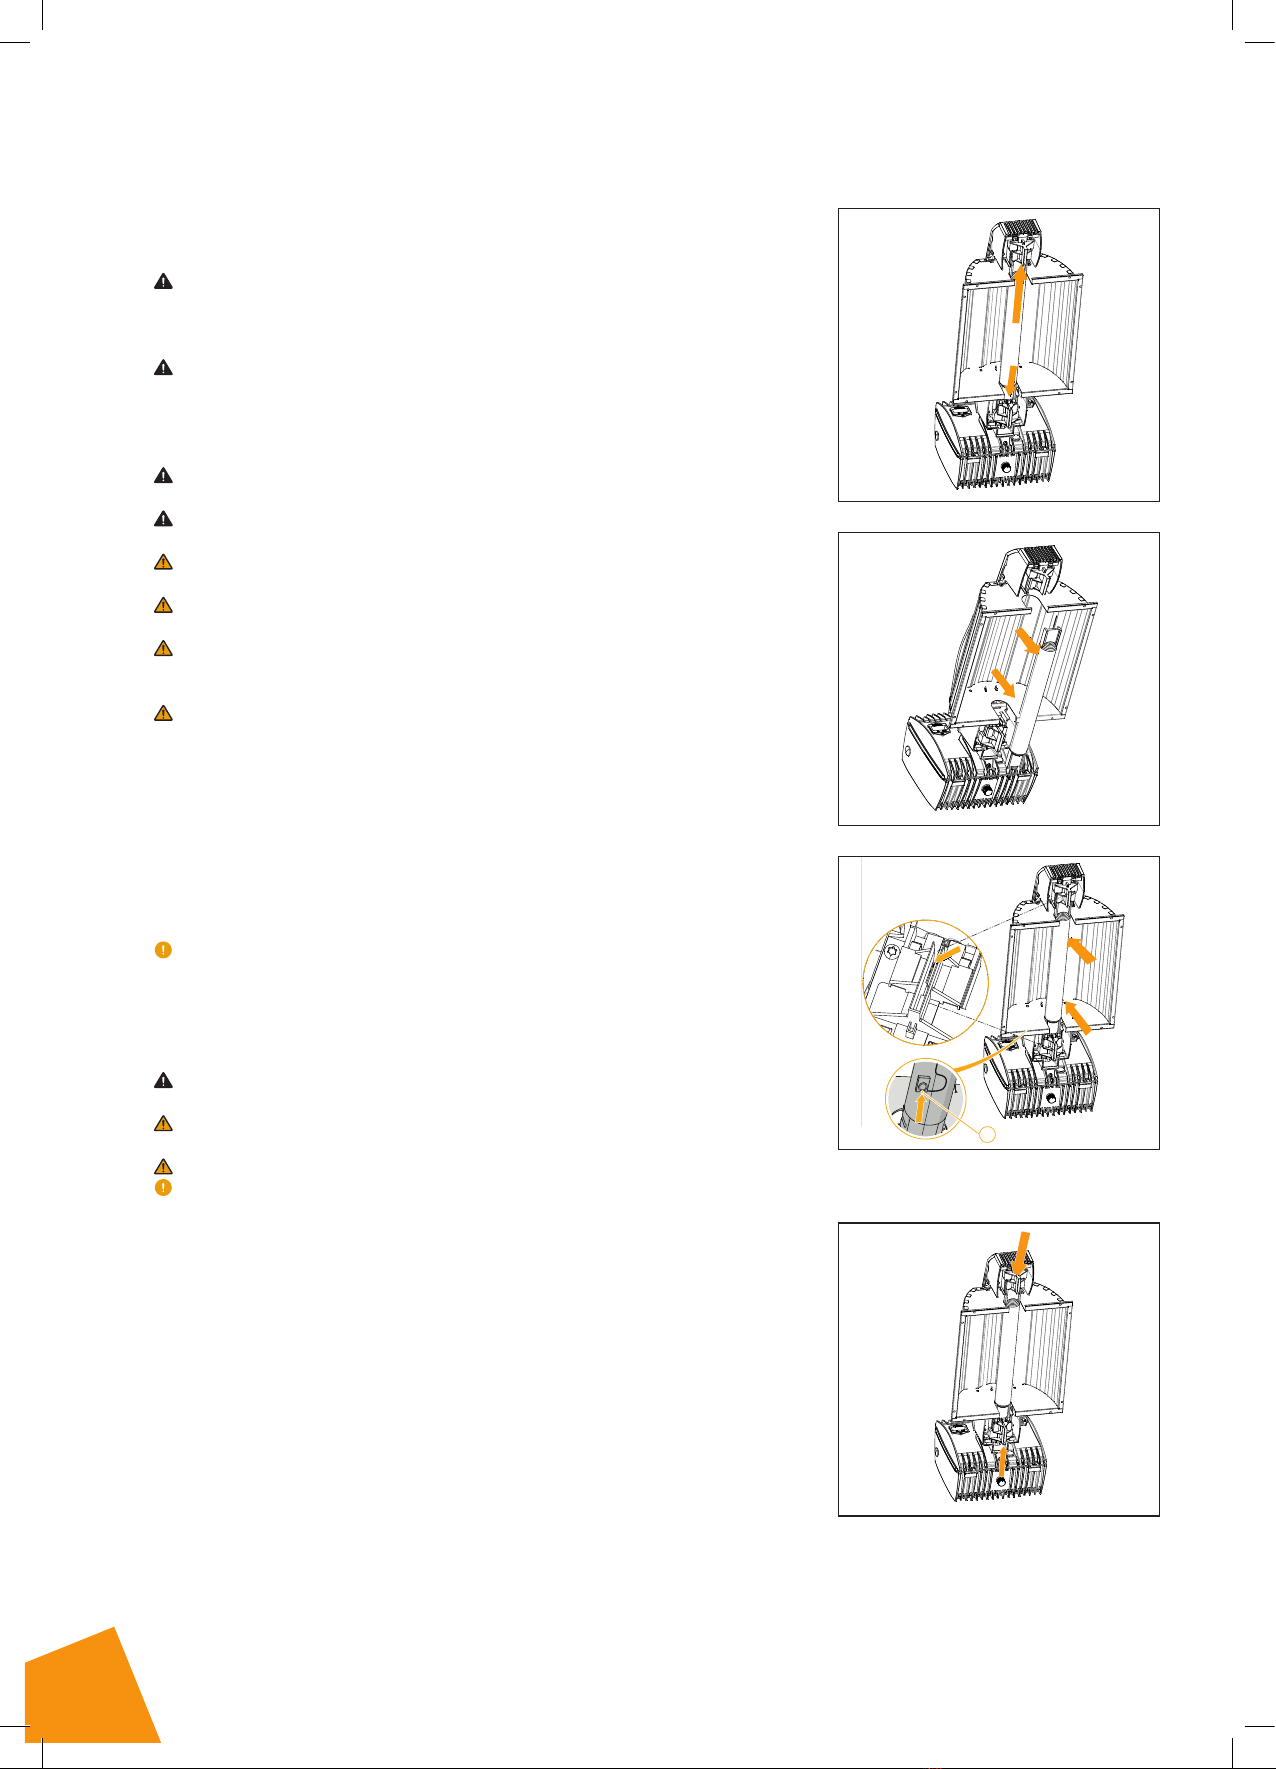
• Open the lamp holders by sliding them outwards (11).
• Carefully take the lamp out of the fixture (12).
• Install the new lamp with the getter (A) near the ballast (13), with the glass
vacuum seal pointed downwards (Philips lamps) or sideways (Gavita lamps).
• Use a fabric glove to carefully press the lamp in the fitting until the metal
springs hold the lamp (13).
• Close the lamp holders by sliding them inwards (14).
• Switch on mains power.
11.
12.
A
13.
14.
9.2 Placement and replacement of the reflector
Warning! Always allow for a cool down period of at least 30 minutes before
touching the lamp or reflector.
Avertissement! Toujours prévoir une période de refroidissement d’au moins 30 minutes
avant de toucher la lampe ou le réflecteur.
Note: Gavita recommends replacing the reflector* after 5000 lighting hours.
Depending on the environment and contamination levels the reflector will degrade.
The Vega/Miro™ aluminum can not be cleaned without damage. Therefore we
recommend to change the reflector once every year. Also replace the lamp when
replacing the reflector.
* The reflector is delivery dependent, it may differ from the image.
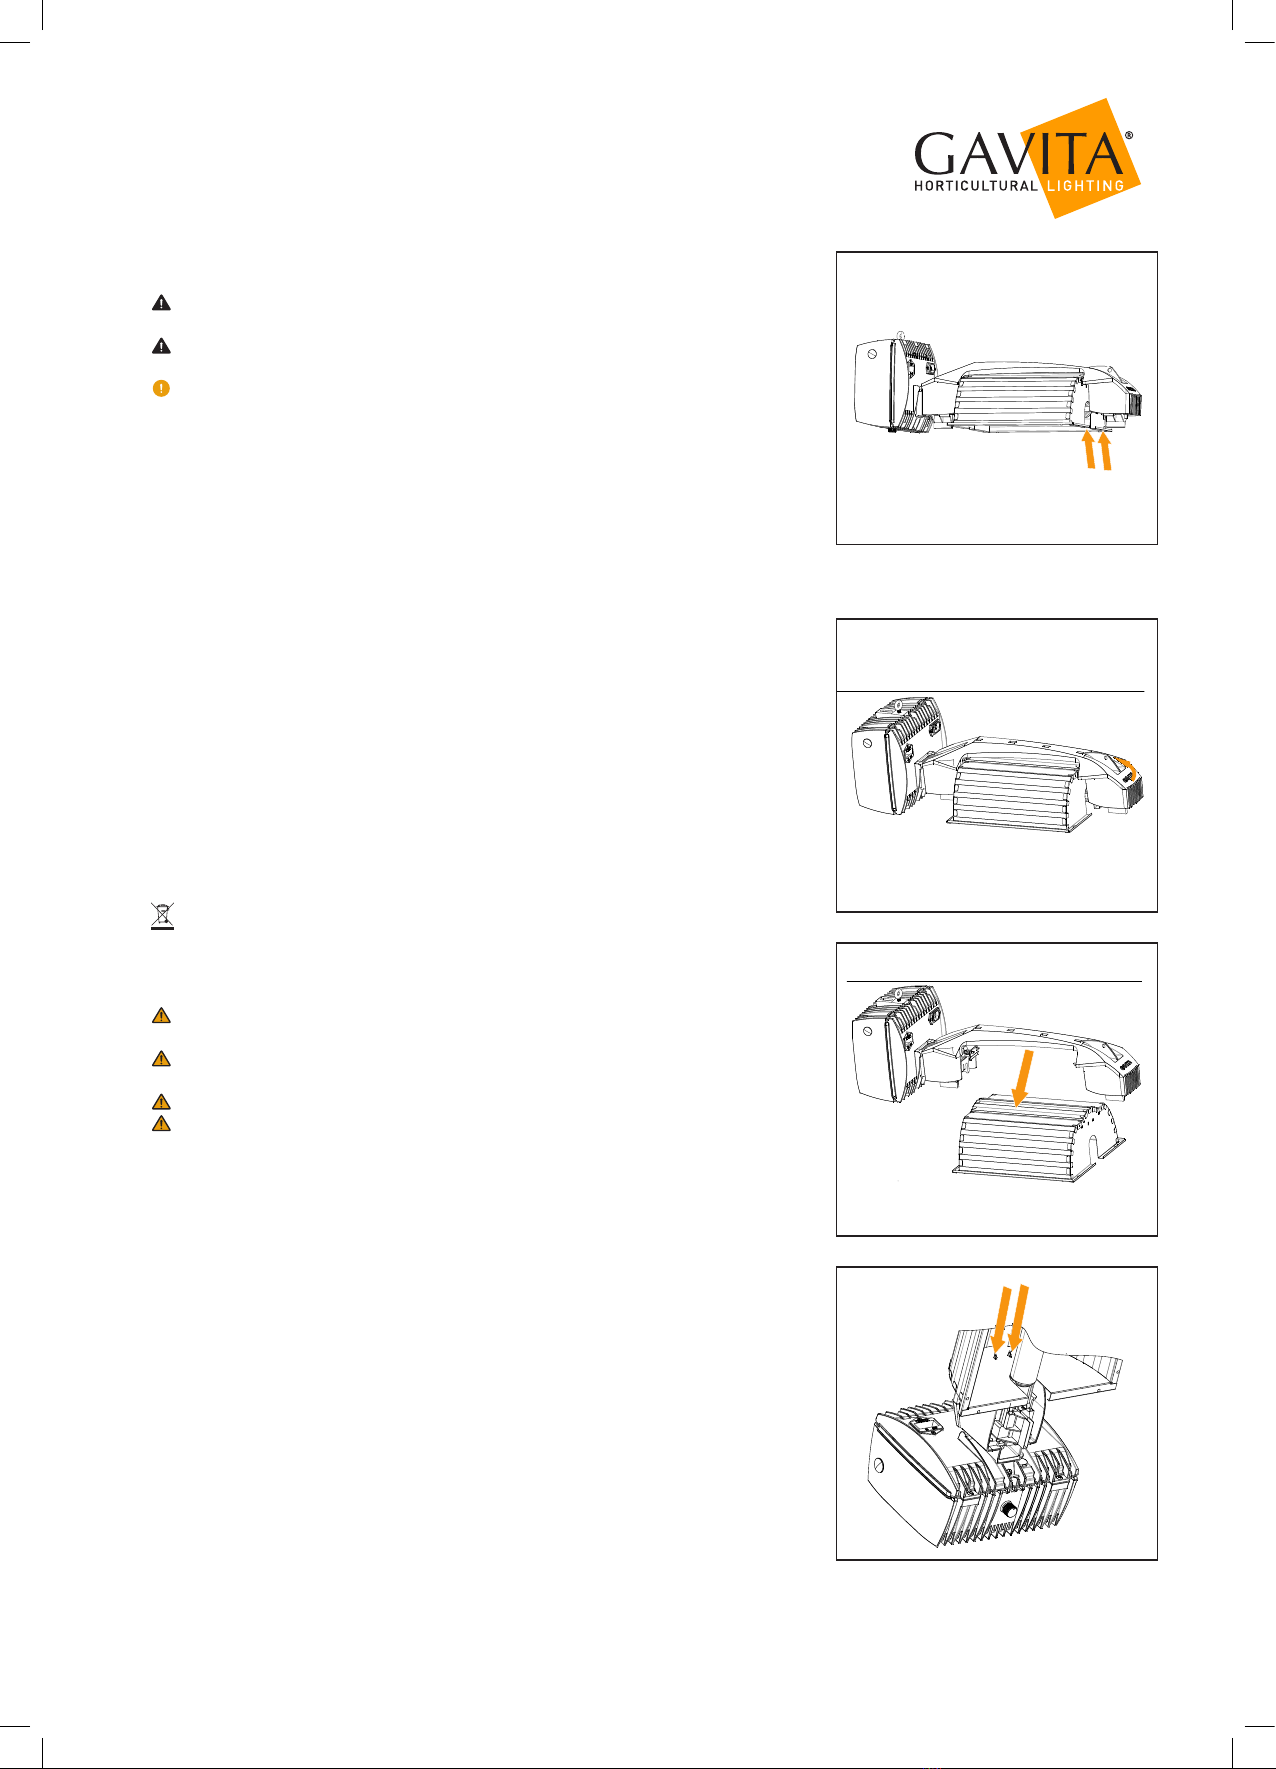
• Switch off mains power.
• Remove the lamp from the fixture (see paragraph 10.1).
• Support the reflector on the side of the reflector lever to prevent it from falling
(15).
• Move the reflector lever up to retract the two pins holding the reflector in place
(16).
• Remove the reflector (17).
• Place the new reflector. Ensure the reflector lever is in the opened position to
allow the reflector to pass.
• Ensure the holes in the reflector are aligned with the pins in the fixture (18).
• Release the reflector lever so its two pins hold the reflector in place.
• Insert the lamp in the lamp holder (see paragraph 10.1).
• Switch on mains power.
10 Storage and disposal
• Store the fixture in a dry and clean environment, with an ambient temperature of
-20 ~ 85 °Celsius / -4 ~ 185 °Fahrenheit.
• The product must not be discarded as unsorted municipal waste, but must be
collected separately for the purpose of treatment, recovery and environmentally
sound disposal.
Caution! The lamps are chemical hazardous waste and must be delivered to the
designated authorities.
Mise en garde! Les lampes constituent des déchets chimiques dangereux et
doivent être livrées aux autorités compétentes.
Caution! The lamp contains mercury.
Mise en garde! La lampe contient du mercure.
15.
16.
17.
18.

11 Limited Warranty
When purchased from an autorized Hawthorne dealer, this product is limited by a 3 year LIMITED WARRANTY, available at
hawthornegc.com/warranties. You can also obtain the Terms of Sale and Limited Warranty by calling Hawthorne toll-free
at: 1-888-478-6544 or writing Hawthorne at: Hawthorne Hydroponics LLC, 3204 NW 38 Circle, Vancover, WA 98660.,
Att: Customer Service.

THIS PAGE INTENTIONALLY
LEFT BLANK

Manufactured for Hawthorne Hydroponics LLC,
a subsidiary of The Hawthorne Gardening Company
3204 NW 38th Circle, Vancouver, WA 98660
HawthorneGC.com | Canada: HawthorneGC.ca | P +1-360-883-8846 | E info@gavita.com
©2021 World rights reserved
ME1001
Manual: FRENCH_ Gavita®SL2 1000e 208 - 240 V Changes reserved - Version HGC0-01292021
This manual suits for next models
6
Table of contents
Other Gavita Light Fixture manuals


Popular Light Fixture manuals by other brands

Cooper Lighting
Cooper Lighting Halo Classic Pendant Lighting Specification sheet

EuroLite
EuroLite LED Marble Garland 80LEDs-SC-red/blue user manual

Larson Electronics
Larson Electronics SPLT-1.59K-800A-30-4X100W-LED-MS Installation

ADJ
ADJ Ultra Bar 9 User instructions

TECshow
TECshow nebula 18 user manual

Armstrong
Armstrong TechZone 7A-648R brochure


