Gazomat Gazoscan User manual
V5.00 07/03/2019 © GAZOMAT™
GAZOSCAN™
Handheld Remote
Methane Leak Detector
Operating Manual

GAZOSCAN™ – Operating Manual
V5.00 07/03/2019 © GAZOMAT™ 2/28
WARNING
GAZOMAT™ reserves its right to update the contents of this manual, in line with the evolution
of the product.
Text and pictures in the manual are not binding on GAZOMAT™.
Copyright GAZOMAT™ © 2019
All rights to translation, adaptation and reproduction by any process reserved in all countries. No part
of this document may be copied, reproduced or transcribed without the written consent of
GAZOMAT™.
No part of this document may be circulated outside GAZOMAT™ in its present form.
GAZOMAT™ North America, LLC.
850 South Via Lata, Suite 115
Colton, CA 92324
United States
Phone: +1 (909)-906-1001
Email: info@gazomat.com

GAZOSCAN™ – Operating Manual
V5.00 07/03/2019 © GAZOMAT™ 3/28
CONTENTS
1
INTRODUCTION ...................................................................................................................... 5
Key features of a device with highly intuitive handling 5
Purpose 5
Areas of application 5
2 MARKING ................................................................................................................................. 6
3 INSTRUMENT COMPOSITION .............................................................................................. 6
4 WARNINGS AND RECOMMENDATIONS ........................................................................... 7
Reading obligation 7
5 SAFETY REQUIREMENTS FOR THE USE OF GAZOSCAN™ .......................................... 7
Body safety 7
Battery and charger safety 8
Laser safety 9
Usage safety 9
Storage and transportation safety 9
Tips and recommendations 9
6 USER INTERFACE ................................................................................................................. 10
Device buttons 10
Light instructions 10
Interface display 11
Setting menus 11
Menus and default settings 12
6.5.1 Default settings 12
6.5.2 Changing settings 12
7 BATTERY OPERATION ........................................................................................................ 13
Charging the battery 13
Battery charging information 13
Inserting the battery 14
Removing the battery 14
8 SELF-TEST, RED DOT SIGHT AND BLUETOOTH ........................................................... 15
Initialization /Self-test 15
Instructions on the red dot sight 15
Bluetooth connection 16
8.3.1 Functions 16
8.3.2 How to connect using Bluetooth 16
9 OPERATING THE DETECTOR ............................................................................................. 17
Start to use 17
After use 18
10 TECHNICAL PRINCIPLES – DO’s and DON’TS ................................................................. 19
Working principle 19
PPM*M measurement unit 19
Detection Do’s and Don’ts 20

GAZOSCAN™ – Operating Manual
V5.00 07/03/2019 © GAZOMAT™ 4/28
10.3.1 Case 1 – Detection through glass 20
10.3.2 Case 2 – Detection through materials with strong absorption or reflection effect on the
infrared laser 20
10.3.3 Case 3 – Detection towards a corner or similar situation 21
11 TECHNICAL SUPPORT AND MAINTENANCE ................................................................. 22
Error messages 22
11.1.1 Error codes 22
11.1.2 Proper handling method 22
Troubleshooting 23
12 WARRANTY ........................................................................................................................... 24
13 TECHNICAL SPECIFICATIONS ........................................................................................... 25
APPENDIX 1 – FCC STATEMENT............................................................................................... 26

GAZOSCAN™ – Operating Manual
V5.00 07/03/2019 © GAZOMAT™ 5/28
1 INTRODUCTION
GAZOMAT™ has extended its range of laser spectroscopy based (Tunable diode Laser Absorption
Spectroscopy – TDLAS) gas detector with the GAZOSCAN™ detector.
GAZOSCAN™ is an ultra-light and highly sensitive handheld remote methane leak detector
(RMLD) which uses infrared lasers to remotely detect methane leaks. A smart sensor using infrared
(TDLAS) technology guarantees measurement efficiency.
GAZOSCAN™ comes with Bluetooth capability that can transfer measurement data in real-time to
a dedicated APP supplied on option. Users can use the APP to check, record and export the data.
Key features of a device with highly intuitive handling
Methane selectivity
Excellent detection at 100 meters (328 feet)
Detects through glass
5 ppm sensitivity per meter
Fast response time, 0.1s
Lightweight, 0.76kg (1.68lbs) with battery
Visual and audio alarms with configurable alarm threshold
Large color 2.8in LCD screen
Bluetooth® data transmission
Green guide laser light
Red dot sight for precise targeting in bright sunlight or ambient light
Purpose
Ultralight, compact and easy to use, the GAZOSCAN™ device is designed for rapidly inspecting
difficult-to-access installations and equipment in industrial sites. The GAZOSCAN™ is suited to
any situation where field technicians cannot operate close to the inspection zone:
Because it is not accessible – overhead installations…
Or for safety reasons.
IECEx and ATEX certified, it can be used in explosive atmospheres in confined and unconfined
areas.
Areas of application
The GAZOSCAN™ meets the safety and performance requirements of a large range of applications
including but not limited to:
1. Natural gas transmission and distribution pipeline leak inspection (inspection on street,
between buildings, inspection of overhead pipelines, valves, service galleries of bridges...)
2. Inspection of buildings (entrances, staircases, through windows) and fenced residential
properties
3. Safety of first responders’ interventions
4. Industrial site monitoring (refineries, natural gas production, processing and storage plants,
compression stations, injection/extraction wells…).
GAZOSCAN™ – Operating Manual
V5.00 07/03/2019 © GAZOMAT™ 6/28
2 MARKING
The markings include the following:
GAZOMAT™ North America, LLC.
850 South Via Lata, Suite 115
Colton, CA 92324 – United States
Ex ib op is IIA T3 Gb
II 2 G Ex ib op is IIA T3 Gb
IECEx Certificate Number: IECEx NEP 19.0022X
ATEX Certificate Number:
Baseefa19ATEX0076X
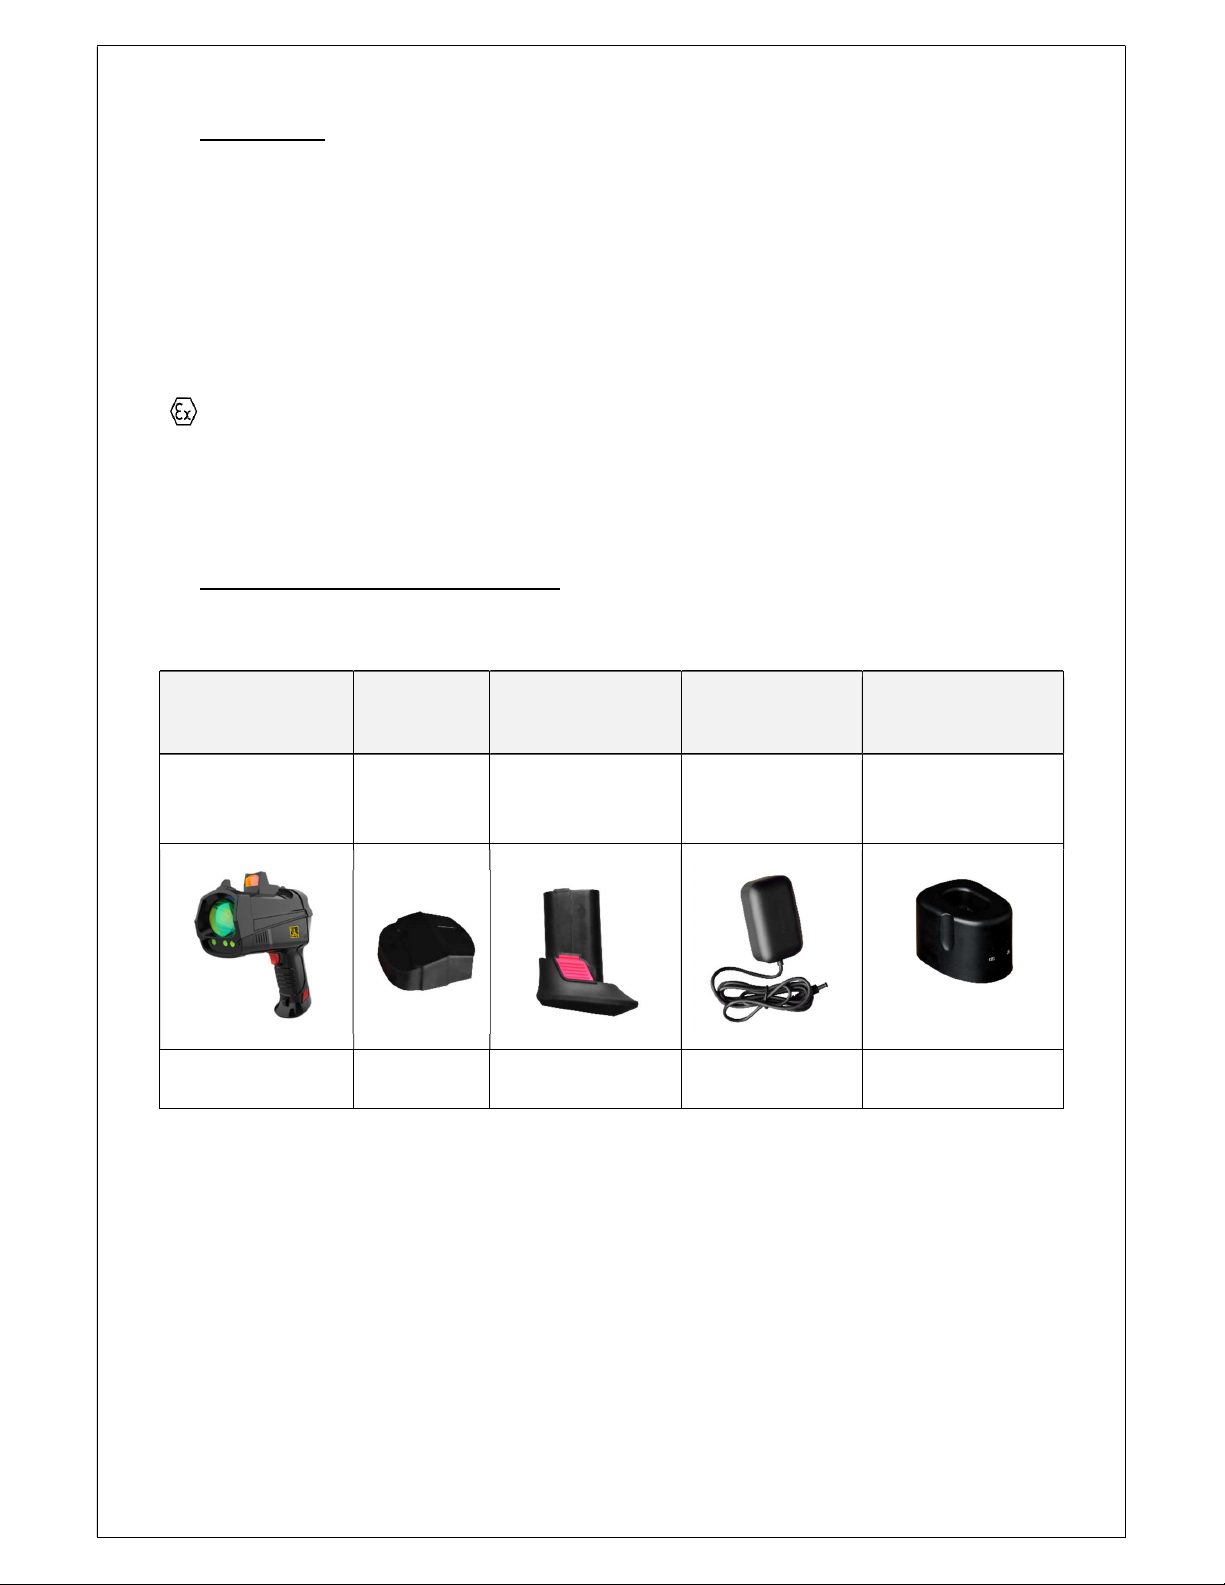
3 INSTRUMENT COMPOSITION
Components:
1-Handheld Remote
Methane Leak
D
etector
1-Lens Cap 1-Battery 1-Power Adapter 1-Charging Base
Use only replaceable
battery pack
GAZOSCAN-B from
GAZOMAT
™
NA
Use only charger
GAZOSCAN-C from
GAZOMAT™ NA
A second battery
provided
on option
Carrying case to fit all above listed components.
GAZOSCAN™ – Operating Manual
V5.00 07/03/2019 © GAZOMAT™ 7/28
4 WARNINGS AND RECOMMENDATIONS
Reading obligation
Prior to using this device, it is imperative that all users read this manual for their own safety, the
safety of those around them and the safety of the device. Users are required to use the device as
instructed by the manufacturer to get the most out of the device and keep it protected from damage.
GAZOMAT™ shall not be liable if the device is used other than as instructed.
The manufacturer shall not be liable in the event of any abnormal use of the product or any malicious
tampering with the product.
In case of malfunction, please contact:
5 SAFETY REQUIREMENTS FOR THE USE OF GAZOSCAN™
It is strictly forbidden:
- to open the detector or the battery, particularly, in a hazardous or supposedly
hazardous atmosphere.
It is strictly forbidden:
- to change, to modify or to adapt external or internal parts or components of the
detector.
Body safety
1. Do not use the instrument if the outer case is broken or wet.
2. Stop using the instrument instantly and take out the battery in case of smoke, strange smells,
short-circuit, or fire.
3. The enclosure rating of the instrument is IP54. Do not immerse in liquid. Stop using the
instrument and pull out the battery if any liquids have gotten inside.
4. Do not look directly at the laser while using the instrument.
5. Do not point the laser at others.
6. Do not attempt to open the instrument, there are no user serviceable parts inside the
instrument.
7. Do not touch the LCD screen if it is broken.
GAZOMAT™ North America, LLC.
850 South Via Lata, Suite 115
Colton, CA 92324
U.S.A.
Phone: +1 (909)-906-1001

GAZOSCAN™ – Operating Manual
V5.00 07/03/2019 © GAZOMAT™ 8/28
NOTE: Should any damage of anodizing layer of the heat sink of middle shell or sight base occur,
then the product must no longer be used in hazardous atmospheres.
FCC ID: 2ASO2HS4000
This device complies with part 15 of the Federal Communications Commission (FCC) rules.
Operation is subject to the following two conditions:
1. This device may not cause harmful interference, and
2. This device must accept any interference received, including interference that may cause
undesired operation.
Battery and charger safety
1. Use only the original manufacturer supplied batteries (GAZOSCAN-B) and chargers
(GAZOSCAN-C).
2. Do not pull off the battery in explosive atmospheres.
3. Do not charge the battery in flammable or explosive atmospheres.
4. Use GAZOMAT™ provided charger (GAZOSCAN-C) only.
5. Do not charge the battery if the charger or the battery is broken or damaged.
6. Keep surrounding environments safe when charging.
7. Keep the charger and battery clean to avoid a short-circuit.
8. Stop charging instantly and unplug the charger immediately if any observable issue arises
while charging (smoke, strange smells, a short-circuit, or fire).
9. Do not short-circuit the terminals of the battery pack.
10. Do not -or attempt to- dismantle, modify, or repair the battery.
11. Do not touch the battery with wet hands.
12. Do not hit or throw the battery.
13. Do not dispose of the battery in the fire. Observe disposal regulations to preserve the
environment.
14. Should the battery leak and come in contact with the skin or clothes, rinse with clean water
and seek medical attention if necessary.
15. Store batteries in a well-ventilated, cool and dry environment. Do not place the battery in a
place with too high or too low temperatures.
16. Do not store the device with the battery installed when not using the device for a long time.
17. Do not store or transport the battery together with metal objects. Observe relevant
regulations when Lithium batteries are in transit.
GAZOSCAN™ – Operating Manual
V5.00 07/03/2019 © GAZOMAT™ 9/28
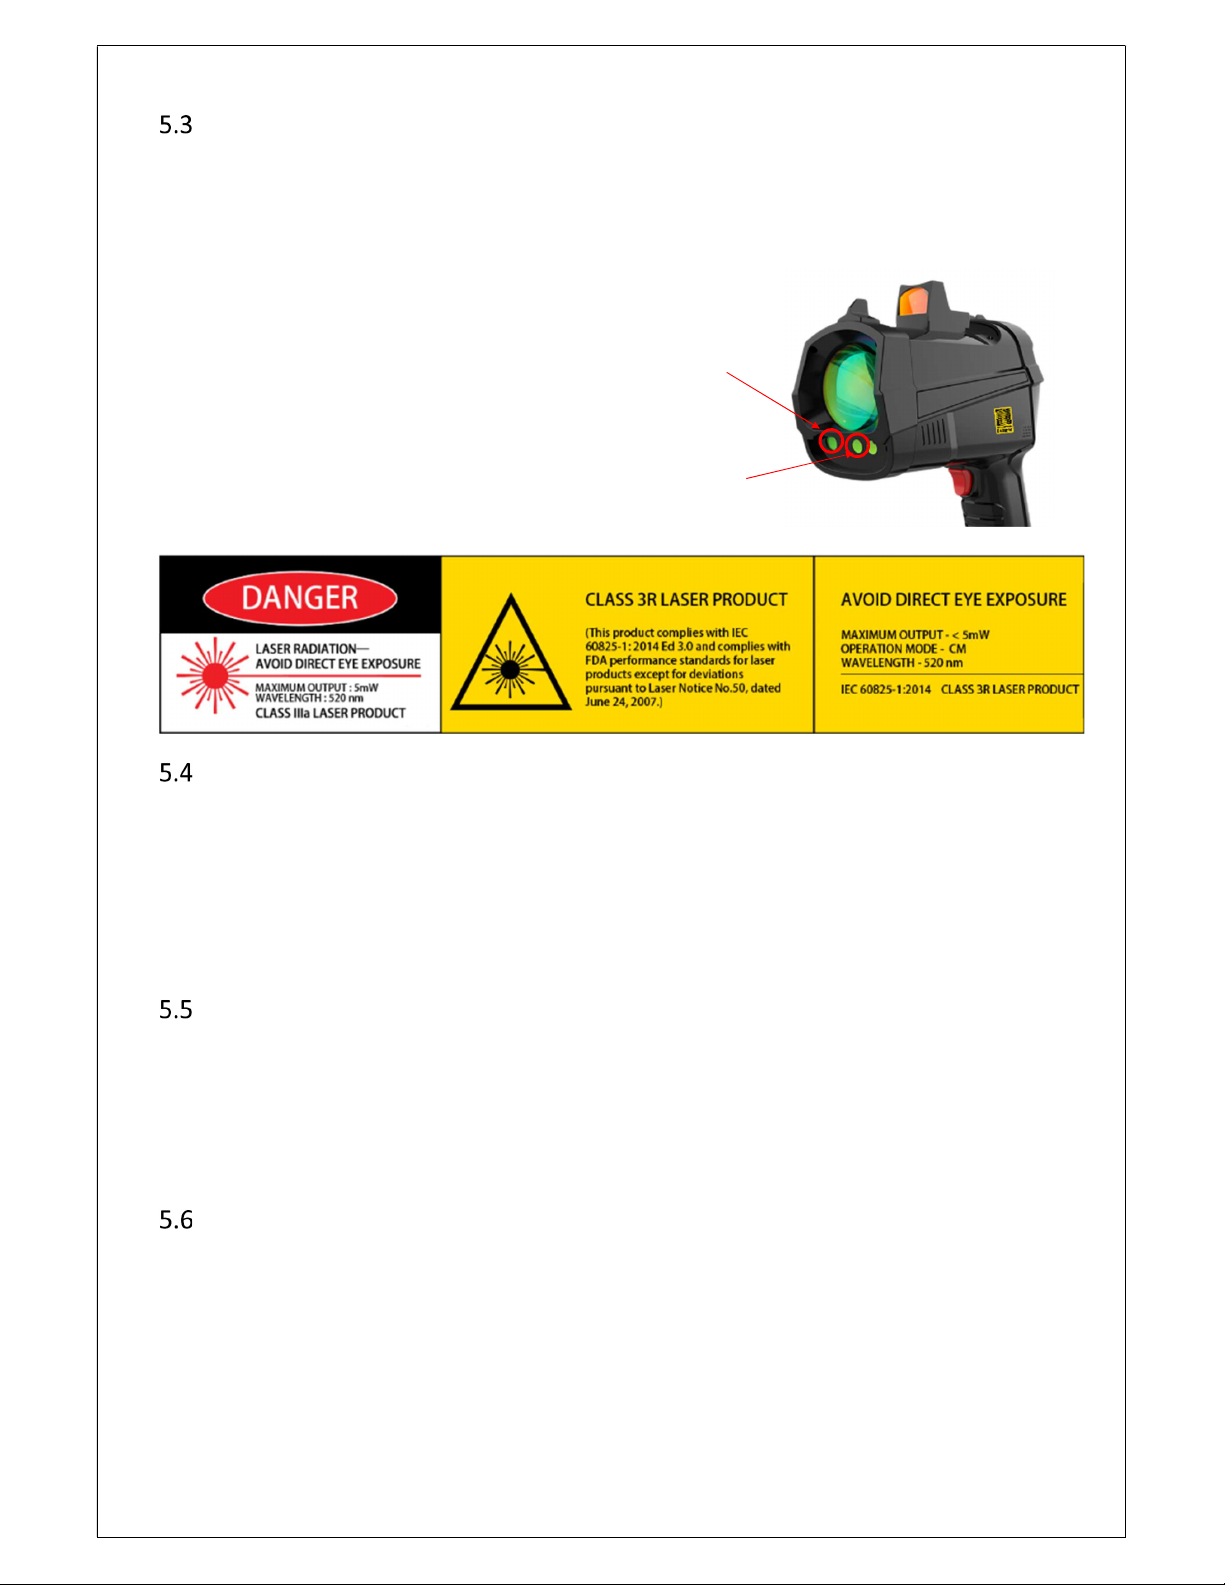
Laser safety
Infrared measurement laser: Class 1 eye safety, wavelength: 1651 nm, <10mW.
Green indication laser: Class 3R, wavelength: 520 nm, <5mW.
Do not stare into the beam. Do not point the laser at humans, livestock or other animals.
The device satisfies the requirements of:
International Electrotechnical Commission
Standards:
o IEC 60825-1:2014
o IEC 60825-1:2007
US CRH standard: 21 CFR 1040.10 and
1040.11 except for deviations pursuant to
Laser Notice No.50, dated June 24, 2007;
People’s Republic of China’s standard:
GB7247.1
-
2012.
Infrared
measurement
laser aperture
Green indication
laser aperture
Usage safety
Operating temperature: -20°C to +45°C (-4°F to 113°F).
Operating humidity: <80% RH, Non-condensing.
1. Avoid electromagnetic interference when using this product.
2. Do not forcefully push the buttons or subject the device to strong shocks.
3. Use the strap when using the device to avoid breakage and foot injury caused by dropping of
the device.
Storage and transportation safety
1. Store this product in a cool and dry environment. Do not store the instrument in an area with
extreme temperatures.
2. Do not store instrument with battery installed.
3. Transport this product within its dedicated casing to avoid damage from strong shock or
vibrations
Tips and recommendations
1. Unlike other battery types, Lithium batteries operate at a high level and then drop suddenly.
An optional second battery is recommended.
2. If there is dust on the lens or body of the instrument, wipe with a lint free dry clean cloth or
premoistened optical wipe. Do not use napkins or other rough materials which could
damage the lens surface.

GAZOSCAN™ – Operating Manual
V5.00 07/03/2019 © GAZOMAT™ 10/28
6 USER INTERFACE
Device buttons
No. Picture Button Descriptions
01
Power/Return Button Hold the power button about 3 seconds to start up
the device
02
Enter Button Enter the menu/confirm selection
03
Up Button Move up the cursor
04 Down Button Move down the cursor
05 Test Button Click once to start testing. The green indication
laser is
visible. C
lick again to stop testing
06 Battery Compartment Button Used to remove the battery
Light instructions
No. Designation Comments
a Infrared Laser
Emitter
-
b Indication Laser
(Green)
Class 3R, Avoid Direct Eye Exposure
The indication light will start to blink when
the device starts measuring and detecting.
c Working Light
(Blue)
The blue working light will turn on on the
process of device self-test. It will not light
after the device is started.
d Receiving Lens -
01.Power/Return
Button
04. Down Button
03. Up Button
02. Enter Button
Test Button
Battery
Compartment
Button

GAZOSCAN™ – Operating Manual
V5.00 07/03/2019 © GAZOMAT™ 11/28
Interface display
NOTE: Measurements must be taken when the light intensity is between 4 to 11 bars to avoid the
measurement error caused by too weak or too strong light intensity.
Setting menus
Main Menu gives access to submenus to adjust the instrument’s settings.
MAIN MENU Alarm Threshold
Offset
Unit
Measuring Speed
System Volume
Brightness
Power Save
Language
About
Fast
Medium
Slow
ppm.m
%vol.m
%LEL.m
Bluetooth Measuring Speed
(Fast, Medium, Slow)
Battery percentage
Measurement Unit
(ppm*m/%
vol
*m/%LEL*m)
Alarm Volume
(Configurable)
Maximum Value detected
Alarm Threshold
(Configurable)
Background Value
(Configurable)
Histogram of measured value
(the latest measured values of
the last 80 measurements,
x-axis represents time,
y-axis represents concentration.
Light Intensity
(Reflected Light)
Light intensity ranges from 1 to
11 bars. Light intensity must be
between 4 to 11 bars for correct
measurements.

GAZOSCAN™ – Operating Manual
V5.00 07/03/2019 © GAZOMAT™ 12/28
Menus and default settings
6.5.1 Default settings
Through the setting menus, users can set the alarm threshold value, alarm volume, screen display
brightness, screen standby time and system language. Users can also check the device hardware and
software version through About menu. Menus are subject to change depending on software updates.
Designation Default setting
Alarm Threshold 200 ppm*m
Offset 0 ppm*m
Unit ppm*m (Options: ppm*m/%vol*m/%LEL*m)
Measuring speed Fast (Options: Fast; Medium; Slow)
Alarm Volume ON, volume 100% (Options: ON/OFF)
Brightness 100%
Power Save 3 Min (Options: 3 Min /10 Min/30 Min/60 Min/120 Min/ Never
Language English (Options: Chinese/English/French/Spanish)
About Hardware Version; Firmware Version; Device Serial NO; Bluetooth Address
Example of menu and submenu access procedure:
To have access to menus, the test button must not be activated (green indication light not visible).
And
And
And
1. Use Up/Down button to move
inside Menu
2. Press Enter button to select item
from menu
3. Use Up/Down button to move
inside Menu
4. Press Enter button to select
item
5. Use Up/Down button to adjust the
value
6. Press Enter button to confirm
7. Press Power/Return button to return
6.5.2 Changing settings
Step 1
[Enter/Validation Button]
Press Enter button to enter the Menu
[Up Button]
[Down Button]
Use Up/Down button to select the item
in the Menu
Step 2
[Up Button]
[Down Button]
Use Up/Down button to adjust the
value of the selected item
[Enter/Validation Button]
Use Enter button to confirm the
setting
Step 3
[Power/Return Button]
Press shortly Power button to
exit and return
GAZOSCAN™ – Operating Manual
V5.00 07/03/2019 © GAZOMAT™ 13/28
Fault indicator light
7 BATTERY OPERATION
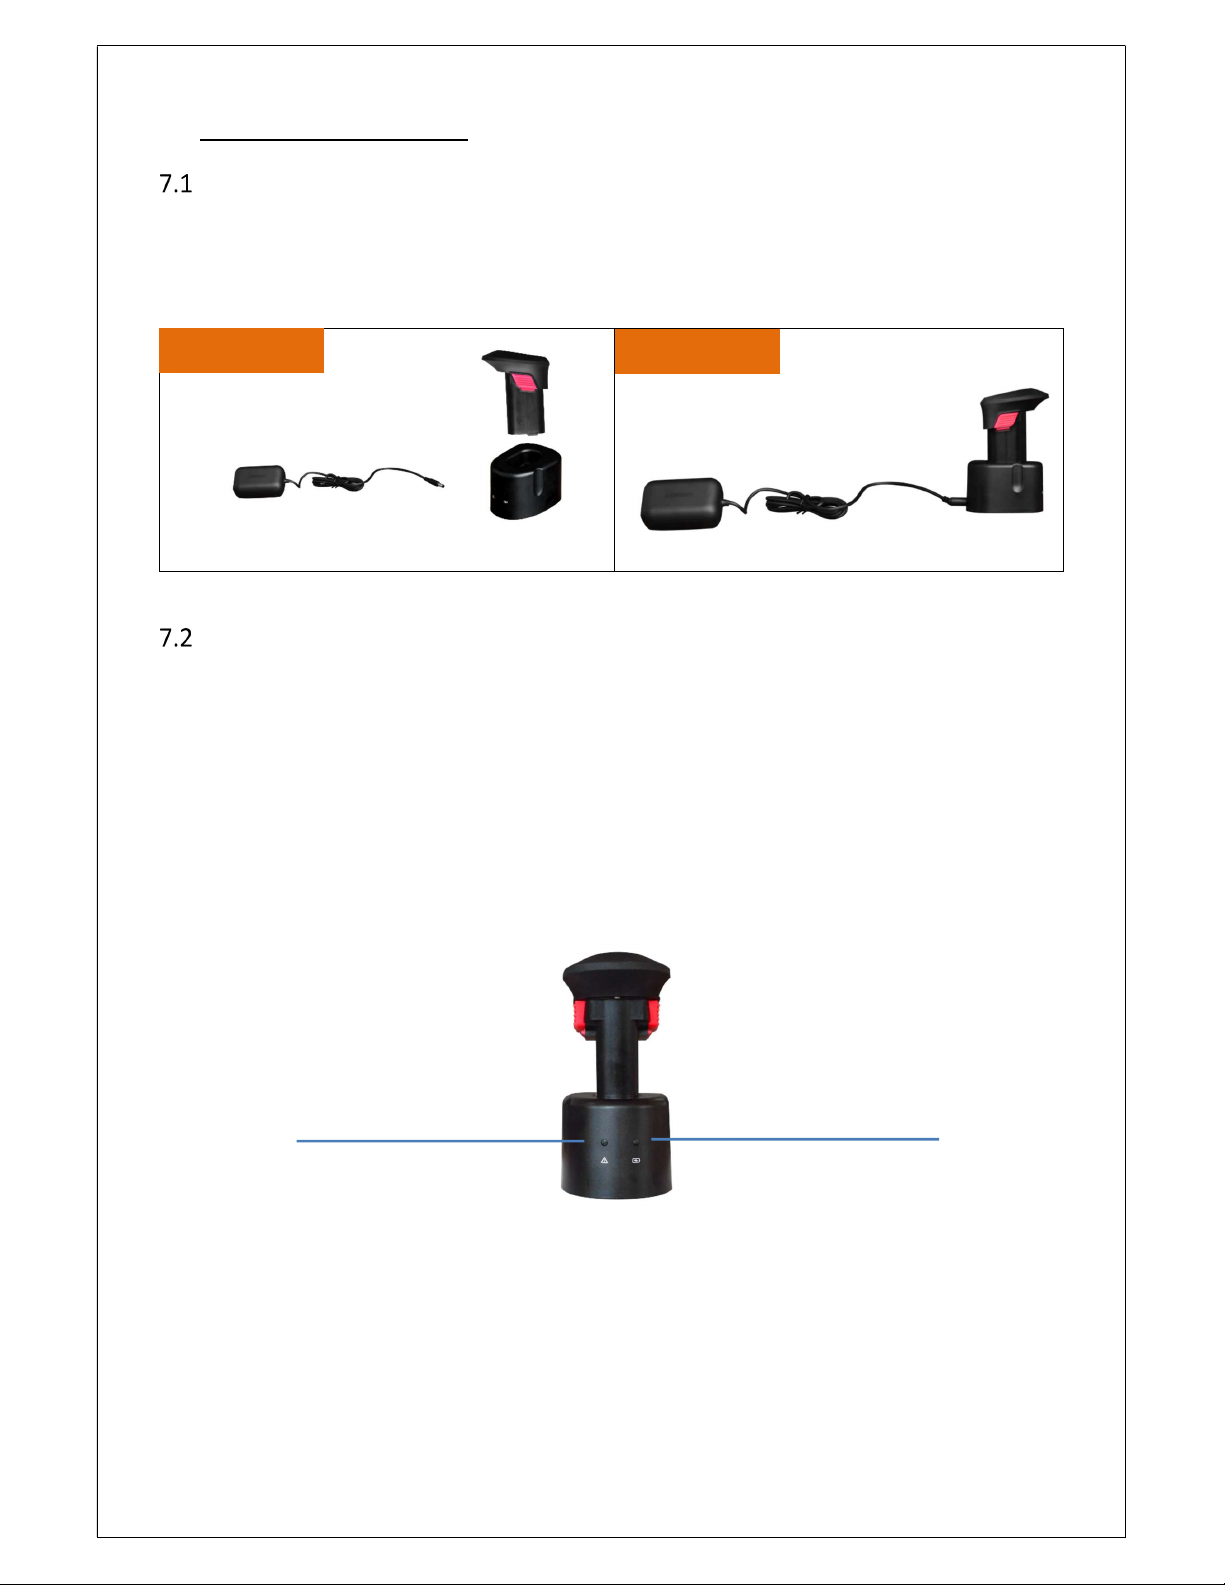
Charging the battery
1. Connect the power adapter cord to the charging base
2. Insert the battery into the charging base
3. Plug the power adapter into a power outlet
4. Unplug the adapter and remove the battery when charging is complete.
Battery charging information
1. There are two lights on the battery charging base:
a. The fault indicator light
b. The charging indicator light
2. If the fault indicator light is on, stop charging immediately, unplug the charger, and contact
GAZOMAT™ for maintenance.
3. The charging indicator lights up during charging and turns off when the battery is fully
charged.
4. When the adapter is plugged in, but the battery is missing from the charging base, the
charging indicator light will blink.
After
Before
Charging indicator light
GAZOSCAN™ – Operating Manual
V5.00 07/03/2019 © GAZOMAT™ 14/28
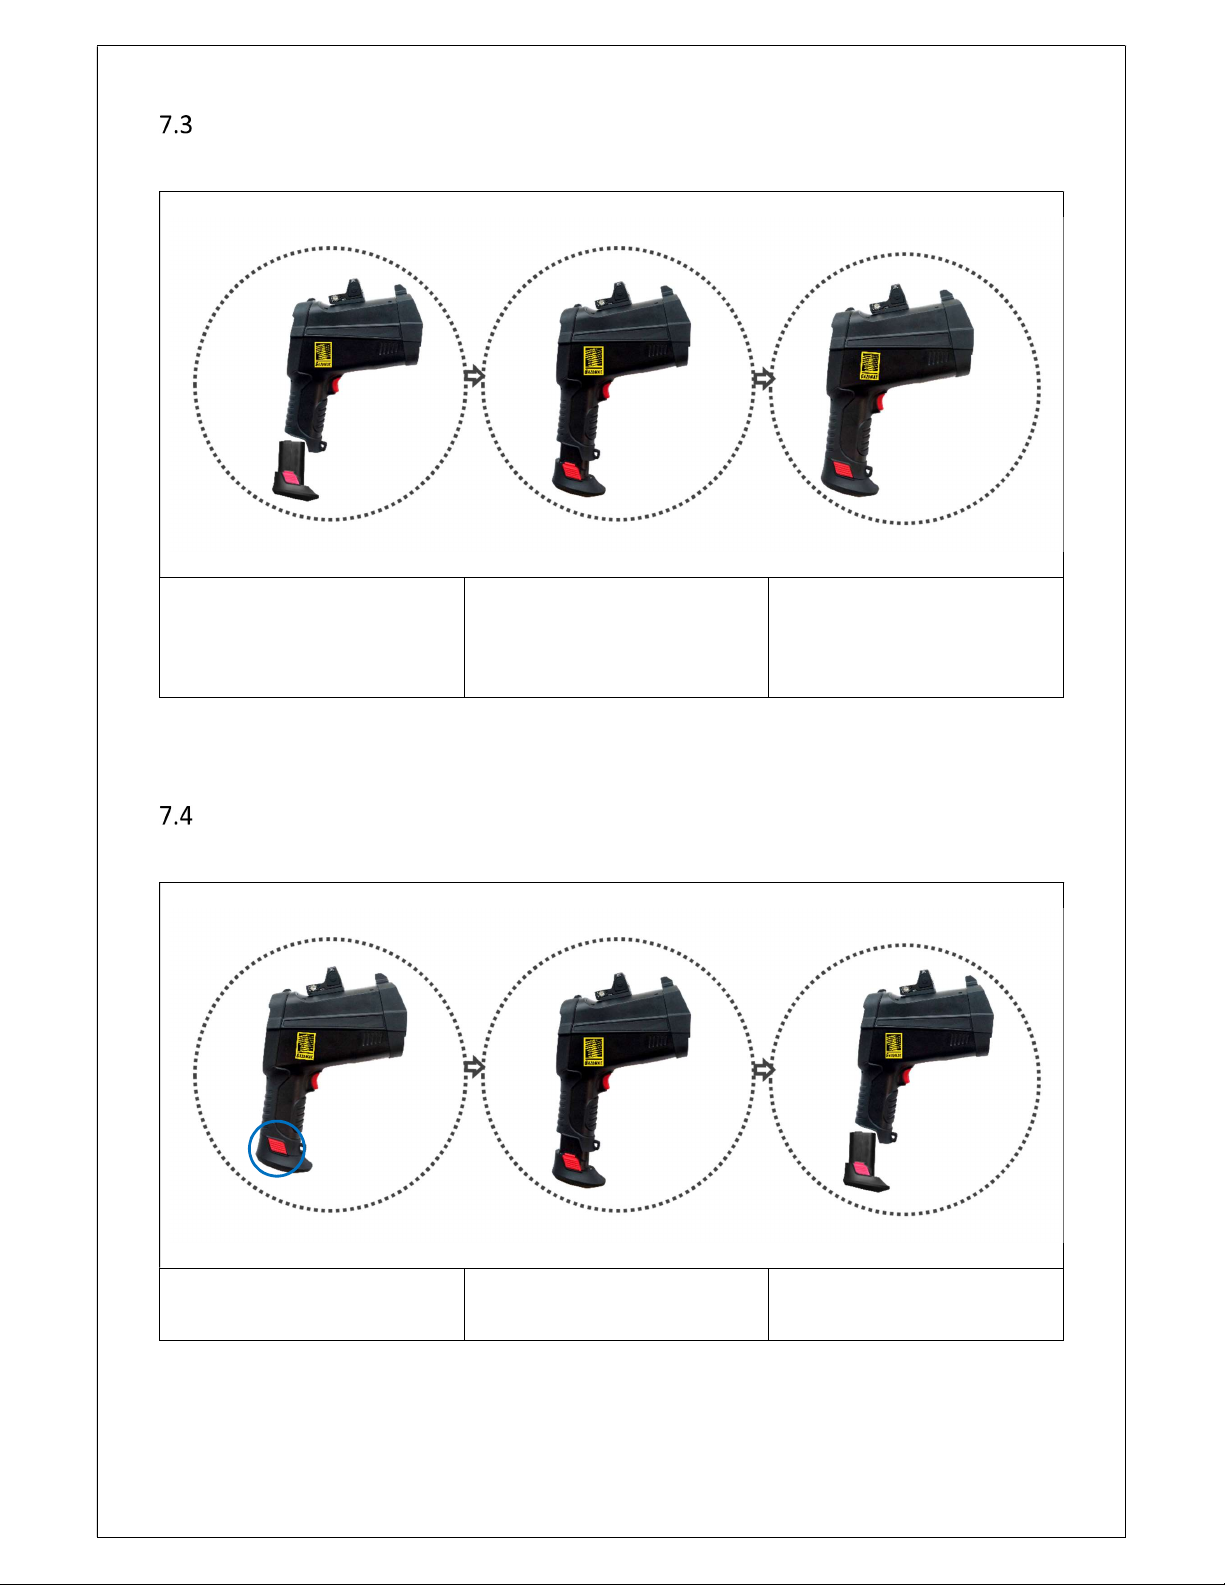
Inserting the battery
Step 1
Align the battery
with the battery compartment.
Step 2
Push the battery in gently.
Step 3
The installation is completed
when you hear a click sound.
Note: wait 10s before turning on
the device.
NOTE: Keep surrounding environments safe.
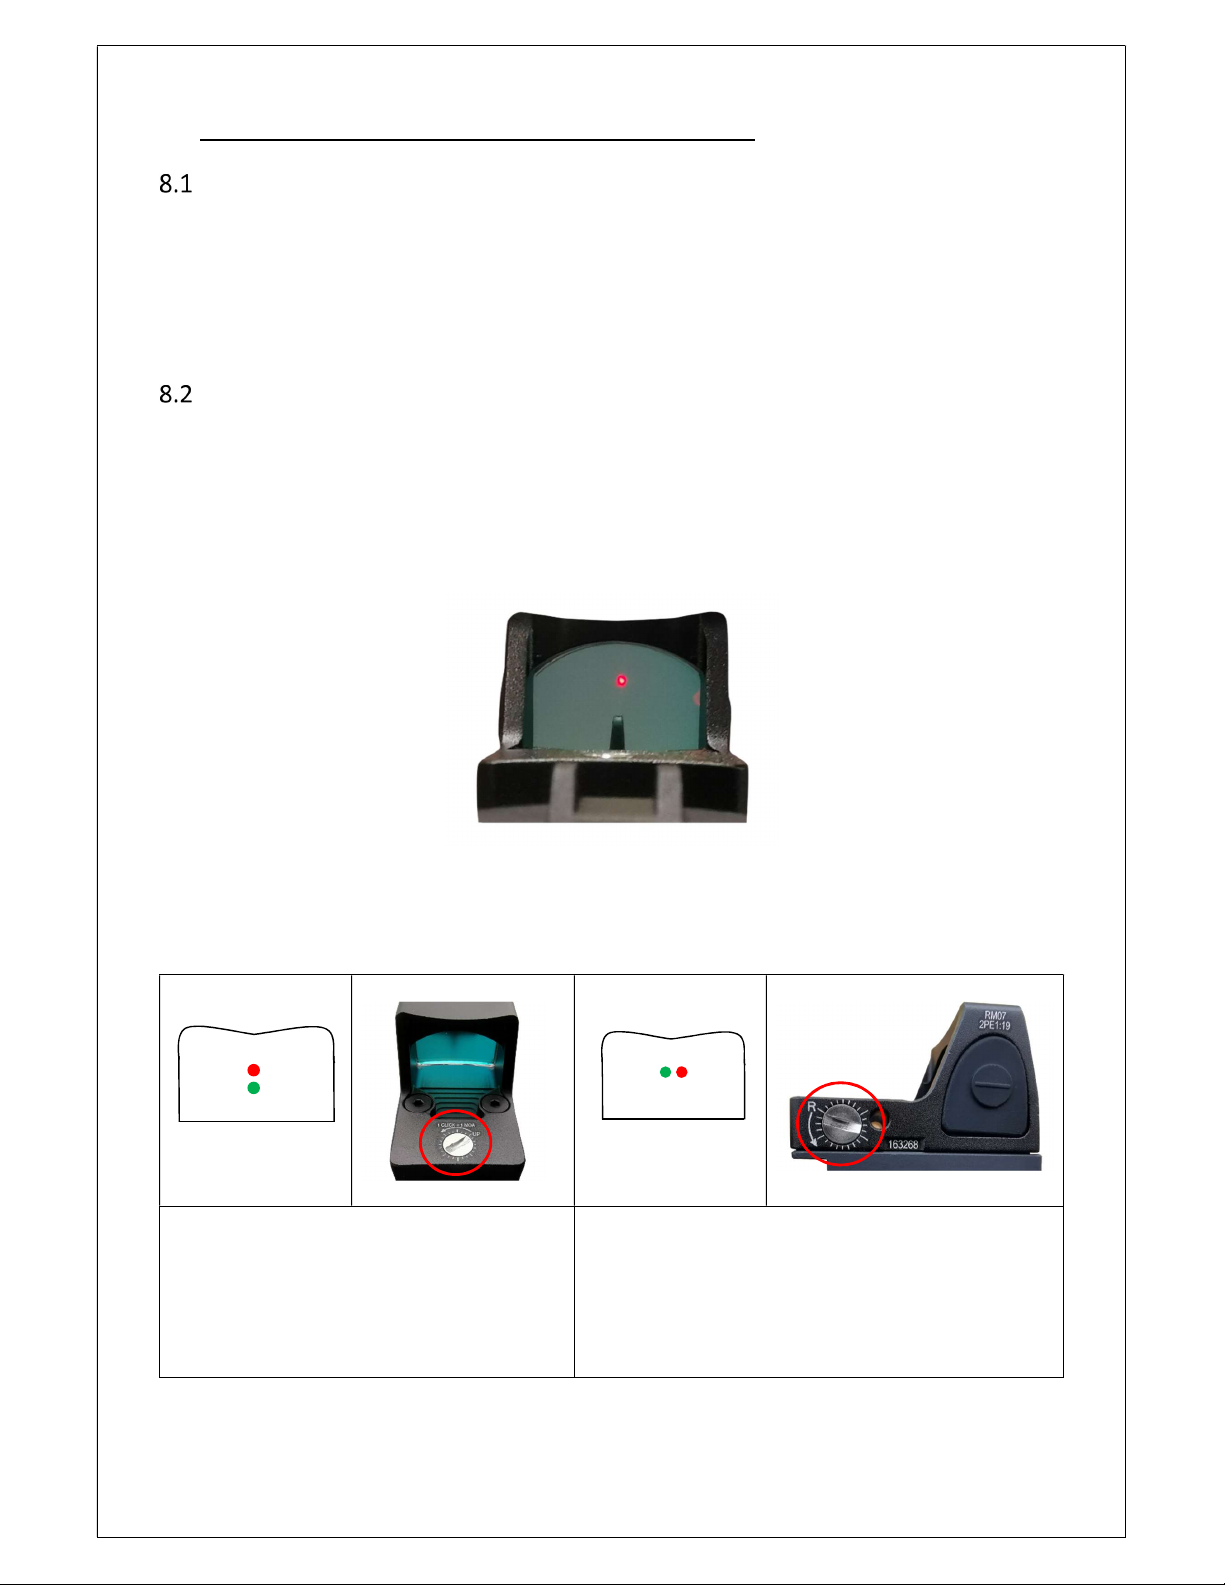
Removing the battery
Step 1
Press the battery compartment
button
.
Step 2
Gently pull out the battery…
Step 3
…until the battery is fully
unplugged.
NOTE: Keep surrounding environments safe.
Always store the instrument with the battery removed.
GAZOSCAN™ – Operating Manual
V5.00 07/03/2019 © GAZOMAT™ 15/28
8 SELF-TEST, RED DOT SIGHT AND BLUETOOTH
Initialization /Self-test
The GAZOSCAN™ automatically performs a Self-Check when powered on. The initialization
Self-Check is performing a series of internal diagnostics to verify the integrity and performance of
the sensor and components. The device will continue to the subsequent user screens upon a
successful result of the diagnostics analysis. If any errors are found during the Self-Check, an error
screen will occur. In this case, contact your local GAZOMAT™ service center for assistance.
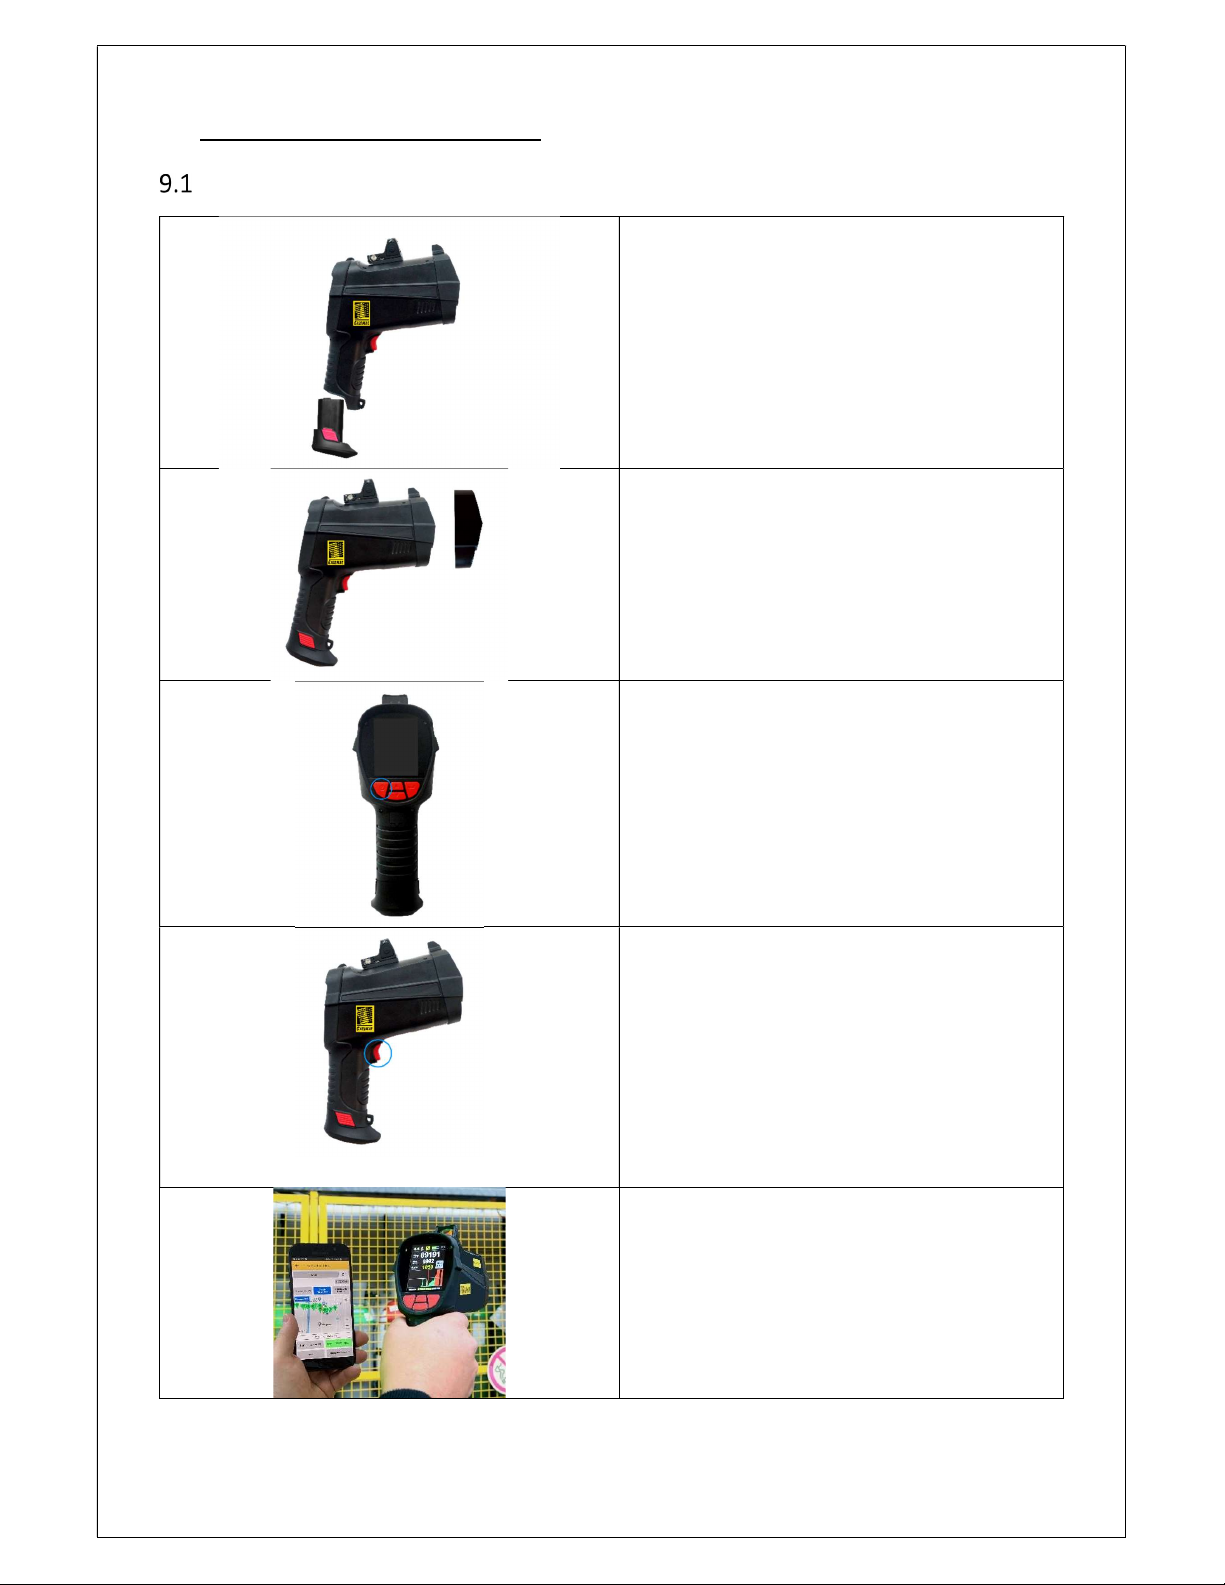
Instructions on the red dot sight
Users can look through the red dot sight to achieve better aiming. The red dot sight is powered by
the device. It automatically lights up after powering on the device.
NOTE: The sight is effective when aiming over 15m away. If the distance from the measured object
is too short, the red dot will not overlap with the green indication laser.
Red dot sight diagram
If the red dot and the green indicator laser do not overlap when aiming for a long distance (>15m),
the red dot calibration can be performed by adjusting the knob on the sight.
If the red dot is higher than the green
indication laser, turn the knob
counterclockwise to make it lower.
If the red dot is lower than the green indication
laser, turn the knob clockwise to move it up.
If the red dot is to the right of the green indication laser,
turn the knob counterclockwise to shift it to the left;
If the red dote is to the left of the green indication laser,
turn the knob clockwise to shift it to the right.

GAZOSCAN™ – Operating Manual
V5.00 07/03/2019 © GAZOMAT™ 16/28
Bluetooth connection
8.3.1 Functions
The GAZOSCAN™ detector uses Bluetooth for communication tool. The Bluetooth
communication enables real-time transfer data to a dedicated App (optional) running on iOS,
Android or Microsoft Windows mobile devices.
NOTE: Contact GAZOMAT™ to obtain the App.
8.3.2 How to connect using Bluetooth
1. Turn on Bluetooth on the mobile device and follow instructions given by the App.
2. The Bluetooth icon on the top of the device screen will turn green to indicate successful
connection.
3. Use the dedicated App to read, record and export data.
NOTE: To enable Bluetooth connection, always press the Test button (in that case the green
indication laser is visible).
GAZOSCAN™ – Operating Manual
V5.00 07/03/2019 © GAZOMAT™ 17/28
9 OPERATING THE DETECTOR
Start to use
Step 1 – Insert the battery
Take the device out of the carrying case.
Insert the battery in its compartment.
Step 2 – Remove the lens cap
Remove the cap that protects the lens.
Step 3 – Turn ON the device
Once the installation of the battery is
completed, wait AT LEAST 10s to turn ON
the device.
Hold the Power button until the device turns
ON.
Step 4 – Prepare for measuring
Press shortly the Test Button to start
measuring.
Do not hold the button.
Point the aim indicator towards the object that
needs to be measured.
To modify the reading frequency, go to
“Measuring speed” submenu.
Step 5 – Connect to App (optional)
Start the App and follow provided instructions
to connect to App.

GAZOSCAN™ – Operating Manual
V5.00 07/03/2019 © GAZOMAT™ 18/28
After use
Step 1 – Stop measuring
Press the test button to stop measuring.
Step 2 – Turn OFF the device
Hold the Power Button
until the device turns OFF.
Step 3 – Remove the battery
Press the Battery Compartment Button.
Remove the battery.
Step 4 – Lens cover
Cover the lens with the protective cap.
Step 5 – Store the device
Put battery and device with lens cap back into
the case.
Always store the device
with battery removed.

GAZOSCAN™ – Operating Manual
V5.00 07/03/2019 © GAZOMAT™ 19/28
10 TECHNICAL PRINCIPLES – DO’s and DON’TS
Working principle
For the GAZOSCAN™ to detect a leak is the result of a laser beam passing through a gas plume
and reflecting off a surface.
The reflected light is collected by the GAZOSCAN™ and converted into a methane concentration.
PPM*M measurement unit
ppm*m is the Parts Per Million concentration that a gas plume 1 meter in depth would have.
Therefor a 1-meter plume of methane at a concentration of 5000 ppm would be read as 5000
ppm*m.
While a gas plume that was 0.5 meter in depth with the same concentration of 5000 ppm would
be read as 2500 ppm*m.
In the case of a 2-meter plume of methane at the same concentration of 5000 ppm, the reading
will be 10000 ppm*m.
The GAZOSCAN™ emits an
infrared laser at 1.65 um.
The laser beam travels to the
target, is partially absorbed by
the gas, then reflected all the way
back into the receiver.
The reflected laser is collected
and converted to an electrical
signal that carries information
needed to deduce the relative
methane concentration.
The reading is expressed by a
methane column density
(ppm*m). it is the integral of the
methane concentration (ppm)
and the distance (m) on the
optical path.
GAZOSCAN™ – Operating Manual
V5.00 07/03/2019 © GAZOMAT™ 20/28
Detection Do’s and Don’ts
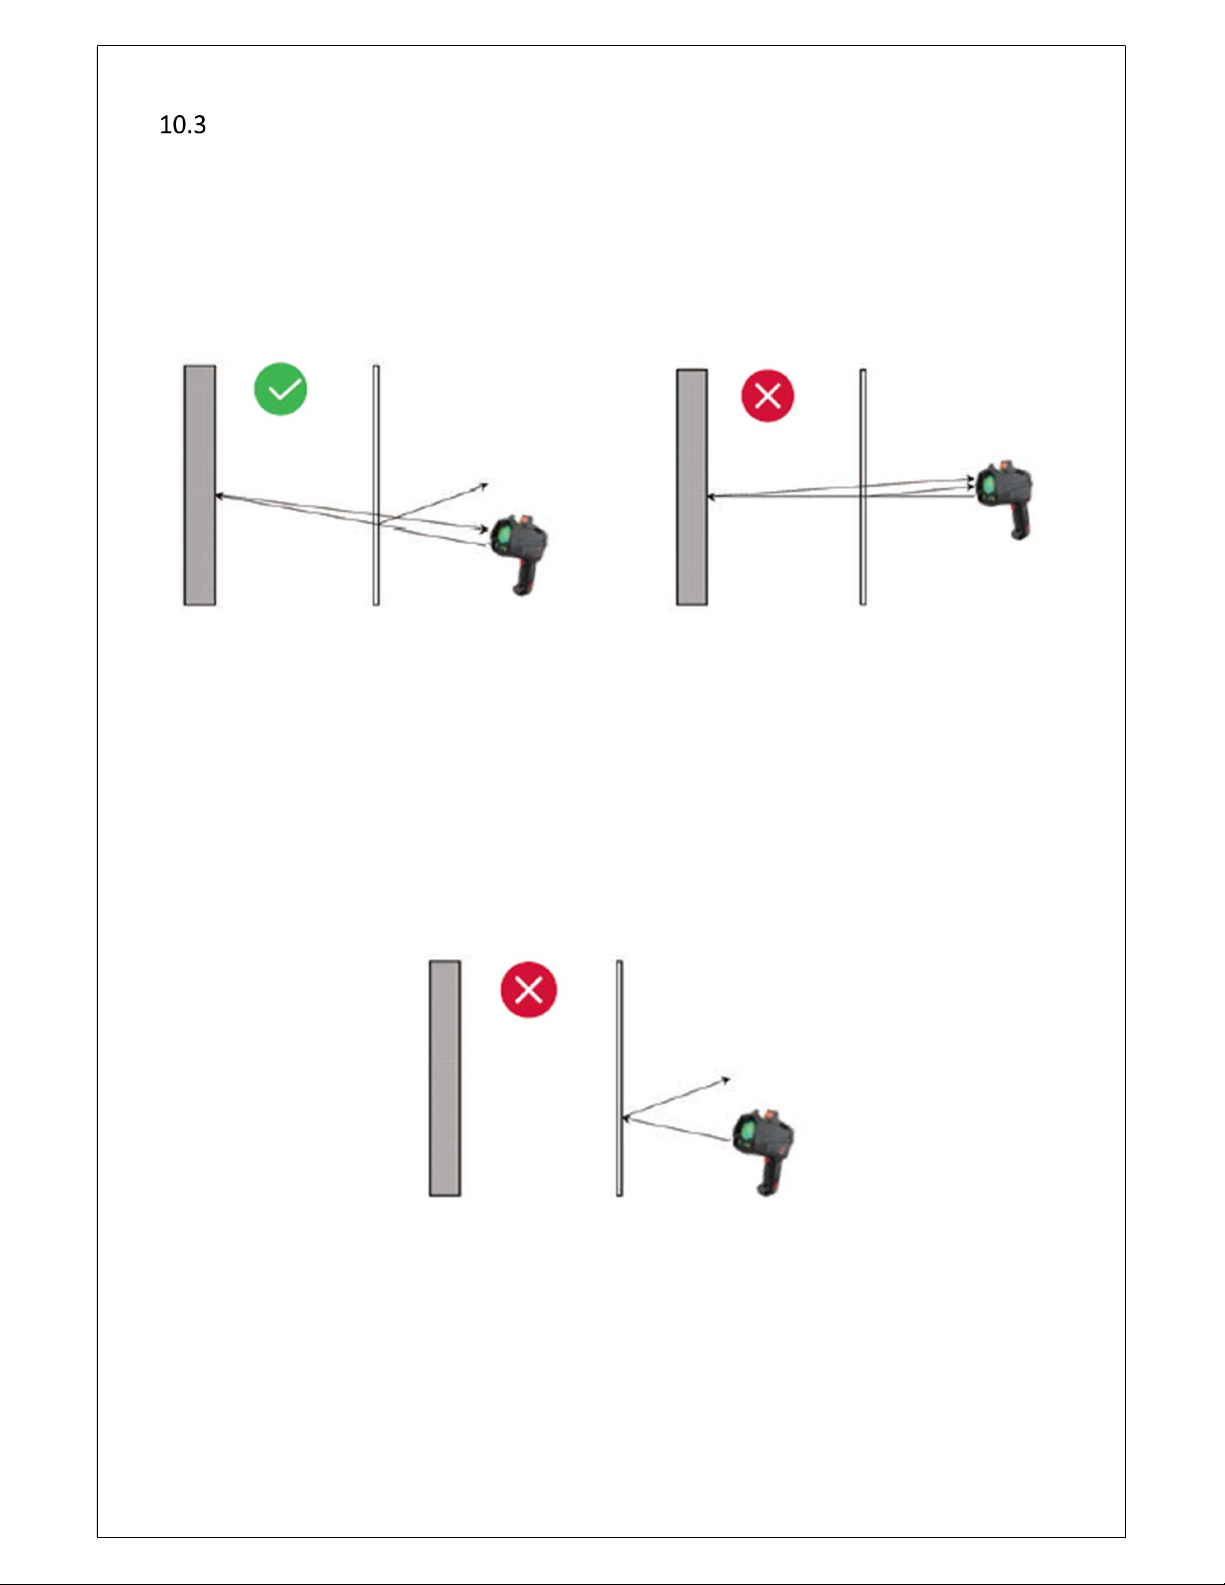
10.3.1 Case 1 – Detection through glass
When detecting through the glass, if the infrared laser is incident on the glass vertically, part of the
light reflected by the glass will be received by the device, which will cause the light intensity
saturation or inaccurate measurement result. In such case, the GAZOSCAN™ needs to be pointed
as shown in figure below to avoid receiving the light reflected by the glass.
A B
Case 1: Detecting through glass
10.3.2 Case 2 – Detection through materials with strong absorption or reflection effect on the
infrared laser
Avoid detecting through materials that have strong absorption or reflection effects on the infrared
laser, such as PMMA, laminated glass or anti-infrared glass.
In such case, the methane concentration behind can’t be detected or the measurement result may be
inaccurate.
Case 2: Avoid detecting through anti-infrared or absorbing infrared material
Table of contents
Other Gazomat Gas Detector manuals


