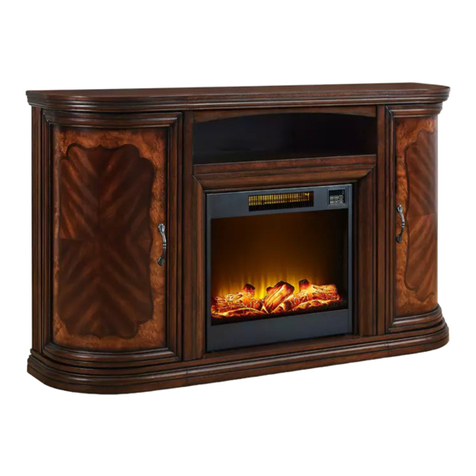
GBT FP-2065-1-DOOR-2 Mounting instructions

ASSEMBLY INSTRUCTION SHEET
ITEM# FP-2065-1-DOOR-2
SKU# 810469914
DESCRIPTION: 75IN BROWN TIERED FIREPLACE
CUSOTMER SERVICE NO.:
1-888-878-8820
Email:customerservice@gbtcorporation.com
1

2
Warning:
1. Need at least two adults to assemble this fireplace.
2.Assemble on soft , smooth surface to protect finish from being
scratched .
3. DO NOT use power tools.
4. Remove all packaging material, make sure all parts are present
before assembly.
5. EstimatedAssembly Time: 30 minutes. Exact assembly times will
vary based on skill level and past assembly experience.
Customer Service
For the missing or replacement of wooden panels, hardware, or electric
fireplace insert, please contact Vendor Customer Service at 1-888-878-
8820
Working hour: Mon.-Fri., 8:30am -
5:30pm Pacific Standard Time.
CARE INSTRUCTIONS:
1. Clean periodically by wiping the product with a soft clean cloth.
2. Do not expose your product to any liquids.All liquids should be wiped
up immediately with a soft, slightly damp cloth in the direction of wood
grain.
3. Do not expose your product to strong or direct sunlight, near heat
outlets or air conditioning units, open windows or dampness. Excessive
exposure to sunlight and heat can cause fading of your furniture finish.
Extreme temperatures and humidity changes can cause wood cracking
and splitting.
4. Clean using a glass/mirror cleaner and soft cloth. Do not use
cleaning products containing abrasives, as these will scratch
glass/mirror.
!
6.Death or serious injury may occur when children clime on audio and/or
video equipment furniture. A remote control or toys placed on the
furnishing may encourage a child to climb on the furnishing and as a result
the furnishing may tip over on to the child.
7.Relocating audio and/or video equipment to furniture not specifically
designed to support audio and/or video equipment may result in death or
serious injury due to the furnishing collapsing or over turning onto a child.

3
VIETNAM
TRENDEX CO., LTD
2020.04
50 "
60
FP-2065-1-DOOR-2;

4
PARTS LIST
A B
CD E F
GH I J
K L M N
MIDDLE TOP PANEL 1pc BASE 1pc
LEFT TOP PANEL
1pc FRONT PANEL 1pc
LEFT SIDE PANEL
1pc
RIGHT SIDE PANEL
1pc
RIGHT PARTITION
1pc
LEFT PARTITION
1pc LEFT POST 1pc
RIGHT POST 1pc
RIGHT SIDE RAIL
1pc LEFT SIDE RAIL 1pc LEFT DOOR 1pc
RIGHT TOP PANEL
1pc

5
PARTS LIST
OP
QR
RIGHT DOOR 1pc BACK PANEL 2pcs
SMALL SHELF 4pcs
ELECTRIC FIREPLACE
INSERT 1pc

6
ASSEMBLY INSTRUCTION
H1
H2
H3
H4
H5
H6
H7
H8
H9
H10
H11
H12
H13
H14
H15
H16
LONG BOLT 6pcs
Ø1/4*2-1/4"
MIDDLE BOLT Ø1/4*1-1/2" 4pcs
SHORT BOLT Ø1/4*1" 6pcs
SHORT BOLT Ø1/4*5/8" 36pcs
SPRING
WASHER Ø1/4 52pcs
FLAT WASHER 52pcs
ALLEN
WRENCH 4mm 1pc
NUT Ø1/4 6pcs
BRACKET 18pcs
ROUND HEAD
SCREW Ø8*12mm 6pcs
24pcs
Ø6*15mm
FLAT HEAD SCREW
ROUND HEAD
SCREW Ø9*15mm 28pcs
SHELF PIN 16pcs
HANDLE 2pcs
SMALL BOLT 4pcs
HINGE 4pcs
Ø1/4*16mm

7
ASSEMBLY INSTRUCTION
Step 1
Place Left Side Panel (F) face down on a smooth soft surface. The side with the most
holes should be facing up. Align the holes of Bracket (H9) with the holes of Left Side
Panel (F) with the tenons facing outward as shown in figure 1. Secure the Bracket (H9)
to the Left Side Panel (F) with Flat Washer (H6), Spring Washer (H5), and Short Bolt
(H4) using Allen Wrench (H7). DO NOT fully tighten bolts in this step for later
adjustment. Repeat this procedure to attach Bracket (H9) to Right Side Panel (G) and
Front Panel (E) and Left and Right Partition (H&I) as shown in figure 1.
Figure 1
H4
H5
H6
H7
H9
F&G
H&I
E

8
ASSEMBLY INSTRUCTION
Figure 2
H4
H5
H6
H7
H3
H5
H6
H7
H4
H5
H6
H7
H3
H5
H6
H7
K
L
I
M
J
H
Step 2
Place Left Post (J) on a soft smooth surface. With assistance from another adult, slide
Left Partition (H) into the groove of Left Post (J) until both ends are flush. Secure the Left
Partition (H) to Left Post (J) with Flat Washer (H6), Spring Washer (H5) and Short Bolt
(H4) using Allen Wrench (H7).
Align the holes of Left Side Rail (M) and Left Post (J) and secure Left Side Rail (M) to
Left Post (J) with Flat Washer (H6), Spring Washer (H5) and Short Bolt (H3) using Allen
Wrench (H7). DO NOT fully tighten bolts in this step for later adjustment. Repeat this
procedure to attach Right Post (K) to the Right Partition (I) and to attach Right Side Rail
(L) to Right Post (K) as shown in figure 2.

9
ASSEMBLY INSTRUCTION
Figure 3
H7
H1
H5
H6
L
M
K
J
H
I
H8
Not provided
B
Step 3
With assistance from another adult, insert tenons of Left Partition (H) and Left Side Rail
(M) into the corresponding holes of Base (B). Panels may need to be slightly adjusted to
be inserted into the proper holes, then place the Nut (H8) into the corresponding holes as
shown in figure 3. Secure Left Partition (H) and Left Side Rail (M) to Base (B) with Long
Bolt (H1), Spring Washer (H5), Flat Washer (H6) using Allen Wrench (H7). Fully tighten
Long Bolts (H1) in this step.
Repeat this procedure to attach Right Partition (I) and Right Post (K) to the Base (B) as
shown in figure 3.

10
ASSEMBLY INSTRUCTION
Figure 4
E
K
J
H7
H3
H5
H6
Step 4
With assistance from another adult, place the Front Panel (E) onto the tenons of Left Side
Rail (M) and Right Side Rail (L). Secure the Front Panel (E) to Left Post (J) and Right
Post (K) with Middle Bolt (H3), Spring Washer (H5), Flat Washer (H6) using Allen Wrench
(H7) as shown in figure 4. DO NOT fully tighten bolts in this step for later adjustment.

11
ASSEMBLY INSTRUCTION
Figure 5
E
F
G
H7
H5
H6
H4
B
Step 5
With assistance from another adult, insert the tenons of Left Side Panel (F) and Right Side Panel (G)
into the corresponding holes of Base (B). Panels may need to be slightly adjusted to be inserted into
the proper holes. Secure Left Side Panel (F) and Right Side Panel (G) to the Base (B) with Short Bolt
(H4), Spring Washer (H5), Flat Washer (H6) using Allen Wrench (H7) as shown in figure 5. DO NOT
fully tighten bolts in this step for later adjustment.

12
ASSEMBLY INSTRUCTION
Figure 6
F
G
I
H
H7
H5
H6
H4
H7 H2 H5 H6
D
C
Step 6
With assistance from another adult, insert the tenons of the Left Top Panel (C) into the
corresponding holes of the Left Partition (H), then insert the tenons of the Left Side Panel
(F) into the corresponding holes of Left Top Panel (C), Secure Left Top Panel (C) to Left
Partition (H) with Middle Bolt (H2), Spring Washer (H5), Flat Washer (H6) using Allen
Wrench (H7), and secure Left Top Panel (C) to Left Side Panel (F) with Short Bolt (H4),
Spring Washer (H5), Flat Washer (H6) using Allen Wrench (H7) as shown in figure 6.
Repeat this procedure to attach Right Top Panel (D) to Right Partition (I) and Right Side
Panel (G) as shown in figure 6.
DO NOT fully tighten bolts in this step for later adjustment.

13
ASSEMBLY INSTRUCTION
Figure 7
H7
H5
H6
H4
Step 7
With assistance from another adult, align Middle Top Panel (A) with the corresponding
tennons of Front Panel (E), Left Partition (H) and Right Partition (I) and carefully lower
into place. Take care not to pinch your fingers. Secure Middle Top Panel (A) to Front
Panel (E), Left Partition (H) and Right Partition (I) with Short Bolt (H4), Spring Washer
(H5) and Flat Washer (H6) using Allen Wrench (H7) as shown in figure 7. DO NOT fully
tighten bolts in this step for later adjustment.

14
ASSEMBLY INSTRUCTION
Figure 8
H13
F
Q
Nice face
Step 8
Inset Shelf Pin (H13) into the Left Side Panel (F), Right Side Panel (G), Left Partition (H)
and Right Partition (I). To adjust the level of the shelf, move all Shelf Pin (H13) up or
down as need dictates. Insert Small Shelf (Q) at an angle with the finished edge facing
the front of the Mantel. Make sure the shelf bottom rests on Shelf Pin (H13) as shown in
figure 8. Align all parts and fully tighten all bolts from Steps 1 through 8.

15
ASSEMBLY INSTRUCTION
Figure 9
P
P
P
H12 Not provided
Step 9
With assistance from another adult, Attach Back Panel (P) to the back of the Mantel with
Round Head Screw (H12) and screwdriver (not provided) as shown in figure 9. Make sure
the smooth side of Back Panel (P) faces the front of the fireplace.

16
ASSEMBLY INSTRUCTION
Figure 10
Step 10
Place the Electric Fireplace Insert (R) into the assembled Mantel from the back.
Adjust the Fireplace Insert (R) so the space around the rails is equal. Secure the
Electric Fireplace Insert (R) to the assembled Mantel with Round Head Screws
(H10) using screwdriver (not provided).

17
ASSEMBLY INSTRUCTION
Figure 11
Not provided
N&O
H16
H11
Step 11
Place the Left Door (N) and Right Door (O) face down on a smooth soft surface. Align the
holes of Hinge (H16) with the pre-drilled holes of Left Door (N) and secure in place with
Flat Head Screw (H11) using screwdriver (not provided) as shown in figure 11. Repeat
this process to attach Door Hinge (H16) to Right Door (O).

18
ASSEMBLY INSTRUCTION
Figure 12
Not provided
H15
N&O
H14
Step 12
With assistance from another adult, hold Left Door (N) vertically and attach Handle (H14)
with Small Bolt (H15) using screwdriver (not provided) and fully tighten bolts as shown
in figure 12. Repeat this process to attach remaining Handle (H14) to Right Door (O).

19
ASSEMBLY INSTRUCTION
Figure 13
O
N
K
J
Not provided
H11
H16
Tighten this screw
after adjusting
Step 13
With assistance from another adult, align the holes of Hinge (H16) on the Left Door (N)
with the Punctures in Left Side Panel (F) and secure in place with Flat Head Screw (H11)
using screwdriver (not provided) as shown in figure 13. Fully tighten all screws. Repeat
this process to attach Right Door (O) to Right Side Panel (G). If the gaps around the doors
are not even, adjust the screw either in or out to even the gaps as shown in figure 13.
If the gap between the Door and
Partition is not equal, adjust this screw
on each hinge until the gap is even.

20
ASSEMBLY INSTRUCTION
PRINTED IN VIETNAM MADE IN VIETNAM
Assembly is now complete.
Note: Please read the operating manual for the Electric Fireplace Insert and Electric
Fireplace Insert remote control before using Fireplace.
This manual suits for next models
1
Table of contents
Other GBT Indoor Fireplace manuals
Popular Indoor Fireplace manuals by other brands

SEI
SEI FA9664 Assembly

Modern Flames
Modern Flames LFV100015-SH Installation & service instructions

Nordpeis
Nordpeis Stockholm Series installation manual

Napoleon
Napoleon HD81NT Installation and operating instructions

Temco
Temco TEF26 Installation instructions and homeowner's manual

Dimplex
Dimplex Toluca Deluxe instruction manual

Lacunza
Lacunza IV-800 Instruction book

Regency
Regency P33NG3-R Owners & installation manual

pleasant hearth
pleasant hearth VFF2-PH20/CP Series manual

HearthStone
HearthStone DVI 38 owner's manual

Dragon Wholesaling
Dragon Wholesaling 564 Diamond-Fyre installation manual

Paragon
Paragon P8 Series owner's manual