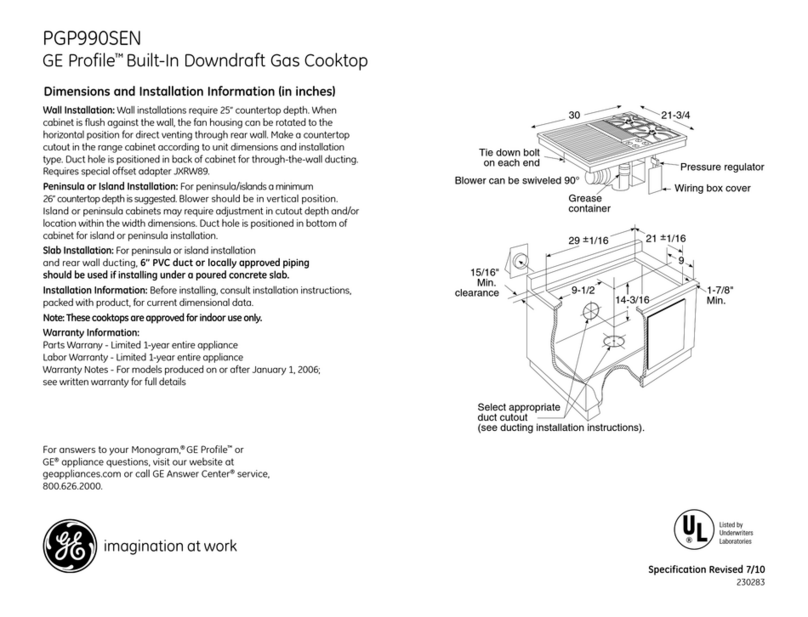
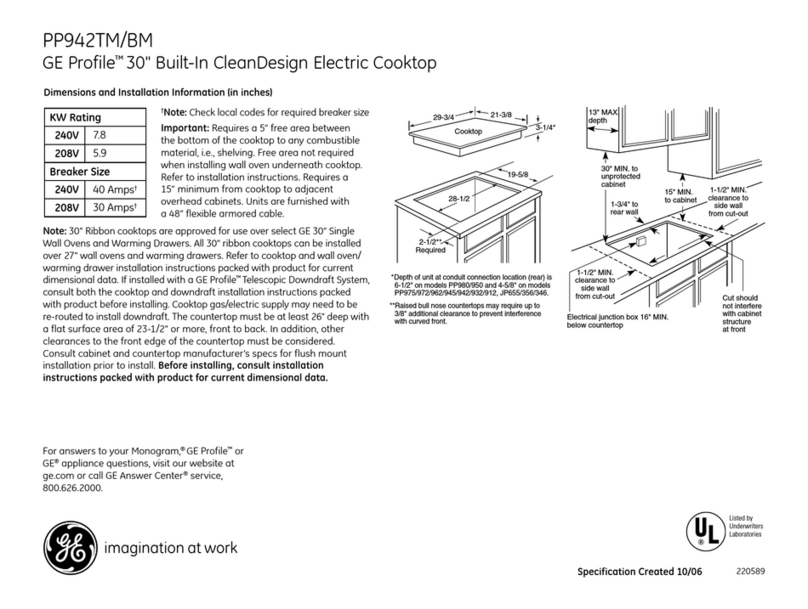
GE Profile PP912 User manual

GEPpp/iances.com
oe-._
Safety Instructions ........ 2-4
Operating Instructions
Bridge Surface Element ....... 8
Control i,ock-Out ........... 9
Cookware Tips .......... 10, 11
Dual Surface Element ........ 8
Features of Your Cooktop ... 5, 6
Surface Elements .......... 7-9
Tri-Ring Surface Element . . .8, 9
Warming Zone
Surface Element ............. 9
Care and Cleaning
Control Knobs ............. 12
Glass Cooktop .......... 13, 14
Stainless Steel Surfaces ...... 12
Troubleshooting Tips ...... 15
Consumer Support
Consumer Support ......... 18
Warranty .................. 17
PP912
PP932
PP942
PP962
PP972
Printed in the United States
Write the model and serial
numbers here:
Model #
Serial #
You can find them on a label
under the cooktop°
49-80413-2 03-09JR

iMPORTANTSAFETYINFORMATION.
READALLiNSTRUCTiONSBEFOREUSING.
m
For your safety, the information in this manual must be foflowed to minimize the risk of fire or
explosion, electric shock, or to prevent property damage, personal injury, or loss of fife,
2
SAFETYPRECAUTIONS
When using electrical appliances, basic safety precautions should be followed, including
the following:
Use this appliance only ff}rits intended use as
described in this mamlal.
Do not attempt to repair or replace any
part of your cooktop unless it is specifically
recommended in this manual. All other
ser_icing should be referred to a qualified
technician.
Beff)re perff)rming any ser_4ce, disconnect
the cooktop power supply at the household
distribution panel by removing the fllse or
su{tching off the circuit breaken
CAt/T/ON:Itemsofinterestto
children should not be stored in cabinets above
a cooktop--children climbing on the cooktop
to reach items could be seriously injured.
Always keep combustible wall coverings,
curtains or drapes a safe distance flom
your cooktop.
: Always keep dishtowels, dish cloths, pot holders
and other linens a safe distance mvayflom your
cooktop.
Be sure your appliance is properly installed
and grounded by a qualified technician in
accordance with the pr(Mded installation
instructions. This appliance must be supplied
u{th the proper voltage and flequenc); and
connected to an indMdual, properly grounded
branch circuit, protected by a circuit breaker
or fuse acceptable for the indicated u"attage
on the name plate.
Name plate location
Hax,e the installer show you the location of
the circuit breaker or fllse. Mark it fbr easy
reference.
Do not lea_,e children alone--children shotfld
not be left alone or unattended in an area
where an appliance is in use. They shotfld
never be allowed to sit or stand on an),
part of the appliance.
Teach children not to play _dth the controls or
an), other part of the cooktop.
Do not allow anyone to climb, stand or hang on
the cooktop.
Alwayskeep wooden and plasdc utensils and
canned food a safe distance mvayfiom your
cooktop. They may become hot and could
cause burns.
Never wear loose-fitting or hanging gam_ents
while using the appliance. Flammable material
could be ignited if brought in contact with hot
surfi_ce elements and may cause severe burns.
Use only dLvpot holder_moist or damp pot
holders on hot surfaces may result in burns
flom steam. Do not let pot holders touch hot
surfi_ce elements. Do not use a towel or other
btflky cloth. Such cloths can catch fire on a hot
surface element.
For your safbt); never use your appliance fbr
wam_ing or heating the room.
Do not use water on grease fires. Never pick up
a flaming pan. Turn the controls offi Smother a
flaming pan on a surfi_ce element by covering
the pan completely u_th a well-fitting lid, cookie
sheet or flat tray. Use a multi-pin-pose diT
chemical or fbam-twe extinguisher.
Naming grease outside a pan can be put out
by covering xdth baking soda oi; if available,
by using a muhi-pmpose d_T chemical or
fbam-b?e fire extingadsher.
Do not flame foods on the cooktop. If you do
flame foods under the hood, mrn the tim on.
Do not let cooking grease or other flammable
materials acct_mlate on the cooktop.

GEPpp/iances.com
SAFETYPRECAUTIONS
_ Do not touch surf`ace elements, These _
surf`aces may be hot enough to burn even
though they are dark in color. During and
after use, do not touch, or let clothing or
other flammable mate, rials contact the _:_
surf`ace elements or areas nead)y the
surf`ace elements; allow st_ticient time
fi)r cooling first. iii}i}i
iii}i}i
Potentially hot surfaces include the
cooktop and areas fhcing the cooktop.
}}To minimize the possibility of burns,
ignition of flammable materials and
spillage, the handle of a container }}
should be turned toward the center
of the cooktop without extending over
any nearby surface elements.
}}Always turn the surf`ace element control to
off before remox,ing the cookware. }}
}}{Use proper pan size--select cookware
hm4ng fiat bottoms large enough to cover
the surface heating element. The use of }}
undersized cookware will expose a portion
of the surface element to direct contact
and may result in ignition of clothing.
Proper relationship of cookware to surf`ace }}
element will also improve efficiency.
}}Never lemre surface elements unattended at }}
high heat settings. Boilovers cause smoking
and greasy spillovers that may catch on fire.
}}Only certain types of glass, glass/ceramic, }}
earthemvare or other glazed containers are
suitable fbr cooktop cooking; others may
break because of the sudden change in
temperature. }}
}}Keep an eye on fi)ods being fried at high
or medium-high heat settings. }}
Foods fbr flying should be as dry as
possible. Frost on flozen fbods or moisture
on fresh foods can cause hot tat to bubble }}
up and over the sides of the pan.
Use little fat for effective shallow or
deep4at frying. Filling the pan tot) full
of fat can cause spillovers when fbod is
added.
ff a combination of oils or f`ats will be used
in flying, stir together befbre heating, or as
f`ats melt slowly.
Always heat fat slowly, and watch as it heats.
Use a deep fat thermometer whenever
possible to prevent overheating tat beyond
the smoking point.
Never try to move a pan of hot fat,
especially a deep tat flyer. Wait until
the f`at is cool
Do not store flammable materials near
the cooktop.
Keep the hood and grease filters clean
to maintain good venting and to avoid
grease fires.
Do not store or use combustible materials,
gasoline or other flammable vapors and
liquids in the x,icinity of this or any
appliance.
Clean only parts listed in this Owner's
Manual.
Do not leave paper products, cooking
utensils or fbod on the cooktop when
not in use.
Keep cooktop clean and flee of
accumulation of grease or spillovers
which may ignite.
Never heat unopened fbod containers.
Pressure buiMup may make container
burst and cause injury.
Never leave jars or cans of tat drippings
on or near your cooktop.
Never use your appliance fbr warming or
heating the room.
COOKMEATANDPOULTRYTHOROUGHLY...
Cookmeat andpoultry thoroughly--meat toat leastan INTERNALtemperatureof 160°Fandpoultry
toat least an INTERNALtemperatureof 180°ECookingto thesetemperaturesusuall}/protects against
foodborneillness. 3

IMPORTANTSAFETYINFORMATION.
READALLINSTRUCTIONSBEFOREUSING.
'!
RADIANTSURFACEELEMENTS
Use care when touching the cooktop, Theglass surface of the cooktop will retain heat after the
controls have been turned off.
_:_Avoid scratching the glass cooktop.
The cooktop can be scratched with items
such as sharp instruments, rings or other
jewelry and rivets on clothing.
}}Never use the glass cooktop surthce as
a cutting board.
iii}i}i
iii}i}}li_
Do not place or store items on top of the
glass cooktop surthce when it is not in use.
Be careful when placing spoons or other
stirring utensils on glass cooktop surface
when it is in use. They may become hot
and could cause bums.
iii}i}i
iii}i}}li_
iii}i}}li_
iii}i}}li_
Avoid heating an empty pan. Doing so may
damage the cooktop and the pan.
Do not allow water, other liquids or grease
to remain on the cooktop.
To minimize the possibility of burns, always
be certain that the controls fbr all surface
elements are at the off position and the
entire glass surface is cool before
atmmpting to clean the cooktop.
Do not operate the glass surface elements
it the glass is broken. Spillovers or cleaning
solution may penetrate, a broken cookmp
and create- a risk of electrical shock.
Contact a qualified mchnician immediately
should your glass cooktop become broken.
_:;Clean the cooktop with caution. If a wet
sponge or cloth is used to ;ripe spills on
a hot surface element, be careful m avoid
steam burns. Some cleansers can produce
noxious fimms if applied m a hot surface.
NOTE:_W_recommend that you avoid
wiping any surface element areas until they
have cooled and the indicator light has
gone of£ Sugarspills are the exception
tothis.Please see the Cleaning the Glass
Cooktop section.
}}To avoid possible damage to the cooking
surface, do not apply the cleaning cream
to the glass surface when it is hot.
}}After cleaning, use a dry cloth or paper
towel to remove all the cleaning cream
residue.
}}Read and tbllow all instructions and
warnings on the cleaning cream labels.
}}Use care when touching the cooktop. The
glass surthce of the cooktop will retain heat
after the controls hm,'e been turned OFF.
}}Do not stand on the glass cooktop.
}}Large scratches or impacts to glass
cooktops can lead to broken or
shattered glass.
READANDFOLLOWTHISSAFETYINFORMAtiONCAREFULLY.
SAVETHESEINSTRUCTIONS
4

Featuresofyour 36'"cooktop, c App,iances.co,,
Throughout this manual, features and appearance may vary from your model
PP972 ?
_]
oo
PP962
FeatureIndex (FeaturesandappearancesmayvaN) Explainedonpage
Single Surface Element 7
Dual Surface Element 8
Tri-Ring Surface Element 8, 9
Lef_ Rear Surface Element Control lgmob 7
O Warming Zone Surface Element 9
Control Lock Indicator Light 9
O Surfhce Element ON Indicator Light 7
OCenter or Tri-Ring Surfhce Element Control ]ShK_b 9
O Dual Surface Element Conuol F,mob 8
Right Rear Surface Element Conuol F,mob 7
Conuol Lock F_K_b 9
O Left Front and Bridge Surface Element 8
Bridge/Left Front Surface Element Control lgmob 8
5

Featuresofyour 30" cooktop.
Throughout this manua/, features and appearance may vary from your mode/,
PP912
6
--e
-o
-0
--0
-o
io ._-----o
PP942
Feature Index (FeaturesandappearancesmayvaN) Explained on page
Single Surflme Element 7
Dual Surflme Element 8
Left Rear Surflme Element Control Knob 7
Left Front Surf_tce Element Control Knob 7
Control Lock Indicator Light 8
O Suif_tce Element ON Indicator Light 7
ODual Surf_ce Element Conuol Knob 8
Dual Surf_ce Element Selector Knob 8
Right Rear Surf_me Element Conuol Knob 7
Conuol Lock Knob 9
O LeR Front and gddge Suif_ce Element 8
Bridge Surf_tce Element Selector Knob 8
Tri-Ring Surflme Element 8, 9
Tri-Ring Surf_me Element Selector Knob 8
Tri-Ring Surf_ce Element Conuol Knob 9
LeA Front/Bridge Suif_ce Conuo][ Knob 8
-O
-O
--O

Usingthesurface elements. CEApplia,oe .oom
Throughout this manual, features and appearance may vary from your model
How to Set
Push file knob down and [m"rl in eifller
direction to the setting you want. _&qlen
the conuol is in any position other than
OFF,it mW be rommd without pushing
it down.
At boil1 OFFand HI file control
clicks into position. You may hear
slight clicking sounds during cooking,
indicating the control is keeping the
power level you set.
The controls f_r file radiant surface
elements can be set anywhere between tO
and HIfbr an unlimimd number of heat
settings. With the infinite switch the
element wcles on and off to maintain
your selected control setting.
The ELEMENTON indicator light will
glow when anysurface element is on.
AHOTSURFACEindicator light will gtow
when any radiant element is turned on
and will remain on until the surface is
cooled to approximately 150°E
NOTE:
It comesonwhentheelementishottothe
touch.
It staysonevenaftertheelementisturnedoff
It glowsbrightlyuntiltheelementiscooledto
approximately150°£
BesureyouturnthecontrolknobtoOFFwhen
youfinishcooking.
(211,,il;;ii,_;_i_i£;L¸:
}COORIRG
Never cook directly on the glass.
Always use cookware.
i_ iii i iiil;,,,_,f,,,,,iii_iii
Always center thepan on the surface
element you are using.
Do not slide cookware across the
cooktop because it can scratch the
glass, Theglass is scratch-resistant,
not scratchproof,
About the radiant surface elements..,
The radiant cooktop fe.atures heating }_
elements beneath a smooth glass surface.
NOTE"Aslightodorisnormalwhenanew
cooktopisusedforthefirsttime.It iscausedby _,
theheatingofnewpartsandinsulatingmaterials
andwilldisappearin ashorttime.
NOTE"Onmodelswithlightcoloredglass
cooktops,it isnormalforthecookingzonesto
changecolorwhenhotorcoolingdown.Thisis
temporaryandwilldisappearasglasscoolsto
roomtemperature.
The surface element will cycle on and off
to maintain your selected control setting.
It is safe to place hot cool<ware (flom the
oven or surfhce) on the glass cool<top
when the surface is cool
iii}i}iiii_,
Even after the surface elements are
turned off; die glass cool<top retains
enough heat to continue cooking. To
avoid overcooldng, remove pans flom
the surface elements when the fk_od
is cooked. Avoid placing umnsils that
cotfld become hot or plasdcs that cotfld
melt on the surface element until it has
cooled completely.
Waterstains(mineraldeposits)areremovable
usingthecleaningcreamorfullstrengthwhite
vinegar
Useofwindowcleanermayleaveaniridescent
filmonthecooktop.Thecleaningcreamwill
removethisdiscoloration.
Don?storeheawitemsabovethecooktop.
If theydropontothecooktop,theycancause
damage.
Donotusethesurfaceasacuttingboard.

Usingthesurface elements.
Thedualsurfaceelementhas2 cookingsizestoselectfromsoyoucanmatchthesizeoftheelementtothesizeofthecookwareyouareusing.
Small ._ @_ Large
air[ace _, ___"_ Surface
element _,_._.j element
Setting Setting
BuM Surface Element with Selector Knob (onsomemodels)
To use the large surfitce element, mrn
file SELECTOR lmob to @. Push in and
turn file control knob to file desired
setting° The element will heat file entire
area contained by file larger circle°
To use file small surfitce element, mrn
the SELECTORknob to o. Push in and
mrn die control knob to die desired
setting. The element will only heat
the area inside die smaller circle°
BuM Surface Element without Selector Knob (onsomemodels)
To use the small surfitce element, turn the
control knot) to the o settings.
To use the large smf_tce element, mrn the
control knot) to the _ setfingso
i/i(_if i _ii!i!_iii_ i_ii_i/ii_iiiiii_iii_
5
/i i_i i
ii i i
Bridge SurfaceElement with Selector Knob (onsome models)
Youcancreateanoblongheatedareabyusing
theleft rearelementinadditiontothefront
elementbridgecombination.
Make sure file pan rests fiat on the glass
cooktop.
_&fhen file SELECTORknob points to _,
file control knob controls boil1 file left
flont smf_ce element and the b_J(tge area°
Choose pans flint match file
circle/bridge area as closely as possible°
When the SELECTORknob points to _,
the control l_lob conuols file lef_ flont
surf[_ce element only.
Bridge SurfaceElement without Selector Knob (onsome models)
Make sure the pan rests fiat on the glass
cooktop.
To use the bridge element, push and
turn the control knob to _, stopping at
the desired settings.
Choose pans that match the
circle/bridge area as closely as possible.
To use the left flont surf_tce element only;
push and mrn the control knob to _,
stopping at the desired settings.
TheTri-Ringsurfaceelementoffers3 cookingareastomatchthesizeofthecookwareyouareusing.
To use the largest cooking area, mrn the
SELECTORknob to @. Push and mrn
the control knob to the desired setting.
® To use the medium cooking area, mrn
the SELECTORknob to ®.
Push down and mrn the control knob to
the desired setdng.
8
Tri-Ring Surface Element with Selector Knob (onsome models)
To use die smallest cooking area, mrn
the SELECTORl<alobto e. Push and mrn
the control M_ob to the desired setting.
This will acuvate only the smallest inside
headng area.

GEApp/iances.com
Tri-Ring Surface Elementwithout Selector Knob (onsome models)
To use the large surf_tce element,
push and mrn file center control knob
clockwise to _ , stopping at the desired
setting. This will activate file entire
heating area.
To use the medium surfitce element,
push and tmn the center control knob
clockwise to @ , stopping at the desired
setting° This will activate file medium-size
beating area°
To use the smallest surfi_ce element,
push and mrn the cenmr control knob
clocl<wise to o, stopping at the desired
setting. This will acfivam the smNlest,
inside beating area.
Surface Elements Cycle On and Off
Surfime elements will cycle on and off
to maintain the temperature you have
selected°
All radiant surfitce elemems have a
temperature limiter that protects the
glass cool<top fiom getting too hot.
The temperature limiter may cycle
the elements offwhile cooldng if".
Thepanboilsdry
Thepanbottomisnotflat
}_,Thepanisoff-center
_,Thereisnopanontheelement
o.iooK Control Lock-Out (appearance may vary)
To lock the cool<top and prevent
umvanted use, mrn the control lock knob
to LOCI£ An indicator light will glow to
show that the cool<top is locked.
To tmlock, press and mrn the knob to
UNLOCK
In the locked position, the cooktop will
produce an audible sound if any control
knob is set to a position other than OFE
Warming Zone Surface Element (onsomemodels)
To use file wamfing zone surf_me
element, push and mrn die WARMING
ZONEcontrol knob, stopping at the
desired setting (HI, MED or LO).
FoodType ControlSetting
Breads/Pastries t (L0W)
Sauces L (LOW)
Soups(cream) L(LOW)
Stews L (LOW)
Vegetables L (LOW)
HotBeverages H (HIGH)
Soups(liquid) H (HIGH)
Thechartaboveshowsinitialsuggestedsettings
only Thetemperature,typeandamountoffood,
andthetimeheldwillaffectthequafityof the
food. CAUTION: notwarmfood
ontheWARMINGZONEformorethantwo
hours.
Useonlyco&warerecommendedfor
top-of-rangecooking.
The WARMINGZONEwill keep hot,
cooked fbod at serving mlnperamre.
Ah,vaysstart with hot foodo Do not use to
heat cold food. Placinguncooked or cold
foodonthewarming zonecould result in
foodbomeillness.
For best results, all food on file
WARMINGZONEshould be covered with
a lid or ahmlinum foil. X4,qlen warming
pasuies or breads, the cover should be
vented to allow moisture to escape.
Always use potholders or oven mitts when
removing food fiom the WARMING ZONE
as cool<ware and plates will be hot.
A hot surf_tce indicator light will glow
when the glass surface is hot and will
reInain on until the smflme has cooled
below 150°E
Donotuseplasticwraptocoverfood.Plastic
maymeltontothesurfaceandbeverydifficult
to remove.
9

Selectingtypesofcookware.
The following information will help you choose cookware which will give good performance on glass cooktops.
Stainless Steel:
recommended
Porcelain Enamel on Cast iron:
recommendedif bottomof pan is coated
Check pans for flat bottoms by using
a straight edge.
Pans with rounded, curved,
ridgedorwarpedbottomsare
notrecommended.
Aluminum:
heavy weight recommended
Good conductivity. Aluminum residues
sometimes appear as scratches on the
cool<top, but can be removed if cleaned
immediately. Because of its low melting
point, thin weight Numinum shoukt not
be used.
CopperBottom:
recommended
Copper may leave residues which can
appear as scratches. The residues can
be removed, as long as the cool<top is
cleaned immediately. Howevet; do not let
these pots boil dry. Overheamd metal can
bond to glass cooktops. An overheated
copper bottom pot will leave a residue
that will permanen@ stain the cool<top
if not remcwed immediamly.
Porcelain EnamelonSteel:
not recommended
Headng empty pans can cause
permanent damage to cool<top glass.
The enamel can melt and bond to the
ceramic cool<top.
Glass-ceramic:
not recommended
Poor performance. Will scratch the
suIf_lce.
Stoneware:
not recommended
Poor perfbrInance. May scratch die
suIf_lce.
Cast iron:
not recommended--unless designedspecifically
forglasscooktops
Poor conductivity and slow to absorb
heat. Will scratch the cool<top smf_ce.
NOTE:Followallcookwaremanufacturer'srecommendationswhenusinganytypeofcookwareonthe
ceramiccooktop.
Do notplacewetPans
ontheglasscooktop.
Donotusewokswith support
ringsontheglasscooktop.
For Best Results
i> Place only dry pans on the surfitce
elements. Do not place lids on the
smf_tce elements, particularly wet
lids.
{}i}Do not use woks that have support
rings. This type of wok will not heat
on glass surf_ce elements.
. We recommend that you use only a
fiat-bottomed wok. They are available
at your local retail store. The bottom
of the wok should have the same
diameter as the surf_ce element
to ensure proper contact.
Some special cooking procedures
require specific cool<ware such as
pressme cookers, deep-fi_t flyers, etc.
All cool<ware must have fiat bottoms
and be the correct size.
Use flat-bottomed woks
I0 Onthe g!asscooktop:

GEPpp/iances.com
Right!
wrong!
Note: Flat-bottomed canners are
required for glass cooktops,
Observe the Following Points in Canning
Pots that extend beyond l" of the _]
surf_tce element's circle are not
recommended for most surf_ce
cooking. Howevex; when canning with
water-bath or pressme cannel large>
diameter pots may be used. This is
because boiling water temperatures
(even under pressure) are not harmflfl
to the cool<top surf_ces smTounding
the smf_ce elements.
HOWEVER, DO NOT USE LARGE-
DIAMETER CANNERS OR OTHER
IARGE-DIAMETER POTS FOR
FP,YING OR BOIIffNG FOODS OTHER
THAN WATER. Most syrup or sauce
mixtures--and all types of fiying---<;ool<
at mmperamres much higher than
boiling wam_: Such mmperamres
coukt evenmN|y ham1 the glass
cool<top surf_ces.
Y] Be sure the canner fi[s over the
center of the smf_ce element.
ff your cooktop or its location
does not Nlow the canner to be
cenmred on the surfi_ce element,
use smaller diamemr pots for good
canning results.
Flat-bottomed canne_ must be
used. Do not use canners with
flanged or rippled bottoms (often
found in enamebvare) because
they don't make enough contact
with the surfi_ce elements and rake
a king time to boil wam_:
Remember that canning is a
process that generates large
amounts of smam. To avoid burns
flom smam or heat, be carefld
when canning.
NOTE:If your house has low voltage,
canningmaytakelonger thanexpected,
eventhoughdirectionshavebeen carefully
followed.Theprocesstime will be
shortenedby:
(1) usinga pressure canner,and
(2) startingwith HOTtap water for fastest
heatingof large quantitiesof water.
ZILCAUTION:
Safecanningrequiresthat harmful
microorganismsare destroyedand
that thejars are sealedcompletely.When
canningfoodsin a water-bathcanner,a
gentle butsteadyboilmustbe maintained
forthe requiredtime.Whencanning
foodsin a pressurecanner,thepressure
must bemaintainedfortherequired time.
After youhaveadjusted thecontrols,
His veryimportanttomakesure the
prescribed boil or pressurelevelsare
maintainedfor therequiredtime.
iiiiiiiiii:_
Sinceyoumustmakesuretoprocess the
canningjars for theprescribed time,with
no interruptionin processingtime,donot
canon anycooktopsurfaceelementif
yourcannerisnot flat.
%When camfing, use recipes
and procedmes flom reputable
sources. Reliable recipes and
procedmes are awailable flom
the manufi_ctmer of your canner;
manufimmrers of glassjars for
canning, such as Ball and Kerr
brand; and [lle United States
Deparunent of Agriculture
Exmnsion Se_Mce.
77

Careand cleaning ofthe cooktop.
Be sure electrical power is off and all surfaces are cool before cleaning any part of the cooktop.
How toRemove Protective Shipping Filmand Packaging Tape
Careflflly grasp a corner of file protective
shipping film widl your fingers and slowly
peel it flom the appliance surfi_ce. Do not
use any sharp items to relIlove the filI_Q.
Remove all of the film before using the
appliance for the first fimeo
To assure no damage is done to file
finish of the product, file safest way to
remove the adhesive flom packaging tape
on new appliances is an application of a
household liquid dishw_Mdng demrgent.
Apply with a soft cloth and allow to soak.
NOTE: Theadhesivemust be removedfromall
parts. It cannotberemovedif it is bakedon.
Moldediib Control Knobs
Thecontrolknobsmayberemovedforeasier
cleaning.
Make sure the l_alobs are in the OFF
positions and pull them straight off the
stems for cleaning.
The l_a_obscan be cleaned in a
dishwasher or dley may a/so be w_Mled
with soap and water: Make sure the insides
of the knobs are dry before replacing.
Replace the knobs in the OFFposidon
to ensme proper placement.
Stainless Steel Surfaces (onsome models)
Be netuseasteel woolpad;#willscratch
thesurface.
To clean die stainless steel surfime,
use wam_ sudsy water or a stainless steel
cleaner or polish. Ah,vays wipe the suIf_tce
in the direction of the grain. Follow the
cleaner instructions for cleaning the
stainless smel smf_ce.
To inquire about purchasing stainless
smel appliance cleaner or polish, or to
find the location of a dealer nearest you,
please ca/1 our toll-flee number:
NationalPartsCenter 1.800.826.2002
GEApp/iances.com
12

Cleaningtheglass cooktop. CEAp.liances.com
Cleanyouroooktopafter
eachspill. Useceramic
oooktopcleaner.
Normal Daily Use Cleaning
ONLY use ceramic cool<top cleaner on
tile glass cooktop. Other creams may not
be _kseffective.
To maintain and protect tile surfitce of
your glass cool<top, follow these steps:
%
[]
Before using the cooktop for
tile first time, clean it with ceramic
cooktop cleaner This helps protect
the top and makes cleanup easier:
Daily use of ceramic cooktop
cleaner will help keep tile cool<top
looking n e',,a
%Shake tile cleaning cream well.
Apply a fe.w drops of ceramic
cooktop cleaner directly to the
cool<top.
[_] Use a paper towel or cleaning pad
for ceramic cool<tops to dean the
entire cool<top smf_ce.
[_ Use a dry cloth or paper towel
to remove all cleaning residue°
No need to rinse°
NOTE:It is veryimportantthatyouO0 NOT
heatthecooktopuntil it hasbeencleaned
thoroughl_
Use a cleaning pad for ceramic
cooktops.
Burned-On Residue
WARNING:AMAGfto
your glass surface may occur if you use scrub
pads other than the pad included with your
cooktop.
%
Allow tile cool<top to coolo
Spread a few drops of ceramic
cooktop cleaner on file entire
burned residue area°
Using the included cleaning
pad for ceramic cooktops, rub file
residue area, applying pressme
as needed°
If any residue remains, repeat the
steps listed above as needed°
For additional protection, af#er all
residue has been removed, polish
the endre surf_lce with ceramic
cool<top cleaner and a paper towel.
The ceramic cooktop scraper
and all recommended suppfies are
available through our Parts Center.
See instructions under "ToOrder
Parts" section on nextpage.
NOTE:Donot use a dull or
nicked blade.
Heavy, Burned-On Residue
Allow tile cool<top to coolo
Use a single-edge razor blade
scraper at approximately a 45 °
angle against file glass surf_ce
and scrape the soilo It will be
necessary to apply pressme to
tile razor scraper in order to
remove the residue°
%After scraping with the razor
scraper; spread a few drops of
ceramic cooktop cleaner on tile
entire burned residue area. Use
tile cleaning pad to remove any
remaining residue°
For additional protection,
after all residue has been
removed, polish the entire
surfi_ce with ceramic cool<top
cleaner and a paper towel.
13

Cleaningtheglass cooktop.
Metal Marks and Scratches
[] Be careful not to slide pots and pans
across your cool<top. It will leave
metal markings on file cooktop
s{lrf_tCeo
These marl<s are removable using
die ceramic cooktop cleaner wifll
file cleaning pad K_r ceramic
cooktops.
[_ If pots with a thin overlay of
aluminum or copper are allowed
to boil dry, the overlay m W leave
black discoloration on the cooktop.
This should be removed
immediately before beating
again or the discoloration mW
be permanent.
WARNING:Carefullycheck
thebottomofpansforroughnessthatwould
scratchthecooktop.
G/ass sur[ace--petentia/ for permanentdamage.
Ourtestingshows thatif
youarecooking highsugar
mixturessuch asje!lyor
fudgeandhavea spillover,
it cancausepermanent
damageto theglass surface
unlessthespillover is
immediately removed.
Damage from Sugary Spills and Melted Plastic
[77 Turn off all surfime elements.
Remove hot pans.
[_ Wearing an oven mitt:
a. Use a single-edge razor blade
scraper (ceramic cooktop
scraper) to move the spill to
a cool area on the cooktop.
b. Remove the spill with
paper towels.
[_] Any remaining spillover shoukt be
left until the smf_ce of the cooktop
has cooled.
[_ Don't use the smfitce elements
again tmtil all of tile residue has
been completely removed.
NOTE:ffpittingorindentationintheglass
surfacehasalreadyoccurred,thecooktopglass
willhavetobereplacecLInthiscase,servicewill
benecessary.
To Order Parts
To order ceramic cooktop cleaner
and the cooktop scrape_; please ca/1 our
toll-flee number:
NationalPartsCenter 800.626.2002.
CeramicCooktopCleaner.... //WX10)(300
CeramicCooktopScraper ...//WX10)(0302
Kit .......................... //WB64X5027
(Kitincludescreamandcooktopscraper)
CleaningPadsfor
CeramicCooktops.......... //WX10)(350
14

Beforeyoucall forservice...
Troubleshooting tips
Save time and money/ Review the charts on the fofiowing
pages first and you may not need to carl for service,
GEApp/iances.com
Possible Causes What ToDo
Surfaceelementswill not
maintaina rollingboil
orcookingisslow
Surfaceelementsdo
notwork
Improper cookware
being used. • Use pans which are fiat and match the diameter
of the smface element selected.
Cooktop making an
audible sound
77n_cratches or metal
marks or abrasions on
radiant cooktop glass
surface
A fuse in your home may be
blown or the circuit breaker
tripped.
Cooktop controls
improperly set.
Cooktop is locked.
• Replace the flxse or reset the circuit breaker
• Check to see the correct control is set for the smface
element you are using.
• Check to be sure that the Control i,ock Selector is
turned to UNLOCI_
• Check to be sure the Control Lock Selector is turned
to UNLOCI_
Incorrect cleaning * Use recommended cleaning procedures.
methods being used.
Cookware with rough
bottoms being used or
coarse parfides (salt
or sand) were between
the cookware and the
surface of the cooktop.
Cookware has been
slid across the cooktop
surface.
•Be SLxI'e cook\wire bot[oxIls and coo]<w_lre aye clean
before use. Use cool<ware with smooth bottoms.
Tiny scmmhes are not rexnovable but will become
less visible in time as a result of cleaning.
Areas of discoloration Improper cookware * Marks flom aluminum and copper pans as well as
or dark streaks on the being used. mineral deposits flom water or food can be removed
cooktop with the cleaning cream.
Hot surface on a model • This is normal. The surface may appear discolored
with a light colored cooktop, when it is hot. This is temporary and will disappear
as the glass cools.
Food spillovers not cleaned • See the Cleaning the glass cooktop section.
before next use.
Incorrect cleaning methods • Use recommended cleaning procedures.
being used.
Plastic melted to Hot cooktop came into *See the Glass surface--potential for permanent damage
thesurface contact with plastic placed section in the Cleaningthe glass cooktop section.
on the hot cooktop.
Pitting (or indentation) Hot sugar mixture spilled * (;all a qualified technician for replacement.
of the cooktop on the cooktop.
Frequent cycling offand Improper cookware * Use only fiat cool<ware to minimize cycling.
on ofsurface elements being used. See the Surface elements cycle on and 0/_section.
Control knob will • When the knob is in the OFFposition, it must be
not turn pushed in beh>re it can be turned. When the knob
is in any other position, it can be turned without
being pushed in.
Cooktop controls
improperly set.
15

Notes.
,0
,0
16

GEElectric CooktopWarranty.
Aft warranty service provided by our Factory Service Centers,
or an authorized Customer Care_technician. Toschedule
service, visit us on-line at GEAppliances.com, or carl
800.GECARES (800.4322737). Please have serial number
and model number available when calling for service.
Staple yourreceipt here.
Proof of the original purchase
date is needed to obtain service
under the warranty.
GE Wi// Provide:
One Year Anypartof tlle cool<top which fhils due to a defect in materials or workmanship° Dudng this
From the date of the limited one-year warranty, GE will also provkte, free ofcharge, all lal)or and in-home service
originalpurchase to replace the def_cdve part.
live Years
Fromthe dateofthe
originalpurchase
Areplacement glass cooktop if it should crack due to thermal shock, discokm or
if file pattern wears off
A replacement radiant surface element if it shouM burn ore.
During this limited additional four-year warranty, you will be responsible fbr any lal)or or
in-home servk;e.
Service trips to your home to teach you how to use
the product.
Improper installation, delivery or maintenance.
Failure of the product if it is abused, misused,
or used for other than the intended purpose or
used commercially.
Damage to the glass cooktop caused by use of cleaners
other than the recommended cleaning cTeams and
pads.
Damage to the glass cooktop caused by hardened
spills of sugary materials or melted plastic that
are not cleaned according to the directions in
the Owner's Manual.
Replacement of house fuses or resetting of circuit
breakers.
Damage to the product caused by accident, fire, floods
or acts of God.
Incidental or consequential damage caused by possible
defects with this appliance.
Damage caused after delivery.
Product not accessible to provide required service.
EXCLUSIONOFIMPLIED WARRANTIES--Your sole and exclusive remedy isproductrepair asprovided in this Limited
Warranty.Any implied warranties, including the implied warranties of merchantability or fitnessfor a particular purpose,
are limited to one Fear or the shortest period allowed by law.
This warranty is extended to the original purchaser and any succeeding owner for products purchased for
home use within the USA. If the product is located in an area where service by a GEAuthorized Servicer is not
available, you may be responsible for a trip charge or you may be required to bring the product to an Authorized GE
Service location for service. In Alaska, the warranty excludes the cost of shipping or service calls to your home.
Some states do not aflow the exclusion or limitation of incidental or consequential damages. This warranty
gives you specific legal rights, and you may also have other rights which vary from state to state. Toknow
what your legal rights are, consult your local or state consumer affairs office or your state's Attorney General
Warrantor: General Electric Company.Louisville, KY 40225 17

ConsumerSupport.
GEAppliancesWebsite GEApp/iances.com
Have a question or need assistance with your appliance? Try tile GE Appliances Website 24 hours a day,
any day of tile year! For greater convenience and faster service, you can now download Owner's Manuals,
order parts or even schedule service on-line.
ScheduleService ;Eapp/iances.com
Expert GE repair service is only one step away f_om your do(n: Get on-line and schedule your service at
your convenience any day of the year[ Or call 800.GE.CARES (800.432.2737) dtnJng noiIIIN business hours.
RealLifeDesignStudio GEApp/iances.com
(;E supports tile Universal Design concept--products, services and envhonments that can be used by
people of all ages, sizes and capabilities. We recognize tile need to design for a wide range of physical and
mental abilities and impaimlents. For derails of GE's Universal Design applications, including ldtchen
design ideas for people with disabilities, check out our Website today. For tile hearing impaired, please
ca/1 800.TDD.GEAC (800.833.4322).
ExtendedWarranties GEApp/iances.com
Purchase a GE extended warranty and learn about special discounts that are mailable while your warranty
is still in effect. You can purchase it onqine anytime, or call 800.626.2224 during normal business hom_.
(;E Consumer Home Services will still be there aRer your warranty expires.
PartsandAccessories GEApp/iances.com
Individuals qualified to service their own appliances can have parts or accesscnJes sent directly to their
homes (VISA, MasterCard and Discover cards are accepted). Order on-line today, 24 hotn_ eve_T day
or by phone at 800.626.2002 during ncmnal business hom_.
Instructions containedin thismanualcoverprocedurestobeperformedbyanyuser.Otherservicing generally
shouldbereferredtoqualifiedservicepersonnel.Cautionmustbeexercised,since improperservicing may cause
unsafeoperation.
ContactUs GEApp/iances.com
If you are not satisfied widl die service you receive flom (;E, contact us on our Websim widl all die details
including your phone numbe_; or w_Jm to: General Manage_; Custonler Relations
GE Appliances, Appliance Park
Louisville, KY 40225
RegisterYourAppliance GEApp/iances.com
Register your new appliance on-line--at your convenience! Timely product registration will allow for
enhanced conmmnication and prompt service under tile temls of your warranty; should the need arise.
You may Nso mail in tile preprinted registration card included in tile packing mate,Jal.
18

GEPpp/iances.com
Instrucdones
de seguridad ............. 2-4
Instrucdones de operad6n
Bloqueo de control .......... 9
Caracterfsficas de su estufa .. 5, 6
Conseios sobre los utensilk)s
de codna ............... ]0, ] ]
Elemento de superfide
de zona de calentanfiento ..... 9
Elemento de superfide doble . . 8
Elemento de superfide puenm . .8
Elemento de superfide triple . .8, 9
Elementos de superfide .... 7-9
Cuidado y limpieza
Pefillas de control .......... 12
Superfide de vidrio ...... 13, 14
Superficies de
acero inoxidable ........... 12
Consejos para la soluci6n
de problemas ............. 15
Soporte al consumidor
Garantfa .................. 17
Soporte al consumidor ...... 18
PP912
PP932
PP942
PP962
PP972
Impreso enlos E-U
Escriba los numeros de modelo
y de serie aquk
No. de modelo
No. de serie
Los puede encontrar en la
etiquem que estd deb_jo de
la superficie de la esmfa. 49-80413-2 03-09JR

/NFORMAC/ONBESEGURIDAB/MPORTANTE.
tEA TODASI.ASINSTRUCCIONESANTESBESUUSO.
2
iABVER' I
Por su seguridad, se debe seguir la informaciSn de este manual para reducir el riesgo de incendio o
explosiSn, descama elbctrica o para evitar dafios a la propiedad, lesiones personales o la pbrdida de
la vida,
PRECAUCIONESDESEGURIDAD
Cuando use electrodombsticos, se deben seguir precauciones b#sicas de seguridad, incluyendo
las siguientes:
:Use este electrodomOsdco s61o para el uso
descrito en este mamlal.
No intente reparar o reemplazar alguna parte
de su esmfh a menos clue se recomiende
especfficamente en este manual. Cualquier otro
serxddo se debe remidr a tin t_cnico calificado.
Antes de realizar cualquier ser_4cio, desconecte
la fheme de energfa de la estufh en el [ablero
general de distfibuci6n retirando el fllsible o
apagando el intermptor de circuitos.
: Siempre mantenga el papel de colgadura o las
cordnas de material combustible a una distancia
prudence de la esmfh.
: Siempre mantenga las toallas ypatios
para platos, guantes pare ollas y otros artfculos
de tela a una distancia prudence de la esuifh.
Asegairese de clue tin electficista calificado
instale y conecte a tierm correctamente
el electrodomdsdco de acuerdo con las
instrucciones de instalad6n suministmdas. Este
electrodomdsdco debe contar con el volmje y
flecuencia adecuados, asf como conectarse con
tin circuito derivado indMdual y descargado a :
fierm adecuadamente, protegido pot tin
cortacircuitos o fl_sible aceptable pare el vataie
indicado en el rduflo.
Ubicaci6n del r6tulo
Pida al instalador clue le muestre la ubicacidn
del intermptor de circuitos o flisible. Mfircluelo
pare una tiM1 referencia.
No deje a los nifios solos o dn supe_a4sidn en una
zona donde tin electrodomdsdco estfi en uso.
Nunca se debe pemudr clue alguien se siente o
se pare en alguna parte del electrodomdsdco.
: Ensefie a los nifios a no jugar con los controles
ni con ninguna otto parte de la esuifh.
: No pemuta clue nadie sake, se pare o se
cuelgaie de la esuifh.
PRECAUCiON:Nosecteben
guardar en los g_abinetes encima de la esmfa
ardculos de interds para los nifios ya clue si se
suben en la esuifh pare alcanzar dichos artfculos
pueden suflir serias lesiones.
Siempre mantenga los utensilios plfisficos
y de madera y los alimentos enlatados a una
distancia prudence de la esmfa. Podrfan
calentarse y provocar quemaduras.
Nunca use ropa suelta o prendas
clue cuelguen mientras ufiliza el
electrodom_sdco. E1material inflamable
se podrfa prender si entre en contacto con
elementos calientes de la superficie y puede
causar quemaduras severas.
Use tinicamente guantes pare ollas clue estdn
secos; los gaiantes hdmedos en superficies
calientes pueden causar quemadas pot el vapol:
No deje que los guantes para ollas toquen los
elementos calientes de la superficie. No use
toallas u otros patios gmesos que puedan arder
si entmnen contacto con el elemento caliente
de la superficie.
Pot su segufic'tad,nunca use este electrodom_sdco
pma calentar el cumxo de la codna.
No use ag_a para extingxfir incendios de grasa.
Nunca le_.ante una olla en llamas. Apague los
controles. Sofoque la olla en llamas en tin
elemento de la superficie cubriendo la olla
completamente con una tapa clue encaje bien,
con una bandeja de _alletas o plana. Use tin
extintor qufMco seco muldusos o de dpo
espuNloso.
Se debe sofocar la grasa encendida pot fliem
de la olla cubfidndola con soda cfiusdca o
si estfi disponible, usando tin extintor qufmico
seco mulfiusos o de fipo espumoso.
No queme alimentos sobre la esmfa.
Si quema alimentos bajo la campana,
encienda el vendladol:
No deje acumular grasas u otros materiales
inflamables en la superficie.
Other manuals for Profile PP912
1
This manual suits for next models
4
Table of contents
Languages:
Other GE Cooktop manuals

GE
GE PGP976DET2BB User manual

GE
GE JP328 Original instructions

GE
GE PP932BMBB User manual

GE
GE 164D3333P027 User manual

GE
GE Monogram ZGU36K User manual

GE
GE JP256 Operating instructions

GE
GE JP950 User manual

GE
GE JP670 Installation instructions

GE
GE JGP300EH Installation instructions

GE
GE Monogram ZGU385L User manual