GE 26998 User manual

1
We bring good things to life.
40-Channel 900 MHz Caller ID Cordless
Telephone/ nswering System
User’s Guide
26998

2
EQUIPMENT APPROVAL INFORMATION
Your telephone equipment is approved for connection to the Public Switched Telephone Network and is in compliance with
parts 15 and 68 FCC Rules and Regulations and the Technical Requirements for Telephone Terminal Equipment published
by ACTA.
1Notification to the Local Telephone Company
On the bottom of this equipment is a label indicating among other information the US number and Ringer
Equivalence Number (REN) for the equipment. You must upon request provide this information to your telephone
company.
The REN is useful in determining the number of devices you may connect to your telephone line and still have all of these
devices ring when your telephone number is called. In most (but not all) areas the sum of the RENs of all devices connected
to one line should not exceed 5. To be certain of the number of devices you may connect to your line as determined by the REN
you should contact your local telephone company.
Notes
• This equipment may not be used on coin service provided by the telephone company.
• Party lines are subject to state tariffs and therefore you may not be able to use your own telephone equipment if you are
on a party line. Check with your local telephone company.
• Notice must be given to the telephone company upon permanent disconnection of your telephone from your line.
2Rights of the Telephone Company
Should your equipment cause trouble on your line which may harm the telephone network the telephone company shall
where practicable notify you that temporary discontinuance of service may be required. Where prior notice is not
practicable and the circumstances warrant such action the telephone company may temporarily discontinue service
immediately. In case of such temporary discontinuance the telephone company must: (1) promptly notify you of such
temporary discontinuance; (2) afford you the opportunity to correct the situation; and (3) inform you of your right to bring a
complaint to the Commission pursuant to procedures set forth in Subpart E of Part 68 FCC Rules and Regulations.
The telephone company may make changes in its communications facilities equipment operations or procedures where
such action is required in the operation of its business and not inconsistent with FCC Rules and Regulations. If these changes
are expected to affect the use or performance of your telephone equipment the telephone company must give you adequate
notice in writing to allow you to maintain uninterrupted service.
INTERFERENCE INFORMATION
This device complies with Part 15 of the FCC Rules. Operation is subject to the following two conditions: (1) This device may not
cause harmful interference; and (2) This device must accept any interference received including interference that may cause
undesired operation.
This equipment has been tested and found to comply with the limits for a Class B digital device pursuant to Part 15 of the FCC
Rules. These limits are designed to provide reasonable protection against harmful interference in a residential installation.
This equipment generates uses and can radiate radio frequency energy and if not installed and used in accordance with the
instructions may cause harmful interference to radio communications. However there is no guarantee that interference will not
occur in a particular installation.
If this equipment does cause harmful interference to radio or television reception which can be determined by turning the
equipment off and on the user is encouraged to try to correct the interference by one or more of the following measures:
• Reorient or relocate the receiving antenna (that is the antenna for radio or television that is “receiving” the interference).
• Reorient or relocate and increase the separation between the telecommunications equipment and receiving antenna.
• Connect the telecommunications equipment into an outlet on a circuit different from that to which the receiving antenna is
connected.
If these measures do not eliminate the interference please consult your dealer or an experienced radio/television
technician for additional suggestions. Also the Federal Communications Commission has prepared a helpful booklet
“How To Identify and Resolve Radio/TV Interference Problems.” This booklet is available from the U.S. Government Printing
Office Washington D.C. 20402. Please specify stock number 004-000-00345-4 when ordering copies.
HEARING AID COMPATIBILITY
This telephone system meets FCC standards for Hearing Aid Compatibility.
US NUMBER IS LOCATED ON THE CABINET BOTTOM
REN NUMBER IS LOCATED ON THE CABINET BOTTOM

3
SEE MARKING ON BOTTOM / BACK OF PRODUCT
RISK OF ELECTRIC SHOCK
DO NOT OPEN
W RNING: TO PREVENT FIRE OR
ELECTRICAL SHOCK HAZARD DO
NOT EXPOSE THIS PRODUCT TO
RAIN OR MOISTURE.
THE LIGHTNING FLASH
AND ARROW HEAD
WITHIN THE TRIANGLE
IS A WARNING SIGN
ALERTING YOU OF
“DANGEROUS
VOLTAGE” INSIDE THE
PRODUCT.
CAUTION: TO REDUCE THE RISK OF
ELECTRIC SHOCK, DO NOT REMOVE
COVER (OR BACK). NO USER
SERVICEABLE PARTS INSIDE. REFER
SERVICING TO QUALIFIED SERVICE
PERSONNEL.
THE EXCLAMATION
POINT WITHIN THE
TRIANGLE IS A
WARNING SIGN
ALERTING YOU OF
IMPORTANT
INSTRUCTIONS
ACCOMPANYING THE
PRODUCT.
C UTION:
TABLE OF CONTENTS
EQUIPMENT PPROV L INFORM TION ........ 2
INTERFERENCE INFORM TION ................... 2
HE RING ID COMP TIBILITY ................... 2
INTRODUCTION ..................................... 5
BEFORE Y OU BEGIN .............................. 5
PARTS CHECKLIST ............................. 5
MODULAR JACK REQUIREMENTS .......... 5
INST LL TION ND SET UP..................... 6
IMPORTANT INSTALLATION INFORMATION 6
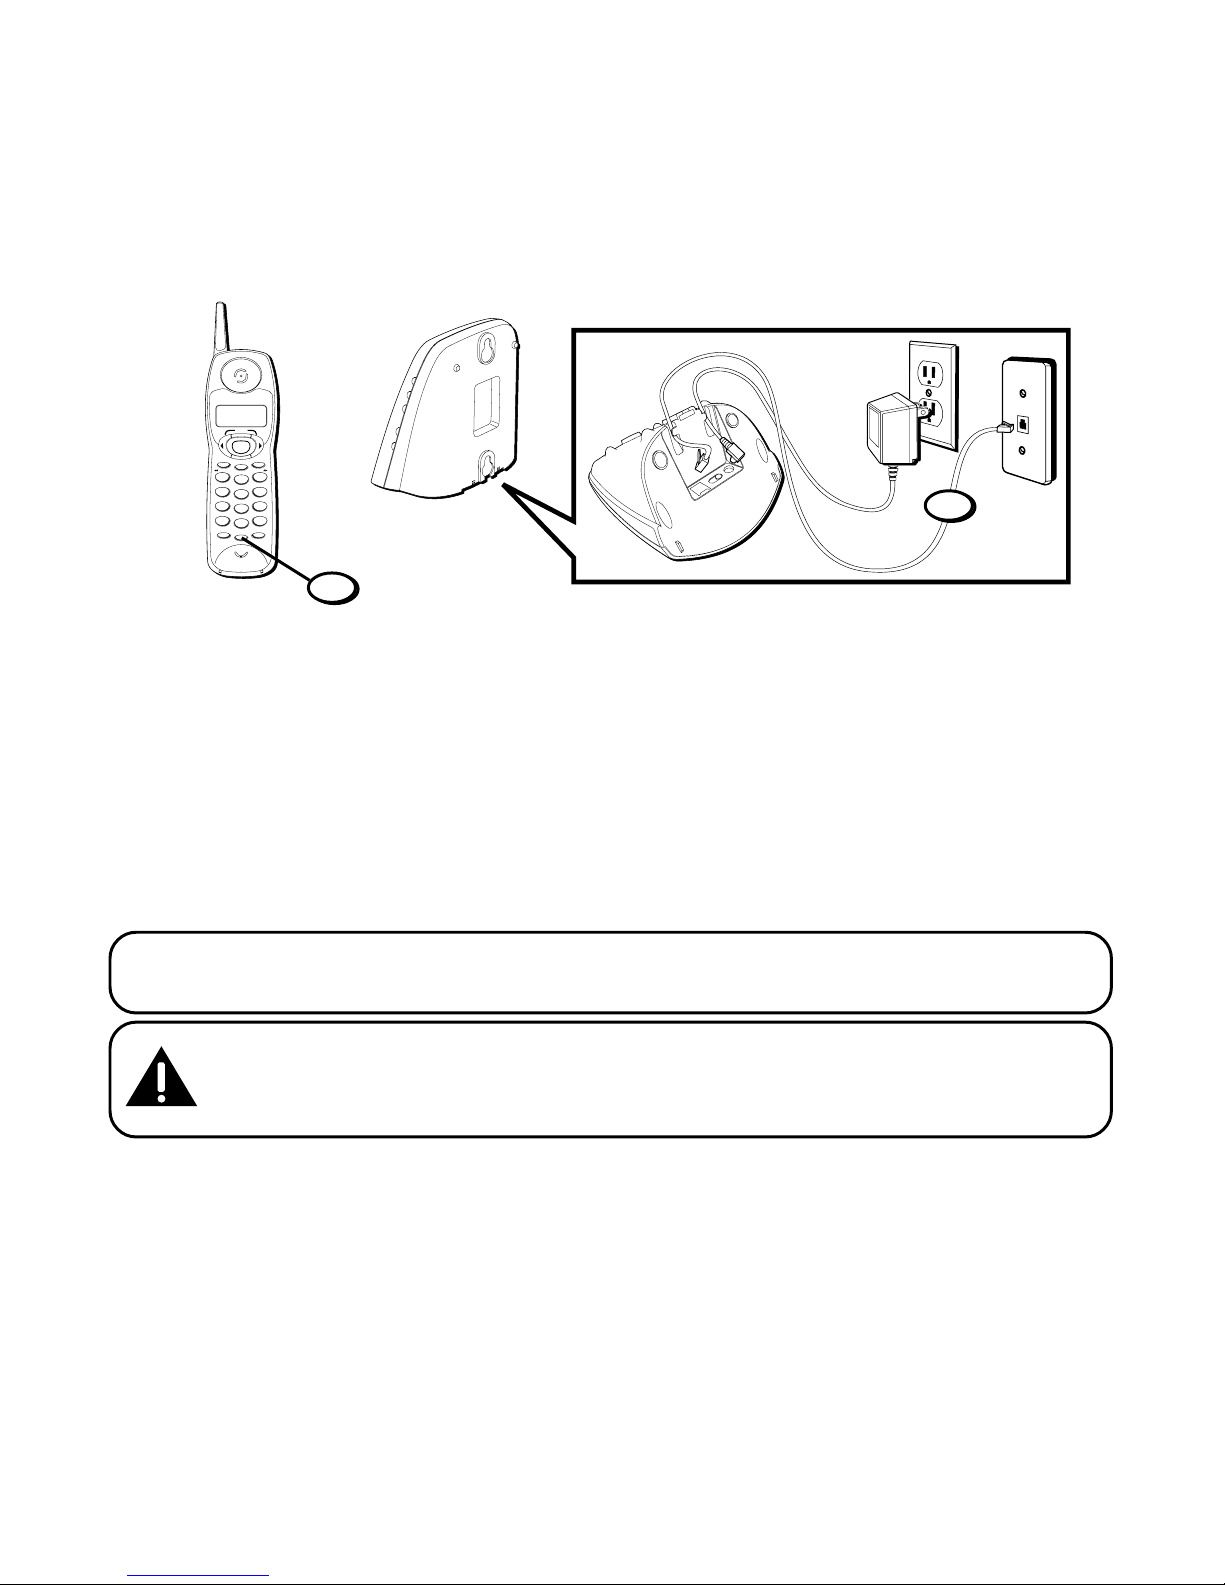
INSTALLING THE PHONE ...................... 7
CONNECTING THE AC (ELECTRICAL)
POWER ............................................ 7
CONNECTING THE T ELEPHONE LINE ....... 7
WALL MOUNTING ............................. 8
TELEPHONE SETUP ................................ 8
SETTING THE DISPLAY LANGUAGE ........ 9
TONE/PULSE DIALING ........................ 9
SETTING THE LOCAL AREA CODE ......... 9
NSWERING SYSTEM SETUP ................ 10
SETTING THE V OICE T IME/DAY STAMP .10
SETTING THE RING SELECT ................ 11
SPEAKER VOLUME ............................ 11
RECORDING THE OUTGOING
ANNOUNCEMENT .............................. 11
REVIEWING ANNOUNCEMENT .......11
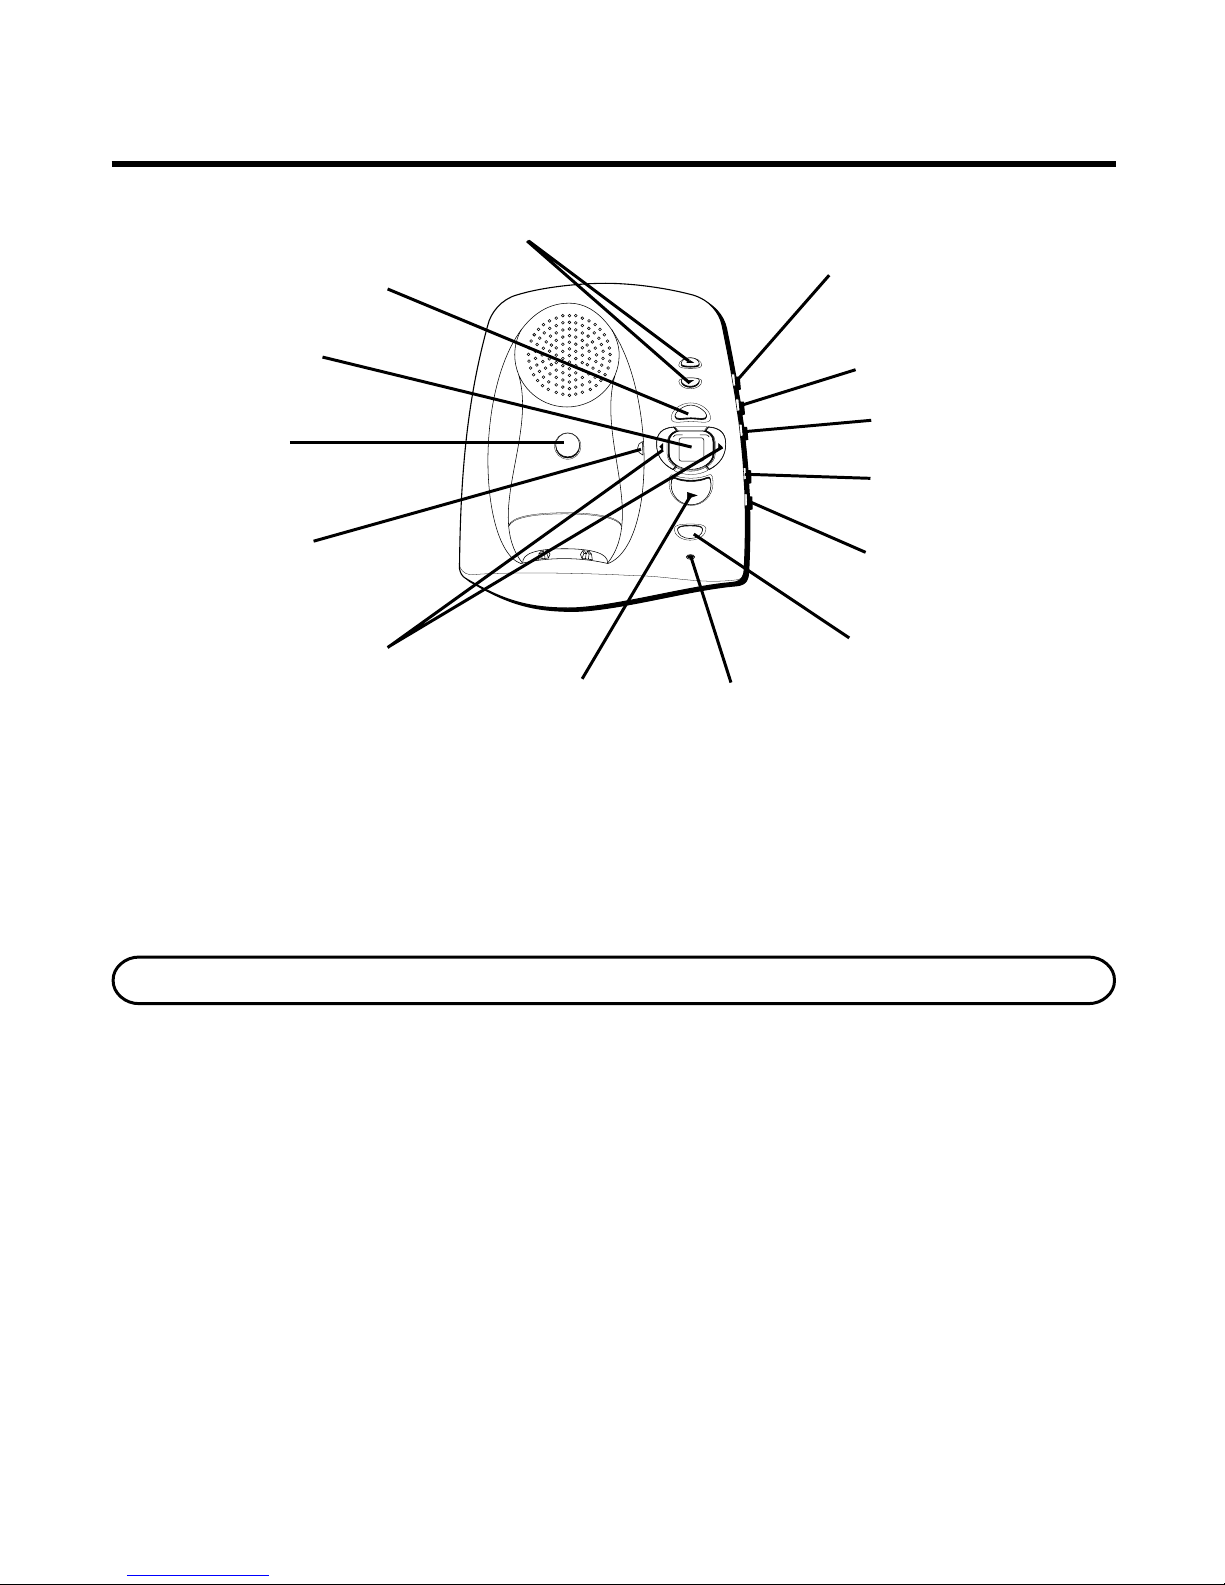
CORDLESS PHONE B SICS .................... 12
MAKING A CALL ............................. 12
REDIAL .......................................... 12
RECEIVING A CALL ........................... 12
FLASH ........................................... 12
VOLUME ........................................ 12
RINGER SWITCH .............................. 13
CANCEL ......................................... 13
IN USE/INDICATOR LIGHT .................. 13
FINDING THE HANDSET ..................... 13
CHANNEL BUTTON .......................... 13
TEMPORARY T ONE ........................... 13
CLLER ID FE TURES .......................... 14
TRANSFERRING CALLER ID RECORDS
TO MEMORY ................................... 14
CALLER ID WITH CALL WAITING ........ 15
RECEIVING AND STORING CALLS ........ 15
REVIEWING MESSAGES .................... 15
DELETING RECORDS ......................... 15
DELETING THE CURRENT RECORD 16
DELETING ALL RECORDS ........... 16
DIALING A CALLER ID NUMBER ......... 16
CHANGING THE NUMBER FORMAT ...... 16
THE MEMORY FE TURE ....................... 17
STORING A NUMBER IN MEMORY ...... 17
CHANGING A STORED NUMBER ......... 17
DIALING A STORED NUMBER ............. 18
DIALING CALLER ID NUMBERS .......... 18
CHAIN DIALING FROM MEMORY .. 18
INSERTING A PAUSE IN THE DIALING
SEQUENCE ..................................... 19
REVIEWING AND DELETING STORED
NUMBERS ...................................... 19
(Table of Contents continued
on next page)

4
NSWERING SYSTEM OPER TION .......... 19
MESSAGES INDICATOR ..................... 19
SCREENING CALLS FROM THE BASE .... 20
MESSAGE PLAYBACK ....................... 20
MEMORY FULL ............................... 20
ERASING MESSAGES ....................... 20
LEAVING A MEMO ........................... 21
REMOTE CCESS ................................ 21
USING THE HANDSET ....................... 21
ANSWERER INDICATOR .............. 22
SCREENING CALLS FROM THE
HANDSET ....................................... 22
MEMORY FULL ............................... 22
ACCESSING THE ANSWERING SYSTEM
FROM ANOTHER LOCATION ................ 23
CHANGING THE SECURITY CODE ......... 23
HE DSET ND BELT CLIP OPER TION ..... 24
CONNECTING A HEADSET TO THE
HANDSET ....................................... 24
CONNECTING THE BELT CLIP .............. 24
CH NGING THE B TTERY ...................... 25
BATTERY SAFETY PRECAUTIONS .25
GENER L PRODUCT C RE .................... 26
HNDSET SOUND SIGN LS .................. 26
NSWER ST TUS INDIC TORS ............... 26
HNDSET INDIC TORS .......................... 27
TROUBLESHOOTING GUIDE ................... 28
CUSES OF POOR RECEPTION ............... 30
SERVICE ............................................ 30
INDEX ............................................... 31
CCESSORY ORDER FORM ................... 33
LIMITED W RR NTY ............................ 34

5
INTRODUCTION
Your cordless telephone/answering system with Caller ID is designed to
give you flexibility in use and high quality performance. To get the most
from your new cordless telephone/answering system we suggest that you
take a few minutes right now to read through this instruction manual.
CAUTION: When using telephone equipment, there are basic safety
instructions that should always be followed. Refer to the IMPORTANT
SAFETY INSTRUCTIONS provided with this product and save them
for future reference.
BEFORE YOU BEGIN
PARTS CHECKLIST
Make sure your package includes the items shown here.
MODULAR JACK REQUIREMENTS
You will need an RJ11C type modular jack which is the most
common type of phone jack and might look like the one pictured
here. If you don’t have a modular jack call your local phone
company to find out how to get one installed.
IMPORTANT: Because cordless phones operate on electricity, you should
have at least one phone in your home that isn’t cordless, in case the power in
your home goes out.
volume
memo
rev/skip
messages
- +
play/stop
erase
mic
in use/charge
page
TALK
answerer
redial memory format
delete ringer
channel
off on
flash
abc
2
jkl
5
tuv
8
oper
0
def
3
mno
6
wxyz
9
#
1
ghi
4
pqrs
7
*
play/stop
review skip
CALL BACK
program
pausetone
cancel erase
CID/VOL
Base Handset AC power
supply
Telephone
line cord Belt clip (provided
with 26998 only)

6
INSTALLATION AND SET UP
CAUTION: Always disconnect phone cords from the wall outlets before
battery installation or replacement.
INSTALLATION NOTE: Some cordless telephones operate at frequencies
that may cause interference to nearby TVs, microwave ovens, and VCRs. To
minimize or prevent such interference, the base of the cordless telephone
should not be placed near or on top of a TV, microwave oven, or VCR. If
interference continues, moving the cordless telephone farther away from the
TV or VCR will often reduce or eliminate the interference. Certain other
communications devices may also use the 900 MHz frequency for
communication, and, if properly set, these devices may interfere with each
other and/or your new telephone. If you are concerned with interference,
please refer to the owner’s manual for these devices on how to properly set
channels to avoid interference. Typical devices that may use the 900 MHz
frequency for communication include wireless audio/video senders, wireless
computer networks, multi-handset cordless telephone systems, and some long-
range cordless telephone systems.
IMPORTANT INSTALLATION INFORMATION
• Never install telephone wiring during a lightning storm.
• Never install telephone jacks in wet locations unless the jack is
specifically designed for wet locations.
• Never touch uninsulated telephone wires or terminals unless the
telephone line has been disconnected at the network interface.
• Use caution when installing or modifying telephone lines.
• Temporarily disconnect any equipment connected to the phone such as
faxes other phones or modems.

7
INSTALLING THE PHONE
Your cordless telephone/answering system should be placed on a level
surface such as a desk or table top or you can mount it on a wall.
CONNECTING THE AC (ELECTRICAL) POWER
Plug the power supply cord into the power jack on the bottom of the base
and the other end into an electrical outlet. The in use/charge indicator turns
on to indicate the battery is charging.
llow the phone to charge for 12 hours prior to first use. If you don’t
properly charge the phone, battery performance is compromised.
NOTE: DO NOT connect the telephone line to the modular jack until the
phone has charged for 12 hours.
CAUTION: Use only the ATLINKS USA, Inc. power supply 5-2521
(black) or 5-2520 (white) that came with this unit. Using other power
supplies may damage the unit.
CONNECTING THE TELEPHONE LINE
1. Plug the one end of the telephone line cord into the jack TEL LINE on the
bottom of the base and the other end into a modular wall phone jack.
2. Set the RINGER switch (on the handset) to ON and place the handset in
the cradle.
TALK
answerer
redial memory format
delete ringer
channel
off on
flash
abc
2
jkl
5
tuv
8
oper
0
def
3
mno
6
wxyz
9
#
1
ghi
4
pqrs
7
*
play/stop
review skip
CALL BACK
program
pausetone
cancel erase
CID/VOL
1
2

8
WALL MOUNTING
NOTE: For best results, leave the phone on a flat surface during initial
charging before you hang the phone on the wall.
If you want to mount the phone on a wall slip the mounting holes (on the
back of the base) over the wall plate posts and slide the unit down into
place. (Wall plate not included.)
TELEPHONE SETUP
TALK
answerer
redial memory format
delete ringer
channel
off on
flash
abc
2
jkl
5
tuv
8
oper
0
def
3
mno
6
wxyz
9
#
1
ghi
4
pqrs
7
*
play/stop
review skip
CALL BACK
program
pausetone
cancel erase
CID/VOL
Display
format/answerer button
flash/program button
redial button
memory button
channel/delete
button
off/on ringer switch
TALK/CALLBACK
button CID/VOL buttons
review button
*tone/cancel
button
0 oper/erase button
# pause button
skip button
play/stop button

9
There are three programmable menus available: Language Tone/Pulse
Dialing and Local Area Code.
SETTING THE DISPLAY LANGUAGE
1. Make sure the phone is OFF (not in TALK mode).
2. Press and release flash/program button until
1 ENG 2 FRA 3 ESP
shows
in the display. The default setting is English
3. Use the handset number pad or press the left or right arrow buttons to
enter the desired setting. For example to choose English press the
number 1 key.
4. When finished press and release flash/program button again to store
the setting. You will hear a confirmation tone and the unit enters the
Tone/Pulse Dialing menu.
TONE/PULSE DIALING
1. Make sure the phone is OFF (not in TALK mode).
2. Press and release the flash/program button until
1TONE 2PULSE
shows
in the display. The default setting is TONE.
3. Use the handset number pad or press the left or right arrow buttons to
enter the desired setting. For example to choose Tone dialing press the
number 1 key.
4. Press the flash/program button again to store. You will hear a confirmation
tone and the unit enters the Local Area Code Setting menu.
SETTING THE LOCAL AREA CODE
1. Make sure the phone is OFF (not in TALK mode).
2. Press and release flash/program button until
ENTER AREA CODE
shows
on the display.
3. Use the handset number pad to enter your three digit area code.
4. When finished press and release flash/program button again to store
the area code and exit setup. You will hear a confirmation tone.
NOTE: If you make a mistake, repeat steps 1-3.

10
ANSWERING SYSTEM SETUP
This section shows you how to set up your answering system to receive incoming
calls. Before you begin the setup you must turn on the answering system.
• Press the answer on/off button on the side of the base to turn the
answering system on and off.
NOTE: The answering system displays “- -” when it is off.
SETTING THE VOICE TIME/DAY STAMP
1. Make sure the answering system is ON.
2. Press and hold the day/check button to set the day of the week.
3. Press the hour button to set the hour (a.m. or p.m.).
4. Press the min button to set the minute. When you press and hold the
min button the time advances in 5-minute intervals.
5. Press and release the day/check button to review the day and time settings.
volume
memo
rev/skip
messages
- +
play/stop
erase
mic
in use/charge
page
announce button
answer on/off
button
day/check button
hour button
min button
erase button
mic
play/stop button
page button
in use/charge
indicator
memo button
volume buttons
display
review (-)/skip (+)
button

11
SETTING THE RING SELECT
Use the RING SELECT switch on the bottom of the base to select the
number of times you want the phone to ring before the system answers
the call. You may choose three or five rings.
SPEAKER VOLUME
Use the volume up or down to adjust speaker volume to a comfortable level.
RECORDING THE OUTGOING ANNOUNCEMENT
For best results when recording you should be about nine inches from the
microphone and eliminate as much background noise as possible.
1. Make sure the answering system is ON.
2. Press and hold the announce button. You need to hold the button until
you finish the announcement.
3. Begin talking after you hear the beep.
4. Release the button when you finish your announcement.
If you choose not to record an outgoing announcement a default
announcement will play. To return to the default announcement after you
have recorded your own outgoing announcement press and hold the
announce button and release it when you hear the beep.
Sample Outgoing nnouncement
Hi, this is (use your name here), I can't answer the phone right now, so please leave your
name, number and a brief message after the tone, and I'll get back to you. Thanks.
REVIEWING ANNOUNCEMENT
• Press and release announce button to review your outgoing
announcement.

12
CORDLESS PHONE BASICS
MAKING ACALL
To make a call:
• Press the TALK/CALLBACK button before you dial.
• Press TALK/CALLBACK button or place the handset in the base to
hang up.
IMPORTANT: Because cordless phones operate on electricity, you should
have at least one phone in your home that isn’t cordless, in case the power in
your home goes out.
REDIAL
Press the redial button to redial the last number you called (up to 32
digits).
If you get a busy signal and want to keep dialing the number press TALK/
CALLBACK to turn off the phone. Press TALK/CALLBACK again to turn it
back on. Then press redial to dial the number.
RECEIVING ACALL
To answer a call you must press the TALK/CALLBACK button on the
handset before you can talk.
FLASH
Use the flash/program button to activate custom calling services such
as call waiting or call transfer which are available through your local
phone company.
TIP: Don't use the TALK/CALLBACK button to activate custom calling
services such as call waiting, or you’ll hang up the phone.
VOLUME
When the phone is ON press the CID/VOL left (-) and right (+) arrow
buttons to adjust the handset volume. There are four settings. VOL 1 is the
lowest level and VOL 4 is the loudest.

13
RINGER SWITCH
The ringer switch must be ON for the handset to ring during incoming calls.
CANCEL
Press the *tone/cancel button to cancel any command you initiated.
INUSE/INDICATOR LIGHT
The phone is ON or being charged when the in use/charge indicator on the
base is turned on.
FINDING THE HANDSET
This feature helps to locate a misplaced handset.
Press the page button on the base. The display shows
PAGING
. The
handset beeps for about two minutes or until you press TALK/CALLBACK
on the handset or press the page button on the base.
NOTE: You can still page the handset with the ringer off.
CHANNEL BUTTON
While talking you might need to manually change the channel in order to
reduce static caused by baby monitors garage door openers or other
cordless phones. Press and release the channel/delete button to advance
to the next clear channel.
TEMPORARY TONE
This feature enables pulse (rotary) service phone users to access touch-
tone services offered by banks credit card companies etc. Press the *tone
button to temporarily make the phone touch-tone compatible. To get
information about your bank account for example you would:
1. Call the bank’s information line.
2. Press the *tone key when your call is answered.
3. Follow the voice menu instructions to get the information. When you
hang up the phone goes back to pulse (rotary) service.

14
CALLER ID FEATURES
This unit receives and displays information transmitted by your local
phone company. This information can include the phone number date and
time;
or
the name phone number date and time. The unit can store up to
40 calls for later review.
TRANSFERRING CALLER ID RECORDS TO MEMORY
You may transfer a Caller ID record to the phone’s internal memory.
1. Use the CID/VOL(-) arrow or CID/VOL(+) arrow button to scroll to the
desired record.
2. Press the memory button and then press the desired memory location.
For example press the number 1 key to store the record in memory
location 1. You will hear a confirmation tone.
To replace a Caller ID record stored in a memory location with a new
Caller ID record:
1. Repeat steps 1 through 2 in Transferring Caller ID Records to Memory.
2. Press the memory button and
REPLACE MEMO?
shows in the display.
3. Press *tone/cancel to exit or press memory again and the new CID
record replaces the old CID record in that memory location. You will hear
a confirmation tone.
Time Date
Caller ID name
Number of calls
Caller ID phone number
317-555-4231
10:51 A.M. 8/11 REPT
CALL
NEW
MEMO
#
25
SMITH JOHN

15
CALLER ID WITH CALL WAITING
Provided you subscribe to Caller ID with Call Waiting service from your
phone company you may see who is calling when you hear the call waiting
beep. The caller identification information appears in the display after you
hear the tone.
• Press the flash/program button to put the current call on hold so that
you can answer the incoming call.
RECEIVING AND STORING CALLS
When you receive a call Caller ID information is transmitted by the phone
company to your telephone between the first and second ring.
VERY IMPORTANT: In order to use all of the features of this unit, you must
subscribe to either the standard Name/Number Caller ID Service or Caller ID
with Call Waiting Service available through your local telephone company. To
know who is calling while you are on the phone, you must subscribe to Caller
ID with Call Waiting Service.
When the memory is full a new call automatically replaces the oldest call
in memory.
NEW
appears in the display for calls received that have not
been reviewed.
NOTE: Check with your local phone company regarding name
service availability.
REVIEWING MESSAGES
As calls are received and stored the display is updated to let you know
how many calls have been received.
• Press the CID/VOL left (-) arrow button to scroll through the call records
from the most recent to the oldest.
• Press the CID/VOL right (+) arrow button to scroll through the call
records from the oldest to the newest.
DELETING RECORDS
Use the channel/delete button to erase the record currently shown in the
display or all records.

16
DELETING THE CURRENT RECORD
1. Press channel/delete button. The display shows
DELETE?
2. Press delete/channel again to erase the current record. The display
shows
DELETED
and you will hear a confirmation tone.
DELETING ALL RECORDS
1. Press and hold channel/delete. The display shows
DELETE ALL?
2. Press channel/delete again to erase all records. You will hear a
confirmation tone.
DIALING ACALLER ID NUMBER
1. Make sure the phone is OFF.
2. Use the CID/VOL left (-) and right (+) arrow buttons to display the
desired Caller ID record.
3. Press the TALK/CALLBACK button to dial the number.
CHANGING THE NUMBER FORMAT
The format/answerer button lets you change the format of the displayed
number. The available formats are as follows.
7-digit 7-digit telephone number.
10-digit 3-digit area code + 7-digit telephone number.
11-digit long distance code “1” + 3-digit area code + 7-digit
telephone number.
1. Use the CID/VOL left (-) and right (+) arrow buttons to scroll to the
number you want to call back.
2. If the number will not dial as shown press the format/answerer button.
Repeat if necessary until the correct number of digits are shown.
3. Press TALK/CALLBACK.
NOTE: To clear the local area code, press and release flash/program, until
ENTER AREA CODE is displayed. Then press channel/delete to delete the
current local area code, or enter “000 ” to replace the current one.

17
THE MEMORY FEATURE
Store up to ten 24-digit numbers in memory for quick dialing. This memory
feature is in addition to the 40 Caller ID records that can be stored in memory.
STORING ANUMBER IN MEMORY
1. Make sure the phone is OFF (not in TALK mode).
2. Press the memory button.
3. Press the desired memory location number (0 through 9).
4. Press the memory button again. The display shows
ENTER NAME.
NOTE: If you don’t want to enter the name, skip step 5.
5. Use the keypad to store a name (up to 15 characters). For example to
enter the name Bill Smith press the two key twice for the letter B press
the four key three times for the letter I and press the five key three
times for the letter L. After one second press the five key three times
again for the second letter L and press the one key to insert a space
between the letter L and S. Press the seven key four times for the letter
S press the six key once for the letter M press the four key three times
for the letter I press the eight key once for the letter T and press the four
key twice for the letter H.
6. Press the memory button to save the name. The display shows
ENTER NUMBER
.
7. Use the number keypad to enter the telephone number you want to
store (up to 24 digits).
8. Press memory again to store the number. You will hear a confirmation tone.
CHANGING ASTORED NUMBER
1. Repeat steps 1 through 7 in Storing a Name and Number in Memory.
2. Press the memory button. “
REPLACE MEMO?
“shows in the display.
3. Press *tone/cancel to exit or press the memory button to store the
number. You will hear a confirmation tone.

18
DIALING ASTORED NUMBER
1. Make sure the phone is ON by pressing the TALK/CALLBACK button.
2. Press memory.
3. Press the number (0-9) for the desired memory location. The number
dials automatically.
DIALING CALLER ID NUMBERS
1. Make sure the phone is OFF.
2. Press memory.
3. Use the CID/VOL left (-) and right (+) arrow buttons to scroll through the
numbers stored in memory until the desired number is shown.
4. Press TALK/CALLBACK. The number dials automatically.
IMPORTANT: If you make test calls to emergency numbers stored in memory,
remain on the line and briefly explain the reason for the call to the dispatcher.
Also, it’s a good idea to make these calls in off-peak hours, such as early
morning or late evening.
CHAIN DIALING FROM MEMORY
Use this feature to make calls which require a sequence of numbers such
as using a calling card for a frequently called long distance number.
Basically you dial each part of the sequence from memory. The following
example shows how you can use chain dialing to make a call through a
long distance service:
The Number For Memory Location
Long distance access number 7
Authorization code 8
Frequently called long distance number 9

19
1. Make sure the phone is ON.
2. Press memory and then press 7.
3. When you hear the access tone press memory and then press 8.
4. At the next access tone press memory and then 9.
TIP: Wait for the access tones before pressing the next memory button, or
your call might not go through.
INSERTING APAUSE IN THE DIALING SEQUENCE
Press the # pause button to insert a delay in the dialing sequence of a
stored telephone number when a pause is needed to wait for a dial tone
(for example after you dial 9 for an outside line or to wait for a computer
access tone). Each pause counts as one digit in the dialing sequence.
Pause shows in the display as a “
P
”.
REVIEWING AND DELETING STORED NUMBERS
1. Press the memory button.
2. Use the CID/VOL left (-) and right (+) arrow buttons to scroll to the desired
memory location or press 0-9.
3. While the entry is displayed press the channel/delete button. The
display shows
DELETE ?
4. Press channel/delete again to erase the current record. You will hear a
confirmation tone.
ANSWERING SYSTEM OPERATION
This section discusses the buttons and features on the answering system.
MESSAGES INDICATOR
The messages indicator shows you the number of new messages you
have received. The answer on/off button must be turned on for the
messages indicator to work.

20
SCREENING CALLS FROM THE BASE
You can screen incoming calls by waiting for the caller to begin leaving a
message (to hear who it is) then pick up the handset and press TALK/
CALLBACK to talk to the caller. The answering system automatically stops
recording when you activate the handset or pick up an extension phone.
TIP: Make sure the volume on the base is set loud enough to hear your
incoming calls.
MESSAGE PLAYBACK
The messages indicator lets you know when you have messages. To play
messages press the play/stop button on the handset or the base.
If you use the handset to play a message please make sure your handset
is off and press format/answerer to access the answering machine.
While a message is playing you can do the following:
• Press play/stop button on the handset or the base to stop the
message playback.
• Press the review button on the handset or the left arrow (-) button on
the base to go to the previous messages.
• Press and release the skip button on the handset or the (+) right arrow
button on the base to go to the next message.
• Press erase on the handset or base to erase the message that is
currently playing.
MEMORY FULL
When the memory is full the system answers after 10 rings. You need to
erase some messages so the answering system can record new messages.
ERASING MESSAGES
•To erase a message, press play/stop on the base and press and release
erase button on the base to erase the message that is playing.
•To erase all messages, press and hold the erase button on the base
when messages have stopped playing.
Other manuals for 26998
1
Table of contents
Languages:
Other GE Cordless Telephone manuals