GE 29893 User manual

29893
Digital Answerer with
Call Waiting Caller ID and
Speakerphone Telephone
User's Guide
We ring good things to life.

2
INDUSTRY CANADA NUMBER IS LOCATED ON THE CABINET BOTTOM
REN NUMBER IS LOCATED ON THE CABINET BOTTOM
IMPORTANT INFORMATION
NOTICE: The Industry Canada label identifies ertified equipment. This ertifi ation means that the
equipment meets ertain tele ommuni ations network prote tive, operational and safety requirements.
The Industry Canada does not guarantee the equipment will operate to the user’s satisfa tion.
Before installing this equipment, users should ensure that it is permissible to be onne ted to the
fa ilities of the lo al tele ommuni ations ompany. The equipment must also be installed using an
a eptable method of onne tion. The ustomer should be aware that omplian e with the above
onditions may not prevent degradation of servi e in some situations.
Repairs to ertified equipment should be made by an authorized Canadian maintenan e fa ility
designated by the supplier. Any repairs or alterations made by the user to this equipment, or equipment
malfun tions, may give the tele ommuni ations ompany ause to request the user to dis onne t the
equipment.
Users should ensure for their own prote tion that the ele tri al ground onne tions of the power utility,
telephone lines and internal metalli water pipe systems, if present, are onne ted together. This
pre aution may be parti ularly important in rural areas.
CAUTION: Users should not attempt to make su h onne tions themselves, but should onta t the
appropriate ele tri inspe tion authority, or ele tri ian, as appropriate.
NOTES: This equipment may not be used on oin servi e provided by the telephone ompany.
Party lines are subje t to telephone ompany tariffs and, therefore, you may not be able to use your own
telephone equipment if you are on a party line. Che k with your lo al telephone ompany.
INTERFERENCE INFORMATION
This equipment generates and uses radio frequen y energy whi h may interfere with residential radio
and television re eption if not properly installed and used in a ordan e with instru tions ontained in
this manual. Reasonable prote tion against su h interferen e is ensured, although there is no guarantee
this will not o ur in a given installation. If interferen e is suspe ted and verified by swit hing this
equipment on and off, the user is en ouraged to try to orre t the interferen e by one or more of the
following measures: Reorient the radio/television re eiver’s antenna, relo ate the equipment with respe t
to the re eiver, plug the equipment and re eiver into separate ir uit outlets. The user may also wish to
onsult a qualified radio/television te hni ian for additional suggestions. This equipment has been fully
tested and omplies with all limits for Class B omputing devi es pursuant to part 15 FCC Rules and
Regulations. This apparatus does not ex eed the lass B limits for RF noise emissions spe ified in the RFI
regulations of the Industry Canada.
HEARING AID COMPATIBILITY
This telephone system meets FCC/Industry Canada standards for Hearing Aid Compatibility.

3
TABLE OF CONTENTS
IMPORTANT INFORMATION ....................... 2
INTERFERENCE INFORMATION ................... 2
HEARING AID COMPATIBILITY ................... 2
BEFORE Y OU BEGIN .............................. 5
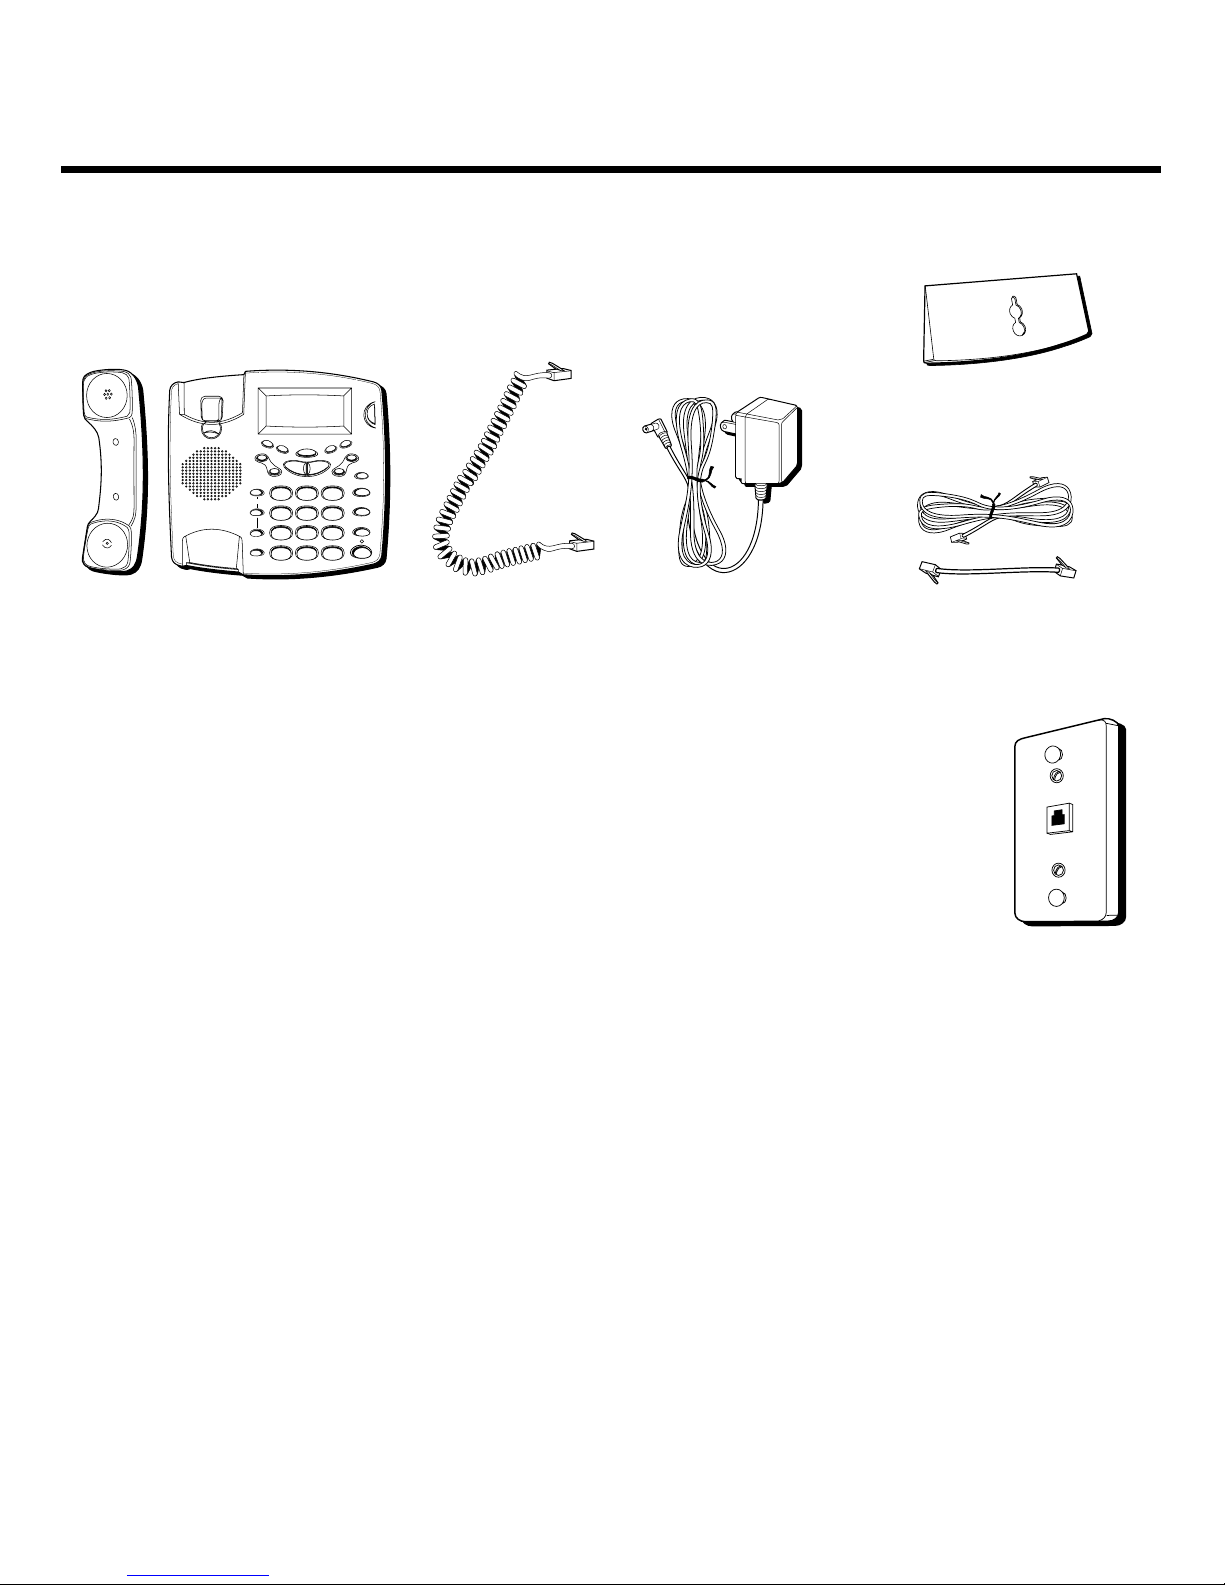
PARTS CHECKLIST ............................. 5
MODULAR JACK REQUIREMENTS .......... 5
INSTALLATION ....................................... 6
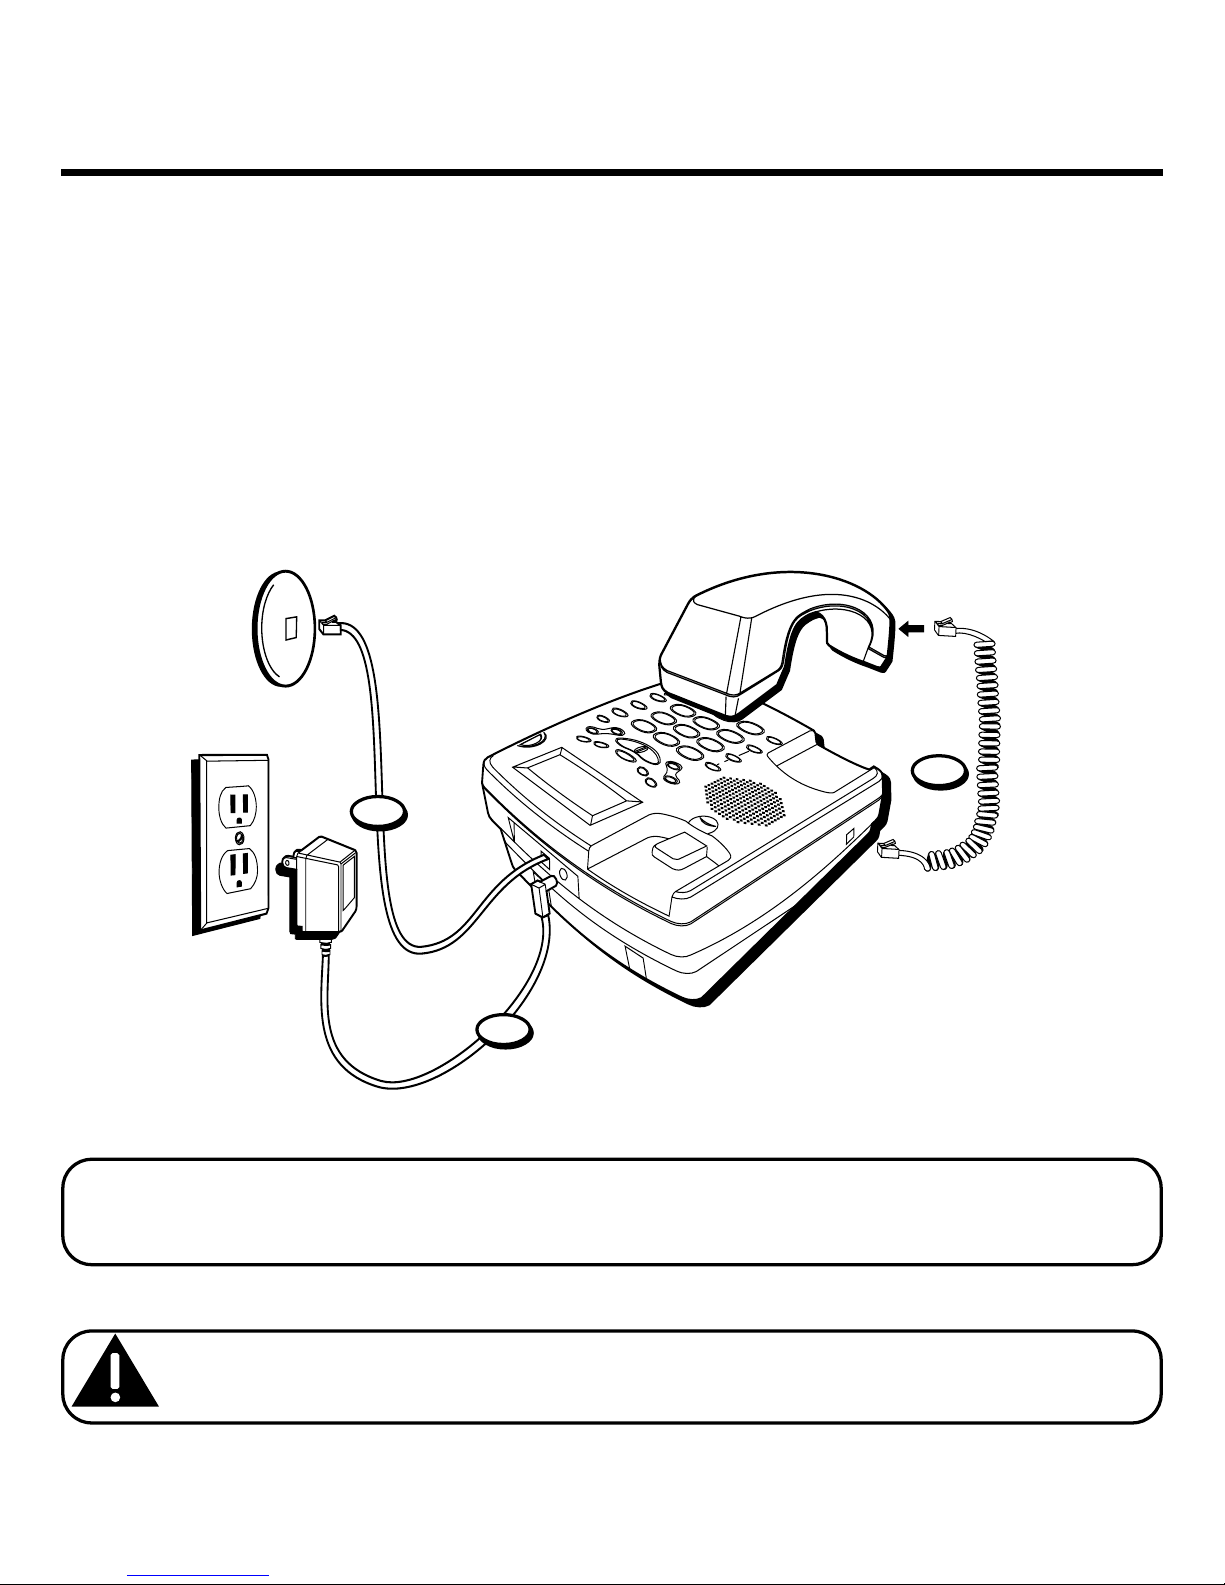
DESKTOP INSTALLATION ...................... 6
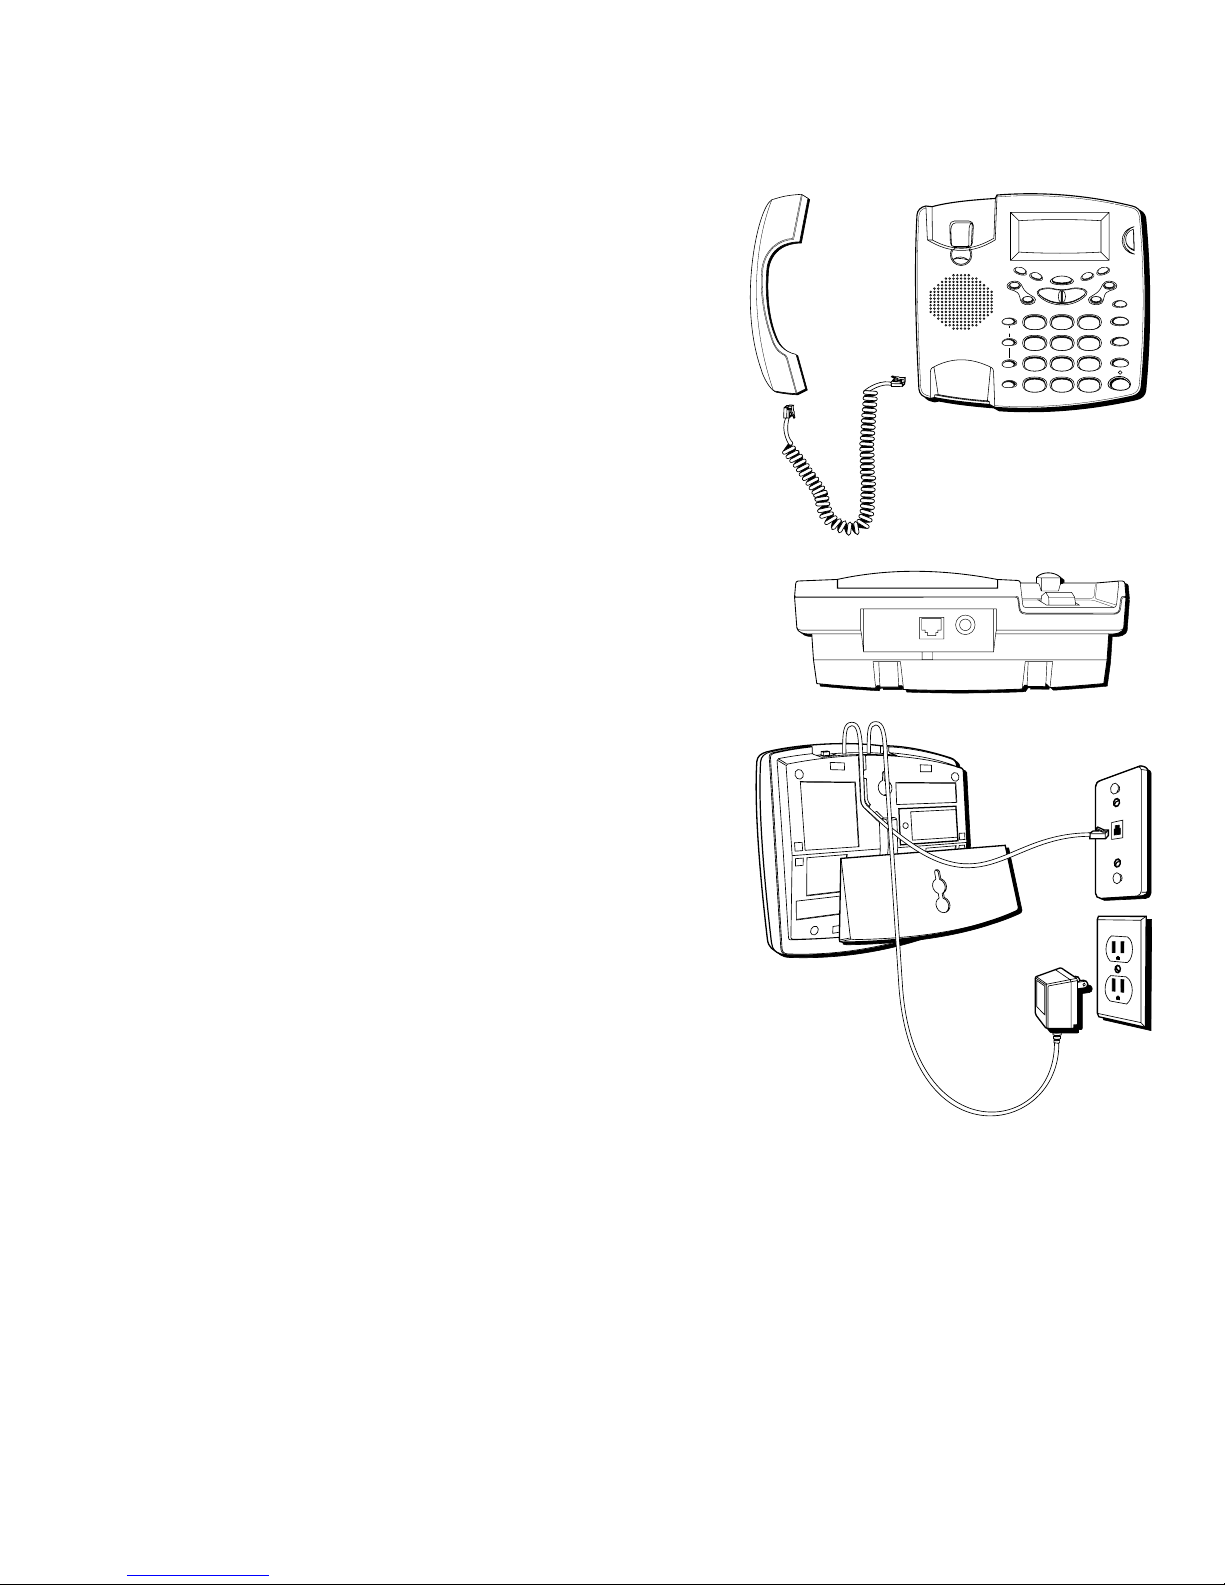
WALL MOUNT INSTALLATION .............. 7
IMPORTANT INSTRUCTIONS FOR MOVING
THE ANSWERER: ............................ 9
SETUP .............................................. 10
RECORDING THE GREETING ............ 10
SETTINGS ........................................... 11
SETTING THE DISPLAY CONTRAST ....... 12
SETTING THE T IME AND DATE ............ 12
MONTH ..................................... 13
SETTING Y OUR LOCAL AREA CODE .... 14
SETTING THE INCOMING MESSAGE
LENGTH ..................................... 14
SETTING THE RINGS TO ANSWER ........ 15
TOLL SAVER ............................... 15
SETTING THE SECURITY CODE ........... 16
SETTING THE DIALING MODE ............. 17
SETTING THE REGIONAL AREA CODES .17
MESSAGE VOLUME ...................... 19
RINGER VOLUME ......................... 19
HANDSET VOLUME ....................... 19
SPEAKERPHONE VOLUME ............... 19
(Ta le of Contents continued on the
following page.)
ANSWERER OPERATION ........................ 20
CALL ANSWERING ........................... 20
AUTODISCONNECT ........................... 20
PLAYING MESSAGES ........................ 21
ERASE MESSAGES .......................... 22
SINGLE MESSAGES ................. 22
ALL MESSAGES ...................... 22
LEAVING A MEMO ........................... 22
MEMORY FULL ............................... 23
REMOTE ACCESS ............................. 23
REMOTE ACCESS COMMANDS ........ 24
CALLER ID FEATURES .......................... 25
SUMMARY SCREEN ......................... 25
CALLER ID WITH CALL WAITING ........ 25
RECEIVING AND STORING CALLS ........ 26
REVIEWING CALL RECORDS ............... 26
ERASING CALLER ID INFO ................ 27
DIAL BACK .................................... 27
CHANGING THE DIAL BACK FORMAT 28
SEE MARKING ON BOTTOM / BACK OF PRODUCT
RISK OF ELECTRIC SHOCK
DO NOT OPEN
WARNING: TO PREVENT FIRE OR
ELECTRICAL SHOCK HAZARD, DO
NOT EXPOSE THIS PRODUCT TO
RAIN OR MOISTURE.
THE LIGHTNING FLASH
AND ARROW HEAD
WITHIN THE TRIANGLE
IS A WARNING SIGN
ALERTING YOU OF
“DANGEROUS
VOLTAGE” INSIDE THE
PRODUCT.
CAUTION: TO REDUCE THE RISK OF
ELECTRIC SHOCK, DO NOT REMOVE
COVER (OR BACK). NO USER
SERVICEABLE PARTS INSIDE. REFER
SERVICING TO QUALIFIED SERVICE
PERSONNEL.
THE EXCLAMATION
POINT WITHIN THE
TRIANGLE IS A
WARNING SIGN
ALERTING YOU OF
IMPORTANT
INSTRUCTIONS
ACCOMPANYING THE
PRODUCT.
CAUTION:

4
MESSAGE INDICATORS ......................... 29
USING THE SPEAKERPHONE .................. 30
SPEAKERPHONE LOCATION ................ 30
SPEAKERPHONE USE ....................... 30
TELEPHONE OPERATION ....................... 31
RECEIVING A PHONE CALL ................ 31
PLACING A PHONE CALL ................... 31
SWITCHING BETWEEN SPEAKER AND
HANDSET ............................... 31
TEMPORARY T ONE DIALING ............... 32
FLASH ........................................... 32
REDIAL .......................................... 33
HOLD ............................................ 33
MEMORY ........................................... 34
STORING A NUMBER IN MEMORY ...... 34
EXAMPLE: .................................. 35
STORING CALLER ID RECORDS .......... 36
INSERTING A PAUSE IN THE DIALING
SEQUENCE ................................. 37
CHANGING A STORED NUMBER ......... 37
DIALING A STORED NUMBER ............. 37
DIALING A QUICK DIAL NUMBER ....... 38
REVIEWING STORED NUMBERS .......... 38
CHAIN DIALING FROM MEMORY ..... 39
GENERAL PRODUCT CARE .................... 40
TELEPHONE NETWORK INFORMATION ...... 41
REN NUMBER ................................... 41
TROUBLESHOOTING T IPS ....................... 42
INDEX ............................................... 45
SERVICE ............................................ 47

5
BEFORE YOU BEGIN
PARTS CHECKLIST
Make sure your pa kage in ludes the following items:
FLASH
REDIAL/PAUSE
HOLD
mi
ON/OFF
VOL -
VOL +
ERASE
MEM DIAL STORE
QUICK DIAL
MEM DIAL
SPEAKER
C
B
A
1
ABC
2
DEF
3
GHI
4
JKL
5
MNO
6
PQ
RS
7
TUV
8
WX
YZ
9
OPER
0#
TONE
M
E
M
O
G
R
E
E
T
I
N
G
M
E
N
U
E
N
T
E
R
D
I
A
L
M
E
S
S
A
G
E
S
T
O
P
M
E
S
S
A
G
E
S
/
C
A
L
L
E
R
I
D
N
E
W
C
A
L
L
*
Base
MODULAR JACK REQUIREMENTS
You need an RJ11(CA11A) type modular ja k, whi h is the most ommon
type of phone ja k and might look like the one pi tured here. If you don’t
have a modular ja k, all your lo al phone ompany to find out how to get
one installed.
AC power supply
Handset Coiled cord Line cords
Mounting bracket

6
INSTALLATION
DESKTOP INSTALLATION
1. Plug the oiled ord into the handset. Plug the other end into the ja k on the side of the base.
2. Pla e the handset in the base.
3. Plug the long telephone line ord into the LINE ja k on the ba k of the phone. Plug the
other end into a wall ja k.
4. Conne t the small end of the power supply into the POWER 9V AC ja k on the ba k of the
answerer. Plug the other end into an AC power outlet. The unit beeps on e and is ready for
setup or to answer alls with the default greeting and settings.
NOTE: The phone automatically defaults to touch-tone dialing. To change to pulse
(rotary) dialing, see “Setting the Dialing Mode.” If you don’t know which type of service
you have, check with the phone company.
CAUTION: Only use the ATLINKS USA 5-2434 power supply that was packed
with this unit. Using other power supplies may damage the unit.
1
2
4
3

7
FLASH
REDIAL/PAUSE
HOLD
mi
ON/OFF
VOL -
VOL +
ERASE
MEM DIAL STORE
QUICK DIAL
MEM DIAL
SPEAKER
C
B
A
1
ABC
2
DEF
3
GHI
4
JKL
5
MNO
6
PQ
RS
7
TUV
8
WX
YZ
9
OPER
0#
TONE
M
E
M
O
G
R
E
E
T
I
N
G
M
E
N
U
E
N
T
E
R
D
I
A
L
M
E
S
S
A
G
E
S
T
O
P
M
E
S
S
A
G
E
S
/
C
A
L
L
E
R
I
D
N
E
W
C
A
L
L
*
WALL MOUNT INSTALLATION
1. Turn the handset hook 180° until it li ks into pla e.
You need to do this so that the handset doesn’t fall
out of the base.
2. Plug the oiled ord into the handset. Plug the other
end into the ja k on the side of the base.
3. Pla e the handset in the base.
4. Carefully turn the phone over. Deta h the mounting
bra ket from the two sets of top grooves by pressing
the tabs in. Pull the bra ket from the phone and turn
it around so that it looks like the diagram below.
Gently press the bra ket into the two sets of bottom
grooves until it snaps into pla e.
5. Plug the short line ord into the ja k on the ba k of
the base.

8
6. Feed the short line ord through the grooves
provided so that the bottom of the phone is flat and
ready to mount on the wall.
7. Conne t the other end of the line ord into the wall
phone ja k.
8. Conne t the small end of the power supply into the
POWER 9V AC ja k on the ba k of the answerer. Plug
the other end into an AC power outlet. The unit beeps
on e and is ready for setup or to answer alls with
the default greeting and settings.
9. Slip the mounting holes of the base (on bottom of
unit) over the wall plate posts and slide the base
down until the phone is firmly in pla e.
NOTE: The phone automatically defaults to touch-tone dialing. To change to pulse
(rotary) dialing, see “Setting the Dialing Mode.” If you don’t know which type of service
you have, check with the phone company.
CAUTION: Only use the ATLINKS USA 5-2434 power supply that was packed
with this unit. Using other power supplies may damage the unit.

9
IMPORTANT INSTRUCTIONS FOR MOVING THE ANSWERER:
To move the answerer to a different lo ation in the house, follow these instru tions:
1. Dis onne t the phone line.
2. Go to the ele tri al outlet and unplug the power supply.
3. Move the unit and phone line to the desired lo ation.
4. Plug in the power supply into an ele tri al outlet.
5. The display shows that the messages have not been erased.
6. Conne t the phone line.
7. Reset the time/date settings or wait for the next all to set them automati ally.

10
SETUP
RECORDING THE GREETING
Before using your new answerer, you should re ord a greeting (the announ ement allers
hear when your answering system answers a all). If you don't re ord a greeting, allers
hear a default greeting whi h says, "We are unable to take your call. Please leave a message. Thank you
for calling."
When re ording the greeting you should be about 6 in hes from the unit. Eliminate as mu h
ba kground noise as possible.
1. Prepare your greeting.
Sample Greeting: Hi, this is (use your name here). I can’t answer the phone right now, so please leave
your name, number, and a brief message after the tone, and I’ll get back to you. Thanks for calling.
2. Hold down the GREETING button. The unit announ es “Record your greeting after the tone,” and
displays GREETING RECORD. After the tone, you have 30 se onds to re ord your greeting.
3. Release GREETING when you finish.
• To review the greeting, press and release GREETING. The unit plays ba k your greeting
automati ally.
• To return to the answerer's default greeting after you've re orded one, press GREET-
ING and release it when you hear the tone, or press and hold ERASE when the
greeting is playing.

11
SETTINGS
Default Settings
Display Contrast 3
Time/Date 12 a.m. 1/01
Local Area Code – – –
Message Length 2 minutes
Rings to Answer 4
Security Code 123
Dialing Tone
Regional Area Codes – – –
You an ustomize the following settings to suit your
needs.
Display Contrast Sele ts the display
ontrast.
Time/Date Sets the time and date.
Local Area Code Sets your lo al area ode
for Dial Ba k.
Message Length Sets the length of time
allowed for
in oming messages.
ings to Answer Sele ts the number of
rings before the unit
answers.
emote Access Sets your 3-digit ode used
for remote a ess to the
unit.
Dialing Sets the phone for tone or
pulse dialing.
egional Area Codes Sets your regional area
odes if you have multiple
area odes where you live.

12
SETTING THE DISPLAY CONTRAST
This setting allows you to adjust the display ontrast for
easier readability.
1. Press and release the MENU button until
SET
CONTRAST
is displayed. The unit announ es, “Setup
menu. To change setting, use NEXT or PREVIOUS. To save a
setting, press ENTER.”
2. Use NEXT or PREVIOUS to sele t the desired setting
or press the keypad number for the setting (1-5).
3. When finished, press ENTER to onfirm. The unit beeps.
NOTE: To skip to the next setting, press MENU. To
exit setup, press PLAY/STOP.
SETTING THE TIME AND DATE
NOTE: The telephone company sends the time and date
with the Caller ID information. The unit automatically sets
the time and date when the first call is received (if it has
not already been set).
HOUR
1. If you just adjusted the Display Contrast menu, skip to
step 2. If you haven’t adjusted any other setting, press
and release the MENU button until SET TIME/DATE is
displayed.
2. Use NEXT or PREVIOUS to set the hour.
3. When finished, press ENTER to onfirm. Now you’re
ready to enter the minutes.
FLASH
REDIAL/PAUSE
HOLD
mi
ON/OFF
VOL -
VOL +
ERASE
MEM DIAL STORE
QUICK DIAL
MEM DIAL
SPEAKER
C
B
A
1
ABC
2
DEF
3
GHI
4
JKL
5
MNO
6
PQ
RS
7
TUV
8
WX
YZ
9
OPER
0#
TONE
M
E
M
O
G
R
E
E
T
I
N
G
M
E
N
U
E
N
T
E
R
D
I
A
L
M
E
S
S
A
G
E
S
T
O
P
M
E
S
S
A
G
E
S
/
C
A
L
L
E
R
I
D
N
E
W
C
A
L
L
*
MENU button ENTER button
NEXT buttonPREVIOUS button

13
MINUTES
1. Use NEXT or PREVIOUS to set the minutes.
2. When finished, press ENTER to onfirm. Now you’re
ready to enter the time of day, AM or PM.
AM/PM
1. Use NEXT or PREVIOUS to set the time of day.
2. When finished, press ENTER to onfirm. Now you’re
ready to enter the month.
MONTH
1. Use NEXT or PREVIOUS to set the month.
2. When finished, press ENTER to onfirm. Now you’re
ready to enter the day.
DATE
1. Use NEXT or PREVIOUS to set the date.
2. When finished, press ENTER to onfirm.
TIP: You can use the keypad as a shortcut to enter
the time/date information.
For example, to enter 8:09 a.m. 7/4:
1. Press 08.
2. Press 09.
3. Press 1 (for a.m.).
4. Press 07.
5. Press 04.
6. Press ENTER.
FLASH
REDIAL/PAUSE
HOLD
mi
ON/OFF
VOL -
VOL +
ERASE
MEM DIAL STORE
QUICK DIAL
MEM DIAL
SPEAKER
C
B
A
1
ABC
2
DEF
3
GHI
4
JKL
5
MNO
6
PQ
RS
7
TUV
8
WX
YZ
9
OPER
0#
TONE
M
E
M
O
G
R
E
E
T
I
N
G
M
E
N
U
E
N
T
E
R
D
I
A
L
M
E
S
S
A
G
E
S
T
O
P
M
E
S
S
A
G
E
S
/
C
A
L
L
E
R
I
D
N
E
W
C
A
L
L
*
ENTER button
NEXT buttonPREVIOUS button

14
SETTING YOUR LOCAL AREA CODE
1. If you just adjusted the Time/Date menu, skip to step
2. If you haven’t adjusted any other setting, press
and release the MENU button until
LOCAL AREA
CODE
is displayed.
2. Use NEXT or PREVIOUS to sele t the first digit.
3. On e the first digit is set, press ENTER.
4. Repeat steps 2-3 until all the digits of the area ode
are set.
5. When finished, press ENTER to onfirm. The unit beeps.
NOTE: To skip to the next setting, press MENU. To
exit setup, press PLAY/STOP.
TIP: You can use the keypad to enter all the digits
in one step. To enter 317, press 3,1, and 7. Then
press ENTER.
SETTING THE INCOMING MESSAGE
LENGTH
This setting allows you to set the maximum length of
time allowed for in oming messages. You an hoose
from 1-4 minutes.
1. If you just adjusted the Lo al Area Code menu, skip to
step 2. If you haven’t adjusted any other setting, press
and release the MENU button until
MESSAGE LENGTH
is displayed.
2. Use NEXT or PREVIOUS or press the keypad number
(1-4) for the desired setting.
3. When finished, press ENTER to onfirm. The unit beeps.
NOTE: To skip to the next setting, press MENU. To
exit setup, press PLAY/STOP.
FLASH
REDIAL/PAUSE
HOLD
mi
ON/OFF
VOL -
VOL +
ERASE
MEM DIAL STORE
QUICK DIAL
MEM DIAL
SPEAKER
C
B
A
1
ABC
2
DEF
3
GHI
4
JKL
5
MNO
6
PQ
RS
7
TUV
8
WX
YZ
9
OPER
0#
TONE
M
E
M
O
G
R
E
E
T
I
N
G
M
E
N
U
E
N
T
E
R
D
I
A
L
M
E
S
S
A
G
E
S
T
O
P
M
E
S
S
A
G
E
S
/
C
A
L
L
E
R
I
D
N
E
W
C
A
L
L
*
MENU button
ENTER button
NEXT buttonPREVIOUS button
PLAY/STOP
button

15
SETTING THE RINGS TO ANSWER
This setting allows you to set the number of rings before
the unit answers a all. You an hoose from 2-8 or Toll
Saver (see “Toll Saver.”)
1. If you just adjusted the Message Length menu, skip to
step 2. If you haven’t adjusted any other setting, press
and release the MENU button until
SET RINGS TO
ANS
is displayed.
2. Use NEXT or PREVIOUS or press the keypad number
(2-8, Toll Saver) for the desired setting.
3. When finished, press ENTER to onfirm. The unit beeps.
NOTE: To skip to the next setting, press MENU. To
exit setup, press PLAY/STOP.
TOLL SAVER
Toll Saver an save you the ost of a all when you
a ess your messages from another phone:
• If you have new messages, the unit answers after the
2nd ring.
• If you have no new messages, the unit answers after
the 5th ring.
You an hang up after the 3rd ring and save the pay
telephone or long distan e harge.
FLASH
REDIAL/PAUSE
HOLD
mi
ON/OFF
VOL -
VOL +
ERASE
MEM DIAL STORE
QUICK DIAL
MEM DIAL
SPEAKER
C
B
A
1
ABC
2
DEF
3
GHI
4
JKL
5
MNO
6
PQ
RS
7
TUV
8
WX
YZ
9
OPER
0#
TONE
M
E
M
O
G
R
E
E
T
I
N
G
M
E
N
U
E
N
T
E
R
D
I
A
L
M
E
S
S
A
G
E
S
T
O
P
M
E
S
S
A
G
E
S
/
C
A
L
L
E
R
I
D
N
E
W
C
A
L
L
*
MENU button
NEXT buttonPREVIOUS button
PLAY/STOP
button

16
SETTING THE SECURITY CODE
This feature allows you to hange the fa tory default
remote a ess ode used for remote a ess to you
answerer. The default ode is 123.
1. If you just adjusted the Rings to Answer menu, skip to
step 2. If you haven’t adjusted any other setting, press
and release the MENU button until
REMOTE ACCESS
is displayed.
2. Use NEXT or PREVIOUS to sele t the first digit.
3. On e the first digit is set, press ENTER.
4. Repeat steps 2-3 until all the digits of the se urity
ode are set.
5. When finished, press ENTER to onfirm. The unit beeps.
NOTE: To skip to the next setting, press MENU. To
exit setup, press PLAY/STOP.
TIP: You can use the keypad to enter all the digits
in one step. To enter 456, press 4,5, and 6. Then
press ENTER.
FLASH
REDIAL/PAUSE
HOLD
mi
ON/OFF
VOL -
VOL +
ERASE
MEM DIAL STORE
QUICK DIAL
MEM DIAL
SPEAKER
C
B
A
1
ABC
2
DEF
3
GHI
4
JKL
5
MNO
6
PQ
RS
7
TUV
8
WX
YZ
9
OPER
0#
TONE
M
E
M
O
G
R
E
E
T
I
N
G
M
E
N
U
E
N
T
E
R
D
I
A
L
M
E
S
S
A
G
E
S
T
O
P
M
E
S
S
A
G
E
S
/
C
A
L
L
E
R
I
D
N
E
W
C
A
L
L
*
MENU button
ENTER button
NEXT buttonPREVIOUS button
PLAY/STOP
button

17
SETTING THE DIALING MODE
This adjustment allows you to sele t tone (tou h-tone)
or pulse (rotary) mode dialing. The phone is
automati ally set for tou h-tone use.
1. If you just adjusted the Remote A ess menu, skip
to step 2. If you haven’t adjusted any other setting,
press and release the MENU button until
DIALING
is displayed.
2. Use NEXT or PREVIOUS or press the keypad number
for the desired setting (1 for pulse, 2 for tone).
3. When finished, press ENTER to onfirm. The unit beeps.
NOTE: To skip to the next setting, press MENU. To
exit setup, press PLAY/STOP.
SETTING THE REGIONAL AREA
CODES
Depending on your area, you may need to set regional
area odes. These are needed in order for the phone to
determine the number format to be displayed when a
valid Caller ID signal is re eived. Calls re eived that
mat h any of the regional area odes are displayed as 10
digits. If the number is not displayed orre tly, the
phone may not be able to dial ba k the number
properly. You an store up to 6 regional area odes.
FLASH
REDIAL/PAUSE
HOLD
mi
ON/OFF
VOL -
VOL +
ERASE
MEM DIAL STORE
QUICK DIAL
MEM DIAL
SPEAKER
C
B
A
1
ABC
2
DEF
3
GHI
4
JKL
5
MNO
6
PQ
RS
7
TUV
8
WX
YZ
9
OPER
0#
TONE
M
E
M
O
G
R
E
E
T
I
N
G
M
E
N
U
E
N
T
E
R
D
I
A
L
M
E
S
S
A
G
E
S
T
O
P
M
E
S
S
A
G
E
S
/
C
A
L
L
E
R
I
D
N
E
W
C
A
L
L
*
MENU button
ENTER button
NEXT buttonPREVIOUS button
PLAY/STOP
button

18
You may need to use this feature if you have:
• Multiple area odes
• Overlapping area odes
• Areas that require 10-digit dialing.
1. If you just adjusted the Dialing menu, skip to step 2. If
you haven’t adjusted any other setting, press and
release the MENU button until
REGIONAL AC#
is
displayed. The first digit of ode #1 flashes.
2. Use NEXT or PREVIOUS to set the first digit.
3. Press ENTER. The next digit flashes.
4. Repeat steps 2-3 until all the digits of the regional
area ode are set.
5. When finished, press ENTER to onfirm. The unit beeps.
NOTE: If you don’t want to enter any more area
codes, press MENU. To exit setup, press PLAY/STOP.
NOTE: You can use MENU at any time to scroll
through the settings. Also, if you don’t make a
selection within 30 seconds, the unit automatically
exits the setup menu.
TIP: You can use the keypad to enter all the digits
in one step. To enter 891, press 8,9, and 1. Then
press ENTER.
FLASH
REDIAL/PAUSE
HOLD
mi
ON/OFF
VOL -
VOL +
ERASE
MEM DIAL STORE
QUICK DIAL
MEM DIAL
SPEAKER
C
B
A
1
ABC
2
DEF
3
GHI
4
JKL
5
MNO
6
PQ
RS
7
TUV
8
WX
YZ
9
OPER
0#
TONE
M
E
M
O
G
R
E
E
T
I
N
G
M
E
N
U
E
N
T
E
R
D
I
A
L
M
E
S
S
A
G
E
S
T
O
P
M
E
S
S
A
G
E
S
/
C
A
L
L
E
R
I
D
N
E
W
C
A
L
L
*
MENU button
ENTER button
NEXT buttonPREVIOUS button
PLAY/STOP
button

19
MESSAGE VOLUME
Use the VOL buttons to adjust the volume when playing
ba k messages and while reviewing or hanging the setting.
RINGER VOLUME
Use the VOL buttons to adjust the loudness of the ringer
when the handset is in the radle of the base. The phone
gives a sample ring when adjusting.
HANDSET VOLUME
Use the VOL buttons to adjust the handset listening
volume when it is not in the radle of the base.
SPEAKERPHONE VOLUME
Use the VOL buttons to adjust the speakerphone
listening volume while it is in use.
VOL buttons
FLASH
REDIAL/PAUSE
HOLD
mi
ON/OFF
VOL -
VOL +
ERASE
MEM DIAL STORE
QUICK DIAL
MEM DIAL
SPEAKER
C
B
A
1
ABC
2
DEF
3
GHI
4
JKL
5
MNO
6
PQ
RS
7
TUV
8
WX
YZ
9
OPER
0#
TONE
M
E
M
O
G
R
E
E
T
I
N
G
M
E
N
U
E
N
T
E
R
D
I
A
L
M
E
S
S
A
G
E
S
T
O
P
M
E
S
S
A
G
E
S
/
C
A
L
L
E
R
I
D
N
E
W
C
A
L
L
*

20
ANSWERER OPERATION
CALL ANSWERING
When a all omes in, the unit will ring the number of
times set, play the greeting, and re ord the in oming all.
You can:
• Answer the all before the unit answers.
• Pi k up the phone during the greeting.
• Listen to the in oming message (Call s reening).
• Pi k up the phone during the in oming message,
if desired.
• Dis onne t the aller by pressing the STOP button.
AUTODISCONNECT
Autodis onne t is a feature that tells the unit to stop
playing the greeting or re ording when a extension
phone is pi ked up. Sometimes you may pi k up and the
ma hine keeps playing the greeting. This is normal. If
you want to pi k up the phone during the greeting play,
wait about two se onds after the system answers before
pi king up a phone.
If the greeting ontinues to play after pi king up an
extension phone, press the STOP button.
FLASH
REDIAL/PAUSE
HOLD
mi
ON/OFF
VOL -
VOL +
ERASE
MEM DIAL STORE
QUICK DIAL
MEM DIAL
SPEAKER
C
B
A
1
ABC
2
DEF
3
GHI
4
JKL
5
MNO
6
PQ
RS
7
TUV
8
WX
YZ
9
OPER
0#
TONE
M
E
M
O
G
R
E
E
T
I
N
G
M
E
N
U
E
N
T
E
R
D
I
A
L
M
E
S
S
A
G
E
S
T
O
P
M
E
S
S
A
G
E
S
/
C
A
L
L
E
R
I
D
N
E
W
C
A
L
L
*
PLAY/STOP
button
Other manuals for 29893
2
Table of contents
Languages:
Other GE Cordless Telephone manuals