GE 30522EE1 User manual

DECT 6.0 CORDLESS TELEPHONE
Model number:
30522

Thank you for choosing GE!
Register your product
Please take a moment to register your product online. Just go
to www.gephones.com and click “register here” from the home
page. Provide your email address and receive product updates,
special oers, or discounts on future purchases.
* It will not diminish your warranty rights if you choose not to register.
Assistance and more information
Retain your sales receipt as proof of purchase in the event
warranty service is necessary.
For product assistance or for more information about
accessories, visit our website at www.gephones.com or call our
customer service center at 1-877-394-9775.
Attach your sales receipt here.

Table of contents
Getting started
Parts checklist................................................1
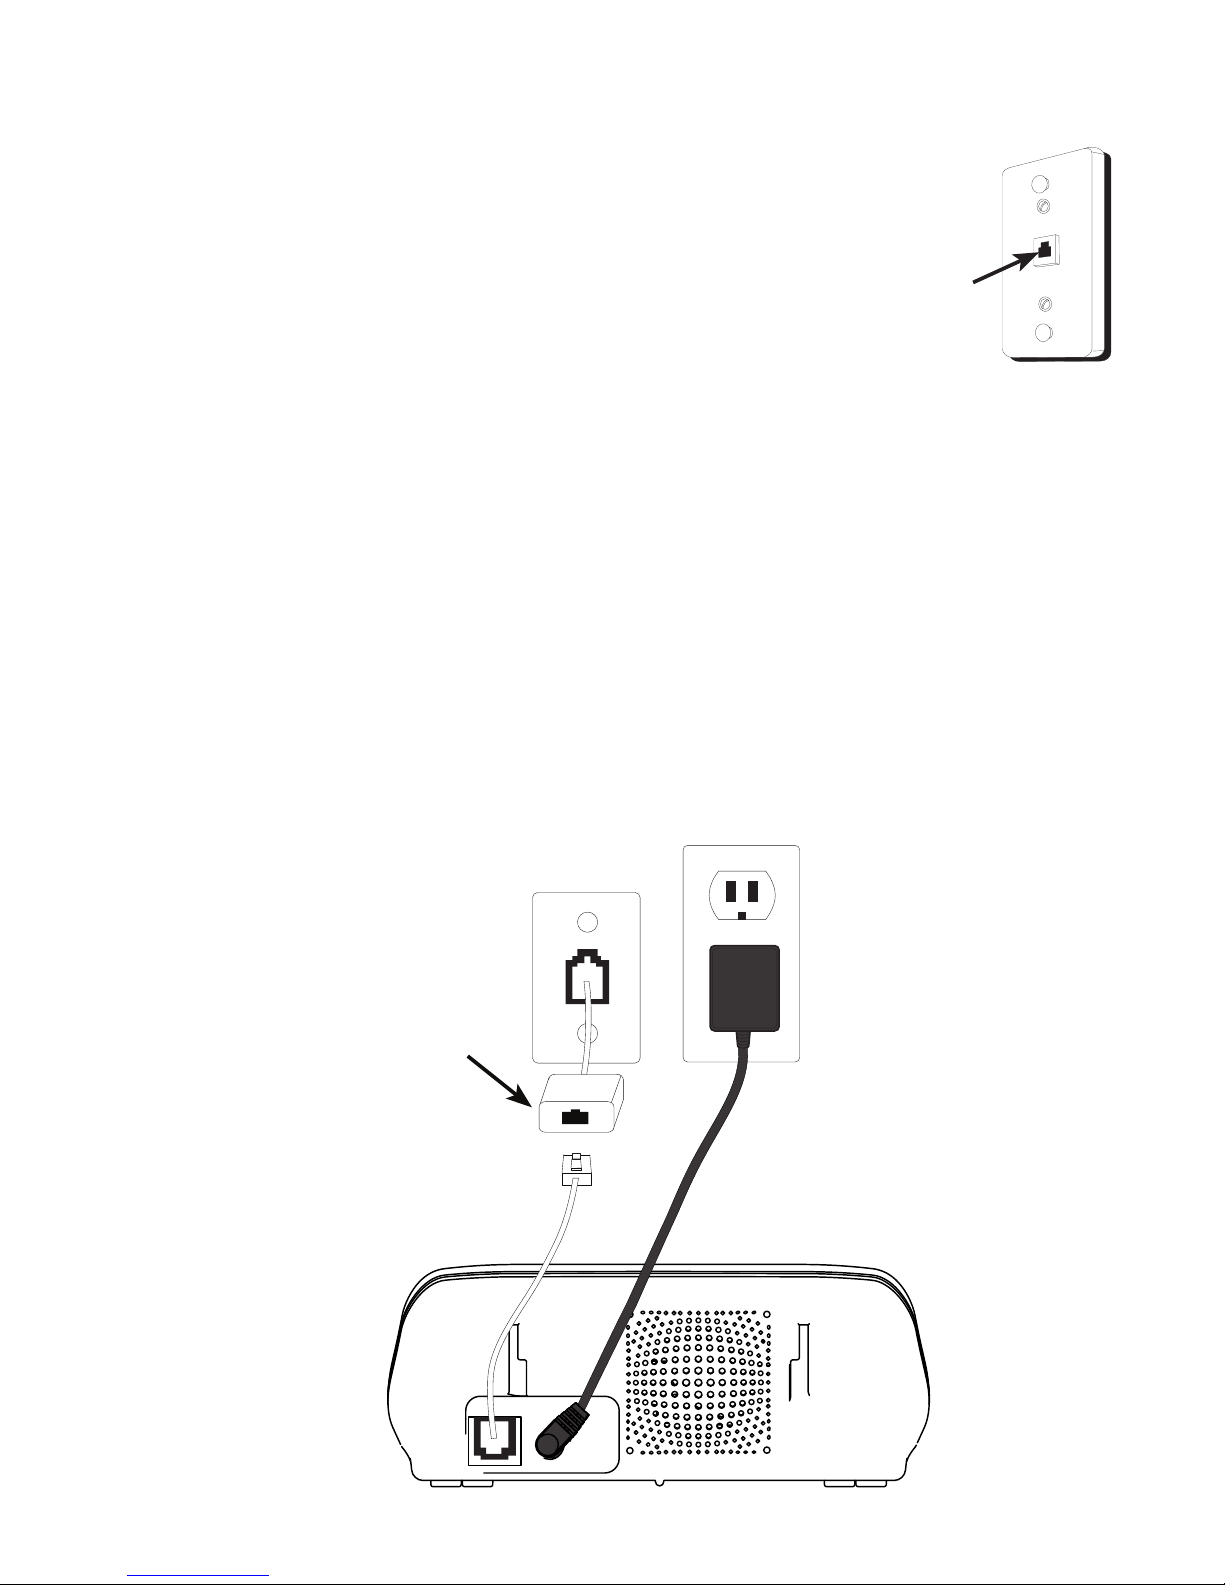
Telephone jack requirements .................2
Telephone base installation.....................2
Charger installation.....................................3
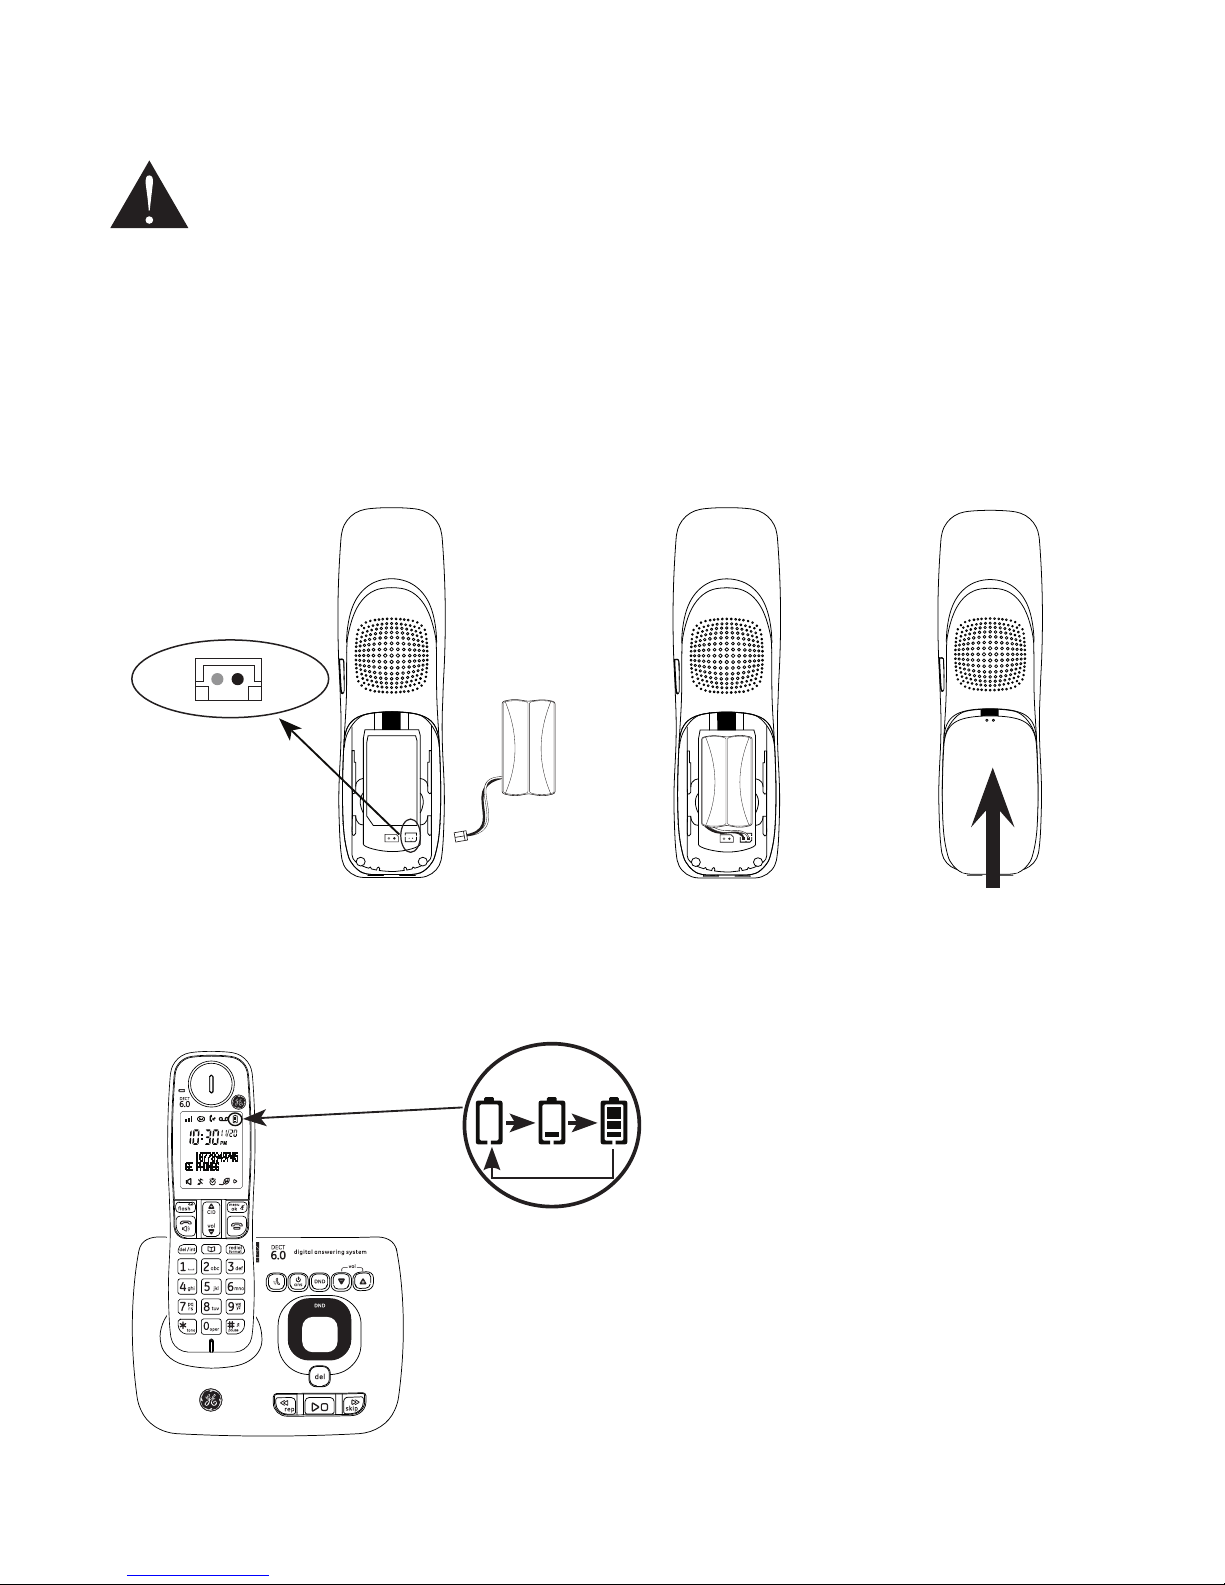
Battery installation.......................................4
Wall mount installation..............................5
Overview
Telephone base layout...............................9
Handset layout ........................................... 10
Battery charging........................................ 11
Screen display icon................................... 12
Initial settings.................................... 13
Telephone operation
Make a call.................................................... 13
Predial a call................................................. 13
Answer a call ............................................... 13
End a call....................................................... 13
Speakerphone............................................. 13
Volume control ........................................... 14
Make a call using the redial
memory...................................................... 14
Save a number from the redial list to
the phonebook........................................ 14
Delete number from the redial list.....14
Mute................................................................. 15
Call waiting or call waiting with
caller ID service....................................... 15
Voice mail service...................................... 15
Using multiple handsets......................... 15
Handset locator ......................................... 15
Intercom ........................................................ 16
To answer an incoming call during
intercom..................................................... 16
To initiate an intercom during a
call................................................................. 17
Push to talk (PTT)........................................ 18
Handset settings
Ringer volume............................................. 19
Ringer melody............................................. 19
Key tone......................................................... 20
Display language....................................... 20
Equalizer ........................................................ 21
Energy save.................................................. 21
Base settings
Base ringer melody................................... 22
Base ringer volume................................... 22
Block list
To add a new entry................................... 23
To view the list............................................. 23
To edit an entry........................................... 23
To delete an entry ..................................... 24
To delete all entries................................... 24
Do not disturb
Global DND................................................... 25
Handset DND............................................... 25
Clock and alarm
Date and time ............................................. 26
Time format.................................................. 26
Date format.................................................. 27
Alarm............................................................... 27
Alarm tone.................................................... 28
Phonebook
Add a phonebook record....................... 29
Character table .......................................... 30
To view/call a phonebook record.......31
To search a phonebook entry
alphabetically .......................................... 31
Chain dialing................................................ 31
Edit a phonebook entry .......................... 32
Delete a phonebook entry..................... 32
Delete all phonebook entries...............32

Caller ID
Using Caller ID service ............................ 33
Phonebook Caller-ID matching........... 33
Review/call from the call log................33
Save a number to the phonebook..... 34
Delete caller ID record............................. 34
Call log display screen messages......34
Answering system
Turning the answering system on or
o .................................................................. 35
Answering system and voice mail.....35
Message capacity ..................................... 35
Telephone base volume ......................... 35
New message indicator..........................36
Outgoing Announcement (OGA) ......... 36
Record an outgoing announcement
(OGA) ............................................................ 36
Delete your recorded OGA .................... 36
Play the current outgoing
announcement ....................................... 37
Number of rings before the system
answers...................................................... 37
Security code for remote access........ 38
Call screening ............................................. 38
Message playback using the
telephone base ....................................... 39
Message playback using the
handset....................................................... 39
Delete all messages ................................. 40
Message window....................................... 40
Access the answering system
remotely .....................................................41
Remote access commands.................. 41
Advanced settings
Dialing mode................................................ 42
Programming your area code
(optional) .................................................... 42
Reset................................................................ 43
Registering a handset ............................. 43
Deregistering a handset......................... 44
Appendix
Troubleshooting guide............................ 45
General Product Care.............................. 47
Important Safety Instructions ............. 48
FCC Parts 15, 68 and ACTA.................... 52
One Year Limited Warranty .................. 56
Technical specication ........................... 58
Index................................................................ 59
Remote access operation card...........61

1
Getting started
Parts checklist
Your telephone contains the following items. Save your sales receipt
and original packaging in the event warranty service is necessary.
Charger
(1 for 30522XE2
2 for 30522XE3
3 for 30522XE4)
Handset
(1 for 30522XE1
2 for 30522XE2
3 for 30522XE3
4 for 30522XE4)
Battery
compartment cover
(1 for 30522XE1
2 for 30522XE2
3 for 30522XE3
4 for 30522XE4)
Battery
(1 for 30522XE1
2 for 30522XE2
3 for 30522XE3
4 for 30522XE4)
Telephone line cord
Telephone base
User’s guide
Power adapter for
telephone base
Wall mount
bracket
Power adapter
for charger
(1 for 30522XE2
2 for 30522XE3
3 for 30522XE4)
DECT 6.0 CORDLESS TELEPHONE
Model number:
30522

Getting started
2
Telephone base installation
1. Plug the smaller end of the power adapter into the power jack at
the back of the telephone base.
2. Plug one end of the telephone line into the jack at the back of the
telephone base.
3. Plug the other end of the telephone line into a telephone wall jack.
4. Plug the larger end of the power adapter into an electrical outlet
not controlled by a wall switch.
DSL lter (not included)
is required if you have
DSL high speed Internet
service.
Telephone base installation
Telephone jack requirements
To use this phone, you need a RJ11C type modular
telephone jack, which might look like the one pictured
here. If you do not have a modular jack, call your telephone
service provider to nd out how to have one installed.
If you have DSL high speed Internet service, a DSL lter is
required (not included). Contact your DSL service provider
for more information about DSL lter.
Wall plate
Modular
telephone
line jack

Getting started
3
Charger installation (For models with additional handsets)
1. Plug the smaller end of the power adapter into the charger.
2. Plug the larger end of the power adapter into an electrical outlet
not controlled by a wall switch.
CAUTION:
1. Use only the power adapter that came with this unit. Using other power
adapters may damage the unit.
2. To prevent re or electrical shock hazard, do not expose this product to rain or
moisture.

Getting started
4
Battery installation
CAUTION:
1. Use only the supplied rechargeable battery or equivalent replacement battery.
See battery specications on the Technical specication page or visit our
website at www.gephones.com to nd out how to order a replacement battery if
necessary.
2. If the handset will not be used for an extended period of time, unplug the battery
and remove it from the handset to prevent possible leakage.
Please fully charge your handset before use!
For optimum battery performance, charge the battery for 16 hours
before rst use.
NOTE: Use only the supplied rechargeable battery or replacement battery. Visit our website
at www.gephones.com to order a replacement battery if necessary.
1. Plug the battery connector securely into
the socket inside the handset battery
compartment. Make sure that red and
black wires on the plug are properly
inserted into the socket as shown.
2. Place the battery
and the wire inside
the battery
compartment.
4. Place the handset onto the base (or charger) as shown.
An animated battery icon will display after a few minutes
to show that the handset battery is successfully being
charged. For optimum performance, please allow the
battery to charge for 16 hours before rst use.
3. Align the cover
against the battery
compartment and
slide it upwards
until it clicks into
place.
Animated
charging
indicator
red
wire
black
wire

Getting started
5
Wall mount installation
The telephone comes ready for desktop use. If you want to mount your
telephone on the wall, follow the steps below.
1. Make sure the telephone line cord is unplugged from the modular
jack and the power adapter cord is unplugged from the electrical
outlet before installation.
2. Thread the power cord through the center cut out of the wall
bracket as shown below.

Getting started
6
3. Plug the power adapter cord into the jack on the back of the
telephone base. Align the tabs at the top of the wall bracket with
the recessed slots on the back of the base unit. Align the lower tabs
of the wall bracket with the slots on the bottom of the base. Slide
the wall bracket upwards until it locks into place. Be sure the power
cord is threaded through the center opening and securely plugged
in. Route the power cord through either slot at the bottom of the
wall mount bracket.
4. Plug one end of the telephone line cord into the jack on the back of
the telephone base.

Getting started
7
5. Route the telephone line cord through the open slot at the bottom
of the wall mount bracket, leaving about 8 inches from the slot to
the end of the cord as shown. Plug the line cord into the jack on
the wall plate. Align the holes on the mounting bracket with the
mounting studs of the wall plate and slide the bracket down until it
locks securely.
6. Plug the power adapter into an electrical outlet. Be sure to avoid
using an electrical outlet that is controlled by a wall switch. The
handset may now be placed in the base for charging.

Getting started
8
7. To test the installation, pick up the handset, press the button. If
you hear a dial tone, the installation is correct.
8. Neatly tie the excess telephone line cord with a twist tie so it is held
close to the bottom of the base unit.

9
Overview
Telephone base layout
vol down
Press to decrease the
telephone base ringer
volume when in idle
mode.
Press to decrease
the volume during
playback or call
screening.
vol up
Press to increase the
telephone base ringer
volume when in idle
mode.
Press to increase
the volume during
message playback or
call screening.
ans. on/o
Press to turn the
answering system
on or o.
locator
Press to page
all system
handsets.
DND
Press to turn DND
mode on or o.
message window
Displays the number of
messages.
Displays the message
number during
playback.
repeat
Press to repeat a
message or press twice
to play the previous
message.
skip
Press to skip to the
next message.
play/stop
Press to play messages
or stop playback.
del
Press to delete the
message during
playback, or press and
hold to delete all old
messages.

Overview
10
Handset layout
o/cancel
• During a call, press to hang up.
• During programming, press to cancel and
exit without making changes.
CID/volume up
• Press to review the call
log when the telephone
is not in use.
• While in menu, press to
scroll up.
• During a call, press
to increase the incoming
volume.
• During a call, press to
answer an incoming
call if you receive a call
waiting alert (if you
have subscribed to the
call waiting feature
from your service
provider).
• Press to access message
playback when in idle
mode.
del/int
• Press to delete the last
number or letter entered.
• Press to initiate an
intercom call or transfer
a call .
volume down
• While in menu, press to
scroll down.
• During a call, press to
decrease the incoming
volume.
menu/ok/mute
• Press to show menu.
• Press to select an item, or to
save an entry or setting.
• Press to mute a call,
press again to resume
conversation.
redial/format
• Press to review redial list.
• Press to change the
telephone number format (7
digits, 1+, or 1+ area code)
for appropriate dialing.
talk/speaker
• Press to make or answer
a call.
• Press to switch to
speakerphone during
a call or message
playback.
• During a call, press to
switch between
speakerphone and
normal handset use.
phonebook
• Press to review the
phonebook when the
telephone is not in use.
*/tone
• During a call, press
to send touch-tone
signals temporarily.
#/pause/ringer o
• Press and hold to turn the
ringer o.
• Press and hold to add a
dialing pause when dialing
or entering numbers into
phonebook.

Overview
11
Battery charging
The following table summarizes the battery charge indicators and
what actions need to be taken.
Battery
indicators
Battery status Action
Battery icon is
scrolling.
Battery is charging. Keep the handset in the telephone
base or charger when not in use.
Battery icon is
on steadily.
Battery is completely
charged.
The handset is ready for use.
It will take approximately 2 hours
for the battery icon to indicate a
full charge even if the handset is
only removed from the telephone
base or charger for a short time
and replaced. This is a normal
operation and does not indicate a
battery issue.
Battery icon is
empty and the
screen shows
LOW BATTERY.
Battery is low. Place the handset in the telephone
base or charger to charge without
interruption (at least 30 minutes)
before use.
The screen is
blank.
Battery has no
power while the
handset is out of the
telephone base or
charger.
Place the handset in the telephone
base or charger for at least 16
hours without interruption. See
troubleshooting on page 45 for
help if the screen remains blank
after charging.

Overview
12
Screen display icon
Item Meaning
• Displays when the telephone base is within
reception range.
• Flashes when the telephone base is out of range.
• Scrolls to indicate battery charging when handset
is in the telephone base or charger.
• Flashes and empty when battery level is low.
• Speakerphone is in use.
• Displays when there are new calls.
• Displays when there is a new voice mail message.
(Available only if you have subscribed to voice mail
service from your telephone service provider.)
• Displays when the alarm is set.
• Displays when energy saving mode is activated.
• Displays when the ringer is turned o.
• Displays when answering system is on.
• Flashes when there are new messages.

13
Telephone operation
Make a call
1. Press .
2. Dial the phone number after you hear the dial tone.
Predial a call
1. Dial the phone number using the dial pad keys. If you make an error
while dialing, you can press del/int to erase the last digit entered.
2. Press .
Answer a call
Press to answer an incoming call.
When there is an incoming call, the screen and dial pad backlight will
be on.
NOTE: The screen shows the elapsed time as you talk (in hours, minutes and seconds).
End a call
Press or place the handset in the telephone base or charger to end
a call.
Speakerphone
Anytime during a call, press to switch between speakerphone and
normal handset use. When the speakerphone is active, the handset
screen shows .
NOTE: Using the speakerphone will drain the battery faster than the normal handset use.
Initial settings
In order for your answering system to accurately mark your messages,
you must set the time and date. Please see page 26 for Time and
date setting instructions.

Telephone operation
14
Volume control
You can adjust the volume of the handset or speakerphone anytime
during a call.
On the handset, press to increase or to decrease the volume.
NOTE: Only the listening volume can be adjusted.
Make a call using the redial memory
The last ten telephone numbers previously dialed are stored in the
redial list (up to 24 digits each).
1. Press redial/format.
2. Press or to select the desired phone number and then
press to dial.
Save a number from the redial list to the phonebook
1. Press redial/format.
2. Press or to select the desired phone number and then
press .
3. Press or to select SAVE NUMBER and then press
4. Enter the name by using the dial pad, refer to the character table on
page 30 for more information, and then press .
5. Edit the number by using the dial pad if necessary, and then press
.
Delete number from the redial list
1. Press redial/format.
2. Press or to select the desired phone number and then
press .
3. Press or to select DELETE and then press twice to
delete the selected number.
-OR-
Press or to select DELETE ALL and then press twice
to delete all numbers in the redial list.

Telephone operation
15
Mute
The mute function allows you to turn o the microphone while on a
call. You can hear the other party but the other party cannot hear you.
1. Press during a call.
2. Press again to resume conversation.
NOTE: The screen shows MUTE ON when mute feature is activated.
Call waiting or call waiting with caller ID service
To use call waiting, you must subscribe to call waiting service from
your telephone service provider. This feature allows you to receive calls
while you are already talking on the phone. You will hear a call waiting
alert tone when there is a second incoming call. If you subscribe to
both caller ID and call waiting with caller ID services, the second
caller’s information is displayed after you hear the call waiting alert
tone.
1. Press to answer the second incoming call.
2. Press to switch between calls.
Voice mail service
The icon ashes on the screen when you have received a new voice
mail message from your service provider.
IMPORTANT: Voice mail service is dierent from the answering system. In order to use the
voice mail service, you must subscribe to it from your telephone service provider.
Using multiple handsets
The system allows a maximum of two handsets to have a conversation
with an outside call at a time. If a handset is already on a call and you
would like to join the call, press on another handset.
The call will not be terminated until all handsets hang up.
Handset locator
You can locate a misplaced handset by paging it.
1. Press on the telephone base. All registered handsets beep for
one minute.
2. Press on the telephone base or press on any handset to
stop paging.

Telephone operation
16
Intercom
The system allows an intercom call between two handsets registered
to the same telephone base.
To initiate an intercom call:
1. Press del/int.
• If your telephone system has only two handsets registered, the
intercom call will be automatically directed to the other system
handset.
• If your telephone system has more than two handsets registered,
enter the handset number you want to call by using the dial pad
1–5.
2. Press to answer the intercom call on the other handset.
3. To end the intercom call, press .
NOTES:
1) The intercom call can be canceled before it is answered by pressing or del/int on the
originating handset.
2) If the handset being called does not answer within one minute, the paging will be
canceled.
To answer an incoming call during intercom
You will hear an alert tone when you receive an incoming call during
intercom.
• Press to answer the incoming call and end the intercom.
• Press del/int to answer the incoming call and put the intercom on
hold. Press del/int to switch between intercom and the incoming
call.
• Press and hold del/int to conference with both the incoming call
and the intercom.
This manual suits for next models
6
Table of contents
Other GE Cordless Telephone manuals