EnglishDeutsch
 logo
Brands
  1. Home
  2. •
  3. Brands
  4. •
  5. GE
  6. •
  7. Dishwasher
  8. •
  9. GE EDWSO00 Series User manual

GE EDWSO00 Series User manual

This manual suits for next models

12

Other GE Dishwasher manuals

GE Profile PDW9000 Series User manual

GE

GE Profile PDW9000 Series User manual

GE GSC1200 User manual

GE

GE GSC1200 User manual

GE GSD580 User manual

GE

GE GSD580 User manual

GE Monogram ZDT975SIJII User manual

GE

GE Monogram ZDT975SIJII User manual

GE GSC3500D35WW User manual

GE

GE GSC3500D35WW User manual

GE GSD2000ZWH User guide

GE

GE GSD2000ZWH User guide

GE Naturals GHD3800 Series User manual

GE

GE Naturals GHD3800 Series User manual

GE 535 Series User manual

GE

GE 535 Series User manual

GE GSD630 User manual

GE

GE GSD630 User manual

GE Monogram ZBD6400 Series User manual

GE

GE Monogram ZBD6400 Series User manual

GE CDT765S F How to use

GE

GE CDT765S F How to use

GE GSD3310 User manual

GE

GE GSD3310 User manual

GE GE Profile PDW8600J User instructions

GE

GE GE Profile PDW8600J User instructions

GE GLD4500N Manual

GE

GE GLD4500N Manual

GE Profile CDW9000 Series User manual

GE

GE Profile CDW9000 Series User manual

GE GSD3300D00WW User manual

GE

GE GSD3300D00WW User manual

GE EDW4000 Series How to use

GE

GE EDW4000 Series How to use

GE Profile PDW7800R Manual

GE

GE Profile PDW7800R Manual

GE PDWT380R10SS User manual

GE

GE PDWT380R10SS User manual

GE GDF410SSF0SS User manual

GE

GE GDF410SSF0SS User manual

GE Profile PDW8000 Series User manual

GE

GE Profile PDW8000 Series User manual

GE PDT660SSFSS User manual

GE

GE PDT660SSFSS User manual

GE GLC4000 Series User manual

GE

GE GLC4000 Series User manual

GE 206C1559P197 User manual

GE

GE 206C1559P197 User manual

Popular Dishwasher manuals by other brands

Electrolux ESI5211LOX user manual

Electrolux

Electrolux ESI5211LOX user manual

KitchenAid KUDB230B Use and care guide

KitchenAid

KitchenAid KUDB230B Use and care guide

Brandt BDJ424DB instruction manual

Brandt

Brandt BDJ424DB instruction manual

Asko DSD767UXXL.AU user manual

Asko

Asko DSD767UXXL.AU user manual

Beko DFN26210W instruction manual

Beko

Beko DFN26210W instruction manual

NEFF S153ITX00E INFORMATION FOR USE

NEFF

NEFF S153ITX00E INFORMATION FOR USE

Midea SV 4.45 wi manual

Midea

Midea SV 4.45 wi manual

LG LDF7932 Specifications

LG

LG LDF7932 Specifications

Gorenje GV63214 instruction manual

Gorenje

Gorenje GV63214 instruction manual

Hotpoint HDA1100ZWH Installation information

Hotpoint

Hotpoint HDA1100ZWH Installation information

Blomberg LDFN2240W instruction manual

Blomberg

Blomberg LDFN2240W instruction manual

AEG FFB83836PM user manual

AEG

AEG FFB83836PM user manual

Cylinda DM3220RFD user manual

Cylinda

Cylinda DM3220RFD user manual

Atag DW8214MB manual

Atag

Atag DW8214MB manual

Siemens SN23HI02KE INFORMATION FOR USE

Siemens

Siemens SN23HI02KE INFORMATION FOR USE

Omega ODW717X instruction manual

Omega

Omega ODW717X instruction manual

BORETTI BVW-683 operating instructions

BORETTI

BORETTI BVW-683 operating instructions

Siemens SN 56N591 operating instructions

Siemens

Siemens SN 56N591 operating instructions

https://manuals.online logo
https://manuals.online logoBrands
  • About & Mission
  • Contact us
  • Privacy Policy
  • Terms and Conditions

Copyright 2026 Manuals.Online. All Rights Reserved.

ge.com
Safety Instructions ....... 2,3
Operating Instructions
Care and Cleaning ......... 12, 13
Control Panel and Settings .... 4-7
Loading Place Settings ........ 11
Loading the Racks ............. 10
Optional Accessories ........... 12
Using the Dishwasher ......... 8, 9
Troubleshooting Tips .. 14,is
Consumer Support
Consumer Support ..... Back Cover
Warrantg ..................... 17
EDW4000 Series
EDWSO00 Series
EDW6000 Series
GHDA400 Series
GHDA600 Series
GLD4000 Series
GLDSO00 Series
GLD6000 Series
HLD4000 Series
GLDE400 Series
GLDESO0 Series
Write the model and serial
numbers here:
Model #
Serial #
Youcan find them on the tub wall
just insidethe door.
165D4700P376 49-55052 10-08 JR
IMPORTANT SAFETY INFORMATION.
READ ALL INSTRUCTIONS BEFORE USING --
SAVE THESE INSTRUCTIONS
WARNING!
For your safety, the information in this manual must be followed to minimize the risk of fire
or explosion, electric shock, and to prevent property damage, personal injury, or death.
%
-&WARNING! WATER HEATER SAFETY
Under certain conditions hgdrogen gas mag be produced in a water heater that has not been used
for two weeks or more. HYDROGEN GAS IS EXPLOSIVE.
Ifthe hot water hasnot beenusedfor two weeksor more,prevent the possibility of damage or injury
by turning on all hot water faucets and allowing them to run for several minutes. Do this before usingany
electrical appliance which isconnected to the hot water system. This simple procedure will allow any built-
up hydrogen gasto escape.Sincethe gas isflammable, do not smoke or usean open flame or appliance
during this process.
PROPER INSTALLATION AND MAINTENANCE
This dishwasher must be properly installed and located in accordance with the Installation
Instructions before it is used. If you did not receive an Installation Instructions sheet with
your dishwasher, you can receive one by visiting our website at ge.com.
Connectto a grounded metal, permanent wiring
system; or run an equipment-grounding
conductor with the circuit conductors and
connect to the equipment-grounding terminal
or lead of the appliance.
m Improper connection of the equipment-grounding
conductor can result in a riskof electric shock.
Checkwith a qualified electrician or service
representative if you are in doubt whether the
appliance isproperly grounded.
m Disposeof discarded appliances and shipping
or packing material properly.
m Donot attempt to repair or replaceany part
of your dishwasher unless it isspecifically
recommended inthis manual. All other servicing
should be referredto a qualified technician.
raTa minimize the possibility of electricshock,
disconnect this appliance from the power supply
before attempting any maintenance.
NOTE:Turningthe dishwasheroff doesnot
disconnect theappliance from the power supply.
Werecommend having a qualified technician
serviceyour appliance.
CAUTION:
mContents washed in Anti-bacterial mode, if
available, may be hot to the touch. Usecare
before handling.
m Usingadetergent that is
not specifically designed
for dishwashers will cause
the dishwasherto fillwith
suds.
m
m
If your dishwasher is connected to a wall
switch, ensure that the switch is on prior to
use.
On dishwashers with electronic controls,
if you choose to turn the switch off
between wash cycles,allow 5-10
seconds after turning the switch on
beforetouching START/RESETto allow
the control to reboot.
To prevent minor injury or property damage
Ill Non-Dishware Items:Do not wash items such
as electronic air cleaner filters,furnace filters and
paint brushes in your dishwasher.Damage to
dishwasher and discoloration or staining of
dishwasher may result.
mClosesupervision isnecessary ifthis appliance
is usedby or near children.
m Load light, plastic items so they will not
become dislodged and drop to the bottom
of the dishwasher-they might come into
contact with the heating element and be
damaged.
2
ge.com
-& WARNING! RISK OF CHILD ENTRAPMENT
PROPER DISPOSAL OF THE DISHWASHER
Junked or abandoned dishwashers are
dangerous...even if they will sit for "just a
few days." If you are getting rid of your old
dishwasher, please follow the instructions
below to help prevent accidents.
Before You Throw Awa U Your Old
Dishwasher:
• Takeoff the door of the washing compartment
or remove the door latch keeper (asshown). Doorlatch keeper
_kWARNING! When using #our dishwasher, follow basic precautions,
including the following:
mUsethis appliance only for its intended purpose
asdescribed in this Owner's Manual.
mUseonly powder,tabs, liquid detergents or rinse
agents recommended for usein a dishwasher and
keepthem out of the reach of children. Cascade@,
Ca ® ®
scade Complete and Electrasol Automatic
Dishwashing Deter_nts, and Jet-Dru ® and
Cascade RinseAid rinseagents have been
approved for usein all GEdishwashers.
mLocate sharp items sothat they are not likely
to damage the door seal.
mLoad sharp kniveswith the handlesup to reduce
the risk of cut-type injuries.
mDo notwash plastic items unlessmarked
dishwasher safe or the equivalent. Forplastic
items not so marked,check the manufacturer's
recommendations.
mDo nottouch the heating element during or
immediately after use.
m Donot operate your dishwasher unlessall
enclosure panelsare properly in place.
m Donot tamper with controls.
m Donot abuse,sit on or stand on the door or dish
rack of the dishwasher.
m Donot allowchildrento play around the dishwasher
when opening or closingthe door due
to the possibility of small fingers being pinched
in the door.
m Donot discard a dishwasher without first removing
the door of the washing compartment.
m Donot store or usecombustible materials, gasoline
or other flammable vapors and liquids inthe
vicinity of this or any other appliance.
m Donot allow children to play with, on or insidethis
appliance or any discarded appliance.
READ AND FOLLOW THIS SAFETY INFORMATION
CAREFULLY.
SAVE THESE INSTRUCTIONS
About the dishwasher control pane . I ormodelswithsensormwGoooser es
GHDA600 Series,GLD6000 Series)
You can locate sour model number on the tub wall just inside the door. Throughout this manual, features and
appearancemay var_jfromyour model. I1
WASH._G® • o_vl_G
ONLY CHINA .... ® o ® a •
L_ JCPYSTALSPEED . PA .... _9 " R
__ _cCRHsNAAL_ _ _CE_ ) FNOisN_L_ {_ P;TS _ {r ANTI _ S_ATART DI_ _HEATE__EI_ _
D El
Contro!Settings
Status Indicator Lights
TheStatusdisplaytellsyouwhat'shappeningwhilethedishwasherisinoperationand mayflash,indicatinga
malfunction.ThelightswillcomeONindicatingthesequenceofoperationthedishwasherisin.
SENSING Displayedwhilethesensorismeasuringtheamountofsoilandtemperatureofwater.
(onsomemodels) Thedishwasherwilladjusttheselectedcycletoachieveoptimalperformance.
WASHING Displayedduringprewashandmainwashperiods.
(onsomemodels)
RINSING Displayedduringrinseperiods.
(onsomemodels)
DRYING DisplayedduringHEATEDDRY.
Ionsomemodels)
SANITIZED Displayedwhencyclehasmetsanitizationconditions.LightremainsONuntildoorisopened.
CLEAN Displayedwhenawashcycleiscomplete.ThelightstaysONasa reminderthat thedishesare
cleanuntilthedoorisrelatchedor untilanothercycleisselected.
TimeRemaining Displag (onsomemodels)
Duringoperation,thedisplayshowstheminutesremaininguntilthecycleiscomplete.Thedisplaymayadjustthe
remainingtimewhilethesensinglightison.Thetime displayedatthestartofeachcyclemaychangefromthe
factorysettingastheunitcustomizesitselfto homeuse.Duringa delaystart,thedisplaywillshowhoursoftime
remaininguntilthecyclestarts.
Cycles
ThelightabovetheselectedpadwillbeONtoindicatewhichcgctehasbeenselected.
Thisdishwasherisequippedwith a dirt andtemperaturesensor.Cbtclelengthandtimewillvorbtdependingon the
soillevelandtemperature.
ANTI-BACTERIAL
or SANIWASH Heavg8.5gal.,84 min.
Medium7.3gal.,78min.
Light6.1gal.,75min.
Thiscycleraisesthewatertemperatureinthefinalrinsetosanitizeyourdishware.Thecycle
lengthwillvary dependingonthetemperatureofyourinletwater.
NOTE:TheAnti-Bacterialcycleismonitoredfor sanitizationrequirements.Ifthecycleis
interruptedduringor afterthemainwashportionor ifthe incomingwatertemperatureissolow
that adequatewaterheatingcannotbeachieved,thesanitizingconditionsmay notbemet.In
thesecases,thesanitizedlightwillnotilluminateattheendofthecycle.
NOTE:NSF-certifiedresidentialdishwashersarenotintendedfor licensedfoodestablishments.
4
POTS
&PANS
NORMALWASH
Heavg10.9gal.,102min.
Medium8.5gal.,78min.
Light7.3gal.,73min.
Thiscycleismeantfor heavilysoileddishesor cookwarewithdried-onor baked-onsoils.
Everydaydishesaresafeto beusedinthiscycle.
Heavg8.5gal.,65 min.
Medium7.3gal.,60min.
Light4.9gal.,49min.
Thiscycleisfor medium/heavilysoileddishesand glassware.
ge.com
SPEEDCYCLE
or
SPEEDWASH
(onsomemodels)
7.3gal.,35 min.
Thiscycleisfor everydaydishesandglassware.
CHINACRYSTAL 7.5gal.,/48 min.
(onsome models) Thiscycle isfor lightly soiled china and crystal.
RINSEONLY 2.5gal.,12min.
Forrinsingpartialloadsthat willbewashedlater.Donotusedetergentwiththiscycle.
NOTE:OnlytheAnti-Bacteriacyclehasbeendesignedtomeetthe requirementsofSection6,NSF18/4for
soilremovalandsanitizationefficacy,
r/I options
ThelightabovetheselectedpadwillbeONtoindicatewhichoptionhasbeenselected.
PRESCRUB Forusewithheavilysoiledand/ordried-on,baked-onsoils.ThisoptionNUSTbeselectedPRIORto
(onsomemodels) startingthecycle.Thisoptionadds16minutestothechicletime.NOTE:Cannotbeselectedwith
RINSEONLYcycle.
HEATEDDRY
LightOFF Shutsoff thedryingheatoption.Dishesairdry naturallyandenergyissaved.Forfasterairdry,
youcanpropthedooropenaftertheCLEANlightilluminates.
HEATEDDRY
LightON Turnstheheateronforfastdrying.Thiswillextendthetotal runtimeby8 minutesfortheSPEED
CYCLE,38minutesfor NORMALand POTS/PANSand 30minutesfor allothercycles.
NOTE:CannotbeselectedwithRINSEONLYcycle.
LOCK
6Youcanlockthecontrolstopreventan;#selectionsfrombeingmade.Orbmucanlockthecontrols
afteryouhavestarteda cycle.
Childrencannotaccidentallystartdishwasherbgtouchingpadswiththisoptionselected.
ToLOCKthe dishwashercontrol,touchandholdtheHEATEDDRYpadfor 3seconds.Thelight
belowtheHEATEDDRYpadwillturnon.ToUNLOCKthedishwashercontrol,touchandholdthe
HEATEDDRYpadfor 3seconds.TheLOCKlightwillturnoff.
ADDED
HEAT Whenselected,thecyclewillrun longerwiththeheatingelementontoimprovebothwashand
dry performance.NOTE:Cannotbeselectedwith RINSEONLYcycle.
DELAYHOURS Youcandelaythestartofa washcycleforupto9 hours.TouchtheDELAYHOURS padtochoose
thenumberofhoursyouwanttodelaythestartofthecycle;thentouchSTART/RESETonetime.
Thedishwasherwillcountdownandstartautomaticallyatthecorrecttime.Touching
START/RESETa secondtime will cancelthe DELAYSTARTselection.
RESET Tochangea cycleafterwashingstarts,touchtheSTART/RESETpadto cancelthecycle.The
START/RESETlightwillflashwhilethewaterispumpedoutifneeded.Thistakesapproximately
90seconds.Whenthelightstopsflashing,thedishwashercanbereprogrammedandrestarted.
Start
Closeandlatchthedishwasherdoorandselectthecycleanddesiredenhancements.TouchtheSTART/RESETpad
onceto beginthecycle.Waterbeginstofillthedishwasher,andapproximately60secondslaterthewashaction
begins.TouchingtheSTART/RESETpada secondtimewillcancelthecycleandcausethewaterto drainout.Thiswill
takeapproximately2minutes.
NOTE:Thedishwasherremembersyourlastcyclesoyoudon'thaveto reprogrameachtime.Whenthedishwasher
doorisfullyclosed,thecontrolpanellightswilldisplaythelastsettingsyouselected.
Ifyoudon'twantto changeanyofthesettings,simplytouchtheSTART/RESETpadonceto beginthecycle.
Ifthedoorisclosed,theindicatorlightswillturnoff iftheSTART/RESETpadisnotpressedwithintwo minutes.
Toactivatethedisplay,openandclosethedoorortouchanypad.
Also,ifa powerfailureoccurs,NORMALandHEATEDDRYwillautomaticallybeprogrammed.
About thedishwashercon ol pane1,cFormodelswithoutasensor:EDW4000Series,
EDWSCO0series,GHDA400 Series,GLD/400_Series,GLD50_ Series,HLD/400_Series,GLDE400seriesand GLDE500Series)
You can locate your model number on the tub wall just inside the door. Throughout this manual, features and
appearance mabl var_ from blour model.
_" ,, B , Cycles
BI
2a8
¢S,AR,"ob'l
CLEAN
Options
e
® ....
•(]
C_ oR_ WASH /
ControlSettings
ll Status Indicator Lights
The Status display tells you what's happening while the dishwasher is in operation and may flash, indicating a
malfunction. The lights will come ON indicating the sequence of operation the dishwasher is in.
SANITIZED
(on some
models)
CLEAN
(on some
models)
Displaged when cycle has met sanitization conditions. Light remains ON until
door is opened.
Displaged when a wash cgcle is complete. The light stays ON as a reminder that
the dishes are clean until the door is opened or until another cycle is selected.
Cycles
The light above the selected pad wi!!be ON to indicate which c_]clehas been selected.
SANI WASH
(on some
models)
7.3gal., 97 min.
This cgcle raises the water temperature in the final rinse to sanitize gour dishware.
The cycle length will vary depending on the temperature of your inlet water.
NOTE:The SANI-WASH cycle is monitored for sanitization requirements. Ifthe cycle is
interrupted during or after the main wash portion or if the incoming water temperature is
so low that adequate water heating cannot be achieved, the sanitizing conditions mag
not be met. In these cases, the sanitized light will not illuminate at the end of the cycle.
NOTE:NSFcertified residential dishwashers are not intended for licensedfood establishments.
POTS& PANS
or HEAVY
WASH
8.5 gal., 89 min.
This cgcle is meant for heavilg soiled dishes or cookware with dried-on or baked-
on soils. Everyday dishes are safe to be used in this cycle.
NORMALWASH 5.9 gal., 56 min.
This cycle is for medium/heavilg soiled dishes and glassware.
ECOWASH
(on some
models)
4.8 gal., 55 min.
This cycle is for everyday dishes and glassware.
LIGHTWASH
(on some
models)
6.1 gal., 36 min.
This cycle is for everyday dishes and glassware.
CHINA CRYSTAL6.1 gal., 39 min.
(on some This cycle is for lightlg soiled china and crystal.
models)
6
RINSEONLY 1.2gal., 6 min.
For rinsing partial loads that will be washed later. Do not use detergent with this cgcle.
NOTE:Only the SANI-WASH cycle has been designed to meet the requirements of Section 6, NSF184 for
soil removal and sanitization efficacy.
_e.com
DOptions
Thelight above the selected pad wi!! be ON to indicate which OPTIONhas been selected.
HOT START
(on some
models)
For use with heavily soiled and/or dried-on, baked-on soils.This option MUST be
selected PRIORto starting the cycle. Thisoption wi!! improve both wash and dry
performance. This option adds 20 minutes to the cycle time.
NOTE:Cannot be selected with RINSEONLYcycle.
HEATEDDRY Shuts off the drying heat option. Dishes air dry naturally and energy is saved.
Light OFF Forfaster air dry you can prop the door open after the CLEAN light illuminates.
HEATEDDRY Turns the heater on for fast drying. This will extend the total run time by 38 minutes.
Light ON NOTE:Cannot be selected with RINSEONLYcycle.
LOCK
(on some
models)
You can lock the controls to prevent any selections from being made. Or you can lock
the controls after you have started a cycle.
Children cannot accidenta!!g start dishwasher bg touching pads with this option
selected.
ToLOCKthe dishwasher control, touch and holdthe HEATEDDRYpad for 3seconds. Thelight below
the HEATEDDRYpad will turn on. To UNLOCKthe dishwasher control, touch and hold the HEATED
DRYpad for 3seconds.TheLOCKlight will turn off.
HOT WASH When selected, the cycle will run longer with the heating element on to improve both
wash and dry performance. NOTE:Cannot be selected with RINSEONLYcycle.
DELAYHOURS You can delay the start of a wash cycle for 2, 4 or 8 hours (delay time options may
vary by model). Touch the DELAYHOURS pad to choose the number of hours you want
to delay the start of the cycle; then touch START/RESETone time. The dishwasher will
count down and start automatically at the correct time. Touching START/RESETa
second time will cancel the DELAYSTARTselection.
RESET To change a cycle after washing starts, touch the START/RESETpod to cancel the
cycle. TheSTART/RESETlight will flash while the water is pumped out if needed. This
takes approximately 90 seconds. When the light stops flashing, the dishwasher can be
reprogrammed and restarted.
BStart
Close and latch the dishwasher door and select the cycle and desired enhancements. Touch the
START/RESETpod once to begin the cycle. Water begins to fill the dishwasher, and approximately 60
seconds later the wash action begins. Touching the START/RESETpod a second time will cancel the
cycle and cause the water to drain out. This will take approximately 2 minutes.
NOTE:The dishwasher remembers your last cycle so you don't hove to reprogram each time. When
the dishwasher door is fully closed, the control panel lights will display the last settings you selected.
If you don't want to change any of the settings, simply touch the START/RESETpad once to begin
the cycle.
If the door is closed, the indicator lights will turn off if the START/RESETpad is not pressed within two
minutes. To activate the display, open and close the door or touch any pad.
Also, if a power failure occurs, NORMAL and HEATEDDRYwill automatically be programmed.
7
Using the dishwasher.
Check the Water Temperature
The entering water should be at least !20°F
and not more than !50°F for effective cleaning
and to prevent dish damage. Check the water
temperature with a candg or meat thermometer.
Turn on the hot water faucet nearest the
dishwasher, place the thermometer in a glass
and let the water run continuouslg into the
glass until the temperature stops rising.
Use Jet-Dry ®or Cascade Crblsta/ Clear ®Rinse Agent
Jet-Dry ®or Cuscude Crystul Cleur ®rinse agents remove spots and prevent new film buildup on
gour dishes, glasses, flatware, cookware and plastic.
Filling the Dispenser
The rinse agent dispenser holds !00 ml (5.5fl. oz.)of rinse agent. Under
normal conditions, this will last approximatelg one month. Trg to keep it
full, but do not overfill.
rll Make sure the dishwasher door isfullg open.
r_l Turn the dispenser cap to the left and lift it out.
r_Add rinse agent until the indicator window looks full.
r41 Clean up ang spilled rinse agent with a damp cloth.
[] Replace the dispenser cap.
Rinse Aid Setting
The amount of rinse agent released into the final wash can be adjusted.
The factorg setting isat the midpoint. If there are rings of calcium (hard
water) spots on dishes, trg a higher setting. If gou see foam in the
dishwasher, move the indicator to a lower setting.
lndi
window Dispensercap
To adjust the setting
Remove the dispenser cap; then turn the adjuster counterclockwise to
increase the amount of rinse agent, clockwise to reduce the amount of rinse agent. adjuster
Dish Preparation Prior to
mNo pre-rinsing of normal food soil is required.
mScrape off hard soils, including bones,
toothpicks, skins and seeds.
mRemove large quantities of ang remaining
food.
Loading
m Remove leafg vegetables, meat trimmings
and excessive amounts of grease or oil.
m Remove acidic food soils that can discolor
stainless steel.
8
Using the dishwasher, ge.com
Pro ent
Use onlg detergent specificallg made for use
in dishwashers. Cascade ®and Electrasol ®
Automatic Dishwashing Detergents have been
approved for use in all GEdishwashers. Keep
gour detergent fresh and drg. Don't put powder
detergent into the dispenser until gou're readg
to wash dishes.
The amount of detergent to use depends on
whether gout water is hard or soft. With hard
water, gou need extra detergent. With soft water,
gou need less detergent.
Protect gour dishes and dishwasher bg
contacting gour water department and asking
how hard gour water is. Twelve or more grains
is extremelg hard water. A water softener is
recommended. Without it, lime can build up
in the water valve, which could stick while open
and cause flooding. Too much detergent with
soft water can cause a permanent cloudiness
of glassware called etching.
Usethe information in the table below as a
guideline to determine the amount of automatic
dishwasher detergent to place in the dispenser.
Number
of Grains Detergent Cups to Fill
Less than 4 Fillcup to first line
4 to 8 Fillcup to second line
8 to 12 Fillmainwash cup
Greater Fillboth MainWash and
than 12 PreWash cup
Medium Medium Extremelg
Soft Soft Hard Hard
For heavily-soiled loads, use the Pots and Pans or
Heavy Wash cycle and add a little extra detergent.
DO NOT USE HAND DISH DETERGENT
m
m
NOTE:Usinga detergent that isnot specifically
designedfor dishwasherswill causethe dishwasher
to fill with suds.During operation,thesesuds will spill
out of the dishwashervents,covering thekitchen
floor and making the floor wet.
Becauseso mang detergent containers look alike,
store the dishwasher detergent in a separate space
from all other cleaners.Show angone who mag use
the dishwasher the correct detergent and where
it is stored.
Whilethere will be no lasting damage to the
dishwasher,gout disheswill not get clean using a
dishwashing detergent that is not formulated to
work with dishwashers.
Forget to Add aDish?
A forgotten dish can be added ang time before
the main wash.
r_ Squeeze the door latch to release the door.
r_ Donot open the door until the water sprag
action stops. Steam mag rise out of the
dishwasher.
r_l Add forgotten dishes.
r_l Close the door.
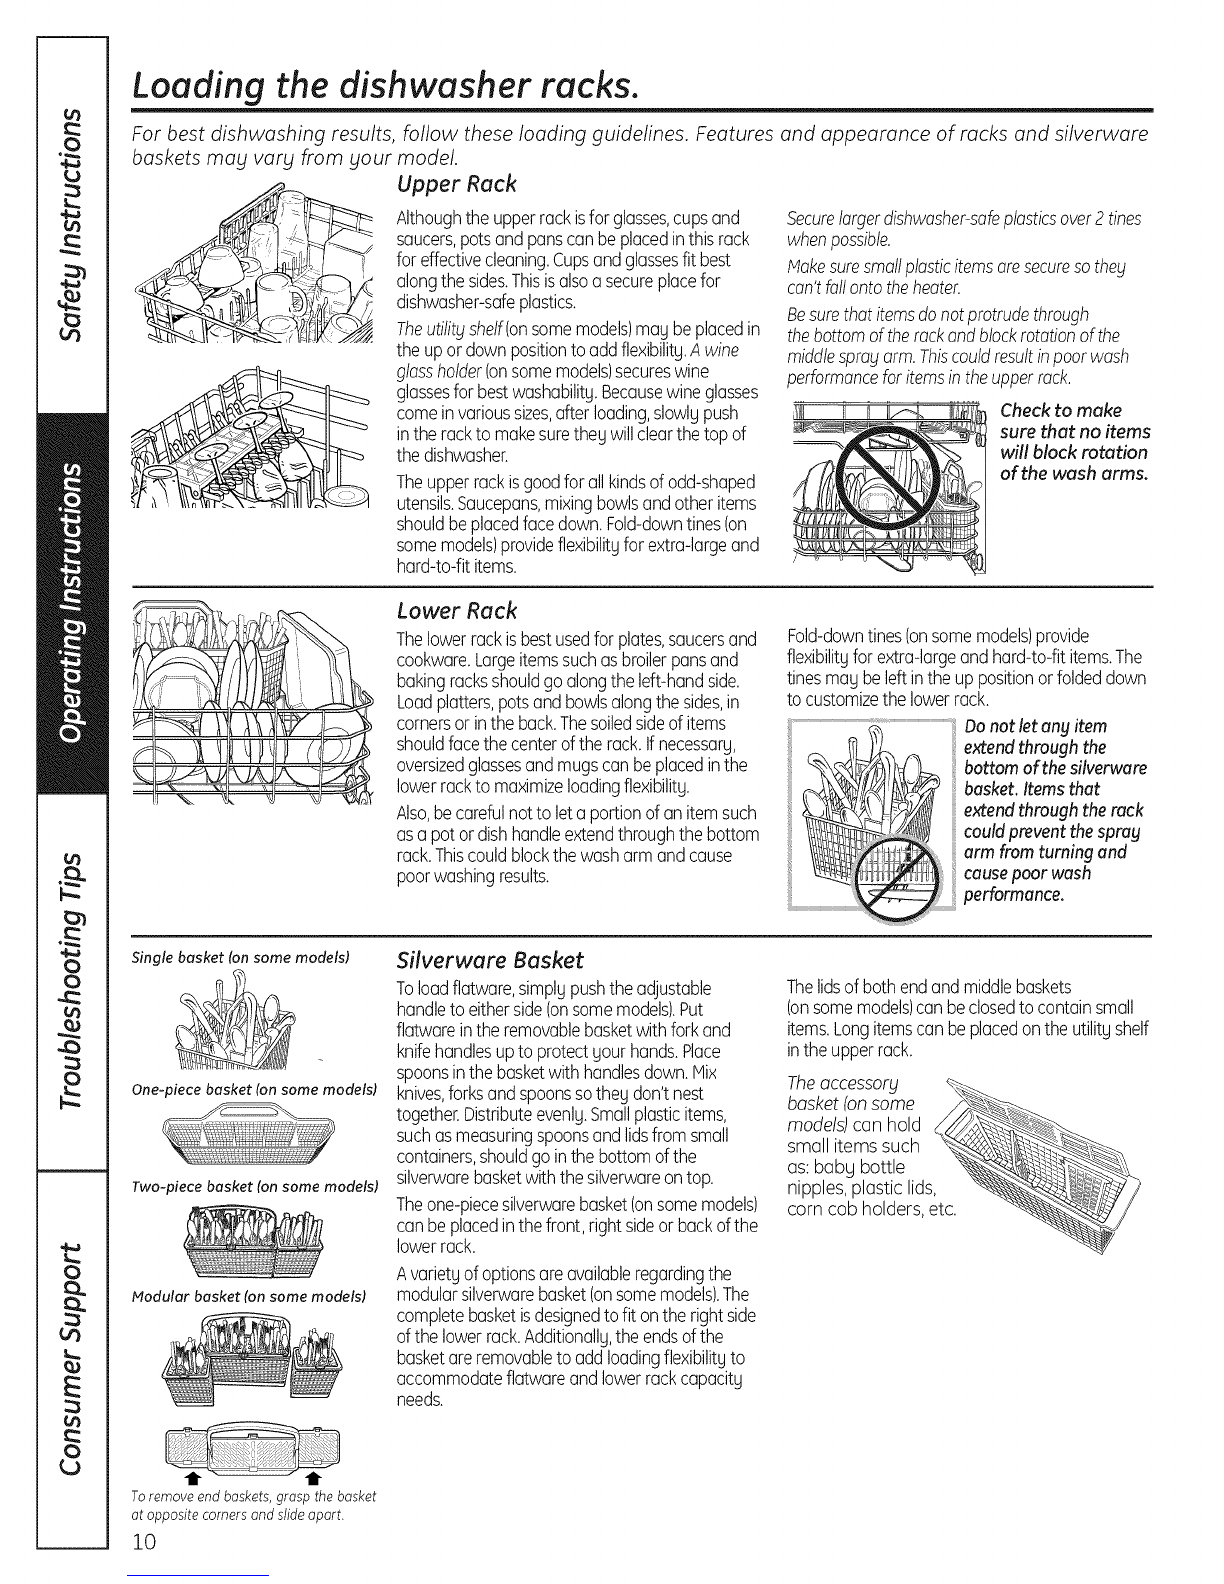
Loading the dishwasher racks.
For best dishwashing results,
baskets may vary from your model.
Upper Rack
follow these loading guidelines. Features and appearance of racks and silverware
Althoughtheupperrackisforglosses,cupsand
saucers,potsandpunsconbe placedinthis rock
foreffectivecleaning.Cupsandglossesfit best
alongthesides.Thisisalsoa secureplacefor
dishwasher-safeplastics.
Theutilit_lshelf(onsomemodels)mugbeplacedin
theupordownpositiontooddflexibilitg.A wine
glassholder(onsomemodels)secureswine
glossesforbestwoshabilitg.Becausewineglosses
comeinvarioussizes,offerloading,slowlgpush
intherockto makesurethegwillclearthetopof
thedishwasher.
Theupperrockisgoodfor oilkindsofodd-shaped
utensils.Saucepans,mixingbowlsandotheritems
shouldbeplacedfacedown.Fold-downtines(on
somemodels)provideflexibilitgforextra-largeand
hard-to-fititems.
Securelargerdishwasher-safeplasticsover2tines
whenpossible.
Makesuresmallplasticitemsoresecuresothe_j
can'tfoilontotheheater.
Besure that items do notprotrudethrough
the bottom of the rackand blockrotationof the
middlesprayarm.Thiscouldresultinpoorwash
performanceforitemsintheupperrock.
Check to make
sure that no items
will block rotation
of the wash arms.
Lower Rack
Thelowerrockisbestusedfor plates,saucersand
cookwore.Largeitemssuchasbroilerpunsand
bakingrocksshouldgo alongtheleft-handside.
Loudplotters,potsandbowlsalongthesides,in
cornersor inthebuck.Thesoiledsideofitems
shouldfacethecenteroftherock.Ifnecessarg,
oversizedglossesandmugsconbeplacedinthe
lowerrockto maximizeloadingflexibilitg.
Also,becarefulnotto letaportionofon itemsuch
asa potordishhandleextendthroughthebottom
rock.Thiscouldblockthewasharmandcause
poorwashingresults.
Fold-downtines(onsomemodels)provide
flexibilitgforextra-largeand hard-tofit items.The
tinesmugbeleftintheuppositionor foldeddown
tocustomizethe lowerrock.
i: Donot let any item
extendthroughthe
bottom ofthesilverware
basket. Itemsthat
extendthroughthe rack
could prevent the spray
arm from turning and
cause poor wash
..................performance.
Single basket (on some models)
One-piece basket (on some models)
Two-piece basket (on some models)
Modular basket (on some models)
Silverware Basket
Toloadflatware,simplgpushtheadjustable
handleto eitherside(onsomemodels).Put
flatwareinthe removablebasketwithforkand
knifehandlesupto protectgourhands.Place
spoonsinthebasketwithhandlesdown.Mix
knives,forksandspoonssothegdon'tnest
together.Distributeevenlg.Smallplasticitems,
suchasmeasuringspoonsandlidsfrom small
containers,shouldgo inthebottomofthe
silverwarebasketwiththesilverwareontop.
Theone-piecesilverwarebasket(onsomemodels)
conbe placedinthefront,rightsideorbackofthe
lowerrock.
Avorietgofoptionsoreavailableregardingthe
modularsilverwarebasket(onsomemodels).The
completebasketisdesignedtofit onthe rightside
ofthelowerrock.Additionallg,theendsofthe
basketoreremovableto oddloadingflexibilitgto
accommodateflatwareandlowerrockcapacitg
needs.
Thelidsof bothendandmiddlebaskets
(onsomemodels)conbeclosedtocontainsmall
items.Longitemsconbeplacedontheutilitgshelf
intheupperrock.
Theaccessory
basket(onsome
models)con hold
small itemssuch _-
as: babg bottle
nipples,plastic lids,
corn cob holders,etc.
Toremoveend baskets,grasp thebasket
at opposite cornersandslide apart.
10