GE GSD1140P User manual

D
contents
Air Gap 15 ProblemSolver 12-14
ApplianceRegistration 2RinseAgent 6
Careand Cleaning 15 SafetyInstructions 3
China,Cn@al,Sterlimz 11 User MaintenanceInstructions 15
ConsumerServices 19 warranty .BackCover
CycleFeatures 5WaterTemperature 6
Detergent,Detergent Guide 6,’7 Wi&erStorage 15
DispenserCups 7
Energy-SavingTips 2
Features 4
FrontPanel ColorChange
Loaciiw 8-:;
Modeland SerialNumbers 2
O~eratin~Guide 4,5
CycleSelection 5
DrvirwChxions 4,5
SoilLevel 7GEAi9swerCentera
POTSCRUBBERCycle 4,5,7 8117.626.20LU7
Built-inModel GSDI140P

Before using‘your
dishwasher,read this
book W“efwy.
It is intendedto help you
operate and maintainyournew
dishwasherproperly.
Keep it handy for answersto
your questions.
If you don’tunderstandsomething
or need more help, write (include
your phone number):
Consumer Affairs
GE Appliances
Appliance Park
Louisville, KY 40225
VV~i@ dom themodeland
serialInRmberso
You’llfind them on alabel
fastened to the tub walljust inside
the dishwasher door.
These numbers are also on the
Consumer Product Ownership
Registration Card that came with
your dishwasher.Before sending
in this card, please write these
numbers here:
ModelNumber
SerialNumber
Use these numbers in any
correspondence or service calls
concerning your dishwasher.
If youreceiveda
da-mageddishwasher...
Immediately contact the dealer
(or builder) that sold you the
dishwasher.
2
savetime
andmoney.
Bdkm! ‘you HXp?st
service...
Check the ProblemSolver(pages
12through 14),It listscauses of
minor operatingproblemsthatyou
can correct yourself.
To obtain aSpanishlanguage
version of thisbook, call
GE Answer Center@
800.626.2000
consumer informationservice.
Para obtenerla versi6nen
espaiiolde este manual,
name a
GE Answer Center?
servicio de informaci(m
para el consumidor,
teli$fono800.626.2000.
.
Energy=savingtips
The power consumption of your
dishwasher can be minimized if
you follow these suggestions:
e(@mate dishwasher onlywhen
it%fu~l.Let the dishes accumulate
in dishwasher. When you put in
only apartial load, use the RINSE
&HOLD cycle to rinse off heavy
soils. Be sure to latch the door
when waiting for afull load.
This helps keep soils moist, easier
to remove.
UIIf you don‘tneed your dishes
right away, use your ENERGY
SAVERno heatfeaturethat turns
the drying heater off automatically.
Dishes dry naturally over alonger
period such as overnight.
QAlways selectthe cyclethat
uses least amountofwater that
WiuNmImve ‘thesoilfromthe
load. See pages 4and 5.
0Turn your water heater down to
120°F and use the WATER HEAT
option. Make sure the entering
water temperature is no less than
120”F(see page 6).
If youneedservice
To obtainservice,see the
ConsumerServicespage in the
back of thisbook.
We’reproudof our serviceand o
want you to be pleased.If for some
reason you are not happywith the
serviceyou receive,here are three
stepsto followfor furtherhelp.
FIRST,contactthe people who
servicedyourappliance.Explain
why you are not pleased.In most
cases, this will solvethe problem.
NEXT, if you are stillnotpleased,
write all the details—including
your phone number—to:
Manager,ConsumerRelations
GE Appliances
AppliancePark
Louisville,Kentucky40225
FINALLY,if your problem is still
not resolved,write:
Major ApplianceConsumer
Action Panel
20 North WackerDrive
Chicago, Illinois 60606

.
IMPORTANTSAFETY INSTRUCTIONS
mad $311instructionsbefore usingthisappliance
WARNING—Whenusingthis
appliance,always exercisebasic
safetyprecautions,including
the foHowing:
@Usethisappiianceonlyforits
intendedpurpose,asyouwillfind
describedinthisUseandCare
Book.
@This dishwashermust be
propedy installed and
located in accordancewith
the InstallationInstructions
beforeit is usd If you did ‘
notreceive an Installation
Instructions sheet with your
dishwasher,you can obtain one
by contacting the service
location nearest you.
—This appliance must be
connected to agrounded metal,
permanent wiring system; or an
equipment-grounding conductor
must be run with the circuit
conductors and connected to the
equipment-grounding terminal
or Iead of the appliance.
—Connect to aproperly rated,
protectedand sized power-supply
circuit to avoid electrical
overload.
QDo not store or use
combustible materials9
gasoline or other flammable
vapors and liquids in the
vicinity of this or any other
appIia~]ee.
~Use only powder or liquid
detergents or wetting agents
recommended for use in a
dishwasher.
~Do not washplastic itemsunless
marked “dishwashersafe” or the
equivalent.Forplasticitemsnot so
marked,check the manufacturer’s
recommendations.
~Load lightplasticitems so
they will not becomedislodged
and drop to the bottomof the
dishwasher—they might come
into contactwith the heating
unit and be damaged.
TOminimize the possibility
of injury.
oWhen loadingitems to be
washed:
A. Locate sharp items so that
they are not likelyto damage
the door seal, and
B. Load sharp knives with the
handles up to reduce the risk
of cut-type injuries.
~Do not touch the heating
element during or immediately
after use.
eDo not operateyourdishwasher
unless all enclosure panels are
properly in place.
eDo not tamper with controls.
~Do not abuse, sit on, or stand
on the door or dish rack of the
dishwasher.
~Close supervision is necessary
if this appliance is used by or
near children. Do not allow
children to play inside, on or
with this ap~liance or any
discarded appliance. Dispose
of discarded appliances and
shipping or packing material
properly. Before discarding a
dishwasher, remove the door
of the washing compartment.
~Keep all washing detergents
and wetting agents out of the
reach of children, preferably in
alocked cabinet. Observe aH
warnings on container labels to
avoid personal injury.
@To minimize the possibility
of electric shock,disconnect
this appliancefrom the power
supply before attemptingany
maintenance.
Note: Turning the control dial
to the OFF position does not
disconnectthe appliance
from the power supply.We
recommend having,.a.qualified.
technicianserviceyour appliance
w~m~–m~o~~~ cx3
is produced by the chemical
action within your water heater.
It can accumulate in the water
heater and/or water pipes i-fhot
water has not been used for a
period of two weeks or longer.
HYDROGEN GAS IS
13XPLOSPLE.To prevent the
possibility of damage or injury,
if you have not used hot water
for two weeks or more, or
moved into aresidence in which
the hot water system may not
have been used for some time,
turn on all hot water faucets and
allow them to run for several
minutes before using any
electrical appliance which is
connected to the hot water
system. This will allow any
hydrogen gas to escape. Also,
since the gas is flammable, do
not smoke or use an open flame
or appliance during this process.
SAVE THESE
INSTRUCTIONS
-
—
1-
E$
w
m
E?

0RINSE
6!3
Pofscrubberff40
JydesO/MOr Ewrw .Wor Opic+?a
STEP 4. WATERHEATOption.
S’I’EFLLoad your dishwasher
with dishes, silverware,pots,
pans, bowls,etc., accordingto
instructionson pages 8-10.
STEP 2. Add detergentto the
detergentdispenser.Make surethe
Cycle IndicatorDial is at OFF
positionbefore adding detergent.
(See pages 6and 7.)
Youwill hear the motor sta;t.
There is atime delay between
start-upand water fill so you
will not hear any wash action
right away.
To obtain the benefits of a
complete cycle, be careful that
you do not turn the dial any
further than necessary to start
the dishwasher.
IWATER
HEAT
El
When selected, the wash cycle will
be extended for 8minutes while
the dishwasher heats the water for
good washing and drying. The
entering water mustbe at least
120”F.
Use rinse aid agent to help prevent
spotting.~ccasionally check to
ensure thatrinse agent container is
at least half full. (See page 6.) ~For RINSE &HOLD cycle:
IRINSE I
STEP 3. Select ENERGY SAVER
Option. When this option is not selected
the entering water must be at least
140°F.To test water temperature,
see page 6.
I&HOLD I
❑
IHOT ENERGY RESIZ
RINSE SAVERDRY OPTIONS ISTEP 5. Selectthe wash cycle and
start the dishwasher. (See Cycle
Selection Hints on next page.)
KEEN a.
b.
c.
d.
Push RINSE &HOLD button.
Select ENERGY SAVER DRY
drying option.
Latch the door.
If your dishwasher drains into a
food waste disposer,operate the
disposer until it is empty before
starting the dishwasher.
~ForLIGHTWASH,ENERGY
SAVER, CHINA Cm!YiH’fm,
NORiMAL WASH and
POTSCRIJBBER cycles:
HOT RINSE option will add 8
minutes to the cycle while the
dishwasher heats the water for a
final hot-rinse.
ENERGY SAVERDRY option
turnsthe heateroff forentiredrying
period.Disheswill dry naturally
overalongerperiod suchas
overnight.If you need yourdishes
sooner,open the dishwasherdoor
after thecycle is completeto reduce
thenaturaldryingtime. ILIGHT ENERGY CHINA NORMAL POT-
WASH SAVER CRYSTAL WASH SCRUBBER
RESETOPTIONSwillcancel
selectedWATERHEAT,HOT
RINSE,andENERGYSAVER
DRYoptions.MainwashtimewiH
notbe extended,anddisheswiH
dry in heatedair.
/~/./j$fllz
---7/ &
a. Push selected cycle button.
b. Latch the door.

I--l
—
cycleSelectionhints
Ris importantto followtheloading
instructionsonpages8-10.
POTSCRUB13ER-For itemssuch
aspots, pansand casseroleswith
dried-on or baked-onsoils.
Everydaydishesmay be included.
NORMAL WASH—Forloadsof
everydaydishes,glassesand
cookwarewith medium soils.
Designedto yield high
performanceon normal soils.
LIGHT WAS13-For mostloadsof
everyday disheswith lightsoilsor
soilsthat have not dried on. It
saveshot water over the higher
performance cycles, savingenergy.
mathappensheachcycle
oYou’llhear occasional clicking
sounds:
—Soft food disposer shredding
action.
—Drain valveopening to pump
water out.
—Timer control as cycle
progresses.
—Detergent cup opening.
RINSE &HOLD—Forrinsing
partial loadswhich willbe washed
later.Do not use detergent.
CHH’iA/CRYSTAL-For lightly I
soiledchina and crystal.Water
actionis softened~ypumping air
along withwater.
ENERGY SAVER—Fortableware
that is lightlysoiledwith fresh
soilsand is prerinsed.
~During the drying period:
—The motor stops.
—Watervapor comes through the
vent by the door latch during
drying and when water is being
pumped out.
Wash
WaterUseCycleTime
Gallons Minutes
WashCycles (approx.) (approx,) Cycle Sequence
IVYI’SCRUBBEX? 11.8 ““ REIEEIBEBHB
NORMAL WASH 11.8 ‘l” F@ilBBmmHE
CHH’+JA/CRYSTAL 6.i3’:K EEIEEIEIEEIEEI
ENERGY SAVER 8.8 Q]>! EEiilmBm
LIGHT
WASH 8.8 3’:, EIHEIEIEEI
RmlsE &HOLD 3.5 12 Elm
N_Jnextcndedtimes:SelectingtheWATERHEAToptionwilladdupto8minutestothesecycle
tinwx; selecting theHOTRIIWEoptionwilladd8minutesto thecycletimes.Seenextpage,
.<*
~:w~
e

GtmddishwashingSW4s
with I-Ion’ water
Togetdishescleananddryyouneed
hotwater.Tohelpyougetwaterof
thepropertemperature,your
dishwasherhasaWATERHEAT
feature.Whenselected(seepage4),
thiswaterheatingfeatureallowsyou
toturndownyourhouseholdwater
heaterandsaveenergyifyou’re
willingtoletthedishwasherrun a
li~e longerwhileitheatswater.For
goodwashinganddrying,the
enteringwatermustbebetween
120”Fand 140”F.Topreventdish
damage,inletwatershouldnot
exceed150°F.
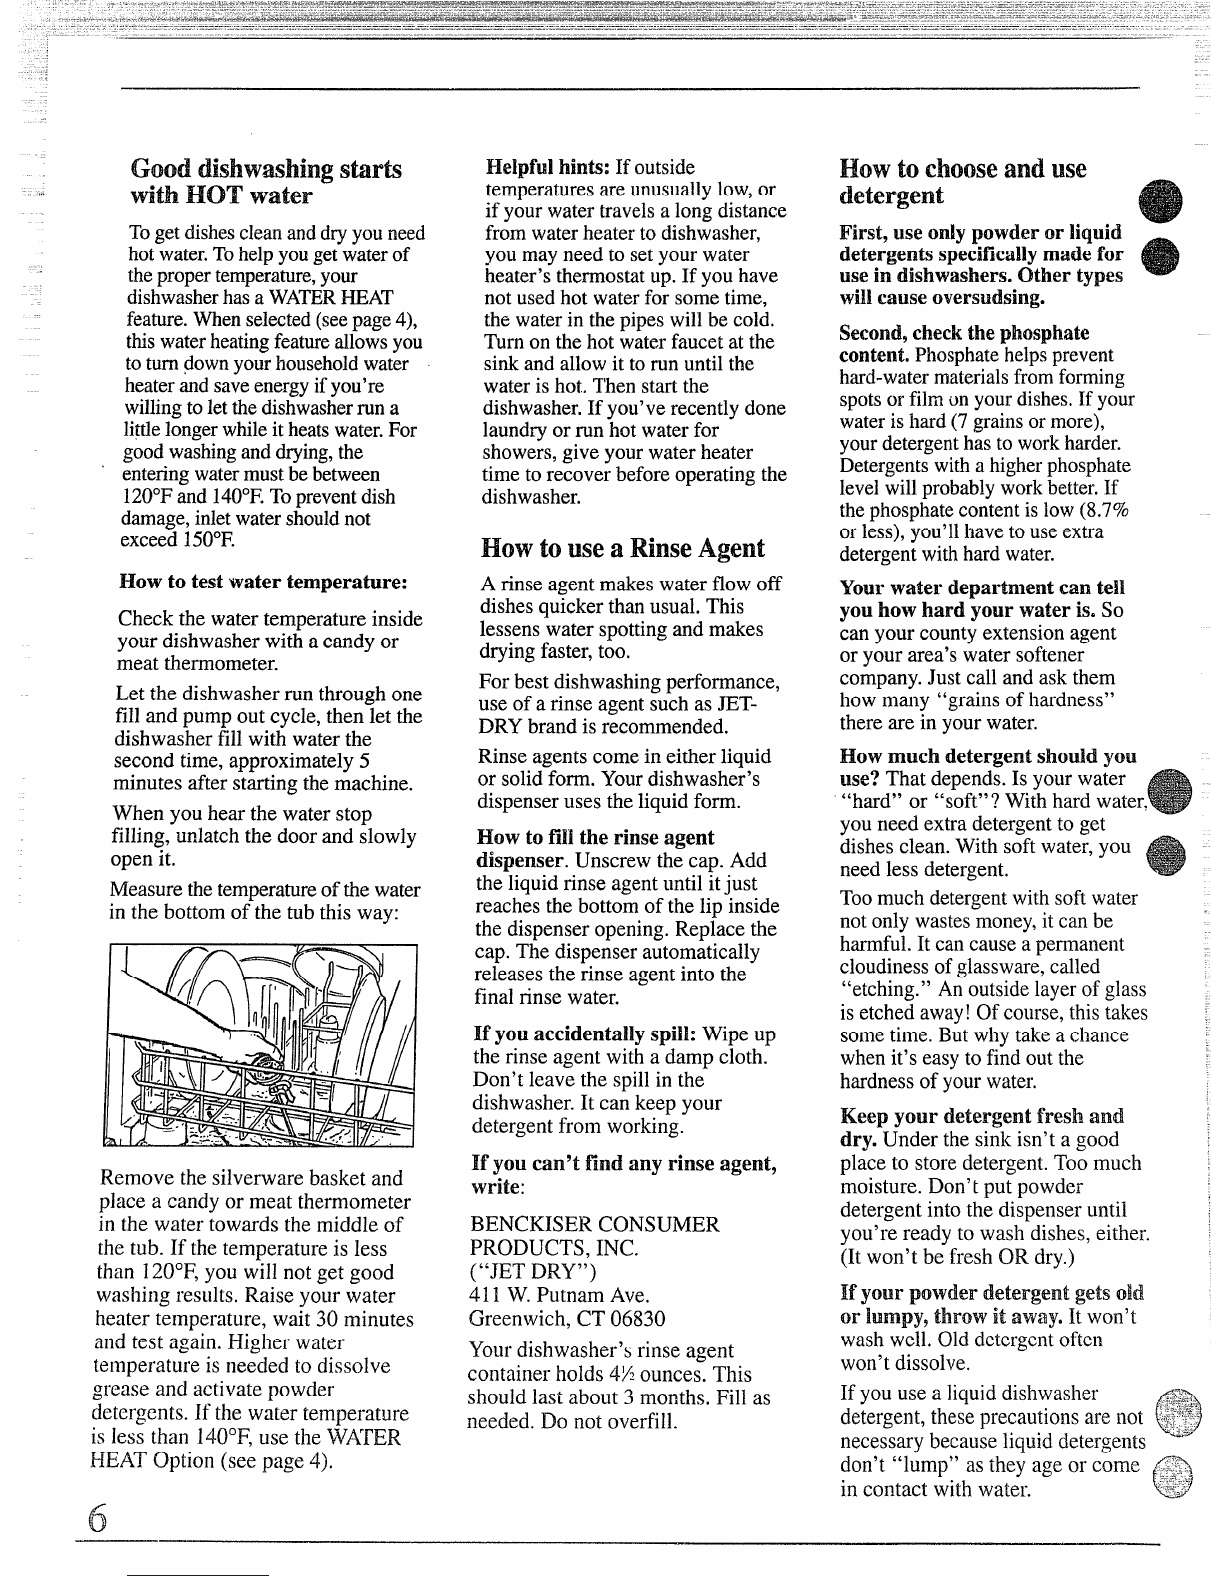
How to test water temperature:
Check the water temperature inside
your dishwasher with acandy or
meat thermometer.
Let the dishwasher run through one
fill and pump out cycle, then let the
dishwasher fill with water the
second time, approximately 5
minutes after starting the machine.
When you hear the water stop
filling,-urdatchthe door and ;lowly
open it.
Measurethetemperatureof thewater
in the bottom of the tub this way:
Remove the silverware basket and
place acandy or meat thermometer
in the water towards the middle of
the tub. If the temperature is less
than 120”F,you will not get good
washing results. Raise your water
heater temperature, wait 30 minutes
and test again. I+igherwater
temperature is needed to dissolve
grease and activate powder
detergents. If the water temperature
is less than 140”F’,use the WATER
HEAT Option (see page 4).
6
He#pfulhints: If outside
temperaturesare unusuallylow,or
if yourwater travelsalong distance
from waterheater to dishwasher,
you may need to setyourwater
heater’sthermostatup. If you have
not usedhot water for some time,
the waterin the pipeswill be cold.
Turnon the hot water faucet at the
sink and allowit to run untilthe
water is hot. Then startthe
dishwasher.If you’verecently done
laundryor run hot water for
showers,give your water heater
time to recover beforeoperatingthe
dishwasher.
How to use aRinse Agent
Arinse agent makes water flow off
dishesquickerthan usual. This
lessens water spottingand makes
drying faster,too.
For best dishwashingperformance,
use of arinse agent such as JET-
DRY brand is recommended.
Rinse agents come in either liquid
or solidform. Yourdishwasher’s
dispenseruses the liquid form.
EIowto fi~lthe rinse agent
dispenser. Unscrew the cap. Add
the liquid rinse agent until itjust
reaches the bottom of the lip inside
the dispenser opening. Replace the
cap. The dispenser automatically
releases the rinse agent into the
final rinse water.
Myou accidentally spill: Wipe up
the rinse agent with adamp cloth.
Don’t leave the spillin the
dishwasher. It can keep your
detergent from working.
If you.can’t find any rinse agent,
write:
BENCKISER CONSUMER
PRODUCTS, INC.
(“JET DRY”)
411 W.Putnam Ave.
Greenwich, CT 06830
Yourdishwasher’s rinse agent
container holds 4X ounces. This
should last about 3months. Fill as
needed. Do not overfill.
How tod-momandwe
detergent e
First, use onlypowder or Iiquid
detergentsspecificallymadefor
use in dishwashers.Othertypes
wiUcause ovenmlsing.
Second,checkthephosphate
content.Phosphatehelpsprevent
hard-watermaterialsfromforming
spotsor filmun yourdishes.If your
wateris hard (7 grainsormore),
yourdetergenthasto workharder.
Detergentswithahigherphosphate
levelwillprobablyworkbetter,If
thephosphatecontentis low (8.7%
orless),you’llhaveto useextra
detergentwithhard water.
Yourwater department can tell
you how hard your water is. So
canyour countyextension agent
or your area’swater softener
company.Just call and ask them
how many “grains of hardness”
there are in your water.
How much detergent shodd you
use? That depends.Is your water
“hard” or “soft”? With hard water,
you need extra detergentto get
dishes clean. With soft water, you
need less detergent.
Toomuch detergentwith soft watel
notonly wastesmoney,it can be
harmful It can cause apermanent
cloudinessof glassware,called
“etching.” A~outside layerof glass
is etched away!Of course,thistakes
sometime. Butwhy take achance
when it’seasy to find out the
hardnessof yourwater,
Keep your detergent fresh and.
dry. Under the sink isn’t agood
place to store detergent. Too much
moisture. Don’t put powder
detergent into the dispenser until
you’re ready to wash dishes, either.
(It won’t be fresh OR dry.)
If your powder detergent gets old
or lumpy9throw it away.Itwon’t
wash well. Old detergentoften
won’tdissolve.
If you use aliquiddishwasher )
&j~.,.
detergent, these precautionsare not ~~~
necessary because liquid detergents “%””
don’t “lump” as they age or come L3:t
)
in contact with water. L
..
~J-.~-
~
r“i.

--
You’ilfind two detergent
dispenserson theinsidedoorofyour
dishwasher-.There are two,because
somecycles use two washes.
See “DetergentUsageGuide”
below.(Besurethe CycleIndicator
Dial isat OFFposition before
addingdetergent.Otherwise,the
detergentcup willnotcloseand
latchproperly.)
Close the main CUP.
.
NOTE: Detergent cup may be
opened manually with no harm.
How toprepare the dishes
forvvashhg
If thisisyourfirstdishwasher,or
ifyou’rereplacingamucholder
model,youmay wonderhow much
preparationyourdishesneed.
Actuallyverylittle.Ike-rinsingof
normalfoodsoilsisnotnecessary.
Withcommonsenseand alittle
practiceyou’llsoonknowwhat
foodstoremove.Hereare some
guidelines:
1.Scrapeoffbones,seeds,skins,
toothpicksandotherhard solids.It
isalso besttoremovehard shelled
vegetables,meattrimmings,lea~
vege~bles andc~sts. Remove
excessivequantitiesofoilor grease.
2. Removelargequantitiesof any
food.Yourdishwasherhas abuilt-in
softfood disposerthatpulverizes
softfood bitsand flushesthem
away.It canhandlesmall amounts
of softfoods,but largeamountswill
be difficultto handle.
Turnhandle co~nterclockwise
until it releases.Asnapping sound
is normal when it opens.
Detergent Usage Guide (powderor liquid)
3.Tryto removefoodscrapsand
placedishesindishwasherbefore
soilhasachancetodry andbecome
hard.Disheswithdried-onsoilare
moredifficultto washandmay not
comecleanin theNORMAL
WASHcycle,Remembertouse
yourRINSE&HOLDcyclefor
small“holding”loads.
Note:The foodsmentionedabove
areforexamplesonly.Otherfoods
notmentionedmayalsoneedtobe
removedfromyourdishes.Youmay
alsowantto considerremoving
foodssuchas mustard,mayonnaise,
vinegar,lemonjuice andotherfoods
thatcan causediscolorationof
stainlesssteelif allowedto remain
ondishesforalongperiodof time.
When usingthe POTSCRUB13ER
cycle9lesspreparationisrequired
beforeloading.TheI?OTSCRUBBER
cyclecanwashheavily-soileddishes.
Itemswithburned-onandbaked-on
soilsmaynotcomeclean.Andthe
dishwashercannotremoveburn
marksorrestorefadingcausedby
overheatingduringcooking.
ISOFT WATER MEDIUM WATER
(O-3grains hardness) (3-7 grains)
CYCLES IMainCup OpenCup IMainCup OpenCup
POTSCRUBBER,and ITablespoon 1Tablespoon HalfFull HalfFull
NORMALWASH minimum minimum
cycles ++
II
LIGHTWASH, ITablespoon None HalfFull None
ENERGYSAVERand ‘~ini~num
CHINACRYSTAL
cycles
HARD WATER
(7-12 grains*)
MainCup~ OpenCup*
Completely Completely
Full Full
-4-
Completely INone
RINSE&HOLDcyclel use no detergent Iusenodetergent
IIJsenodetergent
‘~12grainsand up isextremelyhard water.Awatersofteneris recommended.Withoutit,lime
canbuildup in thewatervalve.The watervalvemay stickwhileopenandcauseflooding.
:~~illcdMainCupholds3tabkspoons; IWed OpenCupholds2tablespoons.
7
-

This isarandommixed load, the most common ~pe
you will have.
Make suredishes are properly loaded to insure that
water can reach the soiled surfaces. The wash arm in
the bottomsprays water up. The tower that rises in the
center sends water out over the dishes to wash the
iternsin the upper rack. Aspray arm in the top washes
down also.Make sure to place tall items to the outside
so the upper wash arm is not blocked.
The toprack is best for glasses, cups and saucers, Two
rows of cups can be washed when using the folding
shelf. Load the bottom row first, then fold down the
shelf and load the top row, Cups and glasses fit best
along the sides. This is the place for dishwasher-safe
plastics, too. Make sure small plastic items are lodged
in tightly so they can’t fall onto Calrod@heating unit.
Arrange stemware so that it cannot move easily, Don’t
let the glasses touch each o~her.
s
f
WATCHOUT FOR THIS.
The wash tower rises through the center of the bottom
rack during the wash and rinse portionsof the cycle.
Don’t block it or load tall things next to it. Also, be
careful not to let aportion of an item such as apot or
dish handle extend through the bottom rack. This could
block the wash arm and cause poor washing results.
Saucepans, mixing bowls and other small items may
be placed—face down—in the top rack. The top rack is
handy for all kinds of odd shapes.

HowtoloadtheTOP MCK
-.
shelf’up
Fold the folding shelfup for glassesand tall things.
Place tall items to the outsideso the upper wash arm is
not blocked.
SheIt’Down
The folding shelf givesyou extra space for cups and
long utensilson two levels.Load the lower level first,
then fold the shelf down.
.-.
HowtoloadtheBOTTOMMCK
-.=-% I ,
,-...
~lt plates and saucers between the pins. Load platters,
pot; and bowls along the sides, in corners or in the
back.
II
As shownhere,thisplateis beingplacedwiththe
soiledsidefacingthecenteroftherack sowaterand
detergentfromwasharmcanreachsoiledsurfaces. I
(continuednextpage)
9

EIOWtoloadtheBOTTOM RJA
~~ (continued)
Pots,pans, casseroles, saladbowls, mixing bowls and
lidsnzustbe loadedin thebottomrack,facingdown.
Pr’ecautiorl!
Take out anything that may fall or extend through the
bottom of the basket.
Heavily soiledpots, pans and casserolesmust be loaded
in the bottomrack, facing down. Propbroiler pans and
racks alongthe edge. Shallowitems may be angled
providedthe lower sidedoes not shieldthe soiled
surfaceinsidefrom the water.
.-
Put flatware in the removable basket with handles up to
protect your hands. Mix knives, forks and spoons so
they don’t nest together. Distribute evenly.
The security cell cover, hinged in the handle, can be
lowered to either side to secure light-weight itemsfrom
the effectsofthevigorouswashaction. Whenit is not
needed,thiscovercanremainupright.
;.,

#
-— whatyou aimusuallym’ashsafelyinyour dishwasher.
UsualIy
MateriaE Safe IExceptions(notsafe) SpecialInstructions
Somedarkeningor spottingpossible.Removeby
scouringwith soap-filled steel wool pads.
If in doubt,check with the manufacturer,or test wash
one piece daily for at least amonth.Comparewith the
rest of the set.
Aluminum IYES ISome colored anodizedaluminumcan
fade.
Antique, metal-trimmed, hand-painted
or over-the-glazepatterns fade. Gold
leaf will discolor.
Antique, metal-trimmed or hand-
painted patterns fade. Gold leaf will
discolor.
China/Stoneware YES
Load securelyto prevent movement.Check
manufacturer’sinstructionsfor yourcrystal.
crystal YES
Do not wash in dishwasher.Damage to dishwasher and
discolorationor staining of dishwasher mayresult.
Non-dishwasher NO
items-such as
electronic air cleaner
filters, furnace filters,
paint brushes, etc.
Milk glass may yellow.
Glass IYES
Iron INO Iron wiUrust,
Pewter tarnishes.
Pewter INO
If it doesrl’tsay DISHWASHERSAFE,test one piece in
the toprack before dishwashing an entire set. Wash in
top rack only.
Plastics YES
Rinse if not washing immediately. Salty or acid foods
can stain if left on.
Stainless steel jYES
Sterling Silver YES Don’t put in same silverware basket
with stainless steel. Contact between
metals can damage silver. Don’t wash
copper utensils in the same load. Silver
may get abrown film. Adhesive used
to attach some hollow-handle knives
can loosen.
Rinse if not washing immediately. Salty or acid foods
can stain if left on. Dry detergent can cause difficult-to-
remove black spots. Place in back section of silverware
basket to avoid exposure to detergent from the detergent
cup.
and Silver plate
After washing, wipe the non-stick coating area with
vegetable oil to keep it from losing its non-stick quality.
Non-stick IYES
coatings
Tin INO Tin can rust.
wood INO Woodcan warp, crack or lose its
finish with any type of washing.
However, opening the door during 2. Wait afew seconds until the
any cycle lessens cleaning power water calms. Then open the door.
Forgeta dish?Here’s
‘whenJw.B canaddit.
Adddishesanytimeduringthe
RINSE&HOLDcycle.With
otherwashcycles,youcanadd
becausethetemperatureinsidethe
dishwasher is lowered. So try to 3. Add dishes you’ve forgotten.
load everything at the beginfiing. 4. Close the door and push the
Here’s how to add aforgotten dish: Iatch to the far right. When the
~iishesat any”time~EFORE themain door is locked, washing will
detergentw;sh portionof thecycle. 1.Push the door latch to the left. continue.
Washing will stop.
-rL .s.
-. -

.- -====--
—-
-Questions?
“~~ UseThisProblemSolver
-—
.— I
PROBLEM POSSIBLE CAUSE AND REMEDY
DKHWVASHER.
WON’T RUN Afuse in yourhome maybe blown,or thecircuitbreaker tripped,Replacefuse or
reset circuitbreaker.Removeany otherappliancesfrom the circuit.
UNUSUAL NO.ISE Utensilsmay not be secure on rack pins,orsomethingsmallmay have droppedfrom
therack. Wateriscausing utensilsto rattle. Mike sure everythingis securelyplaced in
dishwasher.
DISHES DON’T DRJ
UNCLEAN DISHES
AND FLATWARE
BLACK OR GRAY
MARKS IN CUPS
DETERGENT LEFT 11
DISPENSER CUPS
DETERGENT CUP
LID WON’T LATCH
AFTER ADDING
DETERGENT
YELLOW OR
BROWN FILM
12
Make sureinlet water temperatureis correct. (See Page 6.)
Unloadthe bottomrack first, Waterfrom dishes in the top rack maybe spillinginto the
bottomrack. ,,
Check for improperloading.Dishesshouldn’tnest together.Avoid overloading.
Check the rinse agentdispenserto see that it’snot empty.
Check inlet water temperature. It shouldbe at least 120”F.(Totest, see page 6.)
Waterpressure may be temporarilylow.Turn on afaucet. Is watrer coming out slower
than usual? If so, wait until pressureis normal before using your dishwasher.
Plugged air gap. (See page 15.)
Improper rack loading. (See pages 8-10.)
Aluminum utensilsoften leave marks when they rub against dishes.Remove marks
with amild abrasivecleanser.
Water may not be reaching the detergentcups. Move dishes that maybe blocking
detergent cup.
The dispenser cover may not be opening or may be blocked by improperly loaded
items. If you used apowder detergent,open the cup and remove any caked-on
detergent. If the cup still doesn’t open automatically,call for service.
Detergent may be old. If the powder detergent is hard or caked in the box, throw it
away.The detergent may not be working well, Try another brand.
Cycle Indicator Dial must be in OFF position for CUDlid to close and latch properly. If
y& unlatch the door and open it to dl~ your dishes,~heCycle Indictor Dial_do&snot
advance to OFF by itself.
rea or coffee can stain cups. Remove the stains by hand, using asolution of 1/2cup
gleachand 3cups warm water.
4n overall yellow or brown film on dishes or glassware can be caused by iron
ieposits in water. Aspecial filter in the water supply line is the only way to correct
his problem. Yourwater softener company can tell you about the filter.
(ellow film on sterling silver results when you wash copper utensils in the same
oad. Silver polish will usually remove this stain,

PROBLEM
SPOTS AND
FILMING ON
GLASSES AND
FLATWARE
CLOUDINESSON
GLASSWARE
POSSIBLE CAUSE AND REMEDY
Spottingcan be caused by all thesethings:
@Extremely hard water. (Seepage 6.)
“Low inlet water temperature.(Totest, see page 6.)
~Overloadingthe dishwasher.
~Improper loading.(See pages 8-10.)
“Old or damp powder detergent.
~Phosphatelevel in detergenttoo low.(See page 6.)
~Rinse agentdispenser empty.(Seepage 6.)
*Too littledetergent. (See page 7.)
Due to varyinglocal water conditionsand personalpreferences,try severalbrandsof
detergentsto find one that gives the bestresults for you. Aliquiddishwasherdetergent
may help reduce fihning.
To remove stubborn spots and fihn from ghssware:
1. Remove all metal utensils from the dishwasher.
2. Do not add detergent.
3. Select P0TSCRU1313ERcycle.
4. Start the dishwasher and allow to run for 15to 20 minutes.The dishwasherwill
now be in the main wash.
5. Then open the door and pour 2cups (500ml) of white vinegarinto thebottom of
the dishwasher.
6. Close the door and allow to completethe cycle.
If’vinegar rinse doesn’t work: Repeat as above, except use 1/4cup (60ml)of citfic
acid crystals instead of vinegar. (Mostdrugstores carry citric acid crystals. If yours
doesn’t, call GE Factory Service.)
Using avinegar or citric acid crystal rinse more than twice amonth? Considera
homewater softener.
[fvinegar or citric acid crystal rinse doesn’t work, the cloudinessis “etching.”
I’hefilm cannot be removed.
Ucan be prevented: Use less detergent if you have soft water.Wash glassware in
the shortest cycle that will get them clean.
Water temperature entering dishwasher exceeds 150°F.
(cmtinuedonnextpage
I

PROBLEM
CHIPPINGOl?
CHINA
SMALL AMOUNT
OF WATER
STANDINGIN
THE BOTTOM
OF THE TUB
WATERWON’T
PUMP OUT OF
THE TUB
SUDS IN THE TUB
DISHWASHER
LEAKS
POSSIBLE CAUSE AND REMEDY e
Roughhandlingcan cause chipping.Load with care. Make sureglassware and china
are secureand can’tjar loose. (Seepage 8for correctway to load glassware.)Make
suretall glassesand stemwarewill clear the top of the tub when you push the rack
into thedishwasher.
Alwaysusethetoprackfordelicateitems.
Wateraroundtheoutletonthetubbottomatthebackofthetubisnormal.It is clean
water.It’s there to keep the water seal lubricated.
If the entire bottomof the tub has water,you may have adrain problem. Clean the air
gap, if you have one. (See page 15.)
Check thekitchen sink.Is it draining well? Youmay need aplumber.
If dishwasherdrainsinto disposer,run disposerto clear.Be sure disposer is not
clogged.
Sudsingdetergentsarenotmeantfordishwashers.USEONLYAUTOMATIC
DISHWASHERDETERGENT’STOAVOIDSUDSING.
To remove suds from the tub: Open the dishwasher.Let suds evaporate. Add 1
gallon of cold water to the tub. Close and latch the dishwasher. Pump out water by
slowly turning the control dial until adrain period is reached.
Repeat if necessary.
Sudscancauseunittooverflow.That’swhyit’ssoimportanttouseadetergentthat’s
designedforautomaticdishwashers.
Spilling the rinse agent can cause foam during washing. This can lead to overflowing.
Wipe up accidental spill of rinse agent with adamp cloth.
If you need!more help...d, toll free:
GE Answer Center@
800.626.2000
consumer information service
—— — . . ..— . ... ... . ..—.—

CareandCleaning
USERMAINTENANCE
INSTRUCTIONS
Cleanthe controlpanel with a
lightlydampenedcloth.Dry
thoroughly.Do not use abrasives
or sharpobjectson the panel.They
candamage it.
Clean the outside with agood
appliancepolishwax. The outside
cabinetfinish is durable, butit can
scratch.So useno scouringpads,
orharsh or grittycleaners.
AppliancePolishWax &Cleaner
(~;t. No. WR97X0216)is
availablefrom GE Appliance
PartsMart.
The inside usuallytakes careof
itself.If it shouldever need
cleaning,use amild cleansing
powder.Scouringpads and harsh
cleanerscan mar the finish.
B1.nikindishwashers
Oftenuse WIi airgap.
Keepit dean.
An air gap is aplumbingdevice.
It protectsyour dishwasheragainst
water backingup intoit if adrain
clogs.The air gap is notapart of
the dishwasher.And you may not
even have one. Not allplumbing
codesrequire air gaps.
If you have an air gap, check it at
least once amonth. IT IS NOT
PARTOF YOUR DISHWASHER.
IT IS NOT COVERED IN YOUR
WARRANTY.
The air gap is easy to ckan.
With most types, first turn off the
dishwasher,then lift off the
chrome cover.Then unscrew the
plastic cap and check for any
buildup ofgrit.Atoothpickmakes
cleaning easy.
Check the air gap any time your
dishwasher isn’t draining welL
Notusingyour dishwasher
iinwh@??-Pmtect
againstfreezing.
If yourdishwasheris left in an
unheatedplace duringthe winter,
ask aservicetechnicianto:
*Cut off electricpower to the
dishwasher.Removefuses or trip
circuitbreaker.
~Turn offthe watersupply.
~Disconnectthe water inletline
from the water valve.
*Drain water from the inletline
and water valve. (Use apan to
catch the water.)
~Reconnectthe water inlet line to
the water valve.
~Removetheplasticpump coverin
thetub bottomanduseaspongeto
soakupwaterintherubberboot.
PUMP COVERSCREWS
-. -

If you areredecorating,you can
changeyourdishwasher’sfront
panels to match or blendwith your
new colors.
The panels are held inplace by the
door trimand the trimon the panel
below thedoor.Each sideof each
panel is adifferentcolor.Or you
can paint apanel with thecolorof
your own choice.
4WL
;~
1~
‘VI &
fi
..
;.:..:
........
..W.>.. ::
:.;+.W .N,
. . . . .. . .
x+...:.:.) ,%*
.:.:::::}:.:. ++.,
.,.. . . ............
. .:.::::.:.:.:.:::
.w.::.:
Do not operate the dishwasher
whi~echanging paneksor when
Iower accesspaneIis removed.
How tochange the door panel:
1.Takeouttrim screwson either
sideof the dishwasherdoor.
Removethe sidetrim.
2. Slidethe door panelout.
(Careful-edges may be sharp.)
3. Turnthe door panel around and
put thecolor you want in front.
4. Replacethe doorpanel, side
trim and screws,
How to change the lower paneh
1. Removepanel attachment
screws.
2. Remove the entirepanel.
3. Takeout screw’sand remove the
top trim.
4. Slidethe door panel out.
5. Turn the panel around and put
the coloryou want in front.
6. Replace the lower
trim and screws.
7. Replace the entire
attachment screws.
panel, top
panel and
Awoodpaneltrimkitcontains
trimandinstructionsforadding
decorativewooddoorpanelor @
loweraccesspanelto matchkitchen
cabinets.Thekitisavailableatno
extracost.(SpecifyGI?F40.)
Order from:
GE Appliances
c/o Dri-ViewManufacturing
4706 AllmondAve.
Louisville,KY 40209
16

we’llBeThere
With the pw..chaseof’yournewGE appliance,receivethe
assunmce that if youeverneed information or assistance
from GE,we’llbe there.AHyou haveto do iscall--toll-free!
AGE ConsumerServiceprofessional
willprovicie expert repair service,
scheduled at atime that’sconvenient
foryou.ManyGEConsumerService
company-operatedlocationsofferyou
servicetodayor tomomow,or at your
Youcanhavethesecurefeelingthat
GEConsumerServicewillstillbe
there afteryourwarmmtyexpires.Pur-
chaseaGEcontractwhileyourwar-
rantyisstillin effectand you’llreceive
asubstantialdiscount.Withamultiple-
yearcontrac~you’reassuredof fimn-e
serviceat today’sprices.
convenience(7W a.m.to ZOOp.m.
weekda~ 9:00a.m.to 2:00p.m.Satur-
days).Our factory-trainedtechnicians
knowyourappliance insideand out—
somost repairs can be handled injust
one visit.
WhateveryourquestionaboutanyGE
majorappliance,GEAnswerCente@
informationserviceisavailableto
help.Yourcall-and yourquestion—
willbe answeredpromptlyand
courteously,Andyoucancallany
time.GEAnswerCente@serviceis
open 24hoursaday’7daysaweek.
TelecommunicationDevicefor theDeaf
(p+#x&2 I“-
A’- L
s_.lq. A.&
1*W -. . . . ,.> . .. . . . -.
.>.. —. ...0 e. ““-... e... ... ,
hhkb.ls Cpdifkd! tow-vice their
owna@ances can haveneeded
parts or accessoriessentdirectlyto
their home, free of shippingcharge!
The GEparts systemprovidesaccess
to over47,000parts...and allGE
Genuine RenewalPartsare filly
warranted.VISA,MasterCardand
Discovercardsare accepted.
user mtitenanee imwlwetions
contained in this bookletcoverpmce=
dines intended to be perfomed by
my user. other servicinggerm-ally
should be referred to qualified ser-
vicepersonnel. Caution must be
@xemised9since improper servicing
may cause unsafe operation.
Upon request,GEwillprovideBraille
controlsfor avarietyof GEappliances,
andabrochuretoassistin planninga
barrier-freekitchenfor personswith
limitedmobilityToobtaintheseitems,
freeof charge,call800.626.2000.
Consumerswithimpairedhearing
or speechwhohaveaccesstoaTDD
or aconventionalteletypewritermay
Cdl 800-TDD-GEAC(800-833-4322)
to request information or service.
%ii
.-—
—.— .— —-—. .—
—

$YOURGE!DISHWASHERWITHPERMATuF@INTERIOR
WARRANTY 4
Saveproof of originalpurchasedate suchas yoursales slip or cancelled check to establish warranty period.
WHAT1sCOVERED
FLU ONE-YEARWARRANTY
Forone yearfromdateof original
purchase,wewill provide,freeof
charge,partsandservicelaborin
yourhometo repairor replaceany
partdthedishwasherthatfails
becauseofamanufacturingdefect.
FULL TEIN-YEARWARRANTY
Forten yearsfrom dateof original
purchase,wewill provide,free of
charge,partsandservicelaborin
yourhometo repairor replacethe
Penna7W’ W7 or doorlinerif it
failsto containwater becauseof
amanufacturingdefectsuchas
cracking,chipping,peeling
or rusting.
LMTH3 SHXM4D-M%W?
WARRANTY
Forthe secondyearfromdateof
originalpurchase,wewillprovide,
freeof charge,replacementpartsfor
anypart of the WaterDistribution
System(asillustratedbelow)that
failsbecauseofamanufacturing
defect.Associatedinletanddrain
plumbingpartsarenotcoveredby
thiswarranty.Youpayfor the
servicetripto yourhomeand
servicelaborcharges,
ion
Iy
Water DistributionSystem
Thiswarrantyisextendedto
theoriginalpurchaserandany
succeedingownerfor products
purchasedforordinaryhomeusein
the 48 mainlandstates,Hawaiiand
Washington,D,C,InAlaskathe
warrantyisthe sameexceptthat it is
L!MITEDbecauseyoumustpayto
shipthe producttothe serviceshop
orforthe servicetechnician’stravel
coststo yourhome.
/411warrantyservicewill be
providedby our FactoryService
Centersor byourauthorized
CustomerCare@servicersduring
normalworkinghours,
Lookinthe WhiteorYellowPages
of yourtelephonedirectoy for
GENERALELECTRICCOMPANY,
GENERALELECTRICFACTORY
SERVICE,GENERALELECTRIC-
HOTPOINTFACTORYSERVICEor
GENERALELECTRICCUSTOMER
CARE@SERVICE.
WHATIs NOT COVERED *Setvicetripsto yourhometo teach
you howto usethe product.
Readyour Useand Carematerial.
Ifyou then have anyquestions
aboutoperatingthe product,please
contactyourdealeror our
ConsumerAffairsofficeat the
addressbelow,or call,toll free:
GE AnswerCenter’]
800.626.2000
consumer informationservice
~Improper installation.
Ifyou havean installationproblem,
contactyour dealeror installer.You
are responsiblefor providing
adequateelectrical,plumbing,and
other connectingfacilities. 4
~Replacementof housefusesor
resettingof circuitbreakers.
QCleaningor servicingof air gap
deviceindrain line.
@Failureof the productif it is used
for otherthan its intendedpurpose
or usedcommercially.
~Damageto productcaused by
accident,fire,floods or acts of God.
WARRANTORISA/OTRESPONSIBLE
FORCONSEQUENTIALDAMAGES.
.
-+
Some states do not allow the exclusion or limitation of incidental or consequential darnages, so the above limitation or exclusion
may not apply to you. This warranty gives you specific legal rights, and you may also have other rights which vary from state to state.
To know what your legal rights are in your state, consult your local or state consumer affairs office or your state’s Attorney General.
Wa~~a~~O~: General Electric Company
if further help is needed concerning this warranty, write:
Manager—Consumer Affairs,GEA~@i2m3es,Lcmkwilk,KY40225 L
Table of contents
Other GE Dishwasher manuals

GE
GE GSD1400 Series User manual

GE
GE GDF 570 Series User manual

GE
GE Spacemaker GSM1800N Manual

GE
GE Monogram ZBD9900R00II User manual

GE
GE PDWF500PBB - Profile Dishwasher With SmartDispense... Manual

GE
GE GSD2800 Series User manual

GE
GE Monogram ZBD3500 User manual

GE
GE GDF520PGJ Manual

GE
GE GSD700 User manual

GE
GE CDT725SSFSS User manual