GE JE87 Installation instructions

use care p(i
by ptl
p!)
Howtouse
Howtousethe
HOWTtousetheshelf lpuii
Savetimeand
you.
service,
usethe sd..er’eplti
~
.—
~
——-
,——
--
—.————.——
————’
-—~
——
—.—
Dk’ectLh-leto(kmemi!Ekxm’ic

Read this book carefully.
It isintendedtohelp youoperate
and maintainyournew Microwave
Ovenproperly.
Keepit handy for answerstoyour
questions.
Ifyoudon’tunderstandsomething
or need more help. . .
Call, toll-free:
The GE AnswerCenterT”
800.626.2000
consumer informationservice
or write (includeyour phone
number)
Consumer Affairs
General Electric Company
AppliancePark
Louisville,KY40225
Write down the model
and serial numbers.
You’Hfind them on alabelinside
the oven.
These numbers are also on the
Consumer Product Ownership
RegistrationCard that came with
your MicrowaveOven. Before
sending in thiscard, please write
these numbers here:
ModelNumber
.—. —————————————..
SerialNumber
Usc these numbers in any
correspondence or scrviw calls
conccI”ningyouJ.MicrowavcOven.
Be sureyourMicrowave
Oven isregistered.
It is importantthatwe knowthe
locationofyourMicrowaveOven
shouldaneedoccurforadjustments.
Yoursupplieris responsiblefor
registeringyouastheowner.
Pleasecheckwithyoursupplierto
besurehe hasdoneso;alsosendin
yourConsumerProductOwnership
RegistrationCard. Ifyoumove,
or ifyouarenottheoriginal
purchaserpleasewriteto us,
statingmodeland serialnumbers.
Thisappliancemustbe registered.
Pleasebe certainthatit is.
Writeto:
GeneralElectricCompany
~nge productService
AppliancePark
Louisville,KY40225
1~youreceiveda
damagedOven.e.
Immediatelycontactthedealer
(or builder)thatsoldyouthe
MicrowaveOven.
Savetimeandmoney.
Beforeyourequestserkrice...
check the ProblemSolveron
pugc 16.Itlistsminorcausesof
operatingproblemsthat)TOLIcan
COJ”I.CCtyourself.
The electricoutputofthis
microwaveovenis600 watts.
mm
(a)DoNotAttempttooperatethis
ovenwiththedooropensince
open-dooroperationcan resultin
harmfulexposureto microwave
energy.It isimportantnotto
defeator tamperwiththe safety
interlocks.
(b)DoNotPlaceanyobject
betweenthe ovenfrontfaceand
thedooror allowsoilor cleaner
residueto accumulateon sealing
surfaces.
(c) DoNot C@eratethe oven
if itisdamaged. It isparticularly
importantthat the ovendoor close
properly andthatthere isno
damageto the:
(1)Door (bent),
(2)hingesand latches(brokenor
loosened),
(3)door seals and sealing surfaces.
(d) TheOvenShouldNotbe
adjustedor repaired by anyone
exceptproperly qualified service
personnel.

BeforeMicrowaving,,,,,.. ....2
SafetyInstructions . . . . . . . .. .3-5
Featuresof YourOven .........6
Featuresof Your
TouchControlPanel. ., ........7
CookingbyTime . . . . . ........8
CookingbyTemperature .. .....9
Defrosting.............,....10
lvlinute/SecondTimer . . .......11
CareofYourOven ...........12
GroundingInstructions .. .....13
UseofExtension Cords .. .....13
HowtoUsetheShelf ......14,15
ProblemSolver. . . . . . . .......16
ConsumerServices ..........19
\Varranty .. .. .. ... ..BackCover
@Makesureallutensilsusedin
yourMicrowaveOvenarelabeled
“suitableformicrowaving.“
oPapertowels,waxpaper,and
plasticwrapcanbeusedtocover
dishesinordertoretainmoisture
andpreventspattering.
oSomemicrowavedfoodsrequire
stirring,rotating,or rearranging.
CheckyourCookbookforspecific
instructions.
oSteambuildsuppressureinfoods
whicharetightlycoveredbyaskin
or membrane.Piercepotatoes,egg
yolksandchickenliverstoprevent
bursting.
Readall instructions
beforewing this
Whenusingelectrical appliances.
basicsafetyprecautions should
be followed, including the
following:
risk ofburns, electric shock, fire,
injury to persons or exposure to
excessivemicrowave energy:
~Use this appliance only for its
intended use as described in this
manual.
~Read and followthe specific
“PRECAUTIONSTOAVOID
POSSIBLEEXPOSURE!KI
EXCESSIVEMICROWAVE
ENERGY”found onpage2.
~Thisappliance must be
grounded. Comect only to
properly grounded outlet.See
“GROUNDINGINSTRUC-
TIONS” foundonpage 13.
@Forbestoperation,plugthis
applianceintoitsownelectrical
outlet,topreventflickeringof
lights,blowingoffuseor tripping
ofcircuitbreaker.
~Install or locate this appliance
onlyinaccordancewiththe
providedinstallationinstructions.
~Becertain to place the fn”mt
surface ofthe door three
idles or moireback from the
countertop edge to avoid
aecidedldl tipping Ofthe
appliance in normal lmlgee
-.
—.
Fsm6fr
mwm—
-
-
~
—.
-
--
E#-
I?#i#m
-
I?&m?- 9--
—.—
--
——- –-
wzsiaP-
FE&ze-
.. .
&wallx-

-. ‘T’!Y (continued)
~Do not cover or block any
openings on the appliance.
~Do notuseoutdoors.
@Do notimmersepowercord
orplugin water.
sKeep power cord awayfrom
heated surfaces.
~Do not let power cord hang
over edge of table or counter.
@Do not operate this appliance
if it has adamaged power cord
or plug, if it is not working
properly, or if it is has ”been
damaged or dropped.
~See do”orsurface cleaning
instructions on page 12.
@This appliance shod~ be
serviced only by qualified
service personnel. Contact
nearest authorized service
facility for examination, repair
or adjustment.
~As with any appliance, close
supervision is necessary when
used by children.
*Toreduce therisk of fire in
the ovencavity:
—Donotovercook food.
Carefully attend appliance if
paper, plastic or other combus-
tible materials are placed inside
theovento facilitatecooking.
\
—Riper towelsami napkins,
wax ~aper. Recycled paper
productslcan conbin metal flecks
which may cause arcing or
“ignite.Paper products containing
nylon or nylon filaments should
be avoided, as they may also
ignite.
—-Donot operate the oven
whileempty to avoiddamage
to the ovenand the danger of
fire. If byaccidenttheoven
shouldrun emptyaminuteor
two,no harm is done. However,
try to avoidoperatingtheoven
emptyat all times—itsaves
energyand prolongslifeof
the oven. .
—Donot pop popcorn in
your microwave ovenunless
in aspecialmicrowavepopcorn
accessoryor unlessyouuse
popcornlabeledfor use in
microwaveovens.
—Ifmaterials insidetheoven
shouldignite,keep ovendoor
closed, turn ovenoff, and
disconnectthe powercord, or
shutoffpowerat the fuseor
circuitbreaker panel. ‘
~Someproductssuch as whole
eggsand sealed containers-for
example,closed glassjars—may
explodeand should not be heated
in this oven.
~“Avoidheating baby food fin
glassjars, evenwithout their
lids; especially meat and egg
mixtures.
~Don’tdefrost frozen
beverages innarrownecked
bottles;especiallycarbonated
ones. Evenifthecontaineris
opened,pressurecan buildup.
This cancausethecontainerto
burst, resultingin injury.
@Use metal oniy as directed in
Cookbook. Metalstripsas used
on meat roastsare helpfulwhen
usedas shownin Cookbook.
TV dinnersmaybe cookedin
metaltrays,providingthemetal
foilcoversare removed,but
whenusingshelfthey mustbe
replacedin theirboxes.However,
when usingmetalin microwave
oven,keep metal (exceptfor
Double Duty’”shel~ at least
l-inch away from sides of oven
@Cooking utensils may
becmne hot becauseof heat
transferredfrom the heatedfood.
This is especiallytrue if plastic
wrap has been coveringthe top
and handlesofthe utensil.
Potholdersmaybe needed to
handletheutensil.
—Removewire twist-ticsfrom
paper or plasticbagsbefore
placingbag in oven.
—Donot use your microwave
ovento dry newspapers.

‘Sometimes,the cookingtray
can becometoo hot to totich.
Becarefulhandlingthe cooking
tray during and after cooking.
~Therrnorneter-Do notuse
athermometer in food you
are microwaving unless the
thermometer is designed or
recommended for use in the
microwaveoven.
*Removethe temperature
probe from the oven when not
in use. If youleavetheprobe
insidethe ovenwithoutinserting
it in foodor liquid, and turn on
microwaveenergy,it can create
electricalarcingin the ovenand
damageovenwalls.
~Plastic utensils—P1astic
utensilsdesignedfor microwave
cookingare very useful, but
shouldbe used carefully.Even
~icrowaveplastic may not be
tolerant of overcooking
conditions as are glass or
ceramic materials and may
softenor char if subjectedto
shortperiodsof overcooking.In
longerexposuresto overcooking,
thefoodand utensilscould
ignite.For these reasons: 1)Use
Microwaveplasticsonly and use
them instrict compliancewith
[hcutensilmanufacturer’s
]$cct>rlln~endations.2) Do not
subjectempty utensilsto
microwaving.3) Do notpermit
chilclrento use plastic utensils
~~’ithoutcomplctcsupervision.
@When cooking pork follow
ourdirectionsexactlyandalways
cookthemeatto atleast 170?
Thisassuresthat, in theremote
possibilitythattrichinamaybe
presentin the meat, it willbe
killedand meatwillbe safe
to eat.
~Boilingeggs(in and out of
shell)is not recommended for
microwavecooking.Pressure
canbuildup insideeggyolkand
maycauseit to burst, resulting
in injury.
~Foodswith unbroken outer
“skin” suchas potatoes,hot
dogsor sausages,tomatoes,
apples,chickenliversand other
giblets,and eggs(seeprevious
caution) should be pierced to
allow steam to escape during
cooking.
~~~~oila~le”cooking pouches
and tightly closed plastic bags
shouldbe slit, piercedor vented
as directedin Cookbook.If they
are not, plasticcouldburstduring
or immediatelyafter cooking,
possiblyresultingin injury.
Also, plastic storage containers
should be at least partially
uncovered because they form a
tight seal. When cooking with
containers tightly covered with
plastic wrap, remove covering
carefidly and direct steam away
from hands and Face.
5
0Useof the IXNJBLEDIJTIP
shelf accessory.
—Removetheshelffromoven
whennot inuse.
–Do not storeor cook with
shelfon floorofoven.Product
damagemayresult.
–Use potholderswhenhandling
theshelfandutensils.Theymay
behot.
—Donot use microwave
browningdish on shelf. Product
damagecould result.

ofYour Oven
1.DoorHandle. Squeezeandpull
door handleto open door. Door
must be securely latchedbefore
oven willoperate.
2. DoorLatches.
3. ChokeDoor Seal.
4. Door Screen. Metal screen
permits viewingof foodsand keeps
microwfivcsconflncd insideoven.
..
5. OvenInterior Lightturns on
when the door isopened and when
theovenisoperating.
6. Model and SerialNumbers.
7.ModeStirrer Cover.Protects
the microwaveenergydistributing
system. Do not removethis cover.
Youwill damage theoven.
8.MICROTHERMOMETERT’l
temperature probe. Usewith
TEMP COOK/HOLD function
only.
9. IXXJBLE-DUTYT”shelf.
Letsyoumicrowaveseveralfoodsat
once. (See SafetyInstructions for
special instructions.) When this
shelf is not in use, please remove
from the oven.
10.RemovableGlassCooking
Tray.Do not operate the oven
withoutthe cooking tray in place.
11.CookingTray Retainers.
12.TouchControlPaneland
Display.Seenextpagefor
instructions.

Tbldll Panel
eTouchControlPanel
allowsyoutoset the ovencontrols
electronicallywiththe touchof a
finger.It’sdesignedto be easy
@useand understand.
LTime Cook. Microwavefora
presetamountoftime using
automaticPowerLevelHI (or
changepowerlevelafter entering
cookingtime. Seepage 8.)
2. TempCook/Hold. Use the
temperatureprobeto cook byusing
apresettemperature. Onceoven
reachespreset temperature, it
switchesto HOLD settingand
maintainsthat temperatureuntil
youtouchthe CLEAR/OFF pad.
(Seepage 11.)
3.TimeDefrost. Gentle, generally
uniformthawingat automaticPower
LevelLO, (or change powerlevel
fterenteringdefrostingtime.
epage 10.)
4. Min/Sec Timer. This feature
usesno microwaveenergy. It
functionsas akitchen timer, as a
holdingperiod after defrost or as a
clelaytimer before time cooking.
(Seepage 11.)
5. (lock. Touchthis pad to enter
timeofday or check time ofday
whi]cmicrowaving.
Nsetclock, first touch CLOCK
padanti then enter time ofday. For
example, iftime is 1:30,touch
numhcrpmis 1,3, and Oand 1:30
\\ill appear in display.Touch
STARTpad. To reset or change
[imc, simply repeat above process.
o-
fo-
.
-%3
.
-43
-43
-c)
6. IlispIay.Displaystimeofday
andtimecountingdownduring
cookingfunctions(orpowerlevel
when PowerLevelpad is touched).
‘7.NumberPads.Touchthesepads
to entercooking/defrostingtime,
timeofdayandtemperature.
8. PowerLeveLTouchthesepads
to setyourdesiredpowerlevel.
9. Clear/Off. Whentouched, it
shutsoffthe ovenanderasesall
settings(excepttimeofday).
10.Start. After allselectionsare
made, touchthispadto startoven.
‘LEEMl” Appears On Display:
When usingTEMP COOK/HOLD
function, you haveentered less
than 80°or more than 199?
When setting CLOCK, youhave
not cntcrcd avalidclock time.
Invalidtime ofday or COOK
TIME entered.
7
“mow’ Appeal’%’onDisplay:
~Probe has been forgottenwhen
TEMP COOWHOLD function
isbeing used.
~Probe is not securely seated in
ovenwall receptacle.

byTime
The timecookingfeatureallows
youto presetthe cookingtime.
The ovenshutsoffautomatically.
PowerLevelHI is recommended
formostcooking,butyoumay
changethis formore flexibility.
SeeyourCookbook.
Tobecomebetter acquaintedwith
timecooking,make acup ofcoffee
byfollowingthe stepsbelow.
I IIIIII A=====- 1
Step 1:Fillacup 2/3 fullofwater
and add 1teaspoonof freezedried
coffee. Useacup that has no metal
decoration. Place cup inovenand
closedoor.
Step2: TouchTIME COOK.
Displayshows:0and HI. TIME
COOK flashes.PowerLevelHI is
automaticallyset.
Step3: Selectyourt~me.Touch
1,2 and Ofor aminuteand20
seconds. TIME COOK flashes,
and 1:20and HI are displayed.
If another powerlevelisdesired,
touchdesired PowerLevel pad,
althoughPowerLevelHI is
preferred for thiscup ofcoffee.
Step 4: TouchSTART.Time
countingdown showson display.
Step 5:Whentimeis up, the oven
signalsand flashes “End,”then
shutsoff.
Step &Open the door.
(@@MISandAnswa?ii
Q. Isetxny ovenfortiwtime
calledforinthe recipe,but.at the
end ofthetimeaUowed9mydish
wasn’tdone.Whathappened?
A. Sincehousepowervariesdue
totimeor locationmanyTime
Cookrecipesgiveyouatimerange
topreventovercooking.Setthe
ovenforminimumtime, testthe
foodfordoneness,and cookyour
dishalittlelonger,ifnecessary.
(). Iwanttocookon aPower
LevelotherthanI-D,what do I
need to do?
A. Tochangethe PowerLevel,
touchthedesiredPOWER LEVEL
pad afterenteringdesiredcooking
time andthen touchSTART.
Q. WhathappensifIaccidentaHy
operatethe microwaveoven
withoutfoodin it?
A. Accidentaluse for short
periods oftimedoesnotdamage
the Magnetron,but itis not
recommended.
Q. CanIinterruptmy TIME
COOKfunctiontocheckthefood?
A. Yes.To resumecooking,
simplyclosethe door and press
the STARTpad. The timer mustbe
reset forcookingto resume unless
time isremainingon timer.
Q. Itouchedthemmdmr pads
and selectedmy powerlevel.
When ItouchedSTART, however,
myovendidn’tcomeon. Whynot?
A. The TIME COOK pad mustbe
touched beforesettingthe number
pads or else your ovenwill not
begin cooking.

ternaltemperatureisthe besttest
ofdonenessformanyfoods.
TEMP COOK/HOLD takesthe
guessworkoutofcookingbecause
theovenautomaticallyswitchesto
HOLDsettingafter reachingthe
presetfoodtemperatureand
maintainsthattemperatureuntil
youtouchthe CLEAR/OFF pad.
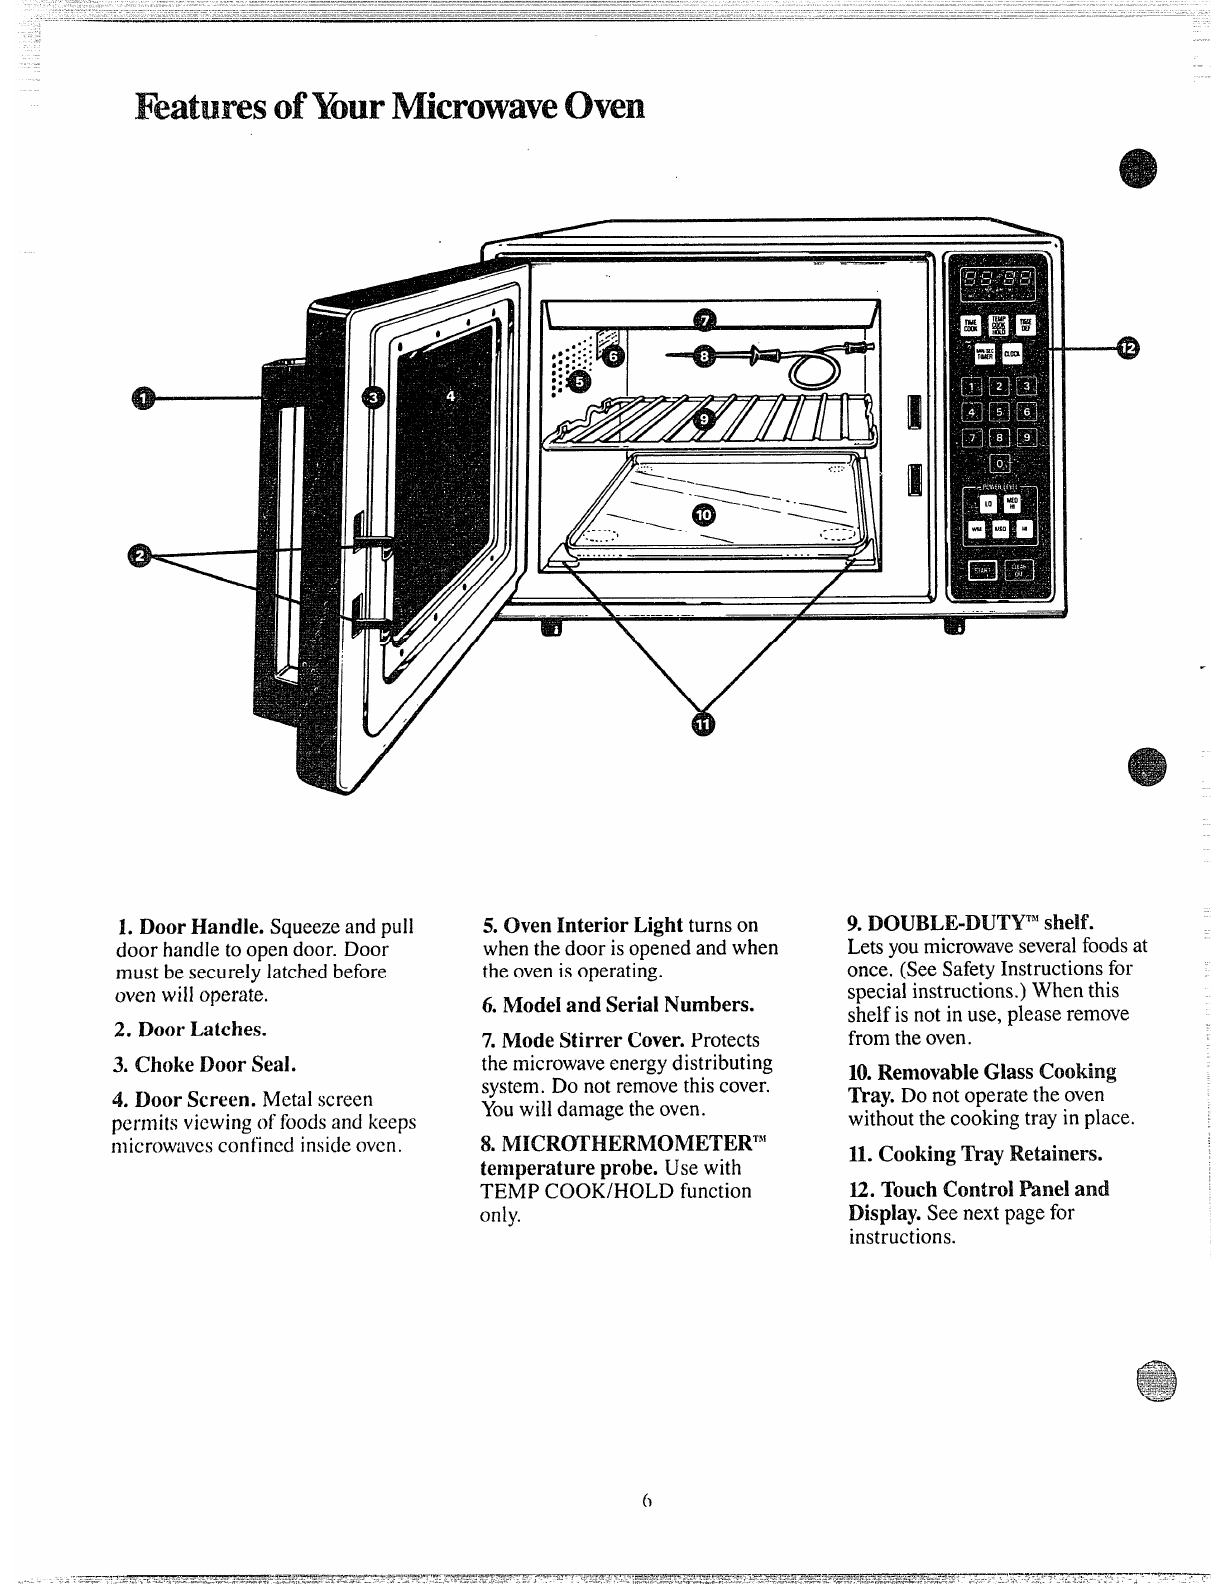
11~ Iknqm-atureProtk
HANDLE CABLE
SENSOR
TheTemperatureProbe isafood
thermometerthatgaugesthe
internaltemperatureofyourfood;
itmustbeusedwhen usingTEMP
COOK/HOLD. Toutilizeyour
probeproperly,followdirections
below.
Placetender beef roasts on trivet in
microwave-safedish. Insert probe
fromthe fronthorizontally intothe
ccntcr meatyarea not touching
boneor fat. Make sure the handle
doesnot touch the food or top or
sidesof the oven.Cover with
wax paper.
(1
a
Placemeat inovenwith probeto
the right. Insert cableendofprobe
firmly intoreceptacleon ovenwall.
HowtoTamp Cookaltolled
BeefRibRoastto Meahm
Step 1:Insert temperatureprobe
and attachprobe securelyin oven
wall. Close thedoor.
Step2: TouchTEMP COOK/
HOLD. The displaypanel shows0
and HI, and TEMP COOK flashes.
Step3: Touch 1,2,5 for 125:125
and HI showon display,and TEMP
COOK flashes.
Step 4: TouchMED PowerLevel
pad. MED appearson display.
Step5: TouchSTART.If internal
temperature ofthe roast islessthan
80~–80° will be displayed,or if
temperature is 80°or above,display
showstemperature countingup:’
Step 6: When 125°is reached, the
ovenwill sound and display
HOLD, The ovenwill then hold the
temperature.
Step 7:Touchthe CLEAR/OFF
pad to stop the cycle,
Step 8: Removeprobe and food
from the oven.
*Usc alower power level; itwill
heat more evenly even though
requiring more time.
@Besure frozen food has been
completelydefrostedbeforeinserting
probe. Probe may break off if used
in frozen fwxk.
@~ovcr foods loosely for moisture
control and quick, even heating.
Quest-ionsmdAnswers
QAfterl Mowedthesteps
andtouchedtheSTARTpad,
“EEEE’9flashedin the display
andasignalsounded.VVhat9s
wrong?
A. “EEEE” flashesifyouset
thetemperatureeitherbelow90°
or above199°.Theoventellsyou,
betweenthe flashingof “EE EE~’
whatincorrectentrywasmade.To
re-enter,touchCLEAR/OFF pad
andbeginagain.
Q. Arethereany foodsIcan’t
TernpCook?
A. Yes.Delicatebuttericings,ice
cream, frozenwhippedtoppings,
etc. softenrapidlyat warm
temperatures.Batters,doughsand
frozenfoodsare alsodifficultto
cookprecisely withthe probe. It’s
bestto Time Cookthese foods.
Q. Why did “PROB” flashon
the displayafterItouched the
STARTpad?
A. “PROB” willflash if you
don’tseatthecableend oftheprobe
securely intothe receptaclein the
ovenwall or if youtouch the TEMP
COOK/HOLD pad and forgetto
use the probe.
Q. Can Ileavemy probe in the
ovenif it’snot insertedin food?
A. No, if ittouchesthe ovenwall,
you maydamage the oven.
Q. Can 1TempCook different
portionsof foodat different
temperatures?
A. Yes.The temperature probe
givesyou the freedom to cook
different portionsof foodat
different temperatures to suit
individualeating styles. Simply
place probe in foodand change
temperature settingas needed.

.-
in
The Defrostsettingisdesigned
for eventhawingforlarge
amountsoffowl andisoneofthe
most importantadvantagesof a
microwaveoven.
@PowerLevelLO isautomatically
setfor defrosting,butyoumay
changethisfor moreflexibility.
~Se”eyour Cookbookfor
defrostinghelp.
Tobecomebetteracquaintedwith
thedefrostfunction,defrostfrozen
pork chopsby followingthe steps
below.
Step 1:Place packageof frozen
chopsin the ovenand closedoor.
Step 2: TouchTIME DEF. Display
reads :0 and PowerLevelLO is
automatically setin the oven.
TIME DEF flashes.
Step 3: Touch 8,0 and Ofor 8
minutes. TIME DEF and 8:00 are
displayed. If you wish to change
power level, touch desired Power
Levelpad.
Step4: TouchSTART.Time counts
downondisplay.Whencycleis
completed,the ovensignalsand
flashes“End~’thenautomatically
shutsoff.
Step5: Turnpackageover,close
doorand repeatSteps2,3 and 4.
Step 6: Open door,remove
packageand separatechopsto
finishdefrosting.
DefrostingTips
@Foodsfrozen inpaper or plastic
can be defrostedin the package.
-.
c“ ..
.,
~For evendefrosting,many foods
need to be brokenup or separated
part ofthe waythroughthe
defrostingtime.
@Pre-packaged frozen dinners
can be defrosted and microwave
cooked. Be sure to removeany foil
covers. Keep metal traysat least 1“
awayfrom cavity walls.
~Check your Cookbook for other
defrosting tips.
QuestionsandAnswers
Q. WhenIpressSTART,Ihear
adullthumpingnoise.Whatis it?
A. This soundis normal. It is
lettingyouknowthe ovenisusinga
PowerLevellowerthan HI.
Q. Can IDefrostsmallitemsin
ahurry?
A. Yes,buttheywillneed more
frequentattentionthan usual. Raise
the PowerLevelafterenteringthe
time bytouchingthedesired power
levelpad. PowerLevelMED cuts
thetime aboutin 1/2;PowerLevel
HI cutsthe timeto approximately
1/3.During either, rotateor stir
foodfrequently
Q. Whydon’tthe defrosting
times in the CookbcDokseem right
for my food?
A. Cookbooktimesare average.
Defrostingtime can vary according
to the temperature in your freeze
Setyour ovenforthe time indicat
in yourCookbook. If your foodis
stillnotcompletelythawedatthe
end ofthat time, reset your oven
and adjustthe time accordingly.
Q. $hmddalifoods be
completely thawedbefore
cooking?
A. Somefoods shouldnot be
completelythawedbefore cooking.
For example, fish cooks so quickly
it isbetter to begin cooking while it
is stillslightlyfrozen.
Q. Can Iopen the door during
defrosting to check on the
progressof my food?
A. Yes.Youmay open the door at
anytime during microwaving.To
resume defrosting, close the door
and press START.The oven begins
operating if time is left on timer.
If not, reset timer.

toUse
TheMIN/SEC TIMERhasthree
timingfunctions:
@It operatesas aminutetimer.
@It can beset to delaycooking.
@It can be used as aholdsetting
afterdefrosting.
The MIN/SEC TIMER operates
withoutmicrowaveenergy.
llOW ~0Timea3-mw~
Phone ‘&Ill
1. TouchMIN/SEC TIMER pad.
The displayshows:0 and TIME
flashes.
2. Touchnumber pads 3,0 and O
(for3minutesand no seconds).
Displayshows3:00.
3. TouchSTART.Displayshows
timecountingdown.
4. When time is up, ovensignals
anddisplayshows-timeofday.
aHOLD
‘mVm
The Minute/Second Timercan
also be used to program “hold
time” between microwavecooking
t’unctions.Thetimecanrangefrom
one second to 99 minutesand 99
seconds. AHOLD, or “standing”
time may be found in some of
yourown recipes or Cookbook.
cooking
T(Iset the oven to delay cooking up
[O99 minutes followSteps 1and 2
[oenter hold time. Then touch
TIME COOK pad and enter time
beforepressing START.
dHOw’to Defl-osty ElOld aEld
Tiille C{){)l{
cLet’ssayyou want to defrost a
~&@~fJ-OZCncasserole for 15minutes,
hold for 10minutes and then Time
Cook f(x<25 minutes. Ffcrc’show:
(%c]I~:Take~ilSS~l”O1~from f[W?Zel’
:indplace in (wen.
Step2: TouchTIME DEF pad.
The displayshows:0, and TIME
DEF flashes.
Step3: Touchpads 1,5,0 andOfor
15minutesdefrostingtime. 15:00
appearson display.(Defrostingis
automaticallyseton PowerLevel
LO but can be changedbytouching
thedesired powerlevelpad.)
Step4: Set standingor hold time
bytouching MIN/SEC TIMER. :0
appears on displayand TIME
tlashes.
Step5: Touch 1,0,0 and Gto hold
forten minutes. 10:00appearson
display.
Step 6: TouchTIME COOK pad.
The display shows:0 and HI, and
TUVIECOOK flashes.
Step 7:Touch 2,5,0 and Ofor
twenty-fiveminutesof cooking
time. 25:00 appears on display.
Step8:TouchSTART.15:00
countingdownshowson display.
Aseach functionisautomatically
performedovendisplayshows
instructionsenteredand the
function.Whilecooking,youmay
touchappropriatepad to recall
timesyouset.
Step9: When time is up, the oven
signalsand flashes“End.”
andL$JW$WWS
Q. What willhappen ifI
accidentallyreversemy defrost,
hold and cookinstructions?
A. The ovenwillautomatically
rearrangeyour program. Defrosting
will alwayscome first, then hold,
and then the cookingfunction.
Q. Can Idefrostand hold only?
A. Yes.Sometimesyou may only
wantto defrostafood, hold it, and
cook it later. Allyouneed to do is
program in Defrostand amount of
time. Then program Hold and the
amount oftime. Be sure to put the
thaweddish in the refrigerator
promptly.
NOTE: Let foodsremain at room
temperature onlyas long as safe.
Times will vary.

care (hmsi
YournewMicrowaveOvenis
avaluableappliance.Protect
itfrommisuse by Mowinjj
theserules:
@Keepyourovenclean and
sweet-smelling.Openingtheoven
door afewminutesafter cooking
helps “air-out” theinterior,An
occasionalthoroughwipingwitha
solutionofbakingsodaand water
keepsthe interior fresh.
@Don’tuse sharp-edgedutensils
withyouroven. The insideand
outsideovenwallscan be
scratched. The controlpanelcan be
damaged.
@Don’tremovethe mode stirrer
coverat the top of the oven
(microwavefeature7on page6).
Youwill damagethe oven.
BE CERTAINPOWERIS OFF
BEFORE CLEANING ANY
PARTOF THIS OVEN.
How toCkan the Inside
Walls,floor and plastic cover.
Becausethere is little heat except
inthe food, or sometimes in the
utensils, spills and spatters are easy
to remove. Some spatters can be
removed with apaper towel, others
mayrequire adamp cloth. Remove
g-easy spatters with asudsy cloth,
then rinse and dry. Do not use
abrasive cleaners on oven walls.
NEVER USE ACOMMERCIAL
OVEN CLEANER ON ANY
PARTOF YOUR MICROWAVE
OVEN.
Door (inside). Glass: Wipe up
spatters daily, wtishwhen soiled,
~+~it}l:1minimum of sudsy warm
water. Rinse thoroughly and dry.
Metaland plasticpartson door:
Wipefrequentlywith adampcloth
to removeall soil.DO NOTUSE
ABRASIVES,SUCHASCLEAN-
ING POWDERSOR STEELAND
PLASTICPADS.THEY WILL
MAR THE SURFACE.
Removable(MassCookingTray.It
isoccasionallynecessaryto remove
thecookingtrayforcleaningofthe
trayor oven.Topreventbreakage,
do notplacetrayintowaterjustafter
cooking.Washitcarefullyinwarm,
sudsywateror in the dishwasher.
The traycan be brokenifdropped.
Specialnotewhen using
Brown ‘NSearDish:If greaseis
present, highheatgeneratedon
bottomofaBrown‘NSeardish
maycausethe greaseto burn onto
the oventray.This maybe removed
with acleanser suchas Bar
KeepersFriend” Cleanserby
SerVaasLaboratories, Inc.
After usingBar KeepersFriend”
Cleanser, rinse anddry thoroughly,
followinginstructionson can. Do
not useBar KeepersFriend”
Cleanser on the paintedsurfaces
such asthe walls.It mayscratch
the paint.
Bar Keepers Friend” Cleanser is
sold in many grocery,hardware,
and department stores.
DOUBLE-lDUT’YTh’shelf. Your
shelf accessory isdesignedfor use
in amicrowaveovenonly; do not
use in aconventionaloven. Do not
useabrowningdish with the shelf.
Arcing could occur.
Clean shelf with mild soap and
wateror in the dishwasher.Do not
chxmin self-cleaning oven.
Automatic TemperatureProbe.
Probe is sturdy,but care shouldbe
taken in handling. Do not twist or
bend; avoiddropping temperature
probe.
Clean as soon after using as
possible. Toclean, wipe with sudsy
cloth, then rub lightlywith plastic
scouring ball if necessary. Rinse
and dry. (Or wash in dishwasher.)
12
How toCleanthe Outside
Case. Cleantheoutsideofyour
ovenwithsoapanddampcloth,
then rinseanddry.The outerpane
ofthe windowisglass,Justwipe
cleanwithadampcloth. Chrome
trim isbestwipedwith adamp
clothandthen withadry towel.
ControlPm@. Wipewith adamp
cloth. Dry thoroughly.Do notuse
abrasivesor sharpobjectscmthe
panel—theycan damageit.
Door Surface. Whencleaning
surfacesofdoor andoventhat
come togetheron closingthedoor,
use onlymild, non-abrasivesoaps
or detergentsappliedwith asponge
or softcloth.
PowerCord. If thecord becomes
soiled, unplugand washwith damp
cloth. For stubbornspots, sudsy
watermaybe used, butbe certain
to rinse and dry thoroughlybefore
pluggingcord intooutlet.
ownLamp
First, unplugthe oven.Then
removelamp compartmentcover
by removingscrewswhich hold
coverin place. Coveris locatedon
the sideofthe outer case.
Replace defectivebulb with a25
watt appliance bulb. (It is available
in drug-andhardware stores.)
Replace compartment cover. Plug
in the oven.

Thisappliancemustbegrounded.
In the&ent of an eiectrfial short
circuit, groundingreducesthe risk
ofelectricshockbyprovidingan
escapewire forthe electric current.
Thisapplianceisequippedwith a
powercord havingagrounding
wire withagroundingplug. The
plugmustbe pluggedinto an outlet
thatis properly installedand
grounded. (Fig. 1)
wAllll!+J1~~-ImProPer use
ofthe groundingplug can result in
arisk ~f electric shock.
PREFERRED
METHOD
sal~
%2
~n
2?+ OINi!iiH
GROUNDEXISTS
Fig. 1BEFOREUSE
Consultaqualifiede~ectricianor
service technicianif the grounding
instructionsare notcompletely
understood, or ifdoubt existsas to
whether the applianceis properly
grounded.
Where astandardtwo-prongwall
receptacle isencountered, itis
your personal responsibilityand
obligationto haveit replaced with
aproperly grounded three-prong
wallreceptacle.
Do not under my ciHmn-
stmce cut or remove the
third (ground) prong from
the power cord.
used’AdapterPhlgs
usagesituationswhere
a@kmce’s~wer cordwill!be
discomectedinfrequently.
Becauseofpotentialsafetyhazards
undercertainconditions,we
stronglyrecommendaga;nstthe
useofanadapterplug. However,
ifyoustillelecttousean adapter,
wherelocalcodespermit, a
TEMPORARYCONNECTION
maybemadetoaproperlygrounded
two-prongwallr;ceptac~ebythe
useofaUL listedadapter(Fig. 2)
whichisavailableatmostlocal
hardwarestores.
TEMP(NW3Y METHOD
(ADAPTER PLUGS NOT
PERMITTED IN CANADA) m
The largerslotin theadapter must
bealignedwith the larger slotinthe
wallreceptacle to provideproper
polarity inthe connectionofthe
powercord.
Caution:Attachingthe adapter
ground terminal tothe wall
receptacle coverscrew does not
ground the appliance unlessthe
coverscrew ismetal, and not
insulated, and the wallreceptacle is
grounded through thehouse
wiring. Youshould havethe circuit
checked byaqualified electrician to
make sure the receptacle is
properly grounded.
When disconnecting the power
cord from the adapter, alwayshold
the adapter with one hand. If this is
notdone, the adapter ground
terminal isvery likelyto break with
repeated use. Shouldthis happen,
D(I NOT USE the appliance until a
proper ground has again been
established.
13
Usagesituationswhere
appliance’s~wer cordVW
bedisconnectedfrequently.
Do notuseanadapterplug
inthesesituationsbecause
disconnectingofthepowercord
placesunduestrainon theadapter
andleadsto eventualfailureofthe
adaptergroundterminal. You
shouldhavethetwo-prongwall
receptaclereplacedwith athree-
prong(grounding)receptacleby
aqualifiedelectricianbefore
usingtheappliance.
Useot’ExtensionCords
Becauseofpotentialsafetyhazards
undercertainconditionswestrongly
recommendagainsttheuseofan
extensioncord. However,if itis
necessaryto usean extensioncord,
useonlya3-wireextensioncord
thathasa3-bladegroundingplug,
anda3-slotreceptaclethat will
accepttheplugon the appliance.
The marked ratingoftheextension
cord shallbe equalto or greater
thantheelectrical ratingofthe
appliance(15amperes).
Suchextensioncordsare obtainable
throughGeneral Electric service.
If you do use an extension ‘cord
withyourmicrowaveoven~the
interiorlightmayflicker andthe
blowersoundmayvarywhen oven
is inuse. Cook anddefrosttimes
maybelongeraswell.
——
—.
-
-
~
.—.
-
-
-
-
-
mar=
mi6K”
—.
Em9T
—.
-
-

Thewireshelfisspecifically
designedforaddedcapacityheating.
andreheatinginyourmicrowaveoven.
Heatingandreheating,whichare
themostpopularusesofmicrowave
ovens,maynowbedoneinmultiple
quantities,soseveralfoodsare
readytoserveatthesametime.
Whenmicrowavingwiththeoven
shelf,sometechniqueswilldiffer
fromthecookbookwhichcame
withyouroven.It isimportantto
arrangefoodsproperly,andthisis
shownonthenextpage.Utensilsize
isimportant;selectfromamongthe
suggestionsatright. Also, foodsize
shouldbeconsidered;foodsover
3~incheshigh, or 3poundsarenot
recommendedforshelfcooking.
Battersanddoughfoodsandalso
foodsforovenmealsusingscratch
recipesshouldbecookedwithout
theovenshelf, followingcookbook
directions.
I
l/r----7 “
Usepotholders whenhandling
foodsheatedtogetherwithyour
ovenshelf, especially when heating
largeramountsoffoodin8inch
squareor other 2quart size
casseroles. Extra steamgenerated
frommultiplefoodcookingmay
makeutensilshotterthan with
regularmicrowaving.
~~se when
metal utensils. They
maybe hot.
utensils forshelf
HeatingandReheating
Beforeplacingfoodinthedishes
youplantouseforshelfmicro-
waving,checktoseethattheywill
fittogetheronor undertheshelf.
Also,besureutensilsaremicro-
wavesafe.
Utensilsforheatingor reheating
include 1cupmeasuringcup,
8x4x3-inchloafdishes,9x5x3-
inchloafdishesor 9-inchpieplates.
I
I
Leftoversmaybe placedinsmall
individualceramic or plasticbowls
or dividedplates.
Usewaxpaper or plasticwrap
insteadoflidson casseroles. Lids
mayadd too much heighttodish.
IPositioningthe shelf
~-
TopositiontheDOUBLEDUTY~
shelf,tipthebackslightlyandfitthe
shelfsupportguidesontothe
supportguideslocatedoneachside
oftheovenintherear.
Next, lowerthe frontuntilthe shelf
supportguidesfitonto thesupport
guideslocatedateachsideofthe
oveninthe front.
Whenproperly positioned,theshelf
shouldfitsnuglyinplace.
14

wto Heator ReheatShniIarT~pesoflhod
TWOplatesofieftoversmaybe
reheatedtogether.Arrangethick
ordensefoodstooutsideedgesof
plateandcoverwithplasticwrap.
MicrowaveatHIfor4 to5minutes.
Reversepositionofplates(topto
bottom)androtate1/2turn.Continue
microwavingatHIfor4to5
minutes.Continueheating,if
necessary,untilhot.
Reheatingtwocasserokx (height
shouldbelessthan3%inches)is
nowpossible.Coverwithplastic
wrap. Usestaggeredarrangements
offood,placingfoodon rightsideof
shelfandleftsideoffloor.Referto
HeatingandReheatingGuide(see
cookbook)forsuggestedmicrowave
timeper casseroleandaddthetimes
together.MicrowaveatHI, reversing
positionoffoods(toptobottom)
afterhalfoftime. Also,heatseveral
smallbowlsofleftoversthisway,
stirringandreversingpositionsafter
halfoftime.
Howto several! Types
Whenheatingseveraldifferenttypes
offoodtogether,foodswhichshould
beservedhotmustbeplacedonthe
ovenshelf,whilefoodswhichare
onlywarmedshouldbeplacedon
thefloor.Thisisbecausemicrowave
energyenterstheovenfromthetop
only.Also,itisimportantto
rememberthatfoodsabsorb
microwaveenergyatdifferentrates.
Ratescanbeaffectedbythesizeof
thefood,anditsstarting
temperatllre.
Becauseofthe varyingrates, you
mayneedtostartreheatingalargeor
densefoodafewminutesaheadof
time, thenaddothersmalleror less
dense foods.Alternately,if
oneofthefoodsyouare heating
seemsundercookedbut theothers
are heatedsatisfactorily,letthe
underheatedfoodcontinuecooking.
Heatorreheatdifferenttypesoffood
atHI. Todetermineheatingtimes,
addtimesforallfoodstogether.(See
heatingguideinCookbook.)After
halfoftime, stiror rearrangefoods
(donotreversepositions).Check
foods(topshelfespecially)after3/4
oftotaltimeandremoveanywhich
aredone.Continuecookingothers.
TWOfrozenindividualentrees
(5t0 70%.each)ortwoTVdinners
(10to 12oz. each)arebothreadyto
serveatthesametime.Removebatter
foods;cooktheseccmventionally.
Removemetalfoilcoversandreturn
foiltrayscontainingfoodtoboxesin
whichtheywerepurchased. Place
inovenwithoneTV dinneronright
shelfandthe seconddinneronleft
floor.MicrowaveatHI for9minutes.
Reversepositions(toptobottom)
androtatefoods 1/2turn, Continue
microwavingatHI for9minutes.
Checkdinners forheating.If one
dinnerseemslessdonethandesired,
return ittotheboxandcontinue
heatingon shelf 1to2more minutes.
15hw3
—.
&mm
Eim?sM
.—
K#wL.
F---
-
ti-
-n
swJr-
E&4.@a
—.–
I
+Fq
.
///y
o~.,
,.
ml
,.-+:”/ ..<!’+----—> ‘
.,, ,
.- 4:““”-:“. “.
,,
/
.. .-’
.
/\\
Ham On Shemr’geordense foods
whichneedthemost heating,suchas
leftoverfried chicken, casserolesof
cannedor leftovervegetables,rice or
pasta. Placeon ovenfloorthose
foodswhich need onlybewarmed,
suchasbakery pies, roils,muffinsor
breads.
15

TOsavetime andmoney—
beforeyourequestservice,
checktheProblemSolver.
Ifyouhaveaproblem, itmaybe
minor.Youmaybe abletocorrect
ityourself.JustusethisProblem
Solverto locateyourproblemand
thenfollowthe suggested
recommendations.
PROBLEM
OVENWILL NCYI’COME ON
CONTROL PANEL
LIGHTED, YET OVEN
WILL NOT START
~OODSARE EITHER
)VERCOOKED OR
UNDERCOOKED
“EEEE” APPEARS
ON DISPLAY
I“PROB” APPEARS
@Steamorvaporescapingfrom @Dullthumpingsoundwhile
aroundthedoor, operatingatpqwerlevelsother
@Lightreflectionarounddooror thanhigh.
outercase. *SomeT’V-Radiointerfmcnce
*Dimmingovenlightandchange mightbenoticedwhileusingyour
inblowersoundmayoccurwhile microwaveoven.It’ssimilar@the
operatingatpowerlevelsother interferencecausedbyothersmtill
thanhigh. appliancesanddoesnotindicatea
problemwithyouroven.
KMNMBLECAUSEANDREMEDY I
Afuseinyourhomemaybe blownor the circuitbreakertripped. Rcplacc
fuseor resetcircuitbreaker.
Make sure%“ong plugon ovenisfullyinsmted intowallreceptacle.
Door not securelyclosed.
STARTmustbe touchedafterenteringcooking selection.
AnotherselectionenteredalreadyinovenandCLIOUVOFFnottouchedto
cancelit.
MakesureyouhaveenteredcookingtimeaftertouchingTIMECOOK.
CIJ3AR/OFI?wastouchedaccidentally.Resetcookingprogram and touch
START.
Make sure youhaveenteredadesired finished temperatureafter touching
TEMP COOK/HOLD.
Cookingtimes may vary because of starting food temperature, food density
or amount of foodsin oven.TouchTIME COOKandadditionalcooking
timeforcompletion.
IncorrectPowerLevel entered. Check Cookbook for recommended Power
Levelor changinglevelsduring cooking if necessary.
Dishwasnot rotated, turned or,stirred. Some dishesrequire specific
instructions.Check Cookbookor recipe for these instructions.
lioomany dishes in ovenat same time. Cooking time must be increased
whencooking more than one fooditem. Check Cookbook for
recommendationon increasingtime.
probenot insefied properly into food when using Temp CoOtiHo~dfunction.
~heck Cookbook for specificinstructions.
when using Temp ~ook/Hold, atemperature less than W“or more than.
[!?9°has been entered.
Whenusing Clock, youhavenot entered avalid clock time.
~robehas been forgottenor not seated properly in Oven~a~~when using I.—
iON DISPLAY T’empCook/Hold &nctkm. /@/j

Services
OurConsumerServicesarc designedwithyour needs and wants in mind,
WarrantyProtection
Before
yournewapplianceleftthe factory, it went And you have awrittenwarrantyto protectyou,Scethe
throughrigorousteststo detectmanufacturingdefects. warrantyon the back page of this book for Mails.
Corrvtxknt Service
Whetheryourapplianceisinor out of warranty,you’re
just aphonecallawayfromournationwidenetworkof
FactoryTrainedServiceprofessionals,
Simplycallour GE service organization,Lookinthe
W“hiteor YellowPagesof yourtelephonedirectoryfor
GENERALELECTRICCOMPANY,GENERAL
ELECTRICFACTORYSERVICE,GENERAL
ELECTRIC-HOTPOINTFACTORYSERVICEor
GENERALELECTRICCUSTOMERCARE@
SERVICE.
Servicecan normallybescheduledat yourconvenience
andthe techniciandrivesafully-stockedparts service
trucksothat, in mostcases,the repaircan becompleted
inonevisit.
We’reproud of ourserviceandwantyou to bepleased,
but if for somereasonyouare not happywith theservice
youreceive,hereare threestepsto followfor furtherhelp.
NRS~,contact the people whoservicedyourappliance,
Explainwhyyouare notpleased.Inmostcases,[hiswill
solvethe problem,
NEXT, if you arestillnot phnsedwriteall the
details—including
your phone number [o:
Manager,ConsumerRelations
GeneralElectric
AppliancePark
Louisville,Kentucky40225
FINALLY,ifyourproblemisstillnot resolved,write:
MajorApplianceConsumerActionPanel
20North WackerDrive
Chicago,Illinois60606
servicecontracts ...............,!,.
For Mmbie-free service beyond ‘f~;g;;;::::$::::::::gy:
the written warranty period.
:. 1,
~,
-,
;,..,----.—...-Y.:----
Ifyouprefer to budgetyourrepairexpenditures :““-.‘:-r ‘— ,:
insteadof beingsurprisedbythem, GE offers ~>...-=.Z-Z==:ZZ :~
servicecontracts for varyinglengthsof timeon ;,. -$
i
--------- - —..:
allGE major appliances.Withacontract, we’ll $—-+ g
keepyour appliancein goodoperatingcondition ~:;::::::?%:%’!::“’:;;$!%
duringthe contract period at no additional _-@@,,,?##(!-4;s$
~
charge, .,,i(,’,1~,
),%
~~~\,~:L,lk:\z,i:,$k/ij\~$$!,,J’r>!i\)is..!..tl
Servicecontractsletyoupaytoday’spricesfor
serviceamonth, ayear,or severalyearsfrom
now.And, you’llreceiveservicefromGE
trainedservicetechniciansusingonlygenuine
GEparts, If youhaveanyquestionsabout
ServiceContracts,call TOLL-FREE
800.626.2224.(InKentucky,call800.292.2057.)
me(@id Fix” sysb’n
YOUcansave money and time &..
by doing it yourself. !, 4
Fordo-it-yourselferswhowouldprefer to fix
T
GEmajor appliancesthemselves...GE offers
an industry first, the QuickFix”System.
Aprogramfor do-it-yourselfappliancerepair,
thesystemincludesstep-by-steprepairmanuals
forrefrigerators,most non-microwaveeiectric
ranges,dishwashers,and standard and large
capacitywashersand dryers, plusspecially
packagedreplacementparts, and technicafhelp
withatol[-free800number.
..
HelpforY’olRby Phone
&%-
...,
a
j$$j&& Shouldyou need helpin the selectionand
$.: purchase of newappliances, or have questions
-m -~@ about the operation of the GE appliancesyou
.,.. J,..
~,~m&nowown—or havean.vother questionsabout
+%.! GE consumer products or services,youare
onlyaT(2LL-FREEcall away.
The GE AnswerCenterT~lconsumer
information serviceisopen 24hoursaday,
sevendaysaweek.
Our staff of expertsstands readyto assistyou
anytime.
--– MM.wDirect Line toGenmi! -!wmk
*---
-.
.. .-...-~
==—:=.——:
:=.= -m?GEAnsiiiinii

‘‘Parti’h.862A725 P176
rPub,No.49-4675
3-85
Thiswarrantyisextendedtothe
original purchaserand anysucceed-
ingownerfor productspurchased
forordinary homeuse in the 48
mainlandstates,Alaska,Hawaii
andWashington,DC.
All warrantyservicewill beprovided
byour FactoryServiceCentersor
byour authorizedCustomerCarefi)
servicersduring normalworking
hours.
Lookin the White or YellowPages
of yourtelephonedirectoryfor
GENERALELECTRICCOMPANY,
GENERAL ELECTRICFACTORY
SERVICE,GENERAL ELECTRIC-
HOTPOINTFACTORYSERVICEor
GENERAL ELECTRICCUSTOMER
CARE@SERVICE.
Printed in
Korea
Other GE Microwave Oven manuals

GE
GE PSA9120SF1SS User manual

GE
GE Cafe CVM1790SSSS User manual

GE
GE Spacemaker XL JVM1840 User manual

GE
GE Spacemaker-3 JEM 4H Installation instructions

GE
GE JHP69GK User manual

GE
GE Profile PVM9005FMDS User manual

GE
GE JES1142 User manual

GE
GE JKP77G Installation instructions

GE
GE Spacemaker PVM2070 User manual

GE
GE JES1460DSBB User manual