manuals.online logo
Brands
  1. Home
  2. •
  3. Brands
  4. •
  5. GE
  6. •
  7. Microwave Oven
  8. •
  9. GE JET211 Specification sheet

GE JET211 Specification sheet

Howtoget
thebestfrom
Oven
UseandCareofmodelJET211
Featuresofyouroven p5
Touchcontrolpanel p6
HowtouseDefrost p7
Howtousethe
AUTOS’IARTfeature p$
Cookingbytime p8
Savetimeandmoney.
Beforeyourequestservice,
usetheProblemSolver
.-
—-
.——~.
.——
.—.——.-
.——
-———-—
.--.-=-—-—==
.—
.-.-——————
———
—-—~
—=.-—-----
~-. .
Us
You.●*
Readthisbookcarefully.
It will help you operateand main-
tain your new MicrowaveOven
properly.
Keepit handy for answersto your
questions.
If you don’t understandsomething
or needmore help. . .
Call, toll free:
The GE AnswerCenter’”
800.626.2000
consumer information service
or write: (include your phone
number);
ConsumerAffairs
General Electric Company
Appliance Park
Louisville. KY40225
Writedownthe modeland
serialnumbers.
You’llfind them on a label inside
the oven on the upper left side.
These numbers are also on the
Consumer Product Ownership
Registration Card that came with
your Microwave Oven. Before
sending in this card, pleasewrite
these numbers here:
——.—--——.-——...———
Model No.
BesureyourMicrowave
Ovenisregistered.
It is important that we,the manu-
facturer, know the location of your
MicrowaveOvenshould a need
occur for adjustments.
Your supplier is responsiblefor
registeringyou asthe owner.
Pleasecheck with your supplier to
besure he hasdone so;alsosend
in your Consumer Product Owner-
ship RegistrationCard. If you move,
or if you are not the original pur-
chaserpleasewrite to us,stating
model and serial numbers.This
appliancemustberegistered.
Pleasebecertainthatitis.
Write to:
GeneralElectric Company
RangeProduct Service
Appliance Park
Louisville, KY 40225
Hyoureceivedadamaged
oven.. .
immediately contact the dealer (or
builder) that sold you the Micro-
waveOven.
Savetimeand money.
Beforeyourequestservice,check
theProblemSolveron page 12.It
lists minor causesof operating
problems that you can correct
yourself.
TOAVOID
POSSIBLE
EXPOSURE
EXCESSIVE
MICROWAVE
ENERGY
(a) Do NotAttemptto operatethis
ovenwith the door open since open
door operation can resuit in harmful
exposure to microwaveenergy. It is
important not to defeat or tamper
with the safety interlocks.
(b) Do Not Placeany object
betweenthe ovenfront face and the
door or allow soii or cieaner residue
to accumulate on sealing surfaces.
(c) Do NotOperatethe oven if it is
damaged. It is particularityimportant
that the oven door ciose properly
and that there is no darnageto the:
(1)door (bent)
(2) hinges and latches (broken or
loosened)
(3) door sealsand sealing surfaces.
(d) The OvenShouldnot be
adjusted or repaired by anyone
except properly qualified service
personnel.
——. ————
Serial No.
Usethese numbers in any
correspondence or service calls
concerning your Microwave Oven.
Accessory
Available at extra-cost from your GE supplier.
Kit
Converts your countertop oven to abuilt-in wall oven. This microwave
oven is UL listed for installation over GE wall ovens with blackgiass
doors.
%fore Microwaving . . . . . . . . . . . . 2
afety instructions ............3-4
Featuresof YourOven .......... 5
Cooking Complete Reminder. ,.. 5
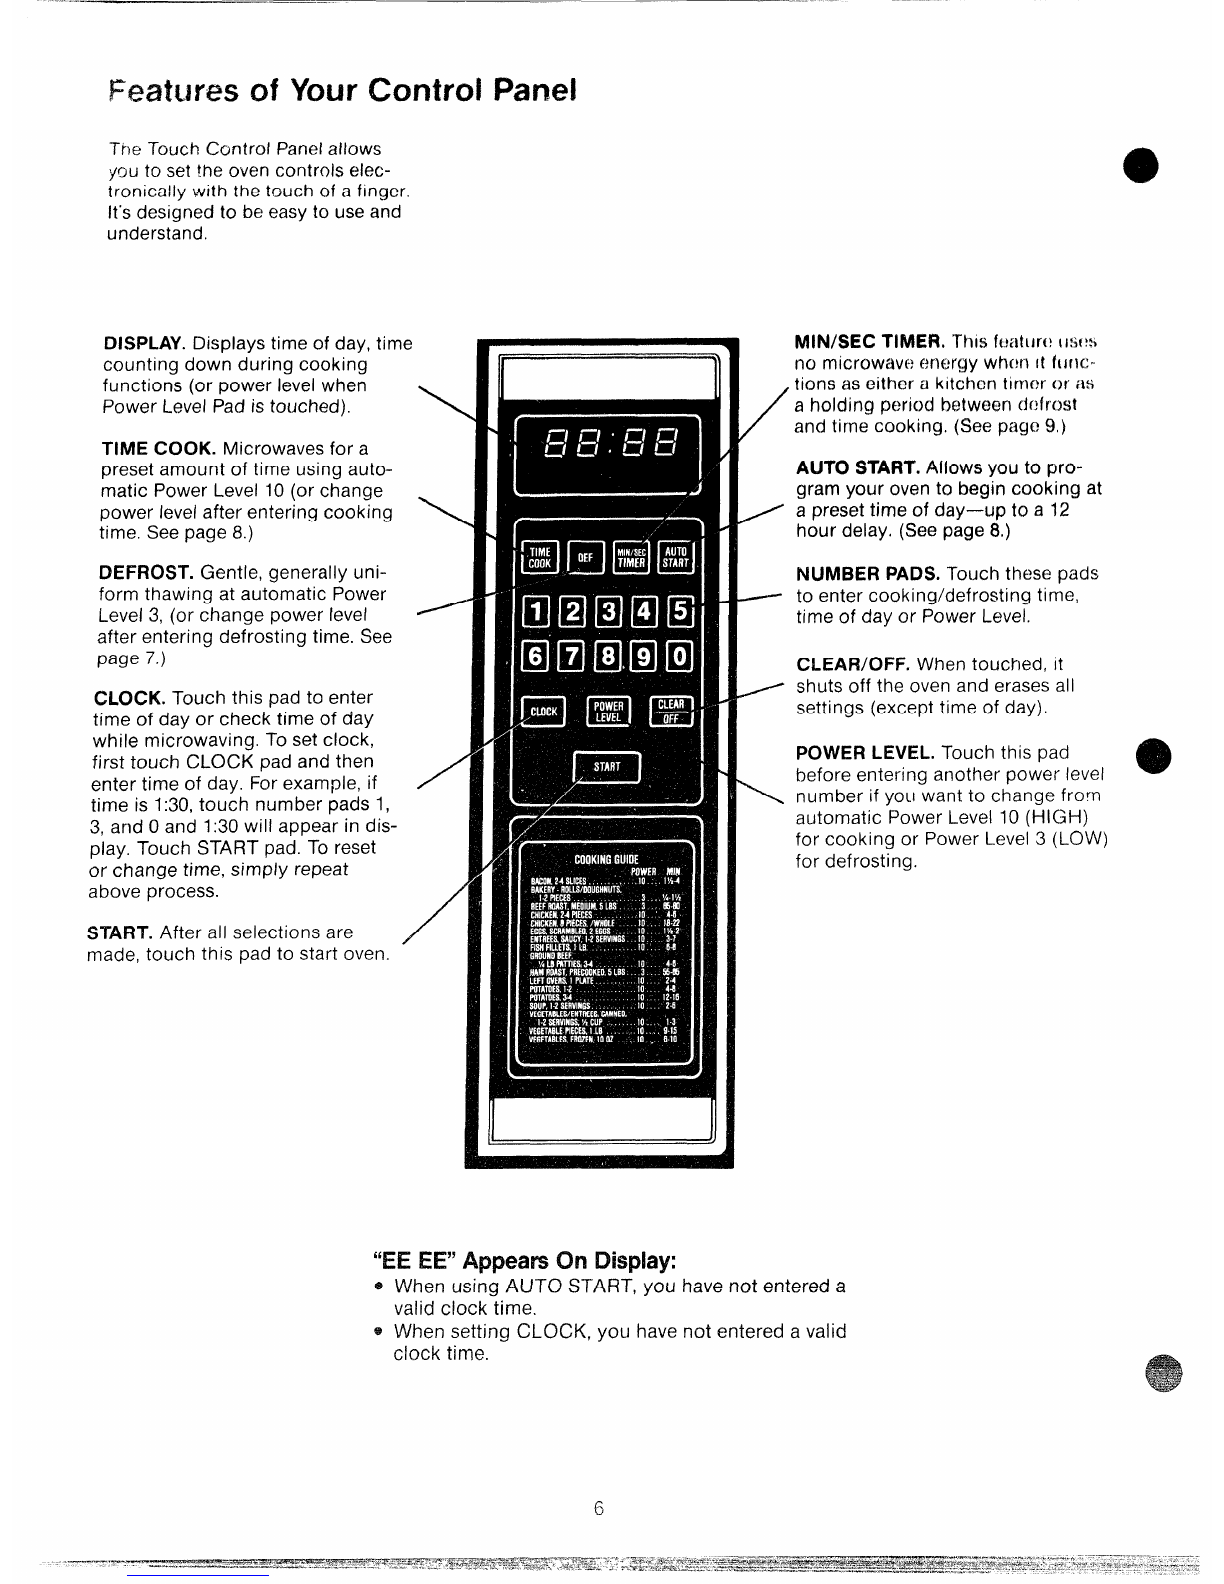
Touch Control Panel . . . . . . . )... 6
Setthe Clock ..........” .. . . .. . 6
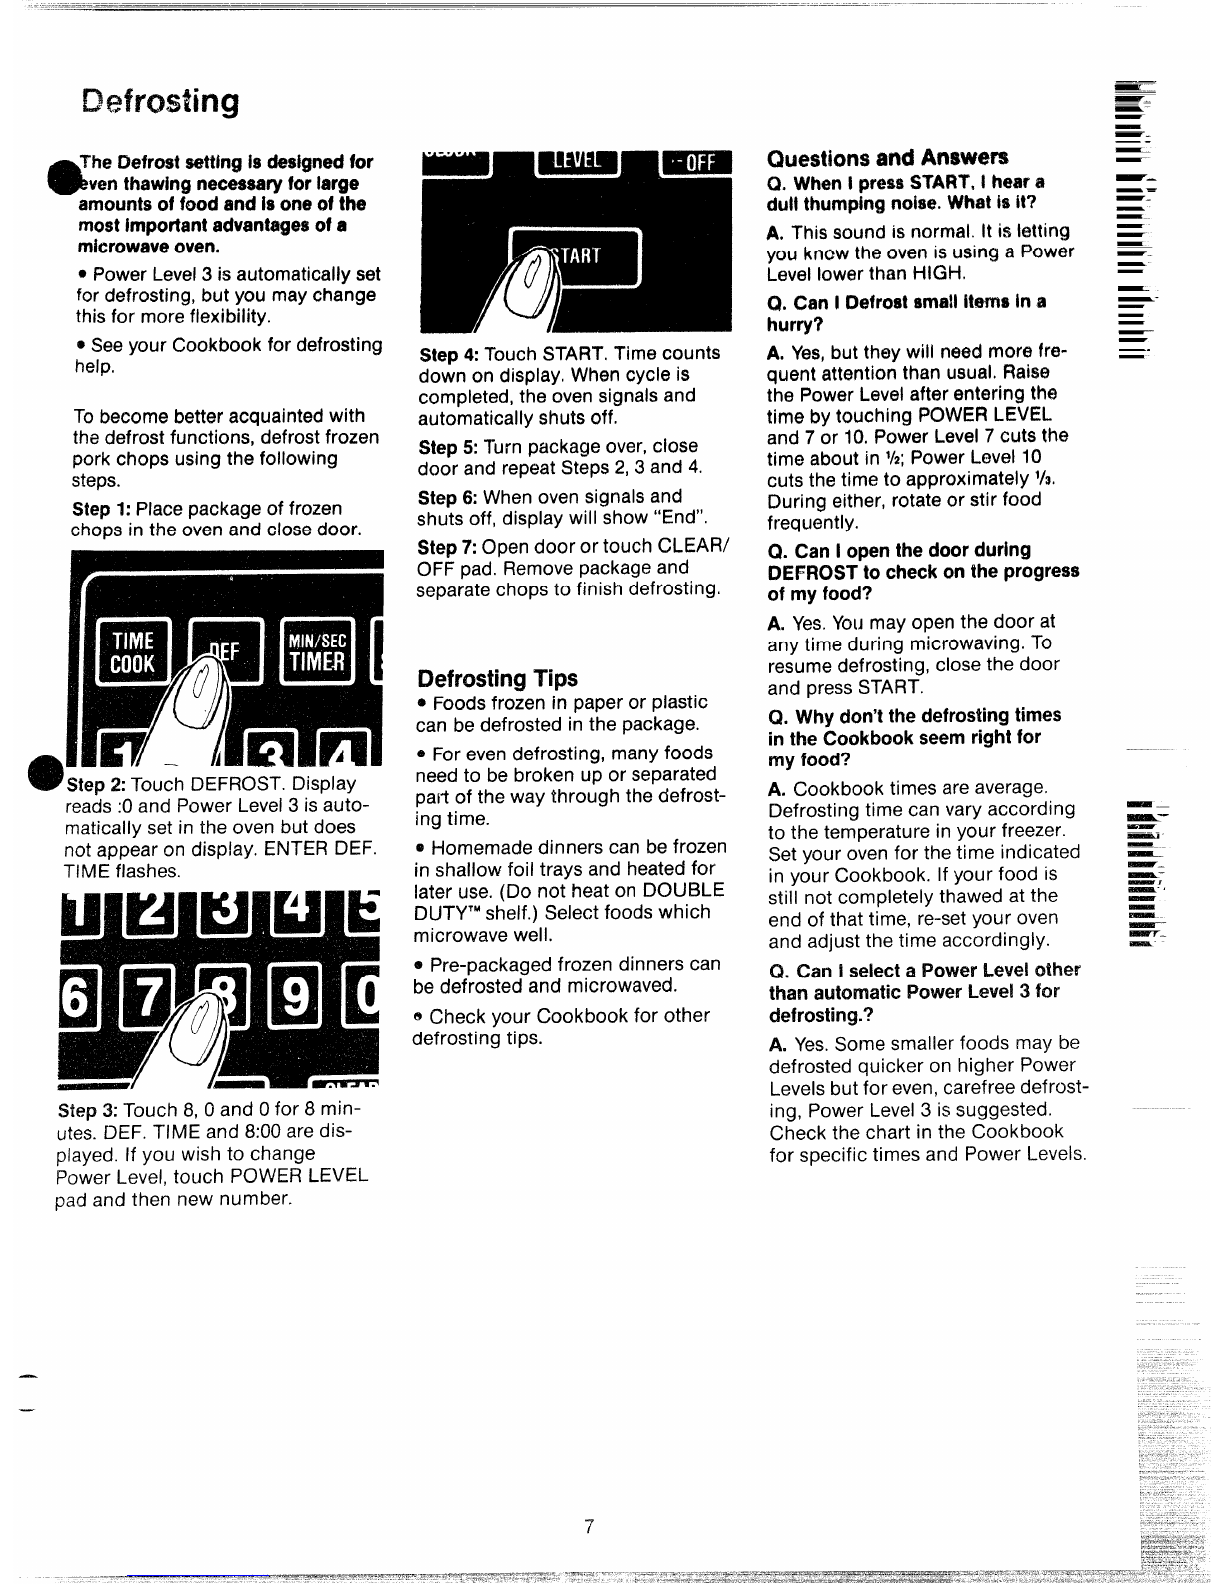
Defrosting. .................... 7’
Time Cook . . . . . . . . . . . . . . . . . .. . 8
AUTOSTART .. . . . . . . .....9... 8
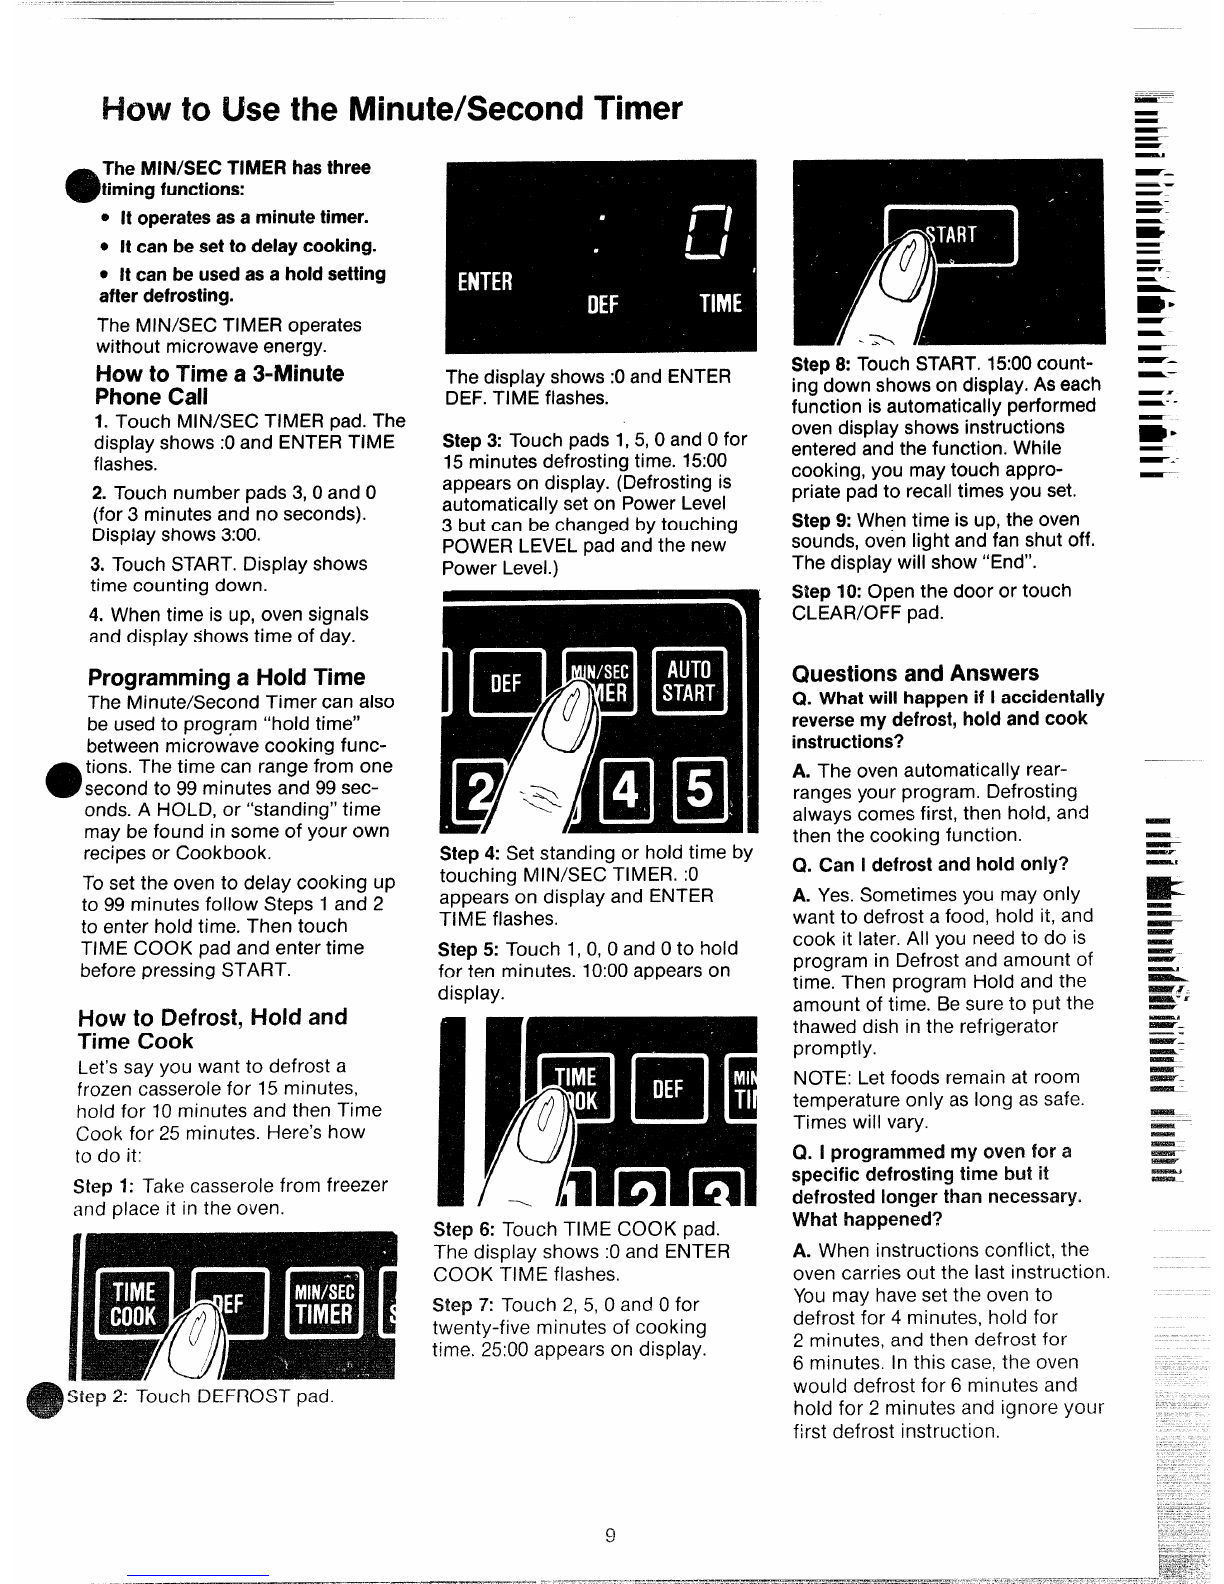
MIN/SEC Timer. ............... 9
Careof YourOven . . . . . . . . . . . . 10
Grounding Instructions ........ 11
Useof Extension Cords. ....... 11
The Problem Soiver
Consumer Services
Warranty ... ......(
. . . . . . . . . . . 12
........... 15
. . . Back Cover
Tips
eMake sure all utensils used in
your microwave oven are labeled
“suitable for microwaving”. Check
-w~urcookbook for specific teSt
~todetermin e’’microwave-safe”
utensils.
@Papertowels, waxpaper, and
plastic wrap can beused tocover
dishes in order to retain moisture
and prevent spattering.
@Some microwaved foods require
stirring, rotating, or rearranging.
Check your Cookbook for specific
instructions.
aSome foods such as unshelled
eggs and hot dogs must be pierced
to allow steam to escape during
cooking.
IMPORTANTSAFETY s?
~-
Fieadall instructionsbeforeusingthisapphrm.
When usingelectrical appliances
basic safety precautions should
be followed, including the
following:
WARNING—TOreducethe risk
of burns,electric shock, fire,
injury to personsor exposureto
excessivemicrowaveenergy:
oUsethis appliance only for its
intended useas described in this
manual.
eReadand follow the specific
“PRECAUTIONS TO AVOID
POSSIBLEEXPOSURETO
EXCESSIVEMICROWAVE
ENERGY”found on page 2.
0This appliance must be
grounded. Connect only to
properly grounded outlet. See
“GROUNDING INSTRUCTIONS”
found on page 11.
0For best operation, plug this
appliance into its own electrical
outlet, to prevent flickering of
lights, blowing of fuse or trip-
ping of circuit breaker.
eInstall or locate this appliance
only in accordance with the pro-
vided installation instructions.
eBe certain to place the front
surface of the door three inches
or more back from the counter-
top edge to avoid accidental tip-
ping of the appliance in normal
usage.
@Do not cover or block any
openings on the appliance.
@Do not use outdoors.
@Do not immerse power cord
or plug in water.
*Keep power cord away from
heated surfaces.
aDo not let power cord hang
over edge of table or counter.
21 Do not operate this appliance
if it has adamaged power cord
or plug, if it is not working prop-
erly, or if it has been damaged
or dropped.
‘See door surface cleaning
instructions en page 10.
0This appliance should be ser-
viced only by qualified service
personnel.Contact nearest
authorizedservicefacility for
repairor adjustment.
oAs with any appliance,close
supervisionis nec$sswywhen
usedby children.
●To reducethe risk of fire in
the ovencavity:
—Do not overcook food. Care-
fully attendappliance if paper,
plastic,or other combustible
materialsare placed insidethe
ovento facilitate cooking.
—-Removewire twist-ties from
paperor plastic bagsbefore
placing bag in oven.
—Do not useyour microwave
ovento dry newspapers.
—Paper towels and napkins,
wax paper. Recycledpaper
products can contain metal
flecks which may causearcing
or ignite. Paperproducts con-
taining nylon or nylon filaments
should be avoided, as they may
also ignite.
—Do not pop popcorn in your
microwave oven unless in aspe-
cial microwave popcorn acces-
sory or unless you use popcorn
labeled for use in microwave
ovens.
—Do not operate the oven while
empty to avoid damage to the
oven and the danger of fire. If by
accident the oven should run
empty aminute or two, no harm
is done. However, try to avoid
operating the oven empty at all
times—it saves energy and pro-
longs life of the oven.
—If materials inside the oven
should ignite, keep oven door
closed, turn oven off, and dis-
connect the power cord, or shut
off power at the fuse or circuit
breaker panel.
(Cof?flnudnex! page.)
..-. —
SAFETY
{continued)
aSome products such as
whole eggs and sealed con-
tainers—for example, closed
glass jars—may explode and
should not be heated in this
oven.
oAvoid heating baby food in
glass jars, even without their
lids; especially meat and egg
mixtures.
eDon’tdefrost frozen bever-
ages in narrow necked bottles;
especially carbonated ones.
Even if the container is opened,
pressure can build up. This can
cause the container to burst,
resulting in injury.
eUse metal only as directed in
Cookbook. Metal strips as used
on meat roasts are helpful when
used as shown in Cookbook.
TV dinners may be cooked in
metal trays. However, when
using metal in microwave oven,
keep metal at least l-inch away
from sides of oven.
eCooking utensils may
become hot because of heat
transferred from the heated
food. This is especially true if
plastic wrap has been covering
the top and handles of the uten-
sil. Potholders may be needed
to handle the utensil.
oSometimes, the oven floor
can become too hot to touch.
Be careful touching the floor
during and after cooking.
eDo not use any thermometer
in food you are microwaving
unless that thermometer is
designed or recommended for
use in the microwave oven.
aPlastic Utensils—Plastic
utensils designed for microwave
cooking are very useful, but
should be used carefully. Even
microwave plastic may not be as
tolerant of overcooking condi-
tions as are glass or ceramic
materials and may soften or
char if subjected to short periods
of overcooking. In longer expo-
sures to overcooking, the food
and utensils could ignite, For
these reasons: 1)Use micro-
wave plastics only “and use
them” in strict compliance with
the utensil manufacturer’s
recommendations. 2) Do not
subject empty utensils to micro-
waving. 3) Do not permit children
to use plastic utensils without
complete supervision.
oWhen cooking pork follow
our directions exactly and
always cook the meat to at least
170°. This assures that, in the
remote possibility that trichina
may be present in the meat, it
will be killed and meat will be
safe to eat.
eBoiling eggs (in and out of
she!!) is not recommended for
microwave cooking. Pressure
can build up inside egg yolk and
may cause it to burst, resulting
in injury.
eFoods with unbroken outer
“skin”such as potatoes, hot
dogs or sausages, tomatoes,
apples, chicken livers and other
giblets, and eggs (see above)
should be pierced to allow
steam to escape during cooking.
@‘*Boilable”cooking pouches
and tightly closed plasticbags o
should be slit, p~ercedor vented
as directed in Cookbook. If they
are not, plastic could burst dur-
ing or immediatelyaftercooking,
possibly resulting in injury. Also,
plastic storage containers should
be at least partially uncovered
because they form atight seal.
When cooking with containers
tightly covered with plastic
wrap, remove covering carefully
and direct steam away from
hands and face.
SAVETI+ESE
HWSTFUJCTIONS
—–
of YourMicrowaveOven
61F
ookingCompleteReminder
orTIME COOKandDEFROST
cycles:)
Toremindyouthat you havefood in
the oven,the oven will beeponce a
minute until you either open the
ovendoor or touch the CLEAR/
OFFPad.
/9
—.
=
—
—-
—-
—.
—
—-
—
—
-.
—
—
—.
-
—
—,
—,
—.
1. DoorHandle. Pull to open
door. Door must be securely
latched for oven to operate.
2. Door Latches.
3. ViewingWindowwith Metal
Shield.Metal screen permits
viewing of foods and keeps
microwaves confined inside
oven.
o
:
o
,.
-
—
—’
E&rim?,
—
—
—
4. AntennaCover.Protects the 7. OvenFloor.
microwave energy distributing 8. Touch ControlPaneland
antenna. Do not remove this Display.See next page for
cover. You will damage the instructions.
oven. 9. CookingChart. Quick refer-
5. OvenVenL ence Codes for many
6. C)venInteriorLight.Turns on frequently prepared foods.
when the door is opened or 10. Model and SerialNumbers.
when the oven is operating.
—–
—–
-
—–
-
-
—
Sws&---
miEK-
—
-
—
....
.
.
of Your Control Panel
TFIeTouch Control Paneiattows
you to set the ovencontrols ele~-
tonically with the touch of afinger.
It’sdesigned to beeasyto useand
understand.
DISPLAY.Displaystime of day
counting down during cooking
functions (or power levelwhen
Power LevelPadis touched).
TIME COOK. Microwavesfor a
tirr
presetamount of time using auto-
matic Power Level 10(or change
power levelafter entering cooking
time. Seepage 8.)
DEFROST.Gentle, generally uni-
form thawing at automatic Power
Level3, (or change power level
after entering defrosting time. See
page 7.)
CLOCK. Touch this pad to enter
time of day or check time of day
while microwaving. To set clock,
first touch CLOCK pad and then
enter time of day. Forexample, if
time is 1:30,touch number pads 1,
3, and Oand 1:30will appear in dis-
play. Touch STARTpad. To reset
or change time, simply repeat
above process.
START.After all selections are
made, touch this pad to start oven.
/
\
MIN/SEC TIMER. Thisfeatiire II:NNI
no microwavt:energy whorl it \[Jrlc-
tions aseither akitchm tirnor or Its
aholding period betwmmdf:frost
and time cooking. (Seepage9)
AUTO START.Allows you to pro-
gram your ovento begin cooking at
apresettime of day—upto a 12
hour delay. (Seepage80)
NUMBER PADS.Touch these pads
to enter cooking/defrosting time,
time of day or Power Level.
C!-EAR/OFF. Whentouched, it
shuts off the ovenand erasesall
settings (except time of day).
POWERLEVEL.Touch this pad
before entering another power level
number if YOUwant to change from
automatic Power Level 10(HIGH)
for cooking or Power Level3(LOW)
for defrosting.
“EEIEE” i!Xspk3y:
*When using AUTO START, you have not entered a
valid clock time.
*When setting CLOCK, you have not entered avalid
clock time.
6
TheDefrostsettingisdesignedfor
eventhawingnecessaryforiarge
amountsoffoodandisoneofthe
mostimportantadvantagesofa
microwaveoven.
●PowerLevel3is automatically set
for defrosting, but you maychange
this for more flexibility.
@Seeyour Cookbook for defrosting
help.
Tobecome better acquaintedwith
the defrost functions, defrostfrozen
pork chops using the following
steps.
Step1:Placepackageof frozen
chops in the ovenand close door.
-Step 2:Touch DEFROST.Display
reads:0 and Power Level3is auto-
matically set in the oven but does
not appear on display. ENTERDEF.
TIME flashes.
Step 3: Touch 8, 0 and Ofor 8min-
utes. DEF. TIME and 8:00are dis-
played. If you wish to change
Power Level,touch POWER LEVEL
pad and then new number.
—
—
Step4: TouchSTART.Time counts
down on display, Whencycle is
completed, the ovensignalsand
automatically shuts off.
Step5: Turn packageover,close
door and repeatSteps2,3 and 4.
Step&Whenovensignals and
shuts off, display will show “End”.
Step7:Open door or touch CLEAR/
OFF pad. Removepackageand
separatechops to finish defrosting.
DefrostingTips
@Foods
frozen in paper or pkistic
can be defrosted in the package.
@For evendefrosting, manyfoods
needto be broken up or separated
pail of the way through the defrost-
ing time.
~Homemade dinners can be frozen
in shallow foil trays and heatedfor
later use. (Do not heat on DOUBLE
DUTY’” shelf.) Select foods which
microwave well.
@Pre-packagedfrozen dinners can
be defrosted and microwaved.
eCheck your Cookbook for other
defrosting tips.
QuestionsandAnswers
~. WhenIpressSTART,!heara
duiithumpingnoise.WhatisIt?
A. This sound is normal. It is letting
you know the oven isusing aPower
Levellowerthan HIGH.
Q. CanIDefrostsma!{itemsIn a
hurry?
A. Yes,but they will need more fre-
quentattentionthanusual.Raise
the PowerLevelafter entering the
time by touching FK)WERLEVEL
and 7 or 10.Power Level7cuts the
time about in %;PowerLevel 10
cuts the time to approximately %.
During either, rotate or stir food
frequently.
Q. Can iopenthedoorduring
DEFROSTtocheckon?heprogress
of myfood?
A. Yes.Youmay open the door at
any time during microwaving. To
resumedefrosting, close the door
and pressSTART.
Q. Whydon’tthedefrostingtimes
inthe Cookbookseemrightfor
my food?
A. Cookbook times areaverage.
Defrosting time can vary according
to the temperature in your freezer.
Set your oven for the time indicated
in your Cookbook. If your food is
still not completely thawed at the
end of that time, re-setyour oven
and adjust the time accordingly.
Q. Can iseiectaPowerLeveiother
thanautomaticPowerLevel3for
defrosting.?
A. Yes.Some smaller foods may be
defrosted quicker on higher Power
Levelsbut for even,carefree defrost-
ing, Power Level3is suggested.
Check the chart in the Cookbook
for specific times and Power Levels.
——
~
m!!!!!r.
—–
—
—
—.
—.
—
—
~.
—.
—.
—
—.
—
—
——
-.
—
—
—-
—
—
—.
~.
~“
mE59&i
—
---
~–
~–
—9
—. ,
—
—
—-
~-
~...
-
. ... .
by Time and How to useAUTO START
TheTime Cookfeatureailowsyou
topresetthecookingtime.
Power Level10isautomatically set
for time cooking, but you may
changethis for moreflexibility.
Seeyour Cookbook.
Whenthe oven completesTime
Cooking, it automatically shuts off.
It will then display “End” and beep
once aminute until you either open
the door or touch the CLEAR/OFF
pad.
To become better acquainted with
Time Cook function, makeacup of
coffee by using the following steps.
7
I~----- ‘—
Step1:Fill acup 2/3 full of water
and add 1teaspoon of freeze dried
coffee. Useacup that hasno metal
decoration. Placecup in oven and
close door.
Step 2: Touch TIME COOK. The
display shows :0. ENTER COOK
TIME flashes. Power Level 10is
automatically set, but does not
appear on display.
Step3: Selectyour time. Touch 1,2,
and Ofor aminute and 20 seconds.
TIME COOK and 1:20aredisplayed.
If another PowerLevelis desired,
touch POWERLEVELand the
number although Power Level10
(HIGH) is preferredfor this cup of
coffee.
Step4: To’uchSTART.Time
counting down showson display.
Step5: When time is up, the oven
sounds, oven light and fan shut off.
The display will show “End”.
Step6: Open the door or touch
CLEAR/OFF pad.
How to useAUTO START
The AUTO STARTfeature allows
you to program you oven to begin
cooking at apresettime of day—
up to a 12hour delay.
TouseAUTO START
Step 1:Enter your desired cooking
program.
Step2: Touch AUTO START pad
(instead of START pad).
Step 3: Enter the time you want the
oven to start. (Be sure your micro-
waveoven clock shows the correct
time of day.)
4: Touch STARTpad.
The oven will automatically start at
the desired time.
QuestionsandAnswers
(2.Isetmyovenforthetimecalled a
forin therecipebutattheendof
thetimeallowed,mydishwasn’t
done.Whathappened?
A. Since housepower variesdue to
time or location, manyTime Cook
recipesgiveyou atime rangeto
preventovercooking.Setthe oven
for minimum time, test the food for
doneness,and cook your dish a
little longer, if necessary.
Q. Iwanttocookon aPowerLevei
otherthanHiGH,whatdo ineedto
do?
A. Tochangethe PowerLevel,
touch the POWERLEVELpad after
entering desiredcooking time.
Enterthe desired number andthen
touch START.
Q. Can iinterruptmyTime Cook
functiontocheckthefood?
A. Yes.To resumecooking, simply
closethe door and touch START.
NOTE:Microwave power will not
come on until you are ready.You
must touch STARTfor cooking to
begin.
Q. itouchedthenumberpadsand
seiectedmy powerievei.Wheni
touchedSTART,however,my oven
didn’tcomeon.Whynot?
A. The TIME COOK pad must be
touched before setting the number
padsor else your ovenwill not
begin cooking.
Q. itriedto changePowerLevel
butthedispiaychangedbackto
cookingtime.Why?
A. After touching Power Level pad
you only have4seconds to enter
the number. Try setting controls
again,
to Usethe Minute/SecondTimer
sTheMHWSECTIMER hasthree
timingfunctions:
*It operatesasa minutetimer.
@Ncanbesettodelaycooking.
.It canbeusedasa holdsetting
afterdefrosting.
The fvllN/SECTIMER operates
without microwaveenergy.
Howto Timea3-Nlinute
PhoneCall
1.Touch MIN/SEC TIMER pad. The
display shows :0and ENTERTIME
flashes.
2. Touch number pads3, 0 and O
(for 3minutes and no seconds).
Display shows3:00.
3. Touch START.Display shows
time counting down.
4. Whentime is up, oven signals
and display showstime of day.
ProgrammingaHold Time
The Minute/Second Timer can also
be usedto progr,am“hold time”
between microwave cooking func-
@tions. The time can range from one
second to 99 minutes and 99sec-
onds. AHOLD, or “standing” time
may be found in some of your own
recipesor Cookbook.
Toset the oven to delay cooking up
to 99 minutes follow Steps 1and 2
to enter hold time. Then touch
TIME COOK pad and enter time
before pressing START.
How to Defrost,Hold and
Time Cook
Let’ssay you want to defrost a
frozen casserolefor 15 minutes,
hold for 10minutes and then Time
Cook for 25 minutes. Here’show
to do it:
Step 1: Take casserole from freezer
and place it in the oven.
The display shows:0 and ENTER
DEF.TIME flashes.
Step3: Touch pads 1,5, 0 and Ofor
15minutes defrosting time. 15:00
appearson display. (Defrosting is
automatically seton Power Level
3but can be changed by touching
POWERLEVELpad and the new
Power Level.)
Step4: Set standing or hold time by
touching MIN/SEC TIMER. :0
appearson display and ENTER
TIME flashes.
Step5: Touch 1,0, 0 and Oto hold
for ten minutes. 10:00appearson
display.
Step6: Touch TIME COOK pad.
The display shows :0and ENTER
COOK TIME flashes.
Step 7: Touch 2, 5, 0 and Ofor
twenty-five minutes of cooking
time. 25:00appears on display.
9
Step8: Touch START.15:00count-
ing down showson display.As each
function is automatically performed
ovendisplay shows instructions
enteredand the function. While
cooking, you maytouch appro-
priate padto recalltimes you set.
Step9: Whentime is up, the oven
sounds,oven light and fan shut off.
The display will show “End”.
Step?0:Open the door or touch
CLEAR/OFF pad.
Questionsand Answers
Q. Whatwill happenif Iaccidentally
reversemy defrost,holdand cook
instructions?
A. The oven automatically rear-
rangesyour program. Defrosting
alwayscomes first, then hold, and
then the cooking function.
Q. Can 1defrostandholdonly?
A. Yes.Sometimes you may only
want to defrost afood, hold it, and
cook it later. All you needto do is
program in Defrost and amount of
time. Then program Hold and the
amount of time. Be sure to put the
thawed dish in the refrigerator
promptly.
NOTE: Let foods remain at room
temperature only as long as safe.
Times will vary.
Q. Iprogrammedmyovenfora
specificdefrostingtime but it
defrostedlongerthan necessary.
Whathappened?
A. When instructions conflict, the
oven carries out the last instruction.
Youmay haveset the oven to
defrost for 4minutes, hold for
2minutes, and then defrost for
6minutes. In this case,the oven
would defrost for 6minutes and
hold for 2minutes and ignore your
first defrost instruction.
————.——.—
for Your Microwave Oven
YourNew MicrowaveOvenisa
ValuableAppliance,ProtectIt From
MisuseByFollowingTheseRules:
oKeepyourovencleanand
sweet-smelling.Opening the oven
door afew minutes after cooking
helps “air-out” the interior. An
occasional thorough wiping with a
solution of baking soda and water
keepsthe interior fresh.
eDon’tusesharp-edgedutensils
withyouroven.The interior and ex-
terior oven walls can be scratched.
The control panel can bedamaged.
eDon’tremovetheantennacover
at the top of the oven (microwave
feature 4 on page 5). Youwill
damagethe oven.
)%----7
BE CERTAIN POWER IS OFF
BEFORE CLEANING ANY
PARTOF THIS OVEN.
Howto Cleanthe Inside
Walls,floorandplasticcover.Be-
causethere is little heatexcept in
the food, or sometimesin the uten-
sils,spills and spattersareeasyto
remove.Somespatterscan be re-
movedwith apapertowel, others
may require adamp cloth. Remove
greasyspatterswith asudsy cloth,
then rinseand dry. Do not use
abrasivecleanerson oven walls.
NEVERUSEACOMMERCIAL
OVEN CLEANERON ANY PART
OF YOURMICROWAVEOVEN.
Door-inside.Glass: Wipeup spatters
daily, wash when soiled, with amin-
imum of sudsy warm water. Rinse
thoroughly and dry.
Metal and plastic partson door:
Wipe frequently with adamp cloth
to removeall soil. DO NOT USE
ABRASIVES, SUCH AS CLEANING
POWDERSOR STEELAND PLAS-
TIC PADS. THEY MAY MAR THE
SURFACE.
Specialnotewhen usingBrown‘N
SearDish:High heat generated or?
bottom of Brown ‘N Sear Dish can
causescorched appearing stains to
bake cmtothe oven floor if grease is
present. These may be removed
with Bar Keepers Friend@ Cleanser
by SerVaas Laboratories, Inc.
After using Bar Keepers Friend@
Cleanser, rinse and dry thoroughly,
following instructions on can. Do
not use Bar Keepers Friend@
Cleanser on the painted surfaces
such as the walls. It may scratch the
paint.
Bar Keepers FriendR’ Cleanser is
sold in many grocery, hardware,
and department stores.
Howto Cleantheoutside
Case.Cleanthe outside of your @
ovenwith soapand damp cloth,
then rinseand dry. The outer pane
of the window isglass.Just wipe
cleanwith adampcloth. Chrome
trim is bestwiped with adamp cloth
and then with adry towel,
ControlPanel.Wipewith adamp
cloth. Dry thoroughly. Do not use
abrasivesor sharpobjects on the
panel.They can damageit.
DoorSurface.Whencleaning sur-
facesof door and oventhat come
together on closing the door, use
only mild, non-abrasivesoapsor
detergentsapplied with asponge
or soft cloth.
PowerCord. If the cord becomes
soiled, unplug and washwith damp
cloth. Forstubborn spots, sudsy
water may be used,but becertain
to rinse and dry thoroughly before
plugging cord into outlet.
C)venLampReplacement.First
unplug the oven.Them remove
lamp compartment cover by re-
moving screw which holds cover in
place. Cover is located at the rear
of outer case.
Replacewith 40 watt appliance
bulb. (It is availablein drug and
hardware stores.) Replacecom-
partment cover. Plug in the oven.
INSTRUCTIOIW
This appliancemust begrounded.
Inthe eventof an electricalshort
circuit, grounding reducesthe risk
of electricshock by providing an
escapewire for the electric current.
Thisapplianceis equippedwith a
powercord havingagrounding wire
with agrounding plug. The plug
must beplugged into an outlet that
is properly installedand grounded.
(Fig. 1)
WARNING—improperuseof the
grounding plug can result in arisk
of electric shock.
PREFERRED
METHOD
Q‘1
~n!
8
.0
\
Fig. 1//) INSURE PROPER GROUND
EXISTS BEFORE USE
Consult aqualified electrician or
servicemanif the grounding instruc-
tions are not completely under-
stood, or if doubt exists asto
whether the appliance is properly
grounded.
Whereastandard two-prong wall
receptacleis encountered, it is your
personal responsibility and obliga-
tion to haveit replaced with aprop-
erly grounded three-prong wall
receptacle.
Do Not UnderAny Circum-
stancesCut or Removethe
Third(Ground) ProngFrom
The PowerCord.
UseofAdapterPlugs
UsageSituationsWhere
Appliance’sPowerCord
WillBe Disconnected
Infrequently.
Becauseof potential safety hazards
under certainconditions, we
stronglyrecommendagainstthe
useof anadapterplug.However,
if you still elect to usean adapter,
where local codes permit, aTEM-
PORARYCONNECTION may be
madeto aproperly grounded two-
prong wall receptacle by the useof
aUL listed adapter (Fig.2) which is
availableat most local hardware
stores.
TEMPORARYMETHOO
(ADAPTER PLUGS PJOT
PERMITTED IN CANADA)
ALIGN LARGE
n
al
II
@
PRONGS/SLOTS= ,“●
1,-*
w
..Q-J t
W<NSURE PROPER GROUND
~AND FIRM CONNECTION
Fig. 2BEFORE USE
The larger slot in the adapter must
be aligned with the larger slot in the
wall receptacle to provide proper
polarity in the connection of the
power cord.
Caution:Attaching the adapter
ground terminal to the wall recep-
tacle cover screw does not ground
the appliance unless the cover
screw is metal, and not insulated,
and the wall receptacle is grounded
through the house wiring. You
should havethe circuit checked by
aqualified electrician to make sure
the receptacle is properly grounded.
When disconnecting the power
cord from the adapter, always hold
the adapter with one hand. If this is
not done, the adapter ground ter-
minal is very likely to break with
repeated use. Should this happen,
DO NOT USE the appliance until
aproper ground has again been
established.
UsageSituationsWhere
Appliance’sPowerCord
WillBe Disconnected
Frequently.
Do notuseanadapterplugin these
situations becausedisconnecting of
the powercord placesundue strain
on the adapterand leadsto even-
tual failure of the adapterground
terminal. You should have the two-
prong wall receptaclereplacedwith
athree-prong (grounding) recep-
tacle by aqualified electrician
before using the appliance.
Useof ExtensionCords
Becauseof potential safety hazards
under certainconditions westrongly
recommend againstthe useof an
extension cord. However,if it is
necessaryto usean extension cord,
useonly a3-wire extension cord
that hasa3-blade grounding plug,
and a 3-slot receptaclethat will
accept the plug on the appliance.
The marked rating of the extension
cord shall beequal to or greater
than the electrical rating of the
appliance (15amperes.)
Such extension cords areobtainable
through General Electric service.H
youdo usean extensioncordwith
yourmicrowaveoven,the interior
light may flicker and the blower
sound mayvarywhen oven is in use.
—
—
=
—–
—
—
—
-
The Problem Solver
To Save Time and Money—
before you request service,
check the ProblemSolver
If you haveaproblem, it maybe
minor. Youmay be ableto correct
it yourself.Just usethis Problem
Solverto locateyour problem and
then follow the suggested
recoinmendations.
PROBLEM
OVENWILL NC)TCOME ON
AUTheseThingsAreNormal
on YourMicrowaveOven:
*Steamor vapor escapingfrom
around the door.
●Light reflection around door or
outer case,
●Dimming oven light and changein
blowersound mayoccur while oper-
ating at powerlevelsother than high.
esoundof rotating antenna may be
heardfor afew secondsafter the @
ovenis turned off.
●Dull thumping sound while oper-
atingat powerlevelsother than high.
QSomeTV-Radiointerference
mightbenoticedwhileusing your
microwaveoven, H’ssimilar to the
interferencecausedby other small
appliancesand does not indicate a
problem with your oven.
——.
POSSIBLE CAUSE AND REMEDY
Afuse in your home may be blown or the circuit breaker tripped.
Replacefuse or resetcircuit breaker.
Makesure 3-prong plug on oven is fully inserted into wall receptacle.
Door not securely closed.
STARTmust be touched after entering cooking selection.
Another selection entered already in oven and CLEAR/OFF not
touched to cancel it.
CONTROL PANELLIGHTED,
YET OVEN WILL NOTSTART
IMakesure you haveentered cooking time after touching TIME COOK.
CLEAR/OFF was touched accidentally. Reset cooking program and
touch START.
FOODS ARE EITHER OVER-
COOKED OR UNDERCOOKED Cooking times may vary because of starting food temperature, food
density or amount of foods in oven.Touch TIME COOK and additional
cooking time for completion.
Incorrect Power Level entered. Check Cookbook for recommended
Power Levelor changing levelsduring cooking if necessary. I
Dish was not rotated, turned or stirred. Some dishes require specific
instructions. Check Cookbook or recipe for these instructions.
1
—
“EE EE” APPEARS ON
Too many dishes in ovenat sametime. Cooking time must be increased
when cooking more than one food item. Check Cookbook for recom-
mendation on increasing time.
When using Auto Start, you havenot entered avalid clock time. I
l--
DISPLAY When using Clock, you havenot entered avalid clock time. —.
—
“PF” APPEARS ON Appears when oven is first plugged in. This is normal. +
DISPLAY
-——.-—.--..—- A
Appears when power to oven has been interrupted, and then resumed.
Touch CLEAR/OFF to erase“PF”. Clock must be reset.
-.———
——
~service.
Our Consumer Services are designed with your needs and wants in mind.
WarrantyProtection
Yournew applianceisawell designedandengineered Seethe warrantyonthebackpageof this bookfor
product.Beforeit left thefactory,it wentthrough details.
❑rigorousteststo detectmanufacturingdefects.And
youhaveawrittenwarrantyto protectyou.
2❑
PromptService at your Convenience
Whetheryourapplianceis inorout of warranty,
you’rejust a phonecallawayfromour nationwide
network of Factory Trained Service professionals.
Simply call our GE service organization. You’ll find
them in the White Pages under “General Electric
Company” or “General Electric Factory Service;’
and in the Yellow Pages under “General Electric
Customer Care” Service.”
Service is scheduled at your convenience and the
technician drives afully-stocked parts service truck
so that, in most cases, the repair can be completed
in one visit.
We’re proud of our service and want you to be
pleased, but if for some reason you are not happy
with the service you receive, here are three steps to
follow for further help.
FIRST,contact the people who serviced your
appliance. Explain why you are not pleased. In most
cases, this will solve the problem.
NEXT,if you are still not pleased write all the details
—including your phone number to:
Manager,Consumer Relations
General Electric Company
Appliance Park
Louisville, Kentucky 40225
FINALLY,if your problem is still not resolved, write:
Major Appliance Consumer Action Panel
20 North Wacker Drive
Chicago, Illinois 60606
Service Contracts pyour appliance in good operating
For trouble-freeservicebeyond condition during the contract period at
the written warrantyperiod. no additional charge. Service contracts
let you pay today’s prices for service
If you prefer to budget your repair expenditures amonth, ayear, or several years from
instead of being surprised by them, GE offers now. And, you’ll receive service from
service contracts for varying lengths of time on GE trained service technicians using
all GE major appliances. With acontract, we’ll only Genuine GE parts.
The Quick Fix@System *$%W%%%-..
2’
You can save money and time
by doing it yourself.
For do-it-yourselfers who would
prefer to fix GE major appliances
themselves.. .GE offers an industry 1
first, the Quick Fix@System. K
Aprogram for do-it-yourself appliance repair,
the system includes step-by-step repajr
rnanua/s for refrigerators, most non-microwave
electric ranges, dishwashers, and standard
and large capacity washers and dryers, plus
specjally packaged replacement parts, and
technicalhelpwith atoll free800number
Help for By The GE Answer CenterT~800.626.2000
Should you need help in the selection and purchase consumer information service is open 24 hours a
of new appliances, or have questions about the day, seven days aweek.
—operation of the GE appliances you now own-or have
any other questions about our consumer products Our staff of experts stands ready to assist you
or services, you are only aTOLL-FREEcall away. anytime.
Thiswarrantyisextendedtothe
originalpurchaserandanysucceed-
ing ownerfor products purchased
for ordinary homeuse in the 48
mainland states, Alaska, Hawaii
and Washington, D.C.
All warrantyservicewill be provided
by our Factory ServiceCentersor
by our authorizedCustomerCarem
servicerstiuring normal working
hours.
Look in the White or YellowPages
of yourtelephone directory for
GENERALELECTRICCOMPANY,
GENERALELECTRICFACTORY
SERVICE,GENERALELECTRIC-
HOTPOINTFACTORYSERVICEor
GENERALELECTRICCUSTOMER
CARE” SERVICE.
●Failure of the product if it is
used for other than its intended
purposeor used commercially.
.Damageto product caused
by accident, fire, floods or acts
of God.
WARRANTORIS NOTRESPON-
SIBLEFORCONSEQUENTIAL
DAMAGES.

Other GE Microwave Oven manuals

GE Spacemaker 164 D2588P191 User manual

GE

GE Spacemaker 164 D2588P191 User manual

GE AVM4160 User manual

GE

GE AVM4160 User manual

GE JX9152 User manual

GE

GE JX9152 User manual

GE Spacemaker JVM1740DM Manual

GE

GE Spacemaker JVM1740DM Manual

GE JEB2167 Series User manual

GE

GE JEB2167 Series User manual

GE JES2051DN Manual

GE

GE JES2051DN Manual

GE Monogram ZMW2000 Series User manual

GE

GE Monogram ZMW2000 Series User manual

GE JES1651 User manual

GE

GE JES1651 User manual

GE JES1139 User manual

GE

GE JES1139 User manual

GE Spacemaker PVM2070 User manual

GE

GE Spacemaker PVM2070 User manual

GE JEM31 User manual

GE

GE JEM31 User manual

GE JES1295 User manual

GE

GE JES1295 User manual

GE DVM7195 User manual

GE

GE DVM7195 User manual

GE PNM9216 User manual

GE

GE PNM9216 User manual

GE Profile Spacemaker PNM1871SMSS User instructions

GE

GE Profile Spacemaker PNM1871SMSS User instructions

GE JE740 User instructions

GE

GE JE740 User instructions

GE PEB9159SJSSGE User manual

GE

GE PEB9159SJSSGE User manual

GE JES1460DSBB Manual

GE

GE JES1460DSBB Manual

GE JES1344 User manual

GE

GE JES1344 User manual

GE Spacemaker 49-40612 User manual

GE

GE Spacemaker 49-40612 User manual

GE SCA1001KSS - Profile Advantium 120 Above-the-Cooktop... Owner's manual

GE

GE SCA1001KSS - Profile Advantium 120 Above-the-Cooktop... Owner's manual

GE CSA1201RSS User manual

GE

GE CSA1201RSS User manual

GE JE64 Installation instructions

GE

GE JE64 Installation instructions

GE JNM7196 User manual

GE

GE JNM7196 User manual

Popular Microwave Oven manuals by other brands

Samsung G633C Owner's instructions and cooking guide

Samsung

Samsung G633C Owner's instructions and cooking guide

Sharp EBR-9900W Instruction

Sharp

Sharp EBR-9900W Instruction

Whirlpool MH8150XM Use & care guide

Whirlpool

Whirlpool MH8150XM Use & care guide

Sharp R-922STM Operation manual

Sharp

Sharp R-922STM Operation manual

Brandt BKS6135 user guide

Brandt

Brandt BKS6135 user guide

Panasonic INVERTER NN-S760 operating instructions

Panasonic

Panasonic INVERTER NN-S760 operating instructions

Breville vmw176 user manual

Breville

Breville vmw176 user manual

Nevir NVR-6301MG user manual

Nevir

Nevir NVR-6301MG user manual

Sharp R-242E Operation manual and cookbook

Sharp

Sharp R-242E Operation manual and cookbook

Daewoo KOR-761EW Operating instructions & cook book

Daewoo

Daewoo KOR-761EW Operating instructions & cook book

anko P70B20AP-ST user manual

anko

anko P70B20AP-ST user manual

LG LMVH1750SB owner's manual

LG

LG LMVH1750SB owner's manual

ECG MTM 2070 W instruction manual

ECG

ECG MTM 2070 W instruction manual

Whirlpool WMH31017HB0 user guide

Whirlpool

Whirlpool WMH31017HB0 user guide

Amica AMMB20E1GI INTEGRA operating instructions

Amica

Amica AMMB20E1GI INTEGRA operating instructions

Viking RDMOS201SS installation instructions

Viking

Viking RDMOS201SS installation instructions

Midea MM617AMN instruction manual

Midea

Midea MM617AMN instruction manual

Goldstar MV-1555ST Owner's manual & cooking guide

Goldstar

Goldstar MV-1555ST Owner's manual & cooking guide

manuals.online logo
manuals.online logoBrands
  • About & Mission
  • Contact us
  • Privacy Policy
  • Terms and Conditions

Copyright 2025 Manuals.Online. All Rights Reserved.