GE JES1289 User manual

ge.com
©
©
Safety Information ......... 9-6
Operating Instructions
Convenience Features ..... 14, 15
Grilling Features ......... 18, 19
Microwave Terms ............ 22
Options Features ............ 91
Other Features ............. 90
Oven Features ............. 7, 8
Power Levels ................ 9
Rotisserie Features ........ 16, 17
Timed Features .......... 10-13
Care and Cleaning ......... 93
Troubleshooting Tips ....... 94
Things That Are Normal ...... 24
Consumer Support
Consumer Support . . .Back Cover
Product Registration ...... 95, 96
V_'arranty .................. 97
Write the model and serial
numbers here:
Model #
Serial #
You can find them on a label
inside the oven.
JESl289
3513913700 49-40498 07-06 <7t7

IMPORTANTSAFETYINSTRUCTIONS.
READALLINSTRUCTIONSBEFOREUSING.
^.. WARNING- Foryoursafety,theinformationinthismanualmustbefollowedtominimizetherisk
of fire or explosion, electric shock, or to prevent property damage, personal injury, or loss of life.
PRECAUTIONSTOAVOIDPOSSIBLEEXPOSURE
TOEXCESSIVEMICROWAVEENERGY
(a) Do NotAttempt to operate this oven with the door
open since alien<leer operation can result in ham/fill
eN)osui'e m nlicrowave energy', It is iinl)ortant not to
deteat or tamper with the satiety interlocks.
(h) DoNotPlace any object between the oven fl'ont ti_ce
and the door or allow soil or cleaner residue to
accunlulate on sealing suiqfilces.
(c) Do Not Operate the oven if it is dan/aged. It is
i)articularly in/i)ortant that the oven door close
i)roi)erly and that there is no dan/age to the:
(l) door (bent),
(2) hinges and latches (broken or h)osened),
(3) door seals and sealing sui_fi_ces.
(d) The Oven Should Not be a(!iusted or rei)aired by
anyone except l)rol)erly qualified service l)ei_onnel.
IMPORTANTSAFETYINSTRUCTIONS.
When using electrical appfiances basic safety precautions should be followed, including the following.
Use this appfiance only for its intended purpose as described in this Owner's Manual.
•Read and h)lh)w the specific l)re(atltions in the • Do not store this apl)liance ot/tdoois. Do not t/se this
Precautions to Avoid Possible Exposure to Excessive
Microwave Energy section above.
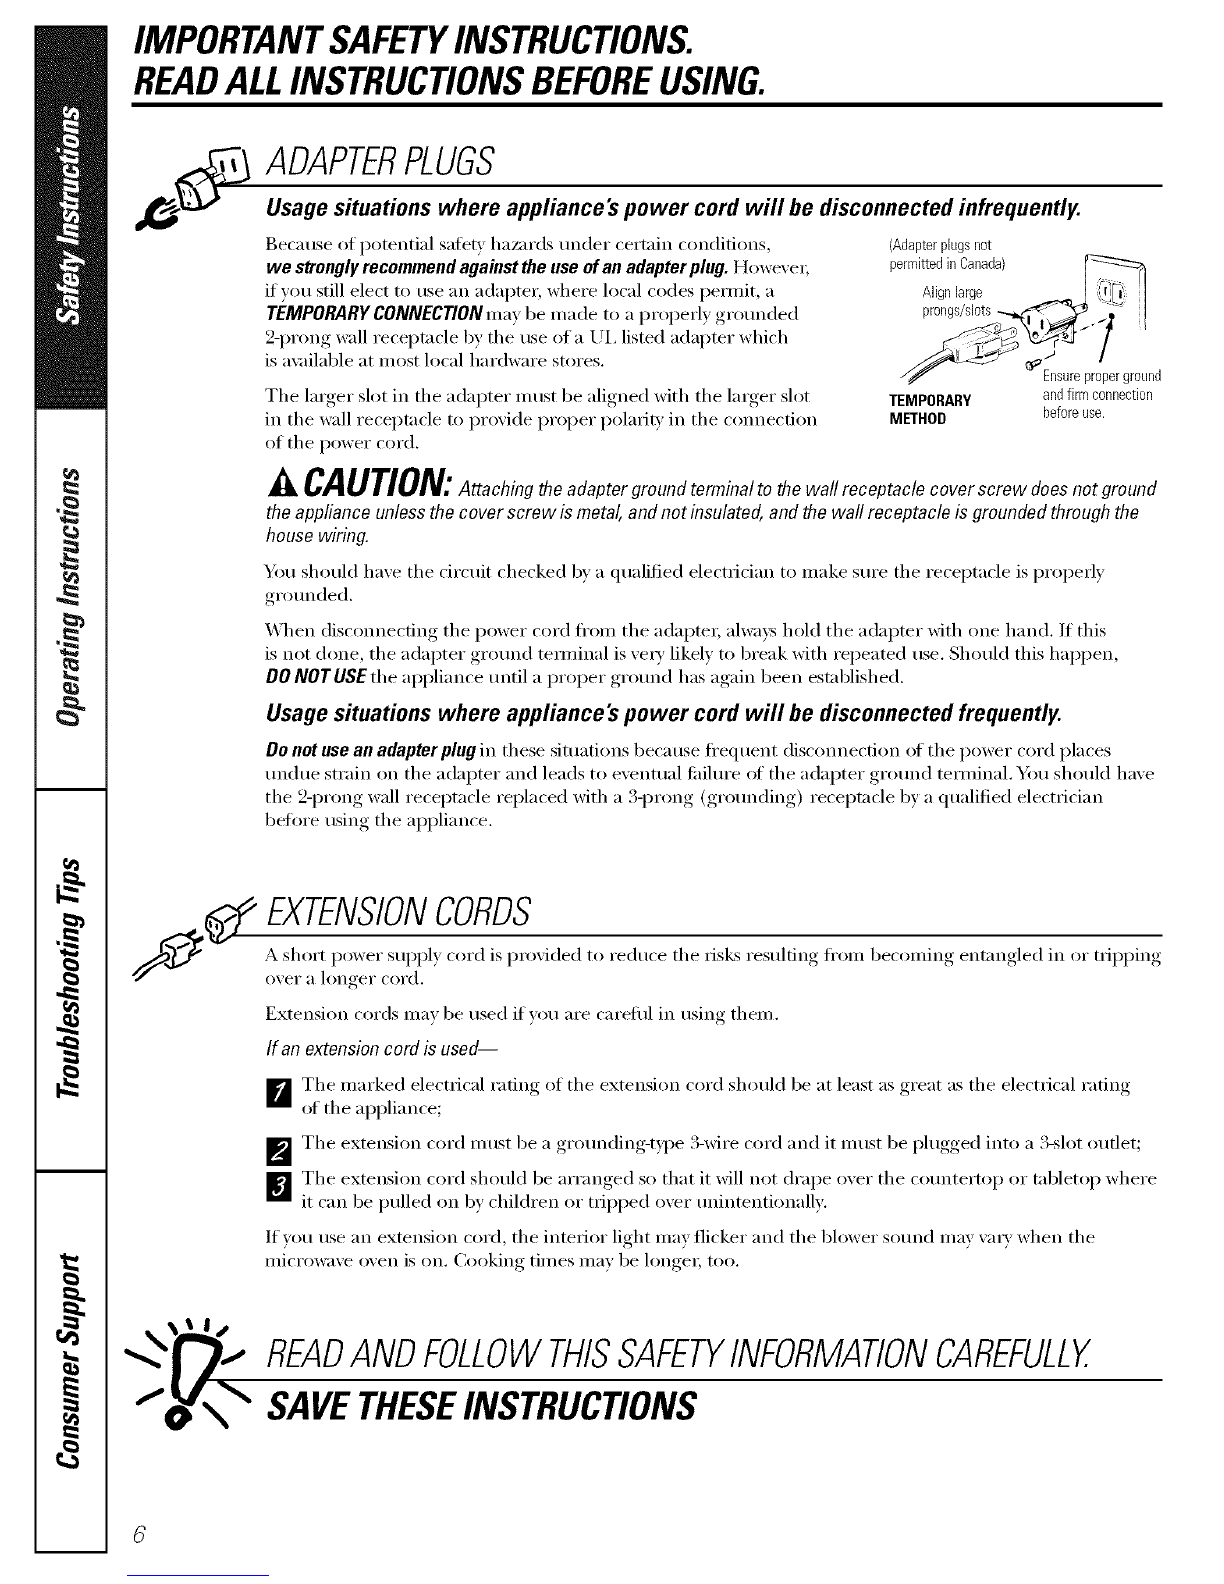
• This al)pliance inust be grotlnded. (:onnect only
to a i)roi)erly grounded outlet. See the Grounding
Instructions section on page 4.
• hlstall or h)cate this api)liance only in accordance
with the provided installation instruct.ions.
• This ()veil n/ust be h)cated at least 3 ft. above floor level.
• Be cert;fin to place the fl'ont surtilce of the door
3" or nlore back fl'onl the counterto l) edge to avoid
accidental ill)ping of the al)pliance in nornlal usage.
• Do not n/aunt this ai)pliance over a sink.
•Do not I//Otlnt the i//ici'owave ()veil over or near }lliV
poilion of a heating or cooking al)pliance.
• Do not store anything directly oil top of the nlicrowave
oven surti_ce when the n/icrowave oven is in oi)eration.
• Do not operate this ai)pliance if it has a damaged
power cord or phIg, if it is not working l)rol)erly or
if it has been danlaged or drol)ped. If the power caM
is damaged, it n/list be replaced by General Electric
SeIMce or an authorized seiMce agent using a power
cord a\_filable fl'onl General Electric.
• Do not cover or block any oi)enings on the apl)liance.
•Lrse this al)pliance only fin" its intended use as described
in this Ill_lIltl_ll. Do not rise coFi'osive cheI/licals or wlpoi's
in this ai)pliance. This nlicrowave oven is specifically
designed to heat, dry or cook flied, and is not inmnded
fi)r lal)oratorv or industrial rise.
• This n/icrowave oven is not apl)roved or tested tor
I/l}lIJne rise.
i)roduct near watei_t0r exainl)le, in a wet basenlent,
near a swinnning pool, near a sink or in sinlilar locations.
• Kee I) power cord away fl'onl heated sui_filces.
• Do not iininei_e power coId or plug in wateI:
• Do not let power cord hang over edge at table
or COtlntei:
• To reduce the risk of fire in the ()veil ca\'iw:
-- Do not overcook toed, Careflillv attend al)l)liance when
pal)eI; plastic or other coInbusfible inaterials are placed
inside the oven while cooking.
-- Ren/ove wire twist-ties and n/etal handles fl'oin paper or
plastic containei_ 1)eti)i'e placing then/in the oven.
-- Do not rise the oven fi)r storage pui])oses. Do not leave
paper products, cooking utensils or ti)od in the ()veil
when not in use.
-- If n/aterials inside the oven ignite, kee I) the oven door
ch)sed, turn the oven off and disconnect the power
cord, or shut off power at the flIse or circuit breaker
panel. If the door is opened, the fire nlay spread.
• See door surfi_ce cleaning instructions in the
Care and cleaning of the microwave oven section
of this nlanual.
• This al)pliance illtlst only be seiMced by qualified service
i)eisonnel. Contact nearest authorized seiMce ti_cilitv fin,
examination, repair or a(!iusnnent.
• _&swith any ai)pliance, ch)se supeiMsion is necessai T
when used bv children.
SAVETHESEINSTRUCTIONS
2

WARNING!
g_com
ARCING
If you see arcing, press CLEAR/OFFand correct the problem.
Arcing is tile inicrowa;'e tetin fl)r sparks in tile ()veil.
Arcing is caused by:
• Metal or fifil touching the side of the oven.
• Foil not molded to fi)od (upturned edges act
like antennas).
• Metal, such as twist-ties, poultty pins or gold-
rimmed dishes, in the microwave.
• Recycled paper towels containing small metal
pieces being used in the microwave.
FOODS
• \._]/en microwaving, place all foods and
containet_ on the glass microwave turntable.
•SUPERHEATEDWATER
Liquids,such aswater,coffee or teaare ableto
be overheatedbeyondtheboilingpoint without
appearingto beboiling. Visiblebubblingor boiling
whenthecontainer isremovedfrom themicrowave
ovenisnot alwayspresent.THISCOULDRESULT
IN VERYHOTLIQUIDSSUDDENLYBOILING0 VER
WHENTHECONTAINERISDISTURBEDORA
SPOONOROTHERUTENSILISINSERTEDINTO
THELIQUID.
To reduce the risk ot iqi mT to persons:
-- Do not overheat the liquid.
-- Stir tile liquid both beflwe and halfway through
heating it.
-- Do not use straight-sided ('ontainet_ with
tl_l ITOW tlec]<s.
--J-_dter heating, allow tile container to stand in
tile microwave oven for a short time heft)re
removing tile container:
-- Use extreme care when inserting a spoon or
other utensil into the container:
Do not pop popcorn in your microwave oven
unless in a special microwave I)opcorn accessory
or unless you use popcorn labeled fin" use in
microwave ()veils.
• Some products such as whole eggs and sealed
containet_fi)r example, closedjat_--are able
to eN)lode and should not be heated in this
tllict'owave ovetl. Sttch ttse of tile tllict'owave
oveIl could t'esttlt iIl iIljttt')'.
• Do not boil eggs in a microwave oven. Pressure
will build up inside egg yolk and will cause it
to butut, possibly resulting in iqjmT:
Operating tile microwave with no fl)od inside fin,
tl/ot'e than a tllitlHte oF tWO tllay cause damage to
the oven and could start a fire. It increases the
heat around tile magnetron and can shorten tile
life of the oven.
• Foods with unbroken outer "skin" such as
potatoes, hot dogs, sausages, tomatoes, apples,
chicken livet_ and other giblets, and egg p)lks
should be pierced to allow steam to escape
dtuing cooking.
• Avoid heating baby f0od in glass jms, even
with the lid off. Make sure all infimt t0od is
thoroughly cooked. Stir food to distfibum tile
heat evenly: Be carefltl to prevent scalding when
winching flnmula. Tile container may libel cooler
than tile titan ula really is. _wavs test tile titan ula
beflwe feeding tile baby:
• Don't defl'ost fl'ozen beverages in narrot_necked
bottles (espedally carbonated beverages). Even if
the container is opened, i)ressure can build up.
This can cause the container to btust, possibly
resulting in iqjmy:
• Hot foods and steam can cause burns. Be ('arefltl
when opening any containet_ of hot food,
including popcorn bags, cooking i)ouches and
boxes. To prevent possible iqjury, direct steam
away fi'om hands and face.
• Do not overcook potatoes. Thev could dehydrate
and catch fire, causing damage to your oven,
• Cook ineat and poultty thoroughl)_meat to at
least an INTERNAl, temperature of 160°F and
poultt T to at least an INTERNAl, temperature
of 180°E Cooking to these temperatures usually
protects against toodborne illness.
3

IMPORTANTSAFETYINSTRUCTIONS.
READALLINSTRUCTIONSBEFOREUSING.
WARNING!
MICROWAVE-SAFECOOKWARE
Make sure to use suitable cookware during
iilicro_zlve cooking. Most glass casseroles, cooking
dishes, measuring cups, custard cups, potmry or
china dinnerware which does not have metallic trim
or glaze with a metallic sheen can be used. Some
cookware is labeled "suitable tot microwaving."
• Place food or microwavable container directly
on tile glass turntable to cook w)m" food.
• Use of tile black metal tray during microwave
cooking will result in inferior cooking
perlimnance.
• If you are not sure it a dish is microwave-sate,
use this test: Place in the oven both the dish you
are testing and a glass measuring cup filled with
1 cup of water--set tile measuring cup either in
or next to the dish. Microwave 30-45 seconds
at high. If the dish heats, it should not be used
for microwaving.
If the dish remains cool and only the water in
the cup heats, then the dish is microwave-sate.
• Ifw)u use a meat them_omemr while cooking,
IIlake S/lI'e it is sate tor rise in ii/ici'owave ovens.
• Paper towels, waxed paper and plastic wrap
can be used to cover dishes in order to retain
moisture and prevent spattering. Be sure to
vent plastic wrap so steam can escape.
• Cookware may become hot because of heat
transferred fl'om tile heamd food. Pot holde_
may be needed m handle tile cookware.
"Boilable" cooking pouches and tightly closed
plastic bags should be slit, pierced or vented as
directed by package. If they are not, plastic could
bm_t dm_ing or immediately after cooking,
possibly resulting in injui T. A]so, plastic storage
containet_ should be at least partially uncovered
because tile)' titan a fight seal. _4]/en cooking
with containe_ tightly covered with plastic wrap,
remove covering careflflly and direct steam away
fi'om hands and e_ce.
Use toil only as directed in this guide. TV dinnet_
may be microwaved in tbil trays less than 3/4"
high; remove tile top foil cover and return tile
troy to tile box. \4lien using foil in tile microwave
oven, kee I) tile foil at least 1" away from tile sides
of tile oven.
• Do not use recycled paper products. Recycled
paper towels, napkins and waxed paper can
contain metal flecEs which may cause ardng
or ignim. Paper products containing nylon
or IMon filaments should be avoided, as they
may also ignim.
• Some st),rof0am trays (like those that meat
is packaged on) have a thin strip of metal
embedded in tile bottom. \._]/en microwaved,
tile metal can burn tile floor of tile oven or
ignite a paper towel.
• Do not use tile microwave to (h T newspape_.
• Not all plastic wrap is suitable tot use in
micrm_z_ve ovens. Check the package tot
proper use.
• Plastic cookware>--Plasfic cookware designed tot
microwave cooking is ve_y uselifl, but should be
used carefully Even microwave-safe plastic may
not be as tolerant of overcooking conditions as
are glass or ceramic inateiJals, and may st)lien oi"
char if subjected to short periods of overcooking.
In longer exposures to overcooking, the t0od
and cookware could ignim.
Follow those guidelines."
_/Jse microwave-sate plastics only and use
them in strict compliance with the cookware
IIla n tilil Ct t ii'ei"s I'e COIIlII/e n da finns.
] Do not Illicl'owa_,e ell/l)g ,' containei3.
_'] Do not peru/it children to use plastic
cookware without complete superxision.
4

ge.com
GRILLINGANDROTISSERIESAFETY
• Use the black metal tray when grilling or using • Use of the browner rack:
the rotisserie. Use the tray as a cooking pan when
grilling or as a drip pan fi>r the YofisseYle fi>od.
Do not use the glass turntable when grilling or
using the rotisserie.
Do not cover the black metal tray with metal toil.
This will cause arcing in the oven.
Any non-metal, oven-safb dish can be used when
grilling or when using the rotisserie in the oven.
Place food, ovei_-sale cookware or the browner
rock directly on the black metal troy when grilling,
The oven and door will get hot when grilling or
using the rotisserie.
Cookware will become hot when grilling or using
the rotisserie. Pot holdei_ or oven mitts will be
needed to handle the cookwam.
•Do not use paper towels or coverings, containe(_
or cooking/roasting bags made of fi>il or other
reflective material, plastic, wax or paper when
grilling or using the rotisserie.
•Do not place fl>od directly against the top or
bottom heating elements.
-- Place the dish direcflv on the rack.
-- Remove the rack from the oven when not in use.
-- Use pot holde_ or oven mitts when handling
the rack. It may be hot.
-- Be sm'e that the rack is positioned properly
inside the oven to prevent product damage.
-- Do not cover the rack or any part of the oven
with metal fi>il. This will cause overheating of
the oven.
•During and after use, do not touch, or let
clothing, pot holde_ or other flammable
materials contact tile top heating element or
guard. These surflaces may be hot enough
to burn even though they are dark in colo_:
J_dl(>wsttflident [.ill/e fi)r cooling fi_t.
• Remove cookware completely fl'om the oven
befl)re turning fi)(>d.
IVOTE:A rotisserie safety Nature prevents the use
of other cooking functions while the rotisserie spit rod
is in place.
GROUNDINGINSTRUCTIONS
WARNING:im ooo,,soofthog o,n,Ji.gpl,gconos,ltinoi,kofoloct ics,ock.
This appliance nlust be grotmded. In the event of
an electrical short circuit, grotmding reduces the
risk of electric shock by providing an escape wire
forthe electric current.
This appliance is equipped with a power coM
having a grotmding wire with a grotmding i)lug.
The phtg m ust be i)lugged into an outlet that is
properly installed and grotmded.
Consult a qualified electrician or service technician
if the grotmding instructions are not completely
tmdetstood, or if doubt exists as to whether the
appliance is properly grotmded.
If the outlet is a st;mdard 2-prong wall outlet,
it is yore" personal responsibili_' and obligation
to have it replaced with a properly grotmded
B-prong wall outlet.
Do not tinder anv cii'CtllllSt;inces Ctlt or i'elllOVe
the third (grotmd) prong from the power cord.
We do not recommend using an extension cord
with this appliance. If the power cord is too short,
have a qualified electrician or service mchnician
install an outlet near tile appliance.
(See EXTENSION CORDS section,)
For best operation, i)lug this appliance into its
own electrical outlet to prevent flickering of lights,
blowing of filse or tripping of circuit breaker.

IMPORTANTSAFETYINSTRUCTIONS.
READALLINSTRUCTIONSBEFOREUSING.
,i_____ADAPTERPLUGS
Usage situations where appliance's power cord will be disconnected infrequently.
Because of potential sati_w ha/_u'ds under certain conditions,
we stronglyrecommend against the use of an adapter plug. Howevex;
if you still elect to use an adapter, where local codes permit, a
TEMPORARY CONNECTIONmay be inade to a propedy grounded
2-prong wall receptacle by the tlse of a UI, listed adapter which
is a\;filable at most local hardware stores.
The larger slot in the adapter must be aligned with the larger slot
in the wall receptacle to pro_ide proper polari b in the connection
of the power cord.
{Adapterplugsnot
permittedin Canada)
Alignlarge I 'l i' I
__pron_,ots-1_I
/_fT" Ensureproperground
TEMPORARY andfirmconnection
METHOD beforeuse.
^_CAUTION:A_achingtheadaptergroundterminaltothewallreceptaclecoverscrewdoesnotground
theapplianceunlessthe coverscrew ismetal,and notinsulated,and thewall receptacleis groundedthroughthe
housewiring.
You should have the drcuit checked by a qualified electrician to make sure the receptacle is properly
grounded.
When disc(mnecting the power cord ti'om the adaptor; alwa}:s hold the adapter with one hand. If this
is not done, the adapter ground temfinal is ve_' likely to break with repeated use. Should this hai)pen,
DONOTUSEthe appliance until a proper ground has again been established.
Usage situations where appliance's power cord will be disconnected frequently.
Donotuseanadapterplugin these situations becauseti'equent disconnection of the power cord places
undue strain on the adapter and leads to eventual fifihu'e of the adapter ground terminal. You should have
the 2-prong wall receptacle replaced with a S-prong (grounding) receptacle by a qualified electrician
belin'e using the appliance.
EXTENSIONCORDS
A short power supply, cord is provided to reduce the fisl<s resulting< ti'om becoming< entangled< in or trili) )ing<
over a hmger cord.
Extension cords may be used if w)u are carefifl in using them.
If an extensioncordis used--
Ir_The marked electrical radng of the extension cord should be at least as great as the electrical rating
of the appliance;
I ,,
_'_ The extension cord i//tlSt be a grotlnding-t}i)e 24-wii'e cord and it illtlSt be )hlgged into a 3-slot otltlet;
_The extension cord should be arranged so that it will not drape oxer the countertop or tabletop where
it can be pulled on by children or t_ipped oxer unintentionally.
If you use an extension cord, the intetlor light may flicker and the blower sound may wu_' when the
microwave oven is on. Cooking times may be longer; too.
READANDFOLLOWTHISSAFETYINFORMATIONCAREFULLY.
SAVETHESEINSTRUCTIONS

Aboutthe featuresofyouroven. gecom
Throughout this manual, features and appearance may vary from your model.
1000Watts
\
0
Featuresof theOven
DoorLatches 0
Window with Metal Shield
Screen allows cooking to be "dewed while
kee )ino IIIi(TOW_I_es confined in tile o_eil.
Control Panel and Selector Dial
Fi_t turn, then press tile dial to make
selections,
0
X41/en entering microwave cooking time using
tile dial, time will add or subtract in 15-second
increments up to 6 minutes. For cooking times
of C_I 5 minutes, time will add or subtract in
30-second increments. When entering cooking
times of 15-30 minutes, time will add or
subtract in 1-minute increments. For times
over 30 minutes, time will add or subtract
in 5-minute increments.
Glass Turntable
Center tile tray on tile turntnble support when
using tile microwaxe teatm'es. Place food or
microwave-safe cookware directly on tile glass
tm'ntable.
@
@
Black Metal Tray
Put food or appropriate cookware directly on
tile black metal tray and place on tile turntable
support when using the grilling teatm'es.
Use tile metnl tray to catch drips when using
tile rotisserie.
Removable TurntableSupport
Tile mrntnble support must be in place when
using tile oven.
NOTE:Ratbg plate Is locatedon the front of the
microwave,behind thedoor Ovenvent(s)andoven light
are/ocatedon the inside waftsof the microwave oven.
Heating Elements
_Sdlow _ot/to cook [i'ozen (-on',enience Ioods,
brown ah'each cooked foods quickl) on top
and to rotisserie or ,grill foods on tile toI )
_lIld bottoiil.
Browner Rack
Center tile rack on tile black metal tra_
when usin,, tile grilling ti_atm'e.
Ootisserie Spit Rodwith Forks
Supports and holds tile tood in place
when connected to tile motto: For rotisserie
leatm'e onh'.
RotisserieConnectionandSupport

Aboutthe featuresofyouroven.
You can microwave by time, or with the convenience features, or cook using the grilling and rotisserie features.
GRILL
O
ROTiS
O
NICRO
O
DEFROST REHEAT
(2DCD
TIMER POPCORN
(2D (2D
POWER BEVERAGE
CDO
OPTIONS EXPRESS
SelectorDial--Turn to make
selections andpress to ente_
CookingControls
Press Enter Option
MICRO Amountofcookingtime more/lesstime
DEFROST
Turndialto AUTO Foodweight
Turndialto TIME Amountofdefrostingtime more/lesstime
POWER Powerlevel1-10 more/lesstime
EXPRESS Startsimmediately! more/lesstime
OPTIONS Display,Beeper,ScrollSpeed,Clock
TIMER Amountoftime
ROTISSERIE Foodtype,servingsize more/lesstime
REHEAT Foodtype,servingsize more/lesstime
GRILL Foodtype,servingsize more/lesstime
POPCORN 3.5oz.or3 oz. more/lesstime
BEVERAGE 4,8 or12oz. more/lesstime
NOTE:A safetyfeaturepreventsthe useof anygrilling or microwave functionwhile
therotisseriespitrod isin position.Thecontrol will read "REMOVESPITROB"

Usingthemicrowave features, ge.com
Make sure the turntable support and glass
turntable are in place when micrewaving.
•Place food or microwavable container
directly on the glass turntable to cook
VO/II" fl)od,
• Center the glass turntable on the
turntable support.
• Make sure that cookware is suitable
fin" micr_)waving.
MICRO
©
POWER
START/PAUSE
Changing the Microwave Power Level
The power level may be entered or
changed after entering the time fin.
Micro Cookor Express,
F_ PressMICROor EXPRESS.
[]For Micro Cook, mrn the dial to set the
cook time and press tile dial to enter.
_Press POWER.
L_Tm'n tile dial to set tile power lexel
and press the dial to entex;
_"_ Press tile dial or STARTto begin
cooking
Variable power levels add flexibility to
microwave cooking. Tile power levels on
tile microwave oven can be COlill)ai'ed
to the sm'ti_ce milts on a range. Each
power level gives you microwave energ)' a
certain percent ot tile time. Power level 7
is microwave energy 70% of the time,
Power level 3 is energy' 30% of the time,
Most cooking will be done on High(power
level 10)which gives you 100% powex:
Power level IOMll cook fi_ster but food may
need more frequent stirring, rotating or
turning ove_: A lower setting will cook more
evenly and need less stirring or rotating of
tile food. Some foods may ha;'e better
fla\'o_; texture or appearance if one of tile
lower settings is used, Use a lower power
level when cooking toods that have a
tendency to boil over, such as scalloped
potatoes.
[lest periods (when tile microwave energy'
cycles off) give time fin" the toed to
"equalize" or transter heat to the inside
of tile food. An example of this is shown
with power level_-the deti'ost cycle.
If microwave energy' did not cycle off;
the outside of the toed would cook befin'e
the inside was deti'osted.
Hem am some examples of uses for various
power levels:
High 10: Fish, bacon, vegetables, boiling
liquids.
Med-High7"Gentle cooking of meat and
poult_T; baking casseroles and reheating.
Medium 5".Slow cooking and tenderizing
for stews and less tender cuts of nleat.
Low2or3: Defl'osfin ," simmering; delicate
Satlces.
Warm I: Keel)ing, fi)od waml; softening
buttex:

Aboutthe timedmicrowave features.
MICRO
©
POWER
START/PAUSE
CD
Micro Cook
/_d]ows votl 1o illiCi'OWa\'e t()I" any [iI/le
up to 99 minutes.
Highpowerlevel(10)is auton/atically set,
but you may change it tot more flexibility:
Make sure the turntable support and glass
turntable are in place when microwaving.
[]Press MICRO.
_'_ Turn the dial to set the cook time
and press the dial to enter;
[]Change the power lexel if)ou don't
want flfll power: (Press POWER;tt/Fn the
dial to set the power lexel and press the
dial to enter;)
DPress the dial or STARTto begin
cooking,
Y_m may open the door during Micro Cook
to check the food. Close the door and press
STARTto resume cooking.
Turn the dial to add or sul)tract 5 seconds
ot cooking time dm_ing com_tdown.
EXPRESS Express
Thisis a quick way toset cookingtime for
30secondsat PowerLevel l&
Make suretheturntablesupportandglass
turntableareinplace whenmicrowaving.
The oven Mll start immediately. It Mll add
30 seconds to the time cotmfing down each
time the button is pressed.
The power level can be changed as time is
cotmting down. Press POWER and mrn the
dial to select 0-10. Press the dial to enter:
Turn the dial to add or subtract time during
the COtlntdown,
DEFROST
MICRO
©
POWER
Sequence Programming
Theovenallows youtoautomaticallybegin
microwave cookingafter defrosting.
Make suretheturntablesupportandglass
turntable are in place when microwaving.
[] Press DEFROST
_'_ Ttu'n the dial to select either Auto
Defrost ,% Time Defrost and press
the dial to entex;
_Turn the dial to enter the fl)od weight
or defl'osting time and press the dial
to entei-
Fj Press MICRO.
_"_ Turn the dial to select the cook time
and press the dial to enter;
_ Change the power lexel ifxou don't
want flfll l)owe_: (Press POWERLEVEL;
turn the dial to set the power lexel and
press the dial to enter:)
_"_ Press the dial or STARTto begin
defrosting. _Mter defl'ostin_ _*Micro
Cook will automatically cotmt down.
Turn the dial to add or subtract time during
the COtlntdown,
START/PAUSE
10

ge.com
Cooking Guide for Micro Cook
NOTE: Use High power level (10) unless otherwise noted.
Vegetable Amount time Comments
Asparagus
(fresh spears) 1 lb. 6 to 9 rain., In 1½-qt. casserole, place 1/4 cup _ltel:
Med-High (7)
(frozenspears) lO-oz, package 5 to 7rain. In l<tt. casserole.
Beans
(fresh green) 1lb. cut in half 9 to 11 nfin. In 1½-qt. casserole, place l/2 cup _te_:
(frozen green) lO-oz, package 6 to 8rain. In l<tt. casserole, place 2 tablespoons _ater.
(frozen lima) lO-oz, package 6to 8 rain. In l<tt. casserole, place l/4 cup water.
Beets
(fresh, whole) 1 bunch 17 to 21 rain. In 2-qt. casserole, place 1/2 cup _ltel:
Broccoli
(fresh cut) 1bmlch (1¼ to 1½ lbs.) 7 to 10 rain. In 2<it. casserole, place 1/2 cup _ltel:
(freshspears) 1bmlch (1¼ to 1½ lbs.) 9 to 13 nfin. In 2-<it.casserole, place 1/4 cup _ltel:
(frozen, chopped) 10-oz. package 5 to 7rain. In l-qt. casserole.
(frozenspears) 10-oz. package 5 to 7 nfin. In l<tt. casserole, place 3 tablespoons _atel:
Cabbage
(fresh) 1 medium head (about 2 lbs.) 8 to 11 rain. In 1½- or 2-qt. casserole, place l/4 cup _ltel:
(wedges) 7to 10 rain. In 2- or ?_t t. casserole, place l/4 cup _ltel:
Carrots
(fresh, sliced) 1 lb. 7 to 9 rain. In 1½-qt. casserole, place l/4 cup _ltel:
(frozen) 10-oz. package 5 to 7rain. In l<tt. casserole, place 2 tablespoons _atel:
Cauliflower
(flowerets) 1 medium head 9 to 14 rain. In 2-<it.casserole, place l/2 cup _ltel:
(fresh, whole) 1medium head 10 to 17 n_l. In 2-<tLcasserole, place l/2 cup _ltel:
(frozen) 10-oz. package 5 to 7rain. In l<tt. casserole, place 2 tablespoons _ater.
Corn
(frozen kernel) 10-_)z.package 5 to 7 rain. In ]<tt. casserole, place 2 tablespoons ware1:
Cornon the cob
(fresh) 1tO 5 ears
(frozen)
3 to 4 rain.
per ear
(fresh, whole, sweet
or white)
Spinach
(fresh)
(frozen, choppedandleaf)
Squash
(fresh, summerand yellow)
(winter, acorn or butternut)
lear 5 to 6 rain.
2 to 6 ears 3 to 4 rain.
per ear
In 2-<it.glass baking dish, place corn. If corn is
in husk, use no water; if corn has been husked,
add l/4 cup ware1: Rearrange after half of time.
Place in 2<tt. oblong glass baking dish.
Cover with _ented plastic _wap. Rearrange after
half of time.
Mixed vegetables
(frozen) 10-oz. pack ag_ 5to 7 rain. In l-<tt, casserole, place 3 tablespoons water:
Peas
(fresh,shelled) 2lbs. unshelled 9 to 12 rain. In l-<tt, casserole, place 1/4 cup water:
(frozen) 10-oz. package 5 to 7rain. In ]-<tt. casserole, place 2 tablespoons water:
Potatoes
(fresh, cubed, white) 4potatoes (6 to 8 oz. each) 9 to 12 rain. Peel and cut into l-inch cubes. Place in 2-<it.
casserole with l/2 cup _te_: Stir after half of time.
1(6 to 8 oz.) 3 to 4rain. Pierce with cooking Ii)rk. Place in the o_en, l"
apart, in circular ar_mgement, i,et stand 5 minutes.
10 to 16 oz. 5 to 7 rain. In 2-<it. casserole, place washed spinach.
10-oz. pack ag_ 5to 7 rain. In l-<tt, casserole, place 3 tablespoons watel:
1 lb. sliced
1 to 2 squash (about 1 lb. each)
5to 7rain.
8to 11 rain. In l V_tt. casserole, place l/4 cup water:
Cut in half and remove fibrous membranes. In
2-<it.glass baking dish, place squash cut-side<lo_m.
Turn cut-side-up after 4 minutes. _

Aboutthe timedmicrowave features.
DEFROST fimeDefrost
START/PAUSE
CD
Mlows you to defl'ost tot a selected length
ot time. See tile Defl'osfing Guide fi)r
suggested times. (Auto Defrost eN)lained
in tile About the convenience microwave
features secOon.)
Make sure the turntable supportand glass
turntable are in place when micmwaving.
Fj Press DEFROST
_Turn tile dM to TIMEand press tile dial
to exlter.
|_J Turn tile dial to enter defl'osfin,* Ome
and press the dial to entex;
DPress tile dial or START
D Turn tile toed oxer when tile oxen
signals.
Press the dial or START
m
X._]/en tile oven signals, mrn ff)od ()vex"and
break al)art or rearrange pieces for more
even defl'osfing. Shield any w;mn areas with
small pieces of toil. The oven will coxlfixlue
to defl'ost if you don't ol)en tile door and
ttlrn tile fl)od.
A dull thumI)ing noise may be heard
during defl'osfing. This is nomml when
oven is not oi)eraOng at HighI)owex:
Turn tile dial to add or subtract dine duI]ng
tile cotxntdown.
Defrosting tips
• Foods fi'ozen in [)aper or [)lastic can be
defl'osted in the I)ackage. Closed packages
sho/fld be slit, pierced or vented AIq-ER
toed has pmtially defrosted. Hasdc storage
containers should be i)arOally/mcovemd.
• F;mfil)'-size, i)rel)ackaged fl'ozen dinnex_
can be defl'osted and microwaved. If tile
fi)od is in a fl)il containex; transfer it to
a microwave-safe dish.
• Foods that spoil easily should not be
allowed to sit otxt tot I/lox'e than oxle hotxx"
after defl'osfing. Room teml)eratm'e
i)romotes tile gr()_h ot hmmflfl bacmfia.
• Fox" I/X()x'e even defl'osOng of larger fi)ods,
such as roasts, use Auto Defrost. Be sure
lmge meats are completely defl'osted
befi)re cooking.
• When defl'osted, fl)od should be cool
but softened in all areas. If still slightly
icy, I'ettlYn to tile microwave ()veil vei'v
briefl> or let it stand a ti_w minutes.
NOTE:A safety feature prevents the use of
any grilling or microwave function while the
rotisserie spit rod is in position. The control
will read "REMOVE SPIT ROD"
12

ge.com
Defrosting Guide
Food Time Comments
Breads, Cakes
Bread, bans orrolls (I piece) !rain.
Sweet rolls (approx. 12oz.) 3 to 5 rain. Rearrange after half the time.
Fish and Seafood
Fillets, frozen (I lb.) 6to 8rain.
Shellfish, smallpieces (I lb.) 5to 7 rain. Place Mock in casserole. Turn o'_er and break up m'ter half the time.
Fruit
Plastic poach--1 or2 3to 6rain.
(10-oz. package)
Meat
Bacon(I lb.)
Franks(I lb.)
Groundmeat (I lb.)
Roast:beef, lamb,veal, pork
Steaks, chopsandcutlets
Poultry
Chicken,broiler-fryer,cat up
(2½to 3 Ibs.)
Chicken,whole(2½to3Ibs.)
Cornishhen
Turkeybreast (4to 6Ibs.)
5to7mm.
12tol6mm.
per_.
5to7mm.
per_.
15 to 19 rain.
17 to 21 rain.
7tol3mm.
per_.
5to9mm.
per_.
Place tmopened package ira oven, l_t stand 5 minutes m'ter defi'osdng.
Place tmopened package ira o_en. Microwm%just tmtil fi'anks can be separated.
Iset stand 5 rain tires, if necessm3, to complete defi'osting.
Tuna meat over after first half of time.
Use power level I0.
Place Um_Tapped meat ira cooking dish, Turn over after first half of time and shield
warm areas with fi)il. _Mter second half of time, separate pieces with ruble knife,
Iset stand to complete deli'osfing.
Place _Tapped chicken ira dish. Unwrap mad turn over after first half of time.
After second half of time, separate pieces and place ira cooking dish. Microwave
2to 4 minutes more, if necessar\, iset stand a few minutes to finish deli'osting.
Place _Tapped chicken ira dish. _Mter half the time, unvvTa l) and turn chicken o_el:
Shield warm areas with lifil. 33) complete deli'osting, run cold water ira the ca\it_
tmtil giblets can be removed.
Place um_Tapped hen ira the ()\era breast-side-up. Tm'n o_er after first half of time.
Rtm cool water ira the ca\it) tmtil giblets can be removed.
Place um_Tapped breast ira microwm'e-sale dish breast-side<lo_m. Alter first half
of time, mrn breast-side-up and shield warm areas with li)il. Deli'ost Ii)r second
half of time. ilet stand I to 2 hours ira refi'igerator to complete deJi'osting.
13

Aboutthe conveniencemicrowave features.
POPCORN
START/PAUSE
CD
Use only with prepackaged
microwave popcorn weighing
3,0to 3,5ounces,
Popcorn
Make sure the turntable supportand glass
turntable are in place when microwaving.
To use tile Popcorn teatm'e:
I_ Follow )ackage instructions, usino
Micro Cook if the package is less than
3.0 ounces or linger than 3.5 ounces.
Place tile package of popcorn in tile
center of tile microwave.
[]Press POPCORN.
_Turn tile dial to select 3.5 ox 3.0 ounce
package of popcorn. Press tile dial to
eIlteE
D Press tile dial or STARTtobegin
cooking
Turn tile dial to add or subtract time during
tile CO/liltdowil.
BEVERAGE
@
START/PAUSE
Beverage
Make sure the turntable supportand glass
turntable are in place when microwaving.
To use tile Beverage teatm'e:
I_ Press BEVERAGE.
_'J Turn tile dial to select 4, 8, or 12 ounces.
Press tile dial to enter;
BPress tile dial or STARTto begin
cooking
Drinks heated with the Beverage feature may
be very hot. Remove the container with care.
Turn tile dial to add or subtract time during
tile COtliltdowil,
14
REHEAT
START/PAUSE
Reheat
Make sure the turntable supportand glass
turntable are in place when micmwaving.
The Reheatleature reheats 1-3 servings
ot many previously cooked toods.
I_ Press REHEAT
_'J Turn tile dial to select tile food g'pe
and press tile dial to entex:
_Turn tile dial to select tile serxing size
and press the dial to entet;
D Press tile dial or STARTto begin
cookiIlg,
NOTE:Serving size for a plate of leftovers
cannot he changed.
TtlFII tile dial to add or stlbtract tillle dtllJllg
tile COtliltdowil.
Reheat Guide
Food Type
Meats
Pasta
Pizza slices
Plate ofleftovers
Vegetables
Comments
Co_er with lid or _ented plastic _Tap.
Coxer with lid or vented plastic _Tap.
Do not cove1:
Co_er with lid or vented plastic _Tap.

DEFROST
START/PAUSE
CD
ge.com
Auto Defrost
Use AUtO Defrestfiw meat, poultr)and
fish weighing up to 6.0 pomMs. Use
Time Defrostfor most other fl'ozen foods.
Auto Defrostautonmficallv sets the
defl'osting times and power levels to give
even defl'osting results tot meats, poult_ 3'
and fish.
Make sure the turntable support and glass
turntable are in place when micrewaving.
ir_ Press DEFROST
_'_ Turn the dial to AUTO and press the
dial to enter:
_"Jl Using the Conversion Guide below, tm'n
the dial to enter food weight and press
the dial to enter:
(TimeDefrostis explained in the About the
timemicrowave featuressection.)
• Remove meat from I)ackage, and place
on microwaxe-sate dish.
• _]_en the oven signals, mrn the food
ove_: Remove defrosted meat or shield
warn/areas with small pieces of foil.
• _Mter defl'osting, most meats need to
stand 5 minutes to complete defl'osting.
I,a_ge roasts should stand for about
30 minutes.
D Press the dial or STARTto begin
defl'osfing.
Conversion Guide
If the wel)ht of foodisstated I)_poundsandounces,the ouncesmust be converted
to tenths_1)of apound
WeightofFoodin Ounces EnterFoodWeight(tenthsofa pound)
I-2 .I
3.2
4-5 .3
6-7 .4
8.5
9-10 .6
11 .7
12-13 .8
14-15 .9
15

Usingtherotisseriefeatures.
Make sure the turntable support and black metal •
tray are in place when using the rotisserie.
Tile rotisserie uses both tile to I) and 1)otton_
heating elements to cook tile fl)od item.
ACAUTION:Whenusingthe
rotisserie, remember that the oven, door and •
dishes will be very hot!
Rotisserie parts and food items will become •
bet duringcooking.Alwayshandle with
oven mitts.
In addition to tile cookware pxx)vided,
you can use pie plates and other heat-
sate cookware to collect drippings. Place
them directly on tile black metal tray:
Be sure to select afi)od size that will
rotnte easily.
Place tile black metal tray directly on
tile mrntnble support.
Do not use cookware or covelJngs ii/a(le
of paper, plastic or foil when using the
rotissei_e,
Using the Spit Rod
ACAUTION: Tinesontheretisserie
meatforksaresharp!Becarefulwhenplacing
foodonthespitrodandwhentakingitoff.
_r_ I,oosen tile screw 1)11 one of the
rotisserie meat tbrks. Slide tile fork
off the rod.
_'_ Push the meat onto the rod and into
the fi)rk,
[]Slide tile other rotisserie ineat fi)rk
onto the rod and push the fines
through the meat,
DMake sm'e the meat forks are fimfl)
in the meat, Tighten the screw on each
meat fork.
_'_ Insert the rod into the motor shaft
on the left side of the o',en.
1_ Slip the opposite end of the rod into
tile SUl)port on tile right side.
IMter the selected cooking time is
finished, check the toed to be sure
it has cooked completely.
_ Using oxen mitts, reach below tile rod
and lifi tile rod off tile right supi)ort.
Moxe the rod to the right, disengage
_Jit fl'om tile motor shaft and remoxe
tile food fl'om tile oven. It may be
necessary to hold aplate beneath the
fi)od when removing tile spit rod
fl'om tile oven.
ROTIS
©
START/PAUSE
Setting a Rotisserie Program
Make sure the turntable support and black
metal tray are in place.
See tile Rotisserie Guide on tile next page
for cooking suggestions.
_ Press ROT/S.
_'_ Tm'n tile dial to select tile food t},])e
and press tile dial to entei:
_Tm'n tile dial to select tile specNc fi)od
and press the dial to enter:
_JTm'n the dial to enter the serving size
and press tile dial to enter:
_'_ Press tile dial or STARTto begin
c(>(>king
When the ovenstops, use ovenmitts to
carefully remove the black metal tray.
It may be very bet.
During and after use, donet touch, or let
clothing, pot holders or other flammable
materials contact the cooking elements.
These surfaces may be hot enough to burn
even though theyare dark in color.Allow
sufficient time for cooling first
Turn tile dial to ;1(1(1or subtract time during
tile co/intdown.
16

ge.com
Manual Rotisserie
Make suretheturntablesupportandblack
metaltrayareinplacewhenusingtherotisserie.
_ Press ROT/S.
_P_ Turn the dial to MANUAL and press the
dial to enter:
BTurn the dial to enter cook fiine and
press the dial to entei;
D Press the dial or STARTto begin
Coo]dng,
Tm'n the dial to add or subtract time dining
the COtlntdown,
Rotisserie Guide
Food Serving/ Cook Time
Type Food Weight (minutes)
FreshBeef Beef Roast 2 lb. 80
3 lb. 100
Beef Tenderloin 0.75 lb. 36
1.5 lb. 70
FreshPoultry CornishHens 1 Hen 50
2 Hens 80
Whole Chicken 2.5 lb. 82
3.0 lb. 99
3.5 lb. 115
FreshPork Pork Roast 2lb. 80
3lb. 115
Pork Tenderloin 0.75 lb. 50
1.25 lb. 60
Manual Cook Enter 77me As Entered
/7

Using the grilling features.
Make sure the turntable support and black
metal tray am in place when grilling.
The grilling _bamres use direct heat fl'om
tile top and bottom elements to cook fl'esh
;rod fl'ozen roods.
ACAUTION:Whenusing,he
grilling features, remember thatthe oven,
door and dishes will be very heft
[] Cool<ware will become hot. Oven mitts
will be needed to handle tile cookware.
[] Place tbod, oven-sMe cookware or tile
browner rack directly on the black metal
tray when cooldng.
[] [)se tile black metal tray in tile same wm
w)u would use a shallow baldng pan or
i_aking tray.
[] Ill addition to the cookware pr(Mded,
you can use non-metal casserole dishes,
pie plates and other heat-sa/b cook,s:ire.
Nace them directly on tile black metal
tray or browner rack.
[] Be sure to select a size that will rotate
easily.
[] Nace tile black metal troy direcdy on tile
mrntable suppo_.
[] Do not rise cookw;ll'e or covelJngs made
of pal)el; plastic or toil when using the
grilling tbatures.
GRILL
©
START/PAUSE
CD
Setting aGrilling Program
Make sure the turntable supportand black
metal tray are in place when grilling.
See tile Grilling Guide on tile next page
for cooking suggestions.
F_ Press GRILL.
_'J Turn the dial to select the food _'pe
and press the dial to enter:
_Turn the dial to select the spedfic food
and press the dial to enter:
I
DDe _ending on your selection, mrn tile
dial to enter the serving size or cook
time and press the dial to enter:
_"_ Press tile dial or STARTto begin
cooking.
Tile twen may signal and prompt you
to "TurnFood Over" or to "Check Food"
during the cooking time.
Turn the dial to add or subtract time during
tile ('otlntdown.
When the ovenstops,use ovenmitts to
carefully remove the dish,black metal tray and
browner rack (if used). Theymay be very hot.
During and after use, donot touch, or let
clothing, pot holders or other flammable
materials contact the cooking elements.
These surfaces may be hot enough to burn
even though theyare dark in color.Allow
sufficient time forcooling first
Remove cookware completely frem the oven
before turning food.
NOTE:A safety feature prevents the use of
any grilling or microwave function while the
rotisserie spit rod is in position. The control
will read "REMOVE SPIT ROD"
18

ge.com
Manual Grilling
Make sure the turntable supportand black
metal tray are in place when grilling.
The Manual grilling features allow you to
choose which heating elements are used
when grilling and set the cooking time.
r_ Press GRILL.
_;'_ Turn the dM to MANUAL and press
the dial to enter:
[]Tm'n the dM to select GRILLI or
GRILL2.
D Turn tile dial to enter cook time and
press the dial to enter:
_'_ Press the dial or STARTto begin cooking
GRILL1tlses the top heating element only
tin" browning on top.
GRILL2utilizes both the top and bottom
elements fin" even browning on all sides.
The manual grilling featm'e can be used
to brown pre-cooked tood.
Tm'n tile dial to add or subtract fiIne during
the CO/lntdown.
Grilling Guide
Food Type Food Servings Cook 77me(minutes)
FrozenFries Crinkle Fries 1 10
4]5
Regular Fries 1 13
4 18
Steak Fries 1 13
4 18
TaterTots 1 8
4 15
VarietyMeats Chicken Breast 1 15
4 20
Filet Mignon 1 13
2 14
Pork Chop 1 10
2 10
VarietyPizza Deep Dish Singles, Frozen 1 Pizza 15
2 Pizzas 20
PizzaShell, Filled 12
Regular Crust,Frozen 6 in. 12
12 in. 15
Rising Crust,Frozen 6 in. 25
12 in. 30
FreshSeafood Salmon Fillets 1 10
2 12
Shrimp, Fresh 1 lb. 10
VarietySnacks Burritos, Frozen 1 10
4 18
CheeseSticks 2 10
4 10
Chicken Wings 1 8
4 12
Grilled Cheese 1 10
4 10
dalapefio Poppers 1 10
4 11
OnionRings 1 8
4 14
PizzaRolls 17
4 9
Pocket Sandwich, 1 6
Frozen 410
Manual Cook Enter 77me Time _atered _

Aboutthe otherfeatures.
Cooking Complete Reminder
To remind v<)u that you have tood in tile
oven, tile oven will display FOODIS READY
and beep once a minute until you either
open tile o_en door or press CLEAR/OFF.
START/PAUSE
CD Start/Pause
In addition to cancelling selections,
START/PAUSEallows you m stop cooking
without opening tile door or clearing
tile display: Press START/PAUSEto restart
tile ()veil.
CLEAR/OFF Child Lock-Out
Y()u may lock tile control panel to prevent
tile microwa',e oven ti'om being accidentall'_
started or used by children.
To lock or tmlock tile controls, press and
hold CLEAR/OFFfi)r about 3 seconds. _,\_/ell
tile control panel is locked, Lwill be in
tile display.
TIMER Timer
timer operates as a minute timer when tile
o_,en is not oi)ei'ating,,
_r_ Press TIMER.
_'_ TtH'n tile dial to enter tile minutes and
press the dial to enter;
[]Tm'n tile dial to enter tile seconds and
press tile dial to entex:
D Press TIMER.
_4]/en time is up, tile oven will signal.
PresstiMERt,, cancel tile timex:
NOTE:7he 77merindicator will be litwhile the
dmer is operating.
2O
Other manuals for JES1289
1
Table of contents
Other GE Microwave Oven manuals

GE
GE Appliances DVM1950 User manual

GE
GE Spacemaker JVM1630CH User manual

GE
GE Profile JES2251SJ User manual

GE
GE JE1160 User manual

GE
GE CVM1750 User manual

GE
GE JVM2052 User manual

GE
GE JES1460DS User manual

GE
GE JES1358 User manual

GE
GE JEM31BF - Spacemaker II Microwave Oven User manual

GE
GE JE1460BF User manual
Popular Microwave Oven manuals by other brands

Miele
Miele H6000BM Cookbook

DeLonghi
DeLonghi MW 500 instruction manual

Kenmore
Kenmore 767.8692000 Basic service manual

Samsung
Samsung CE2717N Owner's instructions and cooking guide

LG
LG LCRM1240ST Owner's manual & cooking guide

Frigidaire
Frigidaire FMV152KB - 1.5 Cu Ft Microwave Guide d’utilisation et d’entretien