UsingtheSabbathFeature.
(Designedforuseon theJewish SabbathandHolidays.)(onsomemodels)
TheSabbathfeature canbe usedfor baking/roastingonlg It cannot be usedfor convection,broiling,self-cleaningor
DelayStart cooking.
NOTE."Theovenlightcomesonautomatically(onsomemodels)whenthedoor isopenedand goesoff whenthedoor is closed.
Thebulbmaybe removed.Seethe OvenLightReplacementsection. Onmodelswith a lightswitch on thecontrolpanel,theoven
lightmay be turnedonand left on,
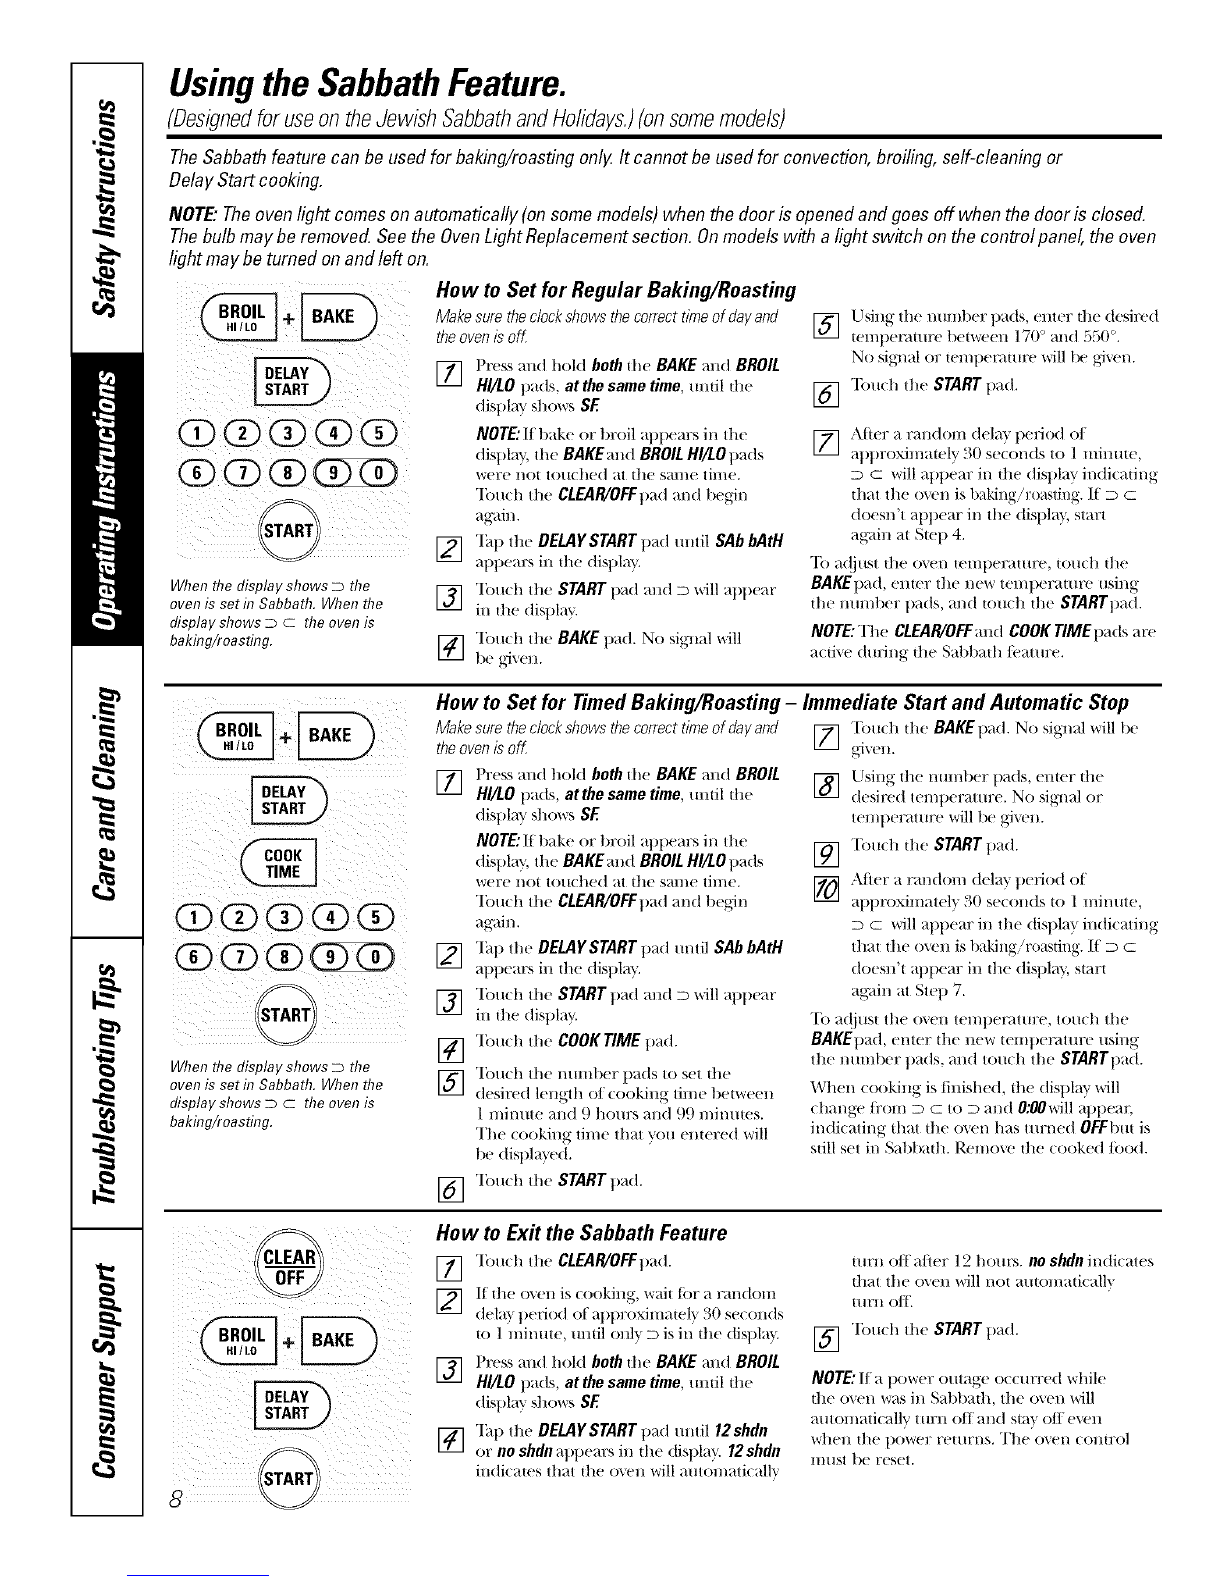
When the display shows Dthe
oven is seth7 Sabbath. When the
display shows D C the oven is
bakhTg/roasting.
Howto Set for Regular Baking/Roasting
Make sure the clockshows the correct time of day and
theoven is off
] Press and hold both ill( BAKE and BROIL
HI/LO pads, at the same time, umil the
display sl*,o\\rs SE
NOTE:If bake or broil appem:s in the
display, tile BAKEand BROIL H//LOpads
were not touched at dl(_ same time.
Touch the CLEAR/OFFpad and 1)egin
again.
12] "]_q)the DELAYSTART pad mltil SAb bAtH
i¢.-i appears in d;e display.
] Touch the START t)ad and D will at)t)ear
in the display.
] Tou*, h the BAKE pad. No siglml will
Using the nmnber pads, enter the desired
] tenq)emutre between 17(F m*,d 550°.
No sigl*,al or temperature *,',rill1X!gJxel*,.
] "lbuch the START pad.
[] ,\tier a random dela'_ period (7t
approxinmtely 30 se*,onds to 1 minute,
D C will appear in d*,e display indi(afing
d/at the oven is baking/roasling. If D C
doesn't appear in tile displa}, start
aKain al Stop 4.
"Ib a(!just the oven temperature, touch the
BAKE1)a(t, enter the new temperatm'e using
tile number pads, and touch d*,e STARTpad.
NOTE:The CLEAR/OFFand COOKTIME pads are
a(tive (hnJng tl'te Sal)l)ad//i.'at rex'.
i!/ i¸
0000@
00
When the display shows Dthe
oven is seth7 Sabbath. When the
display shows D C the oven is
bakhTg/roasting.
How to Set for Timed Baking/Roasting -
Make sure the clockshows the correct time of day and
theoven is off
]Press and t*,(71(tboth die BAKE and BROIL
HI/LO pads, atthe same time, until dw
display S]*,OWS SE
NOTE:If bake or t)roil appem:s in the
display, the BAKEand BROILHl/LOpads
_'(_r(_ I*,O1 t(T/l(l*,e(t at it*,( S_tH/( tll//e.
"lbu*, h the CLEAR/OFFpad and begin
again.
_] "lh1) the DELAYSTART pad m*,til SAb bAtH
at)pears ill d;e display.
] "Ibuch the STARTpad and D *,*,rillappear
in dw display.
[_] "lbu(h the COOK TIME pad.
] "Ibu(h the mmfl)er pads to set d*,e
desired length of (ooking time betvqeell
1 mimlte and 9 hom:s and 99 minmes.
The (ooking time that you elliered will
be displa} ed.
"lbu(h the START pad.
[]
Immediate Start and Automatic Stop
[] "[}m(h ill(! BAKEpad. No signal *,','ill1)e
_1"_ ell.
Llsing the nmnber pads, enter the
] desired temt)erature. No siglml or
temt)eramre will be gJvt'n.
] T(m(h the START pad.
[_ After a randon*, delay period of
at)proximatel" _30 se((mds to 1 mimue,
D C will appear in tile displa} in(ticating
that the oven is baking'roasting. 11 D m
doesn't appear in the display, start
ag;fin at Step 7.
To a(!iust tile oxen temperature, touch tile
BAKEpad, enter tile new temperature using
the number pads, and touch tile STARTpad.
When cooking is finished, the display \\'ill
change fi'om m m to m and 0;00will apl)ear
indi(ating that the o_en has turned OFFbtlt is
still set in Sabbad*,. Remove d*,e cooked/ood.
How to Ex# the Sabbath Feature
[77 "lbu(h the CLEAR/OFFpad.
]dela} perio(1 of al)t)roximately 30 se((mds
to 1 minute, umil (mlx. D is in d*,e displa)
F_] Press and hold both the BAKE and BROIL
IJI HI/tO pads, at the same time, until the
display S] _( >_rs SE
[_] "lhp the DELAYSTART pad until 12shdn
or no shdnappears ill the displa'_ 12shdn
in(li(aws that the oxen *,,,rillaut(m/ati(allv
turn off after 12 hours, no shdnindicates
that the ovell will I/()t a/ttol//atical]'_
ttlrtl ofF.
] "lbu(h the STARTpad.
NOTE:If a power outage occ/m:ed while
it*,e o_en was in Sat)bath, tile oxen will
alltOnlaticallv tHrll Oil al/d sia\ oil evell
\vllell the power rel/lrl/s, The ovel/ COllHX)l
lIl[tSt be reset.