GE JKP30 User manual

_e° COrn
Safety Instructions ....... 2-4
Operating Instructions
Clock and Timer ............ 9
Control Lockout ........... 19
Controls ................. 5, 6
Convection ............. l l-I 3
Oven ................... 7, 8
Sabbath Feaulre ......... 20, 21
Self-Cleaning Oven ...... 15, 16
Special Features ......... 17-19
Thermostat ............... 14
Timed Baking and Roasting . .10
Care and Cleaning
Control Panel ............. 22
Glass Surfaces ............. 25
I_oI) .................... 22
Lift-Off Oven Door . ..... 22, 23
Light Bulb ................ 24
Packaging _q)e ............ 22
Painted Surfaces ........... 25
Racks .................... 23
Stainless Steel Surfaces ...... 25
Troubleshooting Tips .... 26-28
Consumer Support
Consumer Support ......... 32
Product Registration ..... 29, 30
Warranty ................. 31
Write the model and serial
numbershere:
Model #
Serial #
You can find them on a label
on the side trim or on the fl'ont
of the (lower) oven behind the
oven doo I'.
JKP30-2 7" Si_Lg'le Wull ()ve,_
JTP30-30" Sb_gTe _'_dl Ove_
JKP70-2 7" Sizable Co_vectio_ Wull ()ve_
JTP70-30" Si_gfe (,:o_mectio_ Wall Ove_
JKP_5-2 7" Double l'!2d[ (h:e_
.]TP_5-30" Doub# _4_lg (h_en
JKP55-2 7" Doub& l'!_dl (h_en
JTP55-30" Doub& l'!_/g ()ve_
JKP75-2 7" Doub& Co_vectio_ l'!_dl (h_e_
JTP75-30" Doub& Co_vectio_ 14_d[ (h_e_
4_-8042_ 02-07 dE

IMPORTANTSAFETY/NFORMATiONo
READALLINSTRUCTIONSBEFOREUSING
It I
For your safety, the information in this manual must be followed to minim)e the risk of fire or
explosion, electric shock, or to prevent property damage, personal idury, or loss of life.
IMPORTANTSAFETYNOtiCE
The California Safe Drinking Water and ToxicEnforcement Act requires the Governor of California to
publish a list of substances known to the state to cause cancer, birth defects or other reproductive
harm, and requires businesses to warn customers of potential exposure to such substances.
The fiberglass insulation in self-clean ovens gives off a very small amount of carbon monoxide during
the cleaning cycle. Exposure can be minimized by venting with an open window or using a ventilation
fan or hood.
SAFETYPRECAUtiONS
When using electrical appflances, basic safety precautions should be followed, including the following:
Use this appliance only for its intended
purpose as described in this Owner's
Manual.
Be sure your appliance is properly
installed and grounded by a qualified
technician in accordance with the
provided installation instructions.
Do not atmmpt to repair or replace any
part of your oxen unless it is specifically
recommended in this manual. All other
servicing should be refelled to a qualified
technician.
Hme the installer show you tile location
of the circuit breaker or fllse. Mark it for
easy reference.
Before performing any service, disconnect
the ox>n power supply at the household
disuibufion panel by removing tile fuse or
switching off tile circuit breaken
Do not leme children alone--<hildren
should not be left alone or unattended in
an area where an appliance is in use. They
should nex>r be allowed to sit or stand on
any part of tile appliance.
Do not allow anyone to climb, stand oi
hang on the doon They could damag> tile
oven, oi cause sex,re personal iIljnI>
Be sure tile o\>n is secnlely installed in a
cabinet that is firmly attached m rim house
strnctnre. Never allow anyone m climb, sit,
stand or hang on tile oven door
Ne_er leave tim oven door open when you
are not watching tile oxen.
Alwws kee I) combustible wall coxerings,
curtains or drapes a sad distance flom
vonI" o\_n.
Alwws kee I) dish towels, dish cloths, pot
holders and other linens a sad distance
fFonl vonT oxPn.
Always kee I) wooden and plastic nmnsils
and canned food a safe distance awW flom
yonr oxPn.
Teach children not to play with the
controls or any oilier part of file oven.
Large scratches or impacts m glass doors
can lead to broken or shatmied glass.
2

ge.com
tt WARNING!
SAFETYPRECAUTIONS
Do not store flammable mateiia]s in
an o_en.
CAUTION:Items of interest to
children should not be stored in cabinets
above an oven; children climbing on the
oven to reach items could be seIiouslv
ii_nred.
Never wear loose-fitting or hanging
garments while using file appliance. Be
careflll when reaching tbr items stored
in cabinets o_er file oven. Flamn_able
mateiial could be ignited if brought in
contact with hot sur_aces or heating
elements and may cause se\_re bnrns.
Use only dUpot llolders--moist or damp
pot holders on hot snifi_ces ii]ay iesult in
bums from smam. Do not let pot holders
touch hot heating elements. Do not use a
towel or other bulky cloth.
For your safety, nexer use your appliance
for wam/ing or heating tile room.
Do not let cooking giease or other
flamnlable mamrials accumulam in
or near the o_n.
Do not use water on gTease fires. Nexer
pick up a flaming pan. Turn the controls
oK
Flame in die oven can be smothered
completely by closing the oven door and
turning the oven off orby using a mulfi-
pm])ose dW chemical or foam-type fire
extinguisher
Never lem>jars or cans of fi_t drippings in
or Ileal vonr oxen.
Do not store or use combustible mamrials,
gasoline or other flammable vapors and
liquids ill the vicinity of this or any other
appliance.
Stand away flora the oven when opening
the ox>n doon Hot air or steam which
escapes can cause bums to hands, Pace
and/or eyes.
Do not heat unopened food containers.
Pressure could build up and file container
could burst, causing an iI_nry.
Kee I) the o\_n \_nt unobstructed.
Kee I) tile oven fiee fiom grease buildup.
Place tile ox>n rack in tile desired position
while the oven is cool. If racks must be
handled when hot, do not let pot holder
contact file heating elements.
_Allen using cooking or roasting bags
in the oven, follow file manufitcturer's
directions.
iiiiiiiiiiii_iii
Do not touch file heating elements or the
interior surPace of file oven. These surPaces
may be hot enough to burn even though
they are dark in colon During and after
use, do not touch, or let clothing or oilier
flammable materials contact any interior
area of the ox>n; allow sufficient time for
cooling first.
Potentially hot surfaces inchlde oven x>nt
openings, surlCaces Ileal the openings,
crevices around the oxen dooi, the edges
of the window and metal trim parts above
tile door
REMEMBER:Tile inside surPace of die o_>n
may be hot when file door is opened.
Ne_er place cooking utensils or any other
imms on file oven floon Tilere is a heating
element beneath the oven floor Placing
items on tile oven foot m W cause the
oxen to overheat, Iesulfing in damage
to the oven and risk of damag_ or fire
to cabinets.
3

IMPORTANTSAFETYINFORMATION.
READALLINSTRUCTIONSBEFOREUSING.
WARNING!
SAFETYPRECAUTIONS
iiiiiiiiiiii_iii
iiiiiiiiiiii_iii
iiiiiiiiiiii_iii
Pulling out tile rack m file stoi>lock is a
convenience in lifting beax_' foods. It is
also a precaution against bnrns froll/
touching hot snrfaces of the door or
ox.en walls.
Do not use tile oxen to d_T newspapers.
If oxerheated, they call catch on fire.
Do not use tile oxen for a storage area.
hems stored ill all oxen call ig_fite.
Do not leme paper products, cooking
utensils or food ill the oxen when not
ill use.
'After broiling, always rake any broiler pan
out of file oven and clean it. Leftover
gxease ill a broiler pan can catch fire
next time yon use the pan.
Clean only parts listed ill this Owner's
Manual.
Do not use aluminum foil to lille oxen
bottoms, except as suggested in this
manual, hnproper installation of
aluminum foil may resuh ill a risk
of electric shock or fire.
COOKMEATANDPOULTRYTHOROUGHLY...
Cookmeatandpoultry thoroughly--meat to at leastan INTERNALtemperatureof 160°Fandpoultry
toat least an INTERNALtemperatureof 180°ECookingto thesetemperaturesusuallyprotectsagainst
foodboroeilbess.
SELF-CLEANINGOVEN
Do not clean tile door gvtsket. The door
gasket is essential for a g_od seal. Care
should be taken not to rub, damag.e or
mox.e the gasket.
Do not use ox.en cleaners. No commetvial
ox.en cleaner or ox.en liner protective
coating of any kind should be used ill or
around any part of file ox.en. Residue from
ox.en cleaners will damag_ the in0de of the
ox.en when the self-clean cycle is used.
Before self-cleaning die ox.en, remox.e any
broiler pan, grid and other cookware.
Be sure to wipe up excess spillag.e before
starting the selt¥1eaning operation.
If the self-cleaning mode malfunctions,
turn tile ox.en off and disconnect rite
power supply. Hax.e it serviced by a
qualified technician.
READANDFOLLOWTHISSAFETYINFORMATIONCAREFULLY.
SAVETHESEINSTRUCTIONS
4

Usingthe ovencontrols.(on some models)
Throughout this manual, features and appearance may vary from your model.
ge.com
Double oven control shown.
'Ktchn
OvenControl,ClockandtimerFeaturesandSettings
Bake Pad
Press to select fl_e 1)ake flulcdon.
Broil Hi/Lo Pad
Press to select the broil ftin(fion.
Convection Bake Pad
Press to select baking with the comection
fiulction.
Convection Roast Pad
Press to select i'oastino with the comection
flUlCtion.
StartPad
Must be i)ressed to start any cooking or
cleaning flUlCtion.
Display
Sho_,_,:stile tinIe of day, oven tenli)erature ,
whether the ()veil is in the bake, broil or
sel6cleaning mode and the tiines set tor
tile [illler or atltOlllatic ()veil ol)ei'ations.
ff "F- anda numberorletter"flashinthedisplayand
theovencontrolsignals,thisindicatesa function
errorcode.PresstheClear/Offpad Allowtheovento
coolforonehourPuttheovenbacklbtooperation.If the
functionerrorcoderepeats,disconnectthepowertothe
ovenandcarlforservice.
fly our oven was set fora timed ovenoperation
and a power outage occurred, theclock andall
programmedfunctionsmustbe reseL
Thetime ofdaywill flashinthedisplaywhen there
hasbeena poweroutage.
Self Clean Pad
Press to select self:<leaning function. See
the Using the self-cleaning oven section.
OOven LightOn/OffPad
Press to turn the o_en light on or off'.
Delay Start Pad
Use ahmg with Cooking Time or Serf Clean
l)ads to set the oxen to start and stop
autonlaticallv at a tiine you set.
G
0
0
0
Cooking -time Pad
Press and then press fl_e nuinl)er l)ads to set
tile alllOtlnt of tiI//e Veil w;Int VOtli" ['ood to
cook. The oven will shut offautoniaticallv
when the cooking tiine has run ()tit, unless
the Cook and Hold timture was set.
Clear/Off Pad
Press to cancel ALL oxen ol)eradons except
the clock and tiinei:
Clock Pad
Press 1)efore setting the chick.
Number Pads
ILrseto set any flUlCfion requiring nuinbeis
such as the tiIne of day Oil the chick, the
tiIneI; the oven tenll)erature , the internal
flied tenll)erature, the start tiine and
length of ol)eration for dined baking
and self:cleaning.
Kitchen -timer On/Off Pad
Press to select the diner teatuI'e.

Using the oven controls, (onsomemodels)
Throughout this manual, features and appearance may vary from your model
ero rz......" "_ ero
C°°ki)LB'°'O I C°r°'i)
O_ HIILo HilLO
Delay Cookin 9 Delay
Cooki{_g Time_ _tor_
On/Off
Double oven control shown
OvenControl,Clockand TimerFeaturesandSettings
0Bake Pad
Press tiffs pad to select the bake timcfion.
Broil Hi/Lo Pad
Press this pad to select the broil ft/n(don.
Self CleanPad
Pros this pad to select the selfk'leaning
flmction. See the Using the self-cleaning oven
section,
0Start Pad
Must be pressed to start any cooking or
cleaning flmction.
0Display
Shows the time of day, oven temperatm'e,
whether the o_en is in the bake, broil or self:
cleaning mode and the times set fi)r the
tilller or atltOlllatic oxen operations,
If "Fiand anumber or letter" flash in the display
and the oven control signals, this indicates a
function error code.Pressthe Clear/Offpad Allow the
oventocoolfor onehour Putthe ovenbackinto operation.If
the functionerrorcoderepeats,disconnect thepower to the
ovenandca//for service.
Ifyourovenwassetfora timedovenoperationand
a poweroutageoccurred, thedockandallprogrammed
functionsmustbereseL
The time ofday will flash in the display when there
has been a power outage.
Oven Light On/Off Pad
Press this pad to mrn the men light on or off.
Delay Start Pad
Use along with Cooking time or SeffClean
pads to set the oven to start and stop
automatically at a time you set.
Cooking -time Pad
Press this pad and then press the Hourand
Min +and -pads to set the amom_t of dine
you want yore" food to cook. The oven will
shut off automatically when the cooking tim e
has mn out tmless tl_e Cook and Hold
teattlI'e WaS set.
0Clear/Off Pad
Press this pad to cancel ALLo'_en
operations except the clock and timer.
Temp+and- Pads
Press these pads to set the cooking
telllpei'attli'e ,VOtl W_lllt 10 rise.
Clock Pad
Press this pad before setting the clock.
Hour and Min + and- Pads
Press these pads to set times up to 9 hom_
and 59 minutes--fi)r example, the time of
day on the clock, the time_; the starting and
length of cooking time for timed bake and
fl_e starting and length of cleaning time
for selfk lean.
I_ Kitchen-timerOn/OffPad
Press this pad to select the timer teatm'e.
Lower OvenControlSettingsonmodels with a knob
OVENKnob
Tm'n this knob to
the temperature
setting you want.
TheOvenCycleh)ht glows until the ovenreachesyour
selectedtemperature,thengoes off and onwith the oven
element(s)dunbgcooking.

Usingthe oven. gecom
Toavoid possible bums, place the racks in the desired position before you turn the oven on.
Before you begin...
Tile rocks baxe stop-locks, so that when placed
correctly (m the supports, the} will stop betore
coming, comf)letelx, out, and will not tilt.
When l)lacing, and removing cookware,
pull the rock out to the bul;qp on the rack
support.
Toremove a rack, pull it tox_ard yr()(_,
tilt the ti'ont end up and pull it out.
Toreplace, place the end of d_e rack
(stop-locks)on dm support, dlt up the
fl'ont and push the rock in.
CAUTION:Neverplacecookbgutensilsorany
otheritemsontheovenfloorThereisa heat/by
dementbeneaththeovenfloorPlacingitemson
theovenf/oormaycausetheoventooverheat,
resultingin damagetotheovenandrfakof
damageor firetocabinets.
Theoven has 7rack positions.
How to Set the Oven for Baking or Roasting
[] Press the Bake pad.
[] On models _qth nun-lber pads, press
them in order to set the desired
temperature.
On models with Temp+and -pads,
press them to incx_ase or decrease the
set (lesix_(1 temperature.
[] Press the Start pad.
[] Check toed tar doneness at minimum
time on recipe. Cook longer if necessaQ'.
[] Press the Clear/Offpad x_hencooking is
complem.
NOTE:Onsomemodels,the/oweroveniscontrolled
withaknob.Tosettheovenforbaking,turntheknob
tothedesiredsettingortemperature.Turntheknob
toOFFwhenbakingiscomplete.
Rack Position
Typeof Food 27" Oven 30" Oven
Frozenpies BorC CorD
(oncookiesheet)
Angelfoodcake A A or B
Bundtorpoundcakes A A or B
Biscuits,muffins, BorC CorD
brownies,cookies,
cupcakes,layer
cakes,pies
Casseroles BorC CorD
,1 . - ..
For27 Ovens./l baking four cake layers at the
same time, place two layers on rack Aand two
layers on rack C.
11 . . ..
For30 Ovens.1tbaking four cake layers at the
same time, place two layers on rack B and two
layers on rack D.
Stagger,, [)arts,on the rack so one is not (lirectl_
abo_e the othex:
NOTE:Acoolingfanmayautomaticallyturnonandoff
tocoolinternalparts.Thisisnormal,andthefanmay
continuetorunevenaftertheovenisturnedoff
Preheating and Pan Placement
Preheat the o_en if the recipe calls tar it.
To preheat, set the oven at the correct
temperature. Preheating is necessa U
tar good results \dmn baking cakes,
cookies, pastry and breads.
Forovenswithoutapreheatindicatorfightor tone,
preheat10minutes.
Baking results will be better if baking pans
are centered in the o_en as much a.spossible.
Pans should not touch each other or the _dls
of the o_en. It_)u need to use t\_o racks,
stagger the pans so one is not directly abo\e
the otbec and leme approximately 1½"
bemeen pans, fl'om the fl'ont, back and
sides of the _dl.
Aluminum Foil
Aluminumfoil maybeusedtocatchaspillover
Ne_er enfire]) co_er a rock with aluminmn
foil. This will disturb the beat circulation and
result in poor baking.
A sm_dler sheet of toil may be used to catch a
spillover by placing it on _ilm_er rack sexeral
inches belm_ the toed. 7

Usingtheoven.
Close the door Always broil
with the door closed,
If youroven isconnected to 208
volts, rare steaks may be broiled by
prebeating tile broiler and positioning
How to Set the Oven for Broiling
Close the doo_: Always broil with the door
closed.
[] Place the meat or fish on a broiler
grid in a broiler pan.
[] Follow suggested rack posidons in
the Broiling Guido.
Thesize,weight,thickness,stamngtemperature
andyourpreferenceofalonenesswillaffect
broihngt/Ynes.Thisguideisbasedonmeats
atrefngeratortemperature.
[] Press the BroilHi/Lopad once fl)r
HI Broil.
To change to LOBroil,pressthe
BroilHi/Lopad again.
[] Press the Start pad.
[] _,A_en broiling is finished, press the
Clear/Off pad.
NOTE'. On some models,the lower oven is
controlled with a knob. Toset the oven forbroi/ing,
turn the knob to BROIL. Turn the knob to OFF
tile oven rack oneposition higber
Broiling Guide
when broiling is complete.
27" Ovens 27" Ovens 27" Ovens 30" Ovens 30" Ovens 30" Ovens
Quantity and/ Rack First Side Second Side Rack First Side Second Side
Food or Thickness Position Time(rain.) Time(rain.) Position Time(rain.) Time(min.) Comments
GroundBeef 1lb. {4patties) C 10 7 Eor F 10 7 Spaceevenly.Up
Well Done 1/2to 3/4" thick C 10 9 Eor F 10 9 to 8 pattiestake
about the same
time.
Beef Steaks
Raret
Medium
Well Done
Raret
Medium
Well Done
Chicken
LoBroil
LoBroil
LobsterTails
LoBroil
FishFillets
HiBroil
LoBroil
1" thick
1to 1½ Ibs.
1½" thick
2 to 2½Ibs.
1whole
2 to 2_ZIbs.,
split lengthwise
Pieces
Boneless
2-4
6 to 8oz.each
1/4to 1/2" thick
C
C
C
C
C
C
A
AorB
AorB
B
C
6
8
12
10
15
25
35
2,535
15 20
18 20
18 25
5
6
11
78
14 16
20 25
10 15
1,520
10 15
Donot
turn ovelt
N/A
E
E
E
E
E
E
C
BorC
BorC
C
D
8
10
12
10
15
25
25
25_5
15_0
18_0
18_5
6
8
10
8
14 16
20 25
10
1,520
10 15
Donot
turn ovelt
N/A
HamSlices 1" thick B 8 8 D 8 8
(precooked)
Pork Chops 2 (1/2" thick) C 10 10 E 10 10
Well Done 2(1"thick)about1lb. B 13 13 D 15 15
LambChops
Medium 2 (1" thick)ahout 10 C 10 9 E 10 9 Slashfat.
Well Done to 12oz. C 12 10 E 12 10
Medium 2(1½"thick/about1lb. C 14 12 E 14 12
Well Done B 17 12 14 E 17 12 14
Garlic Bread C 3 N/A E 3 N/A
LoBroil
Steakslessthan
1" thickcook
throughbefore
browning.
Panfrying is
recommended.
Slashfat.
Reducetimeabout
5 to10minutes
persideforcut-up
chicken.Brush
eachsidewith
meltedbutter.
Broilskin-side-
downfirst.
Cutthroughbackof
sheikSpreadopen
Brashwith melted
butterbefore
broilingandafter
half ofbroiling
time.
Handleandturn
verycarefully.
Brushwith lemon
butterbeforeand
during cooking,if
desired.Preheat
broilerto increase
browning.
Increasetime 5to
10minutesper
sidefor 1Y/'thick
orhome-curedham
Slashfat.
IThe U.& l)_,parh_e_zl of .lg'Hcuflm?, says "l{a_ I)_,_,fis p@uhn; but you should h_ow thai coohi,g it to onl_ 140°F m_,a_s somefi)od ]Joisoni,,_
orq(mL_ms re(t) surefire. "(,%raze: .'_a/eFood Booh. }bu_ K;t(:he_ (;uide. U?;I)A t?_,v.,furze 1985.)
8

Usingthe clock andtimer, ge.com
Make sure the clock is set to the
correct time of da,¢
To Set the Clock
The clock must be set to the correct time []
of din' fi)r the autonmfic oxen tinting
flmcfions to work properly. The time of []
day cmmot be changed dtwing a timed
baking or self=cleaning cycle.
Press the Clockpad,
On models with nmnber pads, press
them in order to set the correct time
of day:
(-)n models with Hour'and Min ÷
and -pads, press them to set the
correct time of day.
[] Press the Start pad.
On/Off
Thetimer is amflTutetimer onl_¢
Thetimer does not control oven
operations. The maximum setting on
the timer is 9hours and 59mflTutes.
To Set the Timer
[] Press the Kitchen timer On/Off pad,
[] On models with nmnber pads, press
them tmtil the ran(rant of time _ou
want sho_:s in the display. For
example, to set 2 hom_ and 45
minutes, press 2, 4 and 5 in that
order.
On models with Hourand Min +
and -pads, press them m_til the
_llilOtlnt oJ[ tinle Veil W;lllt shows in
the display. The maximum time you
can enter in minutes is 59. Cooking
times more than 59 minutes should
be changed to hem5 and minutes.
For example, enter 90 minutes as
1 hem', 30 minutes.
If you make a mistnke, press Kitchen
timer On/Off and begin again.
[] Press the Startpad,
AfterpressingtheStartpad,SETdisappears;
thistellsyouthetimeiscountingdown,although
thedisplaydoesnotchangeuntiloneminute
haspassedSecondswillnotbeshownin the
displayuntilthelastminuteiscountingdown.
[] _&hen the timer reaches :00, the
control will beep 3 times fi)llowed
by one beep every 6 seconds tmtil
the Kitchen timer On/Off pad
is pressed,
The6-secondtonecanbe cance/edby following
the stepsin the Special featuresof youroven
control section under Tonesat the Endofa
TimedCycle.
ToReset the Timer
If the display is still showing the time
remaining, )_m may change it by pressing
the Kitchen timer On/Off pad, then press
the nuinber pads (on seine models) or
the Hourand Min + or-pads (on some
models) until the time you want appears
in the display.
If the remaining time is not in the display
(clock, delay start or cooking tilne are in
the display), recall the remaining time bv
pressing the Kitchen timerOn/Offpad and
then pressing the number pads (on some
models) or the Hourand Min + or -pads
(on some models) to enter the new time
VOII W_IIIt.
ToCancel the Timer
Press Kitchen timer On/Off pad twice.

Onmodelswith presspad controlsfor bothovens,you canusetimedbakingin one ovenw,hileusingserf-cleanin the other;
you canalsousetimedbakinginbothovensatthe sametime.
NOTE;Foodsthat spoileasily--such asmill(,eggs,fish,stubggs, poultryandpork--should notbe allowedto sit formorethan
I hourbeforeor after cookirlg.Roomtemperaturepromotesthegro_§ ofharmfulbacteria•Be surethatthe ovenlightis off
becauseheatfrom thebulbwill speedharmfulbacteriagro_h.
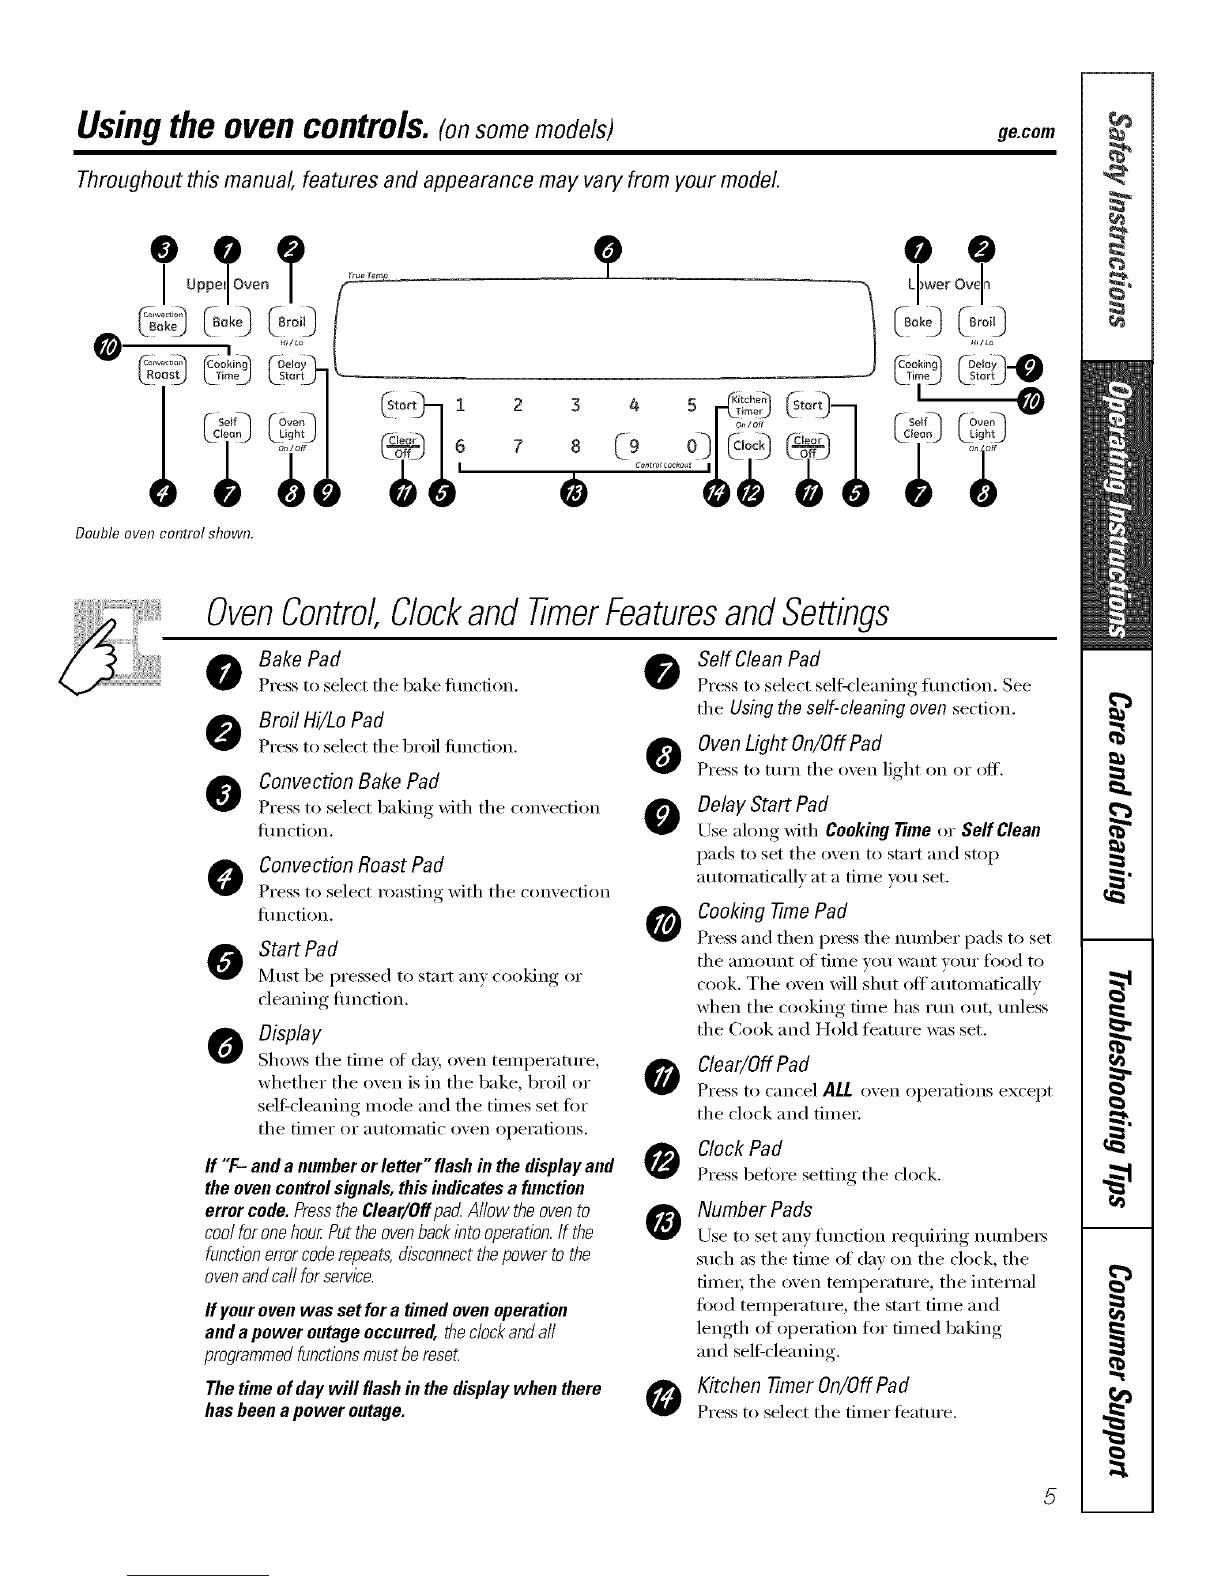
(dependingonmodel)
(Co_ _1Cooking
12 3 4 5
z C_ @
(depending on model)
Hew to Set an Immediate Start and Automatic Stop
#heovenwill turnon/bmedbte/yandcookforase/eded
lengthoftime.Attheendofthecookingtimetheoven
M_ke sure the clock S_{_rS [}_e correct dine
ofdo>.
[] Press d_e Bake p_d.
[] ()£J mo(!e]s'_Jth nucqhet" pads, press [heIyJ
in order to set the desired temperature.
Ol'* models with Tamp +md -p_xds, press
them to increase oF decrease the set
desired temperature.
[] Press the Coeki#g Timepad.
NOTE:Ifyourre@erequirespreheating,youmayneedto
Mdadd/tlona/tlbetothelengthofthecookingtkrle,
[] ()n models with mm_ber p_ds_ press them
mltilthe3111{}ii[1[{}ftime}{mwant shox_sin
the displa). For example, to set 2hems m)d
45 mi[mtes, press 2, 4 and 5 in that ordeL
On models wiflxBour and Min +and -
}rods press them m emel lhe desired
haki_g time. The maximum time }ira
c;m et_ter i[_IlJ!]/![es
more than 59 milmtes shoukl he changed
to hours and minutes. For exm_p/e, emec
90 minums as I hou< 30 milmtes.
]]le {}x_I_tempel_Ktlre iBd the cookitlg
time that Tim emered wil!be disp! _yed.
[] Press the Start pad.
]]le display shows file o*,e!"*temperatm'e flint
}ou set and the cooking time colin/down. The
display starts chm_gil_gonce t/_emmperamre
reaches 100E
NOTE.:Whenusingbothovensatthesametime the
timesshowingin thedisplaywillbeforthelastovenset
Tbdie,playthetimesetforthehbt ovenaet,pre._sthe
CaokingTimepadforthatoven.
The o_el; wil! (onfinue to cook fbr d_e
programmed}IHI{}II[][{}f[il]]e_lheH shlI{off
mmmmficai]}, m_iessd_e Cook aI_d H{}idi£mtre
wasset. See the Specialfeaturesofyouroven
controlsection.
Pressd_eClear,/Offp:_dto dear fl_edispIa!.
10
12 3 g_ 5
57 8 [9 0-.
or
®
©
(dependingon mode!l
Cooking
12 3 ga 5
OI
®®
(depending on medea
_Dehly
!2 _ A 5
" o L9 0)
O[
@@
_dependingon mode!;
How toSet a Delayed Start and Automatic Stop
Youcansettheovencontroltodelay-starttheoven,
cookforaspecif_?lengthoftimeandthenturnoff
automatlbal/g
Make sure the clock sh(ms the correct time
of dm.
[] Press the Bakepad.
[] On models with number pads, press them
in order to set the desired temperature.
On models with Tamp+and - pads, press
them to increase or decrease rite set
desired temperature.
[] Press the CookingTimepad.
NOTE:Ifyourre@erequirespreheating,youmayneedto
addaflditk)naltinletothelengthofthecookingtlbe.
[] On models with nnnlher pads, press them
until the alnOtlnt of time _ou want sh(msin
the displa} For example, to set 2 hours and
45 minutes, press 2, 4 and 5 in that order.
On models with HourandMin+and -
pads,pressfl_emmemer the desired
baking time. The maximum time you,can
emer in mimaes is59. Cooking times more
tlmn 59 minutes should he changed to
hours andnfinutes. For example, enter
90 minutes as ] hou<. 30 mimaes.
The oven temperature and the cooking
time that }ou entered xdll be displayed.
[] Press the OelayStartpad.
[] Llsing the mm_ber pads (on some models)
or d)'eHourand Min+or -pads (on some
models), enter rite time of (ln}you _a.nt
rite oven to mm on and start cooking.
[] Press the Start pad.
NOTE:Anattentiontonewillsoundifyouareusingtimed
bakinganddonotpresstheStartpadafterentenngthe
bakingtemperature.
If you _)uld like to check fl_e times you hme set,
press the DelayStart ix_dm check the start time
you ha\e set or press the CookingTimepad to
&eck the length of cooking time yon hm'e set.
%_,]_enthe oven turns on at the time of do}
you hme set, the display will sho_ the changing
mn_perature (smrdng at 100°F) and rite cooking
time countdo_xn. The displa} starts dmnging
once rite ten,peroraTe reaches 100°E
NOTE:Whenusingbothovensatthesanletkrle,the
timesshowingin the&play willbeforthebstovenset
To&play thetknesetforthefkstovenset,pressthe
CookingTimepadforthatoven.
The m_n will continue to cook Ibr d_e
programmed amonnt of time, fllen shut off
automaficall 5 unless the Cook and Hold feature
was set. See the Specialfeaturesofyouroven
controlsection.
Press the Clear/Offpad to clear the displa}.

Usingtheconvectionoven. ,o..m
ConvectionBake
Multi-rackposition
NOTE:Theconvectionfanwill cycleonandoff
whilecookingtobestdistributehotairin the
oven.
Theconvectionovenfanshutsoff whentheoven
doorisopenedDONOT/eavethedooropenfor
longperiodsoftl_newhileusingconvection
cookingor youmayshortenthefife ofthe
convectionheatinge/emenL
Ina convectionoven,a fancirculateshotair
over,underandaroundthefood
Thiscirculatinghot air isevenlydistributed
throughouttheovencavity.Asa result,foods
areevenlycookedandbrowned--often in less
time with convectionheat.
idealforevenlybrownedbakedfoodscooked
onmultipleracks.
Goodforlargequantitiesofbakedfoods.
Goodresultswithcookies,biscuits,muffins,
brownies,cupcakes,creampuffs,sweetroils,
angelfoodcakeandbreacL
The convection tim drculates the heated
air evenh' over and arotmd the fi)od.
Multi-Rack Convection Baking
[] WhenconvectionbakingwithonlyI rack,
followtherackpositionsrecommendedin
[] theUsingtheovensection.
Because heated air is circulated evenh'
] throughout the oxen, fi)ods can be
baked with excellent results using
m tflfiple racks.
Multi-rock baking may increase cook times
slightly fi)r some foods but the overall
result is time saved. Cookies, nmflins,
biscuits and other qtfickbreads give very
good results with m ult]-rack baking.
For30" Ovens:When baking on 3 racks,
place one rack in the second (B)
position, one in the fi)m'th (D) position
and one in the sixth (F) position.
For two-rack baking, place one rack
in the second (B) rack position. Place
the other rack in the fi)m'th (D) rack
position.
For27" Ovens:When baking on 3 racks,
place one rack in the fi_t (A) position,
one in the third (C) (offset) position
and one in the fl)m'th (D) position.
For two-rack baking, place one rack
in the fi_st (A) rack position. Place
the other rack in the third (C) rack
position.
Adapting Recipes..,
}'ol_ cm) me yolw _il_orite recipes ira) the
COl)VeCtiOm) ovel).
When con_ecdo_) bakim]g, re(h_ce bakim)g
temperature by 25°F or acdv;_te the AL_to
Recipe '_ (_o]wershm feature. See Auto
Recipe"_dbnversionim_the Specialfeatures of
your ovencontTO/sectiom
Usepansizerecommended
Somepackageinstructionsfor frozen
casserolesor maindisheshavebeen
developedusing commercialconvectionovens.
Forbest resu/tsin this oven,preheat the oven
and usethe temperatureon the package.
1/

Usingtheconvectionoven.
Grid
t!_ q,;r4r!l/f I f' f i,/_/',,\\_
Broilerpan
ConvectionRoast
Goodforlargetendercutsofmeat,uncovered.
Tile convection iim circulates the heated air
exenlv o_er and around the fi)o(t. Meat and
poult} 7 are browned on all sides as if the_
_m cooked on a rotisserie. Heated air _;'illbe
circulated o_e_; trader and arotmd the food
being roasted. The heated air seals in juices
quickly for a moist and tender product \d_ile,
at the same time, creating a dch golden
bro_n exterior.
When you are con\ecdon roasdng it is
impor(ant that you use a broiler pan and grid
tbr best comectkm roasting x_sults. The pan
is used to catch grease spills and the grid is
used to px_vent gTease spatmrs.
When bakingcooldes,you will
get thebest results if you use a
flat cookie sheetinstead ofa
pan with low sides.
Cookware for Convection Cooking
geibre using your convection <wen, check
to see if vo[/r cook_are leaves FOOlTI_[)rair
circulati(m in the oven. If }_)u are baking with
several pans, leave space ber\_een them. Mso,
be sure the pans do not touch each other or
the _tlls of the o\en.
PaperandPlastic
Heat-resistant paper and plastic containers
that are recommended tor use in regular
ovens can be used in convection o_ens. Plastic
cook\_are that is heat-resistant to temperatm'es
of 400°F can also be used.
MetalandGlass
M/y Upe of cook\_are Mll _x)rk in wmr
comecfion oven. Ho_\'e_; metal i_ans heat
the fastest and are x_commended for
comection baking.
Darkenedormatte-finlahedpanswi//bakefaster
thanshinypans.
Glassorceramicpanscookmores/ow/_
For recipes like oxen-baked chicken, use a
pan Mth low sides. Hot air cannot circulate
_ell around food in a pan Mth high sides.
O[
!2 3 _ 5
6 7 8 @ 03
tort-)
To change the oven temperature
during the Convection Roast cycle,
press the Convection Roast pad
and then press the number pads to
set the new desired temperature.
/2
How to Set the Oven for Convection Baking or Roasting
] Press the ConvectionBake pad
or the ConvectionRoastpad.
[] Press the number pads to set the desired
oxell tenlperature.
[] Pre_s the Stattpad.
To change the men temperatm_, press
the Convection Bake or Convection Roast pad
and then the mm_ber pads to set the ne_
tempemtm'e.
When the oxen starts to heat, the changing
temperature, starting at 100°E will be
displa}ed. When the o_en reaches the
temperatm'e you set, 3 beeps will sound.
[] Press the Clear/Offpad when finished.
Youwillhearafanwhilecookingwithconvection.
Thefanwillstopwhenthedoorisopened,butthe
heatwillnotturnoff
Youmayheartheovenclickingduringbaking.
Thbisnormal.
Convection Roasting Guide
Meats
Beef Rib,BonelessRib, Rare
TopSirloin Medium
(3to 5 Ibs./ Well
BeefTenderloin Rare
Medium
Pork Bone-in,Boneless(3 to5 Ibs.)
Ham Canned,Butt,Shank(3 to5 Ihs.fully cooked)
Lamb Bone-in,Boneless(3 to5 Ibs.) Medium
Well
Poultry WholeChicken(2Yzto 31/zIbs.)
CornishHens,Unstuffed(1to 1VzIbs.)
Stuffed (1to I_ Ibs.)
Duckling(4to 5 Ibs.)
Turkey,whole-"
Unstuffed(10to 16Ibs.)
Unstuffed(18to 24 Ibs.)
TurkeyBreast(4 to6 Ihs.}
*Sltd/ud bi_zt_g_'_,r(tll)'_'(lUi_l,31,c_5 mMutus additio_tal _)(t_ti_
Minutes/Lb. OvenTemp. I
20 24 325°F
24 28 325°F
28 32 325°F
10 14 325°F
14 18 325%
23 27 325%
14 18 32B°F
17 20 325°F
20 24 325%
24 26 325%
50 55to_l 325°F
55 60toni 325°F
24 26 325°F
8 11 325°F
710 325%
16 19 325%
lime.,%llidd/c_s a_zd b_l'aslwilh

Usingthe timedfeaturesforconvectioncooking, gocorn
On double oven models, you can use timed baking or roasting in one oven while using self-clean in the other; you can
also use timed baking or roasting in both ovens at the same time.
Youwill hear a fan while cooking with these features. The fan will stop when the door is opened, but the heat will not
turn off.
NOTE:Foods that sped easily--such as milk, eggs, fish, stuffings, poultry and pork--should not be allowed to s# for
more than 1hour before or after cooking. Room temperature promotes the growth of harmful bacteria. Be sure
that the oven light is off because heat from the bulb will speed harmful bacteria growth.
How to Set an Immediate Start and Automatic Stop
2[ 2 34 5
Theovenwill turnonimmediatelyandcookfora
selectedlengthof time.At theendof thecookingtime,
theovenwi//turnoffautomatically
Make sure file clock shows file correct time
of din.
]Press the ConvectionBake or Convection
Roastpad.
[] Press tile nurrd)er pads to set the desired
ovell temperature.
[] Press the Cooking lime pad.
NOTE:ff yourreciperequirespreheating,youmay
needtoaddadditionaltimetothelengthof the
cookingtime.
[] Press the number pads to set tile desired
length of cooking time. Tile minimum
cooking tirne you can set is 1 minum.
The o_en temperature fllat you set and
the cooking time that ym e{itered will be
ill the (lispla_.
[] Press the Start pad.
Tile display will sho_ tile changing
tempen_ture (starting at 100°F) and tile
cooking time. The display starts changing
once the temperature l_aches 100°E
NOTE:Ondoubleovenmodels,whenusingboth
ovensatthesametime,the timesshowingin the
displaywi//beforthelastovenset.Todisplaythe
timesetfor thefirstovenset,presstheCooking
lime padfor thatoven.
The o_en will continue to cook fi)r tile
programmed amolmt of time, then shut
off amomaficall b unless file Cook and Hokt
fbature _ms set. See the Specia/features of your
ovencentre/secfilm.
[] Press tile Clear/Offpadto clear the
display if necessa U. Remove tile food
f}'c)mthe o_.en. Remember, e_.en thoug]l
file o_,ell shtlts off automatically; food left
ill the ()',ell will continue cooking after
the ()_ell turns off.
123 _ 5
oki_
imeJ
1 2 3 4 5
67 8 [9 0)
Deley
1. 2 3 4 5
Start)
How to Set a Delayed Start and Automatic Stop
Youcansettheovencontroltodelay-starttheoven,
cookforaspecificlengthof timeandthenturnoff
automatica//_
Make sure dm clock shows dm correct time
of dat.
]Press the ConvectionBake or Convection
Roastpad.
[] Press tile number pads to set the desired
oxeil telllper_:|ttlre.
[] Press the Cooking lime pad.
NOTE ff yourreciperequirespreheating,youmay
needtoaddadditionaltimetothelengthof the
cookingtime.
[] Press the number pads to set tile desired
cooking time.
[] Press tile OelayStartpad.
] Press the mm-lber pads to set tile time
of d_l} ,V()H "_\illl[ the o'_,eil to [/IrH OH
and start cooking.
#youwouldliketocheckthetimesyouhaveset,press
theBelay Startpadtocheckthestarttimeyouhave
set,orpresstheCookinglime padtocheckthe
lengthofcookingtimeyouhaveset.
[] Press the Start pad.
NOTE:Anattentiontonewi//soundffyouareusing
timedbakingorroastinganddonotpresstheStart
padafterenteringthebakingormastingtemperature.
_l/en tile ()\'ell turns on at file time of
(la} you hme set, tile (tispl_g will sho_\ tile
changing temperature (starting at 100°F) and
the cooking time. Tile display starts changing
once tile temperature reaches 100°E
NOTE:Ondoubleovenmodels,whenusingbothovens
at thesametime,thetimesshowingin thedisplaywill
beforthelastovenset.Todisplaythetimesetfor the
firstovenset,presstheDelayStartorCookinglime
padforthatoven.
The o_en will continue to cook fi)r the
progTammed al//OtlI/t of time, then shtlt
oft mm/maticall 5 unless the Cook and Hold
feature was set. See the Specialfeaturesofyour
ovencontrolsecfi(m.
[] Press the Clear/Offpad to clear the
displa? if necess;:u_. Ren-loxe tile food
fl'on/the o_en. Renlelrlbe/; e_en though
file o_,ell shtlts Off automaticalb; food left
ill the ()tell will continue cooking after
file o_ell turns ()fl_ 13

Adjust the oven thermostat--Do it yourself!
Youmay find that your new oven cooks differently ftlan the one it replaced. Use your new oven for a few weeks to become more
familiar with it. If you still think your new oven is too hot or too cold, you can adjust ftle thermostat yourself.
Do not use dTermometers, such as those found b grocery stores, to check the temperature setting of your oven. These
thermometers may vary20-40 degrees.
NO?E; This adjustment will only affect baking and masting temperatures," it does not affect broiling, convection or self=cleaning
temperatures. 7?leadjustment will be retained in memory after a power failure.
0o'0+7°0
oke)
12$4
67 8 Q9
OF
®
Q
Terao
fdepending on modeo
5
©
To Adiust the Oven Thermostat (onsomemode!s)
[] Pressthe Bake and BrOilH_iLopads (oil
douNe o_en models, use die @per ove_
co_m'ols) at tile same dine %r 3 seco[lds
mltiI the displa_ shows SF The_ proceed
with steps 2 dlrough 4, _ls[l_gthe pads
fkwtile upper or l_B'er o_en.
S[ ,* <
[] l _e,s tile Bake >ad _ two-digit mmfl_er
shows in tile dispk_y.
On models with ram/her pads,
press Bake agah! to almrnate betweea
increasing m_d decreasi_g the o_en
_emperatm e.
[] The o_e_ temperature ca_/be a@mted
_p to (+) 35T hotter or (-) 35_'Fcooler.
On models with number pads, press
[hem tile same w_} }ou read [hem.
For example, to chmlge the o_e_
mmperatme 15°K press 1and 5.
On models with Tamp ¢ a[/d -pads,
press them to increase or decrease the
mmperatme in 1 degree incremems.
[] When you hax,e made _he a(!iustment,
press the Start Dad to go back to tile
time of dl) displ m, Use vain" o_e_ as
Turn the disk counterclockwise to
it?crease the oven temperature.
To Adjust the Oven Thermostat (onsomemodels)
Pull tile OVENknob off tile shaft, look at tile
b_mkof file knob and note file curl_nt setting
betore making any a@mtment. Tile knob is
ti_ctorv set with tile top scre_ directly under
tile poinmr
[] Pull off tile OVENknob.
[] i,oosen both screws on back of
the knob.
You _qll hear and teal tile notches as xou mm
the knob. Each notch chan_,es teml)emmre
about 10° Fahrenheit.
[] Tighten the screws.
[] Return tile OVENknob to tile oven.
Re-checkovenperformancebeforemakingany
additionaladjustments.
[] Hold both parts of tile knob as shown in
tile illllstr;ttioi1 of tile back of tile OVEN
knob and ttlrI/st) tile lower s(re'B' 1TIt}lOS
ill the desired direction.
Turn the disk clockwise to decrease
the over temperature.
Thetypeof margarine will affect bakingperformanc!!
Most recipes for baking have been developed using high-fat products such as butter or margarine (80% fat). If you
decrease the fat, the recipe may not give the same results as with a higher-fat product.
Recipe failure can result ff cakes, pies, pastries, cookies or candies are made with low-fat spreads. The lower the fat
content of a spread product, the more noticeable these differences become.
Federal standards require products labeled "margaiine" to contain at least 80% fi_t by weight, i,{m_fht spreads, on tile
other hand, contain less ti_t and more water The high moisnu'e content of these spreads afli_ct tile texture and flavor
of baked goods. For best results with your old Ire'elite recipes, use maigaiine, butter or stick spreads cant:fining
at least 70% vegetable oil.
14

Usingtheself-cleaning oven.(0,somem0 efs; gec0m
The oven door must be closed and all controls must be set correctly for the cycle to work properly.
Wipe up heavy soil on flTeoven
bottom. (appearance may vary)
Before a Clean Cycle
_'e reconm/end venting your kitchen
with an open window or using a
ventilation tim or hood dm-ing the
fi_st sel6clean cycle.
Remoxe an) broiler pan, broiler grid, all
cookware and am' almninmn fi)il fl'om
tile oxen,
Tile oxen racks can be selfkleaned, but
the) will darken, lose their luster and
become hard to slide.
Do not rise abI'asi;'es oi" (wen cleanels.
Clean tile top, sides and outside ot tile
oven door with soap and wateI;
Make sure the oven light bulb cover
(on some models) is in place and tile
oven light is off.
IMPORTANT'. Tile health of some birds
is extremely sensitive to the tirades given
off din{rig the sel6cleaning cycle of any
oven. Move birds to another well
ventilated i'OOill,
On models with press pad controls
tot both ovens, you can set a clean
cycle in both ovens at the same time.
The last oven set will automatically
delay its start tmtil tile end ot tile
fi_st oven's clean cycle.
On models with press pad controls fl)r
both ovens, you can use timed baking
in one oven and selfXclean the other at
tile same time.
On models with a knob, tile lower
oxen does not haxe the self:clean
teatm'e.
CAUtiON:Neverplacecooklbgutensilsorany
otheritemsontheovenfloor There/sa heatlbg
e/ementbeneaththeovenfloorPlacingitemson
theovenf/oormaycausetheoventooverheat,
resu&bgin damagetotheovenandnskof
damageor firetocabinets.
l
6
Z 3 _ 5
OF
®®
®®
_our
(depenDingonmode#
How to Set the Oven for Cleaning
[] Press tile SeffClean pad once _or
a 4-hour clean time or twice for
a 3-horn clean time.
A S-horn sel6clean time is
i'ecoll/illended for tlse when
cleaning small, contained spills. A
sell_lean time of 4 hom_ or longer
is recommended fi)r a dirtier oxen.
VN If a time other than 4 l/om_ or
3 hom_ is needed, use the number
pads (on some models) or the Hel/r
and Min + or - pads (on some
models) and enter tile desired
clean time.
You can change tile clean time to am
time between 3 hom_ and 5 hom_,
dei)ending, on how dirty your oxen is.
[] Press tile Staff pad,
The door locks automaficalh,: Tile display
will show tile clean time remaining. It will
not be possible to open tile oven door
tmtil tile temperatm'e drops below tile
lock temperatm'e and tile LOCKEDlight
goes off.
When tile LOCKEDlight goes ore you will
be able to open tile do()):
The word t0CKwill flash and the oven
control will signal if you set the clean
cycle and ti)rget to close tile oven door:
To stop a clean cycle, press the
Clear/Off pad. X_]/en tile LOCKEDlight
goes off indicating tile oven has cooled
below tile locking temperature, you
will be able to open the door.
15

Usingthese#-cleam'ngoven.(o, mod J J
The oven door must be dosed and all controls must be set correctly for the cycle to work properly,
_frSeK
I2345
_ 8 (9 o)
O!
(dependingon model)
Oekty _
C%,d
I2345
678(9 O)
OC
@®
tdepending on model;
How to Delay the Start of Cleaning
[] Press the SefClean pad once {br
a 4-h)/IH" c]eam/ th//e ))]/" twice [(IF a
S-hem" cleaN/ time.
A S-hem" selficlean time is
m'ecommem/ded fbm" use when
clean/big small contah/ed spills. A
self-cleaN/ time of 4 hems or hmgem"
isrecom men ded fkw a dird er oven.
]Ira time other thaml4 hem's or
3 ]mom's is m/eede(L rise the ram/bet
pads (on some models) ore"the Hour
amldMin +ore- padsOm some
models) amid entem" the desh'ed
deaN/ dine.
\i)n <m cham/ge the dem_ time to mw
time betweem/ 3 ]mom's amid 5 hem%
dependh/g on ]]()_r dirty yore" <)veil is.
[] Ipm'esstile Delay Start pad.
.... , [ .....
[] []simlgthe mmlbe]" )ads (on some
models) or the Hour amld Mln +<w =
pads (on some models), era/tern"the
time of day yon wm/t the c]em/c)c]e
to start.
The doom" locks antomadca]]y The d]sphff
will show the sta_'t time. It will inlet be
possible to open tile _wen door m/til
tile tempenmlm'e dn)ps behlw tile lock
tempenmlm'e amid the LOCKED light
goes eke
When the LOCKEDIight goes oreyon wi]]
be ableto open the doon
NOTE:Onmedals wi#_presspadcontfo/s for
bo#_oven,s:you canseta de/ayc/eanb bot¢_
ovensat tile sametime. Thesecondovenset will
automaticallydelay the start of cleaninguntil the
endof #_efirst ovent_dean cycM
Tofecal tile start time of ti_esecondoven se_
press the Delay Start padon the cOntTO/Sfor be
secondoven.
[] Press the Start pad.
After a Clean Cycle
Y)u Inav notice soIne white ash in time
oven. _,*(ipe it up with a danlp cloth atier
tile ))veil cools.
If white spots remain, remove them with a
soap-filledscouringpadand rinse thoroughlywith
awnegar and water mixture.
These deposits are usualh' a salt
residue that cannot be i'einoved by
the clean cycle.
If the oven is not clean alter one clean
cycle, repeat time cycle.
You cannot set time ))veil fi)i" cooking
until time oxen is cool enough fi)r time
door to ullh/ck,
If time racks become hard to slide, wipe
the rack supports with cooking oil.
16

Special featuresofyourovencontrol ge.com
Yournew press pad control has additional features that you may choose to use. The following are the features
and how you may activate them.
The special feature modes can only be activated while the display is showing the time of day. They remain
in the control's memory until the steps are repeated.
When the display shows your choice, press the Start pad. The special features will remain in memory after
a power failure, except for the Sabbath feature, which will have to be reset.
:i iG@ iiiii ¸¸
ii iii iiiii
12-Hour Shut-Off
Withthisfeature,shouldyouforgetandleavethe
ovenon,thecontrolwillautomaticallyturnoff the
ovenafter 12hoursduringbakbgfunctionsor
after3hoursdunbga broilfunction.
If _ou wish to mrn OFFthis teature, tollow
the steps below.
[] Press the Bake and BroilHi/Lopads
(on double oxen models, use the upper
o_en controls) at the same time fi)r
3 seconds tmfil the displa) shows SF.
[] Press the Delay Start pad until
no shiln (no shut-off) appeax_ in the
displa}.
[] Press the Start pad to lock in the
noshiln (no shut-off) ti_attu'e and
leave the control set in this special
_%'att II'es illode.
NOTE:
Onmodebwithpresspadcontrolsforboth
ovens,thisactivatesthisspecblfeaturefor
bothovens.
Onmodelswith ovenknob(s),thisfeatureis
notavailablefortheloweroven.
Fahrenhe# or Celsius Temperature Selection
Yourovencontrol isset touse the Fahranheit
temperatureselectionsbut youmay changethis
to use the Celsiusselections.
[] Press the Bake and BroilHi/Lopads
(on double oven models, use the upper
o_en controls) at the same time fi)r
3 seconds tmfil the displa) shows SF.
[] Press the Broil Hi/Lo and Cooking
Time pads at the same time. The
(lispla,_ will show F(Fahrenheit).
[] Press the Broil Hi/Lo and Cooking
Timepads again at the same time.
The display will show C(Celsius).
[] Press the Start pad,
NOTE:
Onmodelswithpresspadcontrolsforboth
ovens,thenewsettlbgwfflbedisplayedfor
bothovens.
Onmodelswith ovenknob(s),thisfeatureis
notavailablefortheloweroven.
Ni/Lo
Tonesat the End of a Timed Cycle
Attheendofa timedcycle,3 shortbeepswill
soundfollowedbyonebeepevery6secondsuntil
theClear/OffpadispressedThiscontlbuous
6-secondbeepmaybecance/ecL
To cancel the 6-second beep:
[] Press the Bake and Broil Hi/Lopads
(on double oven models, use the upper
o_en controls) at the same time fi)r
3 seconds tmtil the display shows SF.
[] Press the Kitchen TimerOn/Off
pad. The displa} shows CONBEEP
(continuous beep). Press the
Kitchen TimerOn/Off pad again. The
display sho_:s BEER(This cancels the
one beep every 6 seconds.)
[] Press the Startpad,
NOTE."
Onmodelswith presspad controls forboth
ovens,thiscancelsthe end of cycle tonefor
both ovens.
Onmodelswith oven knob(s),this feature is
not available forthe lower oven.
17

Special featuresof Four oveneontrot
TOBO Vohlmo (onsomemodels)
Thisfeatureallows youto adjust the tone
volumesto amoreacceptable volume.Thereare
Hilto threepossible volumelevels.
On!Off [] Press the Bake and Broil Hi/Lo pads
((m double oxen models, use the
upper oxen controls) at the same
time fiw 3 seconds, until the display
shows SF.
For each time the lexel is changed,
a tone will somld to provide an
indication of the xolume lexel.
V_] Choose tile desired sound level
(1BEEP,2 BEEP, 3 BEEP).
[] Press tile Start pad to acfi_ _te the
desired le',el shown.
[] Press the OvenLightOil/Off pad. The
display will show 2 BEEP. This is the
middle xolume lexel.
Press the Oven LightOn/Off pad again.
The displa) will show 3BEEP. This is
the hmdest xolume level.
NOTE."
Ondoubleovenmodels,thtsactivatesthis
specialfeatureforbothovens.
Onmodelswith ovenknob(s),thisfeatureis
notavailablefortheloweroven.
Press the Oven Light On/Off pad again.
The displa) will show I BEEP. This is
the quietest xolume lexel.
12-Hour, 24-Hour or Clock Black-Out
Yourcontrolissettousea 12-hourdock.
ff _l_ woldd prelt_r to ha_e a 24-hem"
militar_ dine clock or black ol_t the clock
disp]a), J_b]]ow the steps belong;
[] Press the Bake a_d Broil Hi/Lo pads
(o_ (toub[e o_e*_models, use the upper
ove_ corm ols) at the same time {br
3 see(rods, m_ti] the display sho_s SE
[] Press the CNck pad (race. The
display will show 12hr. I[ this is
the choice yol_ wm_t, press the
Start pad.
Press the C/eck pad agah_ to chm_ge
to the 24-hem" military time clock.
The display _%rH]]sinew 24 fig If this
is the choice yol_ v,r_m?[,[)I'ess the
Staff pad.
Press the Cteck pad agah_ to black
ol_t the clock display. The display
will s]_(}_ OFF.If this is the choice
y(m wm_t, press the Star pad.
NOTE: If the clock is in Ne h/ack-outmod< you
will not be able touse the DelayStart function.
18
Cook and Hold
Yournew controlhas a cookand hold feature that
keepscookedfoodswarm for up to 3hoursafter
ti?nedBakingor Roastingis fimshed
NOTE."Thisfeaturecanonly beprogrammedto
work with TimedBakingor Roastleg (Seethe
Uslegthe t_?nedbaklegand roastleg features
section.)After timedBaklegor Roastinghas
automaticallystopped,the programmedCook
andHold will automatically start.
To a(-fi\_Ke this feature for use after
Timed Baking or Roasting, ti)llow the
steps 1)elm_:
[] Press the Bake and Broil Hi/Le pads
(on double oxen inodels, use the
upper oven controls) at the same
time lot 3 seconds until the display
[]
shmvs BE Then proceed with steps
2 through 3, using the pads fi)r the
tipper or lower ()veil.
Press the Cooking Time pad. The
displa) will show HM OFF.
Press the Cooking Time pad again to
activam the feature. The display will
show Hid ON.
[] Press the Start pad to activate the
cook and hold feature and leaxe the
control set in this special teatures
i/lode.
NOTE:&modelswithovenknob(s),thisfeature
isnotavaileblefortheloweroven.

ge.com
Hi/Lo
Changing the Speed of the + or- Pads (o_7somemodels)
Asyouusethe+ or-pads whensett/?_ga
timeorl_mperature,youmaynot/_'ethedisplay
changessbw/_4This,_oecialbatureallowsyou
tochangethe,seeed.Tosettirespeedyouprefer,
followbe stepsbe/0w
[] Press the Bake aN_d Broil Hi/[o pads
(on double oven models, i_sed_e
upper ovem_cow,trois) at d_e same
time for 3 seco_ds, m_dl the displa)
] Press am +pad to im_crease the
speed Iq) to the m_im_ber 5.
[]
Press am= pad to decrease the
speed dowN_ to the mm_ber 1.
Press Start to activate the settil_g and
leave the co_trol set im_this special
featm'es mode.
[] Press am' +[:)ad. The display will
S]_{}_ r _()[_ _ set speed betwee_ 1
m_d 5_
Auto RecipeTM Conversion (o.somemodels)
Whenuslbgconvectionbake,theAuto Recipe_
Conversionfeature will automattca//yconvert
enteredregularbaking temperaturesto
convectionbakingtemperatures.
Oncethe feature isactivated, the display
wi// show theactual converted{reduced)
temperature.Forexample,if youenter a regular
recipetemperatureof 350°Fand pressthe
Start pad, the displaywill show CONand
the convertedtemperatureof 325°£
NOTE"Thisfeaturedoes not convertconvectbn
bakecookingtimes, onlyregularbaking
temperatures.
Toactivate the feature:
[] Press the Bake and Broil Hi/Lo pads
(on double oxen models, use the
upper oven controls) at the same
time for 3 seconds, tmtil the display
shows SF.
[]
[]
Press the Convection Bake pad. The
display will show CONOFF.Press the
ConvectionBake pad again. The
displa_ will show CONON.
Press the Start pad.
To deactivate the featm'e, repeat steps
1-3 aboxe but press the Start pad when
CON OFFis in the display.
or
(depending on model)
Control Lockout
Yourcontrolwillallowyoutolockoutthepress
padssotheycannotbeactivatedwhenpressed
NOTE:Ondoubleovens with presspad
controlsfor both ovens,this activatesthis
feature for bothovens.
To lock/tmlock the controls:
[] Press the Hour and Min- pads or
the 9and 0pads (depending on
model) at the same time fi)x 3
seconds until the display shows
LOCON.
[] To tmlock the control, press the
Hour and Min -pads or the 9and 0
pads (depending on model) at the
same time for 3 seconds until the
(lispla_ sh(>ws LOCOFF.
When this teatm'e is on and the press
pads are pressed, the control will beep
and the display will show LOCON.
Thecontrollockoutmodeaffectsallpress
pads.Nopresspadswill workwhenthb
featureisactivated
Onmodels with ovenknob{s),thisfeature is
not availablefor the lower oven.
Thisadjustment wi// be retatbedin memory
after apower failure.
19

UsingtheSabbathFeature.
(Designed for use on the Jewish Sabbath and Holidays.) (on some models)
The Sabbath feature can be used for baking/roasting only. It cannot be used for broiling, self-cleaning
or Delay Start cooking.
NOTE"The oven light comes on automatically (on some models) when the door is opened and goes off when the
door is closed. Thebulb maybe removed. See the Oven Light Replacement section. Onmodels with a light switch on
the control panel, the oven light may be turned on and left on.
@ok;)+@,o,!)
@_o;)
tor tjj
L23 e5
5 7 8 9 O)
Of
®
laeoendingonmodel)
(Stort_
When the display shows Dthe
oven is set f17Sabbath. When the
display shews D C the oven is
baiting/roasting.
Hewto Set Sabbath Feature for Regular Baking/Roasting
NOTE."Tounderstandhow the oven
control works,practice usingregularbak/bg
(non-Sabbath)before entenngSabbathmode.
Makesure the clockshows the correctt/me
of day
[] Press and hold both tile Bake and
Broil Hi/Lo pads, atthe same time,
until tile display sho_vs SE
NOTE."If bake or broil ai)peax_ in
tile display, tile Bake and Broil Hi/Lo
pads were not pressed at tile same
time. Press tile Clear/Offpad and
begin again.
[] Tap tile Delay Startpad until
SAbbAtHal)pems in tile display.
[] Press the Start pad and D will
appear in tile displa>
[] Press tile Bake pad. No signal will
be gixen.
[] On models with number pads,
press them in order to set the
desired temperature.
On models with Temp + and-pads,
tile preset starting temperature will
automatically be set to 350 °. _q) tile
Temp+ or-pads to increase or
decrease tile temperature in 5°
increments. (Tile Temp+ or-pad
should be tapped tot each
temperature change; pressing and
holding these pads will not allow
accurate temperature setting.) Tile
temperature can be set between
170 ° and 550 °.
[] Press tile Start pad.
[] _Mter a random delay period of
apilxoximatel) 3(I seconds to 1
minute, D c will appear in the
display indicating that tile oven is
baking/roasting, lf D c does not
appear in tile display, start again at
step 4.
To ac!iust tile oven temperature, press tile
Bake pad and enter tile new temperature
using tile number pads (on some
models) or tap tile Temp +or -pads (on
some models) to increase or decrease tile
temperature in 5 ° increments. (Tile Temp
+or -pad should be tapped tot each
temperature change; pressing and
holding these pads will not allow accurate
temperature setting.)
Press tile Startpad.
NOTE:Tile Clear/Offand Cooking Time
pads are active during tile Sabbath
teature.
No signal or temperatm'e _611be
gixen.
20
Other manuals for JKP30
4
This manual suits for next models
9
Table of contents
Other GE Oven manuals