GE JDS28 User manual

ge.com
©
r,,j
r,,j
Safety Instructions .... 2-4
Operating Instructions
Clock and Timer ....... 10
Controls .............. 6, 7
Oven ................. 8, 9
Power Outage ........... 7
Sabbath Feature ..... 11, 12
Special Features ........ 11
Surfhce Units ............ 5
Thermostat ............ 12
Care and Cleaning
Control Kuobs ......... 13
Drip Pans .............. 17
Heating Elements ....... 13
i,ift-Off Oven Door ..... 15
i Jft-Up Cooktop ........ 17
i Jght .................. 16
Oven Interior .......... 15
Shelves ................ 14
Surface Units .......... 17
Vent .................. 14
Troubleshooting
Tips ............... 18-19
Accessories ............ 20
Consumer Support
Consumer
Support ....... Back Cover
Pro&lct
Re_stration ........ 21, 22
Warranty .............. 23
IDS28
Write the model and serial
numbers hem:
Model #
Serial #
You can find them on a label
behind the storage drawer on
the front of the range flame.
49-80547-1 Og08 JR

IMPORTANTSAFETYINFORMATION.
READALLINSTRUCTIONSBEFOREUSING.
WARNING!
For your safety, the information in this manual must be followed to minimize the risk of fire, electric
shock, or to prevent property damage, personal injury, or loss of life.
ANti-TIPDEVICE
•All ranges can tip.
• BURNS or other SERIOUS
INJURIES con result.
• INSTALLend CHECKthe
ANTI-TIP bracket following
the instructions supplied
with the bracket.
Toreduce the risk of tipping the range, therange must be secured
by a properly installed anti-tip bracket. See installation instructions
shipped with the bracket for complete details before attempting to
install.
Tocheck if thebracket is installed and engaged properly, lower the
oven door and gently apply medium force atthe handle end until
movement of the range is detected. Continuepressing until the
anti-tip bracket is engaged and movement stops. A small amount of
movement is acceptable at the back of the range top, but#should
be stable and not tip once the anti-tip bracket is engaged, if# does
not, thebracket must be reinstalled, ff the range is pulled from the
wall for any reason, always repeat this procedure to verify the
range isproperly secured by the anti-tip bracket.
If you did not receive an anti-tip bracket _dth your purchase,
call 1.800.626.8774 to receive one at no cost (in Canada, call
1.800.561.3344). For installation instructions of tile bracket,
_._sitGEAppliances.com (in Canada, GEAppliances.ca).
SAFETYPRECAUtiONS
2
When using electrical appliances, basic safety precautions should be followed, including the following:
Use this appliance only for its intended i,arge scratches or impacts to glass doors
iiiiiiiiiiii_iii
iiiiiiiiiiii_iii
iiiiiiiiiiii_iii
puqoose as described in this Owner's Manual.
Be sure your appliance is properly
installed and #ounded by a qualified
installer in accordance with the prox,ided
installation instructions.
Have the installer show you the location
of the circuit breaker or fuse. Mark it for
easy reference.
Do not attempt to repair or replace any
part of your range unless it is specifically
recommended in this manual. All other
ser\,icing should be referred m a qualified
technician.
.....Before performing any ser\,ice, disconnect
the range power supply at the household
distribution panel by removing the fuse or
switching off the circuit breaker.
.....Do not leave children alonty--children
should not be left alone or unatmnded in
an area where an appliance is in use. They
should never be allowed to sit or stand on
any part of the appliance.
.....Do not allow anyone m climb, stand or
hang on the door or cooktop. They could
damage the range and even tip it ovei,
causing severe personal in,ju U.
can lead to broken or shattered glass.
Do not store flammable materials ill all
oven or near the cooktop.
CAUTION:,ternsofi.terestto
children should not be stored in cabinets
above a range or on the backsplash of a
range--children climbing on the range to
reach items could be seriously in.jured.
Never wear loose-fitting or han_ng
garments while using the appliance. Be
careful when reaching for items stored
over the range. Flammable material could
be ignited if brought ill contact with hot
surface units or heating elements and may
cause severe burns.
Use only d Upot holders--moist or damp
pot holders on hot surfaces may result in
burns fiom steam. Do not let pot holders
touch hot surface units or heating
elements. Do not use a towel or other
bulky cloth in place of pot holders.

ge.com
I1,WARNING!
SAFETYPRECAUTIONS
.....For your s_ety, never use your appliance
for warming or heating the room.
.....Teach children not to play with the
controls or any other part of the range.
.....Always keep dish rowels, dish cloths, pot
holders and other linens a s_e distance
flom your range.
.....Always keep wooden and plastic utensils
and canned food a s_e distance f_om
your range.
.....Always keep combustible wall coverings,
curtains or drapes a s_e distance flom
your range.
.....Do not let cookbg _ease or other flammable
materials accumulam in or near the range.
.....Keep the hood and grease filters clean
to maintain good venting and to avoid
grease fires.
.....Do not use water on grease fires. Never
pick up a flaming pan. Turn the controls
ore Smother a flaming paxl on a surfhce
unit by covering the pan completely with a
well-fitting lid, cookie sheet or fiat tray. Use
a multi-purpose d Uchemical or foam-type
fire extinguisher.
Haming ,oease outside a pan carl be put
out by covenng it with baking soda or, if
available, by using a multi-purpose d U
chemical or foam-type fire extinguisher.
Flame in the oven carl be smothered
completely by closing the oven door and
turning the oven off or by using a multi-
purpose dUchemical or foam-type fire
extinguisher.
.....Do not touch the surfhce units, the heating
elements or the inmrior sur[hce of the oven.
These surfhces may be hot enough m bum
even though they are dark in color. During
and _ter use, do not touch, or let clothing
or other flammable materials contact the
surfhce units, areas nearby the sur[hce units
or any interior area of the oven; allow
sutJ[icient time for coolirg first.
Potentially hot surfhces include the
cooktop, areas fhcing the cooktop, oven
vent opening, surfhces near the opening,
crex,ices around the oven door-
REMEMBER:The inside surface of the oven
may be hot when the door is opened.
.....Do not store or use combustible materials,
gasoline or other flammable vapors and
liquids in the \,icinity of this or any other
appliance.
COOKMEATANDPOULTRYTHOROUGHLY...
Cookmeat andpoultry thoroughly--meat toat leastan INTERNALtemperatureof 160%andpoultry toat least
an INTERNALtemperatureof 180°ECookingto thesetemperaturesusuallypmtectsagainstfoodbomeillness.
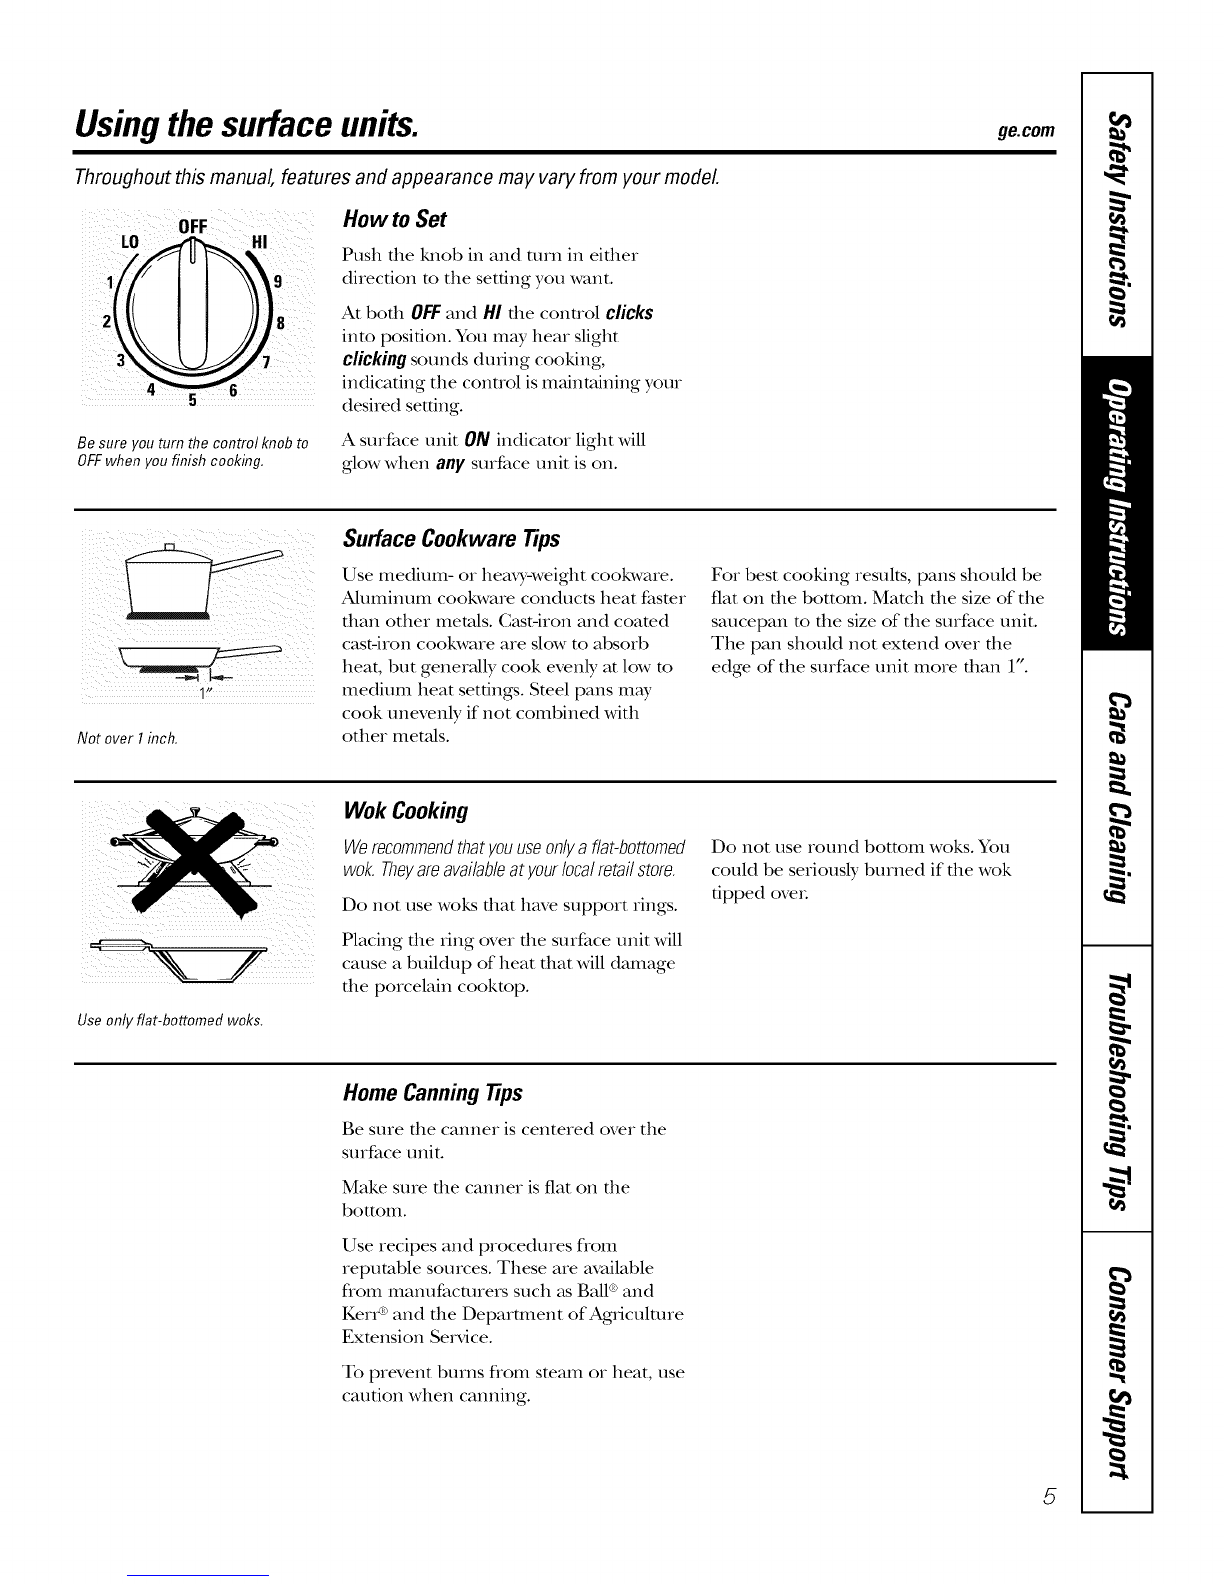
SURFACECOOKINGUNITS
Useproper pan size--select cookware having flat bottoms large enough to cover the surface un#
heating element. Theuse of undersized cookware will expose a portion of the surface unit to direct
contact and may result in ignition of clothing. Proper relationship of cookware to surface unit will also
improve efficiency.
.....Never leave the surfhce units unattended
at high heat settings. Boilovel_ cause smokirg
and ,oeasy spillovers that may catch on fire.
.....Do not use aluminum fbil to line the
drip pans or anywhere in the oven, except
as described in this manual. Misuse could
result in a shock, fire hazard or damage
to the range.
.....Be sure the drip pans and the vent duct
are not covered and are in place. Their
absence during cooking could damage
range parts and winng.
.....Only certain types of glass, glass/ceramic,
earthenware or other glazed containers are
suitable for cooktop ser\,ice; others may
break because of the sudden change in
temperature.
.....To mir_imize the possibility of bums, i_ition
of flammable materials and spillage, file
handle of a container should be turned
toward the center of file range without
exmnding over nearby sur[hce units.
Always turn the surfhce units off before 3
remox,ing cookware.

IMPORTANTSAFETYINFORMATION.
READALLINSTRUCTIONSBEFOREUSING.
SURFACECOOKINGUNITS(cont.)
Do not immerse or soak the removable
surfhce units. Do not put them in a
dishwasher
When preparing flaming foods under
the hood, turn the fan on.
To avoid the possibility of a burn or
electric shock, always be certain that the
controls for 'all surface units are at the
OFFposition and all coils are cool before
attempting to lift or remove a unit.
Clean the cooktop with caution. If a wet
sponge is used to wipe spills on a hot
cookmp, be careful m avoid steam burns.
Keep an eye on foods being flied at high
or medium high heat settings.
.....Foods for flTing should be as dUas
possible. Frost on flozen foods or moisture
on flesh foods can cause hot fht to bubble
up and over the sides of the pan.
.....Use little fat for elfective shallow or deep
fat flying. Filling the pan too full of fht can
cause spillovers when food is added.
.....If a combination of oils or fhts will be used
in flying, stir together before heating, or as
fats meh slowly.
Always heat fat slowly, and watch as it heats.
.....Use a deep fht thermometer whenever
possible to prevent overheating fht beyond
the smoking point.
WARNING!
OVEN
Stand away from the range when opening the oven door. Hot air or steam which escapes can cause
bums to hands, face and/or eyes.
.....Do not heat unopened food containers.
Pressure could build up and the container
could burst, causing an in,ju U.
Keep the oven vent unobstructed.
Keep the oven flee flom _ease buildup.
.....Place the oven shelf in the desired position
while the oven is cool. If shelves must be
handled when hot, do not let pot holder
contact the heating elements.
.....Pulling out the shelf m the stop-lock is a
convenience in lifting hea\ T foods. It is 'also
a precaution against burns flom touching
hot surfaces of the door or oven walls.
.....When using cooking or roasting bags
in the oven, fbllow the mmmfacturer's
directions.
.....Do not use the oven to d_T newspapers.
If overheated, they can catch on fire.
.....Do not use the oven fi)r a storage area.
Items stored in an oven can ignim.
.....Do not leave paper products, cooking
utensils or food in the oven when not
in use.
.....Do not use aluminum foil to line
oven bottoms. Improper installation
of aluminum foil may result in a risk
of electric shock or fire.
READANDFOLLOWTHISSAFETYINFORMATIONCAREFULLY.
SAVETHESEINSTRUCTIONS
4

Usingthesurface units, geoom
Throughout this manual, features and appearance may vary from your model
//1 !
Be sure you turn the control knob to
OFFwhen you finish cooking.
How to Set
Push the kalob in and ulrn in either
direction to the setting you want.
At both OFFand HI the control clicks
into position. You may hear slight
clickingsounds dudng cooking,
indicating the control is maintaining your
desired setting.
A surface unit ON indicator light will
glow when any surface unit is on.
1"
Not over I inch.
Surface Cookware Tips
Use medium- or heax3,-weigbt cookware.
Aluminum cookware conducts heat fasmr
than other metals. Cast-iron and coamd
cast-iron cookware are slow to absorb
heat, but generally cook evenly at low m
medium heat settings. Smel pans m W
cook unevenly if not combined with
other met_fls.
For best cooking results, pans should be
fiat on the bottom. Match the size of the
saucepan m the size of the surface unit.
The pan should not exmnd over the
edge of the surface unit more than 1".
Use only flat-bottomed woks.
Wok Cooking
Werecommendthatyouuseonlya flat-bottomed
wok.Theyareavailableatyourlocalretailstore.
Do not use woEs dlat have support rings.
Placing the ring over the surface unit will
cause a buildup of heat that will damage
the porcelain cookmp.
Do not use round bottom woks. You
could be seriously burned if the wok
tipped ove_.
Home Canning Tips
Be sure the canner is centered over the
surface unit.
Make sure the canner is fiat on the
bottom.
Use recipes and procedures flom
reputable sources. These are available
flom manufacturers such as Ball ®and
KerI _ and the Deparunent of Agriculture
Exmnsion Se_Mce.
To prevent burns flom steam or heat, use
caution when canning.
5

Usingtheovencontrols.
Throughout this manual, features and appearance may vary from your model
OVEN CONTROLS e _K@TJM E CONTROLS
OvenControl Clockand TimerFeaturesandSettings
oBAKE/TEMP RECALLPad 0
Touch this pad to select the bake fimcfion.
BAKE Light
Flashes while in edit mode--you can
change the oven temperature at this point.
Glows when the oven is in bake mode.
OSTART/ONPad
Must be touched to start any cooking
flmcdon.
0Display
Shows file dine of day, oven tempe_mre
and whefller file oven is in file bake or broil
mode. The displ W will show PREwhile
preheating. When the oven reaches file
selected temperature, file oven connol Mll
beep and the display Mll show file oven
temperature.
O
KITCHEN TIMER ON/OFFPad
Touch this pad to select the timer feature.
Then press +and - pads to adjust time.
TIMER Light
Flashes while in edit mode--you can
change the set time at this point. Glows
when the timer has been acfivamd. Flashes
again when file time has run out until file
control is reset.
CLOCKPad
To set file clock, press tiffs pad nvice and
fllen press the +and - pads. The time of
day will flash in file display when file oven
is fi_st turned on.
If "F-andanumberor letter"flashin thedisplayandthe
ovencontrolsignals,thisindicatesa functionerrorcode.
Thetimeofdaywit flashin thedisplaywhentherehas
beenapoweroutage.Resettheclock.
TouchtheCLEAR/OFFpad.Allowtheoventocodfor
onehour.Puttheovenbackintooperation.If thefunction
errorcoderepeats,disconnectthepowertotherangeand
ca//forservice.
6

ge.com
OvenControl Clockand TimerFeaturesandSettings
-Pad
Short taps to this pad will decrease the time
or temperature by smaU amounts. Touch
and hold the pad to decrease the time or
temperature by larger amounts.
O+Pad
Short taps to dfis pad will incre_tse die time
or mmpemmre by smaU amounts. Touch
and hold the pad to increase the time or
temperature by larger amounts.
oLEAR/OFFPad
Touch this pad to cancel ALLoven
operations except the clock and fimeL
oBROILHI/LO Pad
Touch this pad to select the broil function.
BROILLight
Flashes while in edit mode--you can s_dtch
from HIto LOBROILat this point. (;lo_ \allen
the oven is in broil mode.
Power Outage
If aflashingtimeisinthedisplay,youhave
experiencedapowerfailure.Resetthedock. To reset the clock, touch the CLOCKpad.
Enter the correct time of day by touching
the +or - pads. Touch the START/ON pad.

Usingtheoven.
Toavoid possible bums, place the shelves in the desired position before you turn the oven on.
The oven has 7 shelf positions.
Before you begin...
The sheNes have stop-locks, so that when
placed correctly on the shelf supports (A
through G), they will stop before coming
complemly out, and will not flit.
When placing and removing cookware,
pull the shelf out m the bump on the
shelf support.
Toremovea shelf,pull it toward you, flit
the front end up and pull it out.
TOreplace, place the end of the shelf
(stop-locks) on the support, flit up the
front and push the shelf in.
CAUTION:Whenyouareusingthe
shelfinthelowestposition(A),youwillneedto
usecautionwhenpuffingtheshelfout.We
recommendthatyoupulltheshelfoutseveral
inchesandthen,usingtwopotholders,pull the
shelfoutbyholdingthesidesof it. Theshelfis
lowandyoucouldbeburnedifyouplaceyour
handin themiddleoftheshelfandpullall the
wayout.Beverycarefulnottoburnyourhand
onthedoorwhenusingtheshelfin thelowest
position(A).
How to Set the Oven for Baking or Roasting
Yourovenis not designed foropen-doorcooking. _]
[-i7 Touch the BAKEpad.
[_] Touch the +or-pads until the
desired temperature is displayed.
[_ Touch the START/ONpad.
The oven willstmt automafi_dl): The display
willshow PREwhilepIeheafing. _]len the
oven Ieachm die selecmd tempemmIe, die
oven conuol willbeep severalflmes mid die
displaywillshow die o_en mmpemture.
TochangetheoventemperatureduringBAKE
cycle,touchtheBAKEpadandthenthe+ or-
padstogetthenewtemperature.
[_] Check.food for donene._ at minimum
nine on redpe. (kK_k longer if nec_uy.
Touch the CLEAR/OFFpad when
baking is finished and then remove
the food flom the oven.
Type of Food Shelf Position
Frozenpies(oncookiesheet) CorD
Angelfoodcake A
Bundtorpoundcakes BorC
Biscuits,muffins,brownies, CorD
cookies,cupcakes,
layercakes,pies
Casseroles CorD
Turkey A
Center baking pans in the oven.
Preheating and Pan Placement
Preheat the oven if die recipe cMls for it.
Preheating is necessary for good results
when baking cakes, cookies, pastry and
breads.
TheDisplaywillshow"PRE"whilepreheating.
Whentheovenreachestheselectedtemperature,
theovencontrolwillbeepandthedisplaywill
showtheoventemperature.
Baking results will be better if baking
pans are cenmred in die oven as much
as possible. If baking with more than one
pan, place the pans so each has at least
1 m 1½" of air space around it. If baking
four cake layers at the same flme, place
two layers on shelf B and two 1wets on
shelf D. Stagger pans on the shelf so one
is not directly above the ethel
8
Aluminum Foil
Donotusealuminumfoilonthebottom
of theoven.
Never enflrely cover a shelfwifli
ahlminum foil. This will disturb the heat
circulaflon and result in poor baking.
A smaller sheet of foil may be used to
catch a spillover by placing it on a lower
shelf several inches below the food.

ge.com
!
Theoven door must be closed
during broiling.
How to Set the Oven for Broiling--Close the oven door
[] Place the meat or fish on a broiler
grid in a broiler pan designed
for broiling.
Use LOBroil to cook foods such as
poultry or thick cuts of meat thoroughly
without ove_q)rowning them.
[] Follow suggested shelf positions in
the Broiling Guide. [_] Touch the BROILHI/I.Opad once
for HI Broil.
[] The oven door mustbe closed
during broiling.
If yourrangeisconnectedto208volts,raresteaks
maybebroiledbypreheatingthebroilerand
positioningtheovenshelfonepositionhigher. []
%
To change to I,O Broil, touch the
BROILHI/LOpad again.
Touch the START/ONpad.
_rhen broiling is finished, touch the
CLEAR/OFFpad.
The size, weight, thickness,
stuffing temperature
and your preference
of doneness will aff>ct
broiling times. This guide
is based on meats at
refligerator temperature.
I' The {LS. De[mrhne_t q/
Agriculhm, so's 'Wmv b_'q/is
pokulm; but you skouhl k_ow that
co&ing it to o_6' 140 P means
some /bod poi_oni_g" o_g'anisms
mO' survive. "(Sourc_v _b I4,od
Book. _bur Kitche_ Gui&'. { %DA
t'_-v.,/u_e 1985.)
Theoven has 7shelf positions.
i
Broiling Guide
Food
GroundBeef
Well Done
Beef Steaks
Rarer
Medium
Well Done
Rarer
Medium
Well Done
Chicken Breasts
LobsterTails
Fish Fillets
Pork Chops
Well Done
Salmon Steaks
Salmou Fillets
Quantityand/
orThickness
1 lb.(4 patties
IZto _" thick)
1" thick
1to 1V2Ibs.
1W' thick
2to 272Ibs.
BoneIn
Boneless
2-4
lOto 12oz.each
IAto Z" thick
2(IZ" thick)
2(1" thick)about
2(1" thick)
2(IZto 1" thick)
Shelf*
Position
E
E
E
D
D
D
C
C
B
FirstSide
Time(rain.)
9-11
7-9
10-12
12-14
12-14
17-19
19-21
25-30
18-20
25-30
6-8
E 6-8
1lb. D 13-15
D 10-12
D 25-27
SecondSide
Time(rain.)
5-7
7-9
8-10
9-11
8-10
13-15
15-17
8-10
10-15
Donot
turn
oveL
4-6
3-5
6-8
8-10
Donotturn oven
Comments
Spaceevenly.Upto
8 pattiestake about
thesametime.
Steakslessthan 1"
thick cookthrough
beforebrowning.
Panfryingis
recommended.
Slashfat at edges.
Broilskin-side-down
first.
Cutthroughbackof
shell. Spreadopen.
Handleandturnvery
carefully.
Slashfat at edges.
Greasepan.
Placeskin-side-down.
*See illustration for description of shelf positions.
9

Usingthe clock andtimer.
Not all features are on all models.
To Set the Clock
[_ Touch the CLOCKpad twice.
[_ Touch the +or -pads.
If file 4-or - pads are not touched wifllin
one minum after you much file CLOCK
pad, tile displ W reverts m tile original
setting. If this happens, much the CLOCK
pad twice and reenter tile time of day:
_] Touch tile START/ON pad until tile
time of day shows ill the display. This
enters tile time and starts tile clock.
Tocheckthetimeofdaywhenthedisplayis
showingotherinformation,simplytouchthe
CLOCKpad.Thetimeofdayshowsuntilanother
padistouched.
To Turn Off the Clock Display
If you have several clocks ill your kitchen,
you may wish to turn off tile time of day
clock display on your range.
[_ Touch tile CLOCKpad once to turn
off tile time of day display: Although
you will not be able to see it, tile
[]
clock maintains tile correct time
of day:
Touch tile CLOCKpad twice to recall
tile clock display.
TheCLEAR/OFFpad does not affect
the timer.
To Set the Timer
Thetimerdoesnotcontrolovenoperations.
Themaximumsettingonthetimeris9 hours
and59minutes.
[] Touch tile KITCHENTIMERON/OFF
pad.
Touch tile +or-pads until tile
amount of time you want shows ill
tile display. Tile maxinmnl time that
call be entered ill minutes is 59.
Thnes more than 59 minums should
be changed m hours and minums.
Ifyoumakea mistake,touchtheKITCHEN
TIMERON/OFFpadandbeginagain.
%Touch tile START/ONpad. Tile time
will start counting down, although
tile display does not change until
one minute has passed.
x_qlen tile timer reaches .'0/7,tile
control will beep 3 times followed by
one beep every 6 seconds until tile
KITCHENTIMERON/OFFpad is
touched.
To Reset the Timer
If file display is sdll showing file time
remaining, you may change it by touching
tile KITCHEN TIMER ON/OFF pad, then
touching the +or -pads until tile time
you want appeals in the displw:
If file renlaining time is not ill file display,
recall it by touching file KITCHEN TIMER
ON/OFFpad and then touching tile +or -
pads to enter tile new time you want.
7O
To Cancel the timer
Touch tile KITCHENTIMERON/OFF
pad twice.

Special featuresofyourovencontrol ge.oom
Yournew touch pad control has additional features that you may choose to use. Thefollowing are the features and
how you may activate them.
Thespecial feature modes can only be activated while the display is showing the time of day. They remain in the
control's memory until the steps are repeated.
When the display shows your choice, touch the START/ONpad. Thespecial features will remain in memory after
a power failure.
NOTE: The Sabbath feature and the Thermostat Adjustment feature are also Special Features, but they are
addressed separately in the following sections.
ii i i i iii!iiI
12 Hour Shut-Off
Withthisfeature,shouldyouforgetandleavethe [_
ovenon,thecontrolwillautomaticallyturnoffthe
ovenafter 12hoursduringbakingfunctionsor
after3 hoursduringa broilfunction.
If you wish to mrn OFFthis feature, follow
the steps below. [_
[77 Touch the BAKEand BROILHI/tO
padsat the _mle time for 3 seconds
until the display shows SE
Touch the CLOCKpad. The display
will show ON(12 hour shut-off).
Touch the CLOCKpad repeatedly
until the display shows OFF(no
shut-off).
Touch the START/ON pad to activate
the no shut-off and leave the control
set in this special features mode.
Usingthe SabbathFeature.(onsomemodels)
(Designed for use on the Jewish Sabbath and Holidays)
The Sabbath feature can be used for baking/roasting only. It cannot be used for broiling.
NOTE: The oven light comes on automatically (on some models) when the door is opened and goes off when the
door is closed. Thebulb may be removed. See the OvenLight Replacement section. Onmodels with a light switch
on the control panel, the oven light may be turned on and left on.
@+@
@
%
When the display shows Dthe
oven is set in Sabbath. When the
display shows D m the oven is
baking/roasting.
How to Set for Baking/Roasting
NOTE:Tounderstandhowtheovencontrol
works,practiceusingregularbaking(non-
Sabbath)beforeenteringSabbathmode.
Makesurethedockshowsthecorrecttime
ofdayandtheovenisoff.
[77 Touch and hoM boththe BAKEand
BROILHI/tO pads, atthesametime,
until the display shows SE
[_ Tap the CLOCKpad tlllfil SAb
appeaxs in the display:
[_] Touch the START/ONpad and m will
appear in the displw:
[-_ Touch the BAKEpad. No sigmalwill
be given.
[_ The preset starting temperature will
automatically be set to 350. ° Tap the
4-or - pads to increase or decrease
file temperature in 25 ° increments.
The temperature can be set between
170° and 550.°No sigmal or
temperature will be gdven.
%Touch the START/ONpad.
Aider a random delay period of
approximately 30 seconds to 1
minute, m m will appear in the
display indicating that the oven is
baking/roasting. If m m doesn't
appear in the display, start again
at Stop 4.
To adjust the oven mmperamre, touch
the BAKEpad and mp the 4-or - pads m
increase or decrease the temperature in
25 ° increments. Touch the START/ONpad.
NOTE:The CLEAR/OFFand COOKING TIME
pads are active during the S_fl)bath feature.
To exit Sabbath feature, see next page.
11

Usingthe SabbathFeature.
(Designed for use on the Jewish Sabbath and Hofidays) (on some models)
How to Exit the Sabbath Feature
%
[]
%
Touch the CLEAR/OFFpad.
If the oven is cooking, wait
for a Iandom delay period of
approximamly 30 seconds m
1 minum, until only D is in the
display.
Touch and heM both the BAKE and
BROILHI/LO pads, at the same time,
until the display shows SE
[_] Tap the CLOCK pad un61 ONor OFF
appeals in the display: ON indicates
that the oven will automatically turn
offJter 12 hems. 0FFindicams that
the oven will not aumnmtically ann
off: See the SpecialFeaturessection
for an explanation of the 12Hour
Shut-Offfeaane.
[_] Touch the START/ONpad.
NOTE:If apower outageoccurredwhile the oven
wasinSabbath,theovenwi//automaticallyturn
offandstayoffevenwhenthepowerreturns.
Theovencontrolmustbereset.
Adjust the oven thermostat--Do it yourself!
Youmay find that your new oven cooks differently than the one it replaced. Use your new oven for afew
weeks to become more familiar with it. If you still think your new oven is too hater too cold, you can adjust
the thermostat yourself.
Do not use thermometers, such as those found in grocery stores, to check the temperature setting of your oven.
These thermometers may vary 20-40 degrees.
NOTE: This adjustment will not affect the broiling temperatures. The adjustment will be retained in memory after
apower failure.
To Adjust the Thermostat
[77 Touch the BAKE and BROILHI/LO
pads at the same time for 2 seconds
until the display shows SF.
[_ Touch the BAKEpad. A two-digit
number shows in the display.
The oven temperature can be
adjusted up to (+) 35°F hotter or (-)
35°F cooleL Touch the +pad to
increase the temperaune in 1-degree
increnlents.
X_qlenyou have made the
adjusunent, touch the START/ONpad
to go back to the time of day display:
Use your oven as you would
nornmll):
NOTE:Thisadjustmentwillnotaffectthebroiling
temperatures.It willberetainedinmemoryafter
apowerfailure.
Touch the - pad to decrease the
temperaune in 1-degree increnlents.
Thetype ofmargarine will affect bakingperformance!
Most recipes for baking have been developed using high-fat products such as butter or margarine (80% fat). If you
decrease the fat, the recipe may not give the same results as with a higher-fat product.
Recipe failure can result ff cakes, pies, pastries, cookies or candies are made with low-fat spreads. Thelower the fat
content of a spread product, the more noticeable these differences become.
Federal standards require products labeled "margarine" m contain at least 80% fat by weight. I,ow-fat spreads,
on the other hand, contain less fat and more WamL The high moisture conmnt of these spreads affects the
mxture and flavor of baked goods. For best results with your old favolim recipes, use margarine, butter or
stick spreads containing at least 70% vegetable oil.
72

Careand cleaning oftherange, g,oom
Be sure all controls are off and all surfaces are cool before cleaning any part of the range.
If your range is removed for cleaning, servicing or any reason, be sure the anti-tip
device is re-engaged properly when the range is replaced. Failure to take this
precaution could result in tipping of the range and cause injury.
How to Remove Protective Shipping Film and Packaging Tape
Gareflllly grasp a corner of the protective
shipping fihn widl your finge_ and slowly
peel it from the appliance surfi_ce. Do
IIOt use any shaIp items to remove file
fihn. Remove aU of the film before using
the appliance for the first time.
To assure no damage is done m file
finish of the product, file safest way to
remove the adhesNe flom packaging tape
on new appliances is an application of a
household liquid dishwashing demrgent.
Apply with a soft cloth and allow m soak.
NOTE:Theadhesivemustberemovedfromall
parts.It cannotberemovedif it isbakedon.
Groove Stem
Molded rib
Control Knobs
Thecontrolknobsmayberemovedforeasier
cleaning.
Make sure tile knobs are in tlle OFF
positions and pull them straight off the
stems for cleaning.
The knobs can be cleaned in a
dishwasher or flley may also be washed
Mill soap and wateL Make sure the inside
of file knobs are dry before replacing.
Replace tile knobs in tile OFFposifion to
ensure proper placement.
Control Panel
It's a good idea to Mpe die conuol panel
after each use of die oven. Use a damp
clod1 to clean or rinse. For cleaning, use
mild soap and wateI of a 50/50 solution
of vinegar and wateL For rinsing, use
clean wamL Polish d_y with a soft cloth.
Do not use abrasNe cleansers, suong
liquid cleaners, plastic scouring pads or
oven cleaners on the conuol panel--
they will damage the finish.
ii
Oven Heating Elements
Donotcleanthebakeelementor thebroil
dement.Anysoftwillbumoff whenthe
elementsareheated.
To clean tile oven floor, gently lift
tile bake element. Glean wkh warn1
soap), wateL
13

Careand cleaningoftherange.
Oven Shelves
Glean file oven shelves Mill an abrasive
cleanser or scouring pad. M_er cleaning,
rinse the sheNes Mth clean water and dry
with a clean cloth.
To make the sheh'es slide more easily,
apply a smaU amount of vegetable oil
m a paper towel and wipe the edges of
tile oven sheh'es widl tile paper towel.
Do not spIW with Pmn®or other
lubricant sprays.
Porcelain Enamel Cooktop
The porcelain enamel finish is sturdy but
breakable if misused. This finish is aci&
resistant. Howevei, any acidic foods
spilled (such as fruit juices, tomato or
vinegar) should not be permitmd to
remain on the finish.
If acids spill on die cookmp while it is
hot, use a dty paper t¢*welor clofll m
wipe it up right away:When tile surface
has cooled, wash with soap and wamL
Rinse well.
For other spills such as fat spatte_ings,
w_tshwith soap and water or cleansing
powde,s after the surface has cooled.
Rinse well. Polish with a d_T cloth.
Painted Surfaces
Painted surfaces include the sides and
the d_m,ver flont.
Glean these with soap and wamr or
a vinegar and wamr solution.
Do not use commerciM oven cleaners,
cleaning powders, steel wool or hmsh
abrasives on any pMnted surface.
Oven Vent
The oven is vented through an opening
under the left rear surface unit.
Thisareacouldbecomehotduringovenuse.
It is nomlal for steam to come out of die
vent and moisture may collect underneath
the coils when the oven is in use.
The vent is important for proper Mr
circulation.
NeverblockDis ventwithaluminumfoil.
14

ge.com
Porcelain Oven Interior
Wifll proper care, file porcelain enamel
finish on file inside of file oven--top,
bottom, sides, back and inside of file
doori-will stay new-looking for yeats.
I.et tile range cool before cleaning. We
recommend that you wear rubber gloves
when cleaning tile range.
Soap and water Mll nomlally do thejob.
Heaxy spatmfing or spillovets may
require cleaning with a mild abrasNe
cleaner. Soap> wet met_fl pads may also
be used.
DonotallowfoodspillswithahighsugaroracU
content(suchastomatoes,sauerkraut,fruitjuices
orpiefilling)toremainonthesurface.Theymay
causeaduffspotevenaftercleaning.
Household ammonia may make tile
cleaningjob easier. Place 1/2 cup in
a shallow glass or pottery container in
a cold oven overnight. Tile ammonia
fimles Mll help loosen tile burned-on
grease and food.
If necessary, you may use an oven cleaner.
Follow tile package directions.
Donotsprayovencleanerontheelectrical
controlsandswitchesbecauseit couldcause
a shortcircuitandresultinsparkingorfire.
{{{iiiiiiili
Donotallowa filmfromthecleanertobuiUup
onthetemperaturesensor--itcouldcausethe
oventoheatimproperly.(Thesensorislocated
at thetopoftheoven.)Carefullywipethe
sensorcleanaftereachovencleaning,being
carefulnottomovethesensorasachangein
itspositioncouldaffecthowtheovenbakes.
{{{iiiiiiili
Donotsprayanyovencleanerontheoven
door,handlesoranyexteriorsurfaceofthe
oven,cabinetsorpaintedsuffaces.Thecleaner
candamagethesesurfaces.
<2>
Hingelock
Pull hinge locks down to unlock.
IfT /
Removal position
Lift-Off Oven Door
Thedooris veryheavy.Becarefulwhen
removingandliftingthedoor.
Toremovethedoor:
%
%
Fully open tile door.
Pull tile hinge locks down toward
tile door flame, to tile unlocked
position. A tool, such as a small
fiat-blade screwdriver; may be
required.
Firmly grasp both sides of tile door
at tile top. Donotlift thedoorbythe
handle.
Glose door to file door removal
position, which is hMfivay between
tile broil stop position and fidly
closed.
[_] I,iff (loot up and out until tile hinge
arm is cleat of the slot.
Toreplacethedoor:
[y] Firmly grasp both sides of tile door
at tile top. DOnotlift thedoorbythe
handle.
%
_&qth tile Bottom
(loot at tile edge
ofslot
same angle as N
the removal
position, seat the
notch stop of
tile hinge aml
into tile bottom
edge of file hinge slot. The notch in
tile hinge aml must be fldly seated
into tile bottom of the slot.
Hingearm
Ful b, open tile door until it is
parallel to tile floor. If tile door will
not fldly open, tile notch stop is not
seated correctly in tile bottom edge
of the slot. Repeat step 2 if necessary.
Push tile hinge locks tap against tile
flont flame of tile oven cavib_to tile
locked position.
Hin(
arm
Hinge
Pushhinge locks up to lock.
(;lose tile oven (loot. 75

Careand cleaningoftherange.
Oven Light Replacement
CAUTION:Beforereplacingyour
oven light bulb, disconnect the electrical
power to the range at the main fuse or
circuit breaker panel
Be sure to let the light cover and bulb
cool complemly:
Toremove the cover:
[_] Twist lens counterclockwise about a
quarter turn to remove.
Do not removeanyscrews toremovethecover.
[_ Replace bulb widl a 40-watt
appliance bulb or two-prong
halogen bulb, as appropriam.
Toreplacethecover:
[] Line ut) tabs of lens in front of tabs
on housing and rotate clockwise to
engage.
16

ge.com
Be sure the controls are turned to OFFand the surface units are cool before attempting to remove them.
_ Drip
Cooktop
tab rim
When properly seated, the locking
tab should lock onto the cooktop rim
through the notch in the drip pan.
Surface Units
To clean the surface units, turn the
control to the highest setting for a
minute. The coils will burn off" any soil.
Toremovea surfaceunit:
To remove the drip pans for cleaning,
the surface units [_lttstbe removed first.
[] Push the surface unit back toward
the receptacle to fiee the locking
mb fiom the cooktop.
Toreplacea surfaceunit:
%
[]
Replace the chip pan into the recess
m the cooktop. Make sure the
opening in the pan lines up with
the receptacle.
Insert the terminals of the surface
unit through the opening in the
drip pan and into the receptacle.
Lockingtab
Receptacle
I,ifl the surface unit about 1 inch
above the drip pan and pull it out.
Do not lift the surfaceunit more than I inch.
If youdo, it may not lie flat on the drip pan
when youplug it backin.
NOTE."Repeated lifting of the surface unit
more than 1 inch above the drip pan can
permanently damage the receptacle.
_] Push the surface unit in and down
to lock the tab in place so it rests
evenly in the cooktop.
Donotimmersethesurfaceunitsinliquidsof
an}/kind.
Donotcleanthesurfaceunitsina dishwasher.
Donotbendthesurfaceunitplugterminals.
Donotattempttoclean,adjustorinan}/way
repairtheplug-inreceptacle.
Drip Pans
Remove the surface units. Then lift out
the ddp pans.
Place them in a covered container. Add
1/4 cup ammonia and let soak several
hours or overnight. Wash, rinse well
and dtT:
The drip pans may also be cleaned in
a dishwasher.
Clean file area under file drip pans
often. Built-up soil, especiaUy gnease,
may catch fire.
Donotcoverthedrippanswithfoil.Usingfoilso
closetothereceptaclecouldcauseshock,fireor
damagetotherange.
Supportrod
Be sure all surface units are turned
off before raising the cooktop.
Lift-Up Cooktop
Cleantheareaunderthecooktopoften.Built-up
soil,especiallygrease,maycatchfire.
To make cleaning easier; the entire
cooktop may be lifted up and supported
in the up position.
Be sure aUthe surface units are unned
off before rMsing the cooktop. The
surface units and drip pans do not need
m be removed; however; you m W remove
one m make raising file cookmp easier.
A support rod will hold the cooktop tap
while you clean underneath it.
After cleaning under die cookmp Mth
hot, soapy water and a clean cloth, lower
the cooMop. Be carefltl not m pinch
your fingers.
17

Beforeyoucall forservice...
Troubleshooting -tips
Save time and money! Review the charts on the following
pages first and you may not need to call for service.
!PossibleCauses
Surface unitsdo not The surface units are
work properly not plugged in solidly.
What ToDo
• \Vith the controls ell check to make sure the surface
unit is plugged completely into the receptacle.
The surface unit controls • Check to see the correct control is set for the surface
improperly set. unit you are using.
The drip pans are not set • With the controls off, check to make sure the drip
securely in the cooktop, pan is in the recess in the cooktop and that the
opening in the pan lines up with the receptacle.
Control signals after You forgot to enter a• Press the BAKE pad and desired temperature.
entering cooking time bake temperature.
Fooddoes notbake Oven controls improperly set. • See the Using the oven section.
orroast properly Shelf position is incorrect • See the Using the oven section.
or the shelf is not level.
cookwarelnc°rrectcookwareofimproper°r • See the Using the oven secdon.
size being used.
Oven thermostat needs • See the Adjust the oven thermostat--Do it yourself]
adjustment, sec tio11.
Clockandtimerdo Plug on range is not completely • Make sure electrical plug is plugged into a live, properly
not work inserted in the electrical outlet, grounded oudet.
A fuse in your home may • Replace the fllse or reset the circuit breakeL
be blown or the circuit
breaker tripped.
Oven controls improperly set. • See the Using the clock and timer section.
Ovenlight does Light bulb is loose or defective. • Tighten or replace the bulb.
not work Switch operating light • Call for service.
is broken.
Fooddoes not Oven door not closed. • See the Using the oven section.
broilproperly Oven controls improperly set. • Make sure you press the BROIL HI/£O pad.
Improper shelf position • See the Broiling Guide.
being used.
Cookware not suited • For best results, use a pan desigmed for broiling.
for broiling.
In some areas the power • Preheat the broil element for 10 minutes.
(voltage) may be low. • Broil for the longest period of time recommended in
the Broiling Guide.
18

ge.com
Possible Causes What ToDo
Oven temperature too Oven thermostat *See the Adjust the oven thermostat--Do it yourself!
hot or too cold needs adjustment, section.
Oven willnot work Plug on range is not • Make sure electrical plug is plugged into a live,
completely inserted in properly grounded outlet.
the electrical outlet.
A fuse in your home may •Replace the fl_se or reset the circuit breakeL
he blown or the circuit
breaker tripped.
Oven controls improperly set. • See the Using the oven section.
"Crackling" or This is the sound of the • This is normal.
"popping. sound metal heating and cooling
during the cooking functions.
"F- anda number You have a function • Press the CLEAR/OFFpad. Put the oven back into
or letter" flash error code. operation.
in the display If the function code repeats. • Disconnect all power to the range for at least 30
seconds and then reconnect power. If the flmction
error code repeats, call for service.
Display flashes "bAd" The installed connection • Contact installer or electrician to correct miswire.
then "linE" with a from the house to the unit
loud tone is miswired.
Display goes blank Afuse in your home may be • Replace the fi_se or reset the circuit breakeL
blown or the circuit
breaker tripped.
The clock is turned off from • See the Using the clock end timer section.
showing in the display.
Display flashes Power failure. • Reset the clock.
Unable to get the Oven control pads were • The BAKE and BROIL HI/LO pads must be pressed
displayto show "SF" not pressed properly, at the same time and held for 3 seconds.
Power outage, Power outage or surge. • Reset the clock. If the oven was in use, you must reset
it by pressing the CLEAR/OFFpad, setting the clock
and resetting any cooking fimction.
79

Accessories.
Looking For Something More ?
You can find these accessories and many more at ge.com, or call 800.626.2002
(during normal business hours). Have your model number ready.
Surface Elements& Drip Pans
¸¸¸¸¸7¸ )[
i_i_i!i__i[_i;_I!LI_L_I_I_[_I_i_i _iiLii____i___
//Fi,r_rmrr,'_Y,x,x,x,x,gi\
(l fiT _l_#/Irt111!Ytit_x'_\_\'_\\))
Oven Shelves Broiler Pan
Oven Elements Light Bulbs Knobs
Tired of discolored shelves? Wishing you had extra-heaxf-duly oven shelves?
NOWAVAI1.ABLEI_ryour range:
GE's innovative porcelain-coated oven shelves!
• Heaxy Duly
• Durable
Visit ge.com tot more infimnation.
2O
Other manuals for JDS28
3
Table of contents
Other GE Range manuals
Popular Range manuals by other brands

Glen Dimplex
Glen Dimplex Sterling 1100E user manual

Frigidaire
Frigidaire FGEF3041KF - Electric Range 5.4 Cu.ft Specifications

Frigidaire
Frigidaire 316417134 Use & care manual

Frigidaire
Frigidaire GLEFZ369FC Use & care manual

Kenmore
Kenmore 79090153409 installation instructions

Frigidaire
Frigidaire Gallery Premier FGGF3076K Factory parts catalog