GE JGBC16GEJ User manual

Gmtliwge
c’
Contents
Appliance Registration 2Thermostat Adjustment 20
Care and Cleaning 15-19 Vent Duct 10
Control Panel 17 Problem Solver 22
Features 6,7 Repair Service 23
Flooring Under Range 5Safety Instructions 3-5
Leveling 5Surface Cooking 8,9
Lift-Up Cooktop 16 Burner Grates 16
Model and Serial Numbers 2Burners 17
-Oven 9, 10 Clock and Timer 9
Air Adjustment 20 Control Settings 8
Baking, Baking Guide 11, 12 Cookware Tips 9
Broiler Pan and Rack 19 Drip Pans 16
Broiling, Broiling Guide 14 Flame Size 8
Continuous Cleaning Care 15 Lighting Instructions 8
Control Settings 10 Warranty Back Cover
Door Removal 18
Light; Bulb Replacement 10, 18
Lighting Instructions 9, 10
Oven Bottom Removal 19
Preheating 12
Roasting, Roasting Guide 13 GEAnswer Cknt#
Shelves 10, 19 8W.&2E2UW
Standing Pilot Electric Ignition
Model Modeis
JGJ3C16GPJ JGBC16GEJ
JGBC17GEJ
GEA/@kiwces

Help us
help YOU. . .
Read this book carefully.
It is intended to help you operate and
maintain your new range properly.
Keep it handy for answers to your
questions.
If you don’t understand something
or need more help, write (include
your phone number):
Consumer Affairs
GE Appliances
Appliance Park
Louisville, KY 40225
Write down the model
and serial numbers.
You’ll find them on alabel located in
the burner box under the cooktop.
See page 6.
These numbers are also on the
Consumer Product Ownership
Registration Card that came with
your range. Before sending in this
card, please write these numbers
here:
Model Number
Serial Number
If you received
adamaged range ...
Immediately contact the dealer (or
builder) that sold you the range.
Save time and money.
Before you request
service...
Check the Problem Solver on
page 22. It lists causes of minor
operating problems that you can
correct yourself.
Use these numbers in any
correspondence or service calls
concerning your range.
.
-J

IMPORTANT SAFETY INSTRUCTIONS
Read ail instructions before
When YouGet YourRange
●Havethe installer show you
the location of tlw range gas
cut-off valve and how to shut
it off if necessary.
●Have your range installed
and properly grounded by a
qualified installer, in accordance
with the Installation instructions.
Any adjustment and service should
be perform only by qualified
gas range installers or Serviee
technicians.
●Plug your range into a120-volt
grounded outlet only. Do not
remove the round grounding prong
from the plug. If in doubt about
thegroundingofthehomeelectrical
system, it is yourpersonal
responsibility and obligationto
haveanungroundedoutletreplaced
with aproperly-grounded three-
prong outlet in accordance with
the National Electrical code. I)o
not use an extension cord with
this appliance.
●Be sure all packing materials
are removed from the range
beforeoperating it, to prevent fire
or smokedamage should the
packing material ignite.
●Locate range out of kitchen
traffk path and out of drafty
locations to prevent pilot outage
(on models so equipped} and
poor air circulation.
●Be sure your range is correctly
adjusted by aqualified service
technician or installer for the
type of gas (Natural or LP) on
which it is to be used. Your
range can be convertedfor use
on either type ofgas. See
Installation Instructions.
using this appliance.
●After prolonged use of a
range, high floor temperatures
may result and many floor
coverings will not withstand
this kind of use. Never install the
range overvinyl tile or linoleum
that cannot withstand suchtype of
use. Never install it directly over
interior kitchen carpeting.
W@ Your Range
●Don’t leave children alone or
unattended where arange is hot
or in operation. They could be
serious]y burned.
●Don’t aliow anyone to climb,
stand or hang on the door,
broiler compartment or range
top. Theycould damage the range
and eventip it overcausing severe
personal injury.
*~A_(JT~~N:~TE~S QF
IhTTERESTTll CHILDREN
SHOULDNOTBE WIRED IN
CABINETS ABOVEARANGE
OR ON THE BACKSPLASH
OF ARANGE–CHILDREN
CLIMBING ON THE RANGE
T() REACHITEMS COULD BE
SERIOUSLYINHJRED.
*Let burner grates and other
surfaces cod before touching
them or leaving them where
children can reach them.
●Never wear loose fitting or
hanging garments while using
the appliance. Flammable
material couldbe ignited if
brought in contact with flame
or hot ovensurfacesand may
cause severeburns.
●Never use your appliance for
warming or heating the room.
Prolonged use ofthe range
without adequate ventilation
can be hazardous.
oDo not use water on grease
fires. Never pick up aflaming i
pan. Turn off burner, then
smother flaming pan by covering
pan completely with well fitting
lid, cookie sheet or flat tray.
Flaming grease outside apan
can be put out by covering with
baking soda or, if available, a
multqmrpose dry chemical
or foamfire extinguisher.
*Do not store flammable
materials in an oven or near
the cooktop.
●Do not let cooking grease
or other flammable materials
accumulate in or near the range.
eWhen cooking pork, follow
the directions exactly and always
cook the meat to an internal
temperature of at least 170”F.
This assures that, in the remote
possibility that trichina maybe
present in the meat, it will be
killed and meat will be safeto eat.
Surface Cooking
●AJM~~jTSuse the IJTE position
when igniting top burners and
makesurethe burners haveignited.
eNever leave surface burners
unattended at HIGH flame
settings. Boilover causes
smoking and greasy spikwers
that maycatch on fire.
*Adjust top burner flame size
so it does not extend beyond the
edge of the cooking utensil.
Excessive flame is hazardous.
*Use only dry pot hoklers—
moist or damp pot holders on hot
surfaces may result in burns from -
steam. Do not let potholders
come near open flames when
lifting utensils. Do not use atowel
or other bulky cloth in place of a “”
pot holder.

.
JMPORT~T SAFETY INSTRUCTIONS (continued)
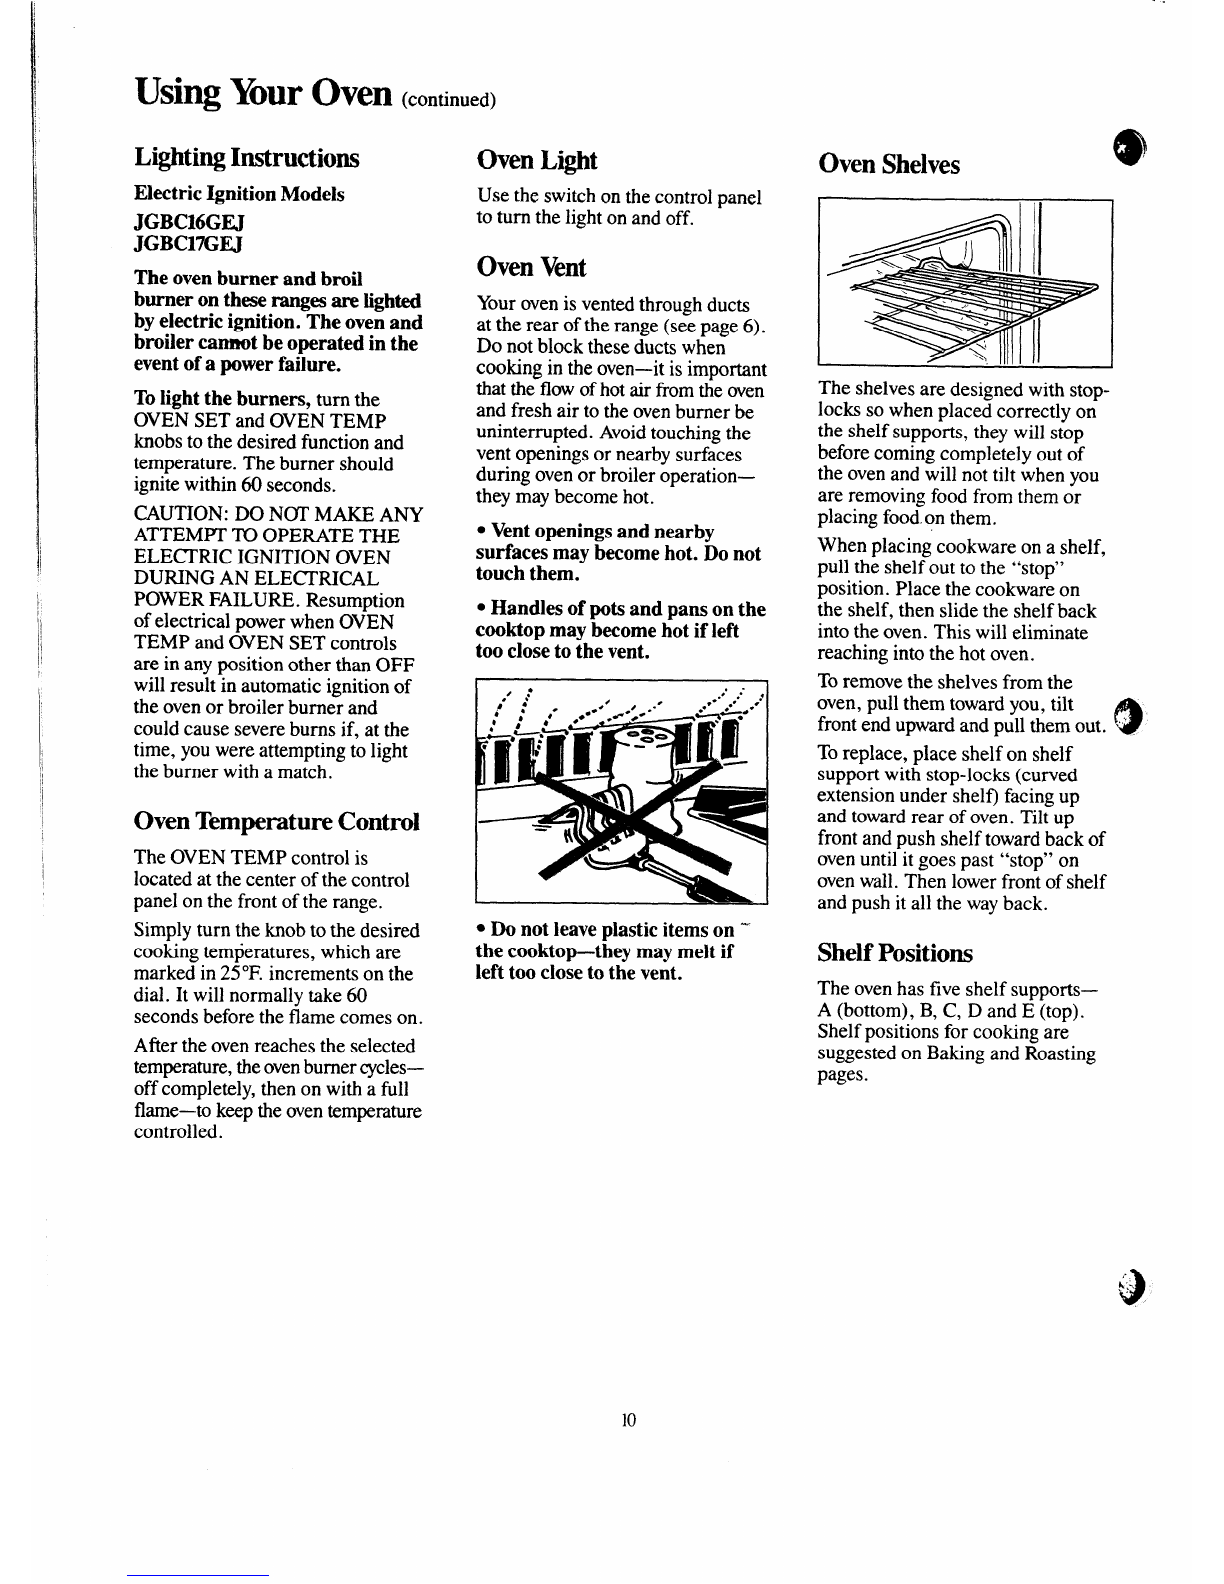
●Tominimize the possibility of
burns, ignition offlammable
materials, and spillage, turn
cookwarehandles towardthe side
or back ofthe range without
extendingover adjacent burners.
●Alwaysturn surface burner to
OFF before removing utensil.
●Carefuliy watch foods being
fried at HI flame setting.
●Never block the vents (air
openings) of the range. They
provide the air inlet and outlet
which is necessary for the range
to operate properly w~ithcorrect
combustion.
.Do not we awok on the
cooking surface if the wok has a
round metal ring which isplaced
over the burner grate to support
the wok. This ring acts as aheat
trap whichmaydamagetheburner
grate and burner head. Also, it
maycause the burner to work
improperly. This maycause a
carbon monoxide levelabovethat
allowedbycurrent standards,
resulting in ahealth hazard.
●Foods for frying shouki be as
dry as possible. Frost on frozen
foodsor moisture on fresh foods
can cause hot fat to bubb~eup and
oversides ofpan.
*Use least possible amount of
fat for effective shallow or deep-
fat frying. Filling the pan too full
offat cm cause spilloverswhen
foodis added.
oIf acombination of’oils or
fats will be used in frying, stir
~ogetherbeforeheating, or as fats
melt slowly.
●Alwaysheat fat slowly,and
watchas it heats.
*Use deep fat thermometer
whenever possible to prevent
overheatingfa[beyondthe
smokingpoint.
●Use proper pan size-Avoid
pans that are unstable or easily
tipped. Select utensils havingflat
bottoms large enough to properly
contain food avoidingboilovers
and spillovers, but large enough
to coverburner grate. This wfll
both savecleaning and prevent
hazardous accumulations of food,
sinceheavyspatteringor spillovers
left on range can ignite. Use pans
with handles that can be easily
grasped and remain cool.
●Use only glass cookware that
is recommended for use on gas
burners.
●Keep all plastics away from
top burners.
●Toavoid the possibility of a
burn, always be certain that the
controls for all burners are at
OFF position and all grates are
coolbefore attempting toremove
the grate.
●When flaming foods under
the hood, turn the fan off. The
fan, if operating, may spread
the flame.
●If range is ~ocatednear a
window, do not use long curtains
which could blowover the top
burners and create afire hazard.
●When apilot goes out, (on
models so equipped), you will
detect afaint odor of gas as your
signal to relight pilot. When
relighting pilot, make s~ie burner
controls are in OFF position and
followinstructions described on
followingpages to relight.
●If you smell gas, and youhave
already made sure pilo[s are lit,
turn offthe gas to the rangeand
call aqualified service technician.
Never use an open flame to locate
aleak.
9
Baking, Broiling and ‘....
Wasting
●Do not use oven for astorage
area.
*Stand away from the range
when opening the door of ahot
oven. The hot air or steam which
escapes can cause bums to
hands, face andlor eyes.
●Keep oven free from grease
buildup.
sPlace oven shelves in desired
position while oven is COOL
●Pulling out shelf to the shelf
stop is aconvenience in lifting
heavy foods. It is also a
precaution against burns from
touching hot surfaces of the
door or oven walls.
●Don’t heat unopened food
containers in the oven. Pressure
could build up and the container,<.
could burst causing an injury. ‘~
●Don’t use aluminum foil
anywhere in the oven except as
described in this book. Misuse
could result in afire hazard or
damage to the range.
@When using cooking or
roasting bags in oven, followthe
manufacturer’s direction.
*Use only glass cookware
that is re&mmended for use
in gas ovens.
* Aiv7aysremove broiler pan
from broiler compartment as
soon as you finish broiling.
Grease left in the pan can catch
fire if ovenis used without
removing the grease from the
broiler pan.
.;-
‘
‘#J
. .

.-
-y -cWhenbroiling, if meat is too
close tothe flame, the fat may
ignite. Trim excessfat to prevent
excessiveflare-ups.
I*Make sure broiler pan is in
placecorrectly @reduce the
possibility of grease fires.
●Myou should have agrease
fwe in the broiler pan, turnoff
oven, and keep drawer closed to
contain fire until it burns out.
I
Cleaning YourRange
●Cleanonly pm-tslistedin this
Use and Care Book.
*Keep range ciean and free of
accumulations of grease or
spiliovers which mayignite.
If YouNeed Service
~.%
●R-d “The fiob~em ~lver~~
}on page 22 of this book.
●Don$t attemptto repair
or replace anypartof your
rangeunless it is specifidly
recommended inthis book. All
other servicing should be referred
to aqualified technician.
SAW THESE
INSTRUCTIONS
Flooring Under
the Range
Yourrange, like so many other
household items, is heavy and
can settle into soft floor coverings
such as cushioned vinyl. When
movingthe rangeonthis typeof
flooring,usecare.
Do not install the range over
kitchen carpeting unless you
place an insulating pad or sheet of
l/4-inch-thick plywood between
the range and carpeting.
When the floor cowing ends&
the front of the range, the areathat
the range will rest on should be
built up with plywood or similar
material to the same level or higher
than the floor covering. This will
allow the range to be moved for
cleaning or servicing.
Leveling the Range
Your range must be level in order to
produce proper cooking and baking
results. After it is in its final location,
place alevel horizontally on an
oven shelf and check the levelness
front to back and side to side. Level
the range by adjusting the leveling
legs or by placing shims under the
comers as needed.
,.
.3
..

. .
Features of YourRange
---
JGBC16GPJwith Standing Pilot Ignition
JGBC16GU with Automatic pilotless Ignition
JGBC17GU with Brushed Chrome Cooktop,Automatic pi]otless Ige&ion
6

——.. - --—
I
\
I
,
I
!
I
i
9
.,
Explained JGWMGPJ
Feature Index on page JGBC16GEJ JG13c17GEJ
1Model and Serial Numbers 2●●
(in burner box under cooktop)
2Surface Burner Controls 844
3Surface Burners, Grates and Drip Pans 8, M4 4
4Oven Temperature Control 10 ● ●
5Clock and Timer 9● ●
6Oven Vent 10 ● ●
7Oven Interior Light 10 ● ●
8Oven Light Switch 10 ● ●
(lets you turn interior oven light on and off)
9Oven Shelves 10, 19 2 2
(easily removed or repositioned on shelf supports)
10 Oven Shelf Supports 10 ●c
11 Broiler Pan and Rack 19 ● ●
12 Removable Oven Door 18 ● ●
(easily removed for oven cleaning)
13 Lift-Up Cooktop 16 ● ●
(locks in up position to simplify cleaning underneath)
14 Removable Oven Bottom 19 ● ●
15 Broiler Drawer 19 ●s
16 Continuous-Cleaning Oven Interior 15 ●●
..
7

Surface Cooking
Lighting Instructions
Standing Pilot Model
JGBC16GPJ
The surface burners on this range
have standing pilots that must be lit
initially. To light them:
LBe sure surface burner control
knobs are in the OFF position.
2. Remove the grates and lift the
cooktop up (see page 16).
I
3. Locate the two pilot ports and
light each of them with amatch.
4. Lower the cooktop. Your surface
burners are now ready for use.
Electric Ignition Models
JGBC16GEJ
JGBC17GEJ
Surfaceburnersontheserangesare
lightedbyelectricignition,ending
theneedforstandingpilotswith
constantlyburningflames.
In case ofapoweroutage, youcan
lightthepilotlessignitionsurface
burnerson your range with a
match. Hold alighted match to the
burner, then turn the knob to the
LITE position. Use extreme
caution when lighting burners
in this manner.
Surface burners in use when an
electrical power failure occurs will
continue to operate normally.
Surface Burner Controls
The knobs that turn the surface
burners on and off are located on
the lower control panel in front of
the burners.
The two on the left control the left
front and left rear burners. The two
on the right control the right front
and right rear burners.
To Light aSurface Burner
Push the control knob in and turn it
to LITE. On electric ignition models,
you will hear alittle clicking noise—
the sound of the electric spark
igniting the burner.
1
\
After the burner ignites, turn the
How to Select Flame Size
The flame size on agas burner
should match the cookware you
are using.
NEVER LET THE FLAME
EXTEND UP THE SIDES OF
THE COOKWARE. Any flame
larger than the bottom of the
cookware is wasted and only serves
to heat the handles.
When using aluminum or
aluminum-clad stainless steel
pOtSand pans, adjust the flame so
the circle it makes is about 1/2 inch
smaller than the bottom of the
cookware.
When boiling, use this same
flame size—1/2 inch smaller than
the bottom of the cookware—no
matter what the cookware is made
of. Foods cook just as quickly at a
gentle boil as they do at afurious,
rolling boil. Ahigh boil creates
steam and cooks away moisture,
flavor and nutrition. Avoid it except
for the few cooking processes
which need avigorous boil.
When frying or warming foods
knob to adjust the-flame size. in stainless steel, cast iron or
enamelware, keep the flame down
Note: lower—to about 1/2 the diameter
●Do not operate aburner for of the pan.
extended periods of time without
having cookware on the grate. The When frying in glass or ceramic
finish on the grate may chip without cookware, lower the flame even
cookware to absorb the heat. more.
●Check to be sure the burner you
turned on is the one you want to use.
●Be sure the burners and grates are
cool before you place your hand, a
pot holder, cleaning cloths or other
materials on them.
8

f!)
.
‘Topof-Range Cookware
Aluminum: Medium-weight
cookware is recommended because
it heats quickly and evenly. Most
foods brown evenly in an aluminum
skillet. Minerals in food and water
will stain but will not harm
aluminum. Aquick scour with a
soap-filled steel wool pad afier 4
each use keeps aluminum cookware
looking shiny new. Use saucepans
with tight-fitting lids for cooking
with minimum amounts of water.
Cast Iron: If heated slowly, most
skillets will give satisfactory results.
Enamelware: Under some
conditions, the enamel of some
cookware may melt. Follow cookware
manufacturer’s recommendations
for cooking methods.
Glass:There are two types of glass
cookware—those for oven use only
and those for top-of-range cooking
(saucepans, coffee and teapots).
Glass conducts heat very slowly.
Heatproof Glass Ceramic: Can
be used for either surface or oven
cooking. It conducts heat very
slowly and cools very slowly. Check
cookware manufacturer’s directions
to be sure it can be used on gas ranges.
StainlessSteel: This metal alone has
poor heating properties, and is usually
combined with copper, aluminum
or other metals for improved heat
distribution. Combination metal
skillets generally work satisfactorily
if used at medium heat as the
manufacturer recommends.
Clock and Timer
The Clock a~d Timer are helpful
devices that serve several purposes.
The Clock
To set the Clock, push in the knob
and turn the clock hands to the
right to the correct time. Then let
the knob out and continue turning
to OFF.
Timer
The Timer has been combined with
the range clock. Use it to time all
your precise cooking operations.
You’ll recognize the Timer as the
pointer which is different in color
than the clock hands.
Minutes are marked up to 60 on the
center ring of the clock.
To set the Timer, turn the knob to
the left, without pushing in, until
the pointer reaches the number of
minutes you want to time.
At the end of the set time, a
buzzer sounds to tell you time is
up. Turn the knob, without pushing
in, until the pointer reaches OFF
and the buzzer stops.
Using YourOven
Lighting Instructions
Standing Pilot Model
JGBC145GPJ
This range has astanding oven
pilot port that must be lit initially.
To light it:
1. Be sure OVEN TEMP knob is in
the OFF position.
2. Remove the oven bottom (see
page 19) and the oven baffle.
3. Locate the pilot port on the side
of the burner at the back of the
broiler compartment. Using along
match or match holder, reach in
and light the oven pilot.
Note: The oven must beat room
temperature before you can light
the oven pilot.
4. Replace the burner baffle and
oven bottom and close the door.
Your oven and broiler are now
ready for use.
Power outage?
An electrical power failure will not
affect alighted standing oven pilot.
9
..

—-. .
Using YourOven (continued)
Lighting Instructions
Electric Ignition Models
JGBCMGEJ
JGBCIXW
The oven burner and broil
burner on these ranges are lighted
by electric ignition. The oven and
broiler cannot be operated in the
event of apower failure.
To light the burners, turn the
OVEN SET and OVEN TEMP
knobs to the desired function and
temperature. The burner should
ignite within 60 seconds.
CAUTION: DO N(YI’MAKE ANY
ATTEMPT TO OPERATE THE
ELECT’RIC IGNITION OVEN
DURING AN ELE(T.RICAL
POWER FAILURE. Resumption
of electrical power when OVEN
TEMP and OVEN SET controls
are in any position other than OFF
will result in automatic ignition of
the oven or broiler burner and
could cause severe bums if, at the
time, you were attempting to light
the burner with amatch.
Oven Temperature Control
The OVEN TEMP control is
located at the center of the control
panel on the front of the range.
Simply turn the knob to the desired
cooking temperatures, which are
marked in 25 “F. increments on the
dial. It will normally take 60
seconds before the flame comes on.
Afier the oven reaches the selected
temperature, the oven burner cycles—
off completely, then on with afuIl
flame-to keep the oven temperature
controlled.
Oven Light
Use the switch on the control panel
to turn the light on and off.
Oven Vent
Your oven is vented through ducts
at the rear of the range (see page 6).
Do not block these ducts when
cooking in the oven—it is important
that the flow of hot air horn the oven
and fresh air to the oven burner be
uninterrupted. Avoid touching the
vent openings or nearby surfaces
during oven or broiler operation—
they may become hot.
●Vent openings and nearby
surfaces may become hot. Do not
touch them.
●Handles of pots and pans on the
cooktop may become hot if left
too close to the vent.
●Do not leave plastic items on”
the cooktop—they may me)t if
left too close to the vent.
oven Shelves
I I Ii
The shelves are designed with stop-
Iocks so when placed correctly on
the shelf supports, they wiIl stop
before coming completely out of
the oven and will not tilt when you
are removing food from them or
placing food.on them.
When placing cookware on ashelf,
pull the shelf out to the “stop”
position. Place the cookware on
the shelf, then slide the shelf back
into the oven. This will eliminate
reaching into the hot oven.
To remove the shelves from the
oven, pull them toward you, tilt @
front end upward and pull them out. “
To replace, place shelf on shelf
support with stop-locks (curved
extension under shel~ facing up
and toward rear of oven. Tilt up
front and push shelf toward back of
oven until it goes past “stop” on
oven wall. Then lower front of shelf
and push it all the way back.
Shelf Positions
The oven has five shelf supports—
A(bottom), B, C, Dand E(top).
Shelf positions for cooking are
suggested on Baking and Roasting
pages.
9
h“;..
10

—.. -
Baking
How to Set YourRange
for Baking
1. Position the shelf or shelves in
the oven.
2. Close oven door. Turn OVEN
SET knob to BAKE or TIME
BAKE and OVEN TEMP knob to
desired temperature. Preheat oven
for at least 15minutes if preheating
is necessary.
3. Place food in oven on center
of shelf. Allow at least 2inches
between edge of bakeware and oven
wall or adjacent cookware.
If cooking on two shelves at the
same time, place shelves about 4
inches apart and stagger food on
them.
4. Check food for doneness at
minimum time on recipe. Cook
longer if necessary. Switch off
heat and remove food.
Preheating
Preheating is very important when
using temperatures below 225”F.
and when baking foods such as
biscuits, cookies, cakes and other
pastries.
Preheating is not necessary when
roasting or for long-time cooking of
whole meals.
Shelf Positions
Most baking is done on the second
shelf position (B) from the bottom.
When baking three or four items,
use two shelves positioned on the
second and fourth sets of supports
(B& D) from bottom of oven.
Bake angel food cakes on first shelf
position (A) from bottom of oven.
Baking Tips
●Follow atested recipe and
measure the ingredients carefully,
If you are using apackage mix,
follow label directions.
●If moisture is noticeable on the
front of the oven or on the black glass
door when first turning on the oven,
leave the oven door ajar for afew
minutes or until the oven is warm.
●Do not open the oven door during
abaking operation—heat will be lost
and the baking time might need to
be extended. This could cause poor
baking results. If you must open the
door, open it partially-only 3or 4
inches-and close it as quickly as
possible.
●Do not disturb the heat circulation
in the oven with the use of aluminum
foil. If foil is used, place asmall
sheet of it, about 10by 12inches at
the most, on alower shelf several
inches below the food. Do not place
foil on the oven bottom.
Common Baking Problems
and Possible Solutions
PIES
Burning around edges
●Oven too full; avoid overcrowding.
cEdges of crust too thin.
●Incorrect baking temperature.
Bottom crust soggy and unbaked
●Allow crust and/or filling to cool
sufficiently before filling pie shell.
●Filling maybe too thin or juicy.
●Filling allowed to stand in pie shell
before baking. (Fill pie shells and
bake immediately.)
●Ingredients and proper measuring
affect the quality of the crust. Use a
tested recipe and good technique.
Make sure there are no tiny holes or
tears in abottom crust. “Patching”
apiecrust could cause soaking.
Pie filling runs over
●Top and bottom crust not well
sealed together.
●Edges of pie crust not built up
high enough.
●Too much filling.
●Check size of pie plate.
R&y is tough; crust not flaky
●Too much handling.
●Fat too soft or cut in too fine.
Roll dough lightly and handle as
little as possible.
CAKES
Cake rises higher on one side
●Batter spread unevenly in pan.
QOven shelves not level.
●Using warped pans.
●Incorrect pan size.
Cakes cracking on top
●Oven temperature too high.
●Batter too thick, follow recipe
orexact package directions.
●Check for proper shelf position.
●Check pan size called for in recipe.
●Improper mixing of cake.
Cake falls
●Too much shortening, sugar or
liquid.
●Check leavening agent, baking
powder or baking soda to assure
freshness. Make ahabit to note
expiration dates of packaged
ingredients.
●Cake not baked long enough or
at incorrect temperature.
●If adding oil to acake mix, make
certain the oil is the type and
amount specified.
Crust is hard
●Check temperature.
●Check shelf position.
Cake has soggy layer or streaks
at bottom
●Undermining ingredients.
●Shortening too soft for proper
creaming.
●Too much liquid.
COOKIES &BISCUITS
Doughy center; heavy crust on
surface
●Check temperature.
●check shelf position.
.FOI1OW baking instructions
carefully as given in reliable recipe
or on convenience food package.
.Flat cookie sheets will give more
even baking results. Don’t overcrowd
foods on abaking sheet.
●Convenience foods used beyond
their expiration date.
Browning more noticeable on
one side
●Oven door not closed properly,
check gasket seal.
●Check shelf position.
.-

Baking Guide
1. Preheating is very important 2. Aluminum pans conduct heat 3. Dark or non-shiny finishes, also e
when using temperatures below quickly. For most conventional baking, glass and Pyroceram@cookware,
225”I? and when baking foods such light, shiny finishes give best results generally absorb heat which may result
as biscuits, cookies, cakes and because they help prevent over- in dry, crisp crusts. Reduce ovenheat
other pastries. Preheat the oven for browning in the time it takes for heat to 25°F. if lighter crusts are desired+
at least 15minutes. cook the center areas. Werecommend Preheat cast iron for baking some
Preheating is not necessary when dull (satin-finish) bottom surfaces of foods for rapid browning ~hen food is
roasting or for long-time cooking of pans for cake pans and pie plates to be added.
whole meals. sure those areas brown completely.
Shelf Oven Time,
Food Cookware Positions Temperatures Minutes Comments
Bread
Biscuits (%-in. thick) Shiny Cookie Sheet B, C400°-4750 15-20 Canned, refrigerated biscuits take 2to 4
minutes less time.
Coffee cake Shiny Metal Pan with B, A350°-4000 20-30
satin-finish bottom
Corn bread or muffins Cast Iron or Glass Pan B400°-4500 20-40 Preheat cast iron pan for crisp crust.
Gingerbread Shiny Metal Pan with B350° 45-55
satin-finish bottom
Muffins Shiny Metal Muffin Pans A, B400°-4250 20-30 Decrease about 5minutes for muffin mix.
Popovers Deep Glass or Cast Iron Cups B375° 45-60 Or bake at 450”F. for 25 minutes, then at
350”F. for 10to 15minutes.
Quick loaf bread Metal or Glass Loaf Pans B350°-3750 45-60 Dark metal or glass gives deepest
Yeast bread (2 loaves) Metal or Glass Loaf Pans A, B375°-4250 45-60 browning.
Plain rolls Shiny Oblong or Muffin Pans A,B 375°-4250 10-25 For thin rolls, Shelf Bmaybe used.
Sweet rolls Shiny Oblong or Muffin Ruts B, A350°-3750 20-30 For thin rolls, Shelf Bmaybe used.
Cakes
(without shortening)
Angel food Aluminum Tube Pan A325°-3750 30-55 Two piece pan is convenient.
Jelly rolI Metal Jelly Roll Pan B3750-4000 10-15 Line pan with waxed paper.
Sponge Metal or Ceramic Pan A325°-3500 45-60
Cakes
Bundt cakes Metal or Ceramic Pan A,B 325°-3500 45-65
Cupcakes Shiny Metal Muffin Pans B350°-3750 20-25 Paper liners produce more moist crusts.
Fruitcakes Metal or Glass Loaf or A, B275°-3000 2-4 hrs. Use 300°F. and Shelf Bfor small or
Tube Pan individual cakes.
Layer Shiny Metal Pan with B350°-3750 20-35 If baking four layers use
satin-finish bottom shelves Band D.
Layer, chocolate Shiny Metal Pan with B350°-3750 25-30
satin-finish bottom
Loaf Metal or Glass Loaf Pans B350° 40-60
cookies
Brownies Metal or Glass Pans B, C325°-350” 25-35 Bar cookies from mix use same time.
Drop Cookie Sheet B, C350°-4000 10-20 Use Shelf Cand increase temperature
25 to 50”F. for more browning,
Refrigerator Cookie Sheet B, C400°-4250 6-12
RoHed or sliced Cookie Sheet B, C375°-4000 7-12
Fruits,
Other Desserts
Baked apples Glass or Metal Pans A, B, C350”-400° 30-60
Custard Glass Custard Cups or B300°-3500 30-60 Reduce temperature to 300”F. for large
Casserole (set in pan of hot water) custard.
Puddings, rice Glass Custard Cups or B325° 50-90 Cook bread or rice pudding with custard
and custard Casserole base 80 to 90 minutes.
Pies
Frozen Foil Pan on CooK\e Sheet A400°-4250 45-70 Large pies use 400°F. and increase time.
Meringue Spread to crust edges B325°-3500 15-25 To quick)y brown meringue use 400”F. for
9to 11minutes.
One crust Glass or Satin-finish Metal f% A, B400°-4250 45-60 Custard fillings require lower temperature,
Two crust Glass or Satin-finish Metal Pan B400°-4250 40-60 longer time.
Pastry shell Glass or Satin-finish Metal Pdn B450° 13-16
Miscellaneous
Baked potatoes Set on Oven Shelf A, B, C325°-400” 60-90 Increase time for large amount or size.
Scalloped dishes Glass or Metal Pan A,B, C3~5°-3750 30-60
Souffles Glass Pan B300°-3500 30-75
i?
i: J

Roasting
(9Roasting is cooking by dry heat. Step2: Check weight of roast. Step 4: Most meats continue to
Tender meat or poultry can be Place meat fat-side-up or poultry cook slightly while standing after
roasted uncovered in your oven. breast-side-up on roasting rack in abeing removed from the oven.
Roasting temperatures, which shallow pan. The melting fat will Standing time recommended for
should be low and steady, keep baste the meat. Select apan as roasts is 10to 20 minutes to allow
spattering to aminimum. When close to the size of meat as possible. roast to firm up and make it easier
roasting, it is not necessary to sear, (Broiler pan with rack is agood
Ibaste, cover, or add water to your Pan for this. )
Imeat. Roasting is easy, just f~llow “
Ithese steps: Step 3: Turn OVEN TEMP to
desired temperature. Check the
Step1. Position oven shelf at Roasting G~ide for temperatures
second from bottom position (B) and app~oximate cooking times.
for small size roast (3 to 5lbs.) and
at bottom position (A) for larger
roasts.
Roasting Guide
to carve. Internal temperature will
rise about 5° to 10”F.;to compensate
for temperature rise, if desired,
remove roast horn oven at 5° to 10”F.
less than temperature on guide.
Frozen Roasts
Frozen roasts of beef, pork,
lamb, etc., can be started without
thawing, but allow 15to 25 minutes
per pound additional time (15
minutes per pound for roasts under
5pounds, more time for larger
roasts).
Thaw most frozen poultry before
roasting to ensure even doneness.
Some commercial frozen poultry
can be cooked successful] ywithout
thawing. Follow directions given
on packer’s label.
Oven Approximate Roasting llme
VP
Internal
Temperature Doneness in Minutes per Pbund Temperature W
Meat 3to 54bs. 6to 8-lbs.
Tender cuts; rib, high quality 325° Rare: 24-30 18-22 130°-1400
sirloin tip, rump or top round* Medium: 29-33 22-25 150’-160”
Well Done: 35-45 28-33 170°-1850
Lamb leg or bone-in shoulder* 325° Rare: 21-25 20-23 130°-1400
Medium: 25-30 24-28 150°-1600
Well Done: 30-35 28-33 170°-1850
Veal shoulder, leg or loin* 325° Well Done: 35-45 30-40 170°-180°
Pork loin, rib or shoulder* 325° Well Done: 35-45 30-40 170°-180°
Ham, pre-cooked 325° To Warm: 18-23 minutes per lb. (any weight) 115°-1250
Under 10 lbs. 10to 15-lbs.
Ham, raw 325° Well Done: 27-35 24-27 170°
*For boneless rolled roasts over 6-inches
thick, add 5to 10minutes per lb. to times
given above.
I%ultry 3to 5-lbs. Over 5lbs.
Chicken or Duck 325° Well Done: 35-40 30-35 185°-1900
Chicken pieces 375° Well Done: 30-35 185°-190°
10 to 15-lbs. Over 15Ibs. In thigh:
Turkey 325° Well Done: 16-22 13-19 185°-1900
..

..
Broiling
Broiling Tips ●Use tongs to turn meat over— c- ‘))
pierced meat loses juices.
.Broiling is usually done with oven
Broiling is cooking food by direct
heat from above the food. Your
range has aconvenient compartment
below the oven for broiling. It also
has aspecially designed broiler pan
and rack that al]cwt i~:pping fat to
drain away from the foods and be
kept away from the high heat of
the gas flame.
Distance from the heat source may
be changed by positioning the broiler
pan and rack on one of three shelf
positions in the broiler compafiment—
A(bottom of broiler compartment),
B(middle) and C(top).
and broiler doors closed. However, ●Steaks and chops should be at
if you like your steaks very rare least 1inch thick for best broiling
inside and charred on the outside, results. Pan broil thinner ones.
leave the oven door slightly ajar.
Broiling Guide
Quantity
andlor
Thickness
1stSit
Broil Timt
l%sition Minuf
2nd Sid(
Time,
Minute~
Food Comments
Bacon %-lb. (about 8
thin slices)
l-lb. (4 patties)
%to %-in. thick
l-in. thick
(1-l% lbs.)
1%-in. thick
(2-2 %Ibs.)
1whole
(2t02&]b~.),
split lengthwise
B3%
c9-1o
A9
A12
A13
A10
A15
A25
A30-35
c2-3
c3-4
B13-16
c5
B8
3Arrange in single layer.
Ground Beef
Well Done
Beef Steaks
Rare
Medium
Well Done
Rare
Medium
Well Done
Space evenly. Up to 8patties
take about same time.
How to Broil
1. If meat has fat or gristle near the
edge, cut vertical slashes through
both about 2inches apart, but don’t
cut into meat. We recommend that
you trim fat to prevent excessive
smoking, leaving alayer about
l/8-inch thick.
2. Remove broiler pan and rack
from broiler compartment and
place food on rack.
3. Pull out drawer and position
broiler pan in compartment. Placing
food closer to flame increases exterior
browning of food, but also increases
spattering and the possibility of fats
and meat juices igniting.
4. Close broiler door and, for most
foods, turn OVEN TEMP knob to
BROIL. Note: Chicken and ham
are broiled at alower setting in
order to cook food through without
over-browning it.
5. Turn most foods once during
cooking; (the exception is thin fillets
of fish; oil one side, place that side
down on broiler rack and cook without
turning until done). Time foods for
about one-half the total cooking
time, turn food, then continue to
cook to preferred doneness.
6. Turn OVEN TEMP knob to
OFF. Remove broiler pan from
compartm c:,: tind ~cr~.t food
immediately. Leave pan outside
com~artment to cool
7-8
7
5-6
8-9
6-7
12-14
16-18
Steaks less than l-in. cook
through before browning.
Pan frying is recommended.
Slash fat.
Reduce times about 5to 10min.
per side for cut-up chicken.
Chicken (450°) 25-30
Brush each side with melted
butter. Broil with skin side down
first and broil with door closed. 9’
,.
,,.’
Bakery Products
Bread (Toast) or
Toaster Pastries
English Muffins
Lobster tails
(6to 8-02. each)
2-4 slices
1pkg. (2)
2-split
‘/2-1 Space evenly. Place English
muffins cut-side-up and brush
with butter if desired.
Cut through back of shell, spread
open. Brush with melted butter
before and after half time.
Handle and turn very carefully.
Brush with lemon butter before
md during cooking if desired.
Preheat broiler to increase
wowning.
!ncrease times 5-10min. per side
‘or 1%-in. thick or home cured.
IIash fat.
‘2-4 Do not
turn
over.
Fish l-lb. fi]]et~ 1Ato
~z-jn thjck 5
Ham siices (4500)
Precooked l-in. thick 8
pork chops
Well Done 2(%in. )
2(l-in. thick),
about 1lb.
T
2(1 inch)
~bout 10-12 OZ.
?(1Y2
inch),
d-)out1lb. +
A10
A13
B8
B10
B10
B17
4-5
10-12
Lamb chops
Medium
d
Well Done
Medium
Well Done
Wieners, l-lb.pkg.(10) c6
similar precooked
sausages,
brat wurst
4-7
10
4-6
12-14
;Iash fat.
1-2 fdesired, split sausages mhalf
engthwise; cut into 5to 6-in.
lieces.
1---,
14

-..
.
Care and Cleaning
*
●
✎
✠
Proper care and cleaning are
important so your range will give
you efficient and satisfactory
service. Follow these directions
carefully in caring for it to help
assure safe and proper maintenance.
BE SURE ELECTRIC POWER
IS OFF BEFORE CLEANING
ANY PART OF YOUR RANGE.
Special Care of
Continuous-Cleaning
Oven Interior
The Continuous-Cleaning oven
cleans itself while cooking. The
inside of the oven—top, sides, back
and inside of the door—is finished
with aspecial coating which cannot
be cleaned in the usual manner
with soap, detergents, steel wool
pads, commercial oven cleaners,
coarse abrasive pads or coarse
brushes. Use of such cleaners
and/or use of oven sprays will
cause permanent damage.
The special coating is aporous
ceramic material which is dark in
color and feels slightly rough to the
touch. If magnified, the surface
would appear as peaks, valleys, and
sub-surface “tunnels? This rough
finish tends to prevent grease
spatters from forming little beads
or droplets which run down the
side walls of ahard-surface oven
liner leaving unsightly streaks that
require hand cleaning. Instead,
when spatter hits the porous finish,
it is dispersed and is partially
absorbed. This spreading action
increases the exposure of oven
soil to heated air, and makes it
somewhat less noticeable.
Soil may not disappear completely
and at some time after extended
usage, stains may appear which
cannot be removed.
The special coating works best on
small amounts of spatter. It does
not work well with larger spills,
especially sugars, egg or dairy
mixtures.
The special coating is not used
on oven shelves. Shelves should be
cleaned outside the oven to avoid
damage to the special coating
inside the oven.
ToClean the Continuous-
Cleaning Oven:
1. Let range parts cool before
handling. We recommend rubber
gloves be worn when cleaning.
2. Remove shelves and cookware.
3. Soil visibility maybe reduced by
operating the oven at 400*F. Close
the door and turn OVEN TEMP
knob to 400”F. Time for at least 4
hours. Repeated cycles may be
necessary before improvement in
appearance is apparent.
REMEMBER: DURINGTHE
OPERATIONOFTHEOVEN,THE
DOOR,WINDOWAND~HER
RANGESURFACESW1~LGET H(YT
ENOUGH‘IQCAUSEBURNS.DO NOT
~UCH. LET THERANGECOOL
BEFOREREPLAclNGOVENSHELVES,
4. If aspillover or heavy soiling
occurs on the porQ~s surface, as
soon as the oven has cooled, remove
as much of the soil as possible using
asmall amount of water and astiff
bristle nylon brush. Use water
sparingly and change it frequently,
keeping it as clean as possible, and
be sure to blot it up with paper
towels, cloths, or sponges. Do not
rub or scrub with paper towels,
cloths or sponges, since they will
leave unsightly lint on the oven
finish. If water leaves awhite ring
on the finish as it dries, apply water
again and blot itwith aclean
sponge, starting at the edge of the
ring and working toward the center.
Do not use soap, detergent, steel
wool pads, commercial oven cleaner,
silicone oven sprays, coarse pads
or coarse brushes on the porous
surface. These products will spot,
clog, and mar the porous surface
and reduce its ability to work.
Do not scrape the porous surface
with aknife or spatuia—they -
could permanently damage it.
The oven bottom has aporcelain
enamel finish. Itcan be removed
for cleaning away from the .0
continuous-cleaning oven.
1s

.-. —. .—~ .-
Care and C1eafing (continued)
Lift-Up Cooktop
Clean the area under the cooktop
often. Built-up soil, especially
grease, may catch fire.
To make cleaning easier, the entire
cooktop maybe liiled up and
supported by locking arms that
catch and hold the top when it’s all
the way up.
Be sure all burners are turned off
before raising the cooktop. Then
remove the grates and drip pans,
grasp the front sides of the cooktop
and lift.
After cleaning under the cooktop
with hot, miId soapy water and a
clean cloth, put the cooktop back in
place. Lifl up alittle to release the
locking arms and push them in
while guiding the top back down.
Be careful not to pinch your fingers.
Burner Gates
Grates should be washed regularly
and, of course, after spillovers.
Wash them in hot, soapy water and
rinse with clean water. Dry the
grates with acloth—don’t put them
back on the range wet.
To get rid of burned-on food, soak
the grates in aslightly diluted
liquid cleanser.
Although they’re durable, the
grates will gradually lose their
shine, regardless of the best care
you can give them. This is due to
their continual exposure to high
temperatures.
Do not operate aburner for an
extended period of time without
cookware on the grate. The finish
on the grate may chip without
cookware to absorb the heat.
When replacing a
pair of grates,
the irregular
sides should
interlock in
the middle as
shown at right.
Drip Fans
Remove the grates and lift out the
chrome drip pans. Wash them in
hot, soapy water. Rinse them with
clean, hot water and polish them
dry with acloth. Never use
abrasive cleaner or steel wooJ—
they’ll scratch the surface. Instead,
soak the drip pans for about 20
minutes in slightly diluted liquid
cleanser or mild solution of
ammonia and water (1/2 cup of
ammonia to one gallon of water).
Aller soaking, wash them in hot,
soapy water. Rinse with clean water
and polish with aclean, soft cloth.
When replacing
drip pans, the
notch on the rear
pan and the notch
on the front pan
should meet in
the middle.
16

._+4.--” -.- - -
0Range TopBurners
The holes in the burners must be
kept clean at all times for proper
ignition and an even, unhampered
flame,
Clean the burners routinely and
especially after bad spillovers
which could clog these holes.
Burners lift out for cleaning.
Note: Two screws hold each burner
pair in place to keep them from
wobbling around during shipment.
~Remove and discard the shipping
@crews and lift the burners up and
out. This disengages them from the
mounting bracket under each
burner pair.
To remove burned-on food, soak
the burner in asolution of aproduct
used for cleaning the inside of coffee
makers. Soak the burner for 20 to
30 minutes. If the food doesn’t
rinse off completely, scrub it with
soap and water or amild abrasive
cleanser and adamp cloth.
Do not attempt to clean burners in
an automatic dishwasher. Loosened
food soil can clog burner holes,
and the caustic action of the
dishwasher detergent can damage
the burner heads.
Before putting the burner back, dry
it thoroughly by setting it in awarm
oven for 30 minutes. Then place it
back in the range, making sure it is
properly seated on the mounting
bracket and is level.
Control F%mels
It’s agood idea to wipe the control
panels clean after each use of the
oven, For amore thorough cleaning,
the control knobs can be pui.led off-
the knob stems and, on models so
equipp@ tie glass upper control
panel can be cleaned on both sides.
B=-
To remove the glass panel:
1. Remove the screw on each end of
the backsplash.
2. Remove the metal strips on each
end that hold the glass in place.
3. Remove the clock knob and nut
securing the light switch.
4. Carefidly remove the glass and
place it on asmooth, flat surface.
Clean it with miid soap and water,
rinse with clean water and dry with
asoft cloth. Caution: Do not use
abrasive cleansers, strong liquid
cleaners or oven cleaners. on glass or
enamel control panel surfaces—they
will darnage the finish.
Outer Enamel Finish
When the range is cool, wash the
enarnel finish with mild soap and
water or amild abrasive cleanser
applied with adamp cloth. Rinse
with clean water and dry with asoft
cloth. If you wish, occasionally
apply athin coat of mild cleaning
wax to help protect the finish.
To avoid marring the surface of
the range and to prevent it from
becoming dull, don’t slide heavy
pans across it. If you spill fds with
alot of acid or high sugar content,
clean them up as soon as possible. If
allowed to remain, these fds could
cause adull spot. Also, never use
harsh abrasive cleansers. They could
permanently damage the enamel
surface.
-’

care and cleaning (continued)
. . Brushed Chrome Finish
Model JGBC17GEJ
Clean the brushed chrome top
with warm, soapy water or an all-
purpose household cleaner and
immediately dry it with aclean, soft
cloth. Take-care to dry the surface
following the “grain.” To help
prevent finger marks after cleaning,
spread athin film of baby oil on the
surface. W@e away excess oil with a
clean, soft cloth. Agood appliance
wax will help protect this finish.
Oven Light Bulb
Replacement
The light bulb is located in the
upper left corner of the oven.
Before replacing the bulb,
disconnect electric power to the
range at the main fuse or circuit
breaker panel or pull the range
power cord plug from the electrical
outlet. Let the bulb cool completely
before removing it. Do not touch a
hot bulb with adamp cloth as the
bulb will break.
Removable oven Door
The oven door is removable to
make the interior more accessible. :
Open the oven door fully and
remove the two Phillips screws that
hold the door to the hinges. Then
close the door to the automatic stop
position (at about 3inches open),
and lift the door straight up and off
the hinges. (Due to th~ large amount
of induration and the construction
of the door, it is heavy. )
Replace with ahigh temperature
appliance bulb of the same wattage.
Note: Care should be taken not to
place hands between the spring
hinge and the oven door frame as
the hinge could snap back and
pinch fingers.
@y
To replace the oven door, make ‘!
sure the hinges are in the “out”
position. Position the slots in the
bottom of the door squarely over
the hinges. Then lower the door
slowly and evenly over both hinges
at the same time. If hinges snap
back against the oven frame, pull
them back out. When the door is
in position, open it fully and insert
the two Phillips screws.
18
.- -,.-..——

knovable ovenBottom
YOU Can remove the porcelain
enamel oven bottom for cleaning
outside the oven.
To remove the ov”n bottom:
1. Remove the oven shelves.
2. Remove the two knurled hold-
down screws at the rear of the oven.
If they are too tight to remove by
hand, use acoin or screwdriver.
3. To lift out the oven bottom,
place your fingers in the slots in the
bottom and Iifi the rear of the oven
bottom up and back until the oven
bottom is clear of the lip at the front.
Then lifi the bottom up and out.
To replace the oven bottom, place
it in the oven with the back raised
about 6to 8inches or until you can
insert the front of the oven bottom
under the hold-down lip at the front.
Then push the back of the oven
bottom down filly into place on the
metal flanges and insert the hold-
down screws.
DO N~ place asheet of aluminum
foil on the bottom of the oven. If
you do, your f~ds may not cook
properly. The oven finish may be
damaged. And there may bean
increase in heat on the outside
surfaces of the oven.
Oven Shelves
Ovenshelves may be cleaned with
amild abrasive cleanser following
manufacturer’s directions. After
cleaning, rinse the shelves with
clean water and dry with aclean
cloth. To remove heavy, burned-on
soil, soapy metal pads may be used
following manufacturer’s directions.
After scrubbing, wash with soapy
water, rinse and dry.
Broiler Pan &Rack
After broiling, remove the broiler
rack and carefully pour off the
grease. Wash and rinse the pan
and rack in hot, soapy water.
If food has burned on, sprinkle the
broiler rack while hot with detergent
and cover with wet paper towels or
adish cloth. Burned-on foods will
then soak loose while the meal is
being served.
The broiler pan and rack are
designed to allow dripping fat to
drain and be kept away from the
high heat of the broiler. Do not
cover the rack with aluminum foil
or use the pan without the rack
because the exposed fat may
catch fire.
Do not store asoiled broiler pan
and rack in the broiler compartment
or oven.
19
--—_

Minor Adjustments YouCan Make
-“OvenThermostat
Adjustment
The temperature control in your
-new oven has been carefully adjusted
to provide accurate temperatures.
However, if this oven has replaced
one you have used for several years,
you may notice adifference in the
degree of browning or the length of
time required when using your
favorite recipes. Oven temperature
controls have atendency t~ “drift”
over aperiod of years and since
this drift is very gradual, it is not
readily noticed. Therefore, you
may have become accustomed to
your previous oven which may
have provided ahigher or lower
temperature than you selected.
Before attempting to have the
temperature of your new oven
changed, be sure you have followed
the baking time and temperature of
the recipe carefully. Then, after
.. you have used the oven afew times
and you feel the oven is too hot
or too cool, there is asimple
adjustment you can make yourself
on the OVEN TEMP knob.
Pull the knob off the shaft and look
at the back side. There is adisc in
the center of the knob skirt with a
series of marks opposite apointer.
the direction of arrow for LOWER.
Each mark will change the oven
temperature approximately 2C)°F.
We suggest that’you make the
adjustment one mark from the
original setting and check oven
performance before making any
additional adjustments.
After the adjustment is made,
press skirt and knob together and
retighten screws so they are snug,
but be careful not to overtighten.
Re-install knob on range and
check performance.
Note: After an adjustment has
been made to the OVEN TEMP
knob, OFF and BROIL will not
line up with the indicator mark on
the control panel as they previously
did. This condition is normal and
will not create aproblem.
Oven Door Height
Adjustment
Repeated openings and closings
can cause the oven door to work
itself out of adjustment. One side
may close higher than the other,
and the door may not seal properly.
To adjust the height of the door:
1. Remove the door (see page 18).
@
,SE-KW64
/\
Loosen only the
L
locking screws
~+ ‘.ERN@
Note position of
pointer to marks
before adjustment
Note to which mark the pointer is
pointing. To make an adjustment,
carefully loosen (approximately
one turn), but do not completely
remove the two screws that hold the
skirt to the knob. Hold the knob
blade in one hand and the outer
skirt in the other hand.
To raise the oven temperature,
move the pointer in the direction of
the arrow for RAISE. To lower the
temperature, move the pointer in
oven Burner
Air Adjustment Shutter
The air adjustment shutter for the
oven burner regulates the flow of
air to the ~lame.
The shutter for the oven burner is
near the back wall of the oven
behind the broiler drawer.
1
f!?
J
To determine if the burner flame
is proper, light the burner. The
flame should have 1/2” to 3/4” blue
cones with no yellow tipping. When
the baffle is back in place, the
flame will resettle.
2. With athin-bladed screwdriver,
turn the screw in the opening at
the top of each door hinge. Turn
cloctiise to lower, counterclockwise
to raise each side of the door.
3. Replace the door, close it, and
check alignment and door seal.
20
I
To reach the shutter, remove
the oven bottom (page 19) and the
burner baffle.
To adjust the flow of air to the
burner, loosen the Phillips head
screw and rotate the shutter to
allow more or less air into the
burner tube as needed.
... ..----
This manual suits for next models
2
Table of contents
Other GE Range manuals