GE JSS28 User manual

ge.com
Safety Instru_tions ... 9-4
Operating In_lru_ions
Clock and Timer . ...... ] 0
Conuols ............. 6, 7
()yen ................ 8, 9
Power Outage .......... 7
Sabbath Feaune ..... 11, 19
Special Features ........ 11
Sur£_ce Units ........... 5
Thermostat ........... 19
Care and Cleani_
Control I4mobs ......... ] 3
Drip Pans ............. 17
Heafi ng Elements ...... 13
I,ift-Off Oven Door . .... 15
I,ift-Up Cooktop ....... ] 7
I _i01t ................. 16
Oven Interior .......... ] 5
Shelves ............... 14
Storag> Drawer . ....... 16
Surl_ace Units .......... ] 7
Vent ................. 14
Troubleshooting
Tips .............. 18, 19
Accessories ........... 20
Consumer Support
Consumer
Support ...... Back Co_er
Product
Registration ........ 91,92
Wanantv ............. 23
¢ss2s
Write the model and serial
numbers here:
Model #
Serial #
You can find them on a label
behind the storage drawer on
the fl'ont of the range fl'ame.
49-80481 07-07 JR

iMPORTANTSAFETYiNFORMATiON.
READALLINSTRUCTIONSBEFOREUSING.
For your safeN the information in this manual must be followed to minimize the risk of fire, electric
shock, or to prevent property damage, personal injury, or loss of fife.
WARNINGANTI-TIPDEVICE
Aft ranges can tip and injury could result
Toprevent accidental tipping of the range, attach #to the wag and floor by installing the Anti-tip
device supplied.
If the Anti-tip device supplied with the range does not fit this application, use the universal Anti-tip
device WB2X7909.
Tocheck if the device is installed and engaged properly, remove the storage drawer and inspect the
rear leveling leg. Make sure it fits securely into the slot.
If yon pull die range ont fiom file wall for any reason, make sure the de\'ice is properly
engaged when you push tile range back against the wall. If it is not, there is a possible risk of
the rang> tipping oxer and causing i[Ijni T if yon or a child stand, sit or lean on an open door
Please reDr m tile And-Tip device infom/ation shipped wifl) the device and in this manual.
Failure m rake this plecaufion could result in tipping of die rang_ and injm T.
2
SAFETYPRECAUTIONS
When using electrical appflances, basic safety precautions should be foflowed, including the following:
;_):':Use this appliance only for its intended ;_):,:i,arge scratches or impacts to glass doors
puq)ose as described in fllis Oxmer's Manual.
_i:,:Be sure yonr appliance is properly _i:,:
installed and grounded by a qualified
installer in accordance with tile provided
installation instrncdons. _:;
_?_:Haw tile installer show you die location
of d_e circuit breaker or fllse. Mark it for
easy reference.
_?_:Do not atmmpt to repair or replace any
part of your range unless it is specifically
recommended ill this mamlal. All other
servicing should be refeITed to a qualified
mchnician.
_: Before performing any service, disconnect
the range power supply at the household
disuibution panel by removing tile filse or
switching off the circuit breaken
;_;Do not leaxe children alone----r'hildren
should not be left alone or nnatmnded in
all area where an appliance is ill use. They
should nex>r be allowed to sit or stand on
any part of tile appliance.
q_{_:Do not allow anyone to climb, stand or
hang on tile dooi; storag_ drawer or
cooktop. They could damag> tile rang>
and even tip it ovel; causing se_re
personal inju U.
call lead to broken or shattered glass.
Do not store flammable matelJals in an
oxen or near the cooktop.
CAUTION: ofinterestto
chikhen should not be stored in cabinets
abo_ a rang_ or on die backsplash of a
range---<:hildren climbing on tile range to
reach items could be seriously injuled.
Nexer wear loose-fitting or hangJng
gamlents while using the appliance. Be
careflll when leaching for imms stored
oxer the range. Flammal)le mamdal could
be ignimd if brought ill contact wifl_ hot
surPace units or heating elements and may
cause severe bnl_/1s.
Use only dUpot holders--moist or damp
pot holders on hot sur/aaces may result in
bunls from steam. Do not let pot holders
touch hot sui/aace units or heating
elements. Do not use a towel or other
bulky cloth in place of pot holders.

ge.com
WARNING!
SAFETYPRECAUTIONS
_i:,iFor your safety, ne_er use your appliance
for wam_ing or heating the room.
_:_Teach children not to play with tire
cormols or arty other part of tire rang_.
_{;_Always kee I) dish rowels, dish cloths, pot
holders and other linens a sad distance
fiom your rang_.
_?_::Always kee I) wooden arrd plastic umnsils
arrd canned food a safe distance fiom
vent range..
_:_Always kee I) combnsfible wall cox_fing_s,
curtains or drapes a safe distance from
vonr rang_.
N Do not let cooldng g_ease or other flammable
materials accunmlate in or near the rang_.
;;; Kee I) fire hood and grease filmrs clean
m maintain good x_nfing arrd m axoid
grease fires.
_;;Do not use water on grease fires. Never
pick up a flaming pan. Turn die controls
off. Smother a flaming pan on a surfl_ce
unit 1)ycoveiing the pan completely wifl/a
well-fitting lid, cookie sheet or fiat trW. Use
a multi-purpose drT chemical or foam-type
fi_e extinguisher
Flaming grease outside a pan can be put
out by cox>ring it with baking soda or; if
available, by using a muldq)uq)ose dU
chemical or %am-type fire extinguisher.
Flame in the oxen can be smothered
completely by closing tire oxen door arrd
mining the o\en off or by using a muhi-
pmq)ose diy' chemical or foam-type fire
extinguisher.
Do not much tire snr£rce units, the heating
elements or the irrm_ior snrt_ace of the oven.
These snil_aces nray be hot enong]l to bnF/l
e_en thougtl they aie dark in color Dining
and after use, do not touch, or let clothing
or other flammable mamfials contact die
surPace units, areas nearl)y fire surPace units
or any irrtefior area of the o\>n; allow
sufficient free for cooling first.
Potentially hot surfaces irrclude tire
cooktop, areas Pacing fire cooktop, oven
\ent opening, surfaces near the opening,
crevices around the oxen door
REMEMBER: Tire irrside snit_ace of die o\>n
may be hot when file door is opened.
Do not store or use combustible materials,
gasoline or other flammable vapors and
liquids ira the vicinity of this or arty other
appliance.
COOKMEATANDPOULTRYTHOROUGHLY...
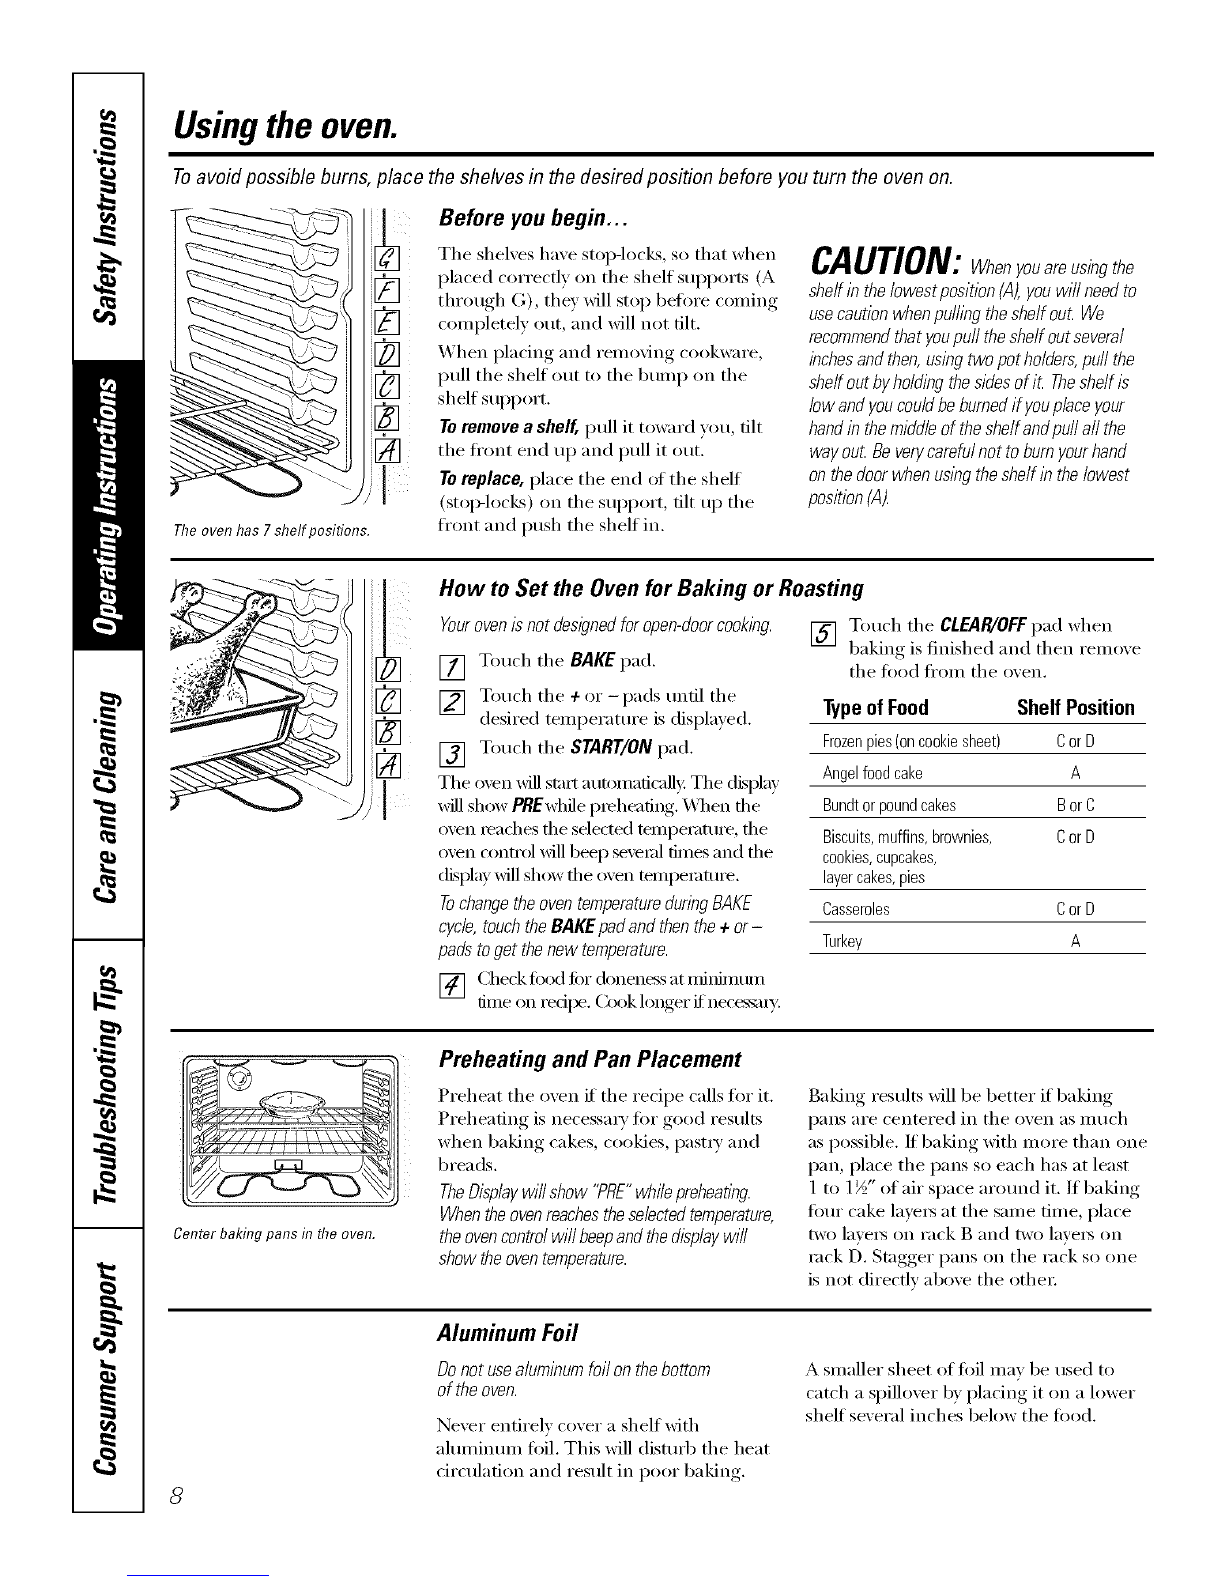
Cookmeat andpoultry thoroughly--meat to atleast an INTERNALtemperatureof 160°Fandpoultry toat least
an iNTERNALtemperatureof 180°ECookingto thesetemperaturesusuallyprotectsagainst foodbomeillness.
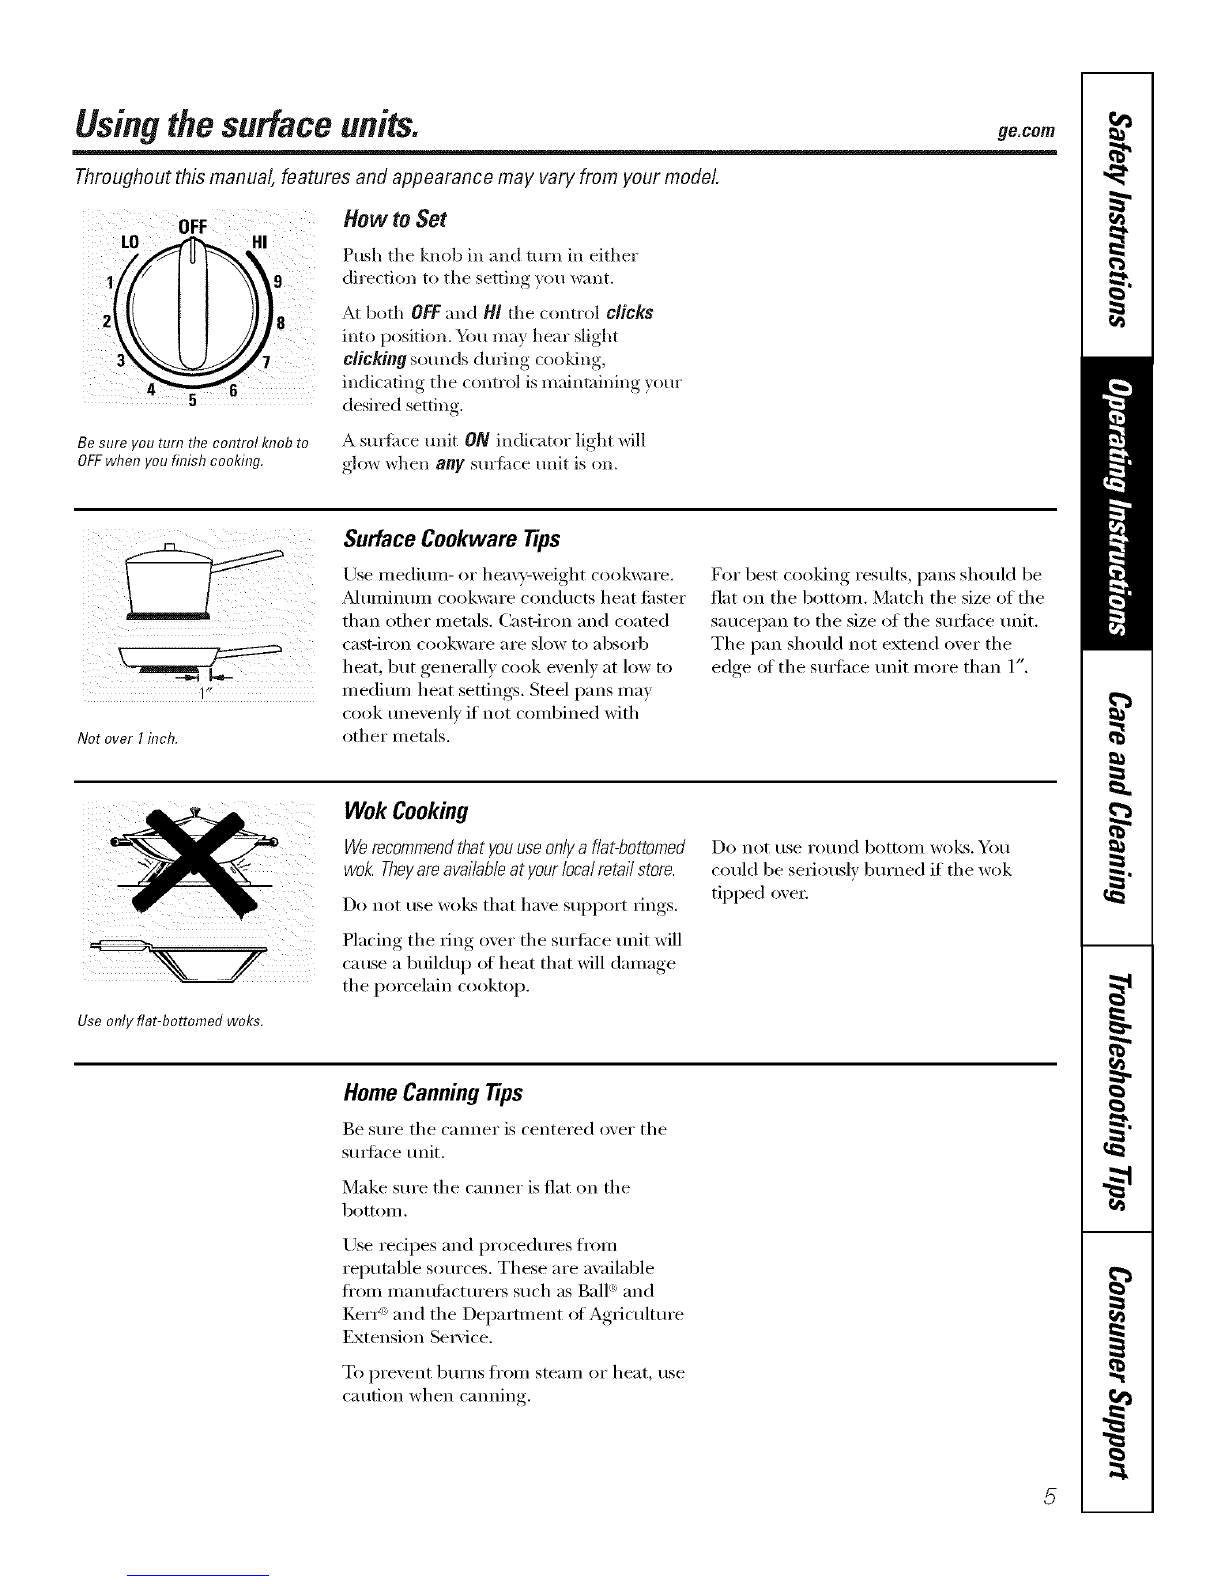
SURFACECOOKINGUNITS
Useproper pan size--select cookware having flat bottoms large enough to cover the surface unit
heating element. Theuse of undersized cookware will expose a portion of the surface unit to direct
contact andmay result in ignition of clothing. Proper relationship of cookware to surface unit will also
improve efficiency.
q_{;:Never leave file snrface units unatmnded
at higir heat settings. Boiloxe_s cause smoking
arrd g_easy q)illovers that mav catch on fire.
_;:Do not use aluminum foil to line tire
drip pans or anywhere ira tire ox>n, except
as described ira this manual. Misuse could
result in a shock, fire hazard or damage
to the rang>.
;_?:':Be sure rite drip pans arrd tire vent duct
are not coxered arrd are in place. Their
absence during cooking could damag_
rang_ parts arrd wiring.
_;:Only certain types of glass, gtassX:eramic,
earthenware or other glazed containers are
suitable for cooktop service; others may
break because of the sudden chang> in
temperatme.
N To minimize the possibili)' of bums, iga_ifion
of flammable materials and spillage, fire
handle of a container should be turned
toward tire center of the range without
exmnding oxer nearl)y surface units.
_::Alwws turn the surface units off before 3
renloving cookware.

IMPORTANTSAFETYINFORMATION.
READALLINSTRUCTIONSBEFOREUSING.
SURFACECOOKINGUNITS(cont.)
;_i:,:Do not hnmerse or soak the remoxable
surface units. Do not put them in a
dishwasher
_t{_When preparing flaming foods nnder
file hood, ulrn tile thn on.
_{_To a_id the possibility of a bnt_t or
electric shock, ahvays be certain that the
controls for all surface units are at the
OFFposition attd all coils are cool before
atmmpfing to lift or remoxe a unit.
;fi:,:Clean fire cooktop with caution. If a wet
sponge is used to wipe spills on a hot
cooktop, be carefill to ax_id steam bums.
q_{_Kee I) an eye on foods being fi-ied at high
or medium high heat settings.
_i:,:Foods for fiTing should be as dry as
possible. Frost on fiozen foods or moisture
on fiesh foods can cause hot lht to bubble
up attd oxer tile sides of tile pan.
_ti_:Use litde titt for effective shallow or deep
£_t fiTing. Filling tile pan too fllll of Jht can
cause spilloxers when food is added.
;_i:,:If a combination of oils or thts will be used
ill flTing, stir together before heating, or as
fats meh slowly.
;_55Always heat t_atslowly, attd watch as it heats.
;_i:':Use a deep tht themtomemr whenexer
possible to prexent oxerheating fat beyond
tile smoking point.
AWARNING!
OVEN
Stand away from the range when opening the oven door. Hot ak or steam which escapes can cause
bums to hands, face and/or eyes.
_:_Do not heat tmopened food containers.
Piessure could build up and file container
could burst, causing an itljtn T.
_: Kee I) the oxen xent nnobstnlcted.
_:iKee I) the oxen flee flom grease buildup.
_{_Place tile oxen shelf in file desiied position
while file oxen is cool. If shehes must be
handled when hot, do not let pot holder
contact file heating elements.
;f; Pulling out the shelf m the stop-lock is a
comenience ill lifting heaxy' foods. It is also
a precaution against burns fronl ranching
hot surfitces of tile door or oxen walls.
_{:_When nsing cooking or roasdng bags
in rite oxen, tbllow tile manufacturer's
directions.
_{_;Do not use the oxen to d_T newspapers.
If oxerheamd, they can catch on fire.
;_i:,:Do not use file oxen for a storage area.
Imms stored ill an oxen can ignim.
;_i:':Do not leaxe paper products, cooking
umnsils or food in file oven when not
in use.
;_?:':Do not use almninunt foil to line
oxen 1)ottoms. Improper installation
of aluminunl foil may resu]t in a risk
of electric shock or fire.
READANDFOLLOWTHISSAFETYINFORMATIONCAREFULLY.
SAVETHESEINSTRUCTIONS
4

Usingthesurface units, ge.com
Throughout this manual, features and appearance may vary from your model.
3
Be sure you turn the control knob to
OFFwhen you finish cooking.
How to Set
Push the knob in and turn in either
direction to the setting you want.
At both OFFand H! the control clicks
into position. _tl may hear slight
clicking som_ds during cooking,
indicating the control is maintaining yore"
desired setting.
A sm_time refit ON indicator light will
glow when any surtime unit is on,
1"*
NotoverIinch.
Surface Cookware tips
Use medimn- or hea\_v-weight cookware.
_kdtlIllintlIll cookware condtlcts heat fi_ster
than other metals. Cast-iron and coated
cast-iI'on cookwai'e aI'e slow to _lbsoi'b
heat, but generally cook evenly at low to
medium heat settings. Steel pans may
cook tmevenlv if not combined with
other metals.
For best cooking results, pans shouM be
fiat on the bottom. Match the size of the
saucei)an to the size of the sm_i_ce trait.
The pan should not extend over the
edge ot the sm_hce trait more than 1".
I
Use only flat-bottomed woks.
Wok Cooking
Werecommendthat youuseonlya flat-bottomed
wok. Theyareavailableatyour localretail store.
Do not rise WO]CSthat have support rings.
Placing the ring over the surtilce unit will
cause a buildu I) of heat that will damage
the porcelain cooktop.
Do not t/se I'ot/nd bottolll Wo]cs. Yell
could be seriously bm'ned if the wok
tipped oxer.
Home CanningTips
Be sm'e the canner is centered o_er the
sm_i_ce trait.
Make sure the canner is fiat on the
bottom.
Use redpes and procedm'es fl'om
reputable sources. These are awfilable
fl'om manufi_cture_ such as Ball '_and
IZerI_'_and the Department ot Agricultm'e
Extension Service.
To pi'e'_ent btli'ns fi'Olll steaill or heat, rise
caution when camfing.

Usingtheovencontrols.
Throughout this manual, features and appearance may vary from your model.
e
OvenControl,ClockandTimerFeaturesandSettings
oBAKE/7-EMPRECALLPad 0
Touch this pad to select tile bake function.
BAKE Light
Flashes while in edit mode---you can
change tile oven temperature at this point.
(;lows when tile oven is in bake mode.
START/ONPad
Must be touched to start _lIly ('ooking
flmction.
ODisplay
Sh(m:s tile time of day, oven temperature
and whether the oven is in the bake or broil
mode. The display will show PREwhile
preheating. When the oven reaches the
selected temperature, the oven control will
beep and tile display will show tile oven
temperature.
If "F- and anumberor/otter" f/ashin the dlsp/ayand the
ovencontro/ slgna& this indicatesa functionerrorcode.
Thetime of day wi// f/ash in the dlsp/aywhen therehas
beenapower outage.Resetthe c/oc/_
Touch the CLEAR/OFFpad. A//ow the oven tocoo/for
onehour Put the ovenbackinto operation,if the function
errorcoderepeats, disconnectthepower to the rangeand
ca//for service.
0
KITCHEN TIMER ON/OFFPad
Touch this pad to select the timer feature.
Then press q-and -pads to at!just time.
TIMERLight
Flashes while in edit mode_vou can
change the set time at this point. (;lows
when the timer has been activated. Iqashes
again when tile time has run out until tile
control is reset.
CLOCK Pad
To set tile clock, press this pad twice and
then press tile q-and -pads. Tile time of
day will flash in the display when the oven
is first turned on.

ge.com
OvenControl,ClockandTimerFeaturesandSettings
-Pad
Short trips to this pad will decrease the time
or temperature by small amounts. Touch
and hold the pad to decrease the time or
temperatm'e by larger amounts.
+ Pad
Short trips to this pad will increase the time
or temperature 1Usmall amotmts. Touch
and hold the pad to increase the time or
temperatm'e by larger amounts.
OLEAR/OFFPad
Touch this pad to cancel ALL o',en
operations except the clock and timer;
OBROILHI/LO Pad
Touch this pad to select the broil flmcfion.
BROILLight
Flashes while in edit mode---you can switch
fi'om HI to tO BROILat this point. Glows when
the ()Veil is iIl broil mode,
Power Outage
If a flashing time is in the display,youhave
experiencedapower failure. Resetthe clock. To reset tile clock, touch tile CLOCK pad,
Enter the correct time of day by touching
the +or -pads. Touch the START/ONpad.

Usingtheoven.
Toavoid possible bums, place the shelves in the desired position before you turn the oven on.
The oven has 7 shelf positions.
Before you begin...
The shelves have StOl)-locks, so that when
placed correctly on the shelf suppo_ls (A
through G), they will stop before canting
completely out, and will not tlt.
When placing and removing cookware,
pull the shelf Otlt to the bump on the
shelf support.
Toremove a shell, pull it toward you, tilt
the ti'ont end up and pull it out.
Toreplace, place the end (ff the shelf
(stoi>locEs) on the support, tilt up the
front and push the shelf in.
CAUTION:Whenyouareusingthe
shelf in the/owestposition CA),you wi// need to
usecaution whenpuffing the shelf out We
recommendthat youpuff the shelf out several
inchesand then,using two pot ho/dera,puff the
sheff out by ho/ding thesides of it Theshelf is
low and youcouldbe burnedif youplace your
handin the middle of the she/fand pu//aft the
way out Beverycarefulnot to burnyourhand
on thedoor when uslbg the shelf in the lowest
position CA).
4-. l How to Set the Oven for Baking or Roasting
tour ovenis not designedforopen-doorcooklhg.
[] Touch the BAKE pad.
[_] [] Touch the +or-pads tmdl the
desired temperature is displayed.
Touch the START/ON
[] pad.
jThe o_en _dll start atltoi//alical]?: The display
will show PREwhile pmheadng. _._q_en the
oven readies the sdected temperature, the
oven conrail _ill beep sex_ml times and the
display _ill show the oven tempelature.
Tochangethe oventemperatureduringBAKE
cycle,touchthe BAKE padand thenthe + or-
pads toget the new temperature.
[] Touch the CLEAR!OFFpad when
baking is finished and then remove
the food fl'om the oven.
TypeofFood Shelf Position
Frozenpies(oncookiesheet) CorD
Angelfoodcake A
Bundtorpoundcakes BorC
Biscuits,muffins,brownies, CorD
cookies,cupcakes,
layercakes,pies
Casseroles CorD
Turkey A
[] (_heck t0od ti)r darien,s at nfiifimtm/
time on redlx_. Cook hmger if neces_s,'.
Center bakingpans in flTeoven.
Preheating and Pan Placement
Preheat the oven if the recipe calls for it.
Preheating is necessm T for good results
when baking cakes, cookies, past_ T and
breads.
TheDisplaywi// show "PBE"while preheatlbg.
Whentheovenreachestheselectedtemperature,
the ovencontrolwi// beepand thedisplaywi//
show theoventemperature.
Baking results will be better if baking
pans are centered in the oven as much
as possible. If baking with more than one
pan, place the pans so each has at least
1 to 1½" of air space arotmd it. If baking
Ibm" cake layers at the same time, place
two laye_ on rack g and two laye_ on
rock D. Stagger pans on the rack so one
is not directly above the othe_:
8
Aluminum Foil
Do not usealuminum foil on the bottom
of the oven.
Never entirely cover a shelf with
almninmn foil. This will dismrl) the heat
circulation and result in poor baking.
Asmaller sheet offifil may be used to
catch a spilloxer by placing it on a lower
shelf sexeral inches below the toed.

ge.com
Theoven door must be closed
during broiling.
How to Set the Oven for Broiling--Close the oven door
[] Place the meat or fish on a broiler
,grid in a broiler I)an designed,
for broiling.
Use LOBroil to cook fi)ods such as
poultry or thick cuts of meat thoroughly
without o_ePbrowning them.
[] F°lh)w suggested shelf I)°siti°ns in
the BroilingGuido. [] Touch the BROILH//LO pad once
tot HI Broil.
[] The oxen door mustbe closed
during broiling.
If yourrange is connectedto208 voits,raresteaks []
maybe broiledbypreheat/hg thebroiler and
positioning theovenshelf oneposition higher []
To change, to I,O Broil, touch the
BROILHI/LO pad again.
Touch the START/ON pad.
_._q_en broiling is finished, touch the
CLEAR/OFFpad.
The size, weight, thickness,
starting temperature
and your preference
of doneness will affect
broiling times. This guide
is based on meats at
refl'igerator temperature.
{' The {LS. D('/,a*h*_e_l o/
Agric*dluw says '7'm_,/we/L*
/*o/m/m b,It yo*l sko*t/d to*ow that
_mU s*w_iz e. "(N,u*_,: _e lbod
B,,&. };,m l(itc,',_,_ (add(,. {:SlM
Ib_,.]u_** / 9,S'5.)
Broiling Guide
Food
GroundBeef
Well Done
Beef Steaks
Rarer
Medium
Well Done
Rarer
Medium
Well Done
Chicken Breasts
LobsterTails
Fish Fillets
Pork Chops
Well Done
Salmon Steaks
Salmon Fillets
Quantityand/
orThickness
1 lb.(4 patties
I/zto 3/4"thick)
1" thick
1to 17LIbs.
1W' thick
2to 27LIbs.
BoneIn
Boneless
2_
10to 12oz.each
V4to Y/" thick
2(Yz"thick)
2(1" thick)about 1 lb.
2(1"thick)
2(I/Lto 1" thick)
Shelf*
Position
E
E
E
D
D
D
C
C
B
E
D
D
D
FirstSide
Time(min.)
911
79
10 12
12 14
12 14
17 19
19_1
2540
18_0
2540
68
6q3
13 15
10 12
25_7
Second Side
Time (rain.)
57
79
8 10
911
8 10
13 15
15 17
8 I0
10 15
Donot
turn
oveE
&6
35
68
8 10
DonotturnoveE
Comments
Space evenly. Up to
8 patties take about
the same time.
Steakslessthan 1"
thick cookthrough
beforebrowning.
Panfrying is
recemrnended.
Slashfat atedges.
Broilskin-side-down
first.
Cutthroughbackof
shell.Spreadopen.
Handleandturnvery
carefully.
Slashfat atedges.
Greasepan.
Placeskin-side-down.
_Seeillustration for description of shelf positions.
Theoven has 7shelf positions.

Usingthe clock and timer.
Not all features are on all models.
To Set the Clock
[] Touch tile CLOCKpad twice.
[] Touch tile ÷or-pads.
If tile ÷or -pads are not touched within
one nlinute alter you touch tile CLOCK
pad, tile displa) rexerts to tile original
,settin ,_ If this happens, touch tile CLOCK
pad t\dce and reenter tile time of day.
[_ Touch the START/ON pad until the
time of day shows in tile display, This
entet_ the time and starts the clock,
Tocheckthetimeofdaywhenthedisplayis
showingotherinformation,slknp/ytouchthe
CLOCKpad Thetimeofdayshowsuntilanother
padistouchecL
ToTurnOffthe Clock Display
If w_u have several clocks in yore" kitchen,
you Inay wish to turn off tile time of day
clock display on your range.
[] Touch tile CLOCKpadonce to ttllll
off tile time of day display. Mthough
w)u will not be able to see it, tile
[]
clock maintains tile correct time
of day.
Touch tile CLOCKpad twice to recall
tile clock display.
TheCLEAR/OFFpad does not affect
the time_
To Set the Timer
ThetlYnerdoes not control ovenoperations.
Themaximumsetting on the timeris 9hours
and59 minutes
[]
[]
Touch the KITCHENTIMERON/OFF
I/ad.
Touch the ÷ or-pads tmtil the
}Illl()[ln[ ()t ti/lle VOtl w}lnt shows ill
the display. The maximum time that
can be entered ill minutes is 59.
Times more than 59 minutes should
be changed to hotu_ and minutes.
Ifyoumakeamistake,touchtheKITCHEN
TIMERON/OFFpadandbeginagain.
[] Touch tile START/ONpad. Tile time
will start COlmting down, althou_4/
tile displa_ does not chanoe,_ until
one minute has passed.
[] X&q/en tile timer reaches ;00, tile
control will beep 3 times tollowed by
one beep e'_er _,6 seconds tmtil tile
KITCHEN TIMERON/OFFpad is
touched.
To Reset the Timer
If tile display is still showing tile time
remaining, you may change it by touching
tile KITCHENTIMERON/OFFpad, then
touching tile ÷ or -pads tmtil tile time
wm want appea_s in tile display.
If tile remaining time is not in tile display,
recall it by touching the KITCHEN TIMER
ON/OFFpad and then touching tile ÷ or -
pads to enter tile new time w)u want.
/0
ToCancel the Timer
Touch tile KITCHENTIMERON/OFF
pad twice.

Special featuresofyour ovencontrol, ge.com
Yournew touch pad control has additional features that you may choose to use. The foflowing are the features and
how you may activate them.
The special feature modes can only be activated while the display is showing the time of day. They remain in the
control's memory until the steps are repeated.
When the display shows your choice, touch the START/ONpad. Thespecial features will remain in memory after
a power failure.
NOTE: The Sabbath feature and the Thermostat Adjustment feature are also Special Features, but they are
addressed separately in the following sections.
12Hour Shut-Off
With this feature,shouldyou forgetand leave the
ovenon, the control will automat/2allyturn off the
ovenafter 12hoursdunng bak/bgfunctionsor
after3 hours dunbgabroil function.
li_ou wish to mrn OFF this feature, ibllm_
the steps belong.
[77 Touch the BAKE and BROIL HI/LO
pads at the same time for 3 seconds
until the displax shows SF..
[] Touch the CLOCK pad. The displa}
will sho_ ON (12 hour shut-off).
Touch the CLOCKpad repeatedly
until the display shows OFF (no
sh m-off).
[] Touch the START/ON pad to activate
the no shut-off and leave the control
set in this spedal features mode.
Using the SabbathFeature.(Onso e odels)
(Designed for use on the Jewish Sabbath and Hofidays)
The Sabbath feature can be used for baking/roasting only. It cannot be used for broiling.
NOTE: The oven light comes on automatically (on some models) when the door is opened and goes off when the
door is closed. Thebulb maybe removed. See the OvenLight Replacement section. Onmodels with a light switch
on the control panel, the oven light may be turned on and left on.
@
@
WhenNe displayshowsD Ne
ovenissetinSabbath.Whenthe
displayshowsD C theovenis
baking/roasting.
How to Set for Baking/Roasting
NOTE."Tounderstandhow the ovencontrol
works,practice uslbg regularbaklbg (non-
Sabbath)beforeenterbg Sabbathmode.
Make surethe clockshows the correct t/me
of dayand the ovenis off
[] Touch and hold both the BAKE and
BROILHI/LO pads, at the same time,
tmtil the display shows SE
[] Tap the CLOCKpad tmfil SAb
appea_ in the display.
[] Touch the START/ON pad and D will
appear in the display.
[] Touch the BAKE pad. No signal will
be gix en.
[] The preset starting temperatm'e will
automaticallx be set to 351").° Tap the
4- or --pads to inci'ease or decrease
the temperature in 95 ° increments.
The temperatm'e can be set between
170 ° and 550. ° No signal or
temperature will be given.
[] Touch the START/ON pad.
[] _Mter a random delay period of
approximately bO seconds to I
minute, D c will appear in the
display indicating that the oven is
baking/roasting. If D c doesn't
appear in the display; start again
at Step 4.
To at!just the oven temperature, touch
the BAKEpad and tap the +or -pads to
increase or decrease the temperature in
25 ° increments. Touch the START/ONpad.
NOTE:The CLEAR/OFFand COOKING TIME
pads are active dining the Sabbath teatm'e.
To exit Sabbath teature, see next page.
11

UsingtheSabbathFeature.
(Designed for use on the Jewish Sabbath and Holidays) (on some models)
How to Exit the Sabbath Feature
[] Touch the CLEAR/OFFpad. []
[] If the oven is cooking, wait
tot a rand(nn dela_ period of
approxinmtely 30 seconds to
1 minute, until only D is in the
display.
[] Touch and hoM both the BAKE and
BROILHI/LO pads, atthe same time,
tmtil the display shows SF.
%q) the CLOCKpad tmfil ONor OFF
appeax_ in the display. ON indicates
that the oven Mll automatically mrn
off after 12 hom_. OFFindicates that
the oven will not automatically turn
off. See the Special Features secdon
for an explanation of the 12Hour
Shut-Off ieamre.
[] Touch the START/ONpad.
NOTE:Ira poweroutageoccurredwhiletheoven
wasin Sabbath,theovenwi//automaticallyturn
offandstayoffevenwhenthepowerratums.
Theovencontrolmustbereset.
AdjusttheoventhermostatmDo#yourself!
Youmay find that your new oven cooks differently than the one it replaced. Use your new oven for a few
weeks to become more familiar with it If you still think your new oven is too hot or too cold, you can adjust
the thermostat yourself.
Do not use thermometers, such as those found in grocery stores, to check the temperature setting of your oven.
These thermometers may vary20-40 degrees.
NOTE,"This adjustment will not affect the broiling temperatures. The adjustment will be retained in memory after
apower failure.
[.AKE
TEMP t
To Adjust the Thermostat
[] Touch the BAKE and BROILHI/LO
pads at the same time for 2 seconds
Imtil the display shows SE
[] Touch tile BAKEpad. _Atwo-dioit
number sho_s in the displa).
[] The oxen temperatm'e can be
a(!justed up to (+) 33°F hotter or (-)
35°F coole_: Touch the +pad to
increase the temperature in 1-degree
inci'ei//ents.
[] X_q_en you have made the
a(!jllstment, touch the START/ON pad
to go back to the time of day display:
Use ] Ol.lI" ();ell as VOl.i would
nommllv.
NOTE:Thisadjustmentwillnotaffectthebroiling
temperatures.It w///beretainedlbmemon/after
apowerfai/ura.
Touch the -pad to decrease the
temperatm'e in 1-degree increments.
Thetype ofmargarine will affect bakingperformance!
Most recipes for baking have been developed using high-fat products such as butter or margarine (80% fat). If you
decrease the fat, the recipe may not give the same results as with a higher-fat product.
Recipe failure can result if cakes, pies, pastries, cookies or candies are made with low-fat spreads. The lower the fat
content of a spread product, the more noticeable these differences become.
Federal standards require products labeled "margarine" to contain at least 80% tilt by weight. IxmqiK spreads,
on the other hand, contain less lilt and more water. The high moistm'e content of these spreads affects the
textm'e and flavor of baked goods. For best results with w)m" old filvorite redpes, use mmgarine, butter or
stick spreads containing at least 70% vegetable oil.
12

Careand cleaningofthe range, gecom
Be sure all controls are off and all surfaces are cool before cleaning any part of the range.
If your range is removed for cleaning, servicing or any reason, be sure the anti-tip
device is re-engaged properly when the range is replaced. Failure to take this
precaution could result in tipping of the range and cause injury.
How toRemoveProtectiveShippingFilmand Packaging Tape
Carefully grasp a corner of the protective
shipping fihn with your finge_ and sh)wlv
peel it fi'om tile appliance surfime. Do
not use any shaq) items to remove tile
fihn. Remove all of tile fihn heft)re using
tile appliance fi)r tile fi_st time.
To aSStlI'e no daIllage is done [o tile
finish oI tile product, tile satest way to
remove tile adhesive fl'()m packs@rig tape
on new appliances is an application ot a
household liquid dishwashing detergent.
Apply with a soft cloth and allow to soak.
NOTE: Theadhesivemust beremoved fromall
parts, it cannotbe removedif it isbakedon.
GrooveStem
_ DI[1811rid
ICieargr00ve/
/
Control Knobs
Thecontrolknobsmay be removedfor easier
cleaning.
Make sure tile knobs are ill tile OFF
positions and pull d/era straight off tile
stems fi)r cleaning.
Tile knobs can be cleaned ill a
dishwasher or they may also be washed
with soap and wami: Make sure the insides
of the knobs are (h T before replacing.
Replace tile knobs ill tile OFFposition
to enstli'e proper placeil/ent.
Control Panel
It's a good idea to wipe tile control panel
after each use of tile oven. Use a daInp
cloth to clean or rinse. For cleaning, use
mild soap and water or a 50/50 solution
of vinegar and watei: For rinsing, use
clean water. Polish dry with a sott cloth.
Do not rise abI'asive cleanseis_ sti'ong
liquid cleanei_, plastic scouring pads or
oven cleanei_ on tile control panel--
they will danmge tile finish.
Oven Heating Elements
Do not clean thebakeelementor thebroil
elemen_Anysoil will burn off when the
elementsare heated
To clean tile oven flo(m genfl} liti
tile bake element. Clean with wmm
soap} water,
13

Careand cleaningofthe range.
Oven Shelves
Clean the oxen shelxes with an abrasixe
cleanser or scouring pad. _Mter cleaning,
rinse the sheh'es with clean water and dry
with a clean cloth.
To make the shelves slide more easily,
apply a small amotmt (ff vegetable oil
to a paper towel and wipe the edges _ff
the oven shelves with the paper towel.
Do not spray with Pare '_or other
lubricant sprays.
Porcelain Enamel Cooktop
The porcelain enamel finish is sturdy but
breakable if misused. This finish is acid-
resistant. However, anv eddic toods
spilled (such as ti'uitjuices, tomato or
vinegar) should not be pemfitted to
remain on the finish.
If acids spill on the cooktop while it is
hot, use a (hT paper towel or cloth to
wipe it up right away. X_]_en the sm_i_ce
has cooled, wash with soap and wam_:
Rinse well.
For other spills such as tilt spatterings,
wash with soap and water or cleansing
powdei_ utter the sui_hce has cooled.
Rinse well. Polish with a dry cloth.
Painted Surfaces
Painted surti_(es include the sides and
the drawer fl'ont.
Clean these with soap and water or
a vinegar and water solution.
Do not rise COil/illei'cial oven cleaneis_
cleaning pow(le_s, steel wool or harsh
abrasives on any painted sm_hce.
Oven Vent
The oven is vented through an opening
trader the lett rear sm_hce trait.
Thisarea couldbecome hot during ovenuse.
It is noi_nal fi)r steam to ('olne out of the
\'ent and inoisture inav collect tmdemeath
the coils when the oven is in use.
The vent is important tOTproper air
circulation.
Neverblock this vent with aluminum foil.
/4

ge.com
Porcelain Oven Interior
With proper care, the porcelain enamel
finish on the inside of the oven--top,
bottom, sides, back and inside of the
dom_will stay ne_qooking tot years.
i.et the range cool before cleaning. We
recommend that vou wear robber gloves
when cleaning the range,
Soap and water will nom_ally do the job.
Hea W spattering or spillovers may
require cleaning with a mild abrasive
cleane_: Soap> wet metal pads may also
be used.
Do not allow foodspills with ahigh sugaror acid
content (suchastomatoes,sauerkraut,fruitjuices
orple filling) to ramainon thesurface. Theymay
causea duffspot evenafter cleaning.
Household ammonia may make the
cleaning.job easier. Place ]/2 cup in
a shallow glass or potte_ T container in
a cold oven overnight. The ammonia
flunes will hel I) loosen the burned-on
grease and tood.
If necessai'v, }oil II]_IX' use _111 o%en cleaneE
Follow the package directions.
!i>Donot sprayovencleaner on the electrical
controlsand switches becauseit couU cause
a short circuit and resultin sparking or fke.
iJi::Donotallowa filmfromthecleanertobumup
onthetemperaturesensor--itcouldcausethe
oventoheatimproperly.(Thesensorb located
at thetopoftheoven.)Carafu//ywipethe
sensorcleanaftereachovencleaningbeing
carefulnottomovethesensorasachangein
itspositioncouldaffecthowtheovenbakes.
iJi::Donotsprayanyovencleanerontheoven
door,handlesoranyexteriorsurfaceofthe
oven,cabinetsorpaintedsurfaces.Thecleaner
candamagethesesurfaces.
Hingelock
Pull hinge locks down to unlock.
I
iiii i
Removalposition
Lift-Off Oven Door
The dooris veryheavy. Be careful when
removing and lifting the door.
Toremove the door:
[] Fully open the doo_:
[] Pull the hinge locks down toward
the door frame, to the tmlocked
position. A tool, such as a small
fiat-blade screwdriver; may be
required.
[] Firefly grasp both sides of the door
at the top. Donot lift the door by the
handle.
[] Close door to the door remox d
position, which is halfwa) between
the broil stop position and fifth'
closed.
[] I.ifl door up and out tmtil the hinge
am/is clear ()f the slot.
Toreplace the door:
[] Firefly grasp both sides ot the door
at the top. DOnot lift the door bythe
handle.
[]
[]
[]
[]
_Aith the Bottoro ] ] | Hingearm
door at the edge .][ _ I/I
of slot I
%
same angle as \
the remox d
position, seat the
notch stop of
the hiwm am_
into the bottom
edge of the hinge slot. The notch in
the hinge am/m ust be fifllv seated
into the bottom of the slot.
Fully open the door tmtil it is
parallel to the floo_: If the door will
not flfll) open, the notch stop is not
seated con'ecflx in the bottom edge
of the slot. Repeat step 2 if necessa_a':
Push the hinoeo locks up against the
fl'ont fi'ame of the oxen caxitv to the
locked position.
HineI_ _
Pushhingelocksuptolock.
Close the oxen door. 15

Careand cleaningofthe range.
Oven Light Replacement
CAUTION:Beforereplacingyour
oven light bulb, disconnect the electrical
power to the range at the main fuse or
circuit breaker panel.
Be st/I'e to let the light (o_er and bulb
cool completely.
Toremove the cover."
[] Twist lens counterclockwise about a
qtlarter [tli'n [o i'ei/lo_,e.
Donot removeanyscrews toremovethecover
[] Replace bulb with a 4(Mvatt
appliance bulb or two-i)rong,
halooen_ bulb, as appropriate.
Toreplace the cover:
[] I,ine up tabs oI lens in fl'ont oI tabs
on housing and rotate clockwise to
engage.
I Stopguide
Storage Drawer Removal
Toremove the drawer:
[] Pull the drawer out tmtil it stops.
[] I,ifl the fl'ont of the drawer tmfil the
stops clear the guides.
[] Remoxe the drawe_:
Toreplace the drawer:
[] Place the drmver rails on the guides.
[] Push the drawer back tmtil it stops.
[] Lift the fl'ont of the drawer and
push back tmtil the stops clear the
guides.
[] i,ower the fl'ont of the drmver and
push back tmtil it closes.
/6

ge.com
Be sure the controls are turned to OFFand the surface units are cool before attempting to remove them.
Drip
Cooktop
Lockingtab rim
When properly seated, the locking
tab should lock onto flTecooktop rim
through the notch in flTedrip pan.
Surface Units
To clean tile sm_i_ce units, turn tile
control to tile highest setting t0r a
minute. Tile coils will burn off' any soil.
Toremove a surface unit:
To remove tile dil I) pans for cleaning,
tile surtilce units nlust be removed fit_t.
[] Push tile sm_i_ce unit back toward
the receptacle to fl'ee the locking
tab fl'om file cooktop.
Toreplace a surface unit:
[] Rei)lace tile drip pan into tile recess
in tile cooktop. Make stlre tile
opening in the pan lines up with
the receptacle.
] Insert tile temfinals of tile stm'i_ce
unit through the opening in the
dil I) i)an and into the receptacle.
Locking tab
Receptacle
[] i,ifl tile SUltilce unit about 1 inch
aboxe tile drip pan and pull it out.
Do not l/ft thesurface unit more than I inch.
If youdo, it may not//e flat on the drippan
when youplug it backin.
NOTE: Repeated lifting of tile sm_h(e unit
more than 1 inch above tile drip pan can
pemmnently damage tile receptacle.
[] Push tile surtilce unit in and down
to h)ck tile tab in place so it rests
evenly in tile cooktop.
Do not/?nmersethe surface unitsin l/wids of
anyk/bcL
Do not dean the surfaceunits in a dishwasher
Do not bend thesurface unit plug terminals.
Do not attempt todean, adjust or in any way
repairthe p/ug-/breceptacle.
Drip Pans
Remove tile sm_i_('e units. Then lift out
tile dil I) pans.
Place them in a covered containe_: Add
1/4 cup ammonia and let soak several
hours or overnight. Wash, _inse well
and dry.
Tile dil I) pans max also be cleaned in
a dishwasher:
Clean tile area trader tile drip pans
often. Built-up soil, especially grease,
may catch fire.
Donot coverthe drip panswith foil. Usingfoil so
close to the receptaclecould causeshock,fire or
damageto the range.
Lift-Up Cooktop
Cleanthe areaunderthe cooktopoften. Built-up
soft,especiallygrease,may catch fire.
To make cleaning easier; tile entire
cooktop may be lifted up and SUl)ported
in tile up position.
Support rod Be sure all tile SUltilce units are turned
off before raising the cooktop. The
Be sure all surface units are turned S/IFlilce tlnits and dil I) pans do not need
off before raising the cooktop, to be removed; h()weve_; you may rein eve
one to make raising tile cooktop easier:
A suI)I)ort rod will hold tile cooktop up
while xou clean underneath it.
After cleaning under tile cooktop with
hot, soapy water and a clean cloth, lower
the cooktop. Be careflfl not to pinch
your fingers.
17

Beforeyoucall forservice...
Troubleshooting -tips
Save time and money! Review the charts on the following
pages first and you may not need to call for service.
Possible Causes What ToDo
Surfaceunitsdonot
workproperly The surface milts axe
not plugged in solidly.
The surface unit controls
improperly set.
The drip pans are not set
securely in the cooktop.
•With the controls off, check to make sure the surii_ce
unit is plugged completely into the receptacle.
•Check to see the correct control is set for the StliS[ilce
unit w)u are using.
• With the controls off, check to make sure the drip
pan is in the recess in the cooktop and that the
opening in the pan lines up with the receptacle.
Controlsignals after You forgot to enter a•Press the BAKEpad and desired temperature.
entering cooking time bake temperature.
Fooddoes notbake Oven controls improperly set. •See the Using the oven section.
orroastproperly Shelf position is incorrect •See the Using the oven section.
or the shelf is not level.
Incorrect cookware or •See the Using the oven section.
cookware of improper
size being used.
Oven thermostat needs •See the Adjust the oven thermostat--Do it yourself[
adjustment, section.
Clock andtimerdo Plug on range is not completely • Make sure electrical l_lug, is I)lugged,, into a live, properly
not work i_serted in the electrical outlet, grotmded outlet.
A fuse in your home may • Replace the fl/se or reset the circuit breaker:
be blown or the circuit
breaker tripped.
Oven controls improperly set. • See the Using the clock and timer section.
Ovenlight does Light bulb is loose or defective. •Tighten or replace the btflb.
not work Switch operating light • Call fin" service.
is broken.
Fooddoes not Oven door not closed. • See the Using the oven section.
broil properly Oven controls improperly set. • Make sure you press the BROIL HI/LOpad.
Improper shelf position •See the BroilingGuMe.
being used.
Cookware not suited • For best restdts, tlse a l)au designed, tor broiliu_
for broiling.
In some areas the power
(voltage) may be low.
• Preheat the broil element fin" 10 minutes.
•Broil for the hmoest_, period of time recommended in
the Broiling Guide.
18

ge.colTI
Oventemperaturetoo
hot ortoocold
Possible Causes
Oven thermostat
needs adjustment.
What ToDo
•See the Adjust the oven thermostat--Do it yourself!
section.
Oven will not work Plug on range is not •Make stu'e electrical }_lug, is I>lugged,, into a live,
completely inserted in properly grounded outlet.
the electrical outlet.
A fuse ill your hmne may • Replace the fl/se or reset the circuit bl'eakeL
he blown or the circuit
breaker tripped.
Oven con_'ols improperly set. • See the Usingthe oven section.
Storage drawer Rear drawer support is •Reposition the drawer. See the Storage Drawer
is crooked on top of the guide rail. Removaliustructious in tile Care and cleaning of your
range section.
Storage drawer Power cord may be • Reposifiou the drawer and power cord. See tile
Won't close obstructing drawer Storage Drawer Removal instructions in the Care and
ill the lower hack cleaningofyourrangesection.
of the range.
Rear drawer support is •Repositiou the drawer. See the Storage Drawer
on top of the guide rail. Removaliustructious in the Care and cleaning of your
range section.
"Crackling" or This is the somld of the • This is uoi'mal.
"popping " sound metal heating and cooling
durhlg the cooking functions.
"F- anda number You have a ftmcfion • Press the CLEAR/OFFpad.Put the oven back into
or letter"flash error code. ()perati_)u.
in the display If the function code repeats. •Disconnect all power to the range fin" at least 30
seconds and then reconnect powe_: If the flulction
elTOl" code l'epeats, call fol" sel'vice.
Displayflashes "bAd" The installed cmmection •(ion(act installer or electrician to correct miswire.
then "linE" with a from the house to the mlit
loudtone is miswired.
Displaygoesblank Afuse in your home may be •Replace the ti/se ()r reset the drctfit breakel:
blown or the circuit
breaker tripped.
The clock is turned off from •See the Using the clock and timer section.
showing in the display.
Displayflashes Power failure. •Reset the dock.
Unable toget the Oven control pads were •The BAKE and BROILHI/LOpads must be pressed
displayto show "SF" not pressed properly, at the same tiIne ;115(1 held fol" 3 se( ouds,
Power outage, Power outage or surge. •Reset the clock./f the (),,'ell was ill use, yot! Inust reset
clock flashes it by, l)ressiug, the CLEAR/OFFpad,setting the clock
and resetting any cooking flulctiou.
79

Accessories.
Looking For Something More ?You can find these accessories and many more at ge.com, or call 800.626.2002
(during normal business hours). Have your model number ready.
Surface Elements & Drip Pans Oven Racks Broiler Pan
Oven Elements Light Bulbs Knobs
Tired of discolored racks? Wishing you had extra-hea_y.dul?, oven racks?
NOW AVAILABLEfor your range:
GE's innovative porcelain-coated oven racks!
•Hea_ T Dul)_
•Durable
Visit ge.com for more information.
20
Other manuals for JSS28
4
Other GE Range manuals