GE Profile JD968 User manual

_&com
©
Safety Instruaions ......... 2-5
Operating Instructions
Baking or Roasting .......... l l
Broiling Guide .............. 12
Canning .................... 9
Clock and Timer . ........... 13
Control I,ockout ............ 13
Convection .............. 16-20
Cookware ................. 8, 9
Oven .................. l 0-28
Probe ..................... 15
Proofing .................. 21
Sabbath Feature ............. 98
Self-Cleaning ............ 93, 94
Special Features .......... 95-27
Surface Units ............. 6, 7
Thermostat ................ 92
Timed Baking & Roasting ..... 14
VVarming .................. 21
Care and Cleaning
Control Panel .............. 29
Door . .................... 30
Floor . .................... 31
Glass Cooktop ........... 34, 35
tgmobs .................... 29
Light Bulb ................. 31
Packaging Tape ............. 29
Racks ..................... 31
Storage Drawer ............. 32
Surfaces ................... 33
Vent ..................... 29
Troubleshooting Tips .... 36-39
Consumer Support
Consumer Support . . . Back Cover
Product Registration ...... 41,42
_4'arranty .................. 43
Write the model and serial
numbers here:
Model#
Serial #
You can find them on a label
behind the open oven door
on the lower left corner of
the range ti'ame. 49-80498 07-07 JR

iMPORTANTSAFETYiNFORMATiON.
READALLINSTRUCTIONSBEFOREUSING.
For your safety, the information in this manual must be followed to minim)e the risk of fire, electric
shock, or to prevent property damage, personal injury, or loss of life.
2
a, WARNINGANti-TIPDEVICE
All ranges
Slide-In
Ranges:
Drop-In
Ranges:
can tip and injury couldresult.
Topre vent accidental tipping of the range, attach it to the wall and floor by installing the
Anti--tip device supplied.
Tocheck if the device is installed and engaged properly, remove the storage drawer
and inspect the rear leveling leg. Make sure #fits securely into the slot.
Toprevent accidental tipping of the range, secure the attached Anti--17pbracket, under
the rear countertop.
Tocheck if the device is installed and engaged properly, lower the oven door and gently
apply medium force at the handle end until movement of the range is detected. Continue
pressing until the anti-tip bracket is engaged and movement stops. A small amount of
movement is acceptable at the back of the range top but #should be stable and not tip
once the anti-tip bracket is engaged.
If you pull tile range out fiom tile wall %I any reason, make sure tile device is properly
engaged when you push tile range back against tile wall. If it is ,lot, there is a possible iisk of
the rang_ tipping oxei and causing ii_n Uif you or a child stand, sit or lean oil an open door
Please refer m the Anti-Tip device infollnation in this manual. Failure m take this precaution
could result ill tipping of tile rang_ and ii_ni>
IMPORTANTSAFETYNOtiCE
The California Safe Drinking Water and ToxicEnforcement Act requires the Governor of California to
publish a list of substances known to the state to cause cancer, birth defects or other reproductive
harm, and requires businesses to warn customers of potential exposure to such substances.
The fiberglass insulation in self-clean ovens gives off avery small amount of carbon monoxide during
the cleaning cycle. Exposure can be minimized by venting with an open window or using a ventilation
fan or hood.
SAFETYPRECAUtiONS
When using electrical appliances, basic safety precautions should be followed, including the following:
_{_;Use this appliance only for its intended
• (
pulpose as descnbed in this )_mer s
Manual.
_{_:Be sure your appliance is properly
installed and grounded by a qualified
installer ill accordance with tile proxqded
installation instructions.
;fi:,iHme tile installer show you the location of
tile circuit breaker or fllse. Mark it for easy
reference.
_t{:_Do not attempt to repair or replace ally
part of your range unless it is specifically
iecommended ill this manual, All other
servicing should be refeITed to a qua]ified
technician,
_: Before perfot_ning any service, disconnect
tile range power supply at tile household
disu_ibufion panel by iemoving tile fllse or
switching off tile citvuit breaken
;_?:':Do not leaxe children alone---<;hildren
should not be left alone or unattended in
all area where all appliance is ill use. They
shou]d nex_r be allowed m sit or stand oil
any part of file appliance.
q_{_;Do not allow anyone to climb, stand or
hang oil tile door; storage drawer or
cookmp. They could damag_ file rang_
and even tip it ovel; causing sex>re
persona] ii_m T.

_e.com
AWARNING'!
SAFETYPRECAUTIONS
Donot operate the oven or cooktop controls if the glass is broken. Food splatter or cleaning solution
may penetrate a broken control panel or cooktop and create a risk of electrical shock. Contact a
qualified technician immediately should your glass control panel or cooktop become broken.
_fi:,iDo not store flammable materials in an
oven or near tile cooktop.
CAUTION:temsofinterestto
children should not be stored in cal)inets
aboxe a range or on tile back of a range--
children climbing on the range to reach
items could he seiiously i_jured.
_i:,:Never wear loose-fitting or hanging
garments while using tim appliance.
Be careflll when reaching for items stored
o_er the range. Flammable mateiial could
he ignimd if brought in contact wifl_ hot
surPace units or heating elements and may
cause sex>re bnrlls.
_i:,iUse only d Upot holders--moist or damp
pot holders on hot snrtaces may result in
hums from smam. Do not let pot holders
touch hot surface units or headng
elements. Do not use a towel or odler
hulky cloth in place of pot holders.
_i:,iDo not use wamr on grease fires. Nexer
pick up a flaming pan. Turn die conuols
off. Smother a flaming pan on a surfi_ce
unit 1)y coxeiing the pan complemly with
a well-fitting lid, cookie sheet or fiat ua>
Use a mulfiq)urpose dtT chemical or
%am-type file extinguisher
Flaming grease outside a pan can be put
out hy covering it with baking soda oi,
if available, by nsing a multi-puq)ose d_T
chemical or foam-type fire extinguisher
Flame in tile oxen can be smofllered
completely by closing tile o_en door
and ulming the o_en off or by using
a mulfi-puq)ose dUchemical or
foam-type fire extinguisher
_?{:_For your safety, nexer use your appliance
for wam_ing or heating tile room.
Do not let cooking grease or other
flammable mateiials accumulate in or
near tile range.
Do not touch file suitZace units, file
heating elements or the inmiior surface
of the oxen. These surfimes may be hot
enough to hum exen though they are
dark in colon During and after use, do not
milch, or let clothing or other flammable
mamrials contact the surPace units, areas
nearby the surPace units or any inmrior
area of the oxen; allow sufficient time for
cooling first.
Potentially hot snrfaces include the
cooktop, areas facing the cooktop, oxen
xent opening, surPaces near the opening,
crevices around tile oxen door
REMEMBER:The inside surPace of tile oven
may be hot when tile door is opened.
Do not store or use combustible mateiials,
gasoline or other flammable vapors and
liquids in tile vicinity of this or any other
appliance.
Kee I) the hood and gTease filters clean
to maintain good xenting and to axoid
grease fires.
Teach children not to play with tile
controls or any other part of the range.
_: Always kee I) dish towels, dish cloths, pot
holders and other linens a satb distance
fi'om yonr range.
_i:,:Always kee I) wooden and plastic utensils
and canned food a safe distance flom
your range.
_i:,:Mways kee I) comhustible wall cox eiings,
curtains or drapes a safe distance fiom
your range.
COOKMEATANDPOULTRYTHOROUGHLY...
Cookmeat andpoultry thoroughly--meat toat least an INTERNALtemperatureof 160°Fandpoultry
to at least anINTERNALtemperatureof 180°ECookingto these temperaturesusuallyprotects against
foodbomeillness. 3

iMPORTANTSAFETYiNFORMATiON.
READALLiNSTRUCTIONSBEFOREUSING.
4
RADIANTSURFACEUNITS
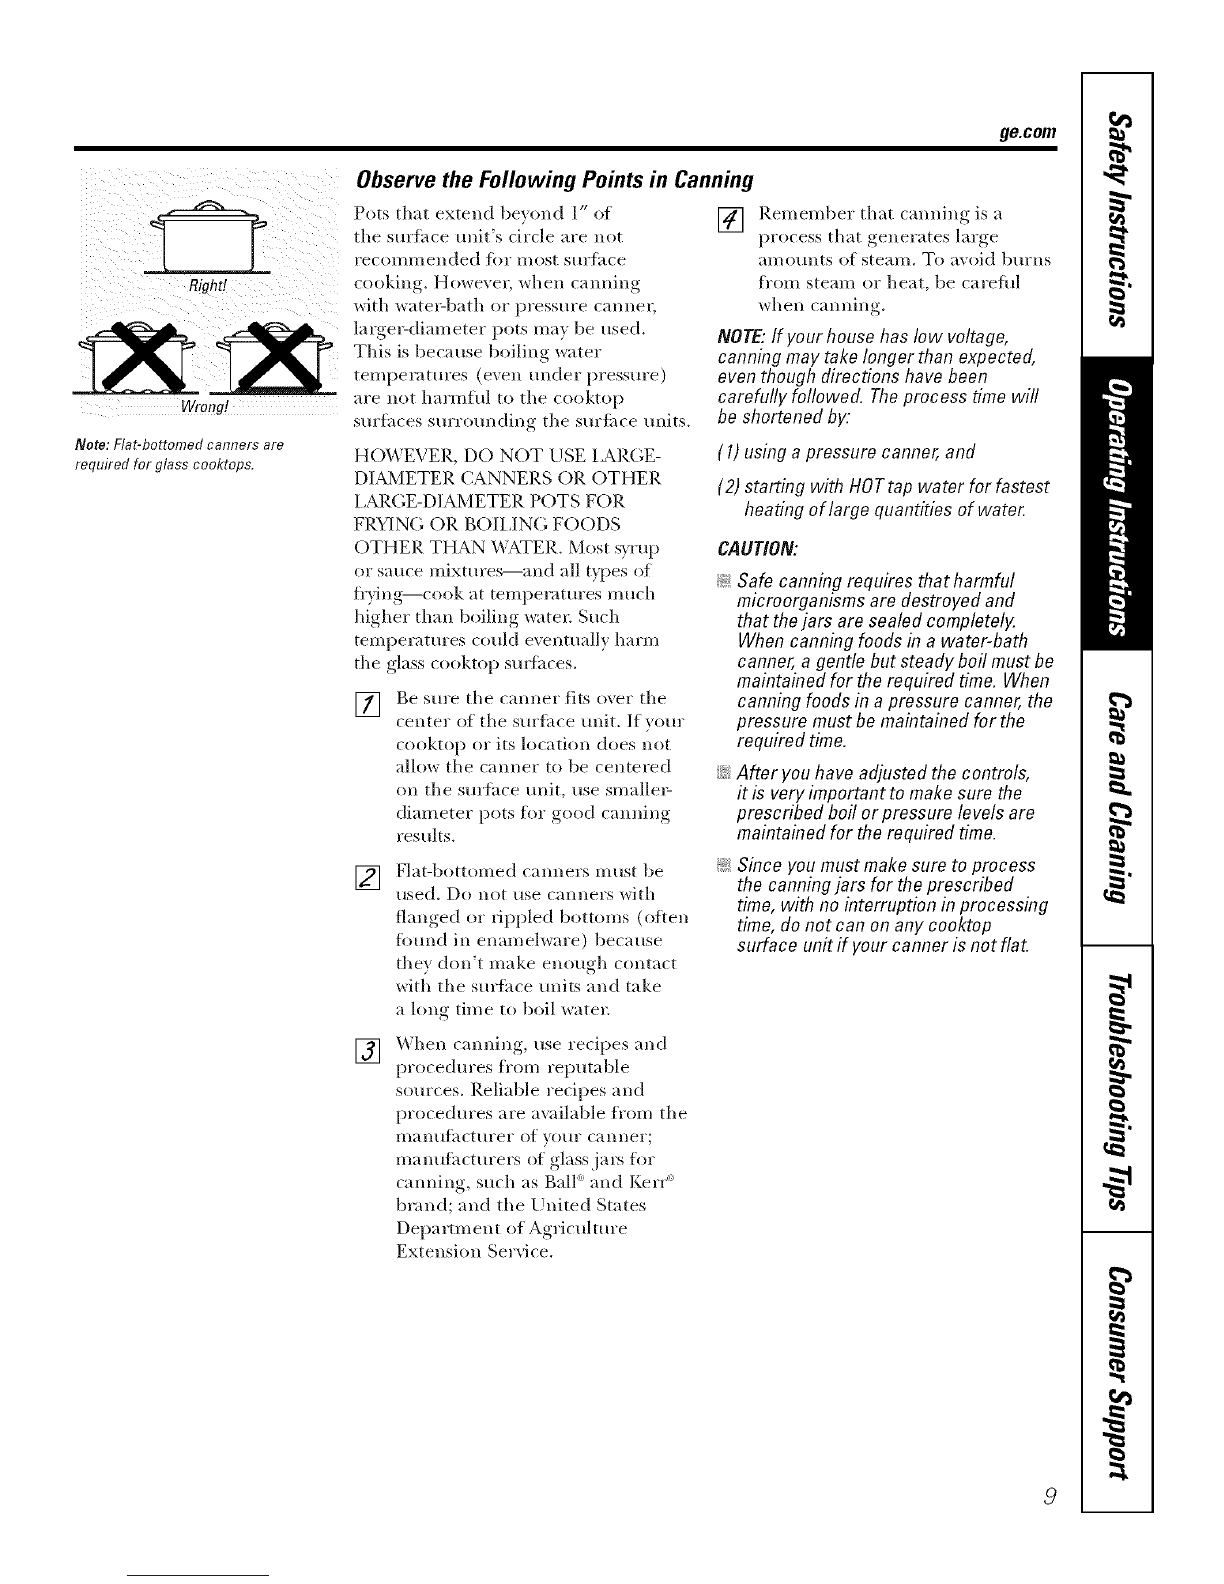
Use proper pan size--select cookware having flat bottoms largo enough to cover the surface unit
heating element. Theuse of undersized cookware will expose a portion of the surface unit to direct
contact and may result in ignition of clothing. Proper relationship of cookware to surface unit will
also improve efficiency.
;_i:,iNever leax_ tile surfitce units unattended
at higtl heat settings. Boiloxers cause
smoking and greasy spillo_ers that may
catch on fire.
Only certain types of glass, glassAeramic,
earthenware or other glazed containers are
suitable for cooktop service; others may
hreak because of the sudden chang_ in
temperature.
To minimize the possibility of bnI_lS,
ignition of flammahle mamrials and
spillage, the handle of a container
should be turned toward the cenmr of
the range withont exmnding oxer nearby
smPace units.
_fi:,:Always mrn file surface units off before
removing cool<ware.
_?_::When preparing flaming foods under
the hood, tutti file fltn on.
_]_;:Use care when touching the cooktop. The
glass sur£_ce of the cooktop will retain heat
after the controls have been turned off'.
_;:Kee I) an eye on foods being flied at higil
or medinm high heat settings.
_;:Foods for fEving should be as dI_' as
possible. Frost on flozen foods or moisture
on flesh foods can cause hot lat to bubble
up and oxer the sides of the pan.
Use little flit for effecfixe shallow or deep
tzatflTing. Filling d_e pan too flfll of/ant can
cause spilloxers when food is added.
If a combination of oils or fiats will be used
in flTing, stir togedler before heating,
or as flits melt slowly.
;_?Always heat tZatslowly, and watch as it heats.
q_{_;Use a deep t:at them/ometer whenever
possible to piexent ox>rheafing tZatbeyond
the smoking point.
_;:Avoid scratching the glass cooktop. The
cooktop can be scratched wifl) imms such
as slim]) instruments, tings or oilier
jeweh T, and rivets on clothing.
Large scratches or impacts to glass doors
or cooktops can lead to broken or
shatmred glass.
Do not operate fl)e radiant surPace units if
the glass is broken. Spilloxers or cleaning
solution m W peneuam a broken cooktop
and cream a risk of electrical shock.
Contact a qualified mchnician immediately
should your glass cookmp become broken.
Nexer use the glass cooktop smthce as a
cntfing board.
Do not place or store items that can melt
or catch fire on the glass cooktop, ex>n
when it is not being used.
_;:Be careflfl when placing spoons or odler
sdrfing utensils on glass cooktop smthce
when it is in use. They may become hot
and could cause broils.
Clean file cooktop with cant.ion. If a wet
spong_ or clod/is used to wipe spills on a
hot sniiCace unit, be careflfl to ax_id steam
hums. Some cleaners can produce
noxious flnnes if applied to a hot surface.
NOTE: VVerecommend that you moid
wiping any surface unit areas unul they
have cooled and the indicator light has
g_ne off: Sugar spills are the exception to
this. Please see the Cloaning tho glass
cooktop section.
E:,:When the cooktop is cool, use only the
CERAMA BRYTE ¢'_Ceramic Cooktop
Cleaner and the CERAMA BRYTE
Ceramic Cooktop Cleaning Pad to clean
the cooktop.
_;;To axoid possible damage to d)e cooking
surface, do not apply cleaning cream to
the glass surthce when it is hot.
q_{::M'ter cleaning, use a diT cloth or paper
towel to remox_ all cleaning cream residue.
_;:Read and follow all instructions and
warnings on the cleaning cream labels.

ge.com
WARNING!!
OVEN
Stand awayfrom the range when opening the oven door. Hot air or steam which escapes can cause
bums to hands, face and/or eyes.
E:,IDo ,lot heat unopened food containers.
Pressure could build up and file container
could burst, causing all il_ury.
_i:Kee I) tile o\en \.ent unobstructed.
_i_Kee I) tile ox.en flee flom gTease buildup.
_{;;Place the ox.en rack ill tile desiIed position
while file oven is cool. If racks must be
handled when hot, do not let pot holder
contact file heating elements.
E:,:'_A'henusing cooking or roasting bags in
tile oven, fbllow tile manufactmer's
diIecdons.
E:,IDo not use the ox.en to dlT newspapers.
If ox.eflleated, flley can catch on fire.
_{_;Do not use tile oven for a storage area.
Imms stored ill all OX.encall ignim.
_{;;Do not leax.e paper products, cooking
umnsils or food in file oven when not
ill use.
Do not use aluminun] foil to lille
oxen l)ottoms. Improper installation
of aluminum foil may result ill a risk
of electric shock or fire.
E:,:Pulling otlt the rack to tile stop-lock is a
comenience ill lifting heax T foods. It is also
a precaution against burns flom touching
hot smfi_ces of tile door or oxen walls.
SELF-CLEANINGOVEN
Do not use oven cleaners. No commercial oven cleaner or oven liner protective coating of any kind
should be used in or around any part of the oven. Residue from oven cleaners will damage the inside
of the oven when the self-clean cycle is used.
_]{;_Do not clean the door gasket. Tile door
gasket is essential for a good seal. Care
should be token not to rub, damag.e or
mox.e tile gasket.
_:;Before self-cleaning tile o_.en, i.emo_.e
shiny, sil_.er-colored o_.en racks (on some
models) and all other cookwm.e.
_?{:_Be sure to wipe up excess spillage befbre
starting tile self-cleaning operation.
_?{:_If dm self-cleaning mode malfunctions,
turn tile ox.en off and disconnect tile
power supply. Hax.e it serviced by a
qualified technician.
_?{:_Clean only parts lismd ill this Owner's
Manual.
READANDFOLLOWTHISSAFETYINFORMATIONCAREFULLY.
SAVETHESEINSTRUCTIONS

Usingthesurfaceunits.
NOTE: Throughout this manual, features and appearance may vary from your model.
How to Set
HI
1 9
2 8
3 7
4 6
Be sure ou Turl7 TlTe COlTTrol KITOD TO
OFFwhenvoufinishcooking.
Push the knob in and turn in either iJi::glow until the unit iscoded toapproxtYnate/y
direction to the settim, xou want. 150°F
At both OFFand H/tile control clicks
into )osition Ymma_ hearslight
clicking sotmds during cooking,
indicating tile control is keel)hwb tile L0 9
po>_er level }ou set. i : 8
cool<top, Mll glow *dlen am radiant
element is turned on. It M]I remain
on tmdl tile sm'fime is cooled to
appx oximately 150°E
Hot surface indicator light will:
!_:comeon when the unit ishot to the touch.
_stay on evenafter the unit is turnedoff
4 5 ¸
Tile WARMsetting on tile right REAR
sm_i_ce refit keeps ah'eady heated fi)od
WalI/l tlntil ready to serve. Do not rise to
heat cold food.
SET:OFF
WARMING ZONE GUIDE
SETI'ING FOOD
1(Low) Bread/Pastries
2(Medium) Chocolate/Butter
2(Medium) Sauces,Stews,
CreamSoups
2(Medium) Vegetables
3(High) Soups(liquid)
3(High) Teaor Coffee
The Warming Zone Guide is for
reference only and the SKI-rING
that you need will depend on the
amount and type of food, the
starting temperature of the food
and the length of the holding time.
Using the Warming Zone
Tile WARMING ZONE,located in tile
center of tile glass cooktop SUlti_ce,
will kee I) hot, cooked food at serving
teml)elamre. Mwa}_s start with hot food.
Do not use to heat cold food. Plating
tmcooked or cold food on tile WARMING
ZONEcould result in fi_od-borne illness.
[] Touch tile WARMING ZONE
SET'OFF pad.
[] Touch tile ntunber pads 1, 2 or 3
to select low (1), medimn (2) or
high (3) wamfing setting.
[] Touch tile START pad.
To turn tile WARMING ZONE ofl; touch
tile WARMING ZONE SET'OFF pad until
WARMERcfisappeals fl'oln tile display:
For best results, all foods on tile
WARMING ZONEshould be covered with
a lid or ahmfinum foil. \Allen wamfing
pastries or breads, tile cover should be
vented to allow inoismre to escape.
Mways use pot holders or oven mitts
when removing food fl'om tile WARMING
ZONE, since cookware and plates will
be hot.
CAUTlON: oo notwarm foodonthe
WARMING ZONE for more than two hours.
NOTE"The warming zone will not glow red like
the cooking elements.
HOTwill be displayed when tile glass
sudace is hot and will relnain on tmtil
tile smti_ce is cool enough to touch.
NOTE"Lower settings may not heat the glass
surface enough to cause the HOT indicator light
to come on.
Awamfing zone ONlight will glow when
tile unit is oil.
_DonotuseplasticwraptocoverfoodPlastic
maymeltontothesurfaceandbeven/difficult
toclean.
_Useonlycookwarerecommendedfor
top-of-rangecooking.
FRONT _BRIDGE
e
_t4 41
O0
@ 0 LO LO
Using the Bridge Surface Un#
To rise tile b_idge Stlltilce tlnit, ttlrn tile
left ti'ont control knob to tile BRIDGE
settings.
For flfll bridge SUltilce unit operation,
also ttlrn on tile left rear S/IYJ;Ice tlnit.
To use only tile fl'ont surfiace unit turn
tile control knob to tile FRONTsettings.

ge.com
Sma!l surface Large
unit setting surface
_Unitsetting
I ii i
© ( oo
,_ FRONT 0 0
Mediumsurface
unitsetting
Using the tri-ring surface unit
Theright front Tri-Ringsurfaceunit has 3sizes to
select fromso youcanmatch thesize of the unit
to the sizeof thecookware youare using.
To use the large sm_i_(-e unit, press
and mrn the right fl'ont control knob
clockwise to @, stopping at the desired
setting, This will acti\:_te the entire
heating area,
To use the medium smthce trait,
press and turn the fight ti'ont control
knob clockwise to @, stopping at the
desired setting. This will activate the
medium-size heating area.
To use the smallest smtace trait,
press and ttlI'n the right ti'ont control
knob clockwise to @, stopping at the
desired setting. This will activate the
smallest, inside heating area.
Never cook directly on the glass.
Always use cookware.
Always place flTepan in the center of
flTesurface unit you are cooking on.
About the radiant surface units...
The radiant cooktop teatm'es heating
units beneath a smooth glass surfilce.
NOTE:A sh)ht odorIs normalwhen anew
cooktopis usedfor the fkst time. It iscausedby
the heating of new partsand lesu/atlegmatena/s
andwill disappearin a short time.
NOTE:Onmodelswith hght-coloredglass
cooktops,it is normal forthe cookingzonesto
changecolor when hot or coo/legdown. Thisis
temporaryand will disappearasthe glasscools
to room temperature.
The smthce trait will c) cle on and off to
maintain "_om"selected control settin ,
It is safe to place hot cookware on the
glass surii_ce men when the cooktop
is cool.
Even after the smti_ce traits are tin'ned
ott; the glass cooktop retains enough
heat to continue cooking. To avoid
overcooking, reillove l)_lliS 1['1"()ii1 the
suiiilce units when the food is cooked.
Avoid placing anything on the smti_ce
trait tmtil it has cooled complemly.
NWaterstales {mineraldeposits)areremovable
using the cleaningcreamor furl-strengthwhite
vinegar
_Use of window cleanermay leavean
iridescent film on thecooktop. Thecleaning
cream will removethis discoloration.
_: Don'tstoreheavyitemsabovethecooktop.
If theydropontothecooktop,theycancause
damage.
::J_::DonotusethesurfaceasacuttingboarcL
Do not slide cookwara across the
cooktop because it can scratch the
glass--the glass is scratch-resistant,
not scratch-proof.
Temperature Limiter
Every radiant surfi_ce trait has a
temperatm'e limited:
The temperatm'e limiter protects the
glass cooktop fl'om getting too hot.
The temperatm'e limiter ma) cycle the
tlnits Off for a tillle if:
!;> Thepan boilsdry
iJi::Thepan bottomIs not fiat.
iJi::Thepan ts off center
!;> Thereisno panon the uni_

Selectingtypesofcookwam.
Thefollowing information will help you choose cookware which will give good performance onglass cooktops.
/[/
Checkpansforflatbottomsby
usingastraightedge.
Stainless Steel:
recommended
Aluminum:
heavywe/_lhtrecommended
Good (onductivit_. _dmninmn residues
sometinles appear as scratches oil tile
cooktop, but call be removed if cleaned
immediately. Because of its low melting
point, lightweight aluminum shonkl not
be used.
CopperBottom:
recommended
Copper may leave residues whicil can
appear as scratches. Tile residues can be
_emo\ ed, as long as tile cooktop is
cleaned immediately. Howevec do not let
these pots boil dry. Oveflleated metal call
bond to glass cooktops. An overheated
copper bottom pot will leaxv a residue
that will pemmnently stain the cooktop
if not rein eyed imm ediately.
Glass-Ceramic:
usable,but not recommended
Poor pe_fi)m_imce. May scratch tile
smtime.
Stoneware:
usab/e,but not recommended
Poor pe_fimnance. May scratch tile
sm_ime.
Home CanningTips:
Be sure tile c;mner is centered over tile
smfime unit.
Make sure the canner is flat on the
bottom.
Use redpes and pFocedlll'es flOI/l
reputable sources. These are axzdlable
fi'om manufimmrers such as Ball' and
Kerr' and tile Department of Agriculture
Extension Se_Mce.
To pre\ ent btlFns il"Olll steal// of heat,
use caution when canning.
Pans with rounded, curved, ridged
or warped bottoms are not
recommended.
Porcelain Enamel-Covered Cast Iron:
recommended
_s long as tile cookwm'e is covered
coml)letely with porcelain enamel, this
cookware is i'ecoillI//ell(le(]. Ca/ltion is
I'ecoll)I/lended tk)/" cast iron cookware
that is not completely covered with
smooth porcelain enamel, since it may
scratch tile glass ceramic cooktop.
Wok Cooking
Werecommendthat youuse onlya flabbo_omM
wok. Theyareavai/aMeat yoa iota/retaii store.
Do not rise i'otlnd-bottoii1 WO_S. _)/l
could be seriously burned if the wok
tipped oveI:
Use only fiat-bottomed woks.
8

ge.com
Observethe Following Points in Canning
Pots that extend beyond 1" of
___ the stlrfilce Hllit's circle are not
_ reroHllllellded ]_()r Ill(is[ s{lr]_lce
Righfl cooking. Howevel; when tainting
with ware>bath or l}ressure canner
large>diameter pots may be used.
This is because boiling water
temperatures (e;en under pressure)
Wrong! are not harmful to the cooktop
Sttl'fi_cessttrro/tl/dillg tire sur_irce units+
Note: Flat-bottomed canners are
required for glass cooktops, HOWEVER, DO NOT USE I,ARGE-
DIAMETER CANNERS ()R OTHER
LAI_.GE-DIAMETEP. POTS FOR
FRYING OR BO/LIN(; FOODS
OTHER THAN WATER, Must syrup
or sauce mixtures--and all types of
fi'ying--cook at tempelatures much
higher than boiling watel: Such
temperatures coukl e_entually harm
tire glass cooktop smfiices.
] Be sm'e tlre cromer fits over tire
center of the sm'fi_ce unit. If your
cooktop or its location does not
allow tlre cam_er to be centered
on tlre surfiice unit, use smallel _
diameter pots for good cmming
results.
[] Remember that canning is a
process that generates large
aillOtllltS of steaIll. To avoid btlrlls
fl'om steam or heat, be carefld
when canning.
NOTE:If yourhouse has low voltage,
canning may take longer than expected,
even though directions havebeen
carefufly followed, Theprocess time will
be shortened by'.
(1) using a pressure canner, and
(2) starting with HOTtap water for fastest
heating of large quantities of wate_
CAUTION:
_: Safe canning requires that harmful
microorganisms are destroyed and
that thejars are sealed completely.
Whencanning foods in a water-bath
canner, a gentle but steady boil mustbe
maintained for the required time. When
canning foods in a pressure canner, the
pressure mustbe maintained for the
required time.
::Ji::After you have adjusted the controls,
it is very important to make sure the
prescribed boil or pressure levels are
maintained for the required time.
[] Flat-bottomed carolers must be
used. Do llot rise callllers with
flanged or tippled bottoms (oiten
found in enamelware) because
they don't make enough contact
with the surihce milts and take
a l<mg time to boil water.
_: Since you mustmake sure to process
the canningjars for the prescribed
time, with no interruption in processing
time,do not can on any cooktop
surface unit if your canner isnot flat.
[] _hen c'mnim,_, use. recipes and
procedm'es from reputable
sources. Reliable recipes and
procedures are a_dlable fl'om the
lllantl_;rcttlrer of your Callller;
manuthcturers of glass jars for
camping, such as Ball' and Kerr"
brand; and the United States
Department of Agriculture
Extension Se_Mce.

Usingtheovencontrols.
(Throughout this manual, features and appearance may vary from your model.)
Features and appearance may vat}4
--0
10
OvenControl Clockand TimerFeaturesandSettings
BAKE Pad
Touch to select tile bake flUlCfion. OVENLIGHTON/OFFPad
Touch to turn tile o',en light on or oft.
BROIL HI/LOPad @
Touch to select tile 1)roll flUlCfion.
CONVECTIONBAKEMULTI/1RACKPad
Touch to select baking with tile con',ection
fiulction.
CONVECTIONROAST Pad
Touch to select roasting with tile
conx ecti(in ttlnctioil.
PROOFPad
Totl(h to select a wann environillent tlseltil
for IiSiIlg yeast-leaxened products.
STARTPad
Must be touched to staIl }lIl} cooking or
cleaning flinction.
D&play
Shows tile time of day, oven tenlperature,
whether tile oven is in tile bake, broil or
self:cleaning nlode and tile times set for
tile [iIller or atltOIllatic ()veil opei'ations.
If "F- and a number or letter" flash in the display and
the oven control signals, this indicates a function
error code. Touchthe CLEAR/OFFpad Allow the ovento
coolfor onehour Put the ovenbackinto operation. If the
function errorcoderepeats,disconnect thepower to the
ovenand call forservice.
If your oven was set for a timed oven operation
and a power outage occurred, the dock and all
programmedfunctions must bereset
The time of day will flash in the display when there
has been apower outage.
SELFCLEANLO/STDPad
Touch to select self:cleaning tml('fion. See
tile Using the self-cleaning oven section.
0
0
0
DELAYSTARTPad
Use along with COOKTIME or
SELFCLEANLO/STD pads to set tile oven
to start and stop autoniaticallv at a time
VO/I set.
COOKTIMEPad
Totl('h and then totl('h tile ntli/lber pads to
set tile }lIlIO/Int o][ tillle Vail W}lIlt FOllY iliad
to cook. Tile oven will Si/lIt Off w]'mn tile
cooking tiIne has mn out.
CLEAR/OFFPad
Touch to cancel ALL oven operations
except tile clock and tiIneI:
CLOCKPad
Touch before setting tile clock.
Number Pads
Use to set anv filn(-tion I'eqtliIJng ntlll/bei's
such as tile tiIne _ff day Oil tile clock, tile
tiIneI; tile oven tenlperature, tile internal
toad ten/perature, tile start tiine and
length (:4operation for finied baking
and self:cleaning.
KITCHENTIMER ON/OFFPad
Touch to select tile tiiner teatuI'e.
PROBEPad
Touch when using tile pI'obe to cook load.
WARM Pad
Touch to kee I) cooked foods wamI. See tile
How to Set the Oven for Warming section.
WARMING ZONE Pad
Tou('h this pad when using tile center
sui'lilce unit to keep load waml until ready
to seiwe.

Usingthe oven. gecem
Toavoid possible bums, place the racks in the desired position before you turn the oven on.
Theoven has 7rack positions.
Before you begin...
The racks have stops, so that when placed
correctly on the supports, they will stop
before coming completely out, and will
not tilt.
_,_]/eil placing and removing cookware,
pull the rack out tmtil it stops.
The bake heating element is under the
oven floo_: Do not place toods on the
oven bottoii/ _'or cooking.
Toremove a rack, pull it toward you,
tilt the ti'ont end up and pull it out.
Toreplace, place the end of the rack
(StOl)-loclcs) on the support, tilt up the
fl'ont and push the rack in.
CAUTION:Whenyouarausingthe
rackin the lowest position(,4),youwill needto
usecaution whenpulling the rackout We
recommendthat youpuff the rackout several
inchesand then,using two pot holders,puff the
rackout by ho/dingthe sidesof it Therackis low
andyou couldbe burnedif youplace yourhand in
the middleof therackand pu// a// the way out Be
verycarafu/ not to burnyour handon the door
when using therack in the/owestposition (A).
How to Set the Oven for Baking or Roasting
[] Touch the BAKE pad.
[] Touch the mmfl)er pads to set
the desired teml)eratm'e.
[] Touch the STARTpad.
[] Check fi)od fi)r doneness at
minim um time on recipe. Cook
longer if necessaD':
[] Touch the CLEAR/OFFpad when
cooking is complete.
TypeofFood Rack Position
Frozenpies(oncookiesheet) CorD
Angelfoodcake A
Bundtorpoundcakes BorC
Biscuits,muffins,brownies, CorD
cookies,cupcakes,
layercakes,pies
Casseroles CorD
Turkey A
NOTE:A coolingfanmayautomaticallyturnon
andoff tocoolinternalparts.Thisisnormal,and
thefanmaycontinuetorunevenaftertheoven
in turnedoff.
If baking fi)ur cake layers at file same time,
place two la)'e_ on rock B and two layers on
rack D. Stagger I)ans on the rack so one is
not direct]} above the othe_:
Do not place foods directly on the
over floor,
Preheating and Pan Placement
Preheat the oven if the recipe calls fiw it.
Preheating is necessary tot good results
when baking cakes, cookies, l)ast_T and
breads.
Topreheat,settheovenatthecorrecttemperature.
Thecontrolwillbeepwhentheovenispreheated
andthe&splaywillshowyourset temperature.
Thiswilltakeapproximately15-20minutes.
Baking results will be better if baking
pans are centered in the oven as much as
possible. If baking with more than one
pan, place the pans so each has at least 1"
to 1½" of air space arotmd it.
Aluminum Foil
Do not usealuminum foil on the bottom
of the oven.
Never entirely cover a rack with
ahmfinum fifil. This will distmb the heat
circulation and result in poor baking.
A smaller sheet offl)il max be used to
catch a spilloxer b) placing it on a lower
rack several inches below the toed.
1/

Usingtheoven.
If yourrangeisconnectedto
208 volts,rare steaksmay be
broiled bypreheating the broiler
and positiombgthe oven rackone
positionhigher
How to Set the Oven for Broiling
Leavethedooropento thebroil stopposition.
Thedoorstaysopenbyitself, yet theproper
temperatureis maintainedintheoven.
NOTE:Foodcanbe broiledwith thedoor
closed,butit maynotbrownas wellbecause
theovenheatingelementwill cycleonandoff.
[_ Place the meat or fish on a broiler
ii i ,grid in a broiler l)an designed,
fi_r broiling.
[] Follow suggested rack positions in
the Broiling Guide.
[] Touch the BROILHI/LO pad once fi,x"
HI Broil
To change to LO Broil, touch the
BROILHI/LO pad again.
Use LOBroil to cook foods such as
l)oultry or thick cuts of meat thoroughly
without ovePbrowning them.
[] Touch the STARTpad.
[] _q_en broiling is finished, touch the
CLEAR/OFFpad.
NOTE:Broil will not work if the temperature
probeis pluggedin.
The size, weight, thickness,
starting temperature
and vom" preference
of doneness will affect
broiling times. This guide
is based on meats at
refl'igerator temperature.
4 71w {LS. Depa_lm_*l of
p,,l,*,l_; b*tt ),mz *ko*zldI_ozlt tkdt
:_M_i_4<it >o_13 140<I; mem*r
*ome/ood poismfi_g o_;Wnisms
ma) _u_-,:i-u_,."(kou_:e: S<_,l'bod
Bool_. }b_t_Kitch* _*Guide. USDA
l_e_,..]tu_e 19<_'5.)
The oven has 7 shelf positions.
12
Broiling Guide
Quantity and/
Food or Thickness
GroundBeef 1 lb. (4patties)
Weii Done 1/2 to3/4" tlfick
Beef Steaks
Rarer 1" thick
Medium 1to lYLIhs.
Well Done
Rarer 1W' thick
Medium 2to 2VLIhs.
Well Done
Chicken 1whole cut up
2to 21/zIhs.,
split lengthwise
2 Breasts
LobsterTails 2-4
10to 12oz.each
FishFillets 1/4 to 1/2" thick
HamSlices 1/2" thick
(precooked)
Pork Chops 2(1/2" thick)
Well Done 2(1" thick)about 1 lb.
LambChops
Medium 2(1" thick)about 10
Well Done to 12oz.
1
Medium 2(1FZ'thick)about 1 lb.
Well Done
Salmon Steaks 2(1" thick)
4(1" thick)about 1 lb.
Shelf
Position
F
E
E
D
D
D
C
E
E
E
E
D
D
FirstSide
Time(min,)
9
11
7
9
11
14
18
22
25
25
18 20
10
15
8
10
14
17
10
12
Second Side
Time (rain.)
B
10
5
67
89
11
1_16
20
10
1015
Do not
turll
oveE
78
910
12
1214
78
10
Comments
Space evenly. Up to 8
patties take about the
same time.
Steakslessthan 1"
thickcookthrough
beforebrowning.Pan
fryingis recommended.
Slashfat.
Broil skin-side-down
first.
Cutthroughbackof
shell. Spreadopen.
Brushwith melted
butter beforebroiling
andafterhalf of
broilingtime.
Handleandturnvery
carefully.Brushwith
lemonbutterbefore
andduringcooking,
if desired.
Increasetime 5 to 10
minutesper sidefor
11/Z'thick orhome-
curedham.
Slashfat.
Slashfat.
Grease pan. Brush
steaks witilmelted
butter.

Usingthe clock, timerand controllockout, gecom
Make sure the clock is set to the
correct time of da,¢
ToSet the Clock
The clock must be set to tile correct time
of da) fi)r tile automatic oxen tinting
flmctions to work properl). Tile time of
da) cannot be changed during a timed
baking or self=cleaning cycle,
[] Touch tile CLOCK pad.
[] Touch tile number pads.
[] Touch tile START pad.
[]
Thetimer is a mhTutet#ner onl,¢
Thetimer does not control oven
operations. The maximum setting on
the timer is 9hours and 59mhTutes.
To Set the Timer
[]
Touch tile KITCHEN TIMER
ON/OFFpad.
Touch tile immber pads until tile
ai//otlnt of time }ou want shows
in tile display: For example, to set
2 hom_ and 45 minutes, touch 2, 4
and 5in that order: If you make a
mistake touch tile KITCHEN TIMER
ON/OFF pad and begin again.
Touch tile STARTpad.
AftertouchingtheSTARTpad, SETdisappears,
thistellsyouthetimeiscountingdown,although
thedisplaydoesnotchangeuntiloneminutehas
passedSecondswillnotbeshownin thedisplay
untilthelastminuteiscountingdown.
[] _._hen tile timer reaches :00, tile
control will beep 3 times fbllowed
by one beep eveI T 6 seconds tmtil
tile KITCHENTIMERON/OFFpad
is touched.
Thef-second tone can be cance/ed by following
thestepsin theSpecialfeaturesofyouroven
controlsectionunderTonesat theEndofa
TimedCycle.
To Reset the Timer
If tile display is still shoMng tile time
remaining, you may change it bv
touching tile KITCHEN TIMER ON/OFF pad,
then touch tile number pads tmtil tile
time you want appea_ in tile displa>
If tile remaining time is not in tile display
(clock, delay start or cooking time are in
tile display), recall tile remaining time by
touching tile KITCHENTIMERON/OFFpad
and then touching tile ntli//ber pads to
entei" tile new [lille vo/i _V;lilt.
ToCancel the Timer
To/uh tile KITCHENTIMERON/OFF
pad twice.
@ @
LOCK/UNLOCK HOLD 3 SECONDS
Control Lockout
Yourcontrolwill allowyoutolockoutthetouch
padssotheycannotbeactivatedwhenpressed
To hxk/tmhxk tile controls:
[] Touch tile 9and 0pads at tile same
time tOT 3 seconds, tmtil tile display
shows LOCON.
[] To unlock tile control, touch tile 9
and 0pads at tile same time fi)r 3
seconds, until tile display shows
LOCOFF.
When this teature is on and tile touch
pads are touched, tile control will beep
and tile display will show LOC ON.
::J_::Thecontrol lockoutmode affectsall touch
pads.No touchpads will work when this
featureis activated
!i> Theadjustment will be retained in memory
after apower failure.
13

Usingthetimedbakingand mastingfeatures.(onsome models)
NOTE."Foods that sped easily--such as milk, eggs, fish, stuffings, poultry and pork--should not be allowed to sit for
more than 1hour before or after cooking. Room temperature promotes the growth of harmful bacteria. Be sure that
the oven light is off because heat from the bulb will speed harmful bacteria growth.
How to Set an Immediate Start and Automatic Stop
Theoven will turnon immediatelyandcook for a
selectedlength of time. At the end of the cooking
tlYnethe ovenwill turn off automatlca//y
[] Touch the BAKEpad.
[] Using the nuinber pads, enter the
desired teinperature,
[] Touch the COOKTIME pad.
NOTE:If yourreciperequkespreheating, you
may needto addadditional time tothe length of
thecookingrime.
The display Mll show the changing
tempemtm'e (starting at 100°F) and the
cooking time. The display starts changing
once the temperature reaches 100°E
The oven will continue to cook for the
programmed amount of time, then shut
offautomaficall):, unless the _M_
feature was set. See the HowtoSettheOven
for Warming section.
Touch the CLEAR/OFFpad to clear the
display.
[] Using the number pads, enter
the desired baking time. The oven
temperature and the cooking time
that you entered will be displa) ed.
[] Touch the STARTpad.
How to Set a Delayed Start and Automatic Stop
Youcanset the oven control to delay-startthe
oven,cookfor a specificlength of time and then
turnoff automafical/g
Make sm'e the clock shows the correct
time of day:
[] Touch the BAKEpad.
[] Using the number pads, enter the
desired temperature.
[] Touch the COOKTIMEpad.
If _ou would like to check the times )ou
ha'.e set, touch the DELAYSTARTpad to
check the stm't time you have set or tou('h
the COOK TIME pad to check the length
of cooking tillle VOtl haxe set,
_'_ hen the o_en ttlI'nS on at the time of
(la) you ha_e set, the displa)will show the
changing, ,teilll)ei'attli'e.... (startin(,., at IO0°F)
and the cooking time. The displa)starts
changing, ,once the teml)erature reaches
lO0°E
NOTE:If yourreciperequkespreheating,you
mayneedtoaddadditionaltimetothelengthof
thecookingrime.
[] Using the number pads, enter the
desired baking time.
The (wen will continue to cook fi)r the
programmed amount of time, then shut
off automatically, tmless the _'_.l_/l
teature was set. See the How to Set the Oven
for Warming section.
[] Touch the DELAYSTARTpad.
[] Using the number pads, enter the
time of (la))ou want the o_en to
[tlI'n on [ln(l st;Irt cooking,
Touch the CLEAR/OFFpad to clear the
display:
[] Touch the STARTpad.
NOTE:An attention tonewi// soundif youare
using tlYnedbakingand do not touchthe START
pad after entering the bakingtemperature.
/4

Usingtheprobe, ge.com
For many foods, especially roasts and poultry, internal food temperature is the best test for doneness. The
temperature probe takes the guesswork out of roasting by cooking foods to the exact doneness you want.
Thetemperature probe has a
skewer-like probe at one end and a
plug at the other end that goes flTto
the outlet t7 the oven.
Use of probes other than the one
proxided xdth this product ma) result in
daillage to the pi'obe or o'_en conti'oL
Use the handles of the probe and plug
when inserting and remoxim* them fl'om
the fi)od and outlet.
iJi::Toavoiddamagingyourprobe,donotuse
tongstopuffonthecamewhenremovingit
_;:_Toavoidbreakingtheprobe,makesurefood
iscompletelydefrostedbeforeinserting.
!5 Topreventpossibleburns,donotunplugthe
probefromtheoutletuntfftheovenhas
cooled
/5_'_ "-- Cable
!,u! //
iJi::Neverleaveyourprobe/bsidetheovenduring
a self-cleanbgcycle.
ij_::Donotstoretheprobeintheoven.
After preparing the meat and placing it
on a trivet or a broiler pan grid designed
fiw broiling, follow these directions for
proper probe placement.
Insert the probe completely into the
meat. It should not touch bone, fat or
gristle,
For roasts with no bone, insert the probe
into the meatiest part of the roast. For
bone-in ham or lamb, insert the probe
into the center of the h m'est lmge muscle.
Inse_t the probe into the center of dishes
Stlch as II/eat loaf or casseroles.
Insert the probe into the meatiest part of
the imler thigh fl'om below and parallel
to the leg era whole tin'key.
O(DGQ(Z)
How to Set the Oven For Roasting When Using the Probe
[]
[] lnsell the probe into the fi)od.
Plug the probe into the outlet in the
oven. Make sm'e it's pushed all the
*_avin. Close the o\en dora: Make
sine the probe cable is not touching
the broil element.
[] Touch the PROBE pad.
[] Touch the number pads to set the
desired internal fi)od or meat
temperature. The maximum
internal temperatme fi)r the food
that }ou can set is 200°E
[] Touch the BAKEpad.
] Touch the re=tuber pads to set d_e
desired oven temperature.
[] Touch d_e STARTpad.
Thed/splaywill flashif theprobe/s/bserted
/btotheoutletandyouhavenotsetaprobe
temperatureandtouchedtheSTARTpad
_Mter the internal temperature of
tile fl_od reaches 100°E the changing
internal temperature will be shown in
the displa>
]"_hen tile internal temperatm'e of
tile fi)od reaches the number _ou
have set, tile probe and tile o;'ell
ttll'n ott alia the oven control
signals. To stop the signal, touch the
CLEAfl/OFFpad, Llse hot pads to
remo_ e the probe fl'om the ibod.
Do not use tongs to pull on it--they
might damage it.
To change the oven temperatm'e during
the Roast c}vle, touch the BAKE pad and
then the number pads to set the new
temperature,
iJi::If theprobe isremovedfrom the foodbefore
the f/hal temperatureisreached,a tonewill
soundand the displaywill flash until theprobe
isremoved from the oven.
iJi::Youcan use the timer even though you
cannot use timed oven operations while
using the probe. 15

Usingtheconvectionoven.
ConvectionFan
In a convection oven,a fan circulates hot air
over, under and around the food
This circulating hot ak is evenly distn_)uted
throughout the oven cavity.As a result, foods
are evenly cooked and browned--often in less
time with convection heat.
NOTE:The convection tim will cycle on
and oft while cooking to best distribute
hot air in the oven.
The convection oven tim shuts off when
the oven door is opened. DONOTleave
the door open for long periods of time
while using convection cooking or you
may shorten the life ot the convection
heating element.
1-Rack Convection Baking
Tile convection tim circulates tile heated
air evenly over and arotmd tile food
using the bake and broil elements.
Whenconvectionbakingwith only I rack,
use CONVECTIONBAKE IRACK and forbest
resultsplace the rackonshelf Cor Dat the
center of the oven.Cooktimesmay decrease,so
foodshouldbe checkedearlier thanpackage
directions tomakesure that it doesnot overcook.
Ideal fi)r cooking large casseroles and
lasagna with good results.
Multi-rack position.
Multi-Rack Convection Baking
Because heated air is circulated evenly
throughout tile oven, foods can be
baked with excellent results using
multiple racks.
Tile amount of tinle required for
multi-rock baking may increase slightly
for some tOo(_s, but overall time is saved
be(;_ use two to three tim es as m tmh food
is cooked at once. Cookies, Inttflins,
biscuits, and other quick breads give
good results with multi-rock baking.
To cook food Oil I/lOI'e than one rack in
convection bake, use CONVECTIONBAKE
MULTI.
_A]/ell baking on 3 racks, place one
rock in tile second (B) position, one
in tile tOtlrth (D) position and one in
the sixth (F) position.
Adapting Recipes...
Ym can use your fi_\'orite recipes in tile
convection ()veil.
_'\]len convection baking, the Auto
Recipe '_Conversion feature automatically
reduces the set reg-ular baking
temperatm'e by tile recommended 25°E
See Auto Recipe _Conversion in the Special
Features section,
_Usepansize recommended.
::Ji::Somepackageinstructions for frozen
casserolesor main disheshave been
developedusing commercialconvection ovens.
Forbest results in this oven,preheat the oven
andusethe temperatureon thepackage.
16

ge.com
Convection Roast
_: Goodforlargetendercutsof meat, uncovered
The convection tim circulates tim heated
air evenly over and around the fi)o(l.
Meat an(l poulti y are browned oil all
sides as if they were cooked on a
rotisserie. The heated air seals in juices
quickly fin" a moist and tender product
wlfile, at tim same time, creating a rich
golden brown extei_oi:
_]_en you are convection roasting, it is
impommt that you use a broiler pan and
grid designed fi)r broiling for best
convection roasting results. The pan is
used to catch grease spills and the grid
is used to pre\'ent grease sl)attei_,
::Ji::Place the rack in the lowest rack
position (A).
When baking cookies, you will
get the best results if you use a
flat cookie sheet instead of a
pan with Iow sides,
Cookware for Convection Cooking
Betore using your convection oven,
check to see if your cookware leaves
room for air circulation in the oven.
If vou are baking with several pans, leave
space between them. Mso, be sure the
pans do not touch each other or the
walls ot the oven.
Paper and Plastic
Heat-resistant paper and plastic
containei_ that are recommended fi)r
use in regular ovens can be used in
convection ovens. Plastic cookware that
is heat-resistant to temperatures of
400°F can also be used.
Metal and Glass
Any _'l)e ot cookware will work in your
convection oven. However, metal pans
heat the fi_stest and are recommended
for convection baking.
::Ji::Darkenedor matte-f/b/shedpanswill bake
faster thanshinypans.
_: Glassor ceramicpans cookmore slowly.
For recipes like ovend)aked clficken,
use a pan with low sides. Hot air cmmot
drculate well around food in a pan with
high sides.
(3)(Z)(3)(3Z3)
@
How to Set the Oven for Convection Baking or Roasting
[] Touch the CONVECTION BAKE
MULTI/1 RACK pad once
(CONVECTION BAKEMULTI mode)
fin" multi-rack convection baking.
Tiffs mode is tlsed for cooking fl)od
items on more than one rack (i.e., 9
3 or more racks) at the same time in
convection bake. See Multi-Rack
Baking section fl)r more
infimnation.
Totlch the CONVECTIONBAKEMULTI/
I RACK pad t_@e (CONVECTIONBAKE
I RACKmode) 16r one-rack
convection baking, This mode is used
fin" cooking fbod items on on b one
rack in coIwecfioI1 bake.
Touch tim CONVECTIONROAST pad
tot convection roasting.
[] Touch the number pads to set the
desired oxen temperature.
[] Touch the STARTpad.
To change tim oven temperature, touch
tile CONVECTION BAKEMULTI/1 RAeKor
CONVECTION ROASTpad and then the
number pads to set the new temperature.
\_]_en the oven starts to beat, the
changing temperature, starting at 100°E
will be displayed. When oven reaches the
temperature you set, 3 beeps will sound.
[] Touch CLEAR/OFFpad when
finished.
::Ji::Youwillheara fanwhilecookingwith
convection.ThefanwillstopwhenthedoorIs
opened,buttheheatwillnotturnoK
::Ji::Youmayheartheovenclickingdunbg
baking.Thisisnormal
17

Usingthe timedfeaturesforconvectioncooking.
Youwill hear a fan while cooking with these features. The fan will stop when the door& opened, butthe heat
will not turn off.
NOTE:Foods that spoil easily--such as milk, eggs, fish, stuffings, poultry and pork--should not be aflowed to
s# for more than 1hour before or after cooking. Room temperature promotes the growth of harmful bacteria.
Be sure that the oven light is off because heat from the bulb will speed harmful bacteria growth.
How to Set an Immediate Start and Automatic Stop
Theovenwill turnonimmediate/)/andcookfor a
selectedlengthof time.At theendof thecooking
time,theovenwill turnoffautomatically
Make stlre tile clock sho_,_:stile correct finle
of day.
[] Touch tile CONVECTIONBAKE
MUL77/1RACK pad once
(CONVECTION BAKEMULTI mode)
fi)r nmlti-rack convection baking.
This lnode is tlsed fl)r cooking fi)od
items on more than one rack (i.e., 2,
3 or more racks) at the same time ill
convection bake. See Multi-Rack
Baking section fi)r more infi)mmtion.
Touch the CONVECTIONBAKEMULTI/
I RACKpad mice (CONVECTIONBAKE
I RACKmode) fi)r one-rack
convection baking, This mode is used
fi)r cooking fi)od items on only one
lack ill convection bake.
Tt,uch tile CONVECTION ROAST pa d
[()I" convection i'oas[ing.
[] Touch the number pads to set the
desired oxen tenlperattu'e.
[] Touch tile COOKTIME pad,
NOTE:ffgourreciperequirespreheating,youmay
needtoaddaflfltiona/timeto thelengthof the
cookingtime.
[] Touch the number pads to set tile
desired length of cooking time, The
nfinimmn cooking dine you call set
is 1 minute, Tile oven tempeIatm'e
that you set and the cooking time that
you enmred will be ill the displa)
[] Touch the STARTpad,
The displa) will show the changing
mmperatm'e (starting at 100°F) and the
cooking time, The displa) starts changing
once the mmperature reaches 100°E
Tile oxvn will continue to cook for tile
progTaimned amount of time, then shut
off autonlaticalb; unless the _'\_RM teature
_;_s set. See the How to Set the Oven for
Warming section.
[] Touch the CLEAR/OFFI)adto clear
the displa) if necessai T, Remme
the fi)od fl'onl tile o_en. Remenlbei;
even though the oven ttlI'ns Off
automaficall}, ti)od left ill tile oven
will continue cooking alter the oxen
turns ofE
/8

ge.com
CONVECTION
000(5
How to Set a Delayed Start and Automatic Stop
Youcansettheovencontroltodelay-starttheoven,
cookforaspecificlengthoftimeandthenturnoff
automatically
Make sure die clock sho_s the correct time
of de)'.
[] Touch the CONVECTIONBAKE
MULTI/1 RACK pad once
(CONVECTION BAKEMULTI mode)
for multi-rack convection baking.
Tiffs mode is used for cooking food
items on more than one rack (i.e., 2,
3 or more racks) at the same time ill
convection bake. See Multi-Rack
Baking section for m ore infimnafion.
Touch the CONVECtiONBAKEMULTI/
I RACKpad t_dce (CONVECTIONBAKE
I RACKmode) for one-rack
convectk)n baking. This mode is used
for cooking filed items on on b one
rack ill convection bake,
Touch tile CONVECtiON ROAST pad fi)r
convection roasting.
[] Touch tile nmnber pads to set the
desired oven temperattu'e.
[] Touch the COOKTIMEpad.
NOTE"Ifyourreciperequirespreheating,youmay
needtoaddadditionaltime to thelengthof the
cookingtime.
[] Touch tile nmnber pads to set the
desired cooking time,
[] Touch the DEIAYSTARTpad,
[] T()uch the number pads to set the
time of da)}ou want tile oxen to ttlrn
on and start cooking,
ff youwould like to check the times you have set,
touchtheDELAYSTARTpadtocheckthestarttime
youhaveset,ortouchtheCOOKTIMEpadto
checkthelengthofcookingtimeyouhaveset.
[] Touch tile STARTpad,
NOTE"An attentiontonewill soundffyouare
usingtimedbakingorroastingand donot touch
the STARTpadafter enteringthebakingor
roastingtemperature.
_'\llen file oven turns on at file tiIlle
of de)you hme set, tile displa)will
show tile changing tenaI/eIature
(smrdng at 100°F) and the cooking time.
Tile displa) starts changing once the
tempeIature reaches 100°E
Tile ()veil will continue to cook for the
proglalnmed alnount of time, then shut
off automaficall}, unless the X'\_RM teatuI'e
was set. See tile How to Set the Ovenfor
Warmingsection.
[] Touch the CLEAR/OFFpad to clear
the displa} if necessai T. Relno'_e
the food fi'om the oven. Remembei;
even thotlgh the o_,en shuts off
automaticalb, tiled leti ii1 the oven
will continue cooking after tile oxen
turns ott_
79

Usingtheconvectionoven.
For best results when roasting large
turkeys and roasts, we recommend
usflTgthe probe flTcluded f17the
COITVectioI7 oveR,
CONVECTION
@@@(i55)
How to Set the Oven for Convection Roasting when Using the Probe
The displa_will flash PROBEand the [] _en the internal temperature of
o_en control will signal if the probe is the meat reaches the number you
inserted into the outlet and you have not
set aprobe temperature and pressed the
STARTpad.
[] Place the rack in the lowest position
(A). Insert the probe into the meat.
[] Plug the probe into the outlet in the
o_en, Make sure it is pushed all the
way in. Close the oxen (loo_:
[] Touch the CONVECTIONROASTpad.
[] Touch the number pads to set the
desired o',en tenlperature,
[] Touch the PROBE pad.
[] Touch the number pads to set the
desired internal meat temperature,
[] Touch the START pad.
_'_ hen the oven stnrts to heat, the word
tO will be in the display:
_AJter the internal temperatm'e of the meat
reaches IO0°K the changing internal
temperatm'e will be shown in the display.
have set, the probe and the oven
ttlI'n off and the oven control
signals. To stop the signal, touch the
CLEAR/OFFpad. Use hot pads to
remove the probe fi'om the fi)od,
Do not use tongs to pull on it--they
might damage it.
CAUTION:ropreventpossiblebume,
donotunplugtheprobefromtheovenoutletuntil
theovenhascooledDonotstoretheprobein
the oven.
NOTE:
iJi::If theprobeisremovedfromthefoodbefora
thefinaltemperatureisreached,atonewill
soundandthedisplaywill flashuntiltheprobe
isremovedfromtheoven.
!;_:Youwill heara fan while cooking with this
feature. Thefan will stof_when thedoor is
opened,but theheat wff/not turn oft
iJi::Youcan use the t/Ynereventhoughyoucannot
usetimed ovenoperations.
Tochange the oven temperature
during the Convection Roast cycle,
touch the CONVECTIONROASTpad
and then touch thenumber pads to
set the new desired temperature.
Convection Roasting Guide
Meats Minutes/Lb. Oven Temp. Internal Temp.
Beef Rib,BonelessRib, Rare 20_4 325°F 140°Ft
TopSirloin Medium 24_8 325°F 160'_F
(3to 5 Ibs.) Well 28_2 325'_F 170'_F
BeefTenderloin Rare 10 14 325°F 140°Ft
Medium 14 18 325°F 160°F
Pod{ Bonedn,Boneless(3to 5 Ibs.) 23_7 32R°F 170°F
Chops(1/2to 1" thick) 2 chops 30_5 total 32R°F 170°F
4 chops 35-40 total 32R°F 170°F
6 chops 40_5 total 32R°F 170°F
Ham Canned, Butt, Shank(3to 5 Ibs.fully cooked) 14 18 325°F 140°F
Lamb Bonedn,Boneless(3to 5 Ibs.) Medium 17_0 325°F 160°F
Well 20_4 325°F 170%
$eateed Fish,Whole(3 to5 Ibs.) 3OqOtotal 4OO°F
LobsterTails(6 to8 oz.each) 20_5 total 350°F
Poultry WholeChicken(21/Lto 31/zIbs.} 24_6 350°F 180° 185°F
CornishHens,Unstuffed(1 to 11/zIbs.) 50 55total 350°F 180° 185°F
Stuffed(1to 11/LIbs.) 5R 60total 350°F 180° 185°F
Buckling(4to 5 Ibs.) 24_6 32R°F 180° 185°F
Turkey,Whole*
Unstuffed(10to 16Ibs.) 8 11 32R°F 180° 185°F
Unstuffed(18to 24Ibs.) 7 10 32R°F 180° 185°F
TurkeyBreast(4to 6 Ibs.) 16 19 32R°F 170°F
Sm/]ed bi_ds g_,)_e_wl0n,q_li)_, 30-45 mimm_ addilim_al nulsti)i time. Shidd h-t_:_m_d blz'as[ ,vilh ]v_l to pn,'l,( _t
"t T/u' _LS. i)@aHml,_ t o/ IK*Tctzflzm"_(z_ "Ibm, bz'l,/is /m/)tz/m; but _ou _/mtt/d /,'_ml! l/_al (vokin_ it to o_ /) I401" m_'tnz_
_ome /ood t,oi_o_i_g o*;_zz_L_m_ma) _tt_'l@,_'."(Sou_ _': S@" 1.'ood Book. };m_ KiI(@ _Guide. [_I)A lb,'l,, fiz_ e 19,t¢5.)
20
Other manuals for Profile JD968
4
This manual suits for next models
1
Table of contents
Other GE Range manuals

GE
GE Profile JGS968 SERIES User manual

GE
GE 49-4540 Installation instructions

GE
GE 164D3333P150 User manual

GE
GE PHB925SB1SS How to use

GE
GE JSC57 Original instructions

GE
GE JGB720EEJES User manual

GE
GE JBS27 Operating instructions

GE
GE JSP42CKCC Manual

GE
GE PC2B940SEJSS User manual

GE
GE JGBS80BELBB Original instructions