manuals.online logo
Brands
  1. Home
  2. •
  3. Brands
  4. •
  5. GE
  6. •
  7. Refrigerator
  8. •
  9. GE 20 Operating instructions

GE 20 Operating instructions

Other manuals for 20

17

This manual suits for next models

2

Other GE Refrigerator manuals

GE Profile PFCF1PJY Manual

GE

GE Profile PFCF1PJY Manual

GE Monogram ZIRS36N LH User manual

GE

GE Monogram ZIRS36N LH User manual

GE 49-6965 User manual

GE

GE 49-6965 User manual

GE Refrigerator Service manual

GE

GE Refrigerator Service manual

GE TFX27EM User manual

GE

GE TFX27EM User manual

GE Profile PSHS6YGZSS Manual

GE

GE Profile PSHS6YGZSS Manual

GE GDSL0KCXLS User manual

GE

GE GDSL0KCXLS User manual

GE ZIF36NMHRH User manual

GE

GE ZIF36NMHRH User manual

GE GE Profile Arctica PSI23MGPBB User instructions

GE

GE GE Profile Arctica PSI23MGPBB User instructions

GE PFSS9PKYSS - 28.5 CF Ref Manual

GE

GE PFSS9PKYSS - 28.5 CF Ref Manual

GE PFSS6SMXSS - Profile 25.8 cu. Ft.... Manual

GE

GE PFSS6SMXSS - Profile 25.8 cu. Ft.... Manual

GE GFSS2HCYSS Manual

GE

GE GFSS2HCYSS Manual

GE Monogram ZIS420NX Manual

GE

GE Monogram ZIS420NX Manual

GE PFSS6SKXSS - Profile 25.8 cu. Ft.... Manual

GE

GE PFSS6SKXSS - Profile 25.8 cu. Ft.... Manual

GE GTK17JBXBS Manual

GE

GE GTK17JBXBS Manual

GE Monogram ZICP360NXARH User manual

GE

GE Monogram ZICP360NXARH User manual

GE GFSF6KEXBB - 25.8 cu. Ft. Refrigerator Manual

GE

GE GFSF6KEXBB - 25.8 cu. Ft. Refrigerator Manual

GE CYE22TSHBSS Operating instructions

GE

GE CYE22TSHBSS Operating instructions

GE PFSS6SMXASS and Operating instructions

GE

GE PFSS6SMXASS and Operating instructions

GE GTS18ABDBB Manual

GE

GE GTS18ABDBB Manual

GE GFE27GSDSS Operating instructions

GE

GE GFE27GSDSS Operating instructions

GE GIE18ISH Manual

GE

GE GIE18ISH Manual

GE PSS25NGNACC and Safety guide

GE

GE PSS25NGNACC and Safety guide

GE Profile PDF22MFS Manual

GE

GE Profile PDF22MFS Manual

Popular Refrigerator manuals by other brands

Frigidaire FRS26TS7DW2 Use & care manual

Frigidaire

Frigidaire FRS26TS7DW2 Use & care manual

Fisher Scientific 10ECEEFSA manual

Fisher Scientific

Fisher Scientific 10ECEEFSA manual

Summit FF22BDRSS user manual

Summit

Summit FF22BDRSS user manual

Frigidaire FFRU17B2QWE use & care

Frigidaire

Frigidaire FFRU17B2QWE use & care

Hotpoint ENBGH 19xxx FW operating instructions

Hotpoint

Hotpoint ENBGH 19xxx FW operating instructions

Hitachi R-SG28KPH instruction manual

Hitachi

Hitachi R-SG28KPH instruction manual

Dometic RMH 7390 L operating instructions

Dometic

Dometic RMH 7390 L operating instructions

AEG S71700TSW0 user manual

AEG

AEG S71700TSW0 user manual

Electrolux ENB3669 Instruction book

Electrolux

Electrolux ENB3669 Instruction book

Electrolux ERN 2930 Instruction book

Electrolux

Electrolux ERN 2930 Instruction book

Beko GNE 60520 X user manual

Beko

Beko GNE 60520 X user manual

Jenn-Air JUR248LBES00 Use & care guide

Jenn-Air

Jenn-Air JUR248LBES00 Use & care guide

Dometic RGE 4000 Installation and operating manual

Dometic

Dometic RGE 4000 Installation and operating manual

Dometic L-0191B Brochure & specs

Dometic

Dometic L-0191B Brochure & specs

LG LRBP1031W - 10 Cu. Ft. Cabinet Depth Bottom Freezer... owner's guide

LG

LG LRBP1031W - 10 Cu. Ft. Cabinet Depth Bottom Freezer... owner's guide

Daewoo RN-33 Series user manual

Daewoo

Daewoo RN-33 Series user manual

Haier RF-8888-174 Service manual

Haier

Haier RF-8888-174 Service manual

Blaupunkt 5CK2 Series user manual

Blaupunkt

Blaupunkt 5CK2 Series user manual

manuals.online logo
manuals.online logoBrands
  • About & Mission
  • Contact us
  • Privacy Policy
  • Terms and Conditions

Copyright 2025 Manuals.Online. All Rights Reserved.

GEAppliances.com
Refrigerators
Profile Bottom Freezer
200D9366P016 49-60603 04-09 JR
Safety Instructions ...........2,3
Operating Instructions
Additional Features . . . . . . . . . . . . . . . . .9
Automatic Icemaker . . . . . . . . . . . . . . .12
Care and Cleaning . . . . . . . . . . . . .13–14
Controls ..........................4–5
Crispers and Pans . . . . . . . . . . . . . . . . .10
Freezer ............................11
Replacing the Light Bulbs . . . . . . . . . .15
Shelves and Bins . . . . . . . . . . . . . . . . . .8, 9
WaterFilter.......................6,7
Installation Instructions
Installing the Refrigerator . . . . . . .17–21
Installing the Water Line . . . . . . . .30–32
Preparing to Install
theRefrigerator....................16
Removing and Replacing
the Doors (Double Door
Refrigerator Models only) . . . . . . .27–29
Removing and Replacing the
Freezer Drawer . . . . . . . . . . . . . . . . .22, 23
Reversing the Door Swing
(Single Door Refrigerator
Modelsonly) ...................24–26
Troubleshooting Tips . . . . . .33–37
Normal Operating Sounds . . . . . . . . . .33
Consumer Support
Consumer Support . . . . . . . .Back Cover
Performance Data Sheet . . . . . . .43, 44
Owner’s Registration
for Canadian Customers . . . . . . . .39, 40
State of California Water
Treatment Device Certificate . . . .45, 46
Warranty for Canadian
Customers.........................42
Warranty for U.S. Customers . . . . . . .41
Réfrigérateurs
Congélateur inférieur
Refrigeradores
Congelador inferior
Write the model and serial
numbers here:
Model # ____________________
Serial #______________________
Find these numbers on a label
on the right side, near the top of the
refrigerator compartment.
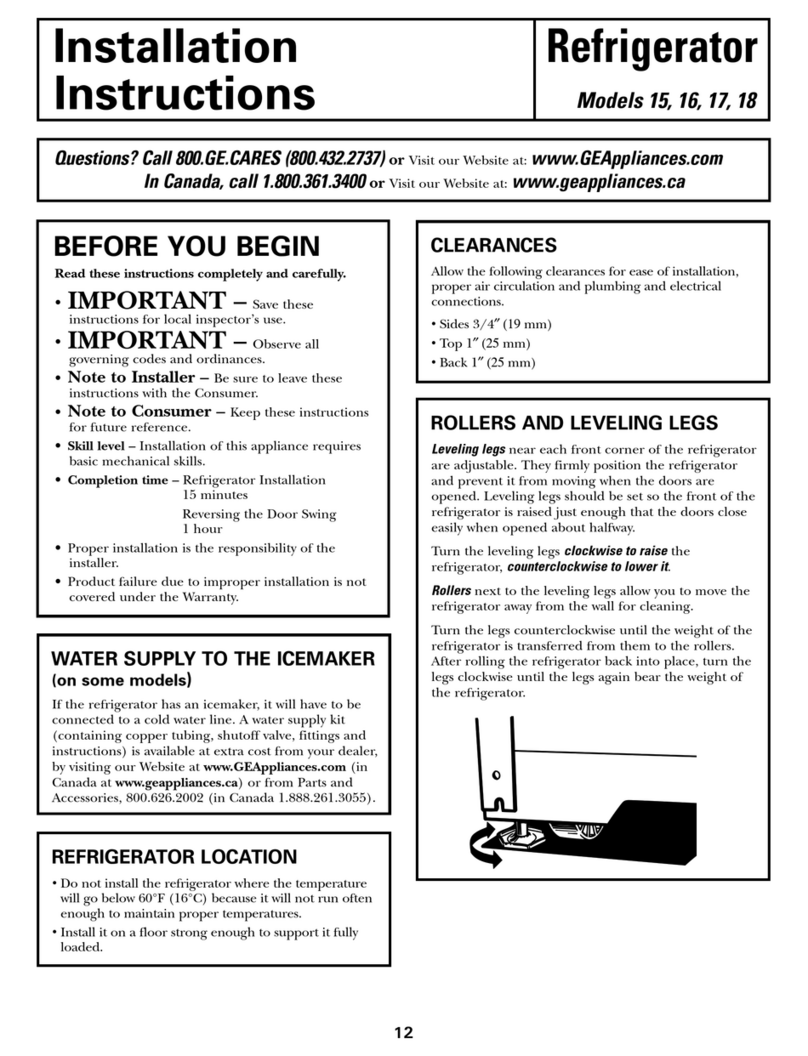
Models 20, 22 and 23
Manuel d’utilisation
et d’installation
Owner’s Manual and
Installation Instructions
Manual del
propietario e
instalación
La section française commence à la page 47
La sección en español empieza en la página 89
IMPORTANT SAFETY INFORMATION.
READ ALL INSTRUCTIONS BEFORE USING.
WARNING!
Use this appliance only for its intended purpose as described in this Owner’s Manual.
SAFETY PRECAUT ONS
When using electrical appliances, basic safety precautions should be followed, including the following:
■
■This refrigerator must be properly installed
and located in accordance with the Installation
Instructions before it is used.
■
■Do not allow children to climb, stand or hang
on the shelves in the refrigerator. They could
damage the refrigerator and seriously injure
themselves.
■
■Do not touch the cold surfaces in the freezer
compartment when hands are damp or wet.
Skin may stick to these extremely cold surfaces.
■
■Do not store or use gasoline or other flammable
vapors and liquids in the vicinity of this or any
other appliance.
■
■Keep fingers out of the “pinch point” areas;
clearances between the doors and between
the doors and cabinet are necessarily small.
Be careful closing doors when children are
in the area.
■
■In refrigerators with automatic icemakers,
avoid contact with the moving parts of the
ejector mechanism, or with the heating element
that releases the cubes. Do not place fingers or
hands on the automatic icemaking mechanism
while the refrigerator is plugged in.
■
■Unplug the refrigerator before cleaning and making
repairs.
NOTE: We strongly recommend that any servicing
be performed by a qualified individual.
■
■Setting either or both controls to 0 (off) does
not remove power to the light circuit.
■
■Do not refreeze frozen foods which have
thawed completely.
PROPER D SPOSAL OF THE REFR GERATOR
Child entrapment and suffocation are not problems of
the past. Junked or abandoned refrigerators are still
dangerous…even if they will sit for “just a few days.”
If you are getting rid of your old refrigerator, please
follow the instructions below to help prevent
accidents.
Before You Throw Away Your Old
Refrigerator or Freezer:
■Take off the doors.
■Leave the shelves in place so that children may not
easily climb inside.
Refrigerants
All refrigeration products contain refrigerants,
which under federal law must be removed prior
to product disposal. If you are getting rid of an
old refrigeration product, check with the company
handling the disposal about what to do.
USE OF EXTENS ON CORDS
Because of potential safety hazards under certain conditions, we strongly recommend against
the use of an extension cord.
However, if you must use an extension cord, it is absolutely necessary that it be a UL-listed (in the United States)
or a CSA certified (in Canada), 3-wire grounding type appliance extension cord having a grounding type plug
and outlet and that the electrical rating of the cord be 15 amperes (minimum) and 120 volts.
DANGER! RIS OF CHILD ENTRAPMENT
Consumer Support Troubleshooting Tips Operating Instructions Safety Instructions
Installation
Instructions
2
3
Consumer Support
Troubleshooting Tips
Operating InstructionsSafety Instructions Installation
Instructions
GEAppliances.com
WARNING!
HOW TO CONNECT ELECTR C TY
Do not, under any circumstances, cut or remove the third (ground) prong from the power cord.
For personal safety, this appliance must be properly grounded.
The power cord of this appliance is equipped
with a 3-prong (grounding) plug which mates
with a standard 3-prong (grounding) wall outlet to
minimize the possibility of electric shock hazard from
this appliance.
Have the wall outlet and circuit checked by a
qualified electrician to make sure the outlet is
properly grounded.
Where a standard 2-prong wall outlet is encountered,
it is your personal responsibility and obligation to
have it replaced with a properly grounded 3-prong
wall outlet.
The refrigerator should always be plugged into its
own individual electrical outlet which has a voltage
rating that matches the rating plate.
This provides the best performance and also prevents
overloading house wiring circuits which could cause a
fire hazard from overheated wires.
Never unplug your refrigerator by pulling on the
power cord. Always grip plug firmly and pull straight
out from the outlet.
Repair or replace immediately all power cords that
have become frayed or otherwise damaged. Do not
use a cord that shows cracks or abrasion damage
along its length or at either end.
When moving the refrigerator away from the
wall, be careful not to roll over or damage the
power cord.
READ AND FOLLOW TH S SAFETY NFORMAT ON CAREFULLY.
SAVE THESE INSTRUCTIONS
USE OF ADAPTER PLUGS
Adapter plugs are not permitted in Canada.
4
About the controls with temperature settings.
The temperature controls are preset in the factory at 37°F for the refrigerator
compartment and 0°F for the freezer compartment. Allow 24 hours for the temperature
to stabilize to the preset recommended settings.
The temperature controls can display both the SET temperature as well as the actual
temperature in the refrigerator and freezer. The actual temperature may vary slightly
from the SET temperature based on usage and operating environment.
Setting either or both controls to OFF stops cooling in both the freezer and refrigerator
compartments, but does not shut off electrical power to the refrigerator.
For Controls-on-the-Door Models:
To change the temperature, press and release the
WARMER or COLDER pad. The ACTUAL TEMP light
will come on and the display will show the actual
temperature. To change the temperature, tap either
the WARMER or COLDER pad until the desired
temperature is displayed.
For Controls Inside the Refrigerator:
Opening the door displays the actual temperature.
To change the temperature, press either the
WARMER or COLDER touch pads until the
desired temperature is displayed.
Once the desired temperature has been set,
the temperature display will return to the actual
refrigerator and freezer temperatures after 5 seconds.
Several adjustments may be required.
ach time you adjust controls, allow 24 hours for the
refrigerator to reach the temperature you have set.
To turn the cooling system off, tap the WARMER pad
for either the refrigerator or the freezer until the
display shows OFF.To turn the unit back on, press
the COLDER pad for either the refrigerator or freezer.
Then press the COLDER pad again and it will go to
the preset points of 0°F for the freezer and 37°F for
the refrigerator. Setting either or both controls to
OFF stops cooling in both the freezer and refrigerator
compartments, but does not shut off electrical power
to the refrigerator.
Changing the Temperature
NOTE: The refrigerator is shipped with protective film covering the temperature controls.
f this film was not removed during installation, remove it now.
Consumer Support Troubleshooting Tips Operating Instructions Safety Instructions
Installation
Instructions
(on some models)
(on some models)
Consumer Support
Troubleshooting Tips
Operating Instructions
Safety Instructions Installation
Instructions
5
About TurboCool.™(on some models) GEAppliances.com
How it Works
TurboCool rapidly cools the refrigerator
compartment in order to more quickly
cool foods. Use TurboCool when adding a
large amount of food to the refrigerator
compartment, putting away foods after they
have been sitting out at room temperature or
when putting away warm leftovers. It can
also be used if the refrigerator has been
without power for an extended period.
Once activated, the compressor will
turn on immediately and the fans will cycle
on and off at high speed as needed for eight
hours. The compressor will continue to run
until the refrigerator compartment cools to
approximately 34°F (1°C), then it will cycle on
and off to maintain this setting. After 8 hours,
or if TurboCool is pressed again, the
refrigerator compartment will return
to the original setting.
How to Use
Press TurboCool. The refrigerator
temperature display will show .
After TurboCool is complete, the
refrigerator compartment will return
to the original setting.
NOTES: The refrigerator temperature cannot
be changed during TurboCool.
The freezer temperature is not
affected during TurboCool.
When opening the refrigerator
door during TurboCool, the fans
will continue to run if they have
cycled on.
About Door Alarm (on some models)
The door alarm will sound if any door is open
for more than 2 minutes. The beeping stops
when you close the door.
(on some models)
(on some models)
(on some models)
(on some models)
About Energy Saver (on some models)
This product is equipped with an nergy
Saver feature. The refrigerator is shipped with
the nergy Saver feature enabled.
Over time, moisture can form on the front
surface of the refrigerator cabinet and cause
rust. If moisture does appear on the front
surface of the refrigerator cabinet, turn off
the nergy Saver feature by pressing and
releasing the ENERGY SAVER pad on the
control panel.
(on some models)
(on some models)
Water Filter Cartridge
The water filter cartridge is located in the
back upper right corner of the refrigerator
compartment.
When to Replace the Filter
There is a replacement indicator light for
the water filter cartridge on the temperature
display. This light will turn orange to tell you
that you need to replace the filter soon. The
filter cartridge should be replaced when the
replacement indicator light turns red or if
the flow of water to the dispenser or
icemaker decreases.
Installing the Filter Cartridge
If you are replacing the cartridge, first
remove the old one by slowly turning it
to the left. DO NOT pull down on the
cartridge. A small amount of water may
drip down.
CAUTION: f air has been
trapped in the system, the filter cartridge may
be ejected as it is removed. Use caution when
removing.
Remove the protective foil from the end
of the cartridge.
Fill the replacement cartridge with water
from the tap to allow for better flow from
the dispenser immediately after
installation.
Lining up the arrow on the cartridge
and the cartridge holder, slowly rotate
the cartridge clockwise until it stops.
When the cartridge is properly installed,
you will feel it “click” as it locks into place.
Do not overtighten.
Run water from the dispenser for
3 minutes (about 11⁄2gallons) to clear
the system and prevent sputtering.
See To Use the Dispenser section.
Press and hold the RESET WATER FILTER
pad for 3 seconds.
NOTE: A newly-installed water filter
cartridge may cause water to spurt from
the dispenser.
Filter Bypass Plug
You must use the filter bypass plug when a
replacement filter cartridge is not available.
The icemaker will not operate without the
filter or filter bypass plug.
Replacement Filters:
To order additional filter cartridges
in the United States, visit our Website,
GEAppliances.com, or call GE Parts and
Accessories, 800.626.2002.
Filter Model MWF
Customers in Canada should consult
the yellow pages for the nearest Mabe
Service Center.
About the water filter. (on 22 and 23 models only)
Consumer Support Troubleshooting Tips Operating Instructions Safety Instructions
Installation
Instructions
6
(on some models)
(on some models)
Cartridge
Holder
Cartridge
Holder
7
Consumer Support
Troubleshooting Tips
Operating Instructions
Safety Instructions Installation
Instructions
Water Filter Cartridge
The water filter cartridge is located in the
back upper right corner of the refrigerator
compartment.
When to Replace the Filter
The filter cartridge should be replaced
when the flow of water to the icemaker
decreases, or every 6 months.
Installing the Filter Cartridge
If you are replacing the cartridge, first
remove the old one. Open the cartridge
cover by pressing in on the tab at the
front and pulling down.
Remove the cartridge by slowly rotating
it counterclockwise. A small amount of
water may drip down.
CAUTION: f air has been
trapped in the system, the filter cartridge may
be ejected as it is removed. Use caution when
removing.
Remove the protective foil from the end
of the cartridge.
Lining up the arrow on the cartridge
and the cartridge holder, slowly rotate
the cartridge clockwise until it stops.
When the cartridge is properly installed,
you will feel it “click” as it locks into place.
The grip on the end of the cartridge
should be positioned vertically.
Do not overtighten.
Close the cartridge cover.
Filter Bypass Plug
You must use the filter bypass plug when a
replacement filter cartridge is not available.
The icemaker will not operate without the
filter or filter bypass plug.
Replacement Filters:
To order additional filter cartridges
in the United States, visit our Website,
GEAppliances.com, or call GE Parts and
Accessories, 800.626.2002.
Filter Model GSWF
Customers in Canada should consult
the yellow pages for the nearest Mabe
Service Center.
About the water filter. (on 20 models only) GEAppliances.com
Consumer Support Troubleshooting Tips Operating Instructions Safety Instructions
Installation
Instructions
8
Rearranging the Shelves
To remove:
Remove all items from the shelf.
Tilt the shelf up at the front.
Lift the shelf up at the back and
bring the shelf out.
To replace:
While tilting the shelf up, insert the top
hook at the back of the shelf in a slot
on the track.
Lower the front of the shelf until the
bottom of the shelf locks into place.
Spillproof Shelves (on some models)
Spillproof shelves have special edges to
help prevent spills from dripping to lower
shelves. To remove or replace the shelves,
see Rearranging the Shelves.
About the shelves and bins.
Not all features are on all models.
Some models have wire shelves that can
be adjusted in the same manner.
Shelves in the refrigerator compartment are adjustable.
Refrigerator Compartment
Slide-Out Spillproof Shelf (on some models)
The slide-out spillproof shelf allows you
to reach items stored behind others. The
special edges are designed to help prevent
spills from dripping to lower shelves.
To remove:
Remove all items from shelf.
Remove the shelf from the compartment
by lifting up and out.
Remove the glass shelf from the frame
by sliding the shelf out until it stops.
Pull the shelf up to release it from
the front of the frame.
Slide the shelf back to release it from
the back of the frame.
To reinstall the glass shelf, reverse these
instructions.
Make sure that the shelf sits flat after
reinstallation and doesn’t move freely from
side to side.
Make sure you push the shelves all the way
in before you close the door.
Tuck-Away Shelf (on some models)
This shelf can retract to half its size for
storage of tall items on the shelf below.
To remove:
Pull the shelf out and up.
Slide the shelf back until it stops.
To return the shelf to its original position,
pull up and forward on the shelf. Push
down slightly to lock the shelf into
position.
Non-Adjustable Bins on the Door
To remove: Lift the bin straight up, then
pull out.
To replace: ngage the bin in the molded
supports on the door and push down.
It will lock in place.
Adjustable Bins on the Door
Adjustable bins can easily be carried from
refrigerator to work area.
To remove: Lift bin straight up, then
pull out.
To replace or relocate: Slide in the bin just
above the molded door supports, and push
down. The bin will lock in place.
The snugger helps prevent tipping, spilling
or sliding of small items stored on the door
shelf. Grip the finger hold near the rear of
the snugger and move it to fit your needs.
GEAppliances.com
About the additional features.
Shelf Saver Rack (on some models)
Slide-out beverage rack holds twelve cans of
soda or two wine/water bottles (lengthwise).
It can be removed for cleaning.
To remove, slide the rack out to the stop
position, lift the rack up and past the stop
position and lift it out.
Consumer Support
Troubleshooting Tips
Operating Instructions
Safety Instructions Installation
Instructions
9
10
Consumer Support Troubleshooting Tips Operating Instructions Safety Instructions
Installation
Instructions
About the crispers and pans.
Not all features are on all models.
Fruit and Vegetable Crisper
xcess water that may accumulate in the
bottom of the drawers or under the drawers
should be wiped dry.
Adjustable Humidity Crisper (on some models)
Slide the control all the way to the
HIGH setting to provide high humidity
recommended for most vegetables.
Slide the control all the way to the LOW
setting to provide lower humidity levels
recommended for most fruits.
Adjustable Temperature Deli Pan (on some models)
When the pan is placed in the 2nd slot from
the top of the track and the lever is set
at COLDEST, air from the freezer is forced
around the pan to keep it very cold.
You can move the pan to any location if
you don’t want the extra cold storage.
The settings can be adjusted anywhere
between cold and coldest .
When set at cold, the pan will stay at the
normal refrigerator temperature.
The coldest setting provides the coldest
storage area.
Second slot
from to