GE 20 Original instructions

®
F1 • by
Side Side
era ors
GEAppliances.com
Side by Side
Refrigerators
3Iodds 20, 22, 25
Safety Information
Connect Electricib_ ............... 3
Extension Cords ................. 2
Proper Disposal ................. 2
Safeb_ Precautions ............... 2
Operating Instructions
Automatic Icemaker ............ 7 8
Controls ....................... 6
Crispers and Pans ................ 5
How to Install Features ............ 4
Ice and Water Dispenser .......... 8
Shelves and Bins ................. 4
Water Filter Cartridge ............ 7
Care and C1eardng
Cleaning ....................... 9
Light Bulbs .................... 9
Installation Instructions
Preparing to Install ............. 10
Water Line Installation ........ 11 13
Troubleshooting Tips
Be%re You Call
For Service ................. 14 16
Normal Operating Sounds ........ 14
Consumer Support
Consumer Support ...... Back Cover
Performance Data Sheet ......... 19
Ownership Registration
(Canadian) ................. 21, 22
State of Califiornia l\"ater
Treatment Device Certificate ...... 20
Warran V (Canadian) ............ 17
l\;arranb_ (U.S.) ................. 18
Cdte 5 cdte
Rdfrigdrateurs
Lasectionfran_aisecommence_la page23
Mesures de sdcuritd
Comment vous d4barrasser
convenablement de votre
ancien rdfrig&amur ................... 23
Cordons prolongamurs ................ 23
Mesures de sdcuritd ................... 23
Raccordement dlectrique .............. 24
Fonctiormement
Bats _ ldgumes ....................... 26
Cartouche du filtre _teats ............... 28
Clayettes et bacs ...................... 25
Installation des accessoires .............. 25
Le distribumur d'eau et de gla_:ons ........ 29
Les COI1LI1LalKlcs...................... 27
Machine i gla_:ons atttomadque ........ 28 29
Entretien et nettoyage
Nettoyage ........................... 30
Rcmplacelnent des ampoules ........... 30
Installadon
Installation de la
condttite d'eau .................... 32 34
Pr@aration .......................... 31
Conseils de ddparmage
Avant d'appeler tm r@arateur ........ 3638
Bruits de fi)nctionnelnent
normatLx ............................ 35
Sendce gtla clientele
Feuilletde donndes relatives _tla
perfl)rmance de la
cartouche HWF ...................... 40
Garantie pour la
clientble au Canada ................... 39
Sen'ice _tla client#lc ................... 41
Lado a lado
Laseccidnenespafiolempiezaonlap_gina42
I_ormad6n de seguridad
Cables dc extensidn ................... 42
Conectar la electricidad ................ 43
Deshacerse debidamente
de su refrigerador ..................... 42
Precauciones de segllridad ............. 42
Instrucciones de operaci6n
CarmdLo dcl filtro de agxm ............. 47
Controles del refrigerador .............. 46
Dispensador ......................... 48
Dispositivo automStico
para hater hielo ................... 47 48
Entrep_glos y recipientes ........... 44 45
Gavetas de almacenmniento ............ 45
Instalacidn dc las caracterfsticas ......... 44
Cuidado y limpieza
Limpieza ......................... 49@0
Rcemplazo de bombillas ............... 50
Instrucciones de instalacidn
Instalacidn dc la llnea
de agua .......................... 53 56
Preparacidn para
instalar el refrigerador .............. 51 52
Solucionar problemas
Antes de solidtar un sen_icio ........ 58_30
Sonidos normalcs
de la operacidn ....................... 57
Servicio al consumidor
Garantfa para consumidores
en los Estados Unidos ................. 61
Hoja de datos de
fimdonamiento ...................... 62
Servicio al consmnidor ................ 63
Writeyourmodelandserialnumbershere:
Model#
Serial#
Find these mmLbers on alabel inside the
refrigerator compartlnent at tile top on tile
right side behind tile controls. 19703351P020 49-60514-3 09-10GE

IMPORTANTSAFETYINFORMATION.
REAl)ALLINSTRUCTIONSBEFOREUSING.
,&WARNING!
Use this appliance only for its intended purpose as described in this Owner's Manual.
SAFETYPRECAUTIONS
When using electrical appliances, basic safety precautions should be followed, including the following:
This refrigerator must be properly inst_ed
and located in accordance with the Inst_dlation
Instructions befi_re it is used.
Do not zdlowdlildren to climb, stand or hang
on die sheh'es in die refrigeraor. They could damage
die refrigerator and seriously injure thelnseh'es.
Do not ouch die cold surfaces in die freezer
comparunent when hands are damp or wet. Skin may
stick to these extrelnely cold surthces.
Do not sore or use gasoline or odler flammable
vapors and liqttids in tile vidnib_ of Oilsor any odler
appliance.
NOTE."Turningtherefrigeratoroff viathecontrolson
thetouchpaneldoesnotshutoff electricalpowertothe
refrigerator.
Do not refreeze frozen floods which have thawed
completely
In refrigerators with auomatic icemakers,
avoid contact with die moving parts of tile
ejector medlanism, or widl die heating element dlat
releases the cubes. Do not place fingers or hands on
die auomatic icemaldng medlanism while die
refrigerator isplugged in.
Keep fingers out of die "pindl point" areas;
clearances between file doors and between
the doors and cabinet are necessarily small.
Be careful closing doors when dlildren are
in the area.
Unplug tile refrigerator befbre cleaning and makiilg
repairs.
NOTE."Westronglyrecommendthatanyservicingbe
performedbyaqualifiedindividual
,&DANGER!RISKOFCHILDENTRAPMENT
PROPERDISPOSALOFTHEREFRIGERATOR
Child entrapment and suflbcation are not probleins of
the past.Junked or abandoned refrigeraors are still
dangerous...even if dley will sit fi_r'just a few days." If
you are getting rid of your old refrigeraor, please fi_llow
the instructions below to help prevent accidents.
BeforeYouThrowAway YourOldRefrigeratoror
Freezer:
Take off the doors.
Leave the shelves in place so that children may not
easily climb inside.
Refrigerants
_M1refrigeration products contain refrigerants, whidl
under feder_dlaw must be removed prior
to product dispose. If ?vmare getting rid of all
old refrigeration product, dleck with the company
han(Hing the dispos_ about what to do.
2
USEOFEXTENSIONCORDS
Because of potential safety hazards under certain conditions, we strongly recommend
against the use of an extension cord.
However, if you must use an extension cord, it is absolutely necessary that it be a UL-listed (in the [Jnited States_or a
C_A-hsted (in Canada!, 3-wire grounding t_1)eappliance extension cord having a grounding t_1)eplug and outlet
and that the electrical rating of the cord be 15 amperes (minimum) and 120 vohs.

GEAppliances.com
,&WARNING!
HOWTOCONNECTELECTRICITY
Do not, under any circumstances, cut or remove the third (ground) prong from the power cord. For
personal safety, this appliance must be properly grounded.
UREpROpE R OROU1D
/// EXISTS BEFOREUSE
The power cord of d_is appliance is equipped wid_ a 3-prong ;grotmding! plug whid_ mates
with a standard 3-prong ;grounding) wall outlet to minimize the possibiliff of electric shock
hazard from this appliance.
Have the wall outlet and circttit d_eckcd by a qualified electridan to make sure the outlet is
properly grounded.
If the outlet is a stm_dard 2-prong outlet, it is your personal responsibiliff and obligation to
have it replaced wid_ a properly grotmded 3-prong wall outlet.
The refrigerator should always be plugged into itsown
individual electricN outlet which has a voltage rating that
matches the rating plate.
This provides the best pert})rmance and also prevents
overloading house wiring cirolits whid_ could cause a tire
hazard from covefl_eatedwires.
Never unph g your refrigerator by pulling on the power cord.
_Mwaysgrip plug tirmly and pull straight out from the outlet.
Repair or replace iminediately all power cords dmt have
become frayed or otherwise damaged. Do not use a cord that
shows cracks or abrasion damage along its length or at either
end.
When moving the refrigerator away from the
wall, be careful not to roll over or damage the
power cord.
ReadandfollowthisSafetyInformationcarefully.
SAVETHESEINSTRUCTIONS
3

Howtoinstaflfeatures.(Not all features are on all models.)
(_ TOP FREEZER SHELF
Make sure the shelf front locks into
position.
Top Freezer Shelf
(_ FREEZER DOOR SHELF FRONTS
Make sure that the shelf front locks
into position.
NOTE: On dispenser models, the
longer shelf fronts go in the top
two positions.
To remove: Lift the shelf extender
straight up, then pull out.
Toreplace: Engage the shelf
extender in the molded supports of
the door and push in. It will lock in
place.
(2) FILTER CARTRIDGE
Remove Bypass Plug Install Filter Cartridge
@LOWER FIXED DOOR BINS
Make sure the bin fronts lock into position.
=
I
Lower Door Bin
@DAIRY COVER
@BOTTLE RETAINER
@ADJUSTABLE
DOOR BINS
DOOR BIN SNUGGERS
Toremove; Lift the front
of the bin up, then pull
out.
To replace or relocate:
Engage the bin in the
molded supports of the
door, and push in. Bin
will lock in place.
Abouttheshelvesandbbs.(Not allfeatures are on allmodels.)
Rearrangingthe Shelves
RefrigeratorShelves: FreezerPan:
ToRemove ToReplace ToRemove
O Tilt up
Lift up and out
y@ Insert
top hook
4
Lower re
lock i1_ _"
place
L
Remove the pan 1)ypulling it
t})rward,lifting up the front and
sliding it past the stop location.
FreezerShelves:
ToRemove

GEAppliances.com
Slide-Out Spillproof Sheff(onsomemodels)
Tile slide-out spillproof shelf allows y_m to
reach items stored behind others. Tile speci_
edges are &sialed to help prevent spills from
dripping to lower shelves.
NOTE:Makesureyoupushtheshelvesall the
waybackin beforeyouclosethedoor.
I _ i
Spfllproof Shelves(onsomemodels)
Spillproof shelves have speci_ edges
to help prevent spillsfrom dripping to
lower shelves.
Aboutthecrispersandpans.(Not all features are on all models.)
Adjustable HumidityCrispersand SnackPan(onsomemodels)
Slide the control all the way to the Slkte the control all the way to the Lowsetting
Highsetting to provide high humidi_' to provide lower humidly' levelsrecommended
recommended tiermost vegetables, tiermost fruits.
c0_aeSt
ConvertibleMeat Pan(onsomemodels)
The convertible meat pan has its own cold air
duct to allow a stream of cold air from the
freezer comparmlent to flow around
file pan.
ThevariabletemperatureCOntrolregulates the air
flow from the freezer compartment.
Set control lever up to convert die pail
to normal refrigerator temperature and provide
extra vegetable storage space. Cold air duct is
turned off. Variable settings between dlese
extremes can be selected.
Set control lever dowRto tile coldest setting to
store fresh meats. If lever is left ill meat position
fi_ralong period of time, some frost may fi_rm
on the inside of the pail.
When replacing the crispers, make
sure you slide them through the
crisper guides.
CrisperRemoval
Crispers Call easily'be removed by tilting up
slightlyand pulling past stoplocation. If die door prevents you from taking out
die crispers, tile refrigerator will need to
be rolled fi_rward until tile door opens enough
to slide the crispers out. In some cases, when
you roll tile refrigerator out, you will need to
move the refrigerator to
the left as you roll it out.
5

Aboutthecontrolsontherefrigerator.
Your controls will look like one of the following:
Startup Steps for Proper TemperatureControl
STEP 1 SetFreshFoodControl on "5."
STEP 2 Set FreezerControlon "5."
STEP 3_\_MT 12HOURS tbr temperatureto stabilize.
STEP 4_f a chm_geisneeded,movethe controlone number at a thne
m_dallow 12hours tbr temperaturetostabilize.
j OIS OFF
r 9 IS COLDEST
NOTE"Turning thereikigeratorto the 0(off)settingvia the controlsdoes
not shutoffelectricalpowerto the reti'igerator.
Controlsettingswillvarybasedonpersonalpreferences,usage
andoperatingconditionsandmayrequiremorethanoneadjustment
@ @ ® @ @
uo1_3se_o_d_ i _ i i i ii ii ii ii ii ii ii ii ii i
ToChangeTemperatureControlSettingwithTouchPads:
• Freezersettingison dieleftsideof die display
• Reti'igeramrsettingison the rightsideof thedispla?:
Pressthe Warmerorgoldorpadtbr comparunent and
direction&sired.
Presentcontrol settingmnnber willilhmfinate.
Each thnethe pad ismudled, compm'unentsetting
chm_gesone mnnber.
A displayof 1iswannest and 9is thecoldestsetdng
ToTumCoolingOff,"
Tostopcoolingind_ereiiqgeratorandfreezercompamnents,ii_t
repeatedlypress the Warmorpadtbr theti'eezeruntilitsdisplay
condnuousNflashes"1".Then, usingthe refkigeramrcontrol,repeatedly
pressWarmerundlboth displaysflash"0". "0" in both displaysrams off
the coolingsysmin. On somemodels,itmay benecessan"m setonlyone
controlm 0m turn off coolingin both compm'unents.
NOTE"Turning therefl'igeramrm the 0 (Off]settingvia the controlsdoes
not shutoffelectricalpowerm the refi'igeramr.
Controlsettingswillvarybasedonpersonalpreferences,usage
andoperatingconditionsandmayrequiremorethanoneadjustment
\
i i! ii )iiiii ii!i
! ii_i_i I ii
Adjust Temperature
@ ....
_ADOrOmr_. _ormi_ _ _Worme_ furboCoo 1
Woter
@
Thetemperaturecontrolsarepresetinthefactoryat37°Fforthe
refrigeratorcompartmentandO°Fforthefreezercompartment.
Allow24hoursforthetemperaturetostabilizetothepreset
recommendedsettings.
ThetemperaturecontrolscandisplayboththeSETtemperatureaswell
astheactualtemperatureintherefrigeratorandfreezer.Theactual
temperaturemayvaryslightlyfromtheSETtemperaturebasedonusage
andoperatingenvironment.
6
Settingeither or both controlsto 05Cstopscooling in both thefreezer
and refrigerator compartments,butdoes not shut off electrical power
tothe refrigerator.
NOTE:Therefrigeratorisshippedwithprotectivefilmcoveringthe
temperaturecontrols.Ifthisfilmwasnotremovedduringinstallation,
removeitnow.

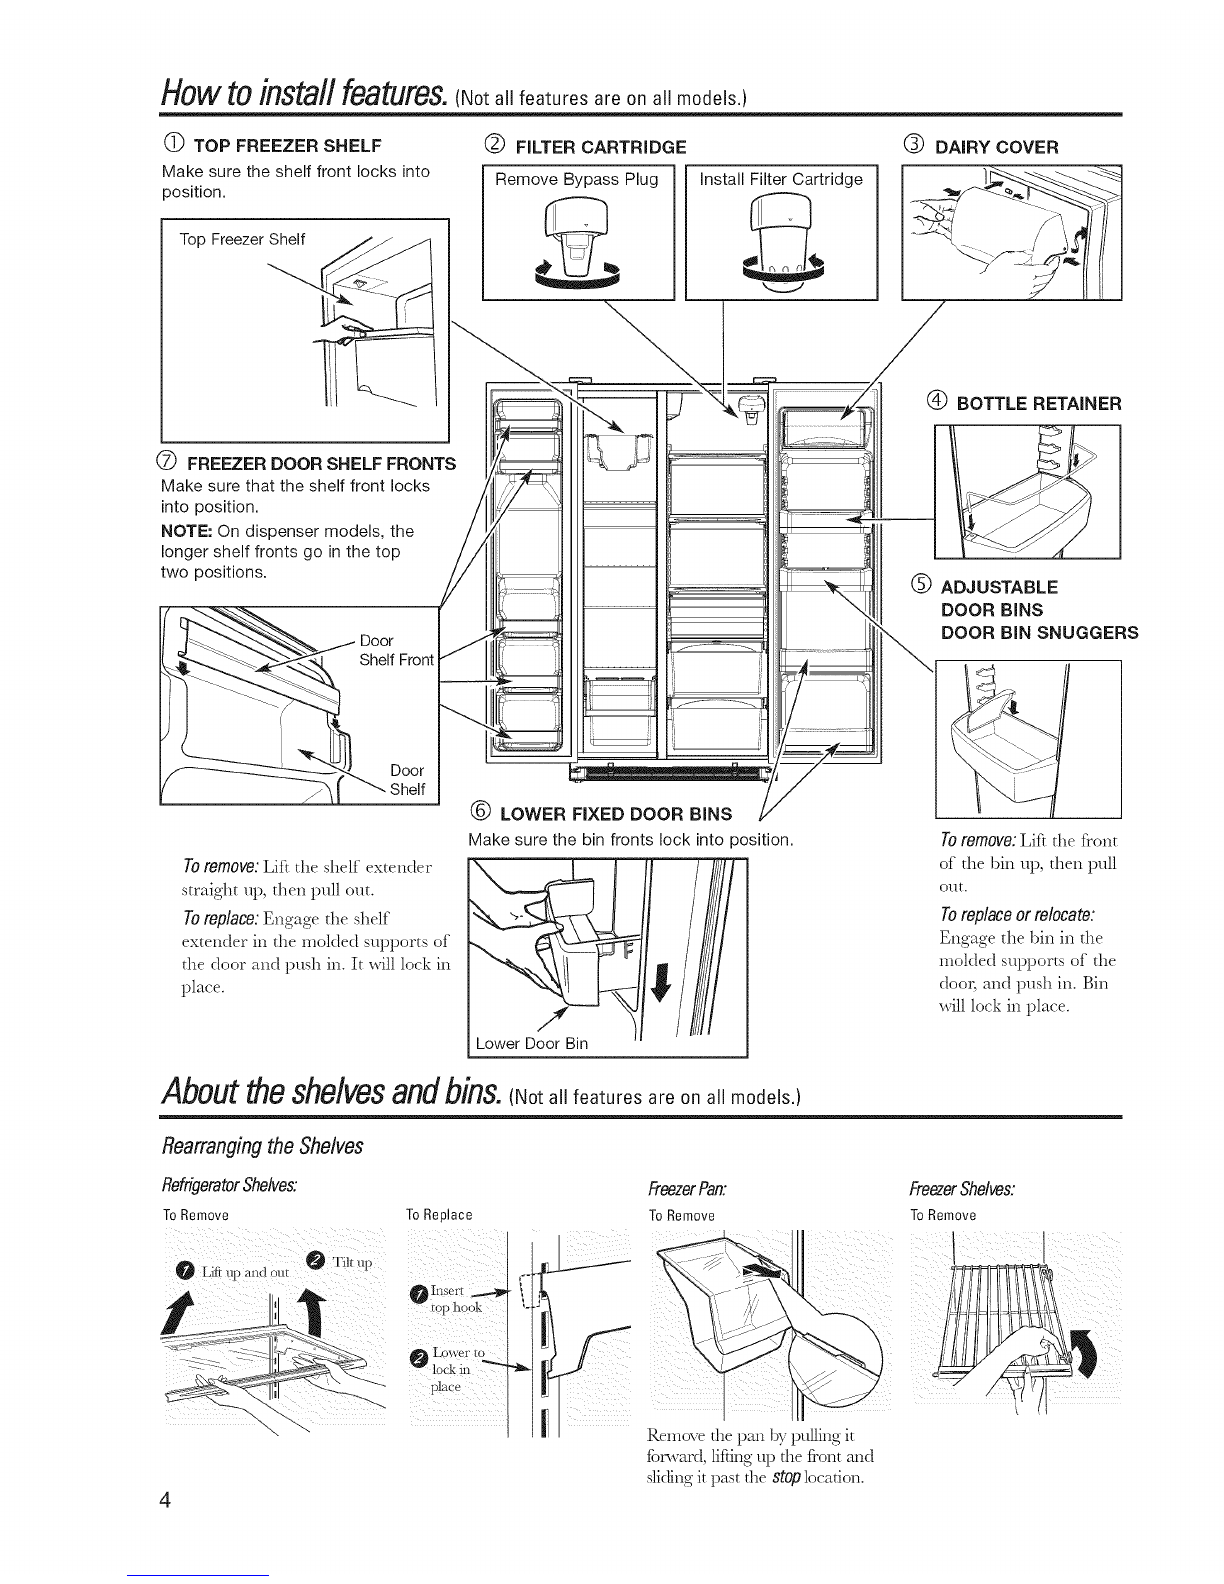
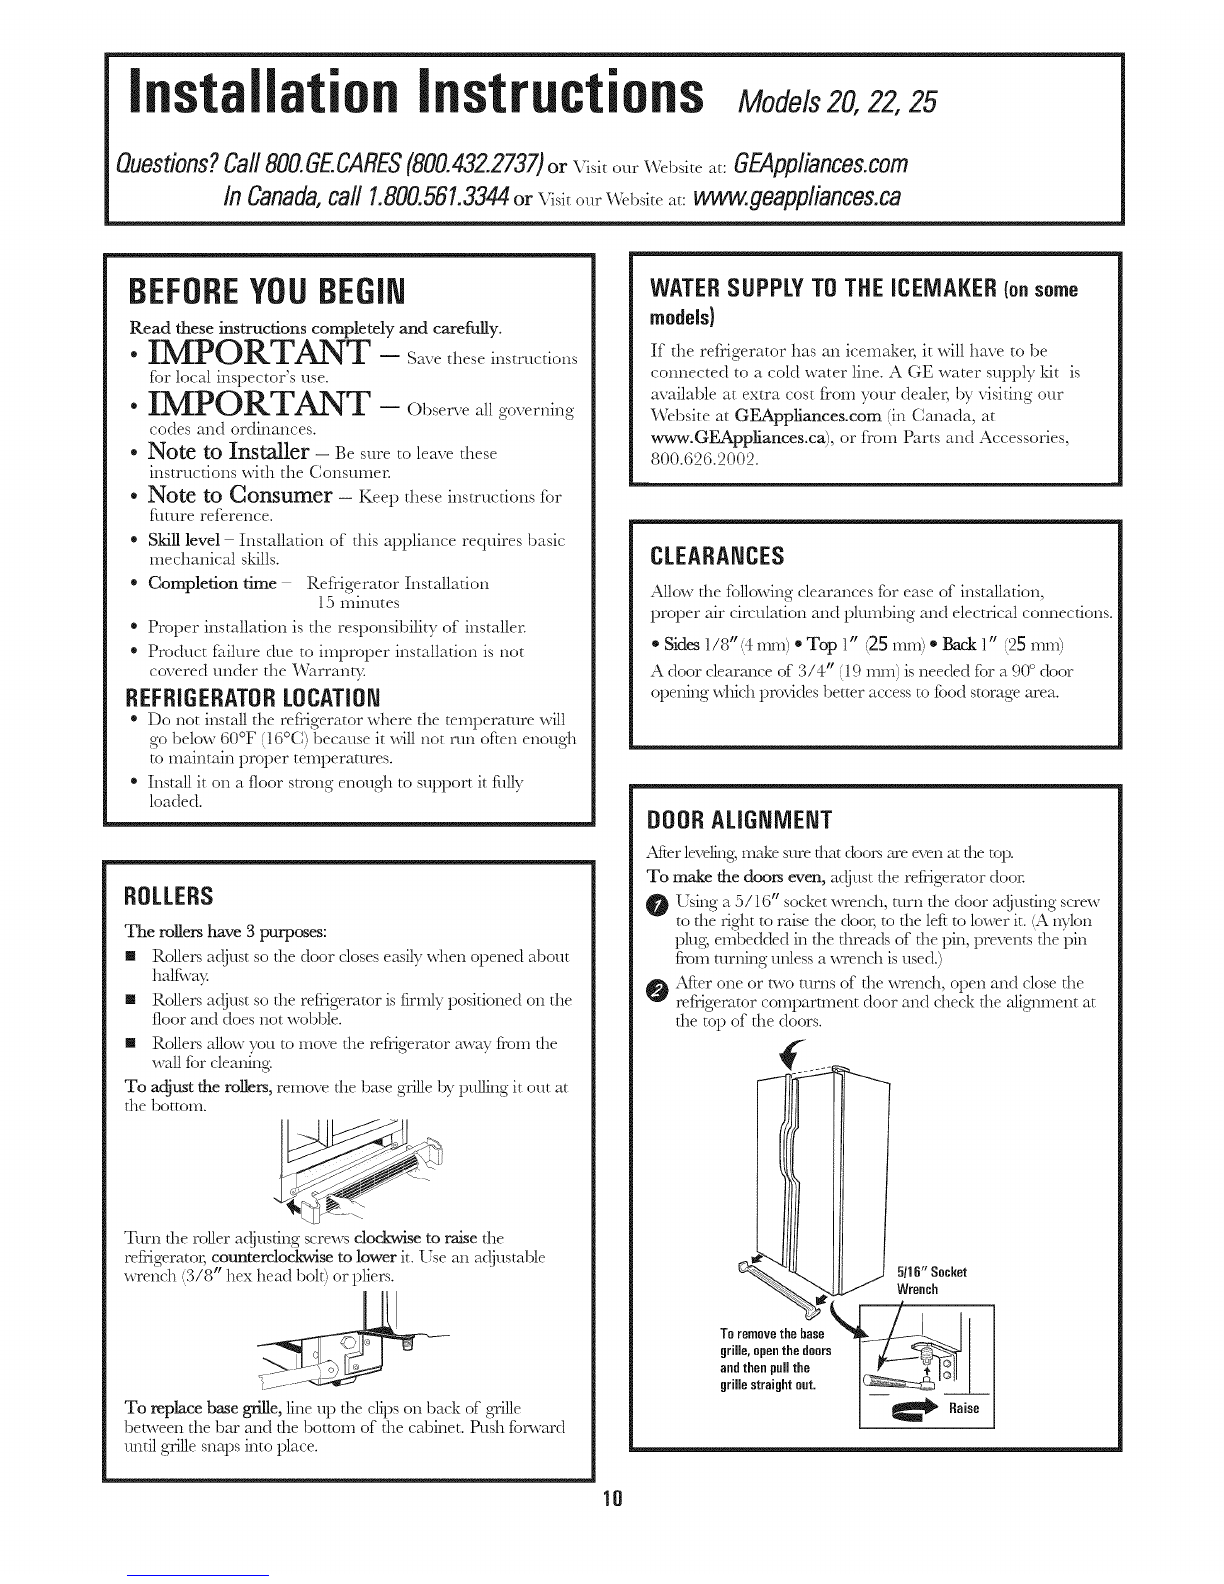
Aboutthewaterfiltercartridde.(Onsome models.) GEAppllances.com
WaterFilterCartridge
The water filter cartridge is located in tile back upper right
corner of the refrigerator compartment.
WhentoReplacetheFilteronModels Witha
ReplacementIndicatorLight
There is areplacement indicator light fi_rtile water filter
cartridge on the dispenser. This light will turn orange to tell you
that you need to replace the filter soon.
Tile filter cartridge should be replaced when tile replacement
indicator light turns red or if the flow of water to the dispenser or
icemaker decreases.
O Line up the arrow on the cartridge and the cartridge hoMer.
Place the top of the new cartridge up inside the hoMer. Do
not push it up into the hoMer,cartridge
. Slowly turn it to tile right until
the lifter stoics.O0NOT
OVERTI6HTEN._4youturnthe
cartridge, it will afitomaticallv Cart idge I I
raise itself into position. Tile" Helder _ _j
cartrktge will niove about 1/2
turn. _--rr=
O Run water t)om the dispenser
tbr l- l/2 gallons ,about three
mmutes_ t6 clear the s?stem and prevent sputtering.
Press and hold the RESETWATERFILTERpad ,:on some
models) on the dispenser tbr three seconds.
WhentoReplacetheFilteronModels Withouta
ReplacementIndicatorLight
The filter cartridge should be replaced every six months
or earlier if the flow of water to the water dispenser or icemaker
decreases.
RemovingtheFilterCartridge
If you are replacing the cartridge, first remove the aM one by
slowb7turning it to the left. Do notptill down on the cartridge. A
small amount of water may drip dovcsl.
InstallingtheFilterCartridge
If you are replacing a
SmartWater cartrk'lge
with an adapml; it must
be removed befiore
inst=dling the cartridge. ,J
To remove the adq)mr,
mrn it to the leR about
1/4tur,1.
If you, are replacing._ a.Wit,,""au.p,_,"'J^"'-:Without adapter
Water byCulhgan cartridge, .
{appearance
leave the adapter in placel may vary)
This adapter will stay in the refrigerator when you replace
filture cartridges.
On models without a replacement indicator light,
apply the month and ?'ear sticker to the new cartridge to
remind you to replace the filter in six months.
OF ill the replacement cartridge with water from the tap to
a_ow riOTbetter flow from the dispenser immediately after
installation.
Abouttheautomaticicemaker.
A newly-installed refrigerator may take 12-24 hours to begin making ice.
FilterBypassRug
xt_tl IiltlSt use the filter b'q_ass pluR when a replacement filter
carrndge ss slot available. Tile &spenser and the memaker _ll not
operat_ without the filter or filter'bypass plug
Smar_Water
..................
Fiiter_ .. I_
Bypass
P!a_
Water by Cu,qigan
To use the filter bypass pluo on Water by CulMan models,
you must first res_iove the fiIter adapter from tl_e cartridge
holder by turning it to the left. *
For tile maximmn benefit of your filtration system, GE
recommends the use of GE branded SmartWater filters only.
T " O _ " _ " "O "
[stag GE branded filters m GE and Hoq)omt refrigerators
provi_tes optimal perfiormance and reliabflits: GE l_{_anded
SmartX\'ater filters are always the nght chome because they are
patented and desig_led specifically (dr GE products. GE "
Smart'Water filter; meet riaorous'industrv _%'SFstandards fior
safety and quality that are'hnportant fiorioroducts that are
filtenn g your water. GE has slot qu=ilsfied non-GE branded filters
fioruse'H_ GE and Hoq)oint refri_oSrators and there is no
assurance that non-GE branded _lters meet GE's standards fior
quali_; pertbrmance and reliabili_:
If you have questions_:isit our Website
at GEApphances.com or call 1.800.GE.C_ES
_1.800.4"39.97373.
Replacementfilters:
Toorderadditional filter ca¢ridgesin the UnitedStates,
visit our Websiteat GE_Appllances.com,or call GEParts
andAccessories,800.6262002
Filter Model N'I_\;F
Custoi_kel;s in _anada,sllotild constilt the yellow pages fiorthe
nearest _\la )e _e_a'sce £_ellter.
Customers outside of the United States or (_anada should
contact the loc=ildistributor.
!Automatic Icemaker{onsomemodels)
lVhen the refrigerator has been connected to
the water suppl?; slide the power switch to the
0Nposition.
The icemaker will fill with water when
it cools to 15°F When the bin fills to the level
of the feeler arm, the icemaker will stop
producing ice.
Be sure nothing interferes with the sweep of the
feeler arm.
Throw awa' the first few batches of ice to =Ztow
the water lisle to clear.
The iceinaker will produce seven cubes per
cycle approximately 100 130 cubes in a 24-
hour period, depending on freezer
COlllpartiileilt telllperature_ roolll
telnperature, number of door openings and
other use conditions.
_bu will hear a buzzing sound each time the
icemaker fillswith water. 7

Abouttheautomaticicemaker.
It is normal fl0r several cubes to be joined together.
If ice is not used frequentl}; aM ice cubes will become
doud?; taste stale, and shrink.
IcemakerAccessoryKit
If your refrigerator did not come zflreadyequipped
with an automatic icelnaker, an icelnakcr accessoWldt
is availal01eat extra cost. Check the back of the
refrigerator fl0rthe specific icelnakcr ldt needed fl0r
your model.
Abouttheiceandwaterdispenser.(Onsome models.)
//
Spill Shelf
ToUse the Dispenser
• • ®
Press the glass gendy against the top of the
dispenser cradJe.
The spill shelf is not self<kaining To reduce
water spotting, the shelf and its gTilleshould be
cleaned reglflarly.
LockingtheDispenser(onsomemodels)
O --_ Press tileLockpadflor
| 3secondsto locktile dispenser
LockJ and controlpmlel.To unlock,
pressmxt hold
Hold 3 seconds the pad again fl0r3seconds.
If no waterisdispensedwhentherefrigeratoris
first installed, theremaybe air in thewater line
system.Pressthedispenserarmfor atleast two
minutestoremovetrappedair fromthewaterline
andtofill thewatersystem.Toflushoutimpurities
in thewaterline,throwawaythefirstsixglassfuls
of water.
CAUTION:Neverput fingersor anyother
objectsintotheicecrusherdischargeopening
DispenserLight
Q This pad turns the nightlightin
igh lightalsocomes on when the
dispensercradle ispressed. If this
lightNlrns out, it should be
replacedwith a 6wattm_xilnmn,
12x'c01tDC 1oullo.
Ice StorageDraweron DispenserModels
Toremove:
Slide the icemakcr power switch to the OFFposition.Pull
the drawer straight out and then liftpast the stOpposition.
Toreplace:
When replacing the drawer, make sure to push it firmly
into place. If it does not go all the way badq remove it and
rotate tile drive medlanism l/4 turn. Then push tile
drawer back again.
Drive
Mechanism
Important FactsAbout YourDispenser
Do not add ice from trays or bags to tile storage bin. It may
not crush or dispense well.
Avoid c0verfilling glass with ice and use of narrow glasses.
Backed-up ice can jam the dmtc or cause the door in the
dmte to freeze shut. If ice is blocldng the chute, poke it
through with a wooden spoon.
Beverages and floods shouM not be quick-dlilled in die ice
storage bin. Cans, bottles or flood pa&ages in the storage bin
may cause the icelnakcr or atger to jam.
To keep dispensed ice from missing the glass, put the glass
dose to, Nit not toudling, the dispenser c0pening
Some crushed ice may be dispensed even though }ou selected
CubedThis happens occasionally when a few cubes have been
left in the crusher.
_M'ter crashed ice is dispensed, some water may drip from the
dmte.
Sometimes a small mound of snow will florm on the door in
the ice dmte. This condition is normal and usually occurs
when you have dispensed crushed ice repeatedly: The snow
will eventually evaporate.
The first glass of water dispensed may be warmer than the
fl01k_ving ones. This is normal.
Dispensed water is not ice cold. For colder ware1; simply add
crashed ice or cubes befl0re dispensing waten

Careandcleaningof therefrigerator, a4ppliancescem
Cleaningthe Outside
Thedispenserdripare&,:'onsome modelsl beneadl
tile g'lq_e, shotdd be wiped &): l\ater left in this
area may leave deposits. Remove tile deposits by
adding mxliluted vinegar to the well. Soak until the
deposits disappear or become loose enot@l to tqnse
21\va} _.
Thedispensercradle,on some models;. Before
cleaning; lock the dispenser 1V pressing and holdi_ N
the t0Ckpad fbr 3 seconds. Clean _th warm water
and baking soda solution_bout
a tableN)oon (15 ml;; of baldng soda to a quart (1 1)
of watel: Rxlse thorot@_y and wipe dr):
Thedoorhandlesand_im.Cleanwith acloth
dampened with soapy ware1:D1T with a soft cloth.
Keeptheou'tsideclean,l\]pe _dth a dean cloth
lighdy dampened with ]dtchen appliance wax or
mild lkluid dish detergent. D1T and polish with a
clean, soft cloth.
The stainless steel door panels and handles.
Tile stahfless steel panels can be cleaned with
a eonm_erciaUy available stai_ess steel cleaner
or a similar pro&mr using a dean, soft cloth. Do
not use appliance wax, polish, bleadl or prodtmts
containing d_orine on stahfless steel doors and
handles.
Rn" best restflts, GE reconm_ends using sta_tfless steel
cleaner PM 10X311 with the 10X307 polishh_g
cloth, or for convenience the SS cleaning _dl)es, pmr
nuraber %\LN10X10001.
Donotwipetherefrigeratorwithasoileddishcloth
or wettowel Thesemayleavearesiduethatcan
erodethepaint.Donotusescouringpads,
powderedcleaners,bleachorcleanerscontaining
bleachbecausetheseproductscanscratchand
weakenthepaintfinish.
fill Cleaningthe Inside
Tohelppreventodors,leave an open box of baking
soda in the refiigerator and fieezer compmtments.
Unplugtherefrigeratorbeforecleaning.If thisisnot
practical, _ng excess moisture €,tit of sponge or
cloth when cleaning around switches, lights or
controls.
Use warm water and ba]dng soda sohltio_al)out
a tal)lespoon (15 ml) of ba]&lg soda
to a quart (1 ll;of wateI: This both deans and
neutralizes odors. R_lse and wipe dry
AZter deani_ N tile door gaskets, apply a thh_ layer
of petroleumjeUy to tile door gaskets
at the hh_ge side. This helps kee l) the gaskets fi'om
sticl&_g and bending out of shape.
DrainopeninginfreezercompartmentDmSlg Farly
cleaning; remove bottom fi'eezer pan and flush a
solution of bald_N soda 1 teaspoon (5 ml) and 2
cups (500 nil) of hot 'not bo_ng_lwate_--throt@l
the drain line with the hell) of a meat baste1: This
will hell) eliminate odor and re&me the likelihood
of a dogged drahl line. If drain becomes dogged,
use a meat baster and baldng soda solution to f}nce
the clog throt@l the chain line.
Avoidcleaningcoldglassshelveswithhot water
becausetheextremetemperaturedifferencemaycause
themtobreak.Handleglassshelvescarefully.Bumping
temperedglasscancauseit toshatter.Donot washany
plasticrefrigeratorpartsin thedishwasher.
Behind theRefrigerator
Be carefitl when moving the refrigerator away from the wall. All
bl)es of floor coverings can be damaged, particularly cushioned
coverings and those with embossed surt_aces.
Pull d_e refrigerator straight out m_d return it to posidon
by pushing it straight in. Moving the refrigerator in a side
direction may reaflt in damage to the floor covering or
refrigerator.
When pushing the refrigerator back, make sure you den? roll over
the power cord or icemakersupply line (on somemodels).
Preparingfor Vacation
For long vacations or absences, remove flood and m_plug d_e
refrigerator. Clean d_e interior wid_ a baking soda solution of
one tablespoon (15 ml) of baldng soda to one quart (l l) of water.
Leave the doors open.
Slide the icemaker power switch to the OFFpositionand shut off
the water supply to the refrigerator.
Preparingto Move
Secure all loose items such as grille, shelves and drawers by taping them securely in place to prevent damage.
Besuretherefrigeratorstaysin an uprightpositionduringmoving.
Replacingthe Light Bulbs
NOTETurningthe refrigeratorto the0(off)settingviathe controlsdoesnotshutoff electricalpower totherefrigerator.
[ nplug the refrigerator. _ Replace with an appliance bulb of the same or lower
wattage.
Remove tl_eshelf just below tl_eli0_t shield. Reinstall the shelf and plug the refrigerator back in. 9

II II ructions Models20,22,25
Questions?Call800.GE.CARES(800.432.2737)orvisitourW_bsiteat:GEAppliances.com
InCanada,ca# 1.800.561.3344orvisitourW_bsiteat:ww_.geappliances.ca
BEFOREYOUBEGIN
Read these instructions completely and carefully.
"IMPORTANT - Savetheseinstructions
for local inspector's use.
.IMPORTANT - Observe all governing
codes and ordinances.
, Note to Installer - Be sure to leave these
instructions with the Consumer.
. Note to Consumer - Keepthese instructions for
future reference.
* Skill level Installation of this appliance requires basic
mechanical skills.
*Completion time Refrigerator h>tallation
15 minutes
*Proper installation is the responsibility of installer.
*Product failure due to improper installation is not
covered under the lVarran_ _.
REFRIGERATORLOCATION
*Do not install the refrigerator where the temperature will
go below 60°F (16°(:) because it will not run often enough
to maintain proper temperatures.
* Install it on a floor strong enough to support it fully
loaded.
ROLLERS
The milers have 3 purposes:
[] Rollers adjust so the door doses easily when opened about
halfwa?:
[] Rollers adjust so the refrigerator is firmly positioned on the
floor and does not wobble.
[] Rollers allow you to move the refrigerator away from the
wall tbr cleaning
To adjust the milers, remove the base grille by pulling it out at
the bottom.
Turn the roller adjusting screwsclockaviseto raise the
refrigerate1; counterclockwise to lower it. Use an adjustable
_sTench(3/8" hex head bolt_jor pliers.
To replace base grille, line up the dips on back of grille
between the bar and the bottom of the cabinet. Push fi_rward
until grille snq)s into place.
WATERSUPPLYTO THE iCEIVlARER{onsome
models)
If the refrigerator has an iceinaker, it will have to be
connected to a cold water line. AGE water supply kit is
available at extra cost from your dealer, by visiting our
Wcbsite at GEAppliances.com (in Canada, at
www.GEAppliances.ca), or from Parts and Accessories,
800.626.2002.
CLEARANCES
Allow the following clearances tbr ease of installation,
proper air circulation and plumbing and electrical connections.
*Sides 1/8" i!4nnn) * Top 1" (25 ram) * Back 1" (25 ram)
A door clearance of 3/4" (19 rain) is needed tbr a 90 ° door
opening whirl] provides better access to tbod storage area.
DOORALJGNVlENT
_Micrleveling,make sure that doors m-eeven at the top.
To make the doors even, _uljustthe refrigerator door.
Using a 5/16" socl<ct_xTend_,turn the door adjusting screw
to d_eright m raise dm door, to the left to lower it. ;A nylon
plug, embedded in the threads of the pin, prevents the pin
from turning ufftessa _Tend_ is used.)
_M'terone or two turns of the _sTench,open and close the
refrigerator compartment door and cl_eckthe alig_mmntat
the top of the doors.
5116" Socket
Wrench
To removethe hose
grille, open the doors
and then pull the
grille straight aut.
10

iNSTALLiNG
installation
THEWMER LiNE
instructions
BEFOREYOUBEGIN
Recommended copper water supply kits are WXSX2,
1\'_28X3 or 1\'_28X4, depending on the amount of ulbing
you need. Approved plastic water supply lines are GE
SmartConnec¢" Refrigerator Tubing (1\'2_408X10002
1\'2_408X 10006, 1\'LX08X 10015 and 1\'2_408X 10025).
When connecting your refrigerator m a GE Reverse Osmosis
"_\;amr System, the o_fly approved installation
is with a GE R\TKit. For other reverse osmosis water systems,
fi)llow the manuthcmrer's recommendations.
If the water supply to the refrigerator is froln a Reverse
Osmosis Water Filtration System _\'D the refrigerator also
has a water filter, use the refrigerator's filter bypass plug:
[sing the refrigerator's water filtration cartridge in
conjunction with the RO filter cast resuh in hollow ice cubes
and slower water flow from the water dispenser.
This water line installation is not warranted by the
refrigerator or icelnaker mmmfacmrer. Follow these
instructions carefully to minimize the risk of expensive water
damage.
Water hammer iwater banging in the pipes) in house
plumbing can cause damage to refrigerator parts and lead to
water leakage or flooding Call a qualified plumber to correct
water hammer before installing
the water supply line to the refrigerator.
To prevent burns and product damage, do not hook
up the water line to the hot water line.
If you use your refrigerator heft)re connecting the water line,
make sure the icelnaker power switch is in the 0YYposition.
Do not install the icemaker robing in areas where
telnperamres fall below freezing:
All installations must be in accordance with local plumbing
code requirements.
WARNING - Co,,,,ectto potablewater
supply only.
WHAT YOUWiLL NEED
*Copper or GE SmartConnect TM Refrigerator Tubing kit,
1/4" outer diameter to connect the refrigerator to the
water supply. If using copper, be sure bott_ ends of the
robing are cut square.
To determine how much robing you need: measure
the distance from the water valve on the back of the
refrigerator to the water supply pipe. Be sure there is
sufficient extra robing to allow the refrigerator to move out
from the wall aRer installation.
GE SinartConnec¢ MRefrigerator Tubing Kits are available
in the following lengths:
2' (0.6 in) WX08X10002
6'(1.8 m) WX08Xl0006
15' (4.6 m) WX08X10015
25' (7.6 m) WX08X10025
WHM YOUWiLL NEED(CONT.)
NOTE: The only GE approved plastic robing is that
supplied in GE SmartConnect TM Refrigerator Tubing kits.
Do not use any other plastic water supply line because the
line is under pressure at all times. Certain types of plastic
will crack or rupture with age and cause water damage to
your home.
*AGE water supply kit containing robing, shutoff valve
and fittings listed below'_ is available at extra cost from
your dealer or froln Parts and Accessories,
800.626.2002.
. A cold water supply. The water pressure must be
between 20 and 120 p.s.i. (1.4 8.2 bar) on models without
a water filter and between 40 and 120 p.s.i. (2.8 8.2 bar)
on models with a water filter.
. Power drill.
. 1/2" or adjustable wrench.
. Straight and Phillips blade screwdriver.
*Two 1/4" outer diameter compression nuts and
2 ferrules (sleeves) to connect the copper tubing
to the shutoff valve and the refrigerator water valve.
OR
*If you are using a GE SmartConnect TM Refrigerator
Tubing kit, the necessary fittings are preasselnbled to the
tubing
*If your existing copper water line has a flared fitting at
the end, you will need an adapter (available at plumbing
supply stores) to connect the water line to the refrigerator
OR you can cut off the flared fitting
with a tube cutter and then use a compression fitting. Do
not cut formed end froln GE SlnartCom_ect TM
Refrigerator tubing.
Shutoff valve to connect to the cold water line.
The shutoff" valve should have a water inlet with a
minimum inside diameter of 5/32" at the point of
connection to the COLD WATER LINE. Saddle-_pe
shutoff valves are included in many water supply kits.
Before purchasing, make sure a saddle-D_pe valve
COlnplieswith your local plumbing codes. Install the
shutoff valve on the nearest frequently used drinking
water line.
11

installation instructions
JJ-f]SHUT OFFMAiN WMER SUPPLY
[!] DRILLTHE HOLEFORTHEVALVE
Choose a location for the valve that is easily accessible.
It is best to connect into the side of a vertical water
pipe. When it is necessary to connect into a horizontal
water pipe, make tile connection to tile top or side,
rather than at the bottom,
to avoid drawing off"any sediment froln tile
water pipe.
Drill a 1/4" hole in tile water pipe (even if using a self-
piercing valve) using a sharp bit. Rclnove any burrs
resulting from drilling tile hole in tile pipe. Take care not
to allow water to drain into the drill. Failure to drill a
1/4" hole may result in reduced ice production or
smaller cubes.
i
[_] FASTENTHESHUTOFFVALVE
Fasten the shutoff valve to tile cold water pipe with the
pipe clamp.
Tighten tile clalnp screws until tile sealing washer begins
to swell.
NOTE: Do not covertighten or you may crush tile
robing: Washer
Pipe Clamp
Clamp Screw --
inlet End
Vertical Cold
Water Pipe
NOTE: Commomsealth of Massachusetts Plumbing
Codes 248CMR shall be adhered to. Saddle valves are
illegal and use is I,Ot permitted is'*Massachusetts. Consult
with your licensed plumber.
[_ ROUTETHE TUBING
Route tile tubing between tile cold water line and tile
refrigerator.
Route tile tubing through a hole drilled in tile wall or
floor (behind tile refrigerator or adjacent base cabinet)
as close to tile wall as possible.
NOTE: Be sure there is sufficient extra tubing to allow
tile refrigerator to move out from tile wall after
installation.
J-if]CONNECTTHE TUBING TOTHE VALVE
Place tile compression nut and ferrule (sleeve)for copper
robing onto tile end of the robing and co,mect it to the
shutoff valve.
Make sure tile tubing is fully inserted into tile valve.
Tighten tile compression mlt securel>
For plastic tubing from a GE SmartConnect TM
Refrigerator Tubing kit, insert tile molded end
of tile tubing into tile shutoff" valve and tighten
compression nut until it is hand tight, then tighten one
additional turn with a wrench. Overtightening may
cause leaks. lressionRut
Packing Nut
OutJet VaJve _FerruJe(sJeeve)
NOTE: Commonwealth of Massachusetts Plumbing
Codes 248CMR shall be adhered to. Saddle valves are
illegal and use is not permitted is'*Massachusetts. Consult
with your licensed plumber.
[g] FLUSHOUT THETUBING
Turn the main water supply on and flush out the tubing
until tile water is clear.
[_ CON_IECTTHE TUBING TOTHE
REFRIGERATOR
NOTES:
*Before making the cosmection to the refrigerator; be
sure tile refrigerator power cord is not plugged into
the wall outlet.
If your refrigerator does not have a water filter, we
recommend installing one if your water supply has
sand or particles that could clog tile screen of tile
refrigerator's water valve. Install it in tile water line
near tile refrigerator. If using a GE SmartConnect TM
Refrigerator Tubing kit, you
will need an additional tube (WX08X10002)
to connect tile filter. Do not cut plastic tube
to install filter.
12

installation instructions
mCONNECTTHETUBINGTOTHE
REFRIGERATOR(CONT.)
Some models have the refrigerator co:mection at the
end of robing located outside the compressor
compartment access cover. On other models, the
compressor coillpartillellt access cover i1]ust be removed
in order to access the refrigerator com:ection at the
water valve.
On models using the refrigerauon com:ection at the
water valve, remove the plastic flexible cap.
©
Place the compression nut and ferrule (sleeve) onto the
end of the robing as shown. On a GE SmartCom:ect _'
Refrigerator Tubing kit, the m:ts
are alrea@ asse:nbled to the robing.
Insert the end of the robing into the refrigerator
connection as far as possible. While holding the robing,
tighten the fitting.
For plastic tubing from a GE SmartConnect"
Refrigerator Tubing kit, insert the molded end of the
tubing into the refrigerator connection and tighten the
compression nut until it is hand tight, then tighten one
additional turn with a wrench. Overtightening may
cause leaks.
Fasten the tubing into the clamp provided as shown to
keep it in position. You may need to pry open the
clamp.
One of the illustrations below will look like the
connection on your refrigerator.
Tubing
Clamp
1/4"
Compression
Nut
1/4"
Tubing
Ferrule
(sleeve)
BeMgerator SmartConnecf_'
Cannection Tubing
J-_CONNECTTHE TUBING TOTHE
REFRIGERATOR(CONT.)
Tubing 1/4"
Clamp CJmpression
_ut
Ferrule
(sleeve)
Refrigerator
Cannection
J-_TURN THEWATERON AT THESHUTOFF
VALVE
Tighten anycom:ections that leak.
Reattach the access cover.
PLUG INTHE REFRIGERATOR
Arrange the coil of tubing so that it does not vibrate
against the back of the refrigerator or against the wall.
Push the refrigerator back to the wall.
STARTTHE ICElVlAKER
Slide the icemaker power switch to the ONposition. The
icelnaker will not begin to operate until it reaches its
operating telnperature of 15°F (-9°C) or belo_xcIt will
then begin operation autolnatically if the icelnaker
power switch is in the 0Nposition.
13

Normaloperatingsounds.
Newer refrigerators sound different from older refrigerators. Modern refrigerators have
more features and use newer technology.
Doyouhear whatI hear?Thesesoundsarenormal
HUMMM,,,
--WHOOSH,,,
[] Tile new high efficiency coinpressor mav run thster and
longer than your old refrigerator and you mav hear a
high-pitched hum or pulsating sound while
it is operating.
[] Sometimes the refrigerator runs fl0r an extended period,
espedall v when the doors are opened frequen@ This means
that the FrostGuardTMfeamre is working to prevent freezer
burn and improve flood presen'ation.
[] _}0umav hear a whooshing sound when the doors dose. This
is due to pressure equalizing within the refrigerator.
WHIR./
[] _)0u mav hear tile thns spinning at high speeds.
This happens when the refrigerator is first plugged in,
when tile doors are opened frequently or when
a large alnount of flood is added to tile refrigerator or
freezer COlnpartlnents. The fans are helping to maintain
the correct telnperatures.
[] If either door is open fl0r over 3 minutes, you mav hear the
tC.tllSCOllle oil in order to cool the light bullos.
[] The thns change speeds in order to provide optimal
cooling and energy savings.
CLICKS,POPS,
CRACKSandCHIRPS
[] _}0u mav hear cracking or popping sounds when the
refrigerator is first plugged in. This happens as the
WATERSOUNDS
6
refrigerator cools to tile correct teinperature.
[] Electronic dampers click open and closed to provide
optimal cooling and energv savings.
[] The COlnpressor may cause a clicking or chirping sound
when attelnpting to restart (this could take
up to 5 minutes).
[] The electronic control board mav cause a clicking sound
when relays activate to control refrigerator COlnponents.
[] Expansion and contraction of cooling coils during and
after defrost can cause a cracking or popping sound.
[] On models with an icelnaker, after an icelnaking cycle,
you mav hear the ice cubes dropping into
the ice bucket.
[] Tile flow of refrigerant through tile freezer cooling coils
mav make a gurgling noise like boiling water.
[] Water dropping on the defrost heater can cause a sizzling,
popping or buzzing sound during the defrost cycle.
[] A water dripping noise mav occur during the defrost cycle
as ice mehs from tile ewqoorator and flows into tile drain
pall.
[] Closing the door mav cause a gurgling sound due to
pressure equalization.
Beforeyoucallforservice...
Troubleshooting Tips
Save time and money! Review the charts on the following
pages first and you may not need to call for service.
Possible Causes What ToDo
Refrigeratordoes not Refrigerator in defrost cycle. - 1\hit about 30 minutes fl)r defrost cvde to end.
operate Freezer control • Move the freezer control to a lower temperature setting
in 0 (off) position.
Refrigerator is unplugged, o Push the ph N completelv into the outlet.
The fuse is blown/circuit • Replace fuse or reset the breaker.
breaker is tripped.
Refrigeratororfreezer Temperature control not set *See Aboutthe controls.
compartmenttoowarm cold enough.
Warm weather or frequent • Set the temperature control one step colder.
door openings. See About the controls.
Door left open. • Check to see if package is holding door open.
14

GEAppliances.com
Possible Causes What ToDo
Vibrationorrattling Front rollers need adjusting. • See Rollers. Slight vibratiol_ is normal.
Motoroperatesfor Normal when refrigerator . _Vait 24 hours fi)r the refrigerator to completely
longperiodsorcycles isfirst plugged in. cool down. "
on -andoff frequently.
(Modemrefrigerators Often occurs when large . This is normal.
amounts of food are
with morestorage
spaceandalarger placed in refrigerator.
rreezer requiremore Door left open. . Check to see if package is holding door open.
operatingtime. They
start andstop otten Hot weather or frequent * This isnormal.
tOmaintain even door openings.
temperatures.) Temperature controls •See About the controls.
set at the coldest
setting.
Frestoricecrystals Door left open. * Check to see if package is holding door open.
on frozenfood
(frostwithinpackage Too frequent or too long
is normal) door openings.
Dividerbdween Automatic energy saver * This helps prevent condensation on the outside.
refrigeratorandfreezer system circulates warm
compartments liquid around front edge
fools warm of freezer compartment.
Automaticicemaker Icemaker power switch o Slide the power switch to the 0Nposition.
does not work is in the OFFposition.
(onsomemodels) Water supply turned offer o See Installingthe water line.
not connected.
Freezer compartment * Wait 24 hours fior the refrigerator to completely
too warm. cool down.
Piled up cubes in the storage * Level cubes by hand.
bin cause icemaker to shut off.
Ice cubes stuck in icemaker. * Turn off the icemake_; remove cubes and turn the
icemaker back on.
Icecubeshave Ice storage bin needs cleaning. * Erupt and wash bin. Discard old cubes.
odor/taste Food transmitting odor/taste * Wrap tbods well.
to ice cubes.
Interior of refrigerator * See Careandcleaning.
needs cleaning.
Smallorhollowcubes Water filter clogged. * Replace filter cartridge with new cartridge or with plug
SIowice cube freezing Door left open. * Check to see if package is holding door open.
Temperature control not set * See Aboutthe controls.
cold enough.
Ooornotclosing Door gasket on hinge side * Apply petroletun jell?' on face of gasket.
properly sticking or folding over.
Orange glowin freezer Defrost heater is on. * This is normal.
Cubedispenserdoesnot Icemaker or water supply * Turn on icemaker or water suppl?:
work(onsome models) turned off.
Ice cubes are frozen to * Remove cubes.
icemaker feeler arm.
Irregular ice dumps in * Break up with fingertip pressure and discard
storage container, remaining clumps.
• Freezer may be too warm. Adjust the freezer control
to a cokler setting, one position at a time, until clumps
do not fiorm.
• Press and hold the L0&pad fior3 seconds.Dispenser is LOCKED.
15

Beforeyoucallforservice...
Possible Causes What ToDo
Waterhaspoor taste/odor Water dispenser has not been • Dispense water undl all water in system is replenished.
(onsomemodels) usedfor a long time.
Waterin firstglassis Normal when refrigerator • X\;ait 24 hours fi)r the refrigerator to completely
warm(onsomemodels) is first installed, cool down.
Water dispenser has not been o Dispense water until _dlwater in system is replenished.
used for a long t:ane.
Water system has been drained. • .Mlow several hours fi)r replenished supply to chill
Waterdisponserdoes Water supply line turned o See installing the water line.
not work (onsomemodels) off or not connected.
Water filter clogged. * Replace filter cartridge or remove filter and install plug:
Air may be trapped in the * Press the dispenser arm tbr at least two minutes.
water system.
Dispenser is LOCKED. • Press and heM the Leckpad fi)r 3 seconds.
Waterspurtingfrom Newly-installed filter cartridge. • Run water from the dispenser fi)r 3 minutes ;about
dispenser 1'-2 g_dlons).
Wateris not dispensed Water in reservoir is frozen. •Call fi)r service.
No water or ice cube Supply line or shutoff *(2all a plmnber.
production valve is clogged.
Water filter clogged, o Replace filter cartridge or remove filter and install plug:
Dispenser is LOCKED. • Press and heM the Leckpad fi)r 3 seconds.
Reffigeratorhasodor Foods transmitting • ]:t)ods with strong odors should be tightly _xTapped.
odor to refrigerator. • Keep an open box of baking soda in the refrigerator;
replace every three months.
Interior needs deaning. * See Care and cleaning.
Defrost water _ge • See Care and cleaning.
system needs cleaning.
Moistureformson Not unusual during • _\,'il)e surf.tee dry.
outsideof refrigerator periods of high humidity.
Moisturecollectsinside Too frequent or too
long door openings.
Interiorlightdoes No power at outlet_ o Replace filse or reset the breaker.
network Light bulb burned out. * See Replacing the light bulbs.
Wateren kitchen flooror Drain in the bottom of o See Care and cleaning.
onbottomoffreezer the freezer dogged.
Cubes jammed in chute. * Poke ice through with a wooden spoon.
Hotairfrem-bo_ Normal air flow cooling motor.
ofrefrigerator In the refrigeralion process,
it is normal that heat be expelled
in the area under the refrigerator.
Some floor coverings are sensitive
and v/ill discolor at these normal
and safe temperatures.
Cubedlcewasselected Last setting was CrushedIce. "A few cubes were left in the crusher from the previous
but CrushedIce was setting This is normal.
dispensed(onsomemodels;
Frequent"buzzing"sound Icemaker power switch is in the •Slide the power switch to the 0FFposition. Keeping it in
ONposition but the water supply the 0Nposidon will dmnage the water valve.
to the refrigerator has not been
connected.
16

CUSTOMER WARRANTY
(forcustomersin Canada)
Yourrefrigeratoriswarrantedto befreeof defectsin materialandworkmanship.
_Vhatis covered HowLongWarranted
(FromDateof Sale) Parts
Repairor Replace
at Mabe'sOption
Labour
%mpressor GEProfile:Ten(1O)Years GEProfile:Ten(1O)Years GEProfile:Five(5)Years
GEandAll Other GEandAll Other GEandAll Other
Brands:One(1)Year Brands:One(1)Year Brands:One(1)Year
SealedSystem(including GEProfile:Five(5)Years GEProfile:Five(5)Years GEProfile:Five(5)Years
_vaporator,condenser GEandAll Other GEandAll Other GEandAll Other
Lubingand refrigerant) Brands:One(1)Year Brands:One(1)Year Brands:One(1)Year
_,llOtherParts One(1)Year One(1)Year One(1)Year
TERMS AND CONDiTiONS:
Thiswarrantyappliesonlyforsinglefamilydomesticusein
CanadawhentheRefrigeratorhasbeenproperlyinstalled
accordingtothe instructionssuppliedbyMabeandis
connectedto anadequateandproperutilityservice.
Damagedueto abuse,accident,commercialuse,and alteration
or defacingoftheserialplatecancelsallobligationsofthis
warranty.
Serviceduringthis warrantyperiodmustbe performedbyan
AuthorizedMabeServiceAgent.
NeitherMabenorthe Dealerisliablefor anyclaimsor
damagesresultingfromfailureoftheRefrigeratororfrom
servicedelaysbeyondtheirreasonablecontrol.
Toobtainwarrantyservice,purchasermustpresenttheoriginal
BillofSale.Componentsrepairedorreplacedarewarranted
throughtheremainderoftheoriginalwarrantyperiodonly.
Thiswarrantyisextendedtotheoriginalpurchaserandany
succeedingownerforproductspurchasedforhomeusewithin
Canada.Inhomewarrantyservicewillbe providedin areas
whereit isavailableanddeemedreasonablebyMabe
toprovide.
Thiswarrantyis inadditiontoanystatutorywarranty.
WHAT iS NOT COVERED:
• Ownerisresponsibleto payforservicecallsrelatedto
productinstallationand/orteachinghowto usethe product.
Damageto finishmustbe reportedwithin48 hoursfollowing
thedeliveryoftheappliance.
Damageto finishafterdelivery.
• Improperinstallation--properinstallationincludesadequate
aircirculationtotherefrigerationsystem,adequateelectrical,
plumbingandotherconnectingfacilities.
Replacementof housefusesor resettingof circuitbreakers.
Replacementof lightbulbs.
Damageto productcausedbyaccident,fire,floodsoracts
ofGod.
Lossoffoodduetospoilage.
• Properuseandcareof productaslistedin theowner's
manual,propersettingofcontrols.
• Productnotaccessibleto providerequiredservice.
Damagecausedbya non-GEbrandwaterfilter.
• WARRANTORISNOTRESPONSIBLEFORCONSEQUENTIAL
DAMAGES.
EXCLUSIONOFIMPLIEDWARRANTIES--Yoursoleandexclusiveremedyisproductrepairasprow'dealinthisLimitedWarran_Any
impliedwarranties,includingtheimpliedwarrantiesofmerchantabilityorfitnessforaparticularpurpose,arelimitedtooneyearorthe
shortestperiodallowedbylaw.
iMPORTANT
Keep this warranty and your bill of sale as proof of original purchase and purchase date.
Please have serial number and model number available when calling for service.
MabeServiceis availablecoasttocoast.If further help is
neededconcerningthis warranty,contact:
Manager,ConsumerRelations
MabeCanadaInc.,ConsumerService
1 FactoryLane,Suite310
Moncton,NewBrunswickE1C9M3
1.800.561.3344
Staple your receipt here.
Proof of the original purchase
date is needed to obtain service
under the warranty.
17

RefrigeratorWarranty.(Forcustomers in the United States)
All warranty service provided by our Factory Service Centers,
or an authorized Customer Care®technician. To schedule service,
on-line, visit us at GEAppliances.com, or call 800.GE.CARES
(800.432.2737).Please have serial number and model number
available when calling for service.
Staple your receipt here.
Proof of the original purchase
date is needed to obtain service
under the warranty.
GEWill Replace:
GEandGEPROFILEMODELS:
OneYear Anypartof the refrigerator whid_ failsdue to a defect in materi_s or worlmmnship.
Fromthe dateofthe During d_islimitedone-yearwarranty,GE will ;dsoprovide, freeofcharge,;d]labor and
original purchase relatedserviceto replacethedefectivepart.
ThirtyDays
(Waterfilter,if included)
Fromthe original
purchasedateof
therefrigerator
Anypartof d_ewater filter cartridge whid_ Failsdue to a defect in materials or worlmmnship.
During dfis limitedthirty-daywarranty,GE will alsoprovide, freeofcharge,a replacelnent water
filtercartridge.
GEPROFILEMODELSONLY:
FiveYears
(6EProfi!emode!sonly)
Fromthe dateOfthe
odgina!purchase
Anypartofthesealedrefrigeratingsystem(the compressor, condenser, evaporator
and all connecting robin!! whid_ failsdue to a defect in materials or workmanship.
During riffslimitedfive-yearsealedrefrigeratingsystemwarranty,(;E wii1_soprovide,
freeof charge,all labor and related service to replace the defective part in the sealed
refrigerating sysmln.
Service trips to your home to teach you how to use
the product.
Improper installation, delivery or maintenance.
Failure of the product if it is abused, misused, or used for other
than the intended purpose or used commercially.
Loss of food due to spoilage.
Replacement of house filses or resetting of circuit breakers.
Damage caused after delivery.
Replacement of the water filter cartridge, ifinduded, due to
water pressure that is outside the specified operating range or
due to excessive sediment in the
water supply.
Replacement of the light bulbs, if included, or water filter
cartridge, if included, other than as noted above.
Damage to the product caused by accident, fire, floods
or acts of God.
Incidental or consequential damage caused by possible defects
with this appliance.
Product not accessible to provide required service.
Damage caused by a non-GE brand water filter.
EXCLUSIONOFIMPLIEDWARRANTIES--Your soleand exclusiveremedy is product repair asprovided in this Limited
Warranty.Any implied warranties, including the implied warranties of merchantability or fitness for a particular purpose,
are limited to one yearor the shortestperiod allowed bylaw.
This warranty is extended to the original purchaser and any succeeding owner for products purchased for home
use within the USA. If the product is located in an area where service by a GE Authorized Servicer is not available,
you may be responsible for a trip charge or you may be required to bring the product to an Authorized GE Service
location for service. In Alaska, the warranty excludes the cost of shipping or service calls to your home.
Some states do not allow the exclusion or limitation of incidental or consequential damages. This warranty gives
you specific legal rights, and you may also have other rights which vary from state to state. To know what your
legal rights are, consult your local or state consumer affairs office or your state's Attorney General.
18 Warrantor: GeneralElectric Company.Louisville, KY40225

Performance Data Sheet
SmartWater Filtration Sgstem-GE®MWF Cartridge
Thissgstem has been tested and certified in filter model GEMWFaccording to NSF/ANSIStandards 42 and 53 for reduction of the substances listed below, The
concentration ofthe indicated substances in water entering the sgstem was reduced to a concentration lessthan or equal to the permissible limit for water
leaving the sgstem, as specified in NSF/ANSIStandards 42 and 53.* (Safetg factors built in for unmetered usage)
Standard No, 42: Aesthetic effects
Substance NSFSpecified Challenge IAverage % I Aveiage Product IMax Permissible Product_NSFReduction I NSFTest
Reduction AVerageJnfluent Concentration I Reduction IWater Concentration IWater Concentration _Requirements I Report
2.0mg/L 2.0mg/L + 10% ÷g/L IN/A ÷
7,833,333pts/mL _ast_OOparticles/_99.7%o 118,617_m[ IN/A 1_>85%>o [J-00077704
Standard No. 53: Health effects
Substance
Reduction Average Influent
47 MF/L
0.009 mg/L
0.08 mg/L
0.006 mg/L
0.152 mg/L
0.148 mg/L
0.002 mg/L
0.0058 mg/L
0.222 mg/L
0.015 mg/L
0.218 mg/L
NSF Specified Challenge
Concentration
Minimum 50,000 c
10_to 1(_fibers/L; fibers
greater than 10 Bm in lengt
0.009 mg/L _+10%
'L + 10%
0.08 mg/L + 10%
0.006 mg/L + 10%
0.15 mg/L + 10%
0.15 mg/L + 10%
0.002 mg/L + 10%
0.006 mg/L + 10%
'L + 10%
0.225 mg/L + 10%
'L + 10%
0.015 mg/L + 10%
0.210 mg/L + 10%
Reduction
99.99%
>99%
94.5%
96.7%
98.7%
95.6%
99.3%
99.3%
99%
93.2%
93.2%
99.7%
96.6%
93.2%
99.5%
_Based on the use of Cryptosporidium parvum oocysts
Capacity 300 gallons (1,135 liters). Contaminant reduction determined by NSF testing.
e Product
Water Concentration
ist/L
<1 MF/L
Water Concentration
N/A
N/A
0.0005 mg/L 0.003 mg/L
0.001 mg/L
0.0003 mg/L
0.001 mg/L
0.001 mg/L
0.00002 mg/L
0.0004 mg/L
0.005 mg/L
0.001 mg/L
0.0009 mg/L
0.04 mg/L
0.002 mg/L
0.010 mg/L
0.010 mg/L
0.0002 mg/L
0.002 mg/L
0.075 mg/L
0.003 mg/L
0.07 mg/L
NSF Reduction
Requirements
_>99.95%
_>99%
N/A
N/A
N/A
N/A
N/A
N/A
N/A
N/A
N/A
N/A
N/A
N/A
N/A
NSFTest
Report
J-00077721
J-00077707
J-00077708
J-00077717
J-00077718
J-00082185
J-00077722
J-00077723
J-00077726
J-00077727
J-00077728
J-00077729
J-00082184
J-00077730
J-00077705
Application Guidelines/Water Supply Parameters
Service Flow ] 0.5 gpm (1.9 Ipm) Water Pressure
Water Su_ ] Potable Water Water Temperature
It is essential that the manufacturer's recommended installation, maintenance and filter replacement requirements be carried out for the product to perform as advertised.
See Installation Manual for Warranty information.
Operating Specifications
, Pressure requirement: 40-120 psi (2.8-8.2 bar), non-shock
* Temperature: 35-100°F (0.6-38°C)
. Flow rate: 0.5 gpm (1.9 Ipm)
General Installotion/Operation/Plointenonce Requirements
, Flush new cartridge at full flow for 1-1/2 gallons (about three minutes) to purge
trapped air.
, Reptoce cartridge when flow becomes too slow.
o Protect from freezing by removing filter cartridge when temperatures are
expected to drop below 33°F (1°C). Do not install sgstems in areas where
ambient temperatures may go above 100°F or below 40°K Do not install
on a hot water supply.
Special Notices
o Installation instructions are included with the product when shipped.
, This drinking water sgstem must be maintained according to manufacturer's
instructions, including replacement of filter ca rtddges.
, Do not use with water that is microbiologicallg unsafe or of unknown qualitg
without adequate disinfection before or after the sgstem. Sgstems certified for
cgst reduction may be used on disinfected water that may contain filterable cgsts.
. The contaminants or other substances removed or reduced by this water
treatment system are not necessarily in your water.
. Check for compliance with the applicable state and local laws and regulations.
. Note that while the testing was performed under standard laboratory conditions,
actual performance may vary. Systems must be installed and operated in
accordance with manufacturer's recommended procedures and guidelines.
. Installation and use MUST comply with all state and local plumbing codes. Do not
install if water pressure exceeds 120 psi. If your water pressure exceeds 80 psi
(552 kPa),you should install a pressure-limiting valve. Contact a plumbing
professional if you are uncertain how to check your water pressure.
. Do not install where water hammer conditions may occur. If water hammer
conditions exist you must install a water hammer arrester. Contact a plumbing
professional if you are uncertain how to check for this condition.
. Where a backflow prevention device is installed on o water system, a device for
controlling pressure due to thermal expansion must be installed.
Tested and Certified bg NSFInternational against ANSI/NSF Standards 42 and 53 in model GEHWF for the reduction of:
Standard No. 42: Aesthetic Effects
• Chemical
- Chlorine Taste and Odor • Hechanical Filtration
- Particulate Reduction, Class I
GE
Appliances
Appliance Park
Louisville, KY 40225
geapplianceparts.com
Standard No. 53: Health Effects
Chemical Reduction
- Atrazine Reduction
- Endrin Reduction
- Benzene and Curbofuran Reduction
- 1.4 Dichlorobenzene and
2.4-D Reduction
- Lead and Lindane Reduction
- Hercurg and Toxaphene Reduction
• Hechanical Filtration
-Cgst and Asbestos Reduction
REPLACEMENT
ELEMENT
© 2010 GECompang PC61278B

State of California
Department of Public Health
Water Treatment Device
Certificate Number
05 - 1698
Date Issued: February 2, 2010
Trademark/Model Designation
GEMWF .... _lacement Elements
MWF
Manufacturer: General Electric Company
The water treatment de_ice(s}_l_sted on this certificate hay e met th etesting requirements pursuant to Section
116830 of the Health and Safety Code for the follnWlng health related contaminants: :
Microbiological ContaminamS and Turbidity dioio_ical Contaminants
Cysts
Organic Contaminants
Atrazin_
Benzene
Carbofuran
Endrin
Lindane
Tetrachloroethylene
Toxaphene
1,4-dichlorobenzene
2.4-D
Rated Service Capacity: 300 gal 0.5 gpm
Conditi_hs of certification:
Do not use where water is microbiologicall ith water o_nknnwn quality, except that systems certified
for cyst reduction may be used on disinfected waters that may contain filterable cysts.
2O
Other manuals for 20
17
This manual suits for next models
2
Table of contents
Languages:
Other GE Refrigerator manuals

GE
GE GBC12IAX Operating instructions

GE
GE Profile PGCS1RKZ How to use

GE
GE 21 Safety guide

GE
GE ENERGY STAR GTH18GBDBB Manual

GE
GE GTH20SBBSS Manual

GE
GE Profile PSSS3RGZSS Manual

GE
GE Model 42 Operating instructions

GE
GE GSHL5KGXLS - CleanSteel 25.4 cu. Ft.... Manual

GE
GE GFSL6KEXLS - r 25.8 cu. Ft. Refrigerator Manual

GE
GE 200D8074P039 Safety guide