GE GSH25JFPACC and Operating instructions

vvwvv.GEAppliances.com
Safety Information
Adapter Plugs ................. 4
Electricity ..................... 4
Extension Cords ............... 3
Proper Disposal ................ 3
Safety Precautions .............. 2
Operating Instructions
Automatic Icemaker ............ 9
Controls ..................... 5
Crispers and Pans ............ 8, 9
Ice and Water Dispenser ........ 10
Shelves, Bins and Racks ........ 6-8
Water Filter Cartridge ........... 6
Care and Cleaning
Cleaning ................. 11, 12
Light Bulbs .................. 13
Installation Instructions
Preparing to Install
the Refrigerator ............ 14, 15
Water Line Installation .... 16-20
Troubleshooting Tips
Before You Call For Service . .22-24
Normal Operating Sounds ...... 21
Consumer Support
Consumer Support ..... Back Cover
Performance Data Sheet ........ 27
Product Registration ........ 29, 30
State of Cali_brnia Water
Treatment Device Certificate ..... 28
Warranty (Canadian) ........... 25
Warranty (U.S.) ............... 26
Models20,22 and25
OSte gtc6te
R frig&ateurs
Lasection fran_aisecommence_la page31
Lado a lado
Refrigeradores
La secci6n en espafiolempiezaen la p6gina 59
Write yourmodeland serial numbershere:
Model #
Serial#
Find these numbers on a label inside
the refi'igerator compartment at the top
on the right side behind the controls. 197D3351PO05 49-60234 12-02JR

IMPORTANTSAFETYINFORMATION.
READALLINSTRUCTIONSBEFOREUSING.
AWARNING!
Use this appliance only for its intended purpose as described in this Owner's ManuaL
SAFETYPRECAUTIONS
When using electrical appliances, basic safety precautions should be followed, including the following:
{This refrigerator must be properly installed
and located in accordance with the Installation
Instructions b@ore it is used.
{_Do not allow children to climb, stand or hang
on tile shelves in the reffigeraton They could
damage @e refrigerator and seriously injure
themselves.
{Do not touch @e cold surfaces in the freezer
compartment when hands are damp or wet. Skin
may stick to @ese extremely cold surfaces.
{_Do not store or use gasoline or other flammable
vapors and liquids in tile vicinity of this or any
other appliance.
{In refrigerators with automatic icemakers,
avoid contact with the moving parts of the
ejector mechanism, or with the heating element
located on the bottom of the icemaker. Do not
place fingers or hands on the automatic
icemaking mechanism while the refrigerator
is plugged in.
@Keep fingers out of the "pinch point" areas;
clearances between the doors and between
the doors and cabinet are necessarily small.
Be careful closing doors when children are
in the area.
_ Unplug the refrigerator before cleaning and
making repairs.
NOTE:Westronglyrecommendthatanyservicingbe
performedbya qualifiedindividual
(_Setting the freezer control to the 0(off) position
does not remove power to the light circuit.
@Do not refreeze frozen foods which have
thawed completely.
2

ww_.GEAppliances.com
ADANGER!RISKOFCHILDENTRAPMENT
PROPERDISPOSALOFTHEREFRIGERATOR
Child enn'apment and suffocation are not problems
of the past. ,Junked or abandoned refrigerators are
still dangerous...even if they will sit for 'just a few
days." @you are getting rid of your old refiigerato_;
please follow the insmmtions below to help prevent
accidents.
Before YouThrowAway YourOldRefrigerator
or Freezer:
@Take off the doors.
@Leave the shelves in place so that children may
not easily climb inside.
Refrigerants
All re@igeration products contain refrigerants,
which under federal law must be removed prior
to product disposal. If you are getting rid of an
old re@igeradon product, check with the
company handling the disposal about what
to do.
USEOFEXTENSIONCORDS
Because of potential safety hazards under certain conditions, we strongly recommend
against the use of an extension cord.
Howevm; ifyou must use an extension cord, it is absolutely necessary that it be a UL-listed (in the United
States) or a CNA-listed (in Canada), @wire grounding type appliance extension cord having a grounding
type plug and outlet and that the elecnical rating of the cord be 15 amperes (minimum) and 190 volts.
3

IMPORTANTSAFETYINFORMATION.
READALLINSTRUCTIONSBEFOREUSING.
AWARNING!
HOWTOCONNECTELECTRICITY
Do not, under any circumstances, cut or remove the third (ground) prong from the power cord. For
personal safety, this appliance must be properly grounded.
The power cord of this appliance is equipped with
a 3-prong (grounding) plug which mates with a
standard 3-prong (grounding) w_l outlet to
minimize the possibility of electric shock hazard
from this appliance.
Have tile wall outlet and circuit checked by a
qualified electrician to make sure tile outlet is
properly grounded.
If the oudet is a standard 2-prong outlet, it is your
personal responsibility and obligation to have it
replaced with a properly grounded 3-prong w_ll
oudet.
The refrigerator should always be plugged into its
own individual electrical oudet which has a voltage
rating tllat matches the rating plate.
This provides tile best performance and also
prevents overloading house wiring circuits which
could cause a fire hazard from overheated wires.
Never unplug your refrigerator by pulling on the
power cord. _Mwaysgrip plug firmly and pull
sn'aight out from tile outlet.
Repair or replace immediately all power cords that
have become frayed or odmrwise damaged. Do not
use a cord tllat shows cracks or abrasion damage
along its lengtll or at eidmr end.
When moving dm refiigerator away from tile
wall, be careful not to roll over or damage the
power cord.
USEOFADAPTERPLUGS(Adapterpl,gsnotpermittedinCanada)
Because of potential safety hazards under certain conditions, we strongly recommend against
the use of an adapter plug.
Howevm; if you must use an adapter, where local
codes permit, a temporary connection may be made
m a properly grounded 2-prong wall outlet by use
era UL-listed adapter a'_ailable at most local
hardware stores.
The larger slot in tile adapter must be aligned witll
tile larger slot in dm wall outlet to provide proper
polarity in the connection of the power cord.
When disconnecting tile power cord from the
adapter, al,a-ayshold tile adapter in place with one
hand while pulling tile power cord plug with tile
other hand. If this is not done, tile adapter ground
terminal is very likely to break with repeated use.
If the adapter ground terminal breaks, DO NOT USE
tlle refrigerator until a proper ground has been
established.
Attachingtheadaptergroundterminaltoa waftoutlet
coverscrewdoesnotgroundtheapplianceunlessthe
coverscrewismetal,andnot insulated,andthe waft
outletisgroundedthroughthehousewiring. Youshould
havethecircuitcheckedbya quafifiedelectricianto make
suretheoutlet isproperlygrounded.
READANDFOLLOWTHISSAFETYINFORMATIONCAREFULLY.
SAVETHESEINSTRUCTIONS
4

Aboutthecontrolson therefrigerator.
Yourcontrols will look like one of the following:
ww_.GEAppliances.com
/nitially,set the refrigerator compartment control at 5and the freezer
control at5 and allow 12hours for the temperature to stabilize.
Several adjustments may be required. Adjust the controls one
increment at a time, and allow 12hours after each adjustment for the
refrigerator to reach the temperature you set.
Setting the freezer control to 0stops coofing in both the refrigerator
and freezer compartments but does not shut off electrical power to
the refrigerator.
Control settings will vary based onpersonal preferences, usage and
operating conditions and may require more than one adjustment.
5

Aboutthe water filter cartridge.
On some models
Water Filter Cartridge
The water filter cartridge is located in tile
back upper right corner of tile refrigerator
compartment.
When to Replace the Filter on
Models With a Replacement
Indicator Light
Place the top of the cartridge up
inside the cartridge holder and
slowly turn it to the right.
There is a replacement indicator light for
tile water filter cartridge on the dispenser.
This light will turn orange to tell you tbat
you need to replace the filter soon.
The filter cartridge should be replaced
when tile replacement indicator light turns
red or iftbe flow of water to the dispenser
or icemaker decreases.
(on some models)
When to Replace the Filter on
Models Without a Replacement
Indicator Light
The filter cartridge should be replaced
evm 7 six monthsor earlier if the flow of
,a-ater to the water dispenser or icemaker
decreases.
Installing the Filter Cartridge
O If you are replacing the cartridge, first
remove the old one by slowly turning it
to the lefL DOnotpull do-an on the
cartridge. A small amount of water may
drip down.
O On models witbout a replacement
indicator light, apply the montb and
year sticker to tile new camidge to
remind you to replace the filter in
sixmonths.
_Fill tile replacement cartridge with
vcater from tile tap to allow for better
flow fi'om the dispenser immediately
after installation.
_ Lining up the arrow on tbe cartridge
and tbe carnidge holdm; place the
top of the new carnidge up inside
tbe holdm: DOnet push it up into
tbe holdm:
O Slowly turn it to the right until tile filter
cartridge stops. DONOTOVERTIGHTEN.
As you turn the cartridge, it will
automatically raise itself into position.
Cartridge will rotate about 1/2 turn.
Rt_n water from the dispenser for 3
minutes (about one and a half gallons)
to clear the system and prevent
sputtering.
_ Press and hold tile RESETWATERFILTER
pad (on some models) on tile dispenser
for 3 seconds.
NOTE: A newly-installed water filter
cartridge may cause water tospurt from
tbe dispenser.
Filter Bypass Plug
You must use tile filter bypass plug
when a replacement filter cartridge is not
available. The dispenser and tile icemaker
will not operate without tile filter or filter
bypass plug.
ReplacementFilters:
Toorderadditionalfiltercartridgesin
theUnitedStates,visitourWebsite,
www.GEAppliances.com,orcall
GEPartsandAccessories,800.626.2_2.
GWF
Suggested Retail $34.95 USD.
Customers in Canada should consult tile
yellow pages for the nearest Camco Serxdce
Center.
Abouttheshelvesand bins.
Not all features are on all models.
6
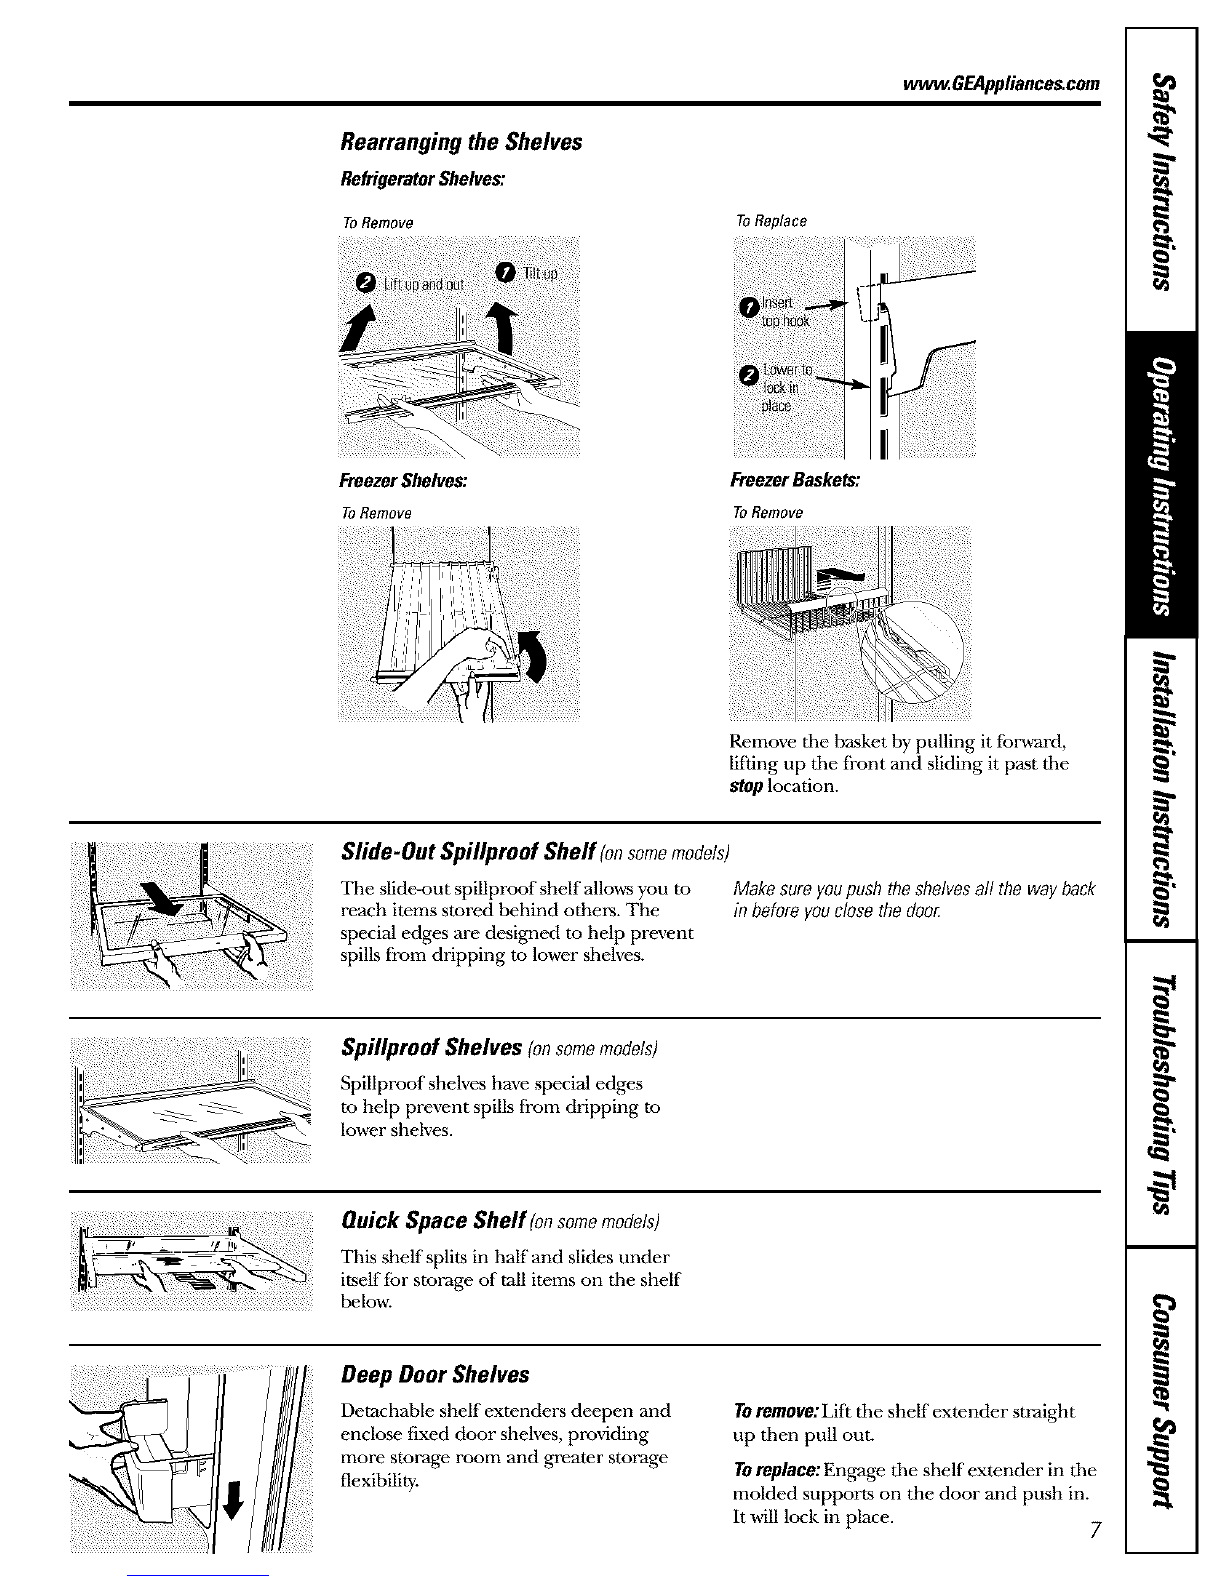
Bins on the Refrigerator Compartment Door
Adjustable bins can easily be carried from
refrigerator to work area.
TOremove:Lift tile front of tile bin up, then
pull out.
Toreplace orrelecate:Engage the bin in the
molded supports of the door, and push in.
Bin will lock in place.
The snuggerhelps prevent tipping, spilling
or sliding of small items stored on the door
shelf Place a finger on either side of the
divider near tbe rear and move it back
and forth to fit your needs.

ww_.GEAppliances.com
Rearranging the Shelves
RefrigeratorShelves:
ToRemove ToReplece
Freezer Shelves:
ToRemove
Freezer Baskets:
ToRemove
Remove tile basket by pulling it forward,
lifting up tile front and sliding it past tile
stop location.
Slide-Out Spillproof Sheff (onsomemodels)
The slide-out spillproof shelf allows you to
reach items stored behind others. The
special edges are designed to help prevent
spills fi'om dripping to lower shelves.
Makesureyoupushtheshelvesall thewayback
in beforeyouclosetim doo_
Spillproof Shelves fortsomemodels)
Spillproof shelves have special edges
to help prevent spills from dripping to
lower shelves.
i!(¸ii_i)_iii!iii!ili_ii_i!_!!_i!iii_i!!i!!i!!!!_!:!i!!:!!!!i!_!i!iiii!!i!iil;!i}iii:i!_;ilS_iQuick Space Shelf (onsomemodels)
i}i ,_, ._ 'L2_, !iii!i ¸¸
_.., -_-___r > This shelf splits in half and slides tinder
: iteelf fbr storage of tall items on tile shelf"
below.
Deep Door Shelves
Detachable shelf extenders deepen and
enclose fixed door shelves, providing
more storage rooln and greater storage
flexibilivy.
TOremove:Lift tile shelf extender straight
tip then pull out.
TOreplace:Engage the shelf extender in the
molded supports on the door and push in.
It will lock in place. 7

Abouttheadditionalfeatures.
Not all features are on all models.
ShelfSaver TM Rack
(onsomemodels)
Use this lack to store
beverage cans for easy
access.
It can also hold a 9" x 13"
baking dish.
Door Can Rack
(onsomemodels)
This door rack holds up
to 9 cans.
NOTE:Thisrackcanonlybe
mountedinthetopposition
underthedairybin.
I
Aboutthecrispersandpans.
Not all features are on all models.
Fruitand Vegetable Crispers
Excess water that may accumulate in tile
bottom of the drawers should be wiped dry.
Adjustable Humidity Crispers and Snack Pan (onsomemodels)
Slide the control all the way m tile
Highsetting to proxdde high humidity
recommended for most vegetables.
Slide tile control all the way to tile LOW
setting to provide lower humidity levels
recommended for most fruits.
IConvertible Meat Pan (onsomemodels)
The convertible meat pan has its o_m cold
air duct to allow a stream of cold air from
tile freezer compamnent to flow around
tile pan.
The variable temperature control reglflates
tile air flow from the freezer compartment.
Set control lever up to convert the pan
to normal refrigerator temperature and
provide extra vegetable storage space. Cold
air duct is turned ore Variable settings
between these extremes can be selected.
Set control lever downto tile coldest setting
to store fresh meats, ff lever is left in meat
position for a long period of time, some
fi'ost may form on tile inside of the pan.
8

Aboutcrisperremoval ww_.GEAppliances.com
Not all features are on all models.
Crisper Removal
Crispers can easily Ix?removed by tilting up
slightly and pulling past stop location.
When replacing the crispers, make
sure you slide them through the
crisper guides,
Abouttheautomaticicemaker.
If the door prevents you from taking out
tile crispers, tile refrigerator will need m
be rolled forward until the door opens
enough m slide the crispers out. In .some
cams, when you roll tile refrigerator out,
you will need to move tile refrigerator to
tile left as you roll it out.
A newly-installed refrigerator may take 12-24 hours to begin making ice.
Automatic leemaker (onsomemodels)
The icemaker will produce seven cubes
per cycle_approximately 100-130 cubes
in a 24-hour period, depending on freezer
compartment temperature, room
temperature, number of door openings
and other use conditions.
If the refrigerator is operated before the
water connection is made to the icemakm;
set the power switch in the 0 (Off)position.
When the refrigerator has been connected
to the water supply, set the power switch to
the I (on)position.
The icemaker will fill with water when it
cools to 15°E A newly-installed refrigerator
may take 12 to 24 hom-s to begin making
ice cubes.
You will hear a buzzing sound each time
the icemaker fills with water.
Throw away the first flew batches of ice to
allow the water line to clean
Be sure nothing interferes with the sweep
of the feeler arm.
When the bin fills to the level of the fizeler
arm, the icemaker will stop producing ice.
It is normal for several cubes to be joined
together.
If ice is not used frequently, old ice cubes
will become cloudy, taste stale and shrink.
NOTE:Inhomeswithlower-than_averagewater
pressure,youmayheartheicemakercyclemultiple
timeswhet;makingonebatchofice.
V
There is an upper freezer shelf
above the ieemaker that can be
used for storage,
Ice Storage Drawer
Toaccessice, pull the drawer out. Toremove tile drawer, pull it straight out
and lift it past the stop location.
Icemaker Accessory Kit
lfyour refrigerator did not come already
equipped with an automatic icemakm;
an icemaker accessory kit is a'railable at
extra cost.
Check the back of the refrigerator for
the specific icemaker kit needed for
your model. 9

Abouttheice and water dispenser.
On some models
TOUse the Dispenser
SpiElSheEf
Select CUBEDICE _, CRUSHEDICE
or WATER_.
Press the glass gently against the top of
the dispenser cradle.
The spill shelf is not self<lraining. To
reduce rearer spotting, the shelf and its
grille should be cleaned regularly.
tf no waterisdispensedwhentherefrigerator
isfirst installed,theremaybeair in thewater
linesystem.Pressthedispenserarmforat least
two minutestoremovetrappedair fromthewater
lineandtofill thewatorsystem.Toflushout
impuritiesin thewaterline,throwawaythefirst
sixglassfulsofwater
CAUTION:Neverput fingersoranyother
objectsinto theicecrusherdischargeopening.
Lockingthe Dispenser(onsomemodels)
Press the LOCK
CONTROLpad for
3 seconds to lock tile
dispenser and control
panel. To unlock, press
and hold tile pad again
for 3 seconds.
Dispenser Light
Tiffs pad turns tile
nightlight in tile
dispenser on and off.
Tile light also comes
on when tile dispenser
cradle is pressed. If this
light burns out, it
should be replaced
with a 6 watt maximum,
12 volt DC bulb.
Ice Storage Drawer
on Dispenser Models
Toremove:
Set tile icemaker power switch to tile
0(off)position. Pull the drawer sn_ight
out and then lift past tile stop position.
TOreplace:
When replacing tile drawm; make sure
to push it firmly into place. If it does not
go all the way back, remove it and rotate
the drive mechanism 1/4 turn. Titan push
the drawer hack again.
10
Important FactsAbout YourDispenser
/}_5Do not add ice from trays or bags to
tile storage bin. It may not crush or
dispense well.
N Avoid overfilling glass with ice and use of
narrow glasses. Backed-up ice can jam tile
chute or cause the door in tile chute to
freeze shut. If ice is blocking tile chute,
poke it through with a wooden spoon.
N Beverages and fbods should not be
quick-chilled in the ice storage bin.
Cans, bottles or fbod packages in the
sturage bin may cause the icemaker
or auger to jam.
N To keep dispensed ice from missing
the glass, put tile glass close to, but not
touching, the dispenser opening.
_ Some crushed ice may be dispensed even
though you selected CUBEDICE.Tiffs
happens occasionally when a few cubes
have been left in the crusher.
_After crushed ice is dispensed, .some
water may drip from tile chute.
_ Sometimes a small mound of snow will
form on tile door in the ice chute. Tiffs
condition is normal and usually occurs
when you have dispensed crushed ice
repeatedly. The snow will eventually
e'_aporate.

Careandcleaning oftherefrigerator. . eEApp,ioncescom
Dispenser drip area.
Cleaning the Outside
The dispenser drip area, (on some models)
heneath the grille, should be wiped dry. Water
left in this area may leave deposits. Remove
the deposits by adding undiluted vinegar to
the well. Soak until the deposits disappear
or become loose enough to rinse away.
The dispenser cradle (on some models).
Befbre cleaning, lock the dispenser by
pressing and holding tile LOCK CONTROL
pad for 3 seconds. Clean with w-arm water
and baking soda solution--about a
tablespoon (15 ml) of baking soda to a
quart (1 1) ofwatel: Rinse thoroughly
and wipe dry.
Thedoorhandlesandtrim.Clean with a
cloth dampened with soapy wamn Dry
with a soft cloth.
Keep the outsideclean. Wipe Mth a clean
cloth lightly dampened with kitchen
appliance w_axor mild liquid dish detergent.
Dry and polish with a clean, .soft cloth.
Donot wipetherefrigeratorwith a soileddish
cloth or wet towel Thesemayleavea residue
thatcanerodethepaint. Donotusescouring
pads,powderedcleaners,bleachor cleaners
containingbleachbecausetheseproductscan
scratchandweakenthepaint finish.
Cleaning the Inside
TOhelp prevent odors,leave an open box of
baking .soda in the refrigerator and freezer
compartments.
Unplugthe refrigerator before cleaning. If this
is not practical, wring excess moisture out
of sponge or cloth when cleaning around
switches, lights or controls.
Use warm water and baking soda solution--
about a tablespoon (15 ml) of baking soda
to a quart (1 1)of water. This both cleans
and neutralizes odors. Rinse and wipe dry.
After cleaning the door gaskets, apply a
thin layer of petroleum jelly m the door
gaskets at the hinge side. This helps keep
the gaskets from sticking and bending out
of shape.
Drainopeningin freezercompartment.
During yearly cleaning, remove bottom
freezer basket and flush a solution of
baking soda--f teaspoon (5 ml) and 2 cups
(500 ml) of hot (not boiling) ,a-ater--
through the drain line with the help of a
meat baster. This will help eliminate odor
and reduce the likelihood of a clogged
drain line. If drain becomes clogged, use a
meat baster and baking soda solution to
force the clog through the drain line.
Avoidcleaningcoldglassshelveswith hot water
becausetheextremetemperaturedifferencemay
causethemtobreak.Handleglassshelves
carefull}4Bumpingtemperedglasscancauseit
toshatter.
Donot washanyplasticrafrigeratorpartsin the
dishwasher
Condenser
There is no need fbr routine condenser
cleaning in normal home operating
emdronments. Howevm; in emdronments
that may be particularly dusty or greasy, the
condenser should be cleaned periodically
for efficient refiigeratur operation.
Cleaningthecondenser:
The condenser is located inside the back
of the refrigeratol: To access it, first unplug
the refiigeratu_: Then remove the access
cover. The condenser is on the right side.
11

Careand cleaning oftherefrigerator.
Behind the Refrigerator
Be careful when moving the refrigerator
away from the wall. All types of floor
coverings can he damaged, particularly
cushioned coverings and those with
embossed surfaces.
Pull the refrigerator straight out and return
it to position by pushing it sn'aight in.
Moving the refrigerator in a side direction
may result in damage to the floor covering
or refiigeraton
Whenpushingtherefrigeratorback,makesure
youdon'traftoverthepowercordor icemaker
supplyline [onsomemodels].
Preparing for Vacation
For long vacations or absences, remove
food and unplug the refffNeratol: Clean the
interior with a baking soda solution of one
tablespoon (15 ml) of baking soda to one
quart (1 1) ofwatel: Leave the doors open.
Set the icemaker power switch to the 0 (Off)
position and shut off the water supply to
the refiigeraton
If the temperature can drop below
freezing, have a qualified servicer drain the
water supply system (on some models) to
prevent serious propervy damage due to
flooding.
Preparing to Move
Secure all loose items such as grille, shelves and drawers by taping them securely
in place to prevent damage.
Be sure the refrigerator stags in on upright position during moving.
12

Replacingthelightbulbs. . GEA ,ia.coscom
Turning the control to the 0(off) position does not remove power to the light circuit.
Refrigerator Compartment--Upper Light
O Unplug the refrigerator. O Plug the refrigerator back in.
_The bulb is located behind tbe controls.
Replace with an appliance bulb of the
same or lower wattage.
Refrigerator Compartment--Lower Light (onsomemodels)
Thislightis locatedabovethe topdrawe_ _After replacing with an appliance
bulb of the same or lower wattage,
Unplug tile refrigerato_: replace the shield.
_ Grasp tile lip at tile bottom of tile light _ Plug the refrigerator back in.
shield and pull it up and forward.
Freezer Compartment
Unplug the refiigerator.
_ Remove tbe shelf just below tbe light
shield. (The shelf will be easier to
remove if it is emptied first.)
Lift up on tbe light shield to remove.
_Afrer replacing with an appliance
bulb of the same or lower wattage,
reinstall the shield by hanging it
from the three tabs.
_ Reinstall tbe shelf and plug the
refrigerator back in.
Dispenser
Unplug tim refiigerator.
_The bulb is located on the dispenser
under the control panel.
Remove tbe light bulb by turning
it counterclockwise.
Replace tbe bulb with a bulb of the
same size and wattage.
Plug tbe refrigerator back in.
13

Installation
Instructions Refrigerator
Models 20,22,25
Questions?Call800.GE.CARES(800.432.2737)or Visitour Website at: www.GEAppliances.com
In Canada,call 1.800.361.3400orVisitourWebsiteat:www.geappliances.ca I
BEFORE YOU BEGIN
Read these instructions completely and carefully.
•IMPORTANT - gavetheso
instructions for local inspector's use.
•IMPORTANT - Obsorvoall
governing codes and ordinances.
• Note to Installer - Be sure to leave these
instructions with the Consumer.
• Note to Consumer - Keep these instructions
1or fllttlre reference.
•Skill level -Installation of this appliance requires
basic mechanical skills.
•Completion time -Refrigerator Installation
15 minutes
• Proper installation is the responsibility of the
installer.
• Product failure due to improper installation is not
covered under the Warranty.
WATER SUPPLY TO THE ICEMAKER
(on some models)
If the refi'igerator has an icemakm; it will have to be
connected to a cold water line. AGE water supply kit
(containing tubing, shutoff valve, fittings and
instructions) is available at extra cost fi'om your dealm;
by visiting our Website at www.GEAppliances.eom
(in Canada, at www.geappliances.ea) or fi'om Parts
and Accessories, 800.626.2002.
REFRIGERATOR LOCATION
•Do not install tile refiigerator where the temperature
will go below 60°F (16°C) because it will not run often
enough to maintain proper temperatures.
• Install it on a floor strong enough to support it fully
loaded.
CLEARANCES
Allow the following clearances tbr ease of installation,
proper air circulation and plumbing and electrical
connections.
• Sides 1/8" (4 mm)
•Top 1" (25 mm)
•Back 1" (25 mm)
A door clearance of 3/4" (19 rnm) is needed for a 90 °
door opening which provides better access to the food
storage area.
ROLLERS
The rogers have 3 purposes:
• Rollers adjust so the door closes easily when opened
about halfu_y.
Rollers adjust so the refrigerator is firmly positioned
on the floor and does not wobble.
Rollers allow you to move the refrigerator a_a_yfrom
the wall for cleaning.
To adjust the rollers, remove the base grille by pulling it
out at the bottom.
Turn the roller adjusting scre,a_ dockwise to raise the
refrigerator, counterclockwise to lower it. Use an
adjustable wrench (3/8" hex head bolt) or pliers.
To replace base grille, line up the clips on back of grille
between the bar and the kuottom of the cabinet. Push
foYward until grille snaps into place.
14

Installation Instructions
DOOR ALIGNMENT
After leveling, make sure that doors are even at the top.
To make the doors even, adjust tile refrigerator door.
O Using a 5/16" socket wrench, turn tile door adjusting
screw to the right to raise the door, to tile left to lower
it. (A nylon plug, embedded in the threads of the pin,
prevents the pin from turning unless a wrench is
used.)
O After one or two turns of the wrench, open and close
tile refrigerator compartment door and check the
alignment at tile top of tile doors.
Toremovethe base
gdlle,oDenthedoors
andthenpullthe
gdllestraightout
15

Installation Instructions
INSTALLING THE WATER LINE
BEFORE YOU BEGIN
Recommended copper water supply kits are WX8X2,
WX8X3 or WX8X4, depending on the amount of
tubing you need. Approved plastic ,a-ater supply lines
are GE SmartConnect '' Refiigeramr Tubing
(WX08X10002, WX08X10006, WX08X10015 and
WX08X10025).
When connecting your refrigerator to a GE Reverse
Osmosis Water System, the only approved installation
is with a GE RVKit. For other reverse osmosis ,a-ater
systems, follow the manufacturer's recommendations.
If the water supply to the refi'igerator is from a Reverse
Osmosis Water Filtration System AND the refi'igerator
also has a water filtm; use the refrigerator's filter bypass
plug. Using the refrigerator's water fihration cartridge
in coiljunction with the RO filter can resuh in hollow
ice cubes and slower water flow fi'om the water
dispensen
This water line installation is not warranted by the
refrigerator or icemaker manufacturen Follow these
instructions carefully to minimize the risk of expensive
water damage.
Water hammer (water banging in the pipes) in house
plumbing can cause damage to refrigerator parts and
lead to water leakage or flooding. Call a qualified
plumber to correct water hammer before installing
the water supply line to the refi'igeratol:
To prevent burns and product damage, do not hook
up the w-ater line to the hot water line.
If you use your refrigerator befbre connecting the
water line, make sure the icemaker power switch is in
the 0 (Off) position.
Do not install the icemaker tubing in areas where
temperatures fall below freezing.
When using any electrical device (such as a power
drill) during installation, be sure the device is double
insulated or grounded in a manner to prevent the
hazard of electric shock, or is batte W powered.
All installations must be in accordance with local
plumbing code requirements.
WHAT YOU WILL NEED
•Copper or GE SmartConnect TM Refrigerator Tubing
kit, 1/4" outer diameter to connect the refi'igerator
to the water supply. If using coppm; be sure both ends
of the tubing are cut square.
To determine how much tubing you need: measure
the distance fi'om the water valve on the back of the
refrigerator to the water supply pipe. Then add 8'
(2.4 m). Be sure there is sufficient extra tubing (about
8" [2.4 m] coiled into 3 turns of about 10" [25 cm]
diameter) to allow the refi'igerator to move out fi'om
the wall after installation.
GE SmartConnect ''_Refrigerator Tubing Kits are
available in the follovdng lengths:
2' (0.6 m) -WXO8XIO002
6' (1.8 m) -WXO8XIO006
15" (4.6 m) - WXO8XIOOf5
25" (7.6 m) - WXO8XlO025
Be sure that the kit you select allows at least 8' (2.4 m)
as described above.
NOTE: The only GE approved plastic tubing is that
supplied in GE SmartConnect TM Refrigerator Tubing
kits. Do not use any other plastic water supply line
because the line is under pressure at all times. Certain
types of plastic will crack or rupture with age and cause
water damage to your home.
16

Installation Instructions
WHAT YOU WILL NEED (CONT.)
•AGE water supply kit (containing tubing, shutoff
valve and fittings listed below) is available at extra
cost fi'om your dealer or fi'om Parts and Accessories,
800.626.2002.
•A cold water supply. The water pressure must be
between 20 and 120 p.s.i. (1.4_.2 bar) on models
without a water filter and between 40 and 120 p.s.i.
(2.8-8.2 bar) on models with a water filten
•Power drill.
• 1/2" or adjustable wrench.
•Straight and Phillips blade screwdriver.
•Two 1/4" outer diameter compression nuts and
2 ferrules (sleeves)--to connect the copper robing
to the shutoff valve and the refi'igerator
water valve.
OR
• K you are using a GE SmartConnecC' Refrigerator
Tubing kit, the necessary fittings are preassembled to
the tubing.
• If your existing copper water line has a flared fitting
at the end, you will need an adapter (available at
plumbing supply stores) to connect the water line to
the refrigerator OR you can cut off the flared fitting
with a tube cutter and then use a compression fitting.
Do not cut formed end from GE SmartConnect '_
Refi'igerator tubing.
• Shutoff valve to connect to tile cold water line.
The shutoff valve should have a water inlet with a
minimum inside diameter of 5/32" at the point of
connection to the COLD WATER LINE. Saddle-type
shutoffvalves are included in many water supply kits.
Before purchasing, make sure a saddle-type valve
complies with your local plumbing codes.
Install the shutoffvalve on the nearest frequently used
drinking water line.
[] SHUT OFF THE MAIN WATER
SUPPLY
Turn on the nearest faucet long enough to clear
the line of water.
[] CHOOSE THE VALVE LOCATION
Choose a location for the valve that is easily
accessible. It is best to connect into the side of a
vertical ,a-ater pipe. When it is necessary to connect
into a horizontal water pipe, make the connection
to the top or side, rather than at the bottom,
to avoid drawing offany sediment from the
,a_ater pipe.
[] DRILL THE HOLE FOR THE VALVE
Drill a 1/4" hole in the ,a-ater pipe (even if using a
self-piercing valve) using a sharp bit. Remove any
burrs resuhing from drilling the hole in the pipe.
Take care not to allow water to drain into the drill.
Failure to drill a1/4" hole may resuh in reduced
ice production or smaller cubes.
17

Installation Instructions
INSTALLING THE WATER LINE (cont.)
[] FASTEN THE SHUTOFF VALVE
Fasten the shutoffvah,e to the cold water pipe with
the pipe clamp.
PipeClamp
Saddle-Type _4 VerticalCold
ShutoffValve Water Pipe
NOTE: Commonwealth of Massachusetts Plumbing
Codes 248CMR shall be adhered m. Saddle valves
are illegal and use is not permitted in Massachusetts.
Consult with your licensed plumbm:
[] TIGHTEN THE PIPE CLAMP
Tighten the clamp screws until the sealing washer
begins to swell.
NOTE: Do not overtighten or you may crush the
tubing.
Washer
PipeCiamPw_ _lniet End
ClampScre
[] ROUTE THE TUBING
Route the tubing between the cold water line and
tile refrigerator.
Route the tubing through a hole drilled in the v_-all
or floor (behind tile refrigerator or adjacent base
cabinet) as close to the wall as possible.
NOTE: Be sure there is sufficient extra tubing
(about 8" [2.4 m] coiled into 3 turns of about 10"
[95 cm] diameter) to allow the refrigerator to move
out from the wall after installation.
[] CONNECT THE TUBING
TO THE VALVE
Place the compression nut and ferrule (sleeve) for
copper tubing onto the end of the tubing and
connect it to the shutoff valve.
Make sure the tubing is fhlly inserted into the valve.
Tighten tile compression nut securely.
For plastic tubing from a GE SmartConnect TM
Refrigerator Tubing kit, insert the molded end
of the tubing into the shutoff valve and tighten
compression nut until it is hand tight, then tighten
one additional turn with a wrench. Overtightening
may cause leaks.
Nut
SaddleType
ShutoffValve SmartConnectM
Tubing
PackingNut
OutletValve \ Ferrule{sleeve)
NOTE: Commonweahh of Massachusetts Plumbing
Codes 248CMR shall be adhered to. Saddle valves
are illegal and use is not permitted in Massachusetts.
Consult with your licensed plumben
[] FLUSH OUT THE TUBING
Turn the main w-ater supply on and flush out the
tubing until the water is clear.
Shut the water offat the water valve after about
one quart (1 liter) of water has been flushed
through the tubing.
18

Installation Instructions
[] CONNECT THE TUBING TO THE
REFRIGERATOR
NOTES:
•Before making the connection to tile refrigeratol,
be sure tile refrigerator power cord is not
plugged into the wall outlet.
•If your refrigerator does not have a ,a-ater filtm,
we recommend installing one if your water supply
has sand or particles that could clog the screen of
the refrigerator's water valve. Install it in the
water line near the refrigeramn If using a GE
SmartConnect '_ Refrigerator Tubing kit, you
will need an additional tube (WX08X10002)
to connect the filmn Do not cut plastic tube
to install filtm:
Some models have the refrigerator connection at
the end of tubing located outside the compressor
compartment access coven On other models, the
compressor compamnent access cover must be
removed in order to access the refrigerator
connection at the water valve.
On models using the refrigeration connection at
the water valve, remove the plastic flexible cap.
Place the compression nut and ferrule (sleeve)
Ohm the end of the tubing as shown. On a GE
SmartConnect Refrigerator Tubing kit, tile nuts
are already assembled to the tubing.
[] CONNECT THE TUBING TO THE
REFRIGERATOR (CONT.)
Insert the end of tile tubing into the refrigerator
connection as far as possible. While holding the
tubing, tighten the fitting.
For plastic tubing from a GE SmartConnect
Refrigerator Tubing kit, insert the molded end of
the tubing into the refrigerator connection and
tighten the compression nut until it is hand tight,
then tighten one additional turn with a wrench.
Overtightening may cause leaks.
Fasten the tubing into the clamp provided as
shown to keep it in position. You may need to pry
open the clamp.
One of the illustrations below will look like the
connection on your refrigerator.
Clamp
1/4"
Compression
Nut
Tubing
Clamp
Ferrule
(sleeve}
Connection
1/4"
_SmartConnecU
Tubing
1/4"
Tubing
Ferrule
(deeve)_
SmartConneet"
Connection Tubing
1_ TURN THE WATER ON AT THE
SHUTOFF VALVE
Tighten any connections tbat leak.
Reattach the access cover.
19

Installation Instructions
INSTALLING THE WATER LINE (cont.)
[] PLUG IN THE REFRIGERATOR
Arrange the coil of tubing so that it does not vibrate
against the back of the refrigerator or against the
wall. Push the refl'igerator back to the wall.
START THE ICEMAKER
Set the icemaker power sudtch to the I (On}position.
The icemaker will not begin m operate until it
reaches its operating temperature of 15°F (-9°C)
or below. It will then begin operation automatically
if the icemaker power switch is in the ! (On}position.
NOTE: In lower water pressure conditions, the
water valve may turn on up to 3 times to deliver
enough water to the icemaker.
2O
This manual suits for next models
24
Table of contents
Languages:
Other GE Refrigerator manuals

GE
GE PFSF0MFCWW Original instructions

GE
GE GE Profile Arctica PSS27NHN User instructions

GE
GE Profile PSHF6PGZ Manual

GE
GE Profile PFCF1NJW Manual

GE
GE Monogram ZISS420NXSS Manual

GE
GE GTE21 Operating instructions

GE
GE SIDE BY SIDE 25 Service manual

GE
GE GTJ18CBDSA Manual

GE
GE Profile PGCS1RKZ Manual

GE
GE TBF21BA Installation instructions