GE Profile GTR12HBX User manual

Safety Instructions . . . . . . . . . . . . . 2, 3
Operating Instructions
Care and Cleaning . . . . . . . . . . . . . . . . . .6, 7
Control Settings . . . . . . . . . . . . . . . . . . . . . . .4
Ice Service . . . . . . . . . . . . . . . . . . . . . . . . . . . . . .5
Storage Drawers . . . . . . . . . . . . . . . . . . . . . . .4
Installation Instructions
Preparing to Install
the Refrigerator . . . . . . . . . . . . . . . . . . . . . . 8
Reversing the Door Swing . . . . . . . . . . 9–12
Troubleshooting Tips . . . . . . . . 13–15
Normal Operating Sounds . . . . . . . . . . . 13
Consumer Support
Consumer Support . . . . . . . . . . Back Cover
Warranty (Canada) . . . . . . . . . . . . . . . . . . 18
Warranty (U.S.) . . . . . . . . . . . . . . . . . . . . . . 17
ge.com
Refrigerators
Top Freezer
197D8071P001 49-60568-1 10-08 JR
Réfrigérateurs
Congélateur supérieur
Refrigeradores
Congelador superior
Write the model and serial
numbers here:
Model # ____________________
Serial # ____________________
You can find them on a label inside
the refrigerator.
GTR10HAX
GTR12HAX
GTR12HBX
Manuel d’utilisation
et d’installation
Owner’s Manual and
Installation Instructions
Manual del
propietario e
instalación
La section française commence à la page 19
La sección en español empieza en la página 37

IMPORTANT SAFETY INFORMATION.
READ ALL INSTRUCTIONS BEFORE USING.
WARNING!
Use this appliance only for its intended purpose as described in this Owner’s Manual.
SAFETY PRECAUTIONS
When using electrical appliances, basic safety precautions should be followed, including the following:
■
■This refrigerator must be properly installed
and located in accordance with the Installation
Instructions before it is used.
■
■Do not allow children to climb, stand or hang
on the shelves in the refrigerator. They could
damage the refrigerator and seriously injure
themselves.
■
■Do not touch the cold surfaces in the freezer
compartment, particularly when hands are
damp or wet. Skin may stick to these extremely
cold surfaces.
■
■Do not store or use gasoline or other flammable
vapors and liquids in the vicinity of this or any other
appliance.
■
■In refrigerators with automatic icemakers,
avoid contact with the moving parts of the
ejector mechanism, or with the heating element
that releases the cubes. Do not place fingers or
hands on the automatic icemaking mechanism
while the refrigerator is plugged in.
■
■Keep fingers out of the “pinch point” areas;
clearances between the doors and between
the doors and cabinet are necessarily small.
Be careful closing doors when children are
in the area.
■
■Unplug the refrigerator before cleaning and making
repairs.
NOTE: We strongly recommend that any servicing
be performed by a qualified individual.
■
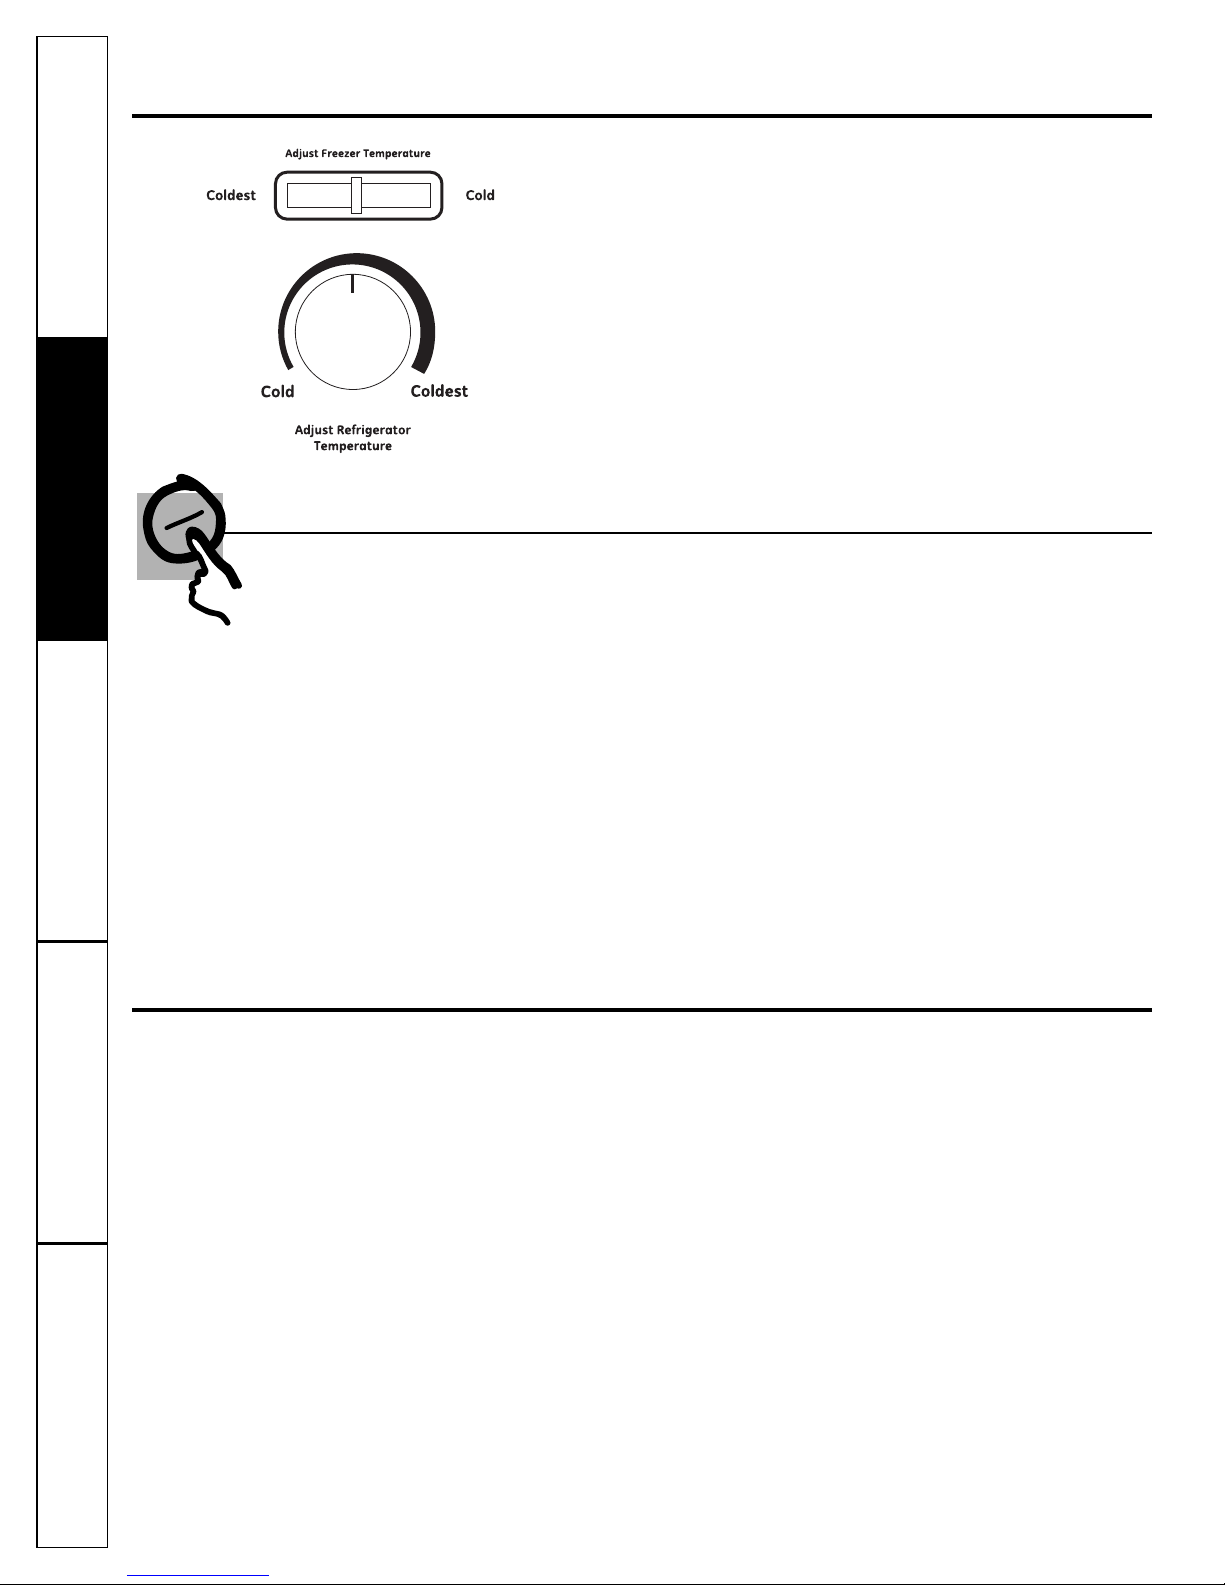
■Turning the control to the COLD position does
not remove power to the light circuit.
■
■Do not refreeze frozen foods which have
thawed completely.
■
■Before replacing a burned-out light bulb, the
refrigerator should be unplugged in order to avoid
contact with a live wire filament. (A burned-out light
bulb may break when being replaced.)
PROPER DISPOSAL OF THE REFRIGERATOR
Child entrapment and suffocation are not problems
of the past. Junked or abandoned refrigerators are
still dangerous…even if they will sit for “just a few
days.” If you are getting rid of your old refrigerator,
please follow the instructions below to help prevent
accidents.
Before You Throw Away Your Old
Refrigerator or Freezer:
■Take off the doors.
■Leave the shelves in place so that children may not
easily climb inside.
Refrigerants
All refrigeration products contain refrigerants,
which must be removed prior to product disposal.
If you are getting rid of an old refrigeration product,
check with the company handling the disposal about
what to do.
USE OF EXTENSION CORDS
Because of potential safety hazards under certain conditions, we strongly recommend against the
use of an extension cord.
However, if you must use an extension cord, it is absolutely necessary that it be a UL-listed (in the United States)
or a CSA-listed (in Canada), 3-wire grounding type appliance extension cord having a grounding type plug and
outlet and that the electrical rating of the cord be 15 amperes (minimum) and 120 volts.
DANGER! RISK OF CHILD ENTRAPMENT
2
Consumer Support Troubleshooting Tips Operating Instructions Safety Instructions
Installation
Instructions
Troubleshooting Tips Installation
Instructions Safety Instructions
Operating Instructions
Troubleshooting Tips Installation
Instructions Safety Instructions
Operating Instructions

3
Consumer Support
Troubleshooting Tips
Operating InstructionsSafety Instructions Installation
Instructions
ge.com
WARNING!
HOW TO CONNECT ELECTRICITY
Do not, under any circumstances, cut or remove the third (ground) prong from the power cord.
For personal safety, this appliance must be properly grounded.
The power cord of this appliance is equipped
with a 3-prong (grounding) plug which mates
with a standard 3-prong (grounding) wall outlet
to minimize the possibility of electric shock hazard
from this appliance.
Have the wall outlet and circuit checked by
a qualified electrician to make sure the outlet
is properly grounded.
Where a standard 2-prong wall outlet is encountered,
it is your personal responsibility and obligation to
have it replaced with a properly grounded 3-prong
wall outlet.
The refrigerator should always be plugged into its
own individual electrical outlet which has a voltage
rating that matches the rating plate.
This provides the best performance and also prevents
overloading house wiring circuits which could cause
a fire hazard from overheated wires.
Never unplug your refrigerator by pulling on the
power cord. Always grip plug firmly and pull straight
out from the outlet.
Repair or replace immediately all power cords that
have become frayed or otherwise damaged. Do not
use a cord that shows cracks or abrasion damage
along its length or at either end.
When moving the refrigerator away from the wall,
be careful not to roll over or damage the power cord.
READ AND FOLLOW THIS SAFETY INFORMATION CAREFULLY.
SAVE THESE INSTRUCTIONS

About the control on the refrigerator.
Control Settings
Adjust the fresh food control one increment
at a time. Allow 12 hours after each adjustment
for the refrigerator to reach the temperature you
have set.
Adjust the freezer control by sliding approximately
1/4 the distance each time. Allow 12 hours after each
adjustment for the freezer to reach the temperature
you have set.
After each adjustment, check both the freezer
and the fresh food compartments. Changing the fresh
food control will affect the temperature of the freezer
compartment. Likewise, changing the freezer control
can affect the temperature of the fresh food
compartment.
Control settings will vary based on personal
preferences, usage and operating conditions
and may require more than one adjustment.
Factors that affect temperature include the amount
of food in the fresh food and freezer compartments,
frequency of door opening, and temperature of food
when placed in either compartment.
There is a temperature control in the fresh food compartment
as well as the freezer compartment. Initially set the control
to the mid point in the fresh food and freezer compartments.
Allow 24 hours for the temperature to stabilize.
4
Consumer Support Troubleshooting Tips Operating Instructions Safety Instructions
Installation
Instructions
Troubleshooting Tips Installation
Instructions Safety Instructions
Operating Instructions
Troubleshooting Tips Installation
Instructions Safety Instructions
Operating Instructions
Fruit and Vegetable Drawers
These storage drawers provide space to store fruits,
vegetables and meats. To replace the drawers and the cover above them,
the door must be fully opened. In some installations,
the refrigerator may have to be moved away from
the wall for the door to be fully opened.
About the storage drawers.

Consumer Support
Troubleshooting Tips
Operating Instructions
Safety Instructions Installation
Instructions
5
Ice Trays
To release ice cubes, turn the tray upside
down, hold it over a container and twist
both ends.
For only one or two ice cubes, leave the tray
right-side up, twist both ends slightly and
remove as many cubes as you want.
Wash ice trays in lukewarm water only—
do not put them in an automatic dishwasher.
About ice service. ge.com
Icemaker Accessory Kit (Model GTR12HBX Only)
An icemaker accessory kit is available
from your dealer. Check the back of the
refrigerator for the specific icemaker kit
needed for your model.
Water Supply Kits (Model GTR12HBX Only)
Kits containing copper tubing, shutoff valve,
fittings and instructions needed to connect
the icemaker to your cold water line are
available at extra cost from your dealer
or from Parts and Accessories. In the U.S.,
call 800.626.2002.

Consumer Support Troubleshooting Tips Operating Instructions Safety Instructions
Installation
Instructions
Troubleshooting Tips Installation
Instructions Safety Instructions
Operating Instructions
Troubleshooting Tips Installation
Instructions Safety Instructions
Operating Instructions
6
Care and cleaning of the refrigerator.
Behind the Refrigerator
Once a year, move the refrigerator out
and vacuum the back coils. Be careful when
moving the refrigerator away from the wall.
All types of floor coverings can be damaged,
particularly cushioned coverings and those
with embossed surfaces.
Pull the refrigerator straight out and return
it to position by pushing it straight in.
Moving the refrigerator in a side direction
may result in damage to the floor covering
or refrigerator.
When pushing the refrigerator back, make
sure you don’t roll over the power cord.
Cleaning the Outside
Keep the outside clean. Wipe with a clean
cloth lightly dampened with mild liquid dish
detergent. Dry with a clean, soft cloth.
Do not wipe the refrigerator with a soiled dish
cloth or wet towel. These may leave a residue
that can erode the paint. Do not use scouring
pads, powdered cleaners, bleach or cleaners
containing bleach because these products
can scratch and weaken the paint finish.
Protect the paint finish. The finish on the
outside of the refrigerator is a high quality,
baked-on paint finish. With proper care,
it will stay new-looking and rust free for
years. Apply a coat of kitchen/appliance
wax when the refrigerator is new, and then
at least twice a year.
Cleaning the Inside
To help prevent odors, leave an open box
of baking soda in the fresh food and freezer
compartments.
Unplug the refrigerator before cleaning.
If this is not practical, wring excess moisture
out of sponge or cloth when cleaning around
switches, lights or controls.
Use warm water and baking soda solution—
about a tablespoon (15 ml) of baking soda to
a quart (1 liter) of water. This both cleans and
neutralizes odors. Rinse and wipe dry.
Other parts of the refrigerator—including door
gaskets, fruit and vegetable drawers, and all
plastic parts—can be cleaned the same way.
After cleaning the door gaskets, apply a thin
layer of petroleum jelly to the door gaskets
at the hinge side. This helps keep the gaskets
from sticking and bending out of shape. Do
not use cleansing powders or other abrasive
cleaners.
Do not wash any plastic refrigerator parts
in the dishwasher.
Avoid cleaning cold glass shelves
(on some models) with hot water because
the extreme temperature difference may
cause them to break. Handle glass shelves
carefully. Bumping tempered glass can cause
it to shatter.

Preparing for Vacation
For long vacations or absences, remove food
and unplug the refrigerator. Clean the interior
with a baking soda solution of one
tablespoon (15 ml) of baking soda to one
quart (1 liter) of water. Leave the doors open.
Preparing to Move
Secure all loose items such as shelves and
drawers by taping them securely in place
to prevent damage.
Be sure the refrigerator stays in an upright
position during moving.
Consumer Support
Troubleshooting Tips
Operating Instructions
Safety Instructions Installation
Instructions
7
ge.com
Replacing the Light Bulb
Moving the control to COLD does not remove
power to the light circuit.
The bulb is located behind the shield
in the back wall.
Unplug the refrigerator.
Remove the shelves (if necessary).
Remove the screw.
Gently remove the light shield by
inserting a flat head screwdriver
into the slot at the top of the shield
and pop it off.
Replace the bulb with an appliance
bulb of the same or lower wattage.
Insert the tab at the bottom of the light
shield into the light bulb housing and
snap into place.
Replace the screw.
Replace the shelves if removed.
Plug in the refrigerator.
10’ Refrigerator Light Location
12’ Refrigerator Light Location
Bulb
Cover
Screw
Hole
Bulb
Cover
Screw
Hole

Models GTR10HAX,
GTR12HAX
GTR12HBX
LEVELING LEGS
Adjustable legs at the front corners of the refrigerator
should be set so the refrigerator is firmly positioned
on the floor, and the front is raised just enough that
the door closes easily when opened about halfway.
To adjust the leveling legs, turn the legs clockwise
to raise the refrigerator, counterclockwise to lower it.
If you have questions, call 1.800.GE.CARES or visit our Website at: ge.com
To raise the refrigerator
Installation
Refrigerator
Instructions
BEFORE YOU BEGIN
Read these instructions completely and carefully.
•IMPORTANT –Save these instructions for
local inspector’s use.
•IMPORTANT –Observe all governing codes
and ordinances.
• Note to Installer – Be sure to leave these
instructions with the Consumer.
• Note to Consumer – Keep these instructions
for future reference.
• Skill level – Installation of this appliance requires basic
mechanical skills.
• Completion time – Refrigerator Installation
15 minutes
Reversing the Door Swing
1 hour
• Proper installation is the responsibility of the installer.
• Product failure due to improper installation is not covered
under the Warranty.
REFRIGERATOR LOCATION
• Do not install the refrigerator where the temperature will
go below 55°F (13°C) because it will not run often enough
to maintain proper temperatures.
• Install it on a floor strong enough to support it fully
loaded.
• Do not install it closer than 5″(13 cm) next to a range.
CLEARANCES
Free-standing installation only.
8

9
Installation Instructions
REVERSING THE DOOR SWING
REMOVE THE FREEZER DOOR
Remove the hinge cover screws (some models have
lock washers with each screw), top hinge and shim.
Set the door on a non-scratching surface with
the outside up.
NOTE: When removing the door, watch for washer(s)
between the center hinge and the bottom of the
freezer door that may stick to the door. Do not lose.
CAUTION:Do not let door drop
to the floor. To do so could damage the door stop.
1
IMPORTANT NOTES
When reversing the door swing:
• Read the instructions all the way through before starting.
• Handle parts carefully to avoid scratching paint.
• Set screws down by their related parts to avoid using
them in the wrong places.
• Provide a non-scratching work surface for the doors.
IMPORTANT: Once you begin, do not move the cabinet
until door-swing reversal is completed.
These instructions are for changing the hinges from the
right side to the left side—if you ever want to change the
hinges back to the right side, follow these same instructions
and reverse all references to left and right.
Unplug the refrigerator from its electrical outlet.
Empty all door shelves.
TOOLS YOU WILL NEED
5/16″Socket driver
Phillips screwdriver
Putty knife or
thin-blade screwdriver
Masking tape

TRANSFER TOP HINGE TO
THE LEFT
Using a putty knife with the edge covered with
masking tape, remove the plug buttons. Be careful
of the paint finish.
Reinstall the plug button on the right side by inserting
it into the holes vacated by the top hinge screws.
Reassemble the top hinge and shim on the left side,
turning the screws just enough to hold the hinge
in place.
3
Installation Instructions
REVERSING THE DOOR SWING (CONT.)
REMOVE THE FRESH FOOD DOOR
Tape the door shut with masking tape.
Remove the center hinge and shim by removing
the screws (some models have lock washers with
each screw). Lift up the hinge to remove it.
NOTE: Some models have a washer between
the center hinge and the top of the fresh food door.
Do not lose.
Remove the tape holding the door shut.
Lift the fresh food door up and off the bottom hinge.
Set the door outside-up on a non-scratching surface.
NOTE: When removing the door, watch for washer(s)
between the bottom hinge and the bottom of the fresh
food door that may stick to the door. Do not lose.
CAUTION:Do not let door drop
to the floor. To do so could damage the door stop.
2
10

Installation Instructions
TRANSFER BOTTOM HINGE
TO THE LEFT
To access the bottom hinge, move the refrigerator
so it is 30″from a wall. Then carefully tip the
refrigerator back until it rests against the wall.
CAUTION:Be sure that the coils
on the back of the refrigerator do not rest against
the wall. Doing so could damage the coils.
Remove the screws (some models have washers
with each screw), leveling leg and bottom hinge from
the right side. Remove the leveling leg from the left side
of the cabinet and install it in the right side.
Reassemble the bottom hinge on the left side.
NOTE: The leveling legs are not interchangeable.
4
11
30″
TRANSFER FRESH FOOD DOOR STOP
TO THE LEFT
Remove the door stop from the bottom of the right
side of the door. Transfer the plug buttons from
the bottom left side to the right side.
Install the door stop on the left side.
5
REHANG THE FRESH FOOD DOOR
Make sure the washer(s) are in place on the bottom
hinge pin. Place the fresh food door on the bottom
hinge, close the door and tape it in place with
masking tape.
Remove the plug button from the left edge of the door
and insert it into the hole on the opposite side.
6
INSTALL CENTER HINGE
ON THE LEFT
Remove the three plug buttons on the left side
and install them on the right.
Install the center hinge designed for the left side
that came with the refrigerator, with the screws, spacer
and washer(s) (on some models) that you removed
in Step 2.
Remove the tape holding the door shut.
CAUTION:When assembled correctly,
the hinge is tight against the cabinet.
ATTENTION: The screws must be properly tightened.
Turn the screws until snug. Then tighten the screws
a minimum of 1/2 turn using both hands.
7
Plug button

ALIGN THE DOORS
Align the freezer door with the fresh food door so that
the gap between the doors is even.
Tighten the top hinge screws by turning them until
snug. Then turn the screws a minimum of 1/2 turn
using both hands.
Install the hinge cover over the top hinge.
10
Plug button
Installation Instructions
REVERSING THE DOOR SWING (CONT.)
REHANG THE FREEZER DOOR
Place the freezer door on the center hinge over
the pin.
Raise the top hinge by hand and insert the top
hinge pin into the hole in the door. Then swing
the door shut.
Transfer the plug button on top of the door
to the opposite side.
9
12
TRANSFER FREEZER DOOR STOP
TO THE LEFT
Remove the door stop from the bottom of the right
side of the door. Transfer the plug buttons from
the bottom left side to the right side.
Install the door stop on the left side.
8

HUMMM...
WHOOSH...
■The new high-efficiency compressor may run faster
and longer than your old refrigerator, and you may
hear a high-pitched hum or pulsating sound while
it is operating.
■You may hear a whooshing sound when the doors close.
This is due to pressure equalizing within the refrigerator.
Newer refrigerators sound different from older refrigerators. Modern refrigerators
have more features and use newer technology.
■You may hear the fans spinning at high speeds.
This happens when the refrigerator is first plugged in,
when the doors are opened frequently or when a large
amount of food is added to the refrigerator or freezer
compartments. The fans are helping to maintain
the correct temperatures.
CLICKS, POPS,
CRACKS and CHIRPS
■You may hear cracking or popping sounds when
the refrigerator is first plugged in. This happens
as the refrigerator cools to the correct temperature.
■The compressor may cause a clicking or chirping
sound when attempting to restart (this could take
up to 5 minutes).
■Expansion and contraction of cooling coils during and
after defrost can cause a cracking or popping sound.
■On models with an icemaker, after an icemaking cycle,
you may hear the ice cubes dropping into the ice
bucket.
WATER SOUNDS
■The flow of refrigerant through the freezer cooling coils
may make a gurgling noise like boiling water.
■Water dropping on the defrost heater can cause a
sizzling, popping or buzzing sound during the defrost
cycle.
■A water dripping noise may occur during the defrost
cycle as ice melts from the evaporator and flows into
the drain pan.
■Closing the door may cause a gurgling sound due
to pressure equalization.
Do you hear what I hear? These sounds are normal.
Normal operating sounds. ge.com
13
Consumer Support
Troubleshooting Tips
Operating Instructions
Safety Instructions Installation
Instructions

14
Problem Possible Causes What To Do
Refrigerator does not Refrigerator in defrost cycle. •Wait about 30 minutes for defrost cycle to end.
operate Refrigerator is unplugged. •Push the plug completely into the outlet.
The fuse is blown/circuit •Replace fuse or reset the breaker.
breaker is tripped.
Vibration or rattling Front leveling legs need •See Leveling Legs.
(slight vibration adjusting.
is normal)
Motor operates for Normal when refrigerator •Wait 24 hours for the refrigerator to completely
is first plugged in. cool down.
Often occurs when large •This is normal.
amounts of food are
placed in refrigerator.
Door left open. •Check to see if package is holding door open.
Hot weather or frequent •This is normal.
door openings.
Temperature control •See About the control.
set at the coldest setting.
Fresh food or freezer Temperature control not •See About the control.
compartment too warm set cold enough.
Warm weather or frequent •Set the temperature control one step colder.
door openings. See About the control.
Door left open. •Check to see if package is holding door open.
Frost or ice crystals Door left open. •Check to see if package is holding door open.
on frozen food Too frequent or too long
(frost within package door openings.
is normal)
Ice cubes have Food transmitting odor/taste •Wrap foods well.
odor/taste to ice cubes.
Interior of refrigerator •See Care and cleaning.
needs cleaning.
Slow ice cube freezing Door left open. •Check to see if package is holding door open.
Temperature control not •See About the control.
set cold enough.
Consumer Support Troubleshooting Tips Operating Instructions Safety Instructions
Installation
Instructions
Before you call for service…
Troubleshooting Tips
Save time and money! Review the charts on the following
pages first and you may not need to call for service.
long periods or
cycles on and off
frequently. (Modern
refrigerators with
more storage space
and a larger freezer
require more
operating time. They
start and stop often
to maintain even
temperatures.)

15
Consumer Support
Troubleshooting Tips
Operating InstructionsSafety Instructions Installation
Instructions
Problem Possible Causes What To Do
Refrigerator has odor Foods transmitting odor •Foods with strong odors should be tightly wrapped.
to refrigerator. •Keep an open box of baking soda in the refrigerator;
replace every three months.
Interior needs cleaning. •See Care and cleaning.
Moisture forms on Not unusual during periods •Wipe surface dry.
outside of refrigerator of high humidity.
Moisture collects inside Too frequent or too long
(in humid weather, air door openings.
carries moisture into
refrigerator when doors
are opened)
Interior light does No power at outlet. •Replace fuse or reset the breaker.
not work Light bulb burned out. •See Replacing the light bulb.
Food is freezing Food too close to the air vent •Move the food away from the air vent.
in the refrigerator at the back of the refrigerator.
Refrigerator control is set •Move the refrigerator control to a warmer temperature
too cold. setting one increment at a time.
ge.com

16
Consumer Support Troubleshooting Tips Operating Instructions Safety Instructions
Installation
Instructions
Notes.

Consumer Support
Troubleshooting Tips
Operating InstructionsSafety Instructions Installation
Instructions
Refrigerator Warranty. (For customers in the United States)
All warranty service provided by our Factory Service Centers,
or an authorized Customer Care®technician. To schedule service
on-line, visit us at ge.com, or call 800.GE.CARES (800.432.2737).
Please have serial number and model number available when
calling for service.
■Service trips to your home to teach you how to use
the product.
■Improper installation, delivery or maintenance.
■Failure of the product if it is abused, misused, or used for
other than the intended purpose or used commercially.
■Loss of food due to spoilage.
■Replacement of house fuses or resetting of circuit
breakers.
■Damage caused after delivery.
■Replacement of the water filter cartridge, if included, due
to water pressure that is outside the specified operating
range or due to excessive sediment in the water supply.
■Replacement of the light bulbs, if included, or water filter
cartridge, if included, other than as noted above.
■Damage to the product caused by accident, fire, floods
or acts of God.
■Incidental or consequential damage caused by possible
defects with this appliance.
■Product not accessible to provide required service.
What GE Will Not Cover:
This warranty is extended to the original purchaser and any succeeding owner for products purchased
for home use within the USA. If the product is located in an area where service by a GE Authorized Servicer
is not available, you may be responsible for a trip charge or you may be required to bring the product to an
Authorized GE Service location for service. In Alaska, the warranty excludes the cost of shipping or service calls
to your home.
Some states do not allow the exclusion or limitation of incidental or consequential damages. This warranty
gives you specific legal rights, and you may also have other rights which vary from state to state. To know
what your legal rights are, consult your local or state consumer affairs office or your state’s Attorney General.
Warrantor: General Electric Company. Louisville, KY 40225
Staple your receipt here.
Proof of the original purchase
date is needed to obtain service
under the warranty.
EXCLUSION OF IMPLIED WARRANTIES—Your sole and exclusive remedy is product repair as provided in
this Limited Warranty. Any implied warranties, including the implied warranties of merchantability or
fitness for a particular purpose, are limited to one year or the shortest period allowed by law.
For The Period Of: GE Will Replace:
One Year Any part of the refrigerator which fails due to a defect in materials or workmanship.
From the date of During this limited one-year warranty, GE will also provide, free of charge, all labor and
the original purchase related service to replace the defective part.
17

18
TERMS AND CONDITIONS:
This warranty applies only for single family domestic
use in Canada when the Refrigerator has been properly
installed according to the instructions supplied by Mabe
and is connected to an adequate and proper utility
service.
Damage due to abuse, accident, commercial use, and
alteration or defacing of the serial plate cancels all
obligations of this warranty.
Service during this warranty period must be
performed by an Authorized Mabe Service Agent.
Neither Mabe nor the Dealer is liable for any claims or
damages resulting from failure of the Refrigerator or
from service delays beyond their reasonable control.
To obtain warranty service, purchaser must present
the original Bill of Sale. Components repaired or replaced
are warranted through the remainder of the original
warranty period only.
This warranty is extended to the original purchaser and
any succeeding owner for products purchased for home
use within Canada. In home warranty service will be
provided in areas where it is available and deemed
reasonable by Mabe to provide.
This warranty is in addition to any statutory warranty.
WHAT IS NOT COVERED:
• Owner is responsible to pay for service calls related
to product installation and/or teaching how to use
the product.
• Damage to finish must be reported within 48 hours
following the delivery of the appliance.
• Damage to finish after delivery.
• Improper installation—proper installation includes
adequate air circulation to the refrigeration system,
adequate electrical, plumbing and other connecting
facilities.
• Replacement of house fuses or resetting of circuit
breakers.
• Replacement of light bulbs.
• Damage to product caused by accident, fire, floods
or acts of God.
• Loss of food due to spoilage.
• Proper use and care of product as listed in
the owner’s manual, proper setting of controls.
• Product not accessible to provide required service.
• WARRANTOR IS NOT RESPONSIBLE FOR
CONSEQUENTIAL DAMAGES.
IMPORTANT
Keep this warranty and your bill of sale as proof of original purchase and purchase date.
Please have serial number and model number available when calling for service.
Mabe Service is available coast to coast. If further help is
needed concerning this warranty, contact:
Manager, Consumer Relations
Mabe Canada Inc., Consumer Service
1 Factory Lane, Suite 310
Moncton, New Brunswick E1C 9M3
1.800.561.3344
Staple your receipt here.
Proof of the original purchase
date is needed to obtain service
under the warranty.
What is covered How Long Warranted Parts Labour
(From Date of Sale) Repair or Replace
at Mabe’s Option
Compressor GE Profile: Ten (10) Years GE Profile: Ten (10) Years GE Profile: Five (5) Years
GE and All Other GE and All Other GE and All Other
Brands: One (1) Year Brands: One (1) Year Brands: One (1) Year
Sealed System (including GE Profile: Five (5) Years GE Profile: Five (5) Years GE Profile: Five (5) Years
evaporator, condenser GE and All Other GE and All Other GE and All Other
tubing and refrigerant) Brands: One (1) Year Brands: One (1) Year Brands: One (1) Year
All Other Parts One (1) Year One (1) Year One (1) Year
CUSTOMER WARRANTY
(for customers in Canada)
Your refrigerator is warranted to be free of defects in material and workmanship.
EXCLUSION OF IMPLIED WARRANTIES—Your sole and exclusive remedy is product repair as provided in this Limited Warranty. Any
implied warranties, including the implied warranties of merchantability or fitness for a particular purpose, are limited to one year
or the shortest period allowed by law.

Consignes de sécurité . . . . . . . 20, 21
Directives de fonctionnement
Bacs à légumes et à fruits . . . . . . . . . . . .22
Entretien et nettoyage . . . . . . . . . . . .24, 25
Réglage des boutons de commande . . .22
Glaçons . . . . . . . . . . . . . . . . . . . . . . . . . . . . . . .23
Directives d’installation
Inversion du sens d’ouverture
des portes . . . . . . . . . . . . . . . . . . . . . . . 27–30
Préparatifs pour l’installation
du réfrigérateur . . . . . . . . . . . . . . . . . . . . . 26
Dépannage . . . . . . . . . . . . . . . . . . . 31–33
Bruits de fonctionnement normaux . . . 31
Service à la clientèle
Garantie . . . . . . . . . . . . . . . . . . . . . . . . . . . . 35
Service à la clientèle . . . . . . . . . . . . . . . . . 36
Inscrivez ci-dessous les numéros
de modèle et de série :
N° de modèle ________________
N° de série __________________
Ils se trouvent sur une étiquette
apposée à l’intérieur du réfrigérateur.
GTR10HAX
GTR12HAX
GTR12HBX
Manuel d’utilisation
et d’installation
19
Soutien au
consommateur
Conseils de dépannage
Fonctionnement
Mesures de sécurité Installation

MESURES DE SÉCURITÉ IMPORTANTES.
LISEZ D’ABORD TOUTES LES DIRECTIVES.
AVERTISSEMENT!
N’utilisez cet électroménager que pour l’usage auquel il est destiné, comme expliqué dans
le présent manuel.
MESURES DE SÉCURITÉ
Lorsque vous utilisez un appareil électrique, observez toujours les mesures de sécurité de base,
y compris les suivantes.
■
■Installez le réfrigérateur conformément aux
directives d’installation avant de l’utiliser.
■
■Ne laissez pas les enfants grimper, s’asseoir, se tenir
debout ni se pendre aux clayettes du réfrigérateur.
Ils pourraient endommager le réfrigérateur
et se blesser gravement.
■
■Ne touchez pas les surfaces froides du congélateur
si vous avez les mains humides ou mouillées :
la peau risque d’adhérer à ces surfaces très froides.
■
■N’entreposez et n’utilisez pas d’essence ou autres
vapeurs et liquides inflammables à proximité de cet
appareil ou de tout autre appareil électroménager.
■
■Si votre réfrigérateur est doté d’une machine
à glaçons automatique évitez le contact avec
les pièces mobiles du mécanisme éjecteur, ou
avec l’élément chauffant situé à la partie inférieure
de la machine à glaçons. Ne posez pas les doigts
ou les mains sur le mécanisme de la machine à
glaçons pendant que le réfrigérateur est branché.
■
■Éloignez les doigts des parties du réfrigérateur
où l’on peut facilement se pincer : les espaces entre
les portes et entre les portes et les placards sont
toujours étroits. Soyez prudent lorsque vous fermez
les portes de l’appareil en présence des enfants.
■
■Débranchez votre réfrigérateur avant de le nettoyer
ou de le réparer.
REMARQUE : Nous vous recommandons vivement
de confier toute réparation à un technicien qualifié.
■
■La rotation de la commande à la position COLD
(froide) ne coupe pas la puissance sur le circuit
léger.
■
■Ne recongelez pas les aliments surgelés qui ont
complètement dégelé.
■
■Avant de remplacer une ampoule brûlée,
le réfrigérateur devrait être débranché afin
d’éviter le contact avec un filament de fil de phase.
(L’ampoule brûlée d’A peut se casser en étant
remplacé.)
COMMENT VOUS DÉBARRASSER CONVENABLEMENT
DE VOTRE CONGÉLATEUR
Les enfants pris au piège ou morts d’asphyxie sont
toujours d’actualité. Les réfrigérateurs abandonnés
sont toujours aussi dangereux, même si on n’attend
que «quelques jours» pour s’en débarrasser. Si vous
ne gardez pas votre ancien réfrigérateur, veuillez
suivre les directives ci-dessous afin de prévenir les
accidents.
Avant de vous débarrasser de votre ancien
réfrigérateur ou congélateur :
■Démontez les portes.
■Laissez les clayettes en place afin d’empêcher
les enfants de grimper à l’intérieur.
Réfrigérants
Tous les appareils de réfrigération contiennent
des réfrigérants qui, conformément aux lois fédérales,
doivent être enlevés avant toute élimination de
l’appareil. Si vous vous débarrassez de vieux appareils
de réfrigération, vérifiez, auprès de la société qui
s’occupe de leur élimination, ce que vous devez faire.
DANGER! RISQUES POUR LES ENFANTS
20
Soutien au
consommateur Conseils de dépannage Fonctionnement Mesures de sécurité
Installation
This manual suits for next models
2
Table of contents
Languages:
Other GE Refrigerator manuals

GE
GE GSS25TGPECC and Safety guide

GE
GE Arctica PSS 23 Series How to use

GE
GE Monogram ZIRS36N LH User manual

GE
GE GTZ18GBESS User manual

GE
GE GSCS3KGYSS Assembly instructions

GE
GE PTS22SCPARBS and Operating instructions

GE
GE 22 Safety guide

GE
GE Beaumark 23 Safety guide

GE
GE 49-60327 Original instructions

GE
GE monogram ZDBC240 User manual

GE
GE GE Operating instructions

GE
GE Profile PSSF3RGZ User manual

GE
GE Profile PSS23MGS Manual

GE
GE Monogram ZIDI240WII User manual

GE
GE PGCS1R User manual

GE
GE GTR16BBSRWW Assembly instructions

GE
GE Profile PCF25PGW Manual

GE
GE TFX19 User manual

GE
GE GLE12HSPSS Original instructions

GE
GE 200D8074P037 Safety guide