GE PSS25NGNACC and Safety guide

GEAppliances.com
Safety Instructions ........... 2-4
Operating Instructions
Additional Features ............ 12
Automatic lcemaker ........... 14
Care and Cleaning .......... 16, 17
Crispers and Pmis ............. 13
CustomCool _" • ............... 7, 8
Ice and Water Dispenser ..... 15, 16
Refrigerator Doors ............ 12
Replacing the Light Bulbs ....... 18
Shelves and Bins ........... 10, 11
Temperature Conu'ols ........... 5
TurboCoor" . .................. 6
Water Filter ................... 9
Instagation Instructions
Preparing to Install
the Refrigerator ............ 24, 25
Removing and
Replacing Doors .............. 23
Trim Kits and Panels ........ 19-22
Water Line Installation ...... 26-30
Troubleshooting Tips ....... 32-34
Normal Operating Sounds ...... 31
Consumer Support
Consumer Support ..... Back Cover
Performance Data Sheet ........ 37
Product Registration ........ 39, 40
State of California Water
Treatment Device Certificate ..... 38
Warranty (Canadian) ........... 35
Warranty (U.S.) ............... 36
Write the model and serial numbers hate:
Model #
Serial #
Find these mmlbers on a label inside
the refrigerator compartment at the
top on the right side.
Models23,25,26,27 and29
ProfileC6te _.C6te
Rdfrig6mteurs
Lasectionfra_aise commence_lapage
Prof!/e Lado a Lado
Refrigeradores
Lasnccidnanespa_nlnmpiezaenInp_gina78
200D2600POI8 4,9-60195 02-02 JR

IMPORTANTSAFETYINFORMATION.
READALLINSTRUCTIONSBEFOREUSING.
AWARNING!
Usethisapplianceon/},forits intendedpurpose asdescribedin this Owner'sManual
SAFETYPRECAUTIONS
Whenusingelectrical appliances,basicsafetyprecautionsshouldbe followed,includingthefollowing:
tyTlaksrefrigerator must be properly imtalled
and located in accordance with the Imtalhtion
Instructions before it is used.
tyDo not allow children to climb, stand or hang
on the shelves in the refrigerator. They could
damage the refrigerator and _riot_sly injure
themselves.
viDo not touch the cold surfaces in the freezer
compartment when hands are damp or wet. Skin
may stick to these extremely cold surfaces.
tyDo nut store or ttse gasoline or other flammable
vapors and fiquids in the vicinity of this or any
other appliance.
ty In refrigerators with atztomafic icemakc_rs,
avoid contact with the moving parts eft the
ejector mechanism, or with the heating element
located on the bottom of the icemaker. Do not
place fingers or hands on the automatic
icemaking mechanism while the rtyvigerator
is plugged in.
ty Keep fingers out of the "pinch point" area.s;
clearances between the doors and between
the doors and cabinet axe nec_ly small.
Be carevifl closing doors when children axe
in the area.
tyUnplug the reviigemtor before cleaning and
making repairs.
NOTE:Wesuong/yrecommendthatanysotvicingbe
#odmtrmdbyaqoalifi_ indivtyual.
vi,Setting either or both controls to 0{off)does not
reluove power to the light circxfit.
viDo not refreeze frozen foods which have
thawed completely.
viAlwaysclean file C_Cool TM Tray after thawing
food.
2

GF.Appliance_com
ADANGER!RISKOFCHILDENTRAPMENT
PROPERDISPOSALOFTHEREFRIGERATOR
Child entrapment and sttffo_ation are not problems
of the pasL Junked or abandoned refrigerators are
still dangerous...even if they will sit for _jttst a few
days." ffyou are getting rid of your old refrigerator,
ple&se follow the itxstrucdons below to help prevent
accidents.
BeforeYouThrowAway YourOldRefrigerator
or Freezer.
st Take offthe doors.
st Leave the shek, t_ in place so star children may
not tya.sllyclimb inside.
CFCDisposal
Your old refrig'erator may have a cooling ,systmn
that ttsed CFCs (chlorofluorocarbons). CFC*are
believed to harm stratospheric ozone.
Ify(m are throwing away your old refrigerator, make
sure the CFC refrigerant ksremoved for proper
disposal by a qualified servicer. If you intentionally
relemse this CFC refrigerant yon can be subject to
fraes madimprisonment uuder proxf.sionsof
emqronmental legislation.
USEOFEXTENSIONCORDS
Because of potentialsafetyhazardsundercertainconditions,we stJ'onglyrecommendagainstthe use
ofan extension cord.
Hov,xocer,if you must use an extension cord, it is absolutely necessary that it be a L_-listed (in the United
States) or a C,SA-listed (in Canada), 3-wire grotrading type appliance extension cord having a grounding
type plug and outlet mad dxat the electrical rating of the cord be 15 amperes (mininram) mad 120 volts.
3

IMPORTANTSAFETYINFORMATION.
READALLINSTRUCTIONSBEFOREUSING.
AWARNING!
HOWTOCONNECTELECTRICITY
Do not,underanycircumstances,cut orremove thethird (ground)prongfromthepowercord.For
personalsafe_, this appliancemustbeproperly grounded.
The power cord cffthis appliance is equipped
with a _prong (gmtmding) plug which mates
with a standard 3-prong (grounding) wall outlet
to minimize the possibility of electric shock hazard
from this appliance.
Have the v-an outlet and circuit checked by a
qualified electrician to nmke sure the oudet is
properly" grounded.
If the outlet is a standard 2-prong outlet, it is your
personal responsibility and obligation to have it
replaced with a properly grounded 3--prong _mll
outlet.
The refrigerator should always be plugged into its
own individual electrical oudet wtlich h_ a voltage
rating that matches the rating plate.
This provides the best performance and also
pro,'en ts overloading hoose wiring circuits whidx
could cause a fire hazard from overheated wires.
Never tmplug your retiigemtor by pulling on the
power cord. Alvws grip phkg firmly and Dill straight
out from the ontieL
Repair or replace immediately all lxr_er cords that
have become frayed or othevwi,se damaged. Do not
use a cord that show cracks or abrasion damage
along its length or at either end.
V_nen mo-,iug the refrigerator away from the
wall, be carefifl not to roll over or damage the
power cord.
USEOFADAPTERPLUGS(Adapterplugsnotpermitted in Canada)
Because of potential safe_ hazards under certain conditions, we strongly recommend against
the use of an adapter plug.
However, if you must use an adapter, where local
codes permit, a t_apo_F comw_ianmay be made
to a properly grounded 2-prong wan ontlet by u_
of a UL-listed adapter available at most local
lxarchcare stores,
The larger flot in the adapter must be aligned with
the larger slot in the wall outlet to provide proper
polarity in the connection of the power cord.
When disconnecting the power cord from the
adapter, always hold the adapter in place with one
hand while pnlling the power cord plug with the
other hand. ff this is not done, the adapter ground
terminal is very likely to break with repeated use.
If the adapter ground terminal breaks, DO NOT
OSEthe refrigerat_r until a proper ground has
been established.
Attachingtheadaptergroundterminaltoawalloutlet
coverscrewdoesnotgroundtheapplianceunlessthe
coverscrewismetal,andnotinsulated,andthewaft
outletisgroundedthroughthehousewiring.Youshould
havethecircuitcheckedbya qualifiedelectriciantomake
suretheoutletisproperlygrounded.
READANDFOLLOWTHISSAFETYINFORMATIONCAREFULLY.
SAVETHESEINSTRUCTIONS
4

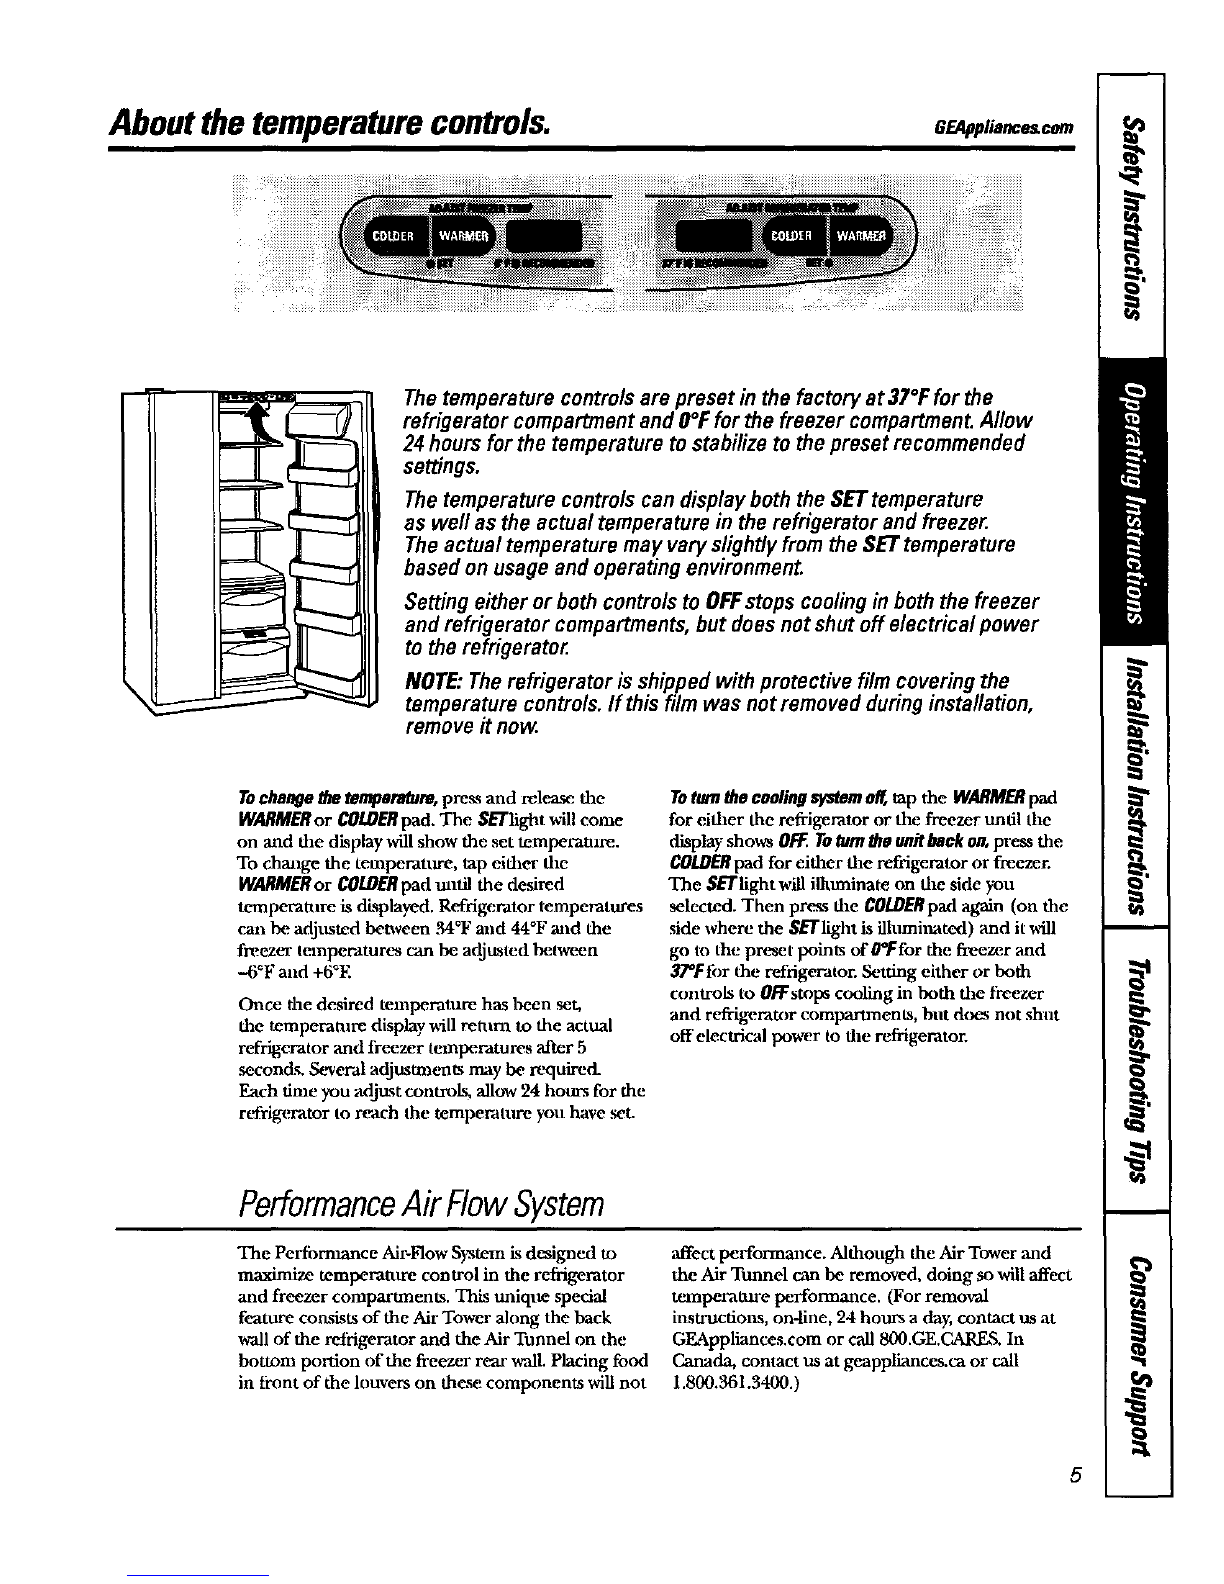
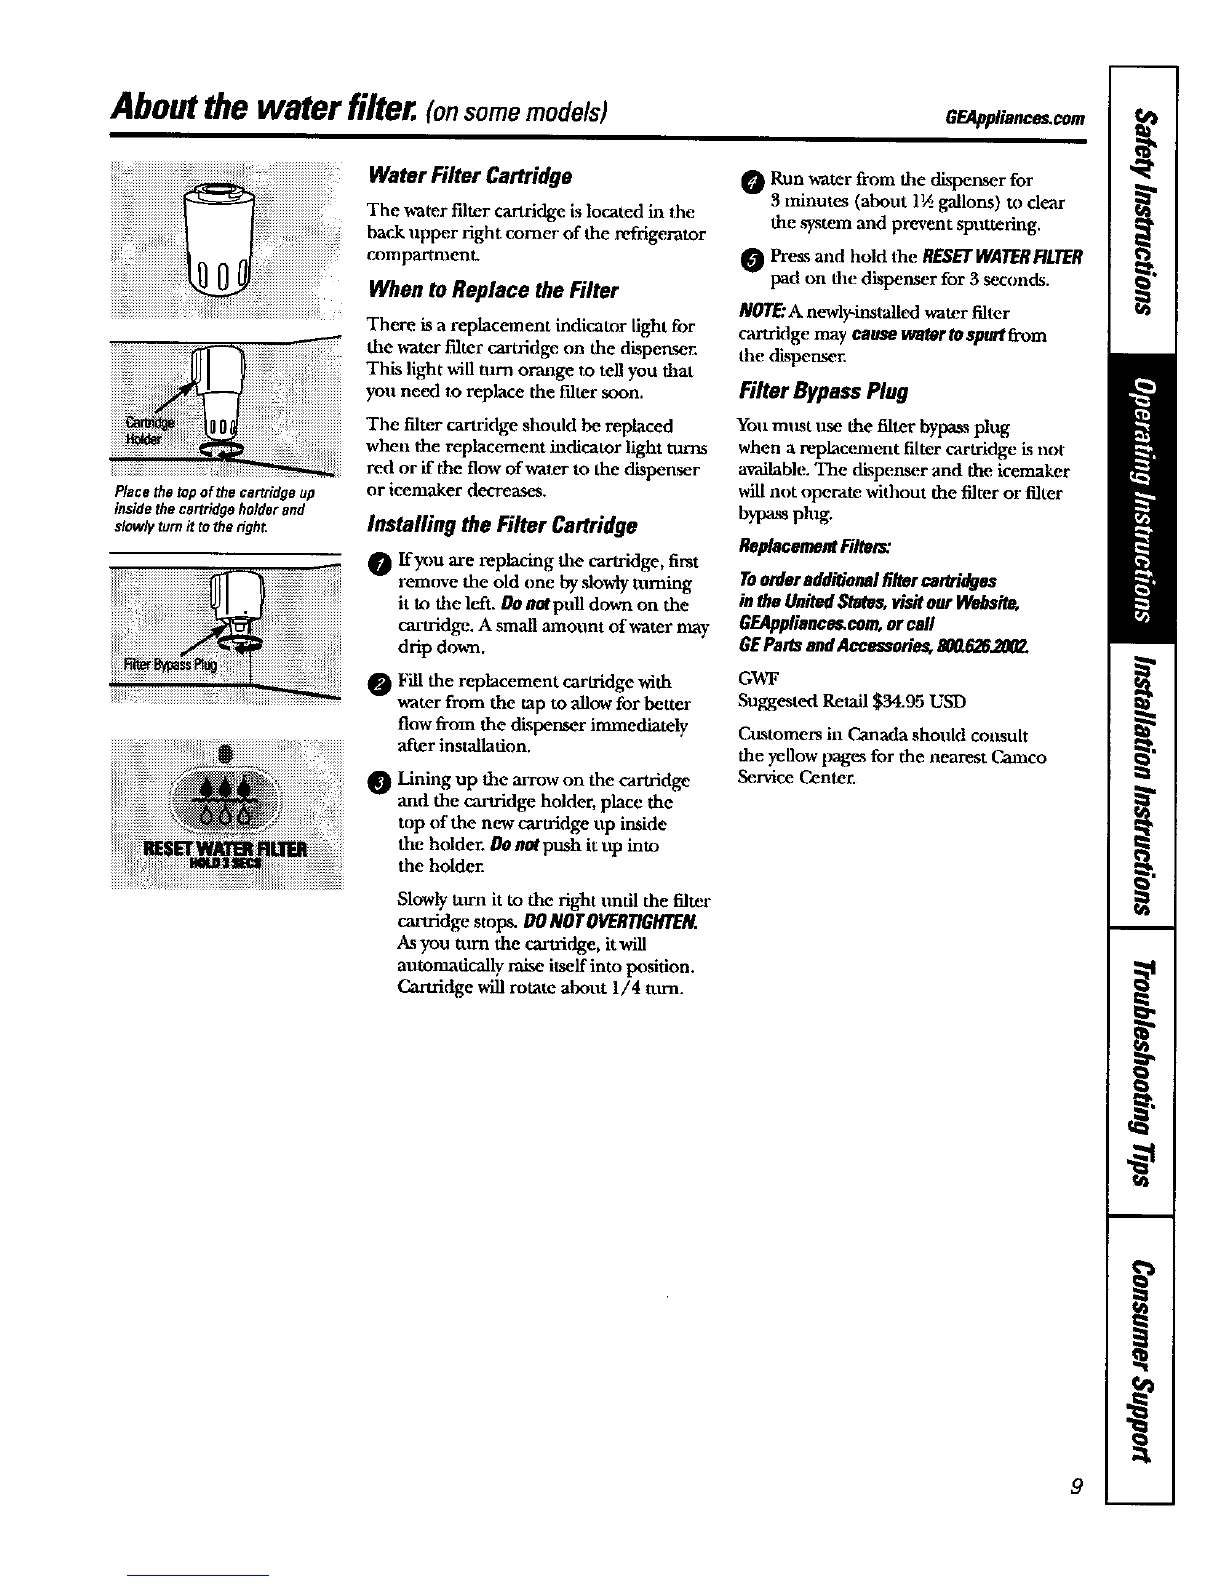
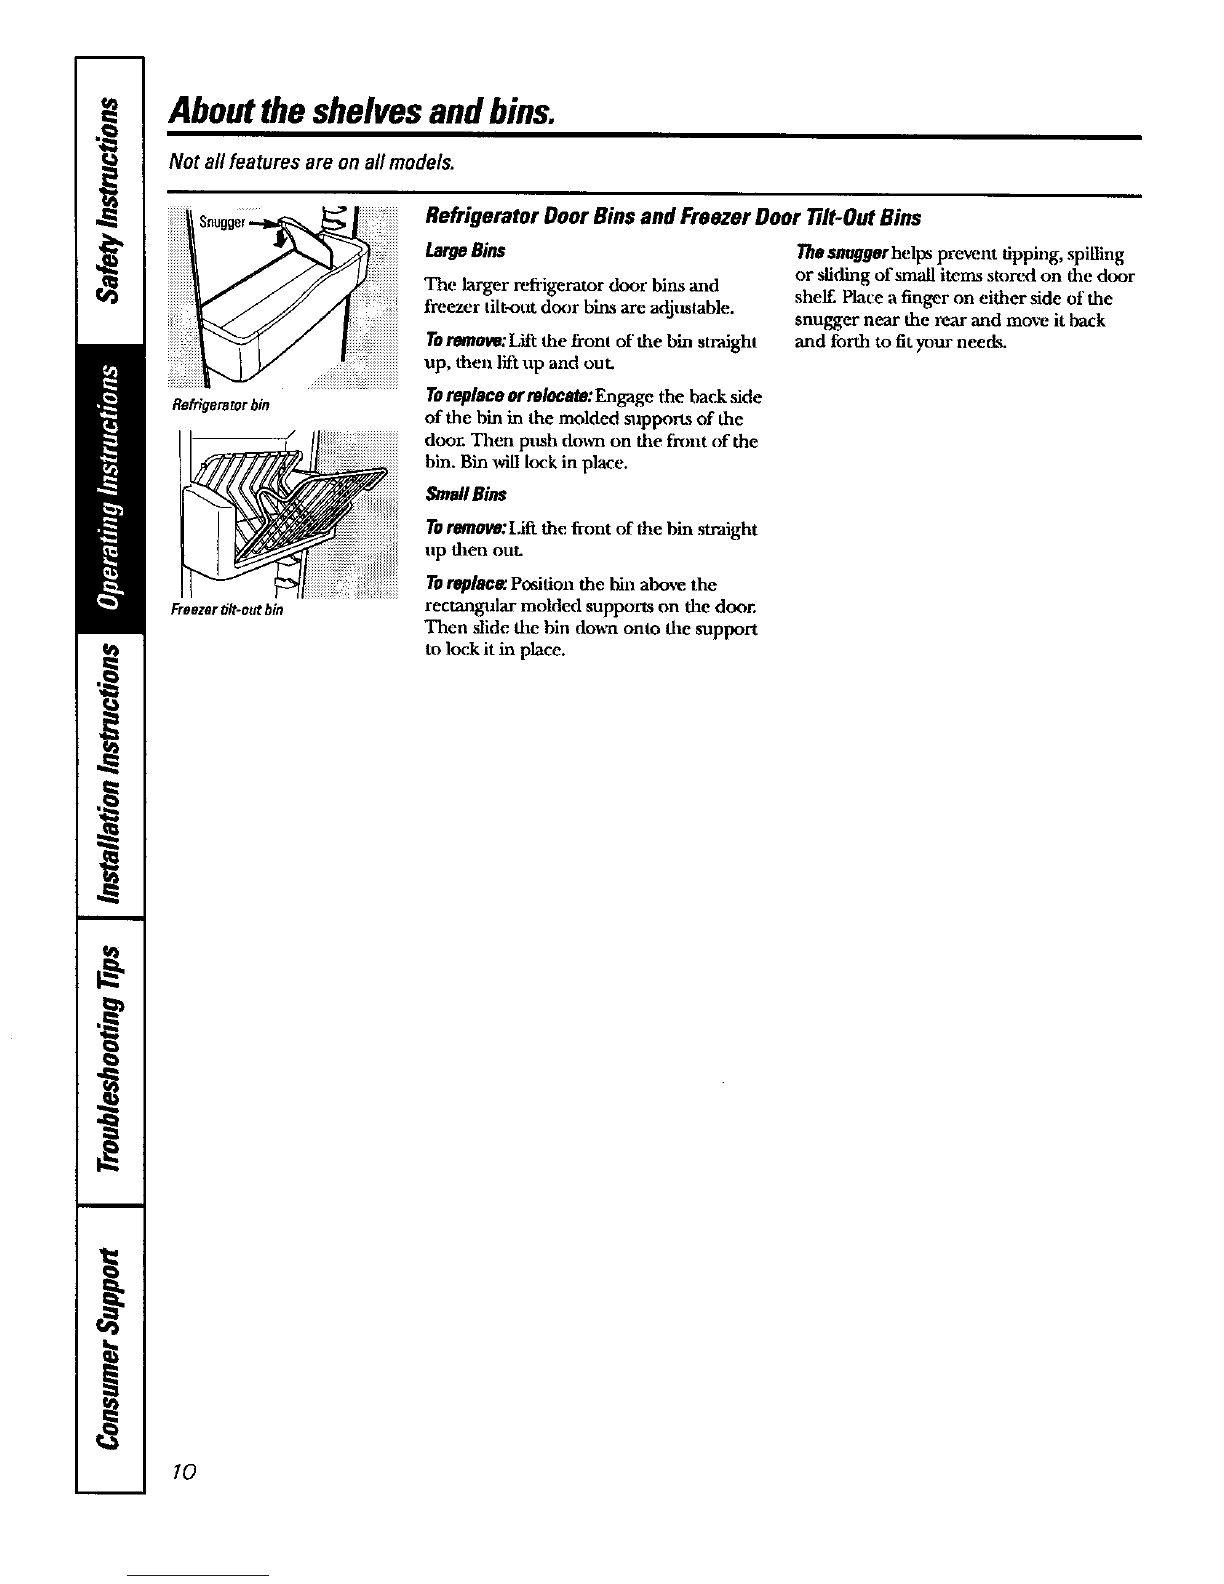
About the temperaturecontrols.
The temperature controls are preset in the factory at 37°1:for the
refrigerator compartment and O°Ffor the freezer compartment. Allow
24 hours for the temperature to stabilize to the preset recommended
settings.
The temperature controls can display both the SET temperature
as well as the actual temperature in the refrigerator and freezer.
The actual temperature may vary slightly from the SET temperature
based on usage and operating environment.
Settingeither orboth controlsto OFFstopscoolingin both the freezer
and refrigerator compartments, but doesnotshutoff electrical power
to the refrigerator.
NOTE: The refrigerator is shipped with protective film covering the
temperature controls. If this film was not removed during installation,
remove it now.
TochatPge _tem_tature, press and release the
WARMERor COI.tiERpad. The SETlight will come
on and the dLsplay will show the set temperatme,.
To chmlge the tempe, retiree, tap either the
WARMERor COLDERpad mltil the desired
temperature is displayed. Refrigerator temperatures
can be adjusted between _°I." and 44°F mid the
freezer tranperatur¢_, can be adjusted between
--6_F and +6°E
Once the desined temperature has been set,
the temperature disphy will return to the actual
refrigerator and freezer temperatures ",d_er5
seconds. S¢.weral adjustments may be ix'quired.
Each time you adjust controls, all_v24 hours for the
rt_'rigerator to reach the temperatra'e you have set.
Toturnthe cooling systemoff, tap the WARMERpad
for either the refrigerator or the freezer until the
ff_play shows 0/:E. Totam the _it back on, press the
COLDERpad for either tile refrigerator or freezer.
The SETlight will ilkuninate on file side you
selected. Then pros file COLBERpwd again (on the
side where the SB'light is illmniuated) and it ,Mll
go m the pr_-aetpoints of 0°Ffor the freezer and
37°E for the refrigerator. Setting either or both
controls m OR:stops coormg in both the freezer
and refrigerator compartments, but do_s not shrzt
offelectrical power to the refrigerator.
PerformanceAirFlowSystem
The Performance Air-Flow System is designed to
maximize temperattu:e control in the refiigerator
and freezer compartments. This tmiq_te special
feature cousists of the Air Tower along the back
wall of the refrigerator and the Air Tnnnel on the
bottom portion of the freezer rear wall. Placing food
in front of the louvers on these components will not
affect performance. Although the Air Tower and
the Air Tunnel can be removed, doing so will affect
temperature performance. (For removal
instrtmfious, on-line, 94 hours a day, contact us at
GEAppliances.com or call 800.GE.CARES. In
Canada, contact us at geappliances._ or call
1.800.361.3400.)
5

AboutTurboCool.TM
iiiii_iiiiiiiiiiiiiiiiiiiiiiiiiiiiiiiiiiiiiiiiiiiiiiiiiiiiiiiiiiiiiiiiillTM_i_ii
How it Works
TurboCoolvapidly ccK)ls flze lx_frigemtor
compartment in order to more quickly
cool ff×xts. Use TurboCool when adding a
large mnotmt of food to the refrigerator
comparmmnt, putting away fix_cis after they
have been sitting out at room teraperatum
or when pntdng away warm leftovers. It can
also be used ff the refrigerator has been
without power for an extended period.
Once activatorl, the compressor will turn on
immediately and the fans win cyvJe on and
offat high speed a.sneeded for eight horn's.
The compressor will continue to run until
the refrigerator compartment cools to
approximately 34°F (IOC), then it will cycle
on and offto maintain this setting. After 8
hours, or if YlmboCoolis pressed again, the
refrigerator compartment will return to
the original setting.
How toUse
Press TurboCool.The refrigerator
temperature display wnl show TC.
After TurboCoo/iscomplete, the
refrigerator compartment will rettuaa
to the original setting.
NOTES."The refrigerator temperature
cannot he changed during
TutboCooI.
The tieezer temperature is not
"affecteddm'ing TurboCool.
When opening the refrigerator
door dining TurboCool,the fans
will continue to run if they have
cycled on.
6

AboutCustomCool7 OrAm == o.
ExpressThavvTM
How it Works
The Cust0mCo01= feature Lsa s)_tem of
dampers, a fan, a temperature thermistor
and a heater. Depending on the ftmctiml
,selected, a combination of these will be
used to quickly chill itmns, thaw items or
hold the pan at a specific temperaalre.
The pan is tightly sealed to prcwen t the van's
temperature from _osing temperatttre
fluctuations in tile rest of the rtffrigera tor.
Tile controls for this pan are located at the
top of the refrigerator with the temperature
controls.
ExpressChillTM
How to Use
0Emptythe pan, Place the Oaill/Thaw
tray in the pan with the metal plate
facing down to chill and store items, or
with the metal plate facing up to thaw
items. P"lacethe items on the tray and
close the pan completely.
Select. the Expresslbaw,TM F_xptessChill"
or SelectTemp'pad. The display and
SETlight will come on. Tap the pad
until the light appears next to the
desirtxt setting. Use the chart to
determine the best setting to use.
To stop a featllre before it is
finished, eap that feature's pad
zmtil no options are selected and
the display is off.
During Expnl_Tlmw_"and
FdcpressChilt"the display on die
controls will count down the time
in the cycle.
After the E_te_Thew" cycleLs
complete, the pan willreset to the
MEATsetting (31¢F) to helppr_erve
thawed itenxsuntil they are used.
The display_l acu_l temperature of
the CuMomCoolpanmay s-ary slightly
from the SET temperature based ma
usage and operating emJronment,
NOTE.'Fortood safety reasons, it is
recommended that foods lse "m"apped
in pl,xstic wrap when using Expre_Thaw."
This will help cmUain meat juices and
ilnprove thawing performmace.
7

AboutCustomCool7
CustomCool TM Chart
NOTE:Resultsmayvarydependingonpackaging,startingtemperatureandotherfoodtraits.
•Hamburger Patties (0.5 lb)
la had2.idu',diy Wrappexl_
_ilet Migalon (0.5 lb)
1.0 Lb. (6 hours)
la Ch2.kel_ B_-'as_s (12. lh)
2. Ground Beef (1.0 lb)
k_ Steak (1.0 lb)
Chicken Brea.sts (2.0 lbs)
Grotmd Beef (2.0 lbs)
la Steak (2.0 lbs)
Chicken Breasts (3.0 lbs)
Grotmd Beef (3.0 II'xs)
Steak (3.0 [[xs)
Disassemblingthe
Chill/Thaw tray
Z_Zm.ut_
la 1 Be,,_ra_ Can (12 oz)
2 S_lJuice Box_ (6--8 oz trach)
2to 6Beverage Cans (12 oz each)
2Plastic20 oz Bottles of Beverage
la 4 to 6 Small Juice Boxes
(6--8c/zeach)
3FoilJuice Packets
la Wine (750 ml bottle)
2Liter of Beverage
la 1/2 Gallon ofJuice
2.laatin-1 package
m Oranges, Lemons, I.imm,
Pineapple, Cantaloupe
t_ Beans, Cucumbers, Tomatoes,
Peppers, Eggplant, S_luash
Swawberri_s, Raspberries, Kiwlfmit,
Pears, Cherrie_s, Bladd_erries,
Crapes, Plu_% Nectarines, Apples
la &_paragus, Broccoli, Corn,
Mushrooms, .Spinach, Gau[iflower,
Kale, Green Onion, Beets, Onions
Raw Meat, lrtsh and Potdtry
Aboutthe CustomCool"Pan Rackand Tray
Toclean Me Chill/Thaw tray,dL_assemble the
metal tray"from file pl_t2, st'mad by,lightly
pttshing in on the haudlas of the plastic
stand and removing the metal tra_ Both
the metal tray and file pl_tic stand are
dL_w_her ,mfe.
Torea_emble thetray,place the plastic
stand ulxside down (handles on l_ottom) on
a solid mwface, Place the metal plate on top
of the stand matching up the CtLrved ,side of
the plate with the curved ,side of the stand.
Irkqertone side of the plate into the notches
on fl_,estand. Ps._h in on t2.e hltndla on the
uther side of the stand wh'fle pushing that
end of the plate dcmal and into place. You
sh(nfld hear the plate "click" into place.
8

Aboutthewater filter.(onsomemodels) GF-Applianccs.cam
iiiiiiiiiiiiiiiiiiiiiiiiiiiiiiiiiiiiiiiiiiiiiiiii_i_¸ _ ......:_i_ii_iiiiiiiiiiiiiiiiiii
Placethe topof the cartridgeup
insidethe cartridgehomerand
slowlytom it totheright.
Water Filter Cartridge
The water filter cartridge, is located in the
back upper fight corner of the refrigerator
compartmenL
When to Replace the Filter
There is a replacement indicator light for
the water filter cartridge on the dispenser,
This light will turn orange m tell you that
you need 1.oreplace the filter soon.
The filter cartridge should be. replaced
when the replacement indicator light mrm
red or if the flow of water to the dispenser
or icemaker decreases.
Installing the Filter Cartridge
0 ffyou are replacing the cartridge, first
remove the old one bysloMy taming
it to the left. DOnntpull down on the
cartridge. A small amount of water may
drip down.
Fill the replacement cartridge with
water from the tap to allow fi)r better
flow from the dispemer immediately
after installation.
@Lining up the arrow on the camidge
and the cartridge holder, place the
top of the new cartridge tap inside
the holder. Oannt push it up into
the holder.
Slowlyturn it to the right tmdl the filter
cartridge stops. DONOTOVERTIGHTEN.
A.syou turn the cartridge, itwfil
atttomadcally raise itself into position.
Cartridge will rotate about 1/4 tram.
Run water from the dispenser for
3 minutes (about l_ gallons) to clear
the system and prevent sputtering.
Press and hold the BESET WATERRLTER
pad on the dispenser for 3seCol|ds.
NOTE:A newly-installed water filter
cartridge may cause waWr to spurtfrom
the di,_ttser.
Filter Bypass Plug
You must lxse the filter bypass plug
when a replacenaent filter cartridge is not
available. The dispenser and the, icemaker
will not operate without the filter or filter
bypass plug.
ReplacementFiltet_"
Toorderadditionalfiltercartridges
inIheUnitedStates,visitourWebsite,
GEAppliance_cam,orcall
GEPartsandAccessories,BO_6262M2.
G_TY
Suggested Retail $34.95 USD
CaLstomers in Cana(la shoafld consult
the yenow pages for the nearest Camco
Service Center.
9

Abouttheshelvesandbins.
Not all features are on all models.
Refrigerator Door Bins and Freezer Door 77It-Out Bins
Refrigeratorbin
_/
Freezertilt-outbin
LargeBins Thesnuggorhe]pspre_m tipping, spilling
The larger _'f'rigemtor door bins and
freezer tilt-out door bins are adjustable.
Toremove:Lift the from of the bin straight
up, then lift up and out.
Toreplace orrelocate:Engage the back side
of the bin in the molded salpports of the
door. Them pz_sh doom on file fixmt of the
bin. Bin will [ock in place.
Small Bins
or sfiding of small items stort_-i on the door
shelf. Place afinger on either side of the
snugger near the rear and move it back
and forth to fit your neecis.
Tor_nove:Lifi the front of the bin straight
up theta ouL
Tor_l_ Position the bin abo_e the
rectangaflar moMed supports on the door.
Then slide the bin down onto the support
to lock it in place.
tO

GEAppliance_eom
Not all features are on all models.
Slide-Out Spillproof Shelf
Presstabandpullshelf
forwardtoremove
The slide-ont spillpr(xffsheLf allows, you
to re/:achitems stored behind others. The
special edges are designed to help prevent
spills fYom dripping to lower shelves.
Toremove:
Slide the sheLf ont until it reaches the stop,
then p_ dram on the tab and slide the
sheLf straight onL
Toreplace or relocate:
I,ine the shelf up with the suplx)m and
slide it into place. The shelf can be
reposidoned when the door is at 90 ° or
more. To reposidon the shelf, slide the sheLf
past the st_)ps and angle downvrart'L Slide
shelf d(van to the desired position, line up
with the snpports and slide into place.
Make sureyoupush the shelvesall the way back
in before youclose the door.
QuickSpace TM Sheff
Tiffs shelf splits in haLf and slides under
itself for storage of tall items on the shelf
below.
This shelf can be removed and replaced
or relocated jest like Slide-Out Spillproof
Shelves.
On some models, this shelf can not be t_sed
in the lowest position.
Freezer Baskets
Toremove,push die basket all the way to the
back of the freezer. Lii_ up tmtll the back
pins are disengaged. Lilt file entire basket
up and pull out.
The dividercan be used to organize food
packages. For large packages, simply fold
down the divider.
Makesureyoupushthebasketsallthewayback
in beforeyouclosethedoor.
Slide-OutFreezezShelves
Toremove, slide oaatto the stopposition,
lift the ti-ont past the stop position, and
slide OUL
Makesureyoupushtheshelvesallthewayback
inbeforeyouclosethedoor.
) Fixed Freezer Shelves
Toremove,lift the sheLf up at the left side
and then bring the shelf(mL
11

Abouttheadditionalfeatures.
Not a// features are on a/I models.
Removable Beverage Rack
Tile beverage rack is designed to hold
a botde on its side. It call be attached to
azly slide-oot shell"
Toinstal/:
OLine up the large part of the slots on
the top of tile rack with the tabs under
the shelf.
Then slide the rack back to lock it
in place.
Abouttherefrigeratordoors.
Refrigerator Doors
The refrigerator doors may feel different
than tile ones you are used to. The special
door opening/dosing feature makes sure
the doors close all the way mid are securely
,sealed.
When opening and closing the door you
will notice a Stop Ix-_sifion. ffthe door is
opened past this stop point, the door will
remain open to allow you to load and
unload food more easily. When the door
is only partially open, it will automatically
close.
The resistance you feel at the Stop
position will be reduced as the door
is loaded with food.
Whenthedoorison/),partiallyopen,
it wifl automaticallyclose.
BeyondthisMopthedoorwillstayopen.
DoorAlignment
If'doors are uneven, adjust the refi-igeeator
door.
Using a 7/16" socket wrench, turn the
&_)r adjllsting screw to the right to
zaise the door, to the left to lower it.
(A n),lon plug, imbedded in the
threads of the pin, prevents the pin
from tttming unless a wrench ks use&)
_ After one or two turns of tile wrench,
open and dose the retkigerator door
and checkthealignmentatthetopof
thedoors.
Toranovethe base
grille,openthedoocs,
te_e _le screw_t
eat_ end0fthe tmso __
grilleandthenpull @Raise
fi_egrillestraightout.
12

About the crispersandpans.
Not all features are on all models.
Fruit and Vegetable Crispers
Excess water that may accumulate in the
bottom of the drawers should be wiped dry.
On some m_lel& the bottom drawer has
a covet- that slides back a.s the drawer is
opened. This "allows full access to the
drawer. A.s the drawer is closed, the cover
will slide forward into its original po_,ition.
HI _ LO Adjustable HumidityCrispers
Slide the control all the way to the Hlsetting
to provide high humidity recommended for
most vegetables.
Slide the control all the way to the LO
setting to provide lower htmaidity levels
recommended for most fruits.
Set the control to the co/deStsetting to
store fresh meat_.
Set the control to coldto convert the pan
to normal refrigerator temperatlwe and
prcmde extra vegetable storage space. The
cold air duct is tttrned off. Variable settings
between these extremes can be selected.
AboutcrisperremovaL
/Vatall features are on all models.
Crisper Removal
Crispers can e_ily be removed by p_flllng
the drawer straigiat out and lifting the
drawer up and over the stoplocation.
If the door prevents you from taking out
the drawers, first try Ix_remove the door
bins. If tiffs does not offer enougla
clearance, the refrigerator will need u,
be rolled forward until the door opens
enough to slide the drawers out. In some
cas_, when you roll the refrigerator out,
you will need to move the refrigerator
to the left or right a.syou roll it OUL
13

Abouttheautomaticicemaker.
A newly installed refrigerator may take 12 to 24 hours to begin making ice.
Automatic lcemaker
in a 2,!-honr period, depeoding on freezer
compartment temperature, room
tempemnlre, nm'aber of door openings
mad other ttse conditions.
if 0n ooOr ope te for
water connecdon is made to the ieemaker,
set the power s_itch in the 0(olOIx_ition.
ii_iii_=_==: =:_.........................i iiii:ii!!iiiiiiiiiiiiiiii
Pulltheupperfreezersheffstraight
outtoaccesstheicemaker.Always
besuretoreplacetheshelf,The
shelfcanbeusedforstorage.
When the refrigerator has heen conneeted
to the water supply, set the power switch to
the I (on)position.
The icemaker v,ill fdl with water when it
cools to 15*F (-10°C), Anewly imtalled
refrigerator Jm)' take 12 to 24 hours to begin
n_Jdng ice ctd_._s.
You will hear a bn_zing sound each time
the icenlaker fills with water.
Throw away the first few batches of ice to
aUow the water line to dear.
Be sure nothing interferes with the s_'eep
of the feeler ann.
When the bin flUs to the level of the feeler
arm, the icemaker will stop producing
ice. It is normal for several culxs to be
joined together.
If ice ksnot t_sed frequently, old ice cubes
_ill become cloudy, laste stale mad shrink.
NOTE:Inhomeswithlower-than-averagewater
pressure,youmayheartheicemaker6,clemultiple
timeswhenmakingonebatchofice.
Ice Storage Drawer
Toaccessice,pull the drawer forward.
Toremovethedrawer,pun it straightout aod
liftit past the stop location.
14

Aboutthe ice and water dispenser.(onsomemodels) eF_App/iance=com
I
SpillS_elf
To Use the Dispenser
Select CUBEDICE_, CRUSHEDICE
or WA_R_.
Prt.'ssthe glass gently against the top of
the dispenser cradle.
The spill shelf is not self-draining.
To reduce water ,spotting, the shelf and
its grille shotdd be cleaned regularly.
If nowaterisdispensedwhentherefrigeratoris
firstinstalled,theremaybeairin thewaterline
system.Pressthedispenserarmforatleasttwo
minutestoremovetrappedairfromthewater
lineandtofill thewatersystem.Toflushout
impuritiesin thewaterline,throwawaythefirst
sixglassfulsof water.
CAUTION:Neverputfingersoranyether
objectsintotheicecrusherdischargeopening.
Locking the Dispenser
Pros the LOCI(CONTROL
pad for 3seconds to
lock the dispenser and
control panel. To
unlock, press and
hold the pad again
for 3 seconds.
Dispenser LigM
This pad turns the nigM
Quick Ice
lightin the dispenser
on and off. The light
ak_o comes on when
the dispenser cradle is
pressed. If dais light
burns out, it shcafld he
replaced _th a 6 wau
12V maximum bulb.
iiiii iiiiiiiiiiiiiii
ii!ilil iii!i!iiiiiiiiii
!iiiiiiiiiim_ii=;i:ii:iiiii;iiiiiiiiii
!ii:!_!_!!i!iiiiiiiiiiiiiiiiiiii!iii_!ililiiiiii
DoorA/arm
When you need ice
in a hurry, pre_s this
pad to speed up ice
prodnctlon. This will
incrt_se ice proclucdon
for the following
48 hours or until you
press the pad again.
To set the alarm, pre_
thh pad until the
indicator light conies
on. This alann will
sound if either door is
open for more than
3 minutes. The light
goe_ out and the
beeping stops when
pt)u close the door.
Important Facts About Your Dispenser
Do not add ice from trays or ba_ to
the storage th_awer. It may not crush or
dispense well.
Avoid m_rfilling gla_g with ice and use of
nanx_w gl,x_ses. Backed-up ice canjmn the
chute or cattge the door in the chnte to
freeze shut. ffice is bkmking the chute,
poke it through _th a _xxxlen spoon_
_Beverages and foods should not be
quick-chilled in the ice storage drawer.
Cans, bottles or food packages in the
storage drawer may cause the icemaker
or attger to jam.
@To keep dispensed ice from mi_,sing
the glass, put the glass close to, but not
touching, the dispenser opening.
Some crashed ice may be dispensed
even though yon selected CUBEDICE.
This happens occasionally when a few
cubes acddentally get directed to
the crnsher.
t_After crushed ice isdispensed, ._ome
water may drip fix)m the chute.
_ Somedlnes a small mound ofsnowwill
form on the door in the ice chute. This
condition is normal and l_slmlly occurs
when you have dispensed crushed ice
repeatedly= The snow win eventtmlly
evatx)rate.
15

Abouttheiceandwaterdispenser.
Ice Storage Drawer
on Dispenser Models
Toremose:
Set the icemaker power switch m the 0 (ell)
posidon. Pull the drawer sWaight out and
then lift past tile Mop position.
Toreplec&"
Whom replacing the drawer, be sure to
pre&s it firmly into p"lace, If it does not go
all the way back, remove itand rotate the
drive mechanism 1/4 turn. Then push
the drawer back again.
Careand cleaning ofthe refrigerator.
Cleaningthe Outside
Iba dispenserdriparea,beneath the grille,
sholdd be wipeddry Water left in this area
may leave detx_li,s. Remove die de|x_sits by
Dispenser driparea. adding undiluted vinegar to the well. Soak
undl the de|x_sitx di_ppear or become
loe_se enongh to rinse away.
Thedispensercradle.Before cleaning, lock
the dhpen_r by presshag and homing the
LOCKCONTROLpad for 3 seconds. Clean
with warm water mid baking ,soda
solution-about a tablespoon (15 ml) of
linking soda to a qlmrt (l liter) of,hater.
Rin_ thoroughly and wipe dry.
Thedoorhandlesand b'im.CJean with
acloth dampened with soapy water.
Dr), with asoft cloth.
Thestainlesssteel panels anddoorhandles
(on some m(xiels) can be cleaned with a
commerciany axailahle staln[ess steel
cleaner such as Stabdes, ,Sled Magit:.TM
Stain/m._ _Magic is available at Ace, True
Value, Servistar, HWI and other leading
stores. It is "aLsoaxailable through GE Parts
mad Accemories, 800.626.2002. Order part
mmlber WX10X15.
Do not use appliance wax or polish on the
stainlexs steel.
Keep the outsideclean.Wipe with aclean
cloth lightly dampened with kitchen
appliance wax or mild liquid dish detergenL
Dry and polish with a clean, soft cloth.
Donotwipetherefrigeratorwithasoileddish
clothor wettowel,lhesemayleavearesidue
thatcanerodethepaint,Donotusescouring
pads,powderedcleaners,bleachorcleaners
containingbleachbecausetheseproductscan
scratchandweakenthepainthnish.
16
Cleaning the Inside
Tohelp preventodors,leave an open box of
baking _a in the fresh food and freezer
compartments.
Unplugthe refrigeratorbeforecleaning,ff this
is not practical, wring excess moLsture out
of sponge or cloth when cleaning arolmd
_,Atches, lights or controls.
Use warm water and baking .soda solndon-
abeut a tablespoon (15 ml) of baking soda
to a quart (1 liter) of water. This both
deans and neutralizes odors. Rinse and
wipe dry.
UseofanycleaningsolutionoMarthanthat
whichisrecommeaderLespeciallythosethat
containpetroleumdistillates,cancrackor
damagetheinterioroftherefrigerator,
Avoid cleaningcoldglass shelveswith hot water
becausethe extreme temperaturedifference
may causethem to break.Handleglass shelves
carefull)_Bumpingtemperedglass cancause
it to shatter.
Donotwashanyplasticrefrigeratorpartsin the
dishwasher

GEAppliancelcom
Behind the Refrigerator
Be carefhl when moving the refrigerator
away from the wall. All types of floor
coverings can be damaged, particularly
cushioned coverings and those with
embossed m_rfaces.
Pull the refrigerator straight out and return
it to p_sidon by pushing it straight in.
Moving the refrigerator in a side direction
may resuh in damage to the floor covering
or refrigerator,
Whenpushingtherefrigeratorhack,makesure
youdon'troll overthepowercordor icemaker
supplyline.
Preparing for Vacation
For long vacations or absences, remove
food and unplug the refrigerator. Clean the
interior with a baking ,soda _hzfion of one
tablespoon (15 ml) of holdng sorh to one
quart (1 liter) of water. Igave the doors
Opell.
Set the icemaker txraer sv,qtc.h to the 0(off)
po.sifion and shut off the v*_tter mxpply to
the refrigerator
ff die ternperamre can drop below freezing,
have a qlmlified _rvicer drain the water
supply s'_tem to prevent serions property
dam_e due to flooding.
Preparing to Move
Secnre all loose items such as shelves and
drawers by taping them securely in place
to prevent damage.
When using a hand truck to move the
refrigerator, do not rest the front or back
of the refrigerator against the hand truck.
This could damage the retHgemto_ Handle
only from the sides of the refrigerator,
Besuretherefrigeratorstaysin anupright
positionduringmoving.
17

Replacingthelightbulbs.
Setting the controls to OFF does not remove power to the light circuit.
Refrigerator Compartment--Upper Light
0 Unplug the refrigerator.
The hulbs are located at the top of the
compartmeut, il_*ide the light shield.
On ,some models, a ,¢w.rewat the front of
the light shield will have to be removed.
_To remove the light shield, pm_ in on
the tabs on the .sides of the shield and
slide forward and out.
After replacing the hidb with an
appliance bulb of the same or k)wer
wattage, replace the light shield and
screws (on some modek_). When
replacing the light shield, make sttre
that the tabs at the hack of the .shield
fit into the slots at the hack of the light
shield homing.
Plug the refrigerator back in.
Refrigerator Compartment--Lower Light
Thislight is located above thetop drawer
Unplug the refrigerator.
Q Remove the convertible meat drawer
control I_mh by pulling straight out.
Lift the light shield up and pull it out.
After rep "lacing the bulb with an
app "liance bulb of the same or lower
_,rattage, replace the shield and
the knob.
Plug the refrigerator back in.
Freezer Compartment
Unplitg the refrigerator.
_ Remove the sheifjtLst above the light
shield. (The shelf wili be easier to
remove if it is emptied first.) On some
models, a screw at the top of the light
shield will need to be removed.
To remove the light shield, press in
on the ,sides, and lift up and out.
0Replace the bulb sfith an appliance
bulb of the same or lower wattage,
and reinstall the light shield. When
reinstalling the light shield, make
sure the top tabs snap securely
into place. Replace the screw
(on some models).
_Reinstall the shelf and plug the
refrigerator back in.
Dispenser
Unphtg the refrigerator.
_The bulb is located on the dispenser
trader the control pand.
Remove the light bulb by torning
it corm terdockwise.
Replace flze bulb with a bulb of the
sanxe size and wattage.
Plug dae refrigerator back in.
18

Trimkitsanddecoratorpanels.
For CustomSlyle" models
Readthese instructionscompletelyandcarefully.
BeforeYouBegin
Somemodelsare equipped with trim kitsthat allow youto install door panels. Youcan order
pre-cut black, white, bisque or stainless steel decorator panels from GEParts and Accessories,
800.626.2002,or you can add wood panels to match yourkitchen cabinets.
Panelsless than I/4" (6ram)thick
When installing wood panels less than 1/4" (6 mm) thick, you need 1o create afiller pand, such as 1/8"
cardlxmrd, that will fit between tile 6_xzeof the door and the wood panel If you are in.stalling the pre-cut
decorau)r pmaels, prL_ut filler panels are included in the kit. Tile combined thic_less of tile decorator
or wood panel and the filler panel should be 1/4" (6 mm).
Panels1/4"thickorless
1/4_ max
3/4" (19 mm) or Raised Panel
Az'aisedpanel design screwed or glued to a 1/4" (6 mm) thick backing, or a 3/4" (19 ram) muted board
can be used. The raised pordon of the panel must be fabricated to permit clearances of at least 2" (5.1 cm)
fi'oiaxthe handle side for fingerdp clearance.
Panels thicker than 1/4" (6 mm), up to 3/4 _' (19 mm) max, will require that the outer 5/lri" (8 mm) of
panel perimeter be no thicker than 1/4" (6 mm).
Weight h'mitatJonsfor custompaneL_:
FreshFood38Ibs.117kg)max.
Freezer Door28Ibs.(13kg)max.
Panelsthickerthan114"_6ram)
1/4"(6ram)max
3/4"(19ram)
2"(5.1_)
Clearance
HandleSide
Panel
I/4" (6ram)
_lek Baddng
{19rran)
Flefngerator
Ooor
19

Trimkitsanddecoratorpanels.
Dimensions for Custom Wood Panels
FreezerPanel
Vir_houtDispenser FreezerPanel
With Dispenser FreshFoodPanel
out 1.p_ t_'-(3 ram)
½...:: __
.... ..r'_
5/1_"
18mini
67_
17019 r,m)
FRONT
_.-. 14ek_z"-.4
otJt"-P=_-(3mm)
_-.-:',
5/I_ _r_
(Smm)
FRONT
(36.8an)
33_
(_5.4 cm}
1/8"
(3 mm),.-b]i
i
--"L
(170.9cm)
FRONT
(49.5an)
Cut
_- ot_t
..._ 5/16"
"" "Z 18ram)
/
The areas at the top of the i'_lels neod to be. cut out of die patlel.s.
2O
This manual suits for next models
24
Table of contents
Other GE Refrigerator manuals

GE
GE PSI23NGPBBB and Safety guide

GE
GE Profile PGCS1RKZ Assembly instructions

GE
GE TFX27FM User manual

GE
GE Profile CustomStyle PSC23SHTSS User instructions

GE
GE PSE26KSESS User manual

GE
GE GSL22JFRBS Manual

GE
GE 22402602P001 User manual

GE
GE Profile 24 CustomStyle User manual

GE
GE Appliances Profile 29 Programming manual

GE
GE CFCP1RKBSS Assembly instructions