GE VG4065 User manual

VCR User’s Guide
VG4065
We bring good things to life.
®

Cautions
SAFETY INFORMATION
TO REDUCE THE RISK OF ELECTRIC SHOCK, DO NOT
REMOVE COVER (OR BACK). NO USER SERVICEABLE
PARTS INSIDE. REFER SERVICING TO QUALIFIED SERVICE
PERSONNEL. This symbol indicates “dangerous
voltage” inside the product that
presents a risk of electric shock or
personal injury.
This symbol indicates
important instructions
accompanying the product.
WARNING
To reduce risk of fire or
shock hazard, do not
expose this product to
rain or moisture.
WARNING
RISK OF ELECTRIC SHOCK
DO NOT OPEN
Caution: To reduce the risk of electric shock, match the wide blade of plug to wide
slot, fully insert.
Attention: Pour éviter les chocs électriques, introduire la lame la plus large de la
fiche dans la borne correspondante de la prise et pousser jusqú au fond.
Refer to the identification/rating label located on the back panel of your product
for its proper operating voltage.
FCC Regulations state that unauthorized changes or modifications to this
equipment may void the user’s authority to operate it.
Cable TV Installer: This reminder is provided to call your attention to Article
820-40 of the National Electrical Code (Section 54 of the Canadian Electrical Code,
Part 1) which provides guidelines for proper grounding and, in particular, specifies
that the cable ground shall be connected to the grounding system of the building
as close to the point of cable entry as practical.
Care and Cleaning: Use a soft cloth or the dusting attachment of your vacuum cleaner to dust
your VCR. Remove dust from the ventilation holes.
Plastic surfaces are easily scratched and can be marred by alcohol and
various solvents. Avoid excessive use of oil-based furniture polishes since
the materials used in the cabinet will accumulate more dust. A
nonabrasive, antistatic cleaner/polisher is recommended.
Product Registration
Please fill out the product registration card and return it immediately. Returning the card allows us to contact you if needed.
Keep your sales receipt to obtain warranty parts and service and for proof of purchase. Attach it here and record the serial and model
numbers in case you need them. The numbers are located on the back of the product.
Model No. _________________________________________________
Serial No. _________________________________________________
Purchase Date: _________________________________________________
Dealer/Address/Phone: ___________________________________________________________________________________________________
___________________________________________________________________________________________________
VG4065
VCR Plus+ system and PlusCode are registered trademarks of Gemstar Development Corporation.
The VCR Plus+ System is manufactured under the license from Gemstar Development Corporation.
i

TABLE OF CONTENTS
1
Table of contents
7
First Things First
............................................................. 3
Using the QuickSet Guide ................................................ 5
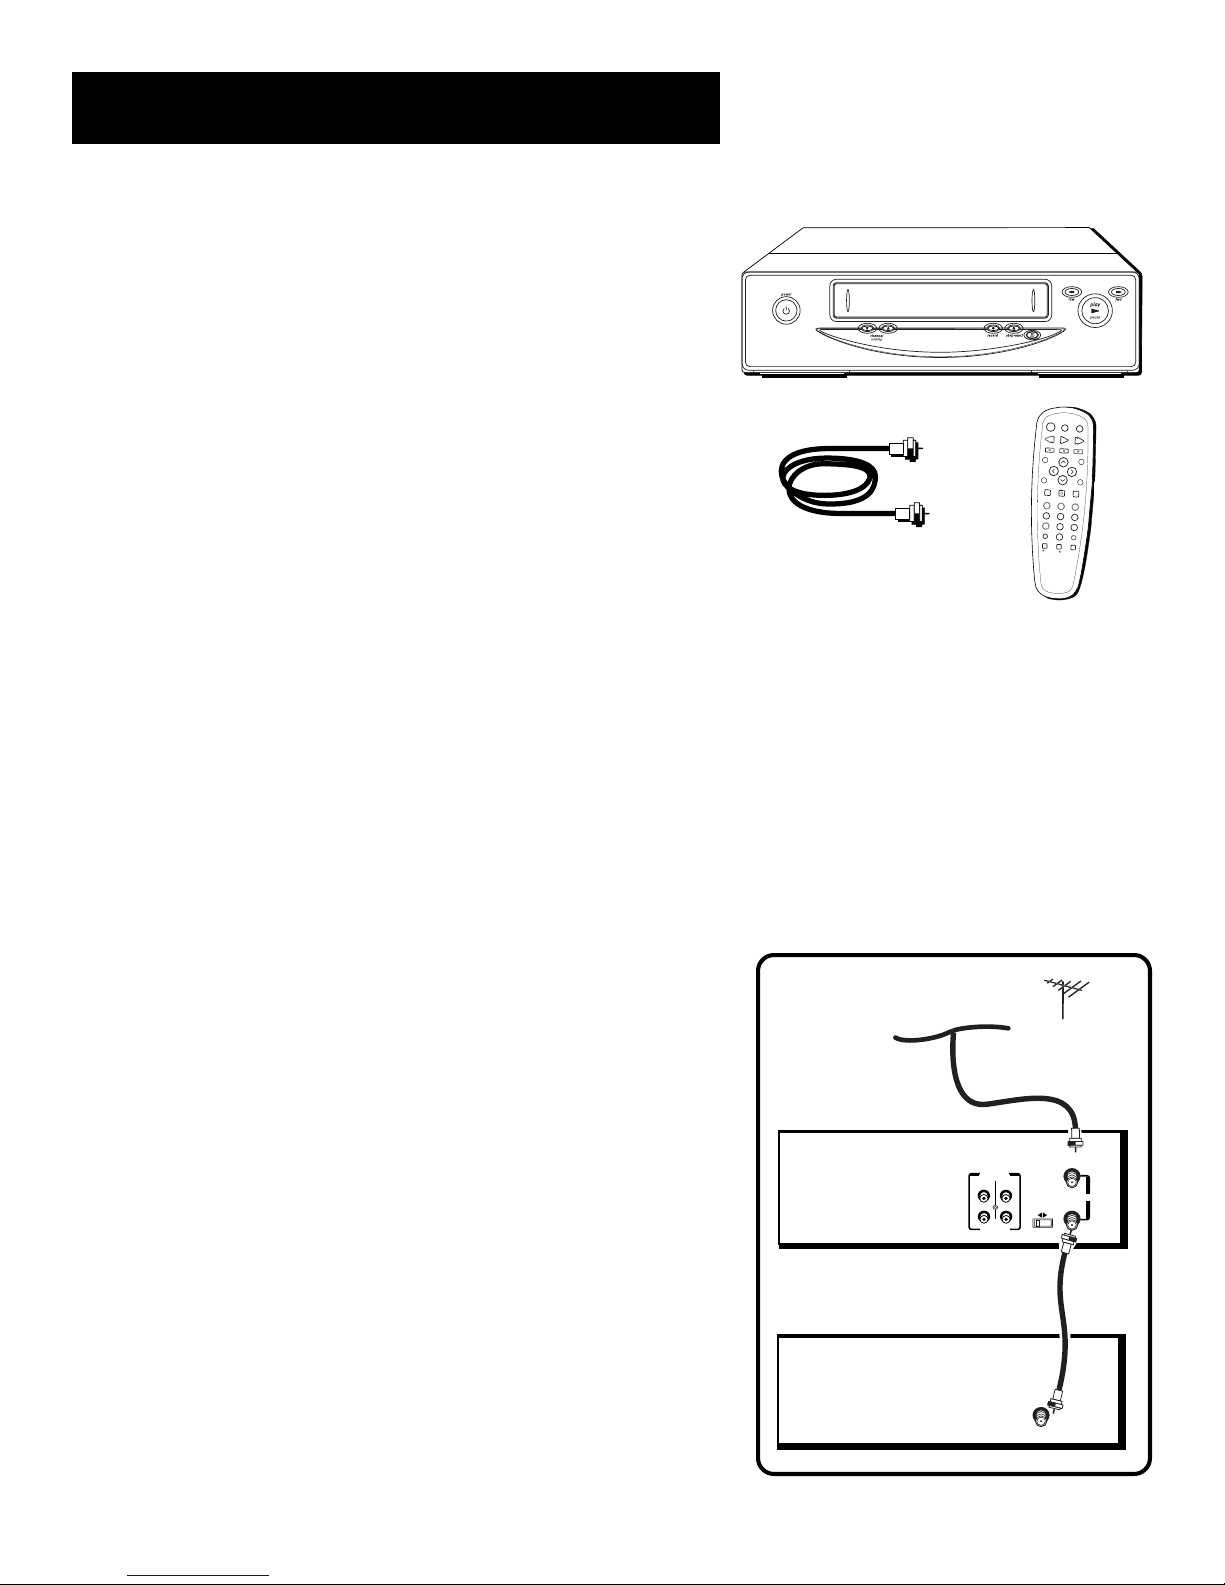
Setting Up the VCR
....................................................... 7
Using On-screen Menus to Set up Features ................... 8
Language Selection .................................................... 8
Cable Box Setup .......................................................... 9
VCR Channels List ..................................................... 10
Auto Channel Search ............................................ 10
Changing the Signal Type ..................................... 12
Adding or Removing Channels ............................ 12
Time and Date ........................................................... 12
Auto Clock Set Feature.......................................... 13
Setting the Time Zone ....................................... 13
Setting Daylight Saving Time ........................... 14
Setting Time and Date Manually .......................... 14
VCR Plus+ System Channels .................................... 16
VCR Plus+ System Worksheet .............................. 17
Additional Set-up Features....................................... 18
Remote VCR1/VCR2 Option .................................. 18
Auto Play ................................................................ 19
Auto TV/VCR .......................................................... 19
EnergySaver .......................................................... 20
Front Panel Brightness (VCR Display).................. 20
VCR Basics
....................................................................... 21
Remote Buttons .............................................................. 22
Component Buttons .................................................. 22
VCR Function Buttons ............................................... 22
TV Function Buttons ................................................. 23
Playing a Tape ................................................................. 24
Automatic Rewind..................................................... 24
Tape Eject ................................................................... 25
Recording ........................................................................ 25
Check the Safety Tab ................................................. 25
Recording
......................................................................... 27
Recording Features ......................................................... 28
Express Recording (XPR).......................................... 28
Timer Recording ........................................................ 29
Timer Recording with the VCR Plus+ System ..... 30
Setting Up the Channel List .............................. 30
Using the VCR Plus+ System ............................ 30
Stopping a Timer Recording ................................. 32
Reviewing and Clearing Programs ...................... 32
Copying and Editing Tapes Using Two VCRs.......... 33

TABLE OF CONTENTS
2
Program the Remote
................................................... 35
Controlling Other Devices .............................................. 36
Programming the Remote to Control a TV ............. 36
Operating the TV ....................................................... 36
Other Features
............................................................... 39
Picture Search Options ................................................... 40
Forward and Reverse Search ................................... 40
Slow Motion .............................................................. 40
Frame Advance ......................................................... 40
Index Search .............................................................. 41
Zero Search ............................................................... 41
Commercial Scan (Search Button) .......................... 42
Tracking ............................................................................ 42
Pro-Tect Plus™Locking Feature .................................... 42
Time Counter ................................................................... 43
On-Screen Displays ........................................................ 43
Connections
.................................................................... 45
Things to Know Before Connecting Components ........ 45
Connecting the VCR ........................................................ 46
Jacks and Cables ....................................................... 46
RF Jacks and Coaxial Cables (F-type) .................. 46
Audio/Video Jacks and Cables (RCA-type) .......... 46
Choosing a VCR Connection .................................... 47
Advantages of A/V Cable Connections ................ 47
Don’t Forget About the Auto TV/VCR Feature ..... 47
TV with RF Jack Only ............................................ 48
TV with Audio/Video Jacks ................................... 49
TV with Audio/Video Jacks and Cable Box
Used to Unscramble Pay Channels Only .......... 50
Reference
......................................................................... 51
Front Panel ...................................................................... 52
Display Panel ................................................................... 53
Back Panel ....................................................................... 54
How to Find Your TV’s Video Input Channel ................. 55
Troubleshooting Tips ...................................................... 56
Specifications .................................................................. 60
Cleaning the VCR ............................................................ 60
Limited Warranty ............................................................ 61
Index ................................................................................ 62

FIRST THINGS FIRST
3
Welcome to your new VCR...
To help you get started using your VCR with
as little reading as possible, we’ve put all the basic
information needed in the first three sections.
To help you along, there’s even a QuickSet Guide the
first time you turn on your VCR, which walks you
through several set-up steps at once.
Getting Started
Before this first step, though, learning about
the time and date, your remote control’s features,
working with channels, and basic video tape
operations are essential to get all you can out
of the VCR. Once you are comfortable with these
features, feel free to refer to other sections because
they cover the more detailed information.
What Remains?
The final sections of this manual contain
playback and recording information, a detailed
connections section, and a reference section including
troubleshooting tips, warranty information, and an
index.
READ ME!
These note boxes give you tips for
your new video cassette recorder.
5
➣➣
SETTING UP THE VCR
2
FIRST THINGS FIRST
1
➣
RECORDING
3VCR BASICS
4
➣
OTHER FEATURES
7
6
CONNECTIONS
➣
5
➣
PROGRAM THE REMOTE
5
➣
8REFERENCE

FIRST THINGS FIRST
4
Step 1: What’s in the Box?
The following items come packed in the box:
•VCR
•Remote control
•RF coaxial cable
Step 2: Install Batteries in the Remote
Control
Follow these steps whenever you need to install or change the
batteries in your VCR’s remote.
1. Remove the cover of the battery compartment.
2. Place the batteries into the remote’s back panel. Match the
positive (+) and negative (–) ends of each battery to the
diagram inside the battery compartment.
3. Replace the cover.
Step 3: Connect Your VCR
If you connect your VCR to your home antenna or cable system
and then to your TV, use the VCR’s IN (FROM ANT.) and OUT (TO
TV) jacks for a good signal as shown to the right.
If you have a TV with AUDIO/VIDEO jacks, use the jacks for a
better connection. Refer to the section,
Connections
, toward
the back of the manual, for additional connection options.
Step 4: Plug in the VCR
Your VCR’s power cord has a plastic band strung through the
blades. Remove plastic band before plugging the cord
into the power outlet. To remove band, cut with a pair of
scissors and pull it free of the blades. Once the plastic is
removed, match the wide blade of the power cord to the wide
slot in the AC outlet. Be sure to insert the plug completely.
VCR
TV
CH
IN
OUT IN
AUDIO
VIDEO
3 4
(FROM ANT.)
OUT
(TO TV)
RF
CABLE/
ANTENNA
CABLE, CABLE BOX, OR ANTENNA
I
N
P
U
T
T
V
•
V
C
R
REVERSEPLAYFORWARD
RECORDSTOPPAUSE
INFO SEARCH
MUTE GOBACK
123
456
78 9
0
F.ADV
CLEARMENUSPEED
C
H
A
N
V
O
L
V
O
L
C
H
A
N
TVVCR
TRACKING
OFF

FIRST THINGS FIRST
5
Step 5: Tune the TV
Tune the TV to the VCR viewing channel. The VCR viewing
channel is channel 3 or 4 or the TV’s video input.
•If you connect your VCR using the IN (FROM ANT.) and OUT
(TO TV) jacks with RF coaxial cable, set the 3 CH 4 switch to
channel 3 or channel 4 —the channel you want to use on
your TV.
•If you connect your VCR using the AUDIO/VIDEO jacks
with audio/video cables, select the TV’s video input with
the remote’s TV and INPUT buttons to see the signal. See
page 55 for more information about your TV’s input channel.
Step 6: Turn on the VCR
Press POWER on the VCR’s front panel or VCR on the remote to
turn on the VCR. The first time you turn the VCR on, a menu
screen appears. This is the start of a QuickSet Guide which helps
you pick different options for your VCR.
Step 7: Using the QuickSet Guide
The QuickSet Guide is an automated procedure that helps you
set up your VCR. The first time you turn on your VCR, the first
screen of the Guide appears.
Select a language.
Seleccione un idioma.
Choisissez une langue.
1 English
2 Espanol
3 Francais
÷
÷
1. Press 1 for English, 2 for Español (Spanish), or 3 for Français
(French).
The remaining menus throughout the set up will appear in the
chosen language. Just follow the step-by-step procedures until
setup is complete.
VCR Viewing Channel
When using the IN (FROM ANT.) and
OUT (TO TV) jacks to connect your
VCR, tune your TV to channel 3 or 4.
The 3 CH 4 switch on the back of the
VCR determines which TV channel
is used to see the VCR’s output.
When using the AUDIO/VIDEO jacks
to connect your VCR, tune your TV
to the TV’s video input channel with
the TV and INPUT buttons on your
remote control. For more
information about video line input ,
see “How to Find Your TV’s Video
Input Channel”in the References
section of this manual.
CH
IN
OUT IN
AUDIO
VIDEO
3 4
(FROM ANT.)
OUT
(TO TV)
RF
A/V Input/Output Jacks Channel 3/4 Switch
Continued on Next Page

FIRST THINGS FIRST
6
If the menu does not appear:
•Make sure the TV is tuned to the same channel as the 3 CH 4
switch or its video input (see page 55 for more information).
•Make sure the VCR indicator is on in the VCR display if you
connected your VCR using the IN (FROM ANT.) and OUT (TO
TV) jacks.
•Check your connections.
If you choose to set up your VCR options individually, then go to
the next section.
Step 8: Access the Menus
The MENU and number buttons on the remote let you access,
select, and change your VCR’s preferences. For example, to
select a different preferred on-screen language than the one you
selected during the initial set up, do the following:
1. Press MENU to display the VCR MAIN MENU.
VCR MAIN MENU
1 VCR Plus+
2 Timer Recordings
3 Time
4 Channels
5 Setup
6 Preferences
7 Language
0 Exit
2. Press 7 to display the LANGUAGE menu
.
LANGUAGE
Select a language.
1>English
2 Espanol
3 Francais
Press MENU to continue
÷
÷
3. Press 1 for English, 2 for Español (Spanish), or 3 for Français
(French).
All other on-screen menus are worked within similar ways
using the remote control to follow on-screen instructions.
See
Additional Set-Up Features
in the next section for
detailed information about accessing menus.
QuickSet Guide
To manually access the QuickSet
Guide, display the VCR MAIN MENU
and then select the Setup feature by
pressing 5.

7
SETTING UP THE VCR
Additional Set-up Features
Below is a list of features that need to be set up
before using your VCR for the first time. Many
of these menus are covered during the initial set
up, but if you ever want to change a menu, refer
to this section.
•Language
•Cable Box Set Up
•VCR Channels List
(Auto Channel Search)
•Auto Clock (Set Time Zone and
Daylight-Saving Time)
•Manual Clock Set
•VCR Plus+ System Channels
•Remote VCR1/VCR2
•Auto Play*
•Auto TV/VCR*
•EnergySaver*
•Front Panel Brightness*
5
➣➣
SETTING UP THE VCR
2
FIRST THINGS FIRST
1
➣
RECORDING
3VCR BASICS
4
➣
OTHER FEATURES
7
6
CONNECTIONS
➣
5
➣
PROGRAM THE REMOTE
5
➣
8REFERENCE
* Items NOT handled during the QuickSet initial
setup and must be set manually.

8
SETTING UP THE VCR
Using On-screen Menus to Set up
Features
You can set up your VCR’s features by using the remote
control’s buttons to enter your choices from on-screen
instructions. Each menu item is explained in this section.
For each numbered selection on the menus, use the same
numbered button on the remote control to select it.
Language Selection
If you did not complete this step in the previous section
using
the QuickSet Guide, it is time to select your preferred
language. Once this step is complete, all on-screen displays
will appear in that language.
1. On your remote control, press the MENU button to display
the VCR MAIN MENU.
VCR MAIN MENU
1 VCR Plus+
2 Timer Recordings
3 Time
4 Channels
5 Setup
6 Preferences
7 Language
0 Exit
2. Press 7 to select the LANGUAGE menu.
LANGUAGE
Select a language.
1>English
2 Espanol
3 Francais
Press MENU to continue
÷
÷
3. Press 1 for English, 2 for Español (Spanish), or 3 for
Français (French). An arrow indicates the selection you’ve
made. Once you have made your choice, press MENU on
the remote to continue back to the VCR MAIN MENU.
Is Something Missing?
Not all the VCR screens will always
be shown in this manual when
explaining the features.

9
SETTING UP THE VCR
Cable Box Setup
This set up applies only when all channels are received through
a cable box. In this case, the VCR will automatically enter the
channel used to view cable box programming. Your VCR will
use this channel for all future timer recordings.
1. Press MENU to display the VCR MAIN MENU.
VCR MAIN MENU
1 VCR Plus+
2 Timer Recordings
3 Time
4 Channels
5 Setup
6 Preferences
7 Language
0 Exit
2. Press 4 to display the CHANNELS menu.
CHANNELS
1 Auto Channel Search
2 Add/Remove Channels
3 Signal Type: CABLE
4 VCR Plus+ Channel list
5 Cable Box Setup
0 Exit
3. Press 5 to display CABLE BOX SETUP. Then select
one of the three choices.
CABLE BOX SETUP
Do you use your cable
box to receive ALL
channels or only SOME
channels?
1 ALL channels
2 Only SOME channels
3 Cancel setup
4. If you selected ALL Channels, enter the output channel
of your cable box (usually 03 or 04), or press the INPUT
button on the VCR’s remote to select the VCR’s video input
channel if you used the AUDIO/VIDEO jacks.
Choosing the Right Setup
for a Cable Box
If you use your cable box to receive:
ALL channels–enter two numbers for
the output channel of your cable box
or press INPUT if you connect your
cable box with AUDIO/VIDEO jacks.
Only SOME channels–choose this
option if you only use the cable box
to unscramble premium channels.
Cancel setup will take you to a screen
stating your VCR will not control the
cable box channel during timer
recordings.

10
SETTING UP THE VCR
CABLE BOX SETUP
On what channel does
the VCR receive signals
from the cable box?
(usually 3, 4, or Video)
--
Enter 01-13 or INPUT
Press MENU to cancel
CABLE BOX SETUP
On what channel does
the VCR receive signals
from the cable box?
(usually 3, 4 or video)
04
Press CLEAR to correct
Press MENU to continue
5. Once you complete the setup, the VCR confirms that the VCR
will now receive all signals on the designated channel.
CABLE BOX SETUP
The VCR will now
receive all signals
from the cable box
on channel 04.
Press MENU to continue
VCR Channels List
If you use a cable box for
all channels
, this step is not necessary.
Your VCR may come with a channel list preset at the factory,
but you may want to add or delete some channels depending
on whether they are active.
Auto Channel Search
1. Press MENU to display the VCR MAIN MENU.
VCR MAIN MENU
1 VCR Plus+
2 Timer Recordings
3 Time
4 Channels
5 Setup
6 Preferences
7 Language
0 Exit
2. Press 4 to display the CHANNELS menu.

11
SETTING UP THE VCR
CHANNELS
1 Auto Channel Search
2 Add/Remove Channels
3 Signal Type: CABLE
4 VCR Plus+ Channel list
5 Cable Box Setup
0 Exit
3. Press 1 to display the AUTO CHANNEL SEARCH menu.
AUTO CHANNEL SEARCH
What type of signal
are you using?
1 Cable TV
2 Antenna
3>Detect Automatically
0 Cancel
4. Select one of the three AUTO CHANNEL SEARCH options,
your choice will be marked with an arrow symbol at the left:
•
Cable TV
searches for cable stations from a single channel
•
Antenna
searches for local broadcast stations on all
channels
•
Detect Automatically
will make this decision for you
AUTO CHANNEL SEARCH
Now scanning channel 14
Press any key to cancel
The VCR begins scanning for the available channels—this takes
about one to two minutes. When the scan is complete, the VCR
tunes to the lowest channel number available. At this point,
pressing CHAN up or down should only select the active
channels.
Auto Channel Search
Use the Auto Channel Search feature
to place all available channels in
memory.
If you ever change cable or antenna
signals, you may need to Auto
Channel Search again.
Detect Automatically
A strong cable or antenna signal in
your area may cause Auto Detect to
mis-detect. If this should happen,
select 1 or 2 for the system you have.

12
SETTING UP THE VCR
Changing the Signal Type
1. Press MENU to display the VCR MAIN MENU.
2. Press 4 to display the CHANNELS menu.
3. Press 3 to change the Signal Type between CABLE and
ANTENNA.
Adding or Removing Channels
You may want to add or remove channels after you Auto
Channel Search, especially if some of the channels have weak
signals or you don’t want to watch them.
1. Press MENU to display the VCR MAIN MENU.
2. Press 4 to display the CHANNELS menu.
3. Press 2 to display the ADD/REMOVE CHANNELS screen. Use
CHAN up or down or number buttons to go to the channels
you want to remove or add.
ADD/REMOVE CHANNELS
Channel 115
is presently ADDED
Press CLEAR to remove
Press MENU to exit
ADD/REMOVE CHANNELS
Channel 115
is presently REMOVED
Press INFO to add
Press MENU to exit
4. Follow the on-screen instructions to finish this set up.
Time and Date
The VCR gives you two ways to set the time and date: the Auto
Clock Feature or manually. The Auto Clock Feature enables the
VCR to update the clock each time the VCR is turned off. The
Auto Clock is advantageous because it updates the time for you
automatically.
Before you set the time and date, set the Auto DST (Daylight-
Saving Time) feature to ON or OFF for your area. Selecting Channels
The Channel up and down buttons
access those channels active in your
VCR channel list.
You can still access channels not in
the channel list by using the
number buttons on the remote.

13
SETTING UP THE VCR
Auto Clock Set Feature
The Auto Clock Set feature is set to ON at the factory. In the ON
setting, the VCR looks for a channel carrying XDS (Extended
Data Services) information. XDS updates the clock using the
Coordinated Universal Time. There are certain steps that are
required, such as Auto Channel Search, setting the Time Zone,
and Daylight Saving feature before the Auto Clock feature
works.
Setting the Time Zone
1. Press MENU on the remote to display the VCR MAIN MENU.
VCR MAIN MENU
1 VCR Plus+
2 Timer Recordings
3 Time
4 Channels
5 Setup
6 Preferences
7 Language
0 Exit
2. Press 3 to display TIME menu.
TIME
1 Set Time and Date
2 Auto Clock Set: ON
3 Set Time Zone
4 Set Daylight Savings
XDS Time Data was
found on channel 20.
0 Exit
3. Press 3 again to display the SET TIME ZONE menu.
SET TIME ZONE
What is your Time Zone?
1 Eastern
2 Central
3 Mountain
4 Pacific
5 Alaska
6 Hawaii
7>Automatic
Press MENU to continue
4. Select your time zone.
Auto Clock Information
With a cable box, the VCR will not
reset the clock after a power outage
unless the cable box is turned on to
the channel carrying the XDS signal.
If AUTO CLOCK SET is unsuccessful,
try tuning the VCR (or cable box) to a
channel carrying the broadcast
information (usually PBS), then turn
the VCR off. If the time does not set
within ten minutes, set the time and
date manually through the menu.
Check your local cable system or TV
stations for availability of channels
with XDS.

14
SETTING UP THE VCR
If “Automatic”is selected for the time zone, the VCR sets the
clock using the first Coordinated Universal Time information it
finds. If the time is not correct, select another time zone or set
the time and date through the menu system.
Setting Daylight Saving Time
1. Press MENU to display the VCR MAIN MENU.
2. Press 3 to display the TIME menu.
3. Press 4 to display the SET DAYLIGHT SAVINGS menu.
SET AYLIGHT SAVINGS
Does your area observe
Daylight Savings Time
from April to October?
1 Yes, DST is observed
2 No
3>Automatic
Press MENU to continue
4. Select one of the options.
•DST is the acronym for Daylight Saving Time.
•If you chose AUTOMATIC, the VCR sets the clock using the
DST information broadcast in the signal (channel).
Setting Time and Date Manually
If the Auto Clock Set was unsuccessful, set the clock through the
menu option. The Auto Clock Set feature is set to OFF
automatically when you set the clock this way.
1. Press MENU to display the VCR MAIN MENU.
VCR MAIN MENU
1 VCR Plus+
2 Timer Recordings
3 Time
4 Channels
5 Setup
6 Preferences
7 Language
0 Exit
2. Press 3 to display the TIME menu.
Spring Forward; Fall Back
In the Spring, daylight-saving time
begins on the first Sunday in April.
Because the clock automatically
changes from 2:00 AM to 3:00 AM
(forward one hour), remember to
include the extra hour for timer
recording falling within this time
frame.
In the Autumn, daylight-saving time
ends on the last Sunday in October.
The VCR clock automatically
changes from 2:00 AM to 1:00 AM
(back one hour). Therefore, it can
affect your recording length.

15
SETTING UP THE VCR
Time/Date Display
Pressing INFO on the remote
displays the time and date on the
screen.
TIME
1 Set Time and Date
2 Auto Clock Set: ON
3 Set Time Zone
4 Set Daylight Savings
XDS Time Data was
not found
0 Exit
3. Press 1 to display the SET TIME AND DATE menu.
SET TIME AND DATE
Time --:--
(hh:mm)
Date --/--/--
Press MENU to cancel
4. Enter the data using the number buttons. Press 0 before
single-digit numbers and follow the on-screen directions.
SET TIME AND DATE
Time 12:34 PM
Date 11/18/99 Thursday
Press CLEAR to correct
Press MENU to set

16
SETTING UP THE VCR
VCR Plus+ System Channel List
Refer to your local television list for a
complete VCR Plus+ channel list for
your viewing area or contact your
cable company. Using the list may
save you some time.
VCR Plus+®System Channels
Using the VCR Plus+ system makes programming timer
recordings for cable or off-air antenna easier, but you
have to put in a little time right now to set up a channel list.
A worksheet and abbreviated codes for typical cable services
in the U.S. and Canada are provided.
1. Press MENU to display the VCR MAIN MENU.
VCR MAIN MENU
1 VCR Plus+
2 Timer Recordings
3 Time
4 Channels
5 Setup
6 Preferences
7 Language
0 Exit
2. Press 4 to display the CHANNELS menu.
CHANNELS
1 Auto Channel Search
2 Add/Remove Channels
3 Signal Type: CABLE
4 VCR Plus+ Channel list
5 Cable Box Setup
0 Exit
3. Press 4 to display the VCR Plus+ Channel List screen.
VCR+ Channel My Channel
5 --
4 --
3 -> -> -> --
2 --
1 --
Use CH+/- to select
Press 0-9 to change
Press MENU to save
4. Enter the data following the on-screen directions using
your worksheet (see next page).
VCR+ Channel My Channel
5 46
4 --
3 -> -> -> 23
2 --
1 --
Use CH+/- to select
Press 0-9 to change
Press MENU to save
*Screen used is for an example only.
See next page for Canadian List
Two-Digit VCR Plus+ System
Channel Numbers for
Cable TV (Canadian List)
35 American Movie Classics
39 Arts &-Entertainment
57 Black Entertainment
54 Bravo
42 Cable News Network
45 Cinemax
98 Cinemax 2
37 The Discovery Channel
53 The Disney Channel
63 Entertainment Television
34 ESPN Sports Network
47 The Family Channel
33 Home Box Office
95 Home Box Office 2
96 Home Box Office 3
51 The Learning Channel
46 Lifetime
58 The Movie Channel
48 Music Television
49 The Nashville Network
38 Nickelodeon
64 Nostalgia Television
99 Quality Value Cable
41 Showtime
97 Showtime 2
59 Sports Channel
52 Turner Network Television
44 USA-Network
62 Video Hits 1
93 Viewer’s Choice 1
94 Viewer’s Choice 2
55 WGN Chicago
43 WTBS Atlanta
60 WWOR-New York
VCR Plus+ system is a registered trademark of Gemstar Development Corporation.
The VCR Plus+ system is manufactured under the license from Gemstar Development Corporation.

17
SETTING UP THE VCR
VCR Plus+ System Worksheet
Two-Digit VCR Plus+ System
Channel Numbers for
Cable TV (Canadian List)
67 Allarcom Pay Television/
Superchannel
44 Arts & Entertainment
72 Cable News Network-
Headline News
61 Cable News Network
70 Canadian Home Shopping
Network
56 Canal Famille
69 Cathay International
Television Inc.
68 Chinavision Canada Corp
60 Country Music Television
63 Family Channel
62 First Choice
96 First Choice Two
97 First Choice Three
99 First Choice Four
90 House of Commons
91 La Chaine Francaise
51 The Learning Channel
65 MeteoMedia/The Weather
Network
48 MuchMusic Network
55 MusiquePlus
52 Nashville Network
73 Newsworld/CBC
53 Le Reseau des Sports
43 The Sports Network
64 Super Ecran
37 Super Ecran B
98 Super Ecran C
66 Telatino Network
46 TV5 Montreal
92 Viewer’s Choice 1
93 Viewer’s Choice 2
94 Viewer’s Choice 3
95 Viewer’s Choice 4
71 Vision TV: Canada’s
Faith Network
38 Youth TV, Canada Inc.
*Check your local or cable listing for the channel number you receive this station on.
**Check your local listing for broadcast or VCR Plus+ channel number assigned.
Broadcast or
Cable-TV Station Name
VCR Plus+
Channel Number**
Channel Number
You Receive the
Station On*
HBO 33
ESPN 34

18
SETTING UP THE VCR
Remote Control Option
Changing the remote option to VCR2
disables the remote that came with
your VCR.
Additional Set-up Features in the
Preferences Menu
The features in this section are all accessed through the
PREFERENCES menu.
1. Press MENU to display the VCR MAIN MENU.
VCR MAIN MENU
1 VCR Plus+
2 Timer Recordings
3 Time
4 Channels
5 Setup
6 Preferences
7 Language
0 Exit
2. Press 6 to display the PREFERENCES menu.
PREFERENCES
1 Remote Control: VCR1
2 Auto Play: ON
3 Auto TV/VCR: ON
4 EnergySaver: 2:00
5 Front Panel: AUTO
0 Exit
Now you are ready to select an item from the menu to set up.
Remote VCR1/VCR2 Option
If you own a compatible GE, RCA, or PROSCAN remote that has
a VCR2, VCR2•LD, or VCR2•DVD button, this feature allows you
to set this VCR to respond to that button.
Press 1 to select the Remote Control item. Then press the VCR2,
VCR2•LD, or VCR2•DVD button to change.
PREFERENCES
(PRESS VCR2 TO CHANGE)
2 Auto Play: ON
3 Auto TV/VCR: ON
4 EnergySaver: 2:00
5 Front Panel: AUTO
0 Exit
PREFERENCES
1 Remote Control: VCR2
2 Auto Play: ON
3 Auto TV/VCR: ON
4 EnergySaver: 2:00
5 Front Panel: AUTO
0 Exit
Other manuals for VG4065
1
Table of contents
Other GE VCR System manuals