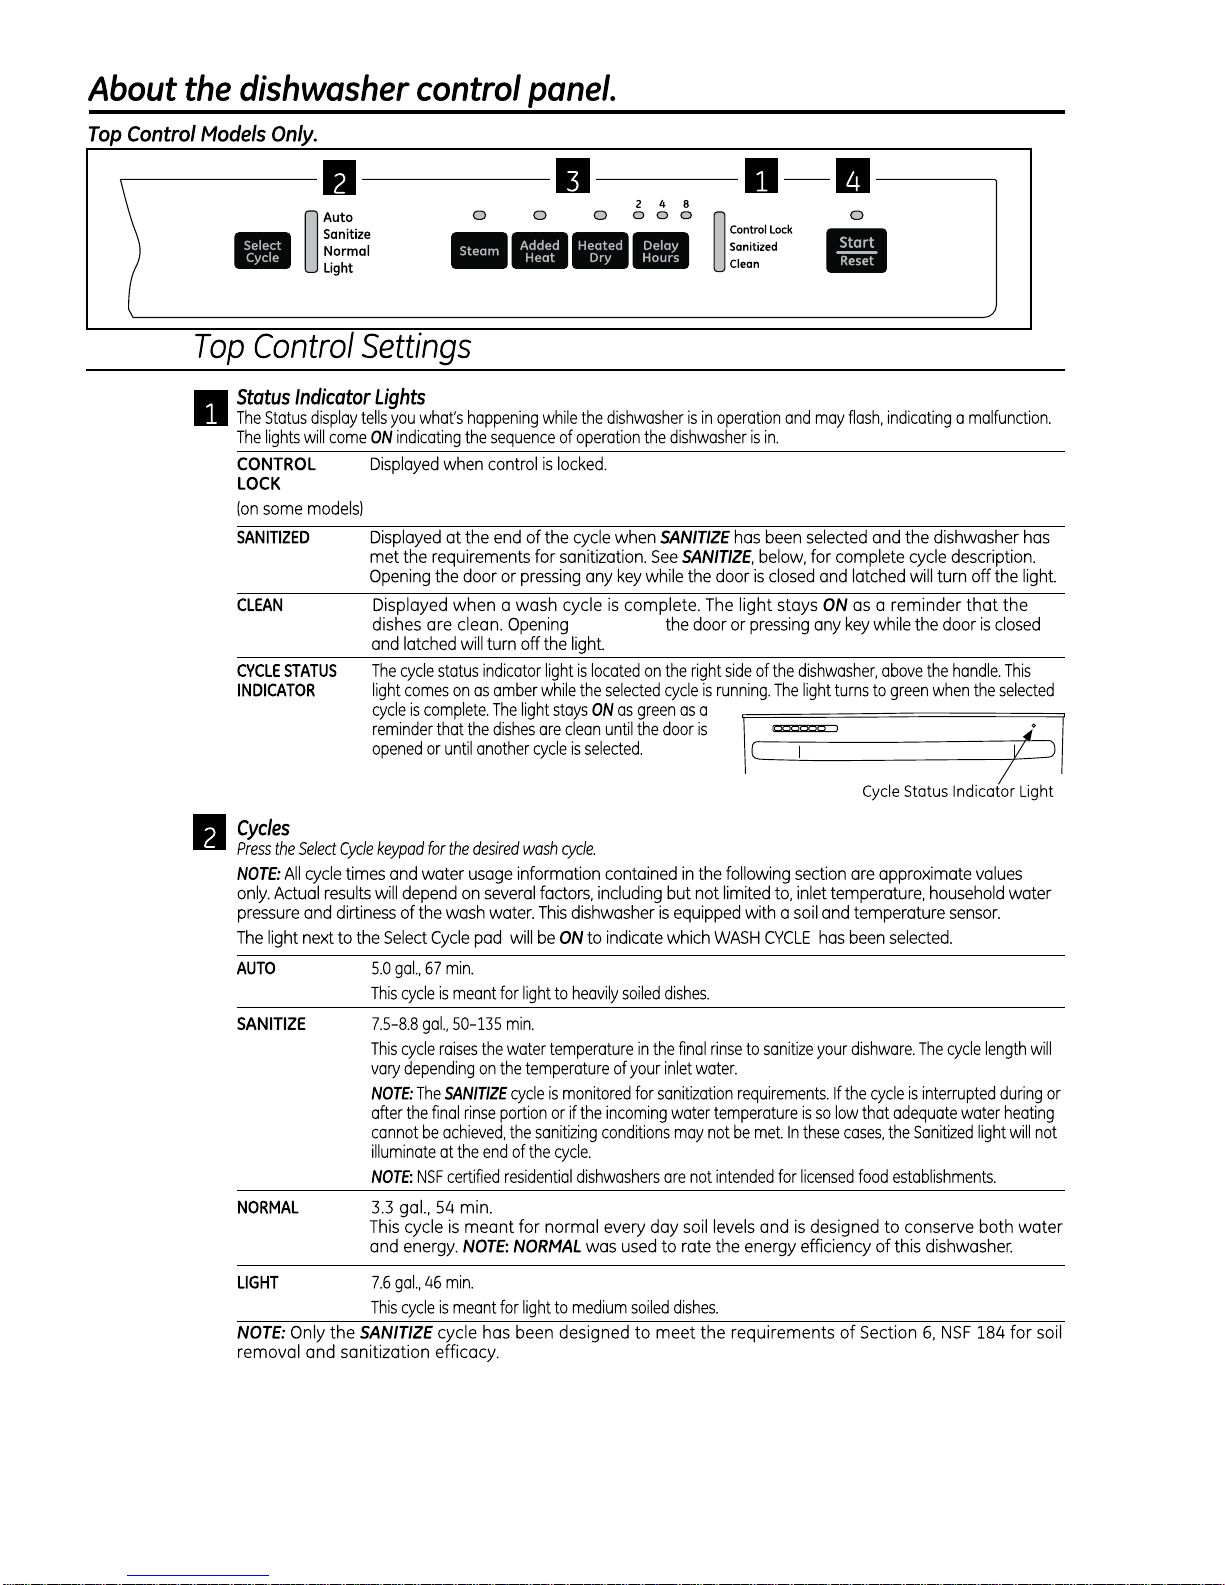
GEAppliances PermaTuf GLD28**V How to use

GE Appliances
General Electric Company
Louisville, Kentucky 40225
31-9220
GE and Profile
Dishwashers
PermaTuf®Tub
Models
GLD28__V
GLD45__V
GLD46__V
GLD49__V
GLD56__V
GLD57__V
GLD58__V
GLD77__V
GLD78__V
GLC5604V
Technical Service Guide
October 2011
GE Appliances
Stainless Steel
Tub Models
GDWT1__V
GHDT1__V
GDWT3__V
PDWT1__V

– 2 –
IMPORTANT SAFETY NOTICE
The information in this service guide is intended for use by
individuals possessing adequate backgrounds of electrical,
electronic, and mechanical experience. Any attempt to repair a
major appliance may result in personal injury and property
damage. The manufacturer or seller cannot be responsible for the
interpretation of this information, nor can it assume any liability in
connection with its use.
WARNING
To avoid personal injury, disconnect power before servicing
this product. If electrical power is required for diagnosis or test
purposes, disconnect the power immediately after performing the
necessary checks.
RECONNECT ALL GROUNDING DEVICES
If grounding wires, screws, straps, clips, nuts, or washers used to
complete a path to ground are removed for service, they must be
returned to their original position and properly fastened.
GE Appliances
Copyright © 2011
All rights reserved. This service guide may not be reproduced in whole or in part
in any form without written permission from the General Electric Company.

– 3 –
Table of Contents
Bottom Door Seal..............................................................................................................................................................25
Coarse Filter........................................................................................................................................................................29
Component Locator Views...........................................................................................................................................13
Console..................................................................................................................................................................................23
Control Board......................................................................................................................................................................18
Control Board Connector Locator View.................................................................................................................16
Control Features................................................................................................................................................................ 6
Control TCO..........................................................................................................................................................................18
Cycle Chart..........................................................................................................................................................................12
Cycles.....................................................................................................................................................................................11
Detergent/Rinse Module................................................................................................................................................25
Dishwasher Components..............................................................................................................................................17
Door Switch Assembly...................................................................................................................................................20
Drain Pump Assembly....................................................................................................................................................33
Fill Funnel..............................................................................................................................................................................31
Fine Filter..............................................................................................................................................................................27
Flood Switch........................................................................................................................................................................29
Heating Element................................................................................................................................................................30
Inner Door Panel (PermaTuf Tub Models)..............................................................................................................17
Inner Door Panel (Stainless Steel Tub Models).....................................................................................................24
Introduction......................................................................................................................................................................... 5
Lens.........................................................................................................................................................................................23
Lower Spray Arm..............................................................................................................................................................26
Mid Spray Arm....................................................................................................................................................................26
Motor Pump Assembly...................................................................................................................................................33
Nomenclature.................................................................................................................................................................... 4
Outer Door Panel (PermaTuf Tub Models).............................................................................................................23
Outer Door Panel (Stainless Steel Tub Models)....................................................................................................17
Pocket Handle....................................................................................................................................................................21
Schematics and Wiring Diagrams............................................................................................................................38
Service Mode......................................................................................................................................................................36
Sump Filter...........................................................................................................................................................................28
Tactile Switch......................................................................................................................................................................19
Towel Bar Handle..............................................................................................................................................................21
Troubleshooting ...............................................................................................................................................................35
Tub Gasket...........................................................................................................................................................................26
Tub TCO.................................................................................................................................................................................34
Turbidity Sensor................................................................................................................................................................30
Unicouple..............................................................................................................................................................................10
Upper Spray Arm..............................................................................................................................................................27
Vent.........................................................................................................................................................................................21
Warranty..............................................................................................................................................................................40
Water Inlet Valve...............................................................................................................................................................31

– 4 –
Model Number -- GE Stainless Steel Tub
The nomenclature plate is located on the left
side of the tub wall, inside the door jamb.
1The mini-manual on stainless steel tub models
is located behind the access panel.
2The mini-manual on PermaTuf tub models is
located under the dishwasher on the right side.
Nomenclature
Nomenclature
Product Type
GDW = Long door GE Stainless Steel Tub
GHD = Home Depot Model
PDW = Profile Dishwasher
Exterior Color
SS = Stainless Steel
WW = White
BB = Black
CC = Bisque on Bisque
Exterior Color
SS = Stainless Steel
WW = White on White
BB = Black on Black
CC = Bisque on Bisque
CS = Clean Steel
SA = Silver
WH = White Door with
Black Control Panel
Model Year Designator
Model Year
Designator
Door
6 = Stainless Door
Feature Pack
Controls
T = Top Control
Product Type
GLD = GE Long Door PermaTuf Tub
GLC = Long Door GE Convertible
Feature Pack
Serial Number
The first two characters of the serial number
identify the month and year of manufacture.
Example: TV123456S = Oct, 2011
T- OCT
V - NOV
Z - DEC
A - JAN
B - FEB
F - MAR
G - APR
H - MAY
L - JUN
M - JUL
R - AUG
S - SEP
2011 - V
2010 - T
2009 - S
2008 - R
2007 - M
2006 - L
2005 - H
2004 - G
2003 - F
2002 - D
2001 - A
2000 - Z
The letter designating
the year repeats every
12 years.
Example:
V - 2011
V - 1999
V - 1987
Model Number -- GE PermaTuf Tub
G L D 7 4 6 0 V S S
G D W T 3 6 0 V S S
Door
4 = Silver Door
5 = Clean Steel Door
6 = Stainless Door
Mini-Manual2
Mini-Manual1

– 5 –
New Features and Benefits
GE Front Control Models
• 2011 Energy Star®qualified with enhanced control.
• Locking connectors on control/harnesses.
• Upper rack uses wheels on rails.
• Revised tine spacing in upper/lower racks.
Top Controls on PermaTuf Tubs
• Top controls - new console and tactile UI for control.
• Locking connectors on harnesses.
• Pocket handle and towel bar handle models.
• Upper rack slides and tine spacing improvements.
• Gray tubs and inner doors.
Entry Level Top Controls on Stainless Steel (SS) Tubs
• Top controls - new console and tactile UI for control.
• Limited pocket handle models.
Weights & Dimensions
Approximate Shipping Weight......................................PermaTuf Tub = 99 lb; Stainless Steel Tub = 115 lb
Net Weight..............................................................................PermaTuf Tub = 82 lb; Stainless Steel Tub = 110 lb
Overall Height.....................................................................................................................................................................3211/32 in.
Height w/Legs Extended...............................................................................................................................................341/2in.
Overall Depth......................................................................................................................................................................24-in.
Overall Width......................................................................................................................................................................24-in.
Introduction

– 6 –
Throughout this manual, features and appearance may vary from your model.
Control Features
(Continued next page)
and closing

– 7 –
*($SSOLDQFHVFRP
2SWLRQV
7KHOLJKWDERYHWKHVHOHFWHGSDGZLOOEH21WRLQGLFDWHZKLFK237,21KDVEHHQVHOHFWHG
67($03UHZDVK
8VHWKLVRSWLRQWRLPSURYHZDVKSHUIRUPDQFHZLWKKHDY\RUGULHGRQVRLOV7KLVRSWLRQLVDYDLODEOH
RQVRPH ZLWKDOOF\FOHVH[FHSW5,16(21/<
PRGHOV
+27:$6+ 8VHWKLVRSWLRQWRLPSURYHZDVKDQGGU\SHUIRUPDQFHZLWKKHDY\RUGULHGRQVRLOV
+,7(03:$6+
7KLVRSWLRQPXVWEHVHOHFWHGSULRUWRVWDUWLQJWKHF\FOH,WFDQQRWEHVHOHFWHGZLWK5,16(21/<RU
$''('+($7&+,1$&5<67$/F\FOH
RQVRPHPRGHOV
+2767$57 8VHWKLVRSWLRQWRLPSURYHZDVKDQGGU\SHUIRUPDQFHZKHUHLQOHWZDWHUWHPSHUDWXUHLVORZ
RQVRPHPRGHOV
+($7(''5< 6KXWVRIIWKHGU\LQJKHDWRSWLRQ'LVKHVDLUGU\ZLWKRXWXVLQJHQHUJ\
/LJKW2)) )RUIDVWHUDLUGU\\RXFDQSURSWKHGRRURSHQDIWHUWKH&/($1OLJKWLOOXPLQDWHV
+($7(''5< 7XUQVWKHKHDWHURQIRUIDVWGU\LQJ7KLVZLOOH[WHQGWKHWRWDOUXQWLPHEHWZHHQDQGPLQXWHV
/LJKW21 GHSHQGLQJRQWKHF\FOHVHOHFWHG
F\FOH 127(&DQQRWEHVHOHFWHGZLWK5,16(21/<
&21752/<RXFDQORFNWKHFRQWUROVWRSUHYHQWVHOHFWLRQVIURPEHLQJPDGH<RXFDQDOVRORFNWKHFRQWUROV
/2&.DIWHU\RXKDYHVWDUWHGDF\FOHWRSUHYHQWXQLQWHUUXSWHGF\FOHFKDQJHV
RQVRPH
)RUH[DPSOHFKLOGUHQFDQQRWDFFLGHQWDOO\VWDUWWKHGLVKZDVKHUE\WRXFKLQJSDGVZLWKWKLVRSWLRQVHOHFWHG
PRGHOV
7R/2&.WKHGLVKZDVKHUFRQWUROWRXFKDQGKROGWKH+($7(''5<SDGIRUVHFRQGV7KHOLJKWWRWKHOHIWRIWKH
+($7(''5<SDGZLOOWXUQRQ7R81/2&.WKHGLVKZDVKHUFRQWUROWRXFKDQGKROGWKH+($7(''5<SDGIRUVHFRQGV
7KH/2&.OLJKWZLOOWXUQRII
'(/$<+2856 <RXFDQGHOD\WKHVWDUWRIDZDVKF\FOHIRURUKRXUVGHOD\WLPHRSWLRQVPD\YDU\E\PRGHO
7RXFKWKH'(/$<+2856SDGWRFKRRVHWKHQXPEHURIKRXUV\RXZDQWWRGHOD\WKHVWDUWRIWKH
F\FOHWKHQWRXFK67$575(6(7RQHWLPH$VLQJOHEHHSZLOOFRQILUP'(/$<+2856KDVEHHQVHW7KH
GLVKZDVKHUZLOOFRXQWGRZQDQGVWDUWDXWRPDWLFDOO\DWWKHFRUUHFWWLPH7RXFKLQJ67$575(6(7D
VHFRQGWLPHZLOOFDQFHO'(/$<+2856DQGWXUQRIIWKHGLVKZDVKHU
127(:KLOH'(/$<+2856LVDFWLYHDIWHUWKH67$575(6(7SDGKDVEHHQSUHVVHGWKHGLVKZDVKHU
ZLOOXSGDWHWKHUHPDLQLQJFRXQWGRZQWLPHRQWKHFRQWUROSDQHOEHIRUHWKHGLVKZDVKHUVWDUWVWKH
F\FOH)RUH[DPSOHLI'(/$<+2856LVVHOHFWHGWKHGHOD\KRXULQGLFDWRUZLOOPRYHIURPWRWR
WRRIIDVGHOD\WLPHHODSVHV
67$57 &ORVHDQGODWFKWKHGLVKZDVKHUGRRUDQGVHOHFWWKHF\FOHDQGGHVLUHGRSWLRQV7RXFKWKH
67$575(6(7SDGRQHWLPHWREHJLQWKHF\FOH:DWHUEHJLQVWRILOOWKHGLVKZDVKHUDQGDSSUR[LPDWHO\
VHFRQGVODWHUWKHZDVKDFWLRQEHJLQV
127(7KHGLVKZDVKHUUHPHPEHUV\RXUODVWF\FOHVR\RXGRQ·WKDYHWRUHSURJUDPHDFKWLPH
:KHQWKHGLVKZDVKHUGRRULVFORVHGDQGODWFKHGWKHFRQWUROSDQHOOLJKWVZLOOGLVSOD\WKHODVW
VHWWLQJVVHOHFWHG
,I\RXGRQ·WZDQWWRFKDQJHDQ\RIWKHVHWWLQJVVLPSO\WRXFKWKH67$575(6(7SDGRQFHWREHJLQWKHF\FOH
,IWKHGRRULVFORVHGWKHLQGLFDWRUOLJKWVZLOOWXUQRIILIDSDGLVQRWSUHVVHGZLWKLQWZRPLQXWHV
7RDFWLYDWHWKHGLVSOD\RSHQDQGFORVHWKHGRRURUWRXFKDQ\SDG
,IDSRZHUIDLOXUHRFFXUV1250$/:$6+DQG+($7(''5<ZLOODXWRPDWLFDOO\EHSURJUDPPHG
5(6(7 7RFKDQJHF\FOHVDIWHUZDVKLQJVWDUWVSUHVVWKH67$575(6(7SDG7KLVZLOOFDQFHOWKHFXUUHQWO\
UXQQLQJF\FOHDQGEHJLQSXPSRXW'XULQJWKLVWLPHWKH/('VRIWKHFXUUHQWO\VHOHFWHGF\FOH
ZLOOIODVK2QFHWKHSXPSRXWLVFRPSOHWHWKHGLVKZDVKHUZLOOWXUQRII
3UHVVWKH
67$575(6(7SDGZKHQWKHGLVKZDVKHULVUXQQLQJWRFDQFHOWKHF\FOH7KHGLVKZDVKHUZLOO
SXPSRXWDQGWXUQRIIDWWKHHQGRISXPSRXW7KH/('VRIWKHFXUUHQWO\VHOHFWHGF\FOHZLOOIODVK
GXULQJSXPSRXW<RXFDQVHOHFWF\FOHVDQGRSWLRQVGXULQJSXPSRXW,I\RXSUHVV67$575(6(7
GXULQJWKHSXPSRXWSHULRGWKHSXPSRXWZLOOVWRSDQGDQHZF\FOHZLOOEHJLQ
(Continued next page)

– 8 –
and closing
(Continued next page)

– 9 –
2SWLRQV
7KHOLJKWDERYHWKHVHOHFWHGSDGZLOOEH21WRLQGLFDWHZKLFK237,21KDVEHHQVHOHFWHG
'(/$<+2856 <RXFDQGHOD\WKHVWDUWRIDZDVKF\FOHIRURUKRXUVGHOD\WLPHRSWLRQVPD\YDU\E\
PRGHO7RXFKWKH'(/$<+2856SDGWRFKRRVHWKHQXPEHURIKRXUV\RXZDQWWRGHOD\
WKHVWDUWRIWKHF\FOHWKHQWRXFK67$575(6(7RQHWLPH$VLQJOHEHHSZLOOFRQILUP'(/$<
+2856KDVEHHQVHW7KHGLVKZDVKHUZLOOFRXQWGRZQDQGVWDUWDXWRPDWLFDOO\DWWKHFRUUHFW
WLPH7RXFKLQJ67$575(6(7DVHFRQGWLPHZLOOFDQFHO'(/$<+2856DQGWXUQRIIWKH
GLVKZDVKHU
127(:KLOH'(/$<+2856LVDFWLYHDIWHUWKH67$575(6(7SDGKDVEHHQSUHVVHGWKH
GLVKZDVKHUZLOOXSGDWHWKHUHPDLQLQJFRXQWGRZQWLPHRQWKHFRQWUROSDQHOEHIRUHWKH
GLVKZDVKHUVWDUWVWKHF\FOH)RUH[DPSOHLI'(/$<+2856LVVHOHFWHGWKHGHOD\KRXU
LQGLFDWRUZLOOPRYHIURPWRWRWRRIIDVGHOD\WLPHHODSVHV
+($7(''5< 6KXWVRIIWKHGU\LQJKHDWRSWLRQ'LVKHVDLUGU\ZLWKRXWXVLQJHQHUJ\
/LJKW2)) )RUIDVWHUDLUGU\\RXFDQSURSWKHGRRURSHQDIWHUWKH&/($1OLJKWLOOXPLQDWHV
+($7(''5< 7XUQVWKHKHDWHURQIRUIDVWGU\LQJ7KLVZLOOH[WHQGWKHWRWDOUXQWLPHEHWZHHQDQG
/LJKW21 PLQXWHVGHSHQGLQJRQWKHF\FOHVHOHFWHG
$''('+($7 :KHQVHOHFWHGWKHF\FOHZLOOUXQZLWKKHDWLQJHOHPHQWRQORQJHUDQGPD\LQFUHDVH
F\FOHWLPHVWRLPSURYHERWKZDVKDQGGU\SHUIRUPDQFH
67($0
3UHZDVK
)RUXVHZLWKKHDYLO\VRLOHGDQGRUGULHGRQEDNHGRQVRLOV7KLVRSWLRQ0867EHVHOHFWHG35,25
WRVWDUWLQJWKHF\FOH7KH67($0RSWLRQDGGVPLQXWHVWRWKHF\FOHWLPH
&21752/<RXFDQORFNWKHFRQWUROVWRSUHYHQWVHOHFWLRQVIURPEHLQJPDGH<RXFDQDOVRORFNWKH
/2&.FRQWUROVDIWHU\RXKDYHVWDUWHGDF\FOHWRSUHYHQWXQLQWHUUXSWHGF\FOHFKDQJHV
RQVRPH
)RUH[DPSOHFKLOGUHQFDQQRWDFFLGHQWDOO\VWDUWWKHGLVKZDVKHUE\WRXFKLQJSDGVZLWKWKLV
PRGHOV
RSWLRQVHOHFWHG
7R/2&.WKHGLVKZDVKHUFRQWUROWRXFKDQGKROGWKH+($7(''5<SDGIRUVHFRQGV7KHFRQWUROORFNOLJKW
ZLOOWXUQRQ7R81/2&.WKHGLVKZDVKHUFRQWUROWRXFKDQGKROGWKH+($7(''5<SDGIRUVHFRQGV7KH
FRQWUROORFNOLJKWZLOOWXUQRII
67$57'RRUFDQEHRSHQWRVWDUWWKHF\FOHDQGVHOHFWGHVLUHGRSWLRQV3UHVVWKH67$575(6(7
SDGRQHWLPHWREHJLQWKHF\FOH&ORVHWKHGRRUWRVWDUWWKHF\FOHRUEHJLQWKH'(/$<+2856
FRXQWGRZQ$SSUR[LPDWHO\VHFRQGVODWHUWKHZDVKDFWLRQEHJLQV
127(7KHGLVKZDVKHUUHPHPEHUV\RXUODVWF\FOH<RXGRQ·WKDYHWRUHSURJUDPHDFKWLPH
3UHVVWKH67$575(6(7SDGWRUHDG\WKHGLVKZDVKHUDQGFORVHWKHGRRUWREHJLQ,IWKHGRRU
LVRSHQWKHLOOXPLQDWHGOLJKWVZLOOWXUQRIILIDSDGLVQRWSUHVVHGZLWKLQWZRPLQXWHV7R
DFWLYDWHWKHGLVSOD\FORVHDQGRSHQWKHGRRURUWRXFKDQ\SDG
2QVRPHPRGHOVLIDSRZHUIDLOXUHRFFXUV$872DQG+($7(''5<ZLOODXWRPDWLFDOO\EH
SURJUDPPHG)RUDOORWKHUPRGHOVLIDSRZHUIDLOXUHRFFXUV1250$/DQG+($7(''5<ZLOO
DXWRPDWLFDOO\EHSURJUDPPHG
5(6(7 7RFKDQJHF\FOHVDIWHUZDVKLQJVWDUWVSUHVVWKH67$575(6(7SDG7KLVZLOOFDQFHO
WKHFXUUHQWO\UXQQLQJF\FOHDQGEHJLQSXPSRXW2QFHWKHSXPSRXWLVFRPSOHWHWKH
GLVKZDVKHUZLOOWXUQRII
3UHVVWKH
67$575(6(7SDGZKHQWKHGLVKZDVKHULVUXQQLQJWRFDQFHOWKHF\FOH7KH
GLVKZDVKHUZLOOSXPSRXWDQGWXUQRIIDWWKHHQGRISXPSRXW<RXFDQVHOHFWF\FOHV
DQGRSWLRQVGXULQJSXPSRXW,I\RXSUHVV67$575(6(7GXULQJWKHSXPSRXWSHULRGWKH
SXPSRXWZLOOVWRSDQGDQHZF\FOHZLOOEHJLQ
*($SSOLDQFHVFRP

– 10 –
Unicouple
$ERXWWKHXQLFRXSOHSRUWDEOHPRGHOVRQO\
$WWDFKWKHIDXFHWDGDSWHU7KHVSHFLDOIDXFHW
DGDSWHUVXSSOLHGZLWK\RXUGLVKZDVKHUPXVW
EHDVVHPEOHGWRWKHVLQNIDXFHWEHIRUH\RXFDQ
XVH\RXUGLVKZDVKHU
7KHIDXFHWDGDSWHULVGHVLJQHGWRILWVWDQGDUG
VSRXWVKDYLQJLQWHUQDORUH[WHUQDOWKUHDGV<RX
ZLOOILQGWKHDGDSWHUDQGWZRZDVKHUVLQWKH
IDXFHWDGDSWHUSDFNHWLQ\RXUGLVKZDVKHU
7RLQVWDOOIDXFHWDGDSWHUILUVWUHPRYHWKHROG
DHUDWRURUWULPULQJRQ\RXUIDXFHWVSRXW
,IIDXFHWKDVH[WHUQDOWKUHDGV,QVHUWWKH
WKLQQHURIWKHWZRZDVKHUVLQWRWKHIDXFHW
DGDSWHUDQGDWWDFKLWWRWKHIDXFHWVSRXW
7LJKWHQZLWKSOLHUV
,IIDXFHWKDVLQWHUQDOWKUHDGV,QVHUWERWK
RIWKHZDVKHUVLQWRWKHIDXFHWDGDSWHUDQG
DWWDFKLWWRWKHIDXFHWVSRXW
7LJKWHQZLWKSOLHUV
,IWKHIDXFHWDGDSWHUWKUHDGVGRQRWPDWFK
\RXUIDXFHWVSRXW\RXUORFDOKDUGZDUH
RUSOXPELQJVXSSO\VWRUHQRUPDOO\KDV
DGGLWLRQDOILWWLQJVWRDGDSW\RXUIDXFHWVSRXW
WRWKHVSHFLDOIDXFHWDGDSWHU
127($VLQNVSUD\DWWDFKPHQWKRVHFDQ
EXUVWLILWLVLQVWDOOHGRQWKHVDPHVLQNZLWK
\RXUGLVKZDVKHU:HVXJJHVWWKDW\RX
GLVFRQQHFWWKHVLQNVSUD\DWWDFKPHQWLI\RXU
VLQNKDVRQHDQGSOXJWKHKROH
,IWKHVLQNLVµRUKLJKHUIURPWKHIORRUWKH
H[FHVVZDWHULQ8QLFRXSOHKRVHVFDQQRW
EHGUDLQHGGLUHFWO\LQWRWKHVLQN,WZLOOEH
QHFHVVDU\WRGUDLQH[FHVVZDWHUIURPKRVHV
LQWRDERZORUVXLWDEOHFRQWDLQHUWKDWLVKHOG
RXWVLGHDQGORZHUWKDQWKHVLQN
5XQWKHKRWZDWHUIDXFHWWRSXUJHFROG
ZDWHUIURPWKHKRWZDWHUOLQH7KHKRW
ZDWHUPXVWEHEHWZHHQ)DQG)
IRUEHVWZDVKSHUIRUPDQFH
3XOO8QLFRXSOHDQGLWVKRVHVFRPSOHWHO\RXW
IURPVWRUDJHFRPSDUWPHQWORFDWHGDWUHDU
RIGLVKZDVKHU
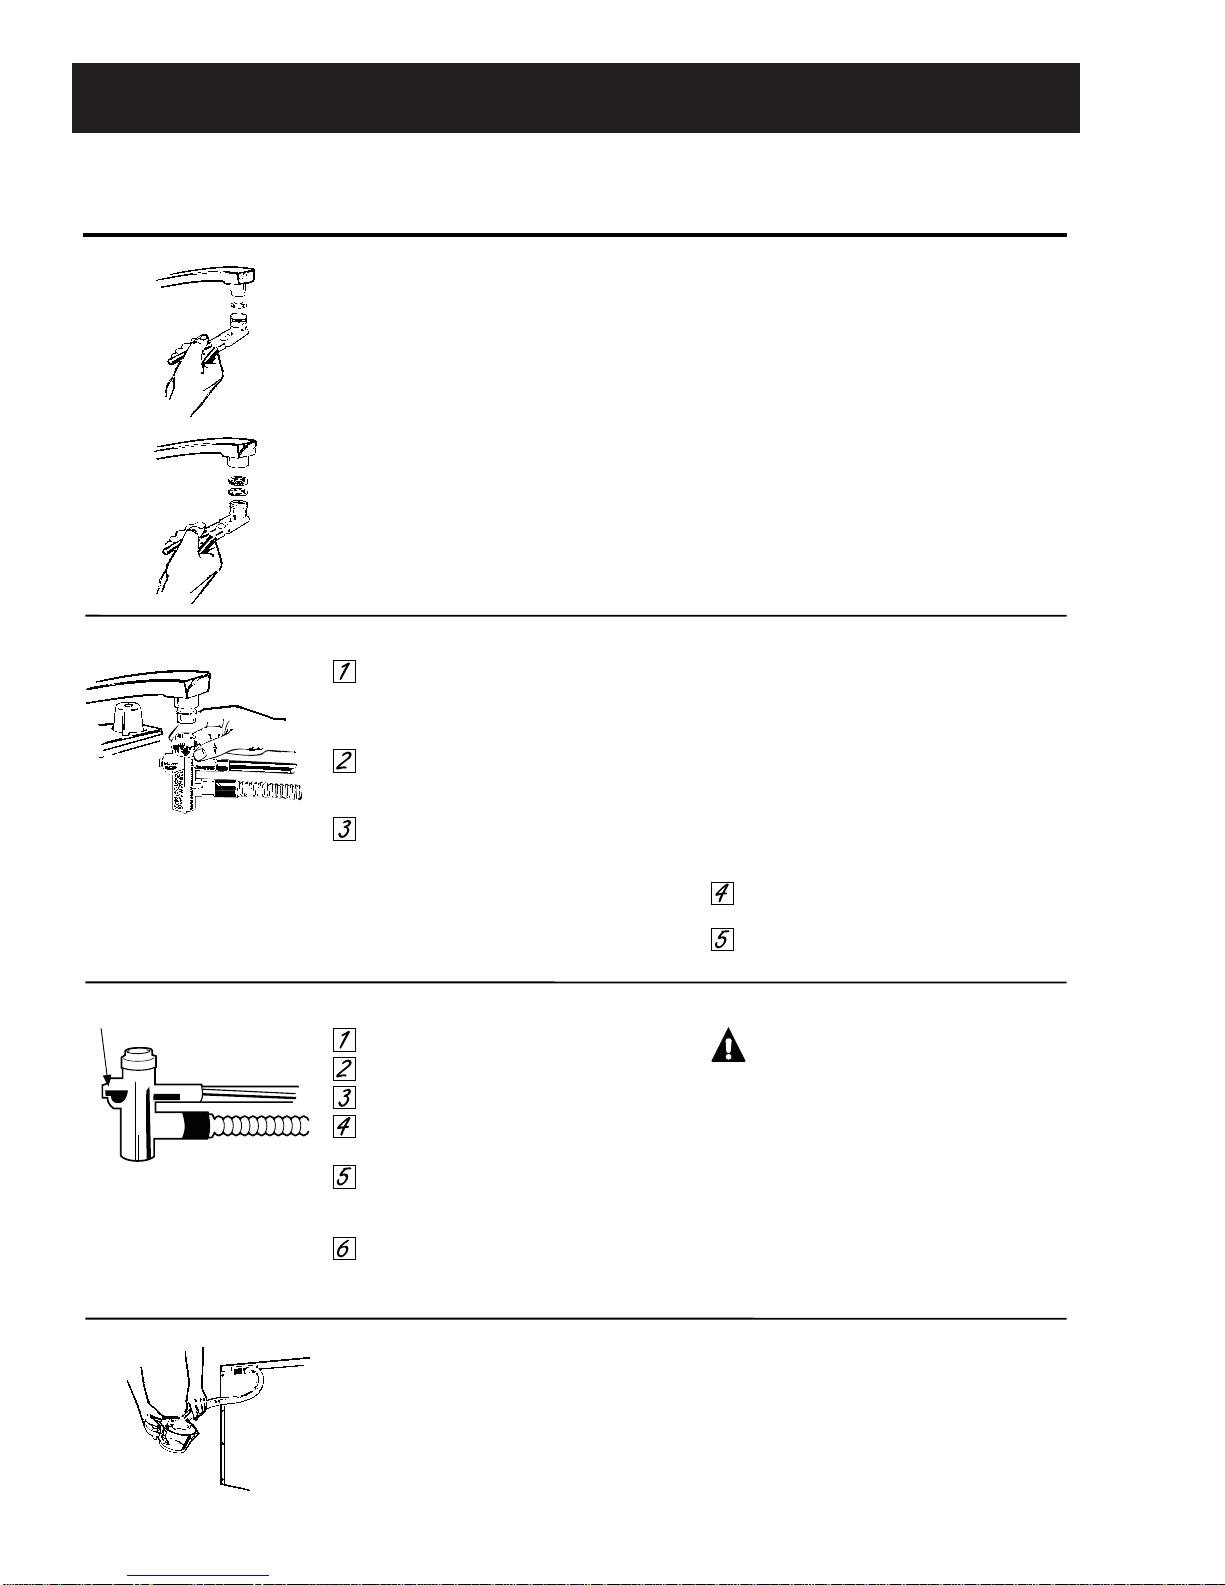
$WWDFKWKH8QLFRXSOHFRQQHFWRUWRWKH
IDXFHWDGDSWHUE\GHSUHVVLQJWKHFROODUDW
WKHWRSRIWKHFRQQHFWRU:KHQ8QLFRXSOH
LVDOOWKHZD\XSRQWRWKHDGDSWHUUHOHDVH
WKHFROODU,WZLOOWKHQVQDSLQWRSRVLWLRQWR
ORFNWKH8QLFRXSOHLQSODFH
7KH8QLFRXSOH·VVPDOOKRVHFDUULHVZDWHU
IURPWKHIDXFHWWRWKHGLVKZDVKHU,WVODUJH
KRVHFDUULHVGUDLQZDWHUWRWKHVLQN%H
VXUH8QLFRXSOHLVSRLQWLQJWRZDUGWKHVLQN
ERZOGUDLQRSHQLQJDQGWKHVLQNGUDLQLV
RSHQIRUZDWHUWKDWZLOOGUDLQIURP\RXU
GLVKZDVKHU
,I\RXUGLVKZDVKHUGUDLQVLQWRDGLVSRVHU
RSHUDWHWKHGLVSRVHUXQWLOLWLVFRPSOHWHO\
HPSW\EHIRUHVWDUWLQJWKHGLVKZDVKHU
7XUQKRWZDWHUIXOO\RQEHIRUHVWDUWLQJWKH
GLVKZDVKHU
3OXJWKHGLVKZDVKHUSRZHUFRUGLQWRWKH
RXWOHW
8QSOXJWKHGLVKZDVKHU
3XVKWKHFRUGEDFNLQWRLWVVWRUDJHORFDWLRQ
7XUQRIIWKHKRWZDWHU
5HOHDVHWKHZDWHUSUHVVXUHE\GHSUHVVLQJ
WKHSUHVVXUHUHOHDVHEXWWRQ
5HOHDVHWKH8QLFRXSOHIURPWKHIDXFHW
E\GHSUHVVLQJWKHFROODUDWWKHWRSRIWKH
8QLFRXSOHFRQQHFWRU
'UDLQH[FHVVZDWHUIURPWKHXQLFRXSOH
KRVHVVHHEHORZ3XVKWKHKRVHVEDFN
LQWRWKHLUVWRUDJHORFDWLRQ
&$87,217RSURWHFW\RXUVHOI
DQGWKHURRPIURPVHYHUHVSODVKLQJUHOLHYH
ZDWHUSUHVVXUHSULRUWRGLVFRQQHFWLQJWKH
XQLFRXSOH
&$87,217RSURWHFW\RXUVHOI
DQGWKHURRPIURPVHYHUHVSODVKLQJUHOLHYH
ZDWHUSUHVVXUHSULRUWRGLVFRQQHFWLQJWKH
XQLFRXSOH
%HIRUH2SHUDWLQJWKH'LVKZDVKHUWKH)LUVW7LPH
+RZWR'UDLQ([FHVV:DWHUIURP8QLFRXSOH+RVHV
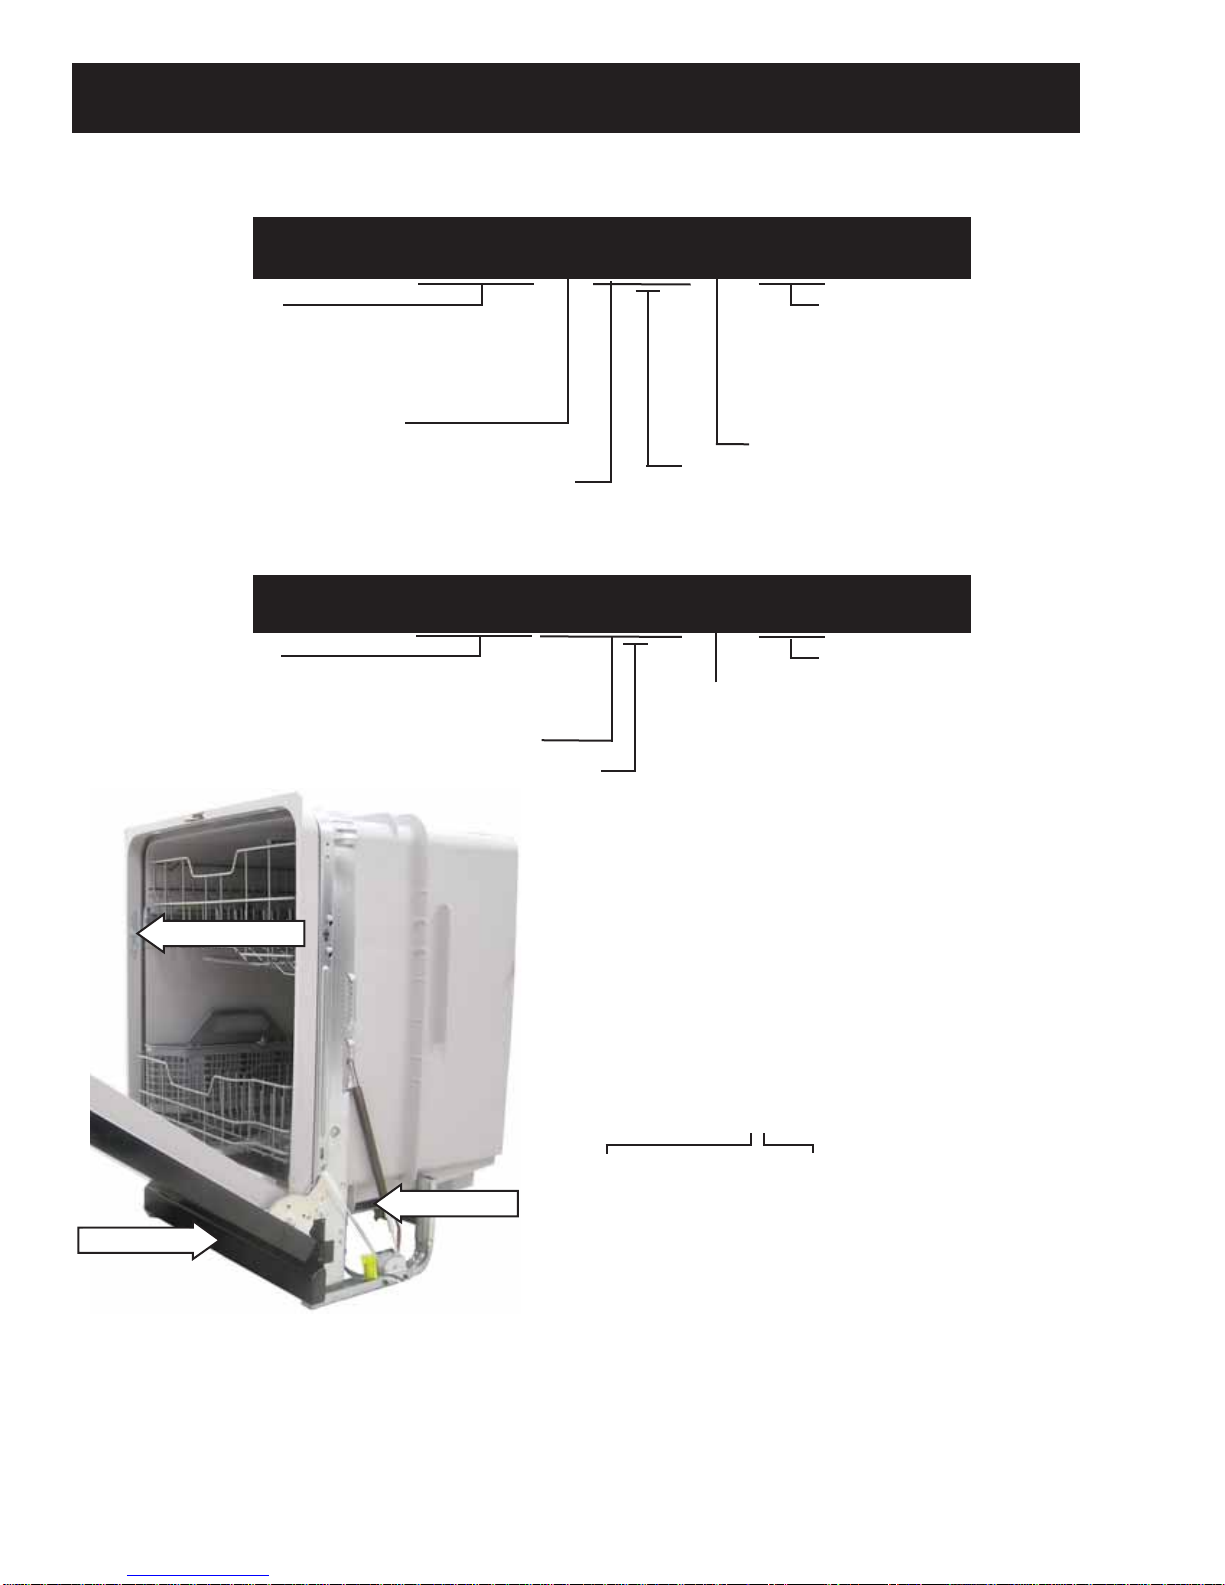
+RZWR&RQQHFWWKH8QLFRXSOH
+RZWR'LVFRQQHFWWKH'LVKZDVKHU
3UHVVXUHUHOHDVH
EXWWRQ

– 11 –
Cycles
Auto Hot Start:
Auto Hot Start is initiated by the control when it senses water temperature below 80°F. If the water is below
80°F after prewash, the unit will circulate for 1-5 minutes (depending on the cycle selected) and then drain
for 75 seconds. This procedure will repeat up to 4 times or until the water reaches 80°F.
Hot Start Enhancement:
Some models have a Hot Start option which enables or disables the Auto Hot Start.
Added Heat:
When Added Heat Enhancement is selected during Pots & Pans, Light, or China Crystal cycles, the control
will run the heating element and main circulation pump for an extra 15 minutes attempting to reach the
minimum operating temperature.
Heated Dry:
Heated Dry takes 34 minutes for the Normal cycle and 45 minutes for the Sani, Auto, Pots & Pans, and
China Crystal cycles. There is no heated dry for the Rinse cycle. During Heated Dry, the heater cycles at a
rate of 60 seconds on and 51 seconds off.
Cycle Explanations and Exceptions:
• Turbidity response is used during the Sani, Normal, and Auto cycles only.
• Pots & Pans, Light, China Crystal, and Rinse are timed cycles.
• Timed cycles can change depending on the water temperature. If the minimum temperature is not met,
an extended time will be added until the temperature is met or the time expires.
• Partial drain and fill algorithm is used on Normal and Auto cycles only.
• Auto Hot Start may cause the first prewash to repeat up to 4 times.
• Steam enhancement is shown on the cycle chart. Disabling steam will shorten the cycle time.
• If Steam is selected in Normal or Auto cycles, turbidity response will be ignored and cycle will default to
the heavy soil algorithm.
• Drain Overlap is a short period where both the wash and drain pumps run simultaneously as the
circulation cycle ends and draining begins.
• Drain Pause is a short period between the circulation cycle ending and starting the drain.
Turbidity Response
The turbidity response is measured in DC volts. 4-5 VDC will register light soil and a shorter wash cycle, while
0-2 VDC will register heavy soil and a longer wash cycle. Sani wash measures the turbidity response during
the third prewash cycle and adjusts the time based on those measurements. Normal wash measures the
turbidity response during the first prewash and the prewash before the main wash. If a clean response is
measured in the first prewash, the cycle will advance directly to the main wash with no drain or fill. If a clean
response is measured in the prewash before the main wash, the control will shorten the active heater time.

– 12 –
Sani Pots Light China Rinse Normal & Auto *7
Light Soil Heavy Soil Light Soil Heavy Soil With Added Heat
Pre-Wash Fill Time 63 sec 63 sec 63 sec 63 sec 63 sec
Circulation Time 1 min 4 min 3 min 2 min 1 min 5 min 1 min
Drain Time 75 sec 75 sec 75 sec 75 sec 7 sec 7 sec
Drain Overlap Time *310 sec 10 sec 10 sec 10 sec 0
Heater on Time 0 0 3 min 0 0
Min-Max Temp 80°F *180°F *180°F *1- 130°F 80°F *180°F *1 & *2
Pre-Wash Fill Time 63 sec 63 sec 63 sec 17 sec
Circulation Time 1 min 15 min 3 min 2 min
Drain Time 75 sec 75 sec 75 sec 7 sec
Drain Overlap Time *310 sec 10 sec 10 sec 0
Circulation to Drain Pause 0 0 0 0
Heater on Time 1 min 15 min 3 min 0
Min-Max Temp 130°F - 158°F 130°F max 0
Pre-Wash Fill Time 63 sec 63 sec 17 sec
Circulation Time 5-8 min 4 min 3 min
Drain Time 75 sec 75 sec 75 sec
Drain Overlap Time *310 sec 10 sec 0
Circulation to Drain Pause 15 sec
Heater on Time 5-8 min 4 min 0
Min-Max Temp 130°F - 158°F 158°F max 0
Steam *4Fill Time 63 sec 63 sec 63 sec 63 sec *6 63 sec 63 sec
Circulation Time 15 min 15 min 15 min 15 min 15 min 15 min
Drain Time 75 sec 75 sec 75 sec 75 sec 10 sec 10 sec
Drain Overlap Time *310 sec 10 sec 10 sec 10 sec 0 0
Heater on Time 15 min 15 min 15 min 15 min 15 min 15 min
Min-Max Temp 125°F - 130°F 125°F - 130°F 125°F - 130°F 0 125°F - 130°F 125°F - 130°F
Extend time *55 min 5 min 5 min 0 5 min 5 min
Steam *4Fill Time 63 sec 63 sec 63 sec 63 sec *6 21 sec 21 sec
Circulation Time 2 min 2 min 2 min 2 min 2 min 2 min
Drain Time 75 sec 75 sec 75 sec 75 sec 130-180 75 sec
Drain Overlap Time *310 sec 10 sec 10 sec 10 sec 0 0
Heater on Time 7 min 7 min 7 min 7 min 7 min 7 min
Min-Max Temp 130°F - 180°F 130°F - 180°F 130°F - 180°F 0 130°F - 180°F 130°F - 180°F
Pre-Wash Fill Time 63 sec 63 sec
Circulation Time 10 min 10 min
Drain Time 10 sec 10 sec
Heater on Time 10 min 10 min
Min-Max Temp 158°F max 158°F max
Detergent Cup Yes
Pre-Wash Fill Time 21 sec
Circulation Time 15 min
Drain Time 10 sec
Heater on Time 15 min
Min-Max Temp 125-158
Extend time *5 5 min
Main Wash Fill Time 63 sec 63 sec 63 sec 63 0 21 sec 21 sec
Circulation Time 5 min 40 min 10 min 18 min 12 min 30 min 30 min
Drain Time 75 sec 75 sec 75 sec 75 sec 75 sec
Drain Overlap Time *310 sec 10 sec 10 sec 10 sec 0
Drain Pause 0 0 0 0 15 sec
Heater on Time 5 min 40 min 10 min 18 min 27 min 30 min 12 min 30 min 30 min
Min-Max Temp 135°F - 158°F 158°F max 130°F - 130°F 0 120°F - 158°F
Detergent Cup Yes Yes Yes Yes No
Extend time *515 min 0 25 min 0 5 min
Post-Rinse Fill Time 63 sec 63 sec 63 sec 63 sec 63 sec
Circulation Time 5 min 5 min 3 min 2 min 3 min
Drain Time 75 sec 75 sec 75 sec 75 sec 11 sec
Drain Overlap Time *310 sec 10 sec 10 sec 10 sec 0
Heater on Time 5 min 5 min 3 min 2 min 0
Min-Max Temp 130°F - 158°F 158°F max 130°F max 0 0
Post Rinse Fill Time 63 sec 63 sec 63 sec 63 sec 23 sec
Circulation Time 5 min 5 min 3 min 2 min 8 min
Drain Time 75 sec 75 sec 75 sec 75 sec 11 sec
Drain Overlap Time *310 sec 10 sec 10 sec 10 sec 0
Heater on Time 5 min 5 min 3 min 2 min 8 min
Min-Max Temp 130°F - 158°F 158°F max 130°F max 0 130°F - 158°F
Extend time *5 5 min
Final Rinse Fill Time 63 sec 63 sec 63 sec 63 sec 63 sec 23 sec
Circulation Time 5 - 60 min 9 min 9 min 5 min 4 min 10 min
Drain Overlap Time *310 sec 10 sec 10 sec 10 sec 10 sec 0
Drain Pause 0 0 0 0 0 15sec
Drain Time 105 sec 105 sec 105 sec 105 sec 105 sec 105 sec
Heater On 5 - 60 min 9 min 9 min 0 0 5 min
Extend time *50 0 10 min 0 0 5 min
Rinse Aid Yes Yes Yes Yes No Yes
Min-Max Temp 158°F max 158°F max 130°F - 135°F 0 0 120°F - 158°F
Heated Dry Heat Dry Time 45 min 45 min 45 min 45 min 0 45 min
Notes *1 If minimum 80°F is not met, Auto Hot Start initiated - can repeat this cycle up to 4 times or until 80°F min temp is met
*2 If Auto Hot Start is initiated in Normal or Auto, the control will change to 63 second fills and 75 second drains up to 4 times to attempt to reach 80°F
*3 Drain Overlap Time: both wash and drain pumps on at same time
*4 Steam is an Option that will add segments to a cycle. If not selected, skip the 2 segments
*5 Extend times - heater and circulation pump are on
*6 When Steam is selected in Normal wash, the wash Algorithm defaults to Heavy Soil Cycle
*7 When Added Heat is selected with Normal or Auto, cycles are the same with Max Turbidity Algorithm defaulting to Heavy Soil Cycle
75 sec
0
15 sec
0
63 sec
Normal *6
0
0
80°F *1 & *2
17 sec
3 min
Segments
of Cycle
34 min
23 sec
6 min
0
15 sec
120°F - 158°F
Auto
63 sec
1 min
7 sec
0
7 min
11 sec
0
0
0
0
15 sec
120°F - 158°F
Yes
5 min
0
105 sec
5 min
5 min
Yes
62 sec
30 min
75 sec
0
80°F *1 & *2
17 sec
3 min
75 sec
2 min
15 sec
0
0
63 sec
15 min
10 sec
0
15 min
125°F - 130°F
5 min
21 sec
75 sec
75 sec
0
7 min
130°F - 180°F
63 sec
10 min
10 sec
10 min
158°F max
Yes
21 sec
45 min
23 sec
10 min
0
15 sec
0
15 sec
120°F - 158°F
No
5 min
120°F - 158°F
63 sec
3 min
11 sec
0
0
0
105 sec
5 min
5 min
Yes
Cycle Chart

– 13 –
Front View
Component Locator Views
Control Panel View
Insulation
Access Panel
(Continued next page)
Door Latch
Control Panel
Door Panel
Control Assembly

– 14 –
Interior View (Without Racks)
Detergent/Rinse Module Compartment View
Detergent/Rinse Module
(Continued next page)
Detergent Compartment
Compartment Lid
Rinse Agent Cap
Rinse Agent Outlet
Indicator Window
Inner Vent

– 15 –
Interior View of Basin (With Racks Removed) Left Side View (Insulation Removed)
Bottom View (Looking Up)
Spray Arm
Heating Element Fill Hose
Fill Funnel
Front
Back
Drain Pump
Tub TCO
Coarse Filter
Float Dome
Fine Filter
Hub Nut
Door Spring
Sump
Water Valve Motor
Turbidity Sensor
Heater
Flood Switch

– 16 –
Control Board Connector Locator View
CN680 - Model Select
CN700 - HMI Connector
CN100 - AC Power
CN500 - AC Load
CN600 - Turbidity Sensor
CN700
CN100 CN500
CN600 CN680

– 17 –
Dishwasher Components
Inner Door Panel (PermaTuf Tub Models)
The inner door panel on the PermaTuf tub models
must be removed to access the control board,
detergent/rinse module, control TCO, tactile switch,
door switch, pocket handle, vent, console, and lens.
To remove the inner door panel:
1. Remove the 8 Phillips-head screws from the
inner door.
2. Disconnect the 2 wires from the detergent/rinse
module.
(Continued next page)
Outer Door Panel (Stainless Steel Tub Models)
The outer door panel on the stainless steel tub
models must be removed to access the control
board, detergent/rinse module, control TCO, tactile
switch, door switch, vent, and lens.
To remove the outer door panel:
1. Remove the two 1/4-in. hex-head screws from
the bottom of the front door panel (one on each
side).
2. Remove the ten T-15 torx screws from the inner
door panel.
Caution: Carefully remove the outer door from the
inner door frame.

– 18 –
Control TCO
The control TCO is one shot with a trip temperature
of 280°F. If the control TCO trips, no voltage will be
supplied to the control or components. Look for
control or wire damage and replace as necessary.
To remove the control TCO:
1. Remove the inner door panel on PermaTuf tub
models or the outer door panel on stainless steel
tub models. (See Inner Door Panel (PermaTuf Tub
Models) orOuter Door Panel (Stainless Steel Tub
Models).)
2. Fold back the vinyl shield that covers the control
board cover.
Caution: The vinyl shield must cover the control
board cover before installing the inner door panel.
Vinyl Shield
3. Remove the single Phillips-head screw that
holds the control TCO to the control board cover.
3. Disconnect the 2 wires from the detergent/rinse
module.
(Continued next page)
Electrical Grade
Silicone Grease
Note: When replacing the control TCO, splice a new
thermostat into the harness using connectors and
procedures approved for damp/wet conditions.
Control Board
The control board is located under the cover
beneath the inner door panel.
To remove the control board:
1. Remove the control TCO. (See Control TCO.)
2. Detach the tape from the control board cover,
then pull the cover off the control board
housing.
Disconnect

– 19 –
Note: When removing or installing the control board
cover, remove or insert the lip under the console.
3. Disconnect the 4 wiring harnesses from the
control board.
4. Remove the single Phillips-head screw from the
center of the control board.
Note: When replacing the control board, transfer the
model select plug to the new board.
Disconnect Disconnect
Disconnect
Model Select Plug
Note: Be sure the insulator is placed on the console
before installing the control board.
Insulator
Lip
3. Remove the 2 Phillips-head screws that hold the
tactile switch to the console.
Note: The tactile switch buttons are keyed to fit in
the proper place on the silicone pad.
Tactile Switch
The tactile switch includes a silicone pad to protect
the switch from moisture. The buttons and silicone
pad come as an assembly.
To remove the tactile switch:
1. Disconnect the tactile switch wire harness from
the control board. (See Control Board.)
2. Disengage the switch wire harness tie from the
console.
Tactile Switch Buttons
Silicone Pad

– 20 –
Door Switch Assembly
The door switch assembly on PermaTuf tub models
consists of 2 switches activated by a spring-loaded
plunger. One door switch connects or disconnects
the line (hot) side of 120 VAC. The other switch
connects or disconnects the neutral side of 120 VAC.
On stainless steel tub models, there is only 1 switch
that connects or disconnects the line (hot) side of
120 VAC.
When the door is in the closed position, the door
latch presses and holds down the switch plunger on
the door switch assembly. This action holds the door
firmly against the seal with the contacts of the door
switches closed.
To remove the door switch assembly (PermaTuf
tub models):
1. Disconnect the power supply to the dishwasher.
2. Remove the inner door panel. (See Inner Door
Panel (PermaTuf Tub Models).)
3. Remove the 2 Phillips-head screws from the
door switch and remove the insulator.
Caution: The door switch insulator must be in place
when installing the door switch.
4. Remove the bracket from the door switch.
Insulator
Bracket
5. Disconnect the 2 wires connected to each door
switch. (1 switch not shown.)
Disconnect
Disconnect
To remove the door switch assembly (stainless
steel tub models):
1. Disconnect the power supply to the dishwasher.
2. Remove the outer door panel. (See Outer Door
Panel (Stainless Steel Tub Models).)
3. Disconnect the 2 wires from the door switch.
4. Remove the 3 Phillips-head screws from the
door switch.
Disconnect
Disconnect
This manual suits for next models
13
Table of contents
Other GEAppliances Dishwasher manuals

GEAppliances
GEAppliances ZBD1800 User manual

GEAppliances
GEAppliances GSD5300G Series User manual

GEAppliances
GEAppliances GSC470 User manual

GEAppliances
GEAppliances JCGB700EEJES User manual

GEAppliances
GEAppliances Dishwasher User manual

GEAppliances
GEAppliances GSD700 User manual

GEAppliances
GEAppliances EDW1500 Series User manual

GEAppliances
GEAppliances GSM507 User manual

GEAppliances
GEAppliances GSD5610 User manual

GEAppliances
GEAppliances PDW1860 User manual