Geckoplex EP-5 User manual

Owners Manual

Congratulations on your choice of the Geckoplex EP-5!
The development of the Geckoplex took many years. Throughout this
process as a constant dedication to create a pedal that maintained the
sound and feel of a vintage tape delay machine, hile also providing a
touch of the modern.
The monochrome art ork nods at the aesthetics of decades past, hile
nothing exemplifies the strive to preserve a vintage tape experience more
than the delay slider. Several 1960's-1970's era machines set the delay
time ith a linear slide control that physically moved a tape head along a
length of moving tape. The Geckoplex no brings back that same slide
control format to a modern device.
As far as the sound, everything possible as done to accurately simulate
the unique sonic characteristics of analog tape machines. The echoes are
nicely compressed, just as they ould be due to the effects of tape
saturation. The arp control allo s adding in varying amounts of tape
elements that cause echoes to degrade and “bloom” as they ould ith a
more orn-in machine. Finally, an analog preamp gain stage provides the
signal boost and po er to drive amps ith clarity, just as some older tape
delays are ell kno n for.
On top of the vintage sound and feel, the Geckoplex is also imbued ith
some more modern features. To name a fe , it comes complete ith a
tap-tempo ith selectable subdivisions, fully programmable presets,
expression pedal support, Sound on Sound looping, and separate et and
dry outputs, all packed in behind a simple and easy to use interface.
To ensure the highest quality, each Geckoplex is manufactured, tested,
and individually numbered by hand in Eugene, Oregon, USA. This
commitment to quality additionally extends to the end-user experience.
We truly hope you enjoy your Geckoplex as much as e did creating it,
and that it serves you ell for years to come. Ho ever, if for any reason
you aren't completely happy ith it, e ant to hear about it. If you totally
love it, e don't mind hearing that either.
Sincerely,
Riley McNiff
Gecko Pedals Founder, Designer, Builder
Introduction
2

1
# Description
1
DC IN is a po er jack for supplying DC po er from an AC/DC adapter.
Be careful that the polarity is correct (barrel center is negative, sleeve is
positive), and that the adapter can supply 9-12V and at least 300mA.
2
TAP is a switch jack for optionally connecting an external tap tempo
s itch. This jack requires an external momentary s itch box and a
standard mono guitar cable to connect it.
3
EXP is a jack for optionally connecting an external expression pedal.
This pedal can then be used for real-time control of the effect settings.
Requires a stereo guitar cable (TRS – Tip/Ring/Sleeve cable) and a
compatible expression pedal.
4IN is the input jack is for connecting input signal from an instrument
(guitar, keyboard, microphone, output from another pedal, etc.)
5
OUT WET is a jack for connecting the et output to other equipment,
such as an amp, recorder, or mixer. The WET output signal is a mix
of the dry input from the instrument mixed ith the et effects
generated by the Geckoplex.
In a single amp setup, this is the output that should be used.
6
OUT DRY is the same as the OUT WET jack except the output is the
dry signal only, without effects. It is essentially an input passthrough
except that it is buffered and has the preamp gain applied.
TRS
3
2 3 4 5 6
Top Panel

# Description
1 GAIN adjusts the preamp gain of the input signal from the IN jack.
2 Level Meter displays the current audio signal level.
3 DELAY adjusts the delay time bet een echoes.
4 Effects ontrols adjusts the effect settings.
5 ON s itch toggles the effect on or off.
6 Delay Flasher flashes the current time bet een echoes.
7PRESET s itch toggles bet een presets. Hold for 10 seconds to
begin programming (See the Preset Programming Page).
8TRAILS s itch toggles hether or not trailing effects are heard hen
the unit is s itched off.
9 SUBDIV s itch adjusts the tap-tempo subdivision factor.
10 TAP s itch is a tap-tempo. It sets the echo delay time by tapping
repeatedly at the desired tempo.
4
Front Panel

GAIN controls the analog input preamp gain. The preamp is al ays on
even hen the ON s itch is toggled off in order to maintain a constant
signal level. The setting can affect the echo saturation some hat, but for
the most part this control has little influence on the effects.
The 1:1 gain position is ith the knob around 11:00, or roughly pointing
to ard the G in GAIN. Above this point the signal ill be amplified up to a
maximum of +11dB. The gain should be lo ered if other pedals in the
chain don't function properly ith a boosted signal, or if the red “peak”
light on the level meter is being reached.
ON toggles the effect on and off. While off, any active preset or tap tempo
setting ill be maintained, but no delay or reverb effects are added to the
output.
PRESET cycles bet een the three presets. Presets can be activated ith
the effect turned off to avoid hearing audible changes during selection.
For further preset information and programming instructions, please refer
to the dedicated “Presets” page of this manual.
TAP is a tap tempo s itch for setting the delay ith foot taps. A single tap
ill activate it and lock the tempo to the current delay slider setting, hich
is useful to lock the delay prior to activating presets that ould other ise
change it. Multiple taps ill activate it and set the delay time to the
interval bet een taps. Taps should be done at quarter-note intervals.
A single tap hile active ill deactivate the tap tempo.
Pressing and holding the TAP s itch ill temporarily ramp the REPEATS
control up past the runa ay feedback level until it is released.
The SUBDIVISION toggle s itch is a 3-position s itch that is part of the
TAP Tempo. It controls ho the delay time is set relative to the tap
frequency of the TAP foot s itch.
Quarter Note: The delay time is set the same as the tap rate, causing
echoes to come back at quarter-note intervals.
Dotted Eighth Note (or 3 sixteenth notes): The delay time is set to
¾ of the tap rate. This produces echoes that are one sixteenth note faster
than the tap rate. When the instrument is played at eighth notes (or t o
notes per the tap rate), echoes ill come back in-bet een notes played.
Eighth Note: The delay time is set to ½ of the tap rate. Echoes ill
repeat at a rate t ice as fast as the taps.
The TRAILS toggle s itch sets hether or not trailing echoes and reverb
are heard after the effect is turned off by the ON s itch.
When enabled, the trailing effects ill gradually fade out hen turned off,
but no ne effects ill be generated from instrument input.
When disabled, the trailing effects ill stop immediately hen turned off.
Gain and Switches
5

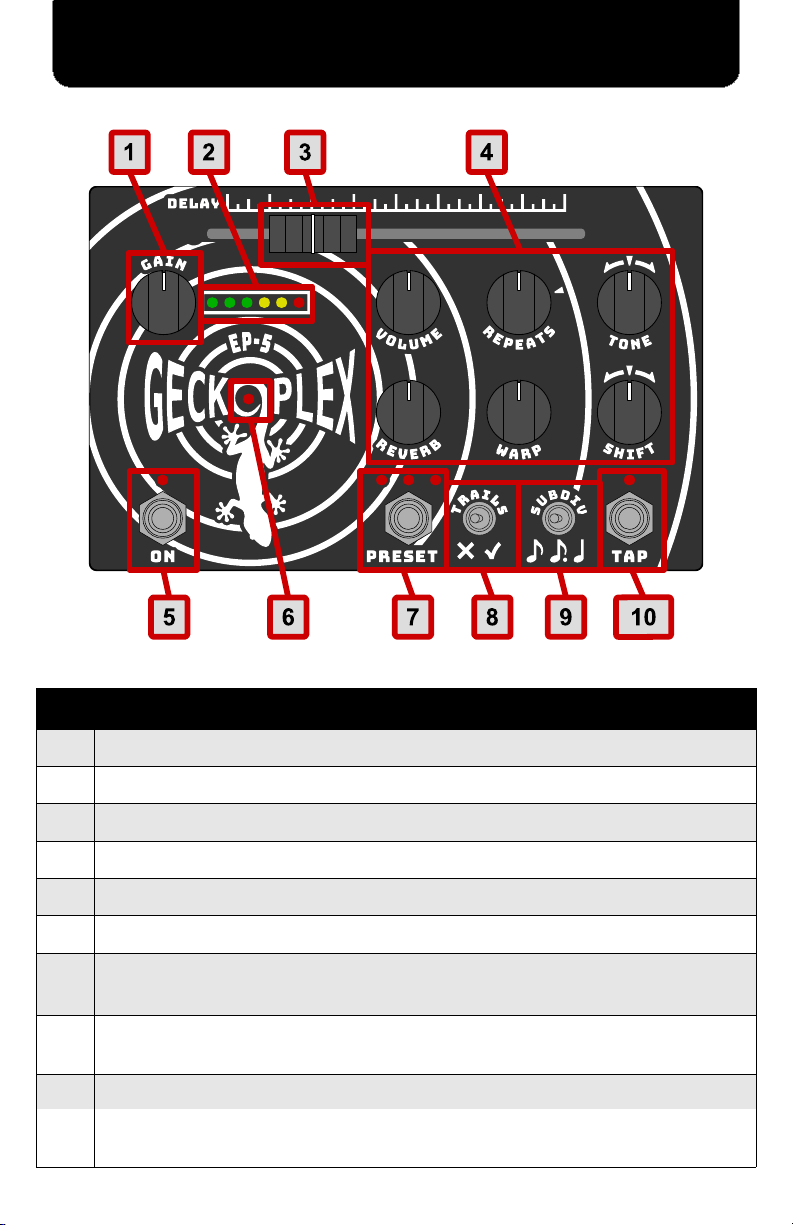
The DELAY slider controls the time bet een echoes, bet een a minimum of 50 milliseconds
at the far left, and a maximum of 2 seconds at the far right.
This control is motorized. Its position ill automatically move hen using the TAP Tempo
s itch to set the delay, and also hen presets are activated and change the delay time.
VOLUME controls the output volume of the echoes. With the knob turned all
the ay to the left, echoes ill be silenced. With the knob turned all the ay
to the right, the initial echo volume ill be louder than the input volume.
NOTE: This does not affect the Reverb output volume. Reverb is controlled
independently ith its o n dedicated knob.
REPEATS controls ho much echoes ill continue to repeat, fading more
quickly the more the knob is turned to the left.
The marker at about 2 O'Clock indicates the runa ay feedback point, or
“self-oscillation point”. With the knob turned clock ise past this marker, the
repeating echoes ill gro in volume rather than fade.
TONE controls the Bass/Treble tone of the echoes.
The marker indicates the center neutral point. With the knob
pointing straight up, the echo sound ill be unchanged.
With the knob to the left of of center, the echoes ill sound armer, ith
more bass and less treble. With the knob to the right of center, the echoes
ill sound brighter, ill more treble and less bass.
REVERB adds a reverberation effect, making the output sound like the
instrument is being played inside of an echoing chamber or large hall.
This effect is controlled separately from the echoes, and a reverb-only effect
is possible by turning up the REVERB hile turning the VOLUME knob all
the ay do n.
WARP controls ho tape-like the sonic qualities of the echoes are.
With the knob turned all the ay do n to the left, echoes ill sound clean
and pristine, able to repeat nearly endlessly ithout changing much.
With the knob bet een 9:00 and the midpoint, echoes ill have the sonic
qualities of those produced by a ell-tuned tape machine, ith each ne
echo blooming into a more “ ashed-out” sound.
With the knob up past the midpoint, the echoes ill begin sounding as they
ould sound coming from a tape machine in need of a tune-up, being more
avering, fluttering, and gritty,
SHIFT controls ho much delay “shift” is applied hen a note is played. This
unique effect mimics the user shifting the delay slider back and forth at the
same time that a note is played, causing the echoes to “shift” in pitch do n
and back up, or up and back do n, depending on the knob direction.
The marker indicates the center neutral point here no shift occurs.
Ho far the knob is moved a ay from center determines ho much the delay
is shifted left or right hen a note is played.
6
Effect Control Knobs

The Geckoplex EP-5 has 3 fully programmable presets hich can be
cycled through by pressing the PRESET s itch. The number of LEDs
lit above the s itch indicates hich preset is currently active.
Each preset can be used ith an expression pedal to make it variable.
This makes it possible to control any set of controls over any desired
range in real-time by simple pedal adjustments. To achieve this, t o
sets of control positions are stored during programming: one for the
expression pedal heel side and one for the toe side.
Presets do not require an expression pedal to be used. When no
expression pedal is plugged in, the preset ill operate in “fixed” mode,
ith only the heel side settings being used.
Expression Pedal ompatibility:
Any compatible expression pedal ill require the use of a stereo cable.
This is sometimes also called a TRS cable, referring to the three Tip,
Ring, and Sleeve conductors on the connector.
The Geckoplex should be compatible ith any passive expression
pedal ired so that the signal comes in on the tip conductor of the
cable. Any pedals from BOSS, Dunlop, Moog, or Roland should ork.
The Mission Engineering EP-1 and SP-1 pedals are also compatible.
Pedals ired any other ay are incompatible and should be avoided.
Pedals from Behringer, Korg, and Zoom are all incompatible. Wah and
volume pedals that use a mono cable are also incompatible.
Expression Pedal Positions:
This manual refers to the toe side and heel side positions of an
expression pedal. These are the limits of the pedal on either end. The
heel side position is all the ay back, hile the toe side is all the ay
for ard:
Heel Side position Toe Side position
7
Presets

This page describes the procedure for programming a preset.
Important Notes:
●Programming does not require an expression pedal to be plugged in, and if
one is it ill not affect the the programming process in any ay.
●The input GAIN knob and toggle s itches are not controlled by presets. The
positions for these controls ill not be stored or controlled by a preset.
Switches in Programming Mode:
All of the foot s itches have an alternate function during preset programming.
These functions are as follo s:
●ON ill AN EL programming mode and leave the preset unchanged.
●PRESET ill STORE the settings in steps 4 and 6.
●TAP ill SKIP storing the settings in steps 4 and 6, leaving that side of the
settings as they ere. This is very useful hen re-programming a preset to
fine-tune it at just one end of the expression pedal, allo ing changes to be
made ithout moving the controls t ice.
Programming Steps:
Follo the steps in the table belo to program a preset.
Step Action
1Activate the preset to be programmed using the PRESET s itch.
2Press and hold the PRESET s itch for 4 seconds to enter
programming mode. The active preset LED ill begin to flash.
3
Set the effect knobs and the delay slider to the desired settings for
this preset. Note that if an expression pedal is used, these initial
settings ill be for the heel side position of the expression pedal.
Other ise, ithout an expression pedal, these ill be the fixed-mode
settings used hen the preset is activated.
4Press the PRESET s itch to store the first set of control settings.
The active preset LED ill no begin flashing t ice.
5
If an expression pedal ill never be used ith this preset, skip to
STEP 6, as there is no need to store another set of control positions.
Other ise, set the effect knobs and the delay slider to their desired
positions for the toe side of the expression pedal and proceed to
STEP 6.
6
Press the PRESET s itch again to store the preset to memory and
exit programming mode. The active preset LED ill flash quickly
for one second to indicate that the preset has been stored,
follo ed by a return to normal operation ith the ne ly
programmed preset activated.
8
Preset Progra ing

9
Sound on Sound
The Geckoplex includes a Sound on Sound (SOS) mode that allo s looping
playback of up to 40 seconds of audio.
Overview:
●Press and hold the ON s itch for 2 seconds to toggle in or out of SOS mode.
The LED ill slo ly pulse hen SOS mode is enabled.
●In SOS mode, create a loop by pressing the PRESET s itch to start
recording. Press it again to stop recording and begin playback.
●The TAP s itch toggles overdub on or off. While overdub is on, all ne
input ill be added to the loop.
●A short press of the ON s itch ill pause or unpause loop playback.
●An expression pedal ill control the loop volume if one is connected.
●The REVERB control is independent. Reverb effects are added after
playback instead of being recorded to the loop. This allo s on-the-fly
adjustments to the reverb during loop playback.
Switches in Sound on Sound Mode:
Each of the three foot s itches has an alternate function in SOS mode, as
described in the table belo .
Note: Presets and tap-tempo are not available in SOS mode.
• With the unit on, hold for 2 seconds to toggle SOS mode on or off.
• A fast double-press ill disable SOS mode and toggle the unit fully off.
• During loop playback, press to PAUSE or UNPAUSE playback. The
LED ill pulse slo ly hen unpaused and quickly hen paused.
• Press to START recording a ne loop. The 3 LEDs ill flash quickly all
together to indicate that a loop is being recorded.
• Press again to STOP recording and begin playback. The 3 LEDs ill
pulse slo ly in a ave to indicate loop playback.
• During loop playback, pressing this again ill abandon the current loop
and begin recording a ne loop.
• Press to toggle OVERDUB recording. Overdub defaults to enabled
hen SOS mode becomes active.
• When enabled, the LED ill be illuminated solidly. Ne input ill be
added to the loop recording and ill repeat as part of the loop. The
original loop ill slightly degrade ith each repeat hile overdub is
enabled, eventually fading completely a ay.
• When disabled, the LED ill be off. Ne input ill not be added to the
loop, and the original loop ill repeat endlessly ithout degradation.
• If an expression pedal is connected, it ill be used to control the loop
volume during playback. If not, the loop ill al ays play at full volume.
• At the heel side, the loop ill be muted.
• At the toe side, the loop ill play at full volume.

Slapback
A single echo ill be heard for each note
played. With very short delay times this
produces a thicker chorus-like sound.
With longer delay times this can double
each note, giving the impression that it
as played t ice.
Spacious Ambiance
Reverb combined ith very fast echoes
(delay slider all the ay to the left)
produce the spacious sound of a large,
reverberant, echoing room.
Warm Vintage Tape Echo
With the TONE control to ard the bass
side, the echoes sound arm and lo-fi.
With the WARP control up half ay, a
touch of tape avering, fluttering, and dirt
are added in for a detuned vintage sound.
The Mothership Landing
This is a pure science-fiction alien
dreamscape. Lots of REVERB creates a
spacious feel. High REPEATS and SHIFT
create almost never-ending t isted
echoes trailing off into the treble end of the
TONE spectrum.
10
Exa ple Settings

11
Troubleshooting
Issue Solution
Unit does not po er on
●Ensure that the po er supply has center
negative polarity and can supply at least
300mA of current at 9-12V.
●Check that the outlet or po er strip that
the supply is plugged into is live.
●Try a second po er supply to ensure that
the first is not faulty.
Presets do not set the delay
time as expected hen
activated
Ensure that the tap tempo is disabled. An
active tap-tempo ill al ays override the
preset delay setting.
No effects are heard at the
output, only the instrument
sound.
●Ensure that the unit is enabled and that
the light is on above the ON s itch. No
effects are heard hile disabled.
●Ensure the output cable is plugged into
the OUT WET jack. If the OUT DRY jack
is used instead only the dry signal ith no
effects added ill be heard.
No output sound
●Ensure that the output cable Is fully
plugged into one of the OUT jacks.
●Ensure that the GAIN knob is turned up
high enough to provide useful volume.
●Ensure that there is not a iring problem
ith signal coming from the instrument or
other upstream equipment.
●Ensure that all other do nstream
equipment and amps are turned on and
functioning correctly.
Loop playback is not heard
in Sound on Sound mode
If an expression pedal is connected, it ill
control the loop volume in SOS mode.
Ensure that the expression pedal is not
muting the loop.
User becomes speechless or
enters an unresponsive state
of amazement
Sit do n, maybe grab a cold beverage, and
focus on breathing as the full magnificence
of the Geckoplex settles in.
Also, congratulate yourself for reading all
the ay to the end of this manual.

geckopedals.com
eck edal
Other manuals for EP-5
1
Table of contents
Other Geckoplex Music Pedal manuals
Popular Music Pedal manuals by other brands

Champion Leccy
Champion Leccy The Woozy manual

IK Multimedia
IK Multimedia Z-TONE DI user manual

FuzzDog
FuzzDog KlonBuffer V3 quick start guide

Johnson Amplification
Johnson Amplification J12 user guide

Hall & Collins
Hall & Collins signature echo Owner's instructions

Carl Martin
Carl Martin DeLayla XL manual