GEM RP60 User manual

OWNER’S MANUAL
English

The information in this publication has been carefully prepared and checked. The
manufacturers however decline all liability for eventual errors. All rights are reserved.
Thispublicationmaynotbecopied,photocopiedorreproducedinpartorinwholewithout
priorwrittenconsentfromGeneralmusicS.p.A. Generalmusicreservestherighttoapply
anyaesthetic,designorfunctionmodificationsitconsidersnecessarytoanyofitsproducts
without prior notice. Generalmusic declines all liability for damage to property or
persons resulting from improper use of the instrument.
© 1999 Generalmusic S.p.A. All rights reserved.
General safety instructions
Power source
• Be sure that your local AC main voltage matches the voltage specified on the name plate before connecting to the mains.
• DC power cannot be used to power this instrument.
Handling the power cord
• Never touch the power cord or its plug with wet hands.
• Never pull on the cord to remove it from the wall socket, always pull the plug.
• Never forcibly bend the power cord.
• If the power cord is scarred, cut or broken, or has a bad contact, it will be a potential fire hazard or source of serious
electric shock. NEVER use a damaged power cord; have it replaced by a qualified technician.
If water gets into the instrument
• Remove the power cord from the wall socket at once, and contact the store where the unit was purchased.
• The top surface of your instrument should never be used as a shelf for flower vases and other containers which hold
liquids.
Metal items etc. inside the unit
• Do not permit metal items or other materials to fall inside the unit.
Metal items may result in electric shock or damage.
• Be especially careful with regards to this point when children are near the unit. They should be warned never to try to put
anything inside, and never to slide a hand into the unit while you or other persons are playing.
• If articles do fall inside, remove the power cord from the wall socket at once and, if necessary, contact the store where the
unit was purchased.
• As a general precaution, never open the unit and touch or tamper with the internal circuitry.
If the instrument plays in an abnormal way
• Turn off the power immediately, remove the power cord from the main outlet and contact the store where it was pur-
chased.
• Discontinue using the unit at once. Failure to do so may result in additional damage or other unexpected damage or
accident.
General user maintenance
• Clean the cabinet and keys of your instrument using a soft, clean, slightly damp cloth and polish with a soft, dry cloth.
• Never use industrial cleaners, detergents, abrasive cleansers, waxes, solvents or polishes as they may damage the instru-
ment finish.
• Always turn off the power supply after use and never turn the unit on and off repeatedly in quick succession as this places
an undue load on the electronic components.

i
Contents
Introduction 1
Instrument Overview 2
Rear panel 3
Power switch and Headphones 4
Turn the instrument on 4
Adjust the overall volume 4
Headphone jacks 4
Pedal Connection 4
Listen to the Demo song 4
The RP60/70 Presets 5
The Functions of the RP60/70 6
Touch sensitivity 7
Transpose 8
Tune 9
MIDI Channel 10
Midi Local 11
Midi Common channel 12
About MIDI 13
The MIDI Ports 13
MIDI Channels 13
MIDI Common 13
The RP60/70 MIDI Sound Banks 13
MIDI messages transmitted & received 14
MIDI Applications 15
RP60/70 as a MIDI controlling device 15
RP60/70 as a Slave device 15
Midi Sequencer recording 15
Panel Reset 16
Technical specifications RP60/70 18
Technology 19
Damper physical model 19
Index 20
Appendix

ii

1
Introduction
ThankyouforpurchasingthenewGEMRP60/RP70,thelatestDigitalPianos
belonging to the prestigious Real Piano Series by Generalmusic.
RP60/70 features the same sound characteristics as the higher end sister
models,butwithacontrolpanelsituatedontheleftkeyblockconsistingofjust
4 elements to reduce user interventions to the bare minimum.
RP60/70 combines advanced technology, reliable high quality componentry
and an easy-to-use interface to produce the unique Real Piano sound. With
its32notepolyphonyand88note,weightedHammerActionkeyboard,RP60/
70 is the modern, economical answer to all home piano playing.
RP60/70isveryeasytouse,buttomakethemostoftheinstrument’sfeatures,
youarerecommendedtoconsultthismanualwheneveryouarenotsurewhat
to do.
Most important, of course, is how you treat your RP60/70. Please take time
to read the General Safety Instructions to guarantee a long and trouble free
use of your instrument.

2
Instrument Overview
1. P
OWER
O
N
/O
FF
Press to turn the instrument on and off.
2. V
OLUME
Control knob to regulate the general volume of the instrument.
3. D
ATA
m
/
n
Use these buttons to select Presets (single, layer or split sound
combinations). Pressbothbuttonsatthesametimetotriggerthe
DEMO song.
InFunctionmode, the Data
m
/
n
buttonschange the parameter
statusofthecurrentfunction. The functions are selected withthe
last six notes of the highest octave of the keyboard.
4. G
RAND
P
IANO
Pressthisbuttonto select theGrandPianoPresetwhich instantly
recalls the GrandPiano sound across the entire keyboard.
5. F
UNCTION
KEYS
Notes E7-C8 of the highest octave are dedicated to the selection
of the RP60/70 functions. The function parameters are selected
with the Data
m
/
n
buttons while holding down a function key.
6. H
EADPHONES
Two Headphone jacks to connect headphones.
7. P
EDALS
Soft and Damper pedals. The cable from the pedal assembly
should be plugged into the rear panel PEDALS connector.
8. C
ONSOLE
The RP60/70 rests on a console which requires assembling.
Refer to the separate mounting instructions.
6
1
2
3
5
7 8
4

3
Rear panel
1. P
EDALS
Thepedalgroupconsistingoftwopedals(SoftandDamper)
should be plugged into this connector.
2. MIDI I
N
/O
UT
Theseportsallowtheinstrumenttobeconnectedtoother
MIDI devices.
3. I
NPUT
You can use these two inputs to connect another instru-
ment to the RP60/70. The output of the other instrument
willbemixedwiththemainsignaloftheRP60/70andsent
to the Output, Speaker and Headphone jacks. If you are
connecting a mono signal (e.g. a microphone) then you
should use only the Right/Mono jack.
4. O
UTPUT
These two stereo outputs are used to connect the instru-
menttoanotheramplifier,mixerorrecordingdevice. Ifyou
areconnectingtomonoequipment(e.g.aguitaramplifier)
then you should use only the Right/Mono jack.
5. M
AINS
INPUT
Connectthe suppliedpowercordtothemainssocket and
the other end to a suitable wall outlet. Make sure that the
mainssupplymatchesthevoltageindicatedontheinstru-
ment’s identification tag.
21 34 5

4
Playing the RP60/70
Turn the instrument on
1. To turn the RP60/70 on, press the ON/OFF switch located on the left
keyblock.
After a short period, the instrument is ready to play the Grand Piano
preset. The LED of the Grand Piano Preset button will be on as an
indication that the instrument is on.
In this power up condition, you will be able to play a piano sound
(GrandPiano) across the entire keyboard without carrying out other
operations.
Adjust the overall volume
2. Use the VOLUME control knob to adjust the overall volume level.
Clockwise rotation of the VOLUME control knob increases the overall
volume and counter-clockwise rotation decreases it.
Headphone jacks
Theheadphonejacksarelocatedattheextremeleftsideoftherailwhichruns
beneath the keyboard.
Pluggingasetofheadphones into the left jackexcludestheinternalspeakers
toallowyoutoplayin totalsilencewithoutdisturbingothers inthesameroom.
Plugging into the right jack does not exclude the internal speakers.
UsetheVolumecontrolontheleftkeyblocktoadjusttheHeadphonesvolume.
Pedal Connection
TheRP60/70issuppliedwithatwinpedalassembly,consistingoftheSoftand
Damper pedals. Make sure that the cable from the pedal assembly is
connected to the Pedals connector on the rear connections panel.
Soft: The Soft pedal (left) is a switch control pedal (On/Off) which
affectsthetimbreoftheinstrumentsuchthatitplayssofter,allowingyou
to continue using the same playing style at a lower volume.
Damper: The Damper pedal (right) applies the Sustain effect to all
notesreleased. Ifyoureleasea note after depressingtheDamper,the
note will proceed towards its natural decay according to the type of
sound played. The Damper is particularly effective with Piano type
sounds.
Listen to the Demo song
The RP60/70 contains a demonstration recording of the internal sounds.
1 Press both the DATA mand nbuttons at the same time.
The Demo song will start to play instantly. When it reaches the end, it
will start from the beginning and repeats continually until stopped.
2 Tostoptheplaybackatanypoint,pressbothDATAm/nbuttonsatthe
sametime.
You can also use the Grand Piano Preset button to stop the Demo.
LED on
SOFT DAMPER

5
The RP60/70 Presets
TheRP60/70contains32InternalPresets,consistingofSingle,
Layered and Split sound combinations.
Formodel RP70,each soundcombination recallsan appropri-
ate configuration of effects (Reverb and Chorus) together with
Volume and Balance settings.
FormodelRP60,aconfigurationofeffects(ReverbandChorus)
is recalled for the Grand Piano Preset only; for all other sound
combinations recalled by the Presets, the Reverb and Chorus
configurations can be activated by pressing both the SOUND/
DATA
m
/
n
buttons at the same time after powering up.
ThetableshownoppositeliststheRP60/70Presets. Aftereach
name,thetypeofPresetisindicatedinbrackets: “S”forSingle,
“L” for Layer and “Sp” for Split.
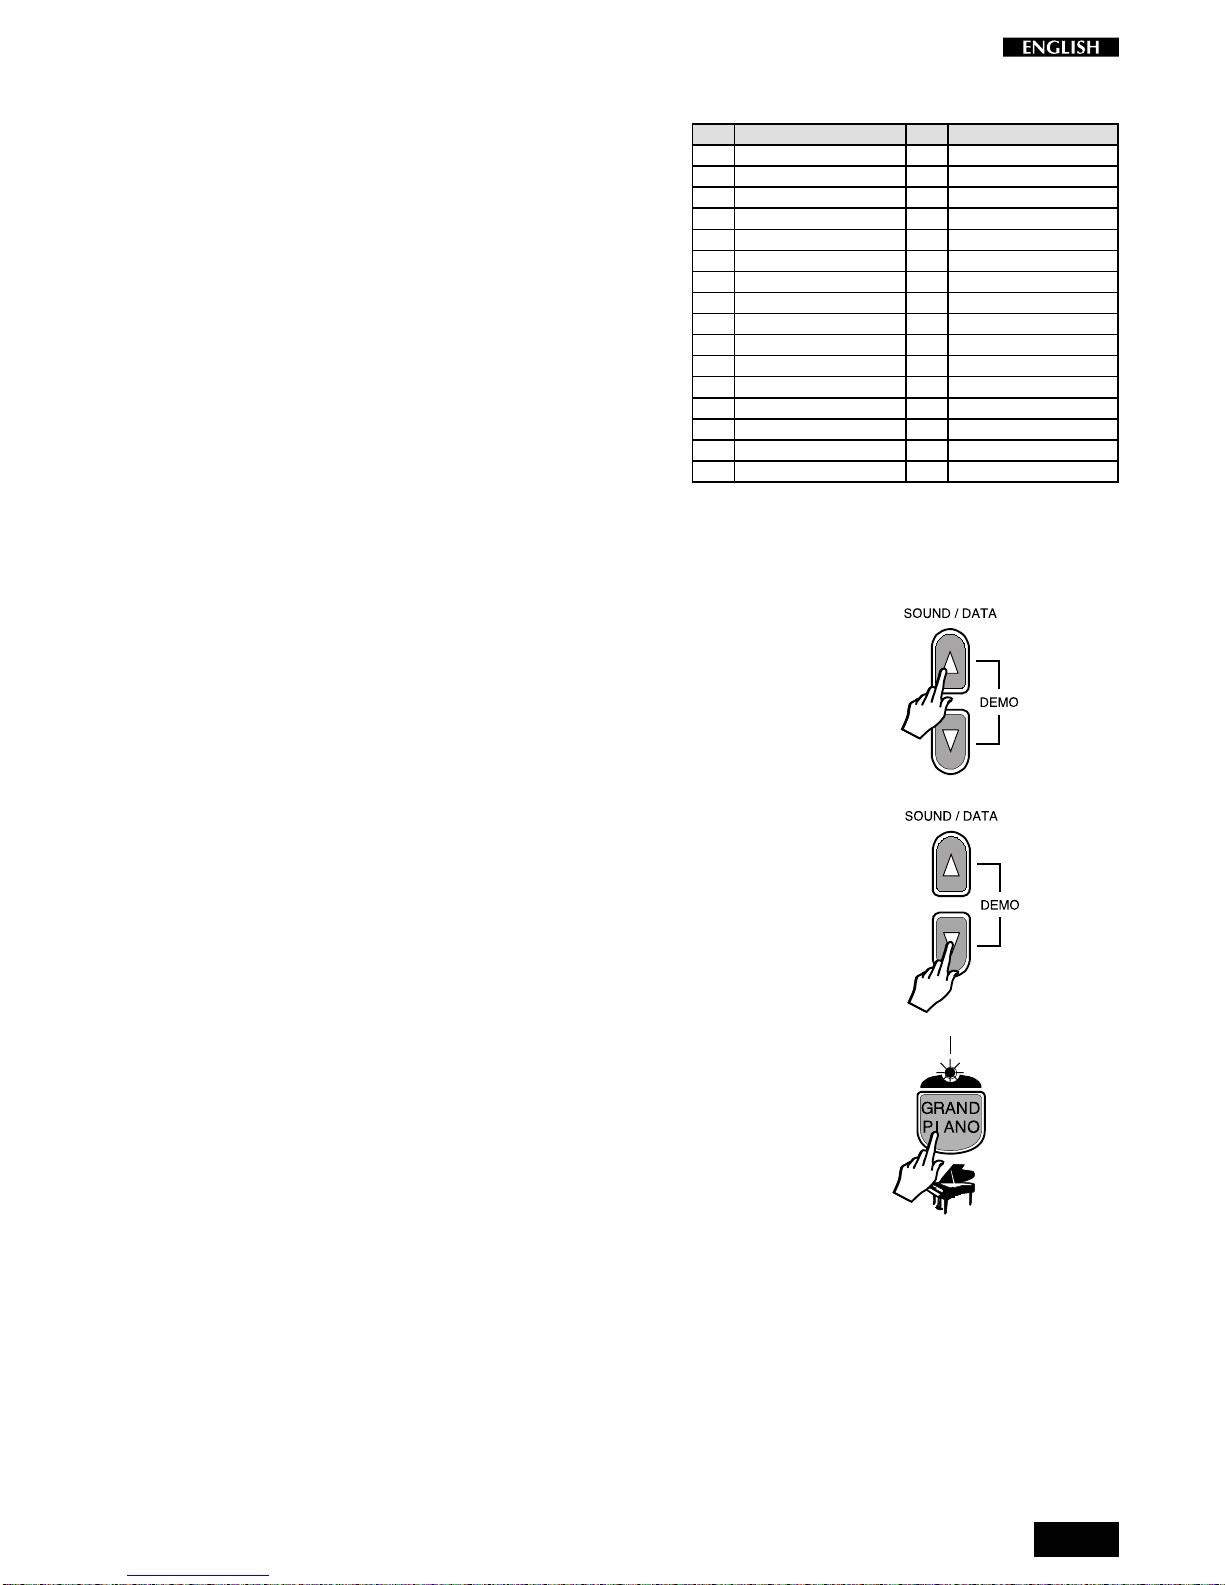
Usingthe SOUND/DATA
m
/
n
buttons, itis possible to select
the RP60/70 Presets sequentially.
1. After turning the RP60/70 on, press the DATA mbutton.
YouwillrecallthefirstPreset,calledStagePianowhichplaysacrossthe
entire keyboard.
2. Press the DATA mbutton again to recall the Preset,” Rock Piano”.
Every time you press the DATA
m
button, you will select the Presets
in increasing numerical order. When you reach the last Preset on the
list, Church/Choir, pressing the Data
m
button will have no effect.
3. Press the DATA nbutton.
Ifyou started withthePreset RockPianoselected instep2 above, you
will return to the previous Preset “Stage Piano”.
Every time you press the DATA
n
button, you will select the Presets
in decreasing numerical order.
Once you select the first preset, “Stage Piano”, pressing the Data
n
button will have no effect.
4. TocancelthecurrentPresetand returntotheGrandPianoPreset,press
theGrand Piano button.
The Grand Piano button will always return to the Grand Piano Preset
active across the entire keyboard.
LED on
N
°
Name N
°
Name
1. Stage Piano (S) 17. Harpsi/Strings (L)
2. Rock Piano (S) 18. Vibes 2 (Sp)
3. Rhodex (S) 19. Rock Piano/Pad (L)
4. Hard Rhodex (S) 20. Rhodex Pad (L)
5. Wurtlitz (S) 21. FM Piano Stage (L)
6. FM Piano (S) 22. Strings/Choir (L)
7. El. Glock Piano (L) 23. Piano/Choir (L)
8. Harpsi (S) 24. Stage Piano/Poly (L)
9. Vibes 1 (S) 25. Rock Piano/Poly (L)
10. Piano/Strings (L) 26. Jazz Organ 1 (S)
11. Stage Piano/Strings (L) 27. Pop Organ (S)
12. Stage Piano/Bass (Sp) 28. Theatre Organ (S)
13. Piano/Bass (Sp) 29. Church Organ (L)
14. Rhodex/Ride (Sp) 30. Jazz Organ 2 (Sp)
15. FM Pad (L) 31. Organ/Bass (Sp)
16. FM/El.Bass (Sp) 32. Church/Choir (L)

6
The Functions of the RP60/70
RP60/70features6functionswhichaffecttheinstrumentinvariousways. The
Functions are activated using the last 6 notes of the highest octave of the
keyboard. To activate a function and modify its value, hold down the
corresponding key and press the DATA
m
/
n
buttons.
The functions and corresponding notes are:
T
OUCH
(E7) : changes the keyboard’s touch sensitivity (response to
changes in the key-strike velocity);
T
RANSPOSE
(F7) : changes the instrument’s overall pitch;
T
UNE
(G7) : fine tunes the instrument;
M
IDI
C
H
. (A7) : sets the instrument’s MIDI Channel (for MIDI setups);
M
IDI
L
OCAL
(B7) : sets the instrument for MIDI Local operation (for MIDI
setups). Local disconnects the RP60/70 sound genera-
tion.
M
IDI
C
OMMON
(C8) : sets the instrument’s MIDI Common channel (for MIDI
setups). TheCommonchannelisusefultocontrolanother
MIDI device which has automatic arrangements.
E7 F7 G7 A7 B7 C8

7
Touch sensitivity
IfthekeyboardofyourRP60/70 istoo“hard”or“soft”,youmaywanttomodify
the touch sensitivity. Your RP60/70 has a touch sensitive keyboard; in other
words,thekeyboardbehavesjustasinatraditionalpiano:theharderyouplay,
the louder the sound.
You can choose from three different velocity curves.
SOFT, NORMAL, HARD
The default status of the instrument corresponds to the NORMAL setting.
1. Press and hold the TOUCH function key (E7) then press the DATA m
buttontoselecttheSOFTcurve,ortheDATAnbuttontoselecttheHARD
curve.
Pressing either button, the instrument automatically plays a reference
noteCwithanintensitycorrespondingtothecurrentvelocitysetting. In
this case, the current setting is NORMAL (default) and the reference
note C will play with a medium intensity.
2. Ifyou press theDATAmbuttona secondtime,youwill selecttheSOFT
velocity curve, identified by the reference note C which will play with a
greaterintensity.
The SOFT setting corresponds to the most sensitive keyboard re-
sponse which permits maximum sound levels with a light touch.
3. If,insteadofDataminstep2,youpresstheDATAnbuttonasecond
time,youwillselecttheHARDvelocitycurve,identifiedbythereference
note C which will play with less intensity.
TheHARDsettingcorrespondstoanotsosensitivekeyboardresponse
which requires a heavier touch to obtain maximum sound levels.
4. Release the Touch function key, (E7), to retain the new setting.
ThecurrentTouchsettingwillremainmemorizedevenafterturningthe
instrument off. To restore to the Normal setting, see step 5 below.
From Hard to Soft
If you press the DATA
m
button when the current setting is HARD, as
instep3,pressingtheDATA
m
buttononcewillplaythereferencenote
ofthecurrentsetting,pressingasecondtimewillselectNORMAL,then
pressing a third time will select SOFT. In this case, you will hear the
reference note play with three different intensities (high, medium and
low).
From Soft to Hard
Similarly, if you press the DATA
n
button when the current setting is
SOFT, as in step 2, pressing the DATA
n
once will play the reference
noteofthecurrentsetting,pressingasecondtimewillselectNORMAL,
then pressing a third time will select HARD. In this case, you will hear
thereferencenoteplaywiththreedifferentintensities(low,mediumand
high).
5. TorestoretheNORMALsetting,holddowntheTouchkey,(E7),thenpress
both Data m/nbuttons at the same time.
Thereference notewill play with a medium intensity asconfirmation of
the reset.
E7 F7 G7 A7 B7 C8
E7 F7 G7 A7 B7 C8
E7 F7 G7 A7

8
Transpose
TheTRANSPOSEfunctionallowsyoutoquicklychangetheoverallpitchofthe
instrument, raising or lowering it in steps of one semitone at a time (max. +/–
12 semitones). The transposition applied remains in memory until changed
again,oruntiltheinstrumentisturnedoff. TurningRP60/70onagainrestores
the normal pitch (C = C).
1. HolddowntheTRANSPOSEfunctionkey,(F7),thenpresseithertheDATA
mbutton or the DATA nbutton.
Pressing either button, the instrument automatically plays a reference
note C in the current pitch (note C).
To raise the pitch of the instrument
2. IfyoupresstheDATAmbuttonasecondtime,thepitchwillberaisedby
onesemitone.
The note played in this case will be C#. The RP60/70 will now be
transposed to the new pitch (C = C#).
PressingDATA
m
againwillraisethepitchbyanothersemitone(C=D)
and so on. Continue in this way until you obtain the required pitch.
To lower the pitch of the instrument
3. Hold down the TRANSPOSE function key (F7) and press the DATA n
buttononce.
The instrument will play a note in the current pitch set in step 2 (in this
case D) which will correspond to the reference note.
Press the DATA
n
button again and the pitch will be lowered by one
semitone. The note played in this case will be Db (C = Db).
PressDATA
n
once more tolowerthe pitchbyanother semitone(C=
C) so on. Continue in this way until you obtain the required pitch.
Repeat the operations, always with F7 pressed, until you obtain the
required transposition either above or below standard pitch.
To escape from the TRANSPOSE menu, simply release the corre-
sponding function key G7.
The instrument will remain set at the new pitch until you change the
setting, or turn the instrument off. When you turn the instrument on
again, the Transpose setting will set automatically to the normal pitch.
To cancel the transposition (without turning off)
4. HolddowntheTRANSPOSEfunctionkey(F7)andpressboththeDATAm
and nbuttons at the same time.
Thenormalpitchoftheinstrumentwillberestored(C=C),confirmedby
the reference note which will play the note C.
E7 F7 G7 A7 B7 C8
E7 F7 G7 A7 B7 C8
E7 F7 G7 A7

9
Tune
The TUNE function allows you fine tune the instrument. The tuning can vary
between427.5Hzand452.5Hz(correspondingtoanexcursionofapprox.one
semitone) in steps of +/– 0.5 Hz. The default status of the instrument
corresponds the equal standard A = 440 Hz.
1. PressandholdtheTUNEfunctionkey(G7)andpresseithertheDATAm
or the DATA nbutton to raise or lower the tuning accordingly.
ThefirsttimeyoupresstheDATA
m
orDATA
n
button,theinstrument
will automatically play a sinusoidal reference sound (A = 440 Hz).
To raise the tuning
2. WhilestillholdingdowntheTUNEfunctionkey(G7),presstheDATA m
button again to obtain the first increment (+0.5 Hz).
Continue in this way until you obtain the required tuning level. The
sinusoidal reference sound will help you fine tune the instrument.
Release the TUNE function key (G7) to escape the function.
To lower the tuning
3. While holding down the TUNE function key (G7), press the DATA n
buttonto activate the function.
Youwillhearthereferencesinusoidalsoundplaywiththelastsettuning
(the one set in step 2 above).
Press DATA
n
again to obtain the first decrement (–0.5 Hz) and
continue in this way until you obtain the required tuning level.
Release the TUNE function key (G7) to escape the function.
The current Tune setting will remain memorized even after turning the
instrument off. To restore the pitch to normal, see step 4 below.
To reset the tuning
4. HolddowntheTUNEfunctionkey(G7)andpressboththeDATAm/n
buttons at the same time.
You will hear the reference sinusoidal sound play with the standard
Pitch (C=C), or with the current Transpose pitch.
E7F7G7A7B7C8
E7F7G7A7B7C8
E7F7G7A7

10
MIDI Channel
RP60/70isabletotransmit MIDImessagesonuptothree channels, depend-
ing on the type of Preset recalled (single, layer or split). In reception, RP60/
70 can receive on all 16 MIDI channels.
TheMIDIfunctionallowsyou to modify theMIDItransmissionchannelsofthe
RP60/70, used by the RP60/70 to communicate with other MIDI devices
through a MIDI cable.
The Midi Channel function does not play a reference note during the setting
operation.
1. PressandholdtheMIDIChannelfunctionkey(A7)andpresstheDATAm
button to increase the transmission channel by one unit.
Each time you press the DATA
m
button, the MIDI channel setting
increases by one unit.
Repeat the operations, making a mental note of how many times you
presstheDATA
m
buttonwithA7pressed,untilyouobtaintherequired
channel number.
2. PressandholdtheMIDIChannelfunctionkey(A7)andpresstheDATAn
button to decrease the channel setting by one unit.
Each time you press the DATA
n
button, the MIDI channel setting
decreases by one unit.
Resetting to the default MIDI channel configuration
3. IfyouarenotsureonwhichtransmissionchannelsRP60/70iscurrently
set, you can reset to the default channel settings (Ch 8, 7 and 6) by
holdingdowntheMIDICh.functionkey(A7)andpressingbothDATAm/
nbuttons at the same time.
E7 F7 G7 A7 B7 C8
E7 F7 G7 A7 B7 C8
7
F7 G7 A7 B7

11
Midi Local
IfyouareusingyourRP60/70viaMIDIasacontrollingdeviceconnectedtoan
externalsound generator(expander, keyboard,etc.), whenyou play, you will
hearthe expander’ssounds togetherwith theRP60/70 Sounds. Ifyou prefer
to listen to the expander’s sounds alone, you can choose to exclude the RP
sounds by setting the MIDI Local function to OFF.
Setting this function to OFF disconnects the keyboard from the internal
generator and transmits keyboard data via the RP60/70 MIDI OUT only.
The Midi Local function does not play a reference note during the setting
operation.
1. Pressand holdtheMIDI Localfunctionkey(B7)andpresstheDATAn
buttononce.
Play the same note, or a note anywhere along the keyboard. You will
not hear any sound.
This is because MIDI LOCAL OFF setting has disconnected the
keyboard from the internal sound engine. This setting will allow you to
play your external expander’s sounds via MIDI without hearing the
RP60/70 sounds.
2. ToreturntoMIDILOCALON,pressandholdtheMIDILocalfunctionkey,
(B7) and press the DATA mbutton.
Playthesamenote,oranoteanywhereonthekeyboard. Thistimethe
keyboard will play. Via MIDI, with MIDI LOCAL ON, you will be able to
playtheRP60/70soundstogetherwiththeexternalexpander’ssounds.
E7 F7 G7 A7 B7 C8
E7 F7 G7 A7 B7 C8

12
Midi Common channel
TheCommonchannelisaspecialchannelthatallowsyoutocontrolotherMIDI
devices that have automatic arrangements.
The Midi Common function does not play a reference note during the setting
operation.
1 Pressandholdthe MIDI Common function key (C8) and press the DATA
mbutton to set the Common channel to ON.
The Common channel is set to OFF by default, therefore, pressing the
DATA
m
button will set the Common channel ON.
When on, the Common Channel is set to the value of 16 (fixed).
2. PressandholdtheMIDIChannelfunctionkey(C8)andpresstheDATAn
buttonto deactivate the Common channel.
The Common channel will now be off.
Resetting to the default Common channel
3. Ifyou are not sure of the currentstatusof the Common channel setting
(onoroff),youcanresettothedefaultsetting(Off)byholdingdownthe
Common Ch.function key (C8) andpressing both DATA m/nbuttons
at the same time.
E7 F7 G7 A7 B7 C8
E7 F7 G7 A7 B7 C8
G
7A7B7C8

13
About MIDI
MIDI, the abbreviation for “Musical Instrument Digital Interface”, is a world
standard interface that allows MIDI compatible instruments and other equip-
ment to communicate with each other, in order to exchange data and control
oneanother. MIDIisnowaverycommonfeatureandagreatdealofliterature
is available explaining all the standards implemented by MIDI. You are
recommendedtoconsultotherspecializedliteratureifyouwishtoknowmore
about the standards implemented and how to apply them. This section limits
itselftogivesomeexamplesregardingthesimplestformsofMIDIapplications
for your RP60/70.
The MIDI ports
The RP60/70 is fitted with two MIDI ports: MIDI IN and MIDI OUT.
The MIDI IN port receives MIDI data from an external MIDI device which can
be used to control the RP60/70.
The MIDI OUT port transmits MIDI data generated by the RP60/70 (for
example, note or velocity data generated by playing the keyboard).
MIDI channels
The “MIDI channels” used in the MIDI communication system is similar to
television broadcasting. Each channel can receive a different stream of data
withrespecttotheothers. Exactlyasoccursintelevisionbroadcasts,inorder
to exchange data, the receiving and transmitting devices must be tuned
correctly. In other words, the MIDI controlling device and the MIDI receiving
devicemust both beset to thesame MIDI channel,selected from16possible
channels.
Multiple channel instruments, called multi-timbral units, can receive and
transmitacrossseveraldifferentMIDIchannelsatthesametime,buteachpart
must correspond to the same MIDI channel between the two communicating
units. RP60/70isabletotransmitonuptothreeMIDIchannels. In reception,
RP60/70 can be used as a multi-timbral unit, because it can receive MIDI on
16 channels.
Midi Common
If you set RP60/70 to receive MIDI messages on the Common channel, all
program change messages received by RP60/70 are interpreted as Preset
Change messages, allowing you to play the 16 Presets from the external
keyboard which emulates the RP60/70 internal keyboard. Simply set the
externalcontrollingdevicetotransmitMIDImessagesonthesamechannelas
the RP60/70 Common channel.
The RP60/70 MIDI Sounds and Banks
Via MIDI, your RP60/70 offers some interesting features which cannot be
achieved using the instrument on its own. On its own, the maximum number
ofPresetsyoucanselectonRP60/70arethoselistedonpage4,atotalof16,
some of which recall single sounds, some two layered sounds across the
keyboard and others two or three sounds on a split keyboard.
WhenyouuseRP60/70asaslavedevice,aMIDIcontrollerkeyboardcanplay
the RP60/70 internal Midi sounds which are organized in four banks, the first
three housing 128 sounds organized in “family” groups, and the fourth
containing60sounds. Thebank1soundscorrespondtotheindustrystandard
General MIDI sound library, while banks 2 and 3 contain sounds taken from
Generalmusic’s own extensive sound library. Bank 4 contains an additional
60 Sounds, but not organized i “family” Groups like those in banks 1, 2 & 3.
Banks 2 and 3 also contain a Percussive family where you’ll find a selection

14
of 16 Drumkits. Another drumkit is also in Bank 4.
These sounds and sound banks can only be selected via MIDI, not from the
RP60/70 control panel. To select these sounds via MIDI, you would have to
sendaMidimessagetotheRP60/70 consistingof twoparts: ControlChange/
BankSelect(CC00-BankSelect)followedbyaProgram Change (PC). Refer
to the Midi sound tables in the Appendix for information regarding the Banks
and Program Change numbers of all the sounds and Drumkits.
MIDI messages transmitted and received by RP60/70
RP60/70 transmits and receives the following type of MIDI information.
NoteandVelocitydata:Thisisinformationpertainingtothenoteplayedand
relativevelocityvalue. Thereceivingdevicerecognizesthenotebecauseitis
defined by the “MIDI note number”, and the velocity value is defined by the
“MIDIvelocityvalue”. WheneverakeyontheRP60/70ispressed,thenoteand
velocityinformation istransmitted from the instrument’s MIDI OUT portto the
receiving device. Conversely, RP60/70 will play the corresponding notes
whenever note and velocity data is received at the instrument’s MIDI IN port.
Program Change numbers: This type of information relates to data which
identifies the RP60/70 Preset. RP60/70 transmits MIDI Program Change
numbersfrom1-32,correspondingtothe32Presetsthatcanbeselectedfrom
the panel. Whenever you select a Preset, the corresponding MIDI Program
Change number is transmitted to the receiving device, causing the corre-
spondingly numbered voices to be selected in the external MIDI unit, set to
receive on the same MIDI channel as the RP60/70.
Conversely, whenever RP60/70 receives Program Change number data (for
1-32) from an external MIDI device, the correspondingly numberedRP60/70
Preset will be automatically selected, but only if received on the Common
channel, otherwise, the internal Midi Sounds will be selected.
Control Change messages: The Soft and Damper pedals of RP60/70
generateControlChangedatawhichistransmittedfromtheinstrument’sMIDI
Outportwheneverthepedalsareoperated. Theinternaltonegeneratorofthe
receivingdevice will respondtothe pedalsolicitationsin thesameway as the
RP60/70 Sound engine. Whenever the same type of Control Change data is
received by RP60/70, it will respond appropriately.

15
MIDI Applications
The following explains how your RP60/70 can be used in the most common
MIDI setups suited to this instrument:
a) as a MIDI controlling device (Master);
b) as a tone generator (in other words, a Slave);
c) for MIDI sequence recording.
As a MIDI controlling device
RP60/70, like most MIDI instruments, transmits note and
velocity information (touch response) via the MIDI OUT port
whenever notes are played on the keyboard.
IftheMIDIOUTportisconnectedtotheMIDIINportofanother
MIDI keyboard (synthesizer, etc.) or a tone generator (more
commonly called an “expander”, but essentially any device
with an internal sound engine), the external unit will respond
precisely to the notes played on the transmitting keyboard.
Theresult is thatsucha setupallowsyou toplaytwo instruments atthe same
time, using RP60/70 as the controlling device (Master) and the other as the
device being controlled (Slave).
Quite simply, every time you select a Preset, you will send Program change
messagestotheexternaldevicewhowillrespondbyplayingasecondsound.
As a Slave device
Aswell astransmittingMIDIinformation,RP60/70recognizes
the same type of data if received at the MIDI IN port from an
externalcontrollingdevice. Inthiscase,theMIDIINportofthe
RP60/70 is connected to the MIDI OUT port of the external
controllingunit. This,therefore,allowsRP60/70 tobecontrol-
led in exactly the same manner as described above, only this
time, the RP60/70 behaves as the slave and the external
device the controller.
Midi Sequencer recording
Thetypeofdatatransferdescribedabove can be exploitedvery
efficiently for MIDI sequence recording. For this connection,
showninthediagram,theRP60/70MIDIOUTisconnectedtothe
SequencerMIDIIN,andtheSequencerMIDIOUTisconnected
to the RP60/70 MIDI IN. This connection is more commonly
know as a “MIDI Loop”.
Any instrument with a sequencer, or a Computer running
sequencer software, can be used to capture (record) the MIDI
data transmitted by the RP60/70.
Whentherecordeddataisplayedback,theRP60/70reproducestherecorded
sequence in exactly the same manner as it was recorded.
SET FOR LOCAL OFF OPERATION

16
Panel Reset
RP60/70offersaPanelReset function which allowsyoutorestorethefactory
settings without turning the instrument off.
For example, if you have changed some parameters, such as the MIDI
channels, the tuning, the velocity curves, etc., you can restore the factory
(default) settings with the following procedure:
• HolddownboththeSOUND/DATAm/nbuttonsandpresstheGRAND
PIANO PRESET button at the same time.
Other manuals for RP60
1
This manual suits for next models
1
Table of contents
Other GEM Musical Instrument manuals