GEMAR Lumitec IRIDIUM Stage Par Mini User manual

Stage Par Mini Stage Par Mini
IRIDIUM Stage Par Mini
7*8W 4in1 RGBW

Stage Par Mini Stage Par Mini
1
Unpacking: Thank you for purchasing the IRIDIUM Stage Par Mini 7*8W 4in1 RGBW .
Every IRIDIUM Stage Par Mini 7*8W 4in1 RGBW has been tested and shipped in perfect
operating condition. Carefully check the shipping carton for damage that may have
occurred during shipping. If the carton appears to be damaged, carefully inspect your
fixture for any damage and be sure all equipment necessary to operate the unit has
arrived intact. In the event damage has been found or parts are missing, please contact
our toll free customer support number for further instructions. Please do not return this
unit to your dealer without contacting customer support first.
Introduction: The IRIDIUM Stage Par Mini 7*8W 4in1 RGBW has five DMX mode. The
fixture can operate in three different operating modes; DMX contorl, sound-active, or in a
Master/Slave configuration. The IRIDIUM Stage Par Mini 7*8W 4in1 RGBW comes with
several built in programs that can be used, while operating as a dimmer unit or when
used in multiples linked in a master/slave configuration. For best results use fog or
special effects smoke to enhance the beams projections.
Warning! To prevent or reduce the risk of electrical shock or fire, do not expose this unit
to rain or moisture.
Warning! This may cause severe eye damage. Avoid looking directly into the light source
at all times!

Stage Par Mini Stage Par Mini
9 2
FeaturesCABLECONNECTORS
● RGBW Color Mixing
● Color Strobe Effect
● Color Mix Effect
● LED Chases (Adjustable Speeds)
● Electronic Dimming 0-100%
● DMX-512 protocol
● Five DMX Modes
● 3 Operating Modes - Sound Active, Maser slave Mode, or DMX Control
● DMX-512 Protocol Compatible (1, 2, 5, 6 & 8 DMX Channels)
● Digital Display for Address and Function Setting
Model
● Voltage: 100V~240V,50Hz~60Hz
● LEDs: 7 × 8-W-RGBW-LEDs
● Weight: 2,1 kg
● Dimensions: 145 ×145 × 190mm
● Colors: RGBW Color Mixing
● DMX Channels: 1, 2, 5, 6 & 8 DMX Channel Modes
Cabling must have a male XLR connector on one end and a female XLR
connector on the other end.
CAUTION Do not allow contact between the common and the fixture’s chassis ground. Grounding the
common can cause a ground loop,and your fixture may perform erratically. Test cables with an ohm
meter to verify correct polarity and to make sure the pins are not grounded or s horted to the shield or
each other.
BUTTON FUNCTION
Exits from the current menu or functionMENU
Navigates upwards through the menu list and
increases the numeric value when in a function
UP
Navigates downwards through the menu list and
increases the numeric value when in a function
DOWN
Enables the currently displayed menu or sets the
currently selected value in to the selected function
ENTER

Stage Par Mini Stage Par Mini
38
On Board System 4. DMX 6channel
channel
ch1
ch2
ch3
ch4
ch5
ch6
DMX value
0-255
0-255
0-255
0-255
0-255
0– 8
9 – 255
Functon
Dimmer
Red (0%--100%)
Green (0%--100%)
Blue (0%--100%)
White (0%--100%)
no stroboscope
stroboscope, slow to fast
5. DMX 8channel
channel
ch1
ch2
ch3
ch4
ch5
ch6
ch7
ch8
DMX value
0 – 255
0-255
0-255
0-255
0-255
0– 8
9 – 255
0– 31
32 – 63
64 – 95
96 – 127
128 – 159
160 – 191
192 – 223
224 – 255
0
1 – 255
fuction
Dimmer
Red (0%--100%)
Green (0%--100%)
Blue (0%--100%)
White (0%--100%)
no stroboscope
stroboscope, slow to fast
no program
dark bright
bright dark
dark bright dark
crossfading between the colours
colour change 1
colour change 2
music-controlled program
When a program is selected via channel
7, this program will stop or fail to start.
when channel 7 = 32 … 223:
speed, slow to fast
when channel 7 = 224 … 255:
music sensitivity, low to high
MENU
ALL 0
255
ODE
AST
SLAV
SOV 1
SOVD
SOV2
SP00
SP3 1
AVTO AV0 1
AV08
S 00
S 99
T P
V R
1
2
5
6
8
OLO O01
O5 1
BL D NO
Y S
90
120
30
60
ON
ON
OFF
ON
OFF
SI 9
[ D
ADDR
DA
SET
INFO
STAT
R000
6000
B000
U000
R000
6000
B000
U000
ST00
OFF
RED
6REE
BLUE
UHI T
ALL[
RS T 0
T ST
LED
ST30

Stage Par Mini Stage Par Mini
7 4
Mode - In this menu,you can select your desired mode,including Master,Slave and dAH.
1. Tap the MENU button and UP button or DOWN button until “Mode” is displayed, then press ENTER.
2. You will see three options-Master,Slave and dAH.Then press UP or DOWN to select them.
1)select Master,then press Enter.”yes” or “no” will be show.Select “yes” to open the Master mode and select
“no” to close the Master mode.
2)select Slave,then press Enter to confirm the slave mode.
3)select dAH,then press Enter.Channel, address or signal will be show.
①select channel,then press Enter to select your desired channel mode-ch 1,ch 2,ch 5,ch 6 and ch 8,by
pressing UP and DOWN.
②select address,then press Enter to select your desired DMX address from 1 to 512 by pressing UP and
DOWN.
③select signal,then press Enter to open or close the signal by selecting “on” or “oFF”.
Allc - This menu will let you control the brightness of the lamp
1. Press the UP or DOWN button until "Allc" is dispalyed, then press ENTER.
2. “x” will be displayed, “x” represents the displayed brightness.Press the UP or DOWN buttons to find your
desired brightness.
Stat- In this menu, you can select your desired static color mode and strobe mode
1. Press the MENU button and UP button or DOWN button until “Stat” is showed, then press ENTER.
2. There will be five options. Press ENTER to select the option and then press UP or DOWN button to select
the value you desire as below.
1) red~R000~R255
2) gree~G000~G255
3) blue~B000~B255
4) uhie~U000~U255
5)st~St 00~St 30
Set – In this menu,you can adjust the value of the system of the light.
1.Tap the MENU button and UP button or DOWN button until “Set” is displayed, then press ENTER.
2.”reset”, “test” or “LED” will be showed.
1)select “reset”,then press Enter.All the value of system will be reset.
2)select “test”,then press Enter to test the function of the light,including the static color and the brightness of
the light.
3)select “LED” then press Enter.”on”,”30”,”60”,”90” or ”120” will be showed.
“on” means the displayer will open all the time.
”30”,”60”,”90” and ”120” means the displayer will close after ”30”,”60”,”90” and ”120” seconds without any
operation.
Info – you can learn the information of the light.
1.Tap the MENU button and UP button or DOWN button until “Info” is displayed, then press ENTER.
2.”Temp” or “Ver” will be showed.
“Temp” represents the working temperature of the light.
“Ver” represents the version of the software.
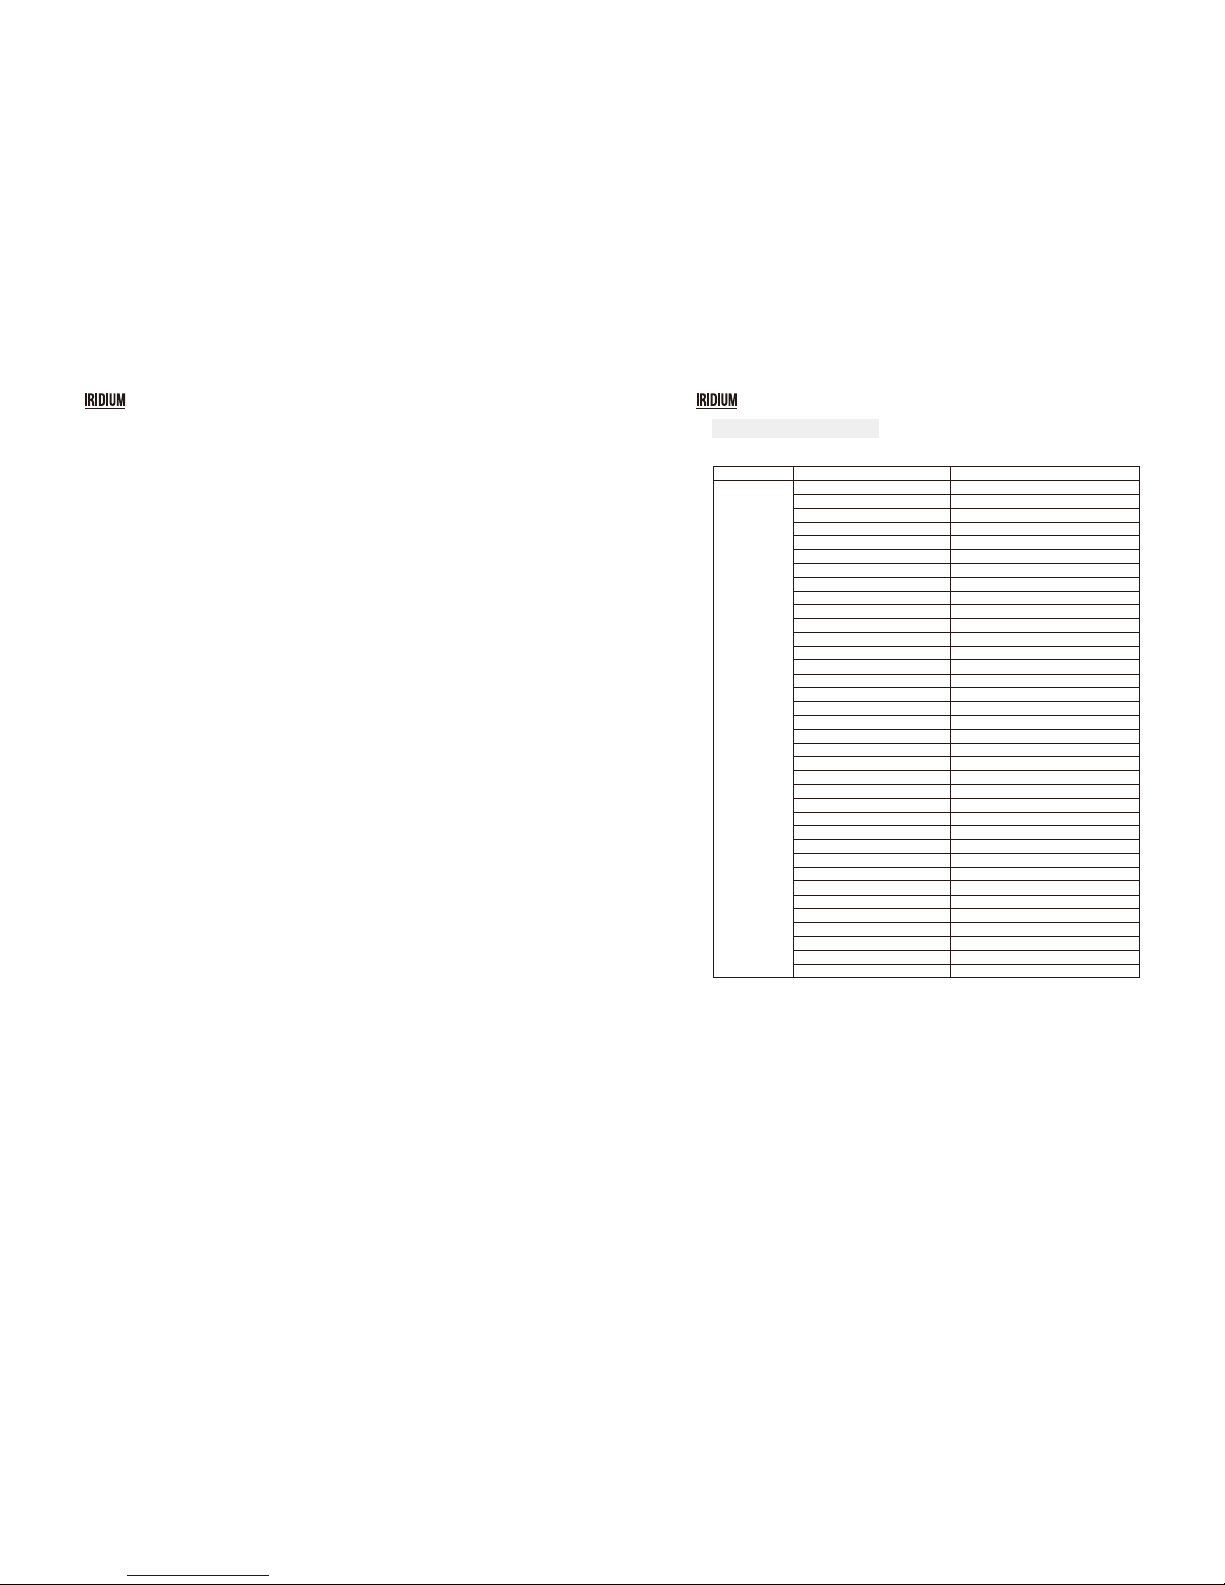
2. DMX 2channel
channel
ch1
ch2
DMX value
0 – 255
0– 6
7 – 13
14 – 20
21 – 27
28 – 34
35 – 41
42 – 48
49 – 55
56 – 62
63 – 69
70 – 76
77 – 83
84 – 90
91 – 97
98 – 104
105 – 111
112 – 118
119 – 125
126 – 132
133 – 139
140 – 146
147 – 153
154 – 160
161 – 167
168 – 174
175 – 181
182 – 188
189 – 195
196 – 202
203 – 209
210 – 216
217 – 223
224 – 230
231 – 237
238 – 244
245 – 255
fuction
brightness
LEDs off
colour 1
colour 2
colour 3
colour 4
colour 5
colour 6
colour 7
colour 8
colour 9
colour 10
colour 11
colour 12
colour 13
colour 14
colour 15
colour 16
colour 17
colour 18
colour 19
colour 20
colour 21
colour 22
colour 23
colour 24
colour 25
colour 26
colour 27
colour 28
colour 29
colour 30
colour 31
colour 32
colour 33
colour 34
colour 35
3. DMX 5channel
channel
ch1
ch2
ch3
ch4
ch5
DMX value
0-255
0-255
0-255
0-255
0-255
Functon
Dimmer
Red (0%--100%)
Green (0%--100%)
Blue (0%--100%)
White (0%--100%)

Stage Par Mini Stage Par Mini
blnd - This menu will let you enable or disable the LED lights
1. Press the UP or DOWN button until "blnd" is dispalyed, then press ENTER.
2. “no” or “yes” will be displayed.Press the UP or DOWN button to enable or disable the LED lights by
selecting “yes” or “no”.
AUTO - This menu will let you select your desired auto mode.
1. Tap the MENU button and UP button or DOWN button until “AUTO” is displayed,then press ENTER.
2. “Autx” will be displayed, You can confirm nine modes by UP or DOWN for auto mode.
3.Press Enter again,”sp XX” will be showed.Then press UP and DOWN to select your desired speed of the
Auto mode from sp00 to sp31.
Colo - This menu will let you select your desired static color and Build-in mix color .
1. Tap the MENU button and UP button or DOWN button until “CoLo” is displayed, then press ENTER.
2. “Co XX” will be displayed,, “XX” representing a number between 1-51 will be displayed. Press the UP or
DOWN buttons to select your desired color.
SOUD - This menu will let you select your desired sound mode.
1. Tap the MENU button until “SOUD” is displayed, then press ENTER.
2. “SOU X” will be displayed, You can confirm two modes by UP or DOWN for sound mode.
3.Press Enter again,”se XX” will be showed.Then press UP and DOWN to select your desired sensitivity of
the Auto mode from se00 to sp99.
1. DMX 1channel
5
DMX control mode
channel
ch1
DMX value
0– 6
7 – 13
14 – 20
21 – 27
28 – 34
35 – 41
42 – 48
49 – 55
56 – 62
63 – 69
70 – 76
77 – 83
84 – 90
91 – 97
98 – 104
105 – 111
112 – 118
119 – 125
126 – 132
133 – 139
140 – 146
147 – 153
154 – 160
161 – 167
168 – 174
175 – 181
182 – 188
189 – 195
196 – 202
203 – 209
210 – 216
217 – 223
224 – 230
231 – 237
238 – 244
245 – 255
fuction
LEDs off
colour 1
colour 2
colour 3
colour 4
colour 5
colour 6
colour 7
colour 8
colour 9
colour 10
colour 11
colour 12
colour 13
colour 14
colour 15
colour 16
colour 17
colour 18
colour 19
colour 20
colour 21
colour 22
colour 23
colour 24
colour 25
colour 26
colour 27
colour 28
colour 29
colour 30
colour 31
colour 32
colour 33
colour 34
colour 35
6
This manual suits for next models
1
Table of contents
Other GEMAR Lumitec Dj Equipment manuals
Popular Dj Equipment manuals by other brands

Chauvet DJ
Chauvet DJ 4BAR Flex T USB Quick reference guide

Chauvet Professional
Chauvet Professional Ovation B-2805FC user manual

thomann
thomann Stairville BS-280 R10 BeamSpot user manual

Event Lighting
Event Lighting DGS400RGB user manual

ALLEN & HEATH
ALLEN & HEATH XONE:62 user guide

Reloop
Reloop ADM-5 Operation manual