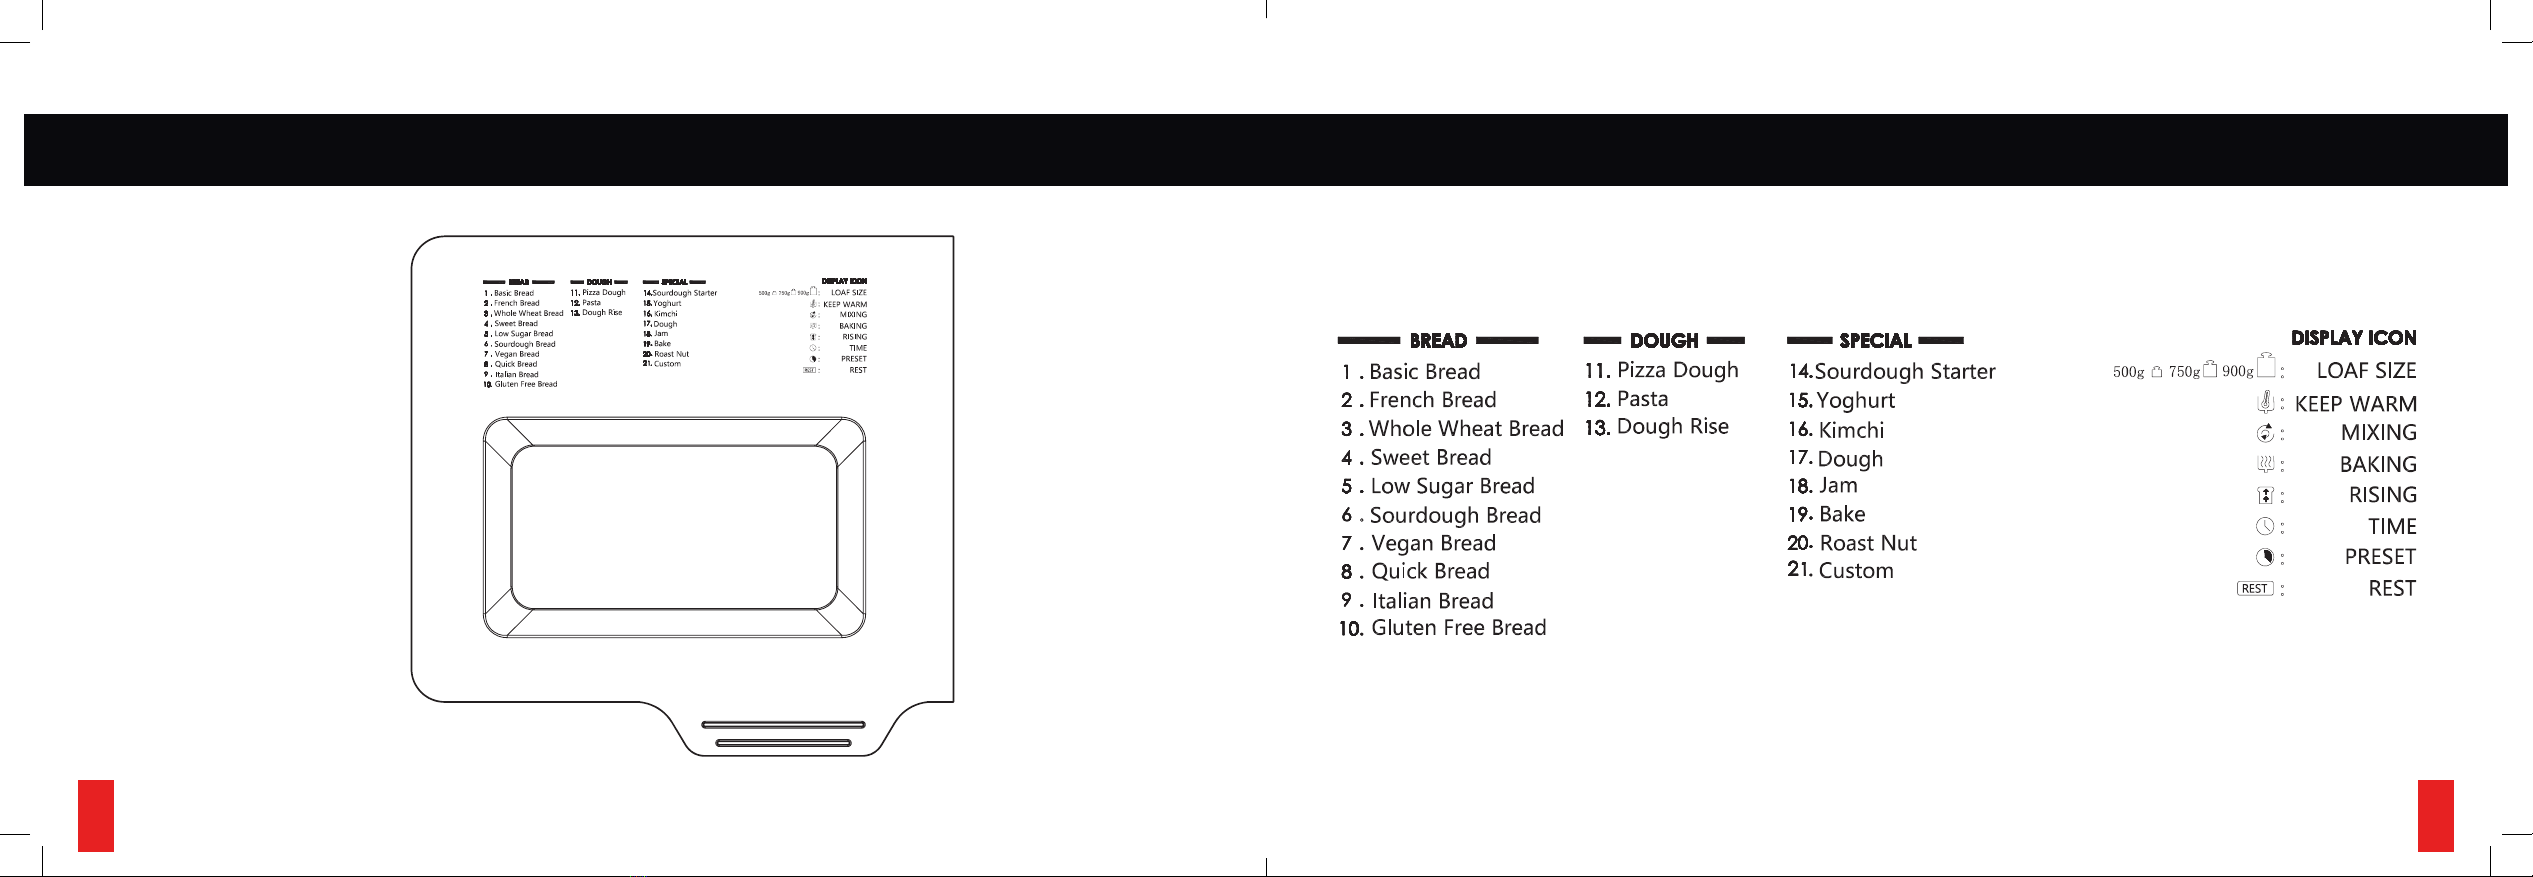
Gemelli BM2531SSDRM User manual

ARTISAN BREAD MAKER
USER MANUAL & RECIPES MODEL: BM2531SSDRM

TABLE OF CONTENTS IMPORTANT SAFEGUARDS
KNOW YOUR BREAD MAKER
INTRODUCTION OF CONTROL PANEL
FIRST TIME USE
WARNING SIGNS
TIPS ON MAKING BREAD
INGREDIENTS TO USE
MENU FUNCTIONS
CUSTOM FUNCTIONS
USING YOUR BREAD MAKER
BREAD STORAGE INSTRUCTION
CLEANING AND MAINTENANCE
TROUBLE SHOOTING
RECIPES
CUSTOM RECIPES
WARRANTY
4
6
8
10
11
12
14
16
20
22
26
27
28
33
57
64

IMPORTANT SAFEGUARDS
1. Before using check that the voltage of wall outlet corresponds to that shown on the rating plate.
2. Do not operate any appliance with a damaged cord or plug, after the appliance malfunctions, or it is dropped
or damaged in any manner. Return the appliance to manufacturer or the nearest authorized service agent for
examination, repair or electrical or mechanical adjustment.
3. Do not touch hot surfaces.
4. To protect against electric shock, do not immerse cord, plugs, or housing in water or other liquid.
5. Unplug from outlet when not in use, before putting on or taking off parts, and before cleaning.
6. Do not let cord hang over edge of table or hot surface.
7. The use of accessory attachments are not recommended by the appliance manufacturer and may cause injuries.
8. Do not place on or near a hot gas, electric burner, or in a heated oven.
9. Do not touch any moving or spinning parts of the machine when in progress.
10.
11. Never strike the bread pan on the top or edges to remove the bread as this may damage the bread pan.
12.
or short circuit.
13.
when this appliance is used by or near children.
14. Keep the appliance and its cord out of reach of children.
15. FIRE HAZARD: Never cover the bread maker with a towel or any other material as heat and steam must be able to escape freely. A
16. Do not operate the appliance for other than its intended use.
17. Always use the appliance on a secure, dry level surface.
18. Do not use outdoors.
19. This appliance has been incorporated with a grounded plug. Please ensure the wall outlet in your house is properly grounded.
20. This appliance is intended to be used in household and similar applications such as:
• Staffkitchenareasinshops,ofces,otherworkingenvironments,andbedandbreakfasttypeenvironments.
21. The appliance is not intended to be operated by means of an external timer or separate remote-control system.
22. Do not operate the unit without bread pan placed in the chamber to avoid damaging the appliance.
23. Do not leave lid open for extended periods of time.
24. Use caution when opening the lid as the mixing mechanism or heat could cause harm.
IMPORTANT INFORMATION: Before using the electrical appliance, read the following basic
precautions that should always be followed.
45

Lid with Viewing Window
Bread Pan with Handle
Housing
KNOW YOUR BREAD MAKER
Ingredient Basket
Ingredient Drawer
Viewing Window
Kneading Paddle
Paddle Hook
Measuring Spoon
6 7

INTRODUCTION OF CONTROL PANEL
Lower Arrow = Rise 1
Lower & Upper Arrow = Rise 2
Baking
Set/Display Working Time
Set/Display Delay Time
Keep Warm
Raisin Dispenser: Set when adding
ingredients
Rest: Allows ingredients to stabilize
before baking for better results
Loaf Size: 500g
1.0 lb
750g
1.5 lb
900g
2.0 lb
REST
“OK” is the select button for each menu program setting
Reset To Main Menu Function:
If you make a mistake on any preference setting, you can press and hold “OK” for 3seconds
to reset and go back to main menu to start the process over again.
“START/STOP” is the button to begin, pause, or cancel your program settings at anytime.
Pause Function:
After procedure starts, touch “START/STOP” button once to interrupt at any time. The
“START/STOP” button again or within 10 minutes without
touching any button, the program will continue.
Cancel Function:
To cancel program, touch the “START/STOP” button for approximately 3seconds until a
OK
8 9

FIRST TIME USE
FOR THE FIRST USE:
1. Please check if all parts and accessories are complete and free of damage.
2. CleaningandMaintenance.
3. Set the bread maker in BakingMode and bake empty for about 10minutes. After the unit has cooled down, wipe and clean the
inside one last time.
4. Dry all parts thoroughly and re-assemble the unit, the appliance is now ready for use.
MEMORY: If the power supply has been shut-off during the course of bread making, the process will automatically continue for 10 min-
utes, even without touching “START/STOP” button. If the break time exceeds 10 minutes the memory cannot be kept and the bread maker
must be restarted, but if the dough is no further than the kneading phase when the power supply breaks off, touch the “START/STOP” to
continue the program from the beginning.
ENVIRONMENT: The machine may work well in a wide range of temperature, but there could be a difference in loaf size between a very
warm room and a very cold room. We suggest the room temperature should be between 60°F to 95°F or 15°Cto34°C.
WARNING DISPLAY
HHH(TemperatureTooHigh): If the display shows “HHH” after the program has been started, the temperature inside is still too high and
is accompanied by 5 beep sounds. Then the program has to be stopped. Open the lid and let the machine cool down for 10to20minutes.
LLL(TemperatureTooLow): If the display shows “LLL” after pressing the “START/STOP” button (Except the programs BAKE), it means
the temperature inside is too low and is accompanied by 5 beep sounds. Stop sound by pressing the “START/STOP” button, open the lid
and let the machine rest for 10to20minutes to return to room temperature.
ERR(Error):If the display shows “ERR” after you have pressed “START/STOP,” the thermal resistor value exceed scope. Please contact
IMPORTANT INFORMATION: Before using the electrical appliance, read the following warning
WARNING SIGNS
10 11

TIPS ON MAKING BREAD
3. ADJUST THE WATER TEMPERATURE IN ACCORDANCE
WITH SEASON OR ROOM TEMPERATURE:
If the bread rises too high or collapses (causing a dent in the
-
frigerator).
lf the bread does not rise as desired due to low room tem-
4.REMOVETHEBREADFROMTHEBAKINGPAN
IMMEDIATELYAFTERBAKINGCOMPLETES.
Be sure to wear oven mitts to remove the bread, and place the
bread on a cooling rack or something similar to elevate the
bread and allow excess heat and moisture to escape from its
bottom. If the bread is not removed immediately after baking
completes, the sides of the bread may collapse or the crust may
become thick or dark.
cooling the bread for 15 to 20 minutes before slicing bread with
a bread knife.
IMPORTANT NOTE: Make sure to observe the maximum capacity and size of ingredients that go into the Baking Pan. If exceeded, the
place large, hard ingredients in the Baking Pan, you may damage the nonstick coating of the Baking Pan and Kneading Blades.
1.USEFRESHINGREDIENTS:
Select ingredients with the most recent manufacturing dates
and use them as soon as possible after opening and always
store yeast in the refrigerator.
2.MEASUREINGREDIENTSACCURATELY
Ingredients are most accurately measured by weight. If possi-
ble, we recommend the use of a kitchen scale. We recommend
using a digital scale (that measures in 0.1 g increments). Do not
liquids only.
When using measuring cups and Gemelli supplied measuring
off. Do not tap or tightly pack ingredients into the spoon. Do not
tap or tightly pack ingredients into the spoon.
12 13

INGREDIENTS TO USE
DRY YEAST Dry yeast becomes active when the ap-
propriate amounts of water and sugar are added at
a suitable temperature, and the carbon dioxide it pro-
duces is what causes bread to rise. Dry yeast is alive,
so it should be used before the manufacturer’s rec-
ommended best-by date and stored in the refrigerator
in a sealed container after opening the package. The
condition of dry yeast will greatly affect baking results.
BREAD FLOUR
Note:Whenwaterisaddedtoourandthedoughis
kneaded, gluten is formed from the protein in our.
Glutenisbothglueyandelastic.Glutenworkstotrap
SUGAR
and keeps breads soft. The recipes in the Recipe Book
use granulated sugar. Do not substitute granulated
sugar with powdered sugar, brown sugar, or other arti-
SALT
It also keeps the dough from fermenting too much.
BUTTER makes breads soft and glossy. Measure and
cut it into small pieces. The recipes in the Recipe Book
use unsalted butter.
DAIRY -
vor and keep breads soft.
EGGS add richness and velvety texture to bread dough.
The recipes in the Recipe Book use large-size eggs.
thecarbondioxidebubblesproducedduringfermen-
tation in the dough. This makes it a very important
componentinbreadsmadewithyeast.
WHOLE WHEAT FLOUR is ground from the entire wheat
kernel, and it can be used to make hearty and nutritious
breads.
ALL PURPOSE FLOUR
GLUTEN FREE FLOUR can be made by grinding various
ingredients that lack gluten, such as brown rice and
potato starch.
VITAL WHEAT GLUTEN is a powdered additive use-
FOR MEASURING LIQUIDS
Use the supplied liquid measuring cups.
FOR MEASURING DRY INGREDIENTS
Use measuring cups
(1 cup = Approx. 237ml)
FOR MEASURING SMALL AMOUNTS
Use the supplied measuring spoon
The tablespoon measures approx. 15 ml
The teaspoon measures approx. 5 ml
14 15

1. BasicBread:
2. FrenchBread: Kneading, rising, and baking with a longer rise time. The bread baked in this program setting will usually have a crisper
crust and light texture.
3. WholeWheatBread: Kneading, rising, and baking of whole wheat bread. This setting has longer preheating time to allow the grain to
soak up the water and expand.
Note: It is not advised to use the delay function on this program setting because it can produce poor results.
4. SweetBread: Kneading, rising, and baking sweet bread. It is for baking sweet crisp breads.
5. LowSugarBread: Kneading, rising, and baking, with low sugar recipes.
6. SourdoughBread: Kneading, rising, and baking for light sourdough.
Note: Must be used with a SourdoughStarter(Setting14).
7. VeganBread:
8. QuickBread: Kneading, rising, and baking loaf with yeast, baking soda, or baking powder. Bread baked on this setting is usually
smaller with a dense texture.
9. ItalianBread: Kneading, rising, and baking, bread has a softer middle with a dense texture and crisper crust.
10. GlutenFreeBread:
11. PizzaDough: Kneading, rising dough, remove the dough and shape it to make your favorite pizza crust or calzones.
12. PastaDough: Kneading dough, remove the dough and put into pasta extruder or shape it to your pasta of choice.
13. DoughRise: Kneading, rising dough, no baking. Remove the dough and shape bread rolls, baguettes, sweet rolls, steamed bread, etc...
14. SourdoughStarter: Kneading with low heat to prepare for sourdough bread.
15. Yoghurt: Mixing with low heat, time can be set between 6 and 12 hours.
16. Kimchi: Low heat to accelerate fermentation process. Time can be set between 24 and 48 hours.
17. Dough:
bread, steamed bread, etc…
18. Jam:
19. Bake: Only baking, no kneading and rising. Also used to increase the baking time on selected settings.
20. Roast Nut: Before roasting nuts, be sure to wash any hard or abrasive impurities from the nuts in order to protect the non-stick
coating of the bread pan and paddle.
21. Custom: Allows you to customize the bread making cycles. The user controls the time of the kneading/rising/baking/warming cycles.
User can set the working time for every cycle by themselves. This advanced program is mainly used for the user who is familiar with
making bread to set working time as per their personal taste to get a satisfactory result.
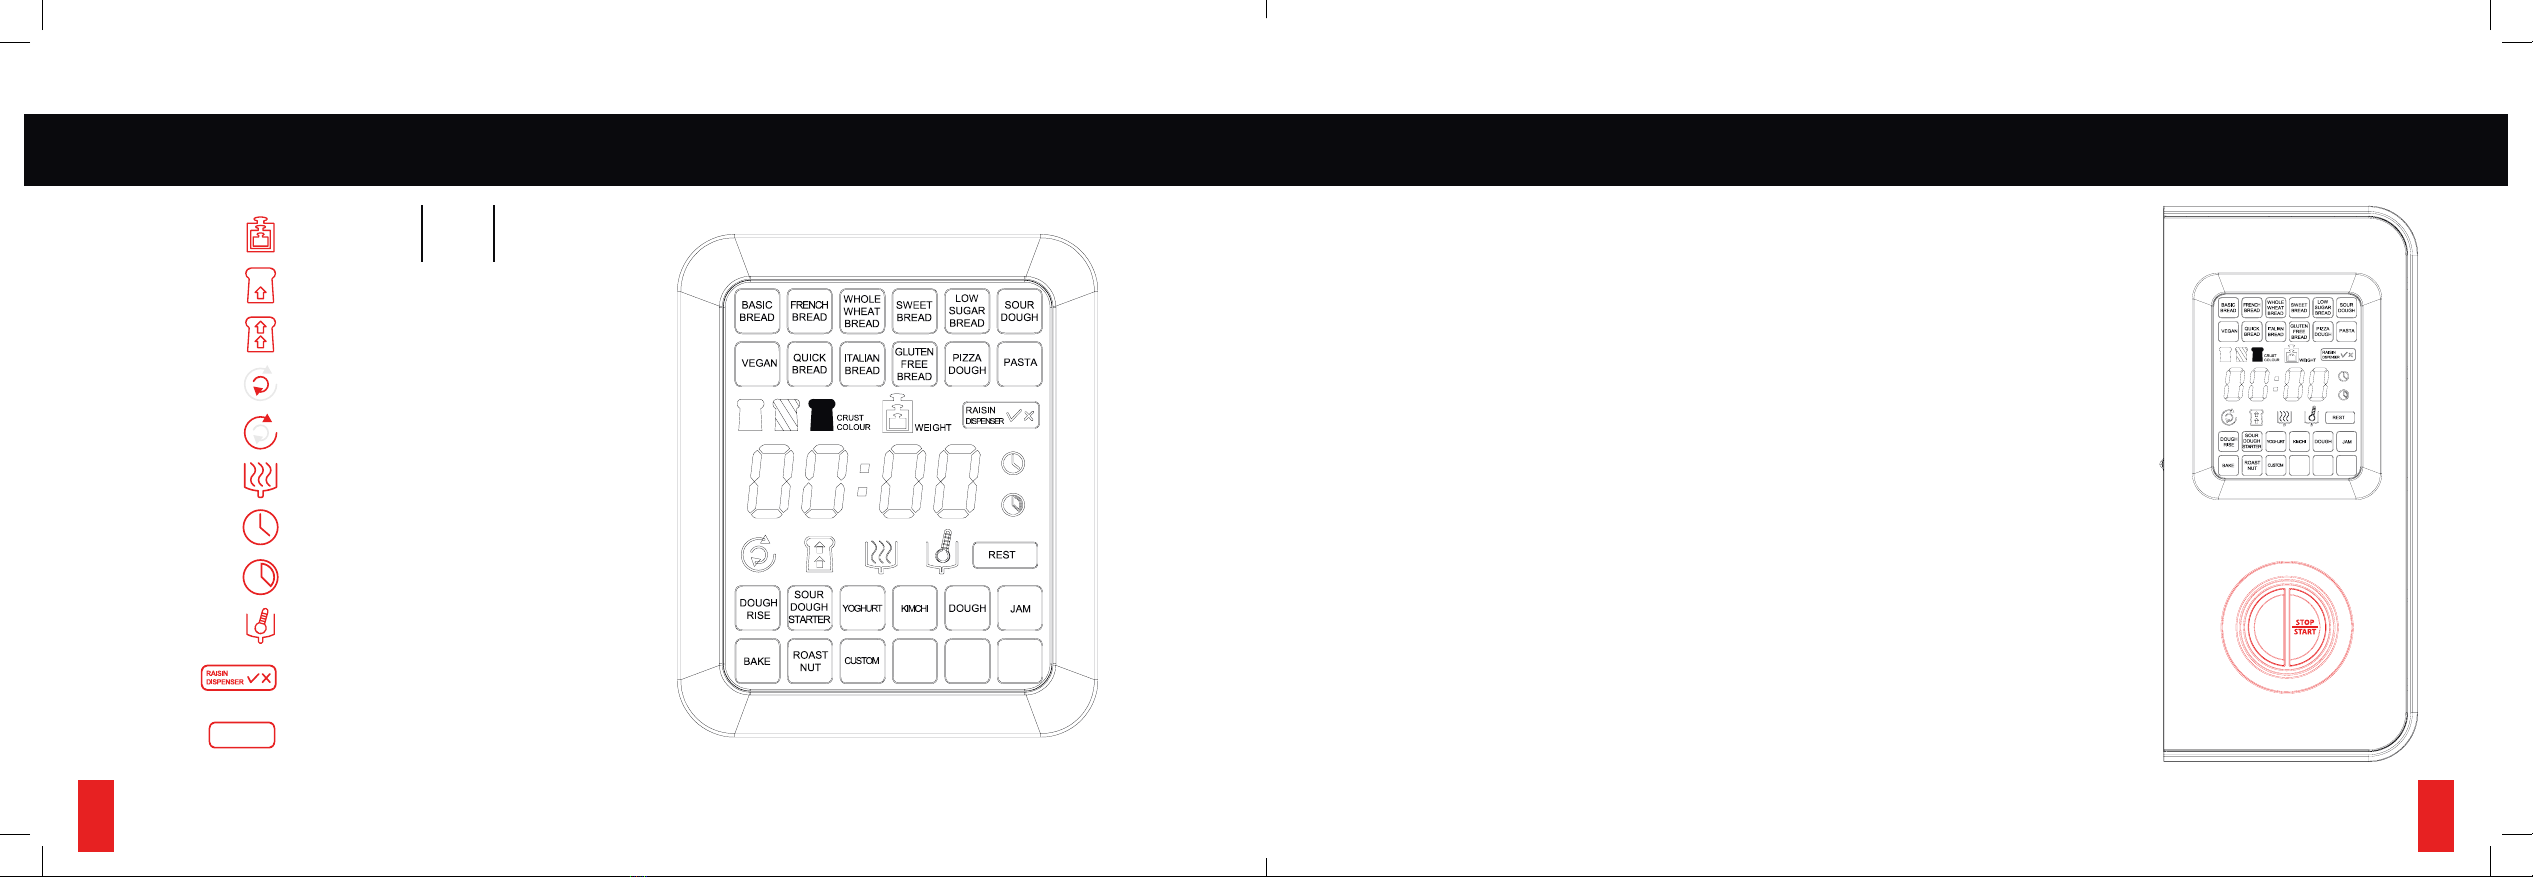
MENU FUNCTIONS
MENU FUNCTIONS: Use setting knob to set different programs. The functions of 21 menus will be
explained below. SeeFig.5
16 17

MENU FUNCTIONS
Fig.5
18 19

CUSTOM FUNCTIONS
1. Rotate “SETTING KNOB” to “Custom” setting and press “OK”
2. Rotate “SETTING KNOB” to “Crust Color” choice and press “OK”
3. Rotate “SETTING KNOB” to add ingredients in “Raisin Dispenser” and press “OK”
4. Rotate “SETTING KNOB” to set “Delay/RestTime” up to 13 hours
5. Rotate “SETTING KNOB” to set “KneadingTime1” between 1to20minutes
6. Rotate “SETTING KNOB” to set “RiseTime1” between 1minuteto1hour
7. Rotate “SETTING KNOB” to set “Kneadingtime2” between 0to30minutes
8. Rotate “SETTING KNOB” to set “RiseTime2” between 0minutesto1hour
9. Rotate “SETTING KNOB” to “Bake” between 0minto1hour
10. Rotate “SETTING KNOB” to “KeepWarm” between 0minuteto1hour
REST
• Please note that we cannot guarantee the results of recipes not included in these operating Instructions or the Recipe Book including
changes made to the amount of ingredients or ingredient substitutions. This also applies to the “CUSTOM” course in which the cycle
times can be changed.
• Be careful in the following situations as doing so may overload the motor. An overloaded motor will cause a malfunction.
- The amount of moisture is reduced.
• Using milk and eggs as a substitute for water will darken the crust color and the results may not be satisfactory.
• Using a lot of sugar will darken the crust color.
•
WARNING: Placing large, hard ingredients in the Baking Pan may damage the nonstick coating
of the Baking Pan and Kneading Paddle.
20 21

USING YOUR BREAD MAKER
1. BREAD MAKER:
2. PLUG IN THE BREAD MAKER:
MEDIUM, and “BASIC BREAD”
3. REMOVE BREAD PAN FROM BREAD MAKER: Using handle turn counter clockwise then lift pan from housing.
Note: Make sure paddle is attached to bottom of pan.
4. WEIGH INGREDIENTS: Before making bread, weigh the ingredients you need, respectively. Place ingredients in order as listed on
recipe. SeeFig.4
5. PAN PLACEMENT: Place the pan in position, turn it clockwise until it locks in correct position.
6. SELECT PROGRAM: Rotate the setting knob until your desired program is selected then press “OK.”
7. SELECT CRUST COLOR: Rotate the setting to the desired crust color and then press “OK.”
8. SELECT LOAF SIZE: Rotate the setting knob to select the desired loaf size (500g/1lb,750g/1.5lbor900g/2lb).
9. INGREDIENT DISPENSER: Rotate the settingknob to either “ ” for ON or “ ” for OFF.
Note: Before making bread, pull out the ingredient basket drawer by pinching the lock device and drawer handle, take the ingredient
basket out, put the ingredients needed into the basket and then replace the drawer. During operation, the ingredients will be
automatically poured into the bread pan.
10. DELAY FUNCTION: To use delay function, the maximum delay time is 13 hours, rotate the settingknob to desired delay time. The
delay time will be increased or decreased in increments of 10 minutes. After up to 13 hours, it will revert to default time. Please note
the delay time should include the baking time of program.
Fig.4
WaterorLiquids
(Bottom)
DryIngredients
(Middle)
YeastorBakingSoda
(Top)
22 23

Example: Now it is 8:30p.m, if you would like your bread to be ready in the morning at 7:00am, i.e. in 10 hours and 30 minutes.
be ready at 7:00am. The bread maker is automatically programmed to keep the bread “warm” for an additional hour if not removed
immediately.
Note: This button is not applicable for the programsPIZZADOUGH,PASTADOUGH,DOUGHRISE,DOUGH,YOGURT,KIMCHI,JAM,
BAKE,andROASTNUT.
For time delayed baking, do not use any easily perishable ingredients such as eggs, fresh milk, fruits, etc...
11. TO START THE BREAD MAKING:“START/STOP” button to start working. For the programs: BASIC, FRENCH,
WHOLE WHEAT, SWEET, LOW SUGAR BREAD, SOURDOUGH, VEGAN, SOURDOUGH, QUICK, ITALIAN BREAD, GLUTEN FREE BREAD,
andCUSTOM
Note: Rest Icon will begin blinking. The rest cycle is designed to stabilize the temperature of the ingredients prior to kneading. If you
decide to bypass resting time, press “OK” and mixing will begin immediately.
WARNING: The dough may not rise well because the temperature of the ingredients will not have stabilized.
12. AUTO ADD INGREDIENT DISPENSER FUNCTION: This machine is capable of adding ingredients automatically for the programs:
BASIC,FRENCH,WHOLEWHEAT,SWEET,LOWSUGARBREAD,QUICK,ITALIANBREAD,GLUTENFREEBREAD,VEGANandCUSTOM.
Note: After lid is closed, pull out the ingredient basket drawer by holding the lock device and drawer handle, take the ingredient basket
out, put the ingredients needed into the basket and insert drawer. During operation, the ingredients will be automatically poured into
the bread pan.
13. KEEP WARM FUNCTION: Once the baking process has been completed, a series of 10 beeps will announce completion and KEEP
WARM cycle starts a countdown of 60 minutes.
14. FINAL STEP: Press “START/STOP” button for approx. 3 seconds to stop the process and take out the bread. Open the lid wearing
the housing.
WARNING: Placing large, hard ingredients in the Baking Pan may damage the nonstick coating
of the Baking Pan and Kneading Paddle.
USING YOUR BREAD MAKER
CAUTION: Never use hands to remove cooked items from the bread pan. The paddle blade,
bread pan, and handle are EXTREMELY HOT and always use the provided paddle hook.
24 25

BREAD STORAGE INSTRUCTION: If bread has not been completely eaten, it is advisable to store the remaining bread in a re-sealed plastic
bag or container. Bread can be stored for up to 3-5 days at room temperature. If you need more storage time, place it in a sealed plastic
bag or container and then place it in the refrigerator, where it can be stored up to ten days.
Note: Bread made without adding preservatives, generally will not last as long as store-bought bread from a local grocery market. You
may freeze your homemade loaf for up to 8 months but we recommend using it up within the 1st or 2nd month for better results.
SafetyNote: After cooking completion, unplug the bread maker and read CLEANING AND MAINTENANCE
1. BreadPan: Wash with mild dish soap, water, and a damp cloth inside and outside. Do not use any sharp or abrasive agents to protect
the non-stick coating. The pan must be dried completely prior to re-installing into bread maker.
2. IngredientBasket: Wash the ingredient basket mild dish soap, water, and a damp cloth and dry thoroughly. Then place basket back
into drawer. Do not use any sharp or abrasive agents to protect the basket.
3. KneadingPaddle:
allow it to soak for approx. 30 minutes. The kneading paddle can then be easily removed for cleaning. Do not use any sharp or abra-
sive agents to protect the non-stick coating.
Note: Please note that the bread pan, kneading paddle and ingredient basket are dishwasher safe.
4. LidandViewWindow:
5. Housing: Gently wipe the outer surface of housing with a wet cloth. Do not use any abrasive cleaner to clean as this would scratch
and degrade the high polish of the surface.
6. BreadMakerStorage:Before the bread maker is packed away for storage, ensure that it has completely cooled down, clean and dry.
You may store measuring cup, measuring spoon, and kneading paddle in the bread pan.
WARNING: Do not leave bread maker plugged into an outlet when not in use. WARNING: Disconnect the machine from the power and let it cool down prior to cleaning and
storing. Never immerse the housing into water for cleaning.
BREAD STORAGE INSTRUCTION CLEANING AND MAINTENANCE
26 27

Problem Cause Solution
Questions &
Answers on Bread
Maker
Smoke comes out of the baking
compartment or of the vents
The ingredients stick to the baking
compartment or on the outside of the
baking pan
Pull out the plug and clean the outside of the baking pan or
the baking compartment
The bread goes down in the middle and
is moist on the bottom
The bread is left too long in the pan
after baking and warming
Take the bread out of the baking pan before the warming
function is over
It is difcult to take the bread out of
the baking pan
The bottom of the loaf is stuck to the
kneading blade
Clean the kneading blade and shafts after the baking.
If necessary, ll the baking pan with warm water for 30
minutes, then the kneading blade can be easily removed and
cleaned
The ingredients are not mixed or the
bread is not baked correctly
Incorrect program setting Check the selected menu and the other settings
The START/STOP button was touched
while the machine was working
Do not use the ingredients and start over again
The lid opened several times while the
machine was working
Never open the lid frequently, unless it is necessary such
as adding ingredients. And make sure that lid was closed
completely
Long blackout time while the machine
was working
Do not use the ingredients and start over again
The rotation of the kneading blade is
blocked
Check that the kneading blade is blocked by grains, etc. Pull
out the baking pan and check the driver is turning. If this is
not the case, contact customer support
The appliance does not start.
The display shows “HHH”
The appliance is still hot after the
previous baking procedure
Pull out the plug, take out the baking pan and leave it to cool
at room temperature, then insert the plug and start again
TROUBLESHOOTING
29

Problem Cause Solution
Error with the
recipes
The bread rises too fast Maybe, too much yeast, too much our, not enough salt, or several of these
causes
A/B – See Below Chart
The bread does not rise at all or not
enough
No yeast at all or too little too little A/B – See Below Chart
Old or stale yeast E – See Below Chart
Liquid too hot C – See Below Chart
The yeast has come into contacting with the liquid D – See Below Chart
Wrong our type or stale our E – See Below Chart
Too much or not enough liquid A/B/G – See Below Chart
Not enough sugar A/B – See Below Chart
The dough rises too much and spills
over the baking pan
If the water is too soft the yeast ferments more F – See Below Chart
Too much milk affects the fermentation of the yeast C – See Below Chart
The bread goes down in the middle The dough volume is larger than the pan and the bread goes down A/F – See Below Chart
The fermentation is too short or too fast owing to the excessive temperature
of the water or the baking chamber or to the excessive moisture little
C/H/I – See Below Chart
Heavy, lumpy structure Too much our or not enough liquid A/B/G – See Below Chart
Not enough yeast or sugar A/B – See Below Chart
Problem Cause Solution
Error with the
recipes
Heavy, lumpy structure Too much fruit, whole meal or of one of the other ingredients B – See Below Chart
Wrong our type or stale our E – See Below Chart
Too much or not enough liquid A/B/G – See Below Chart
Old or stale our, warm liquids make the dough rise too quickly and fall in
before baking
No salt or not enough sugar or too much liquid
E – See Below Chart
The bread is not baked in the center Too much or not enough liquid A/B/G – See Below Chart
Too much humidity H – See Below Chart
Recipes with moist ingredients, e.g. yogurt G – See Below Chart
Open or coarse structure or too many
holes
Too much water G – See Below Chart
No salt B – See Below Chart
High humidity, water too hot H/I – See Below Chart
Too much liquid C – See Below Chart
30 31

Problem Cause Solution
Error with the
recipes
Mushroom-like, unbaked surface Bread volume too big for the pan A/F – See Below Chart
Too much our, especially for white bread F – See Below Chart
Too much yeast or not enough salt A/B – See Below Chart
Too much sugar A/B – See Below Chart
Sweet ingredients besides the sugar B – See Below Chart
The slices are uneven or there are
clumps in the middle
Bread not cooled enough (the vapor has not escaped) J – See Below Chart
Flour deposits on the bread crust The our was not mixed in well on the sides during the kneading G/I – See Below Chart
Reference Chart
A: Measure the ingredients correctly.
B: Adjust the ingredient doses and check that all the ingredients have been added.
C: Use another liquid or leave it to cool at room temperature, add the ingredients specied in the recipe in the right order, make a small ditch in the
middle of the our and put in the crumbled yeast or the dry yeast, avoid letting the yeast and the liquid come into direct contact.
D: Use only fresh and correctly stored ingredients.
E: Reduce the total amount of the ingredients, do not use more than the specied amount of our. Reduce all the ingredients by 1/3.
F: Correct the amount of liquid. If ingredients containing water are used, decrease the amount of water to be added by 1/3.
G: In case of humid weather, remove 1-2 tablespoons of water.
H: In case of warm weather do not use the timing function. Use cold liquids.
I: Take the bread out of the pan immediately after baking and leave it on the grid to cool for at least 15 minutes before cutting it.
J: Reduce the amount of yeast OR all the ingredient doses by 1/4.
K: Never grease the pan!
L: Add a tablespoon of wheat gluten to the dough.
RECIPES
32

BASIC WHITE BREAD FRENCH BREAD
Setting1:
Crust Options:
DelayStart:
BasicBread
Light,Medium,Dark
Yes
Note:
1. Add the ingredients to the baking pan in the order listed.
Ingredients 500g 1.0lb 750g 1.5lb 900g 2.0lb
Water(80°F) 176 g 176 ml 270 g 270 ml 320 g 320 ml
BreadFlour 304 g 459 g 553 g
VitalWheatGluten(Optional) 4 g 6 g 8 g 3 tsp
Sugar 28 g 2 Tbsp 42 g 3 Tbsp 50 g 4 Tbsp
DryMilkPowder 7 g 10 g 12 g 3 Tbsp
Salt 6 g 1 tsp 8 g 10 g 2 tsp
UnsaltedButterSoftened 19 g 29 g 2 Tbsp 35 g
RapidRiseYeast 3 g 1 tsp 5 g 6 g 2 tsp
Ingredients 500g 1.0lb 750g 1.5lb 900g 2.0lb
Water(80°F) 176 g 176 ml 270 g 270 ml 320 g 320 ml
BreadFlour 304 g 459 g 553 g
VitalWheatGluten(Optional) 4 g 6 g 8 g 3 tsp
Sugar 7 g 11 g 13 g 1 Tbsp
DryMilkPowder 7 g 10 g 12 g 3 Tbsp
Salt 6 g 1 tsp 8 g 10 g 2 tsp
RapidRiseYeast 3 g 1 tsp 5 g 6 g 2 tsp
1. Add the ingredients to the baking pan in the order listed.Setting2:
Crust Options:
DelayStart:
FrenchBread
Light,Medium,Dark
Yes
Note:
34 35

WHOLE WHEAT BREAD
Setting3:
Crust Options:
DelayStart:
WholeWheatBread
Light,Medium,Dark
Yes
Note:
Ingredients 500g 1.0lb 750g 1.5lb 900g 2.0lb
Water(80°F) 205 g 205 ml 310 g 310 ml 370 g 370 ml
Honey 23 g 1 Tbsp 35 g 42 g 2 Tbsp
Whole Wheat Flour 304 g 459 g 553 g
Sugar 20 g 30 g 36 g 3 Tbsp
DryMilk 7 g 10 g 12 g 3 Tbsp
Vital Wheat Gluten 18 g 2 Tbsp 27 g 3 Tbsp 32 g 4 Tbsp
Salt 6 g 1 tsp 8 g 10 g 2 tsp
UnsaltedButterSoftened 19 g 29 g 2 Tbsp 35 g
RapidRiseYeast 3 g 1 tsp 5 g 6 g 2 tsp
CINNAMON RAISIN BREAD
Ingredients 500g 1.0lb 750g 1.5lb 900g 230mL
Water(80°F) 130 g 130 ml 190 g 190 ml 230 g 230 ml
Milk(80°F) 100 g 100 ml 150 g 150 ml 180 g 180 ml
BreadFlour 304 g 459 g 553 g
VitalWheatGluten(Optional) 4 g 6 g 8 g 3 tsp
BrownSugar(Packed) 30 g 3 Tbsp 46 g 55 g
UnsaltedButterSoftened 19 g 29 g 2 Tbsp 35 g
Salt 3 g 1 tsp 5 g 10 g 2 tsp
Cinnamon 3 g 1 tsp 4 g 5 g 2 tsp
RapidRiseYeast 3 g 1 tsp 5 g 6 g 2 tsp
Icing
PowderedSugar 35 g 1/4 cup 52 g 1/3 cup 63 g 1/2 cup
Water 6 g 8 g 10 g 2 tsp
1. Add the ingredients to the baking pan in the order listed.
2. For Icing, mix water and sugar and allow the bread to completely cool before icing
the bread.
Setting4:
Crust Options:
DelayStart:
SweetBread
Light,Medium,Dark
Yes
1. Add the ingredients to the baking pan in the order listed.
36 37

LOW SUGAR WHITE BREAD
Setting5:
Crust Options:
DelayStart:
LowSugarBread
Light,Medium,Dark
Yes
Note:
1. Add the ingredients to the baking pan in the order listed.
Ingredients 500g 1.0lb 750g 1.5lb 900g 2.0lb
Water(80°F) 176 g 176 ml 270 g 270 ml 320 g 320 ml
BreadFlour 304 g 459 g 553 g
VitalWheatGluten(Optional) 4 g 6 g 8 g 3 tsp
Sugar 7 g 11 g 13 g 1 Tbsp
DryMilk 7g 10 g 12 g 3 Tbsp
Salt 3 g 1 tsp 5 g 10 g 2 tsp
UnsaltedButterSoftened 19 g 29 g 2 Tbsp 35 g
RapidRiseYeast 3 g 1 tsp 5 g 6 g 2 tsp
LOW SUGAR WHEAT BREAD
Ingredients 500g 1.0lb 750g 1.5lb 900g 2.0lb
Water(80°F) 200 g 200 ml 300 g 300 ml 360 g 360 ml
Whole Wheat Flour 304 g 459 g 553 g
Vital Wheat Gluten 18 g 2 Tbsp 27 g 3 Tbsp 32 g 4 Tbsp
Sugar 7 g 11 g 13 g 1 Tbsp
DryMilk 7 g 10 g 12 g 3 Tbsp
Salt 3 g 1 tsp 5 g 10 g 2 tsp
UnsaltedButter-softened 19 g 29 g 2 Tbsp 35 g
RapidRiseYeast 3 g 1 tsp 5 g 6 g 2 tsp
1. Add the ingredients to the baking pan in the order listed.Setting5:
Crust Options:
DelayStart:
LowSugarBread
Light,Medium,Dark
Yes
Note:
38 39
Other manuals for BM2531SSDRM
1
Table of contents
Other Gemelli Bread Maker manuals