Genesis Genesis 6.1e User manual

ver 1.0
11
absolute fidelity
Owners Manual and Set-up Guide:
Genesis 6.1e Loudspeaker
Contents
1A QUICK START SET-UP GUIDE 3
1.1 UNPACKING 3
1.2 ROOM PLACEMENT 3
1.3 CONNECTIONS 4
1.4 ADJUSTMENTS 4
2COMPLETE SET-UP GUIDE5
2.1 POSITIONING 5
2.2 SOURCE INPUT CONNECTIONS 5
2.3 LOUDSPEAKER CONTROLS 6
3TUNING THE SYSTEM 7
3.1 IMAGING AND SOUNDSTAGE 7
3.2 FURTHER ADJUSTMENTS 8
4THE REFINEMENT STAGE 9
4.1 ONE CHANGE AT A TIME 9
4.2 DEFINING THE SOUNDSTAGE 9
4.3 APPROPRIATE MID-BASS BALANCE 9
4.4 ROOMTREATMENT 10
4.5 MASTERING THE REFINEMENTS OF THE SYSTEM 11
5THE GENESIS 6.1E TECHNOLOGY 12
5.1 DIPOLAR CONFIGURATION 12
5.2 THE TRANSDUCERS 12
5.2.1 THE GENESIS RIBBON TWEETER 12
5.2.2 TITANIUM MIDRANGE 13
5.2.3 MID-BASS COUPLERS 13
5.3 CROSSOVER 13
5.4 VIBRATION-FREE CABINET 14
6SPECIFICATIONS 16

ver 1.0
22
absolute fidelity
A Message from Genesis
Congratulations! You are now the owner of one of the finest
loudspeaker systems in the world. Based on technologies
developed for our flagship Genesis 1 and the award-wining
Genesis 6.1, the Genesis 6.1e is designed for those of us who live
in beautiful homes and still want an elegant loudspeaker that will
deliver the best sound in its class.
So that it will fit into the décor of any home, the cabinet design is a
combination of acoustic, furniture, interior design and architectural
principles. Subtle angles and complex curves are used to create an
optical illusion that makes the G6.1e look smaller and slimmer than
it actually is. The veneers are also carefully chosen to reflect and
enhance these curves and angles.
Sound structural engineering principles have been applied to make
the G6.1e cabinet rigid and well-damped, with no detrimental
vibrations. All construction and even internal braces have been
“tongue and grooved” to ensure that the cabinet is the best
environment on which to mount the transducers. This results in an
absence of cabinet coloration, and excellent sound-staging and
imaging.
Mated with a matching Genesis ServoSum™, the G6.1e will deliver
the full frequency response of 16Hz to 36kHz. Thus delivering the
vital infrasonic and ultrasonic frequencies to deliver the emotive
content of music.
The Genesis 6-Series Cinema System can optionally include a full
complement of matching surround speakers, center channel, and
additional bass modules. Hence the G6.1e is equally at home in an
audiophile two-channel music-only system and as a key component
in a home theater/multi-channel music environment.
Please read this Owners Manual and Set-up Guide to get the
maximum enjoyment out of your purchase. Also, check out our
website at www.genesisloudspeakers.com for the latest updates,
tips and tricks, and support for our owners.

ver 1.0
33
absolute fidelity
1A Quick Start Set-up Guide
Now that you have your new Genesis 6.1e loudspeaker system, we
realize that you can’t wait to hook it up and start playing! However,
pleasereadthisquickset-upguide(evenifyourdealerissettingitupfor
you) before you proceed.
1.1 Unpacking
Your loudspeakers will come to you in two large shipping cartons. The
cartonscontainingyourspeakersweighover90lbs(41kgs)each,sowe
suggest a minimum of two strong people to move the speaker cartons
around. We will notbe held liable for damage to either the speakers or
your backs during unpacking and setting up.
The packaging is designed to ship the speakers vertically, and to be
unpacked horizontally. Please observe the “This Side Up” signs when
shipping and unpacking.
The carton is designed to unfold to make it easy to remove the
speakers. With a sharp knife, cut the tape on the top and two ends of
thecarton.Thesideswillfallapartrevealing thespeaker held inplaceby
a back support box, and two pieces of foam holding on to the top and
bottom of the speaker. You will also find the wire grill that will go on the
front of the speaker.
Remove the foam on the bottom of the speakers, and slide the plastic
and foam wrapping off. Now, tilt up the speaker until it is resting on its
bottom. Remove the top piece of foam, and the wrapping. Repeat with
the other speaker, and store the packaging in a dry, safe place–justin
case you need to transport the speakers.
1.2 Room Placement
A good starting position for your G6.1e is about 18 inches (46cm) into
the room as measuredfrom the front wall (the wall you look at as you
are seated listening to the speakers) to the back of the base of the
speakers. Place the speakers about five to six feet (1.8 metres) apart
measured between the tweeters. Toe the speakers in slightly towards
the listeners –by about 5 to 10 degrees –no more.
Thisisthe best startingpoint for audiophile twochannel stereo set-ups.
If you are primarily using these speakers for home theatre enjoyment,
the speakers can be placed nearer to the wall. If you are only going to
use these speakers for stereo, you may want to pull them further away
from the wall.

ver 1.0
44
absolute fidelity
You will want to sit eight to twelve feet (2.4 to 4 metres) away from the
speakers.
18”
8’ to 10’
Toe in by 5
o
1.3 Connections
For most applications, the speakers should be plugged directly into the
output your power amplifiers using high quality speaker cables and the
5-way binding posts. The speakers has a setofThru-Put binding posts.
These are for connecting to an optional ServoSub™. As the Thru-Put
binding posts are internally connected in parallel, DO NOT use them for
bi-wiring or bi-amping.
1.4 Adjustments
Don’t be too worried by the midrange and tweeter adjustmentknobs on
the back of the G6.1e. The G6.1e will sound great, straight out of the
box, with these both set at the 12 o’clock position. As you play your
system for the next hundred hours or so, the speakers will settle in.
Onceyou familiarize yourselfwiththeirperformance, puttingalittlebitof
additional effort in tuning the speakers properly into your system (which
includes the room) will give you greater long-term enjoyment and
benefits.
Typical room placement: Place speakers about 18 inches
into the room, the tweeters on the inside, 5 to 6 feet
apart, and 8 to 12 feet from the listeners. Toe-in the
speakers by about 5 degrees towards the listeners.

ver 1.0
55
absolute fidelity
2Complete Set-up Guide
2.1 Positioning
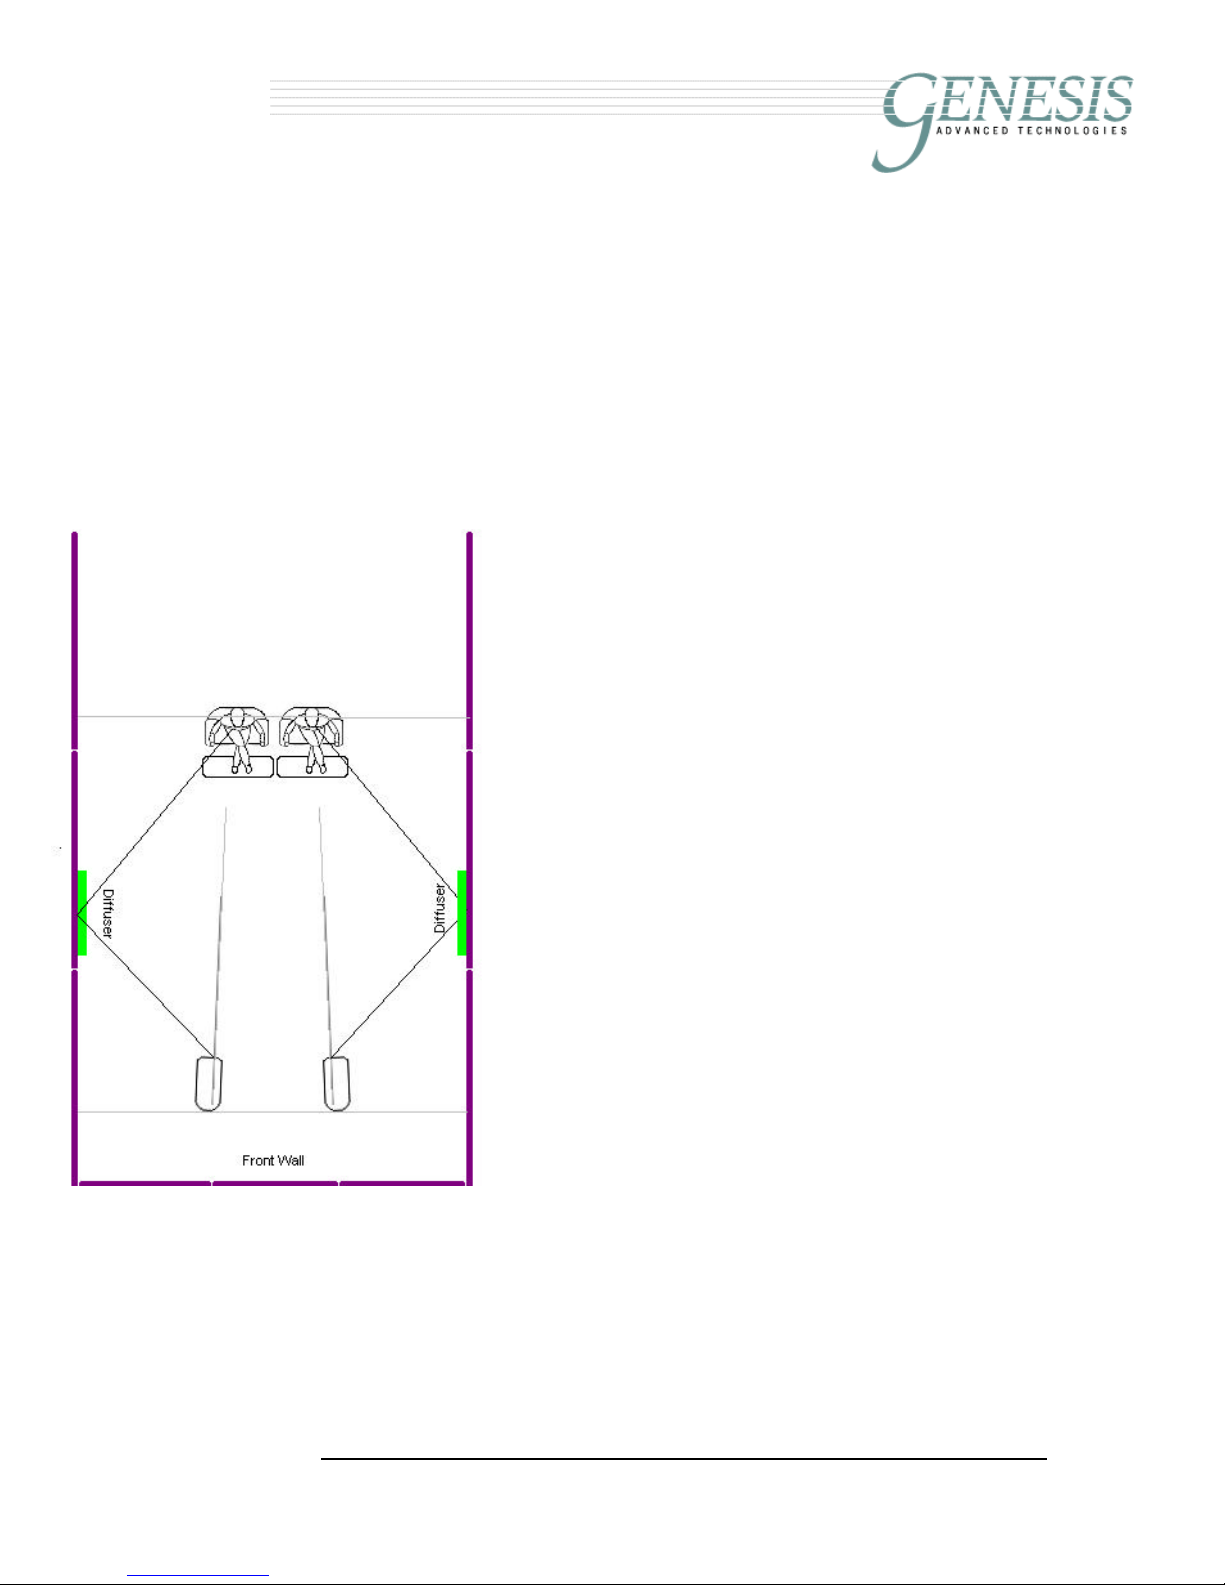
A good starting position for the G6.1e is about 18 inches (0.45m) into
the room, as measured from the front wall (the wall you look at as you
are seated listening to the speakers), to the back of the base of the
speaker. Start with the speakers six feet apart with the tweeters placed
closest together, and angled in (toed-in)towards thelistenerby about5
degrees.Youwillwanttosit eighttotwelvefeet(2.4 to4.0metres)away
from the speakers (if you have the space). We will experiment with
moving the speakers around later.
Asthesespeakersaredipolar,theyarereallyroom-friendly and you are
free to move the speakers closer to, or further away from the front and
side walls. We do recommend, however, that you give the speakers a
little bit of breathing space behind them, so don’t push them up tight
against the wall. If you do need to push then up tight against the wall,
thespeakersfeatureareartweeterdefeatswitchwhichmaymakethem
work better in your room.
If you have the speakers too close to the front wall, youwill find that the
image depth is not as good-the soundstage becomes a little two-
dimensional.Ifyou have the spaceto move the speakersaway from the
wall, do so. You will be rewarded with the deep, broad soundstage that
this loudspeaker is capable of. You should be able to “see” the
soundstage behind, as well as in front of, the loudspeakers. The sound
stage will also extend outside the left and right sides of the speakers.
2.2 Source Input Connections
Connect the speaker outputs of your power amplifier to the INPUTS
binding posts using a high-quality loudspeaker cable.
If you have an optional Genesis ServoSub, connect the subwoofer to
the G6.1e using theTHRUPUT bindingposts.Becausethesubwooferisa
highimpedanceload,youdonotneedtouseabeefyloudspeakercable
for this connection. An interconnect-type cable should be use which will
optimise performance of the subwoofer.
Make sure that you have the correct polarity connected for both
speakers –the plus(+), positive(+ve) or red terminal on theG6.1e
shouldbeconnected to the plus,positive, or red terminalon your power
amplifier. The minus(-), negative(-ve) or black terminal should be
connected to the amplifier’s minus(-), negative(-ve) or black output.

ver 1.0
66
absolute fidelity
2.3 Loudspeaker Controls
The two knobs at the top of the
plate on the back of the speaker
tailor the mid-and high-frequency
response of the G6.1e. They are
subtle controls, but they can make
a great difference in gaining that
last bit of additional performance
in tuning your speakers into the
room that you are using them in. They can turn your system from very
good to exceptional, so take the time to work through this process.
The top left knob markedTWEETER is a volume control for the front
tweeter. Turning this control clockwise will increase the level of the
tweeters.Usethiscontrolifyou needabitmoretreble, ortoincreasethe
apparent space of the soundstage. Too high a tweeter level, and you
canfeelthat crashingcymbalsare leapingoutatyou,andnylonstringed
guitars sound steely. Start with this control at the 12 o'clock position.
There is about a one dB range for this control.
The top right knob markedMIDRANGE is used to adjust the level of the
midrange. Start at the 12 o’clock position. Turning the control anti-
clockwisewillmakethemidrangesound leaner,andturningitclockwise
will make the midrange sound fuller. A fuller midrange can also can
makethesoundstage more forward.There is aboutaone and ahalf dB
range for this control.

ver 1.0
77
absolute fidelity
3Tuning the system
Music is the best wayto begin your set-up procedure. We suggest that
videosources beused onlyafter youhave set-upthesystemtoproperly
reproduce music. There is no “perfect” setting for the G6.1e
loudspeaker. Every listening room is different, and we recommend that
you take the time to carefully tune the system into the environment it is
placed in.
Setting all the knobs at the “12 o’clock” position is “normal” and will be
the position from which you can start tuning. With the controls in this
position, it may not soundperfect, but your Genesis loudspeaker will
sound great straight out of the box.
We suggest that you start with a single vocal with simple instrumental
accompaniment because the sound of the human voice is more easily
recognizable than many instruments and is a less complex sound to
deal with. Use a good recording that you know has atmosphere and
good midrange and bass content.
3.1 Imaging and Soundstage
If your vocal selection is a well-recorded audiophile CD or LP with
good image information in the recording, the performer should appear
tocomefrom behindtheloudspeakers andbeat theappropriateheight
for a standing person. If it is not, there are several remedies that will
address this shortfall.
If the vocal appears to be larger than life, you should first check the
system volume. Is it a volume that would be appropriate for
someone actually singing in your room? If there is too much volume
the artist will appear too big and the opposite is truefor too little
volume. If the volume is set correctly and the image is still too big,
place the speakers closer together and re-listen. Place the speakers
no less than 5 feet apart. If the image is still too big, toe the
speakers in a slight amount.
Conversely, if the image is too small, move the speakers apart. The
speakers should be no more than eight feet apart. Repeat thisprocess
until you have it right. If the voice is too low in height, turn the
MIDRANGE control up (turning the knob clockwise) and the image of the
voice will move upward slightly. Turning the midrange control up also
affects presence and may bring the image too far forward.
If you have the speakers 18 inches into the room, and you are not
getting enough front to back depth (the singer not appearing behind the

ver 1.0
88
absolute fidelity
speaker enough) pull the speakers away from the front wall a little bit at
a time. If you do not have them pulled far enough away, you may
not have enough front to back depth. However, slightly more than
1/3 of the way into the room is about as far as you want to go.
Pulling them half-wayinto the middle of the room is unlikely to help.
Find the best compromise for your room, your tastes and your space
requirements. If you are not getting proper focus on the voice, you may
angle the left and right speaker up to about 15 to 20 degrees (toe-in)
towards your listening position until you have a properly defined center
image.Ifthe speakersare too farapart, the mid-bass will decouple and
you will lose the side image, and if they are too close together you will
have too small a center stage.
When properly set up, very little sound should appear to come
directly from the speaker. Instead, the sound stage should extend far
beyondtheleft andrightedge oftheloudspeakersandtheyshouldhave
tremendous front to back depth. When the recording is close-miked
(when the instrument or performer is very close to therecording
microphone), the music may appear to come directly from the
loudspeaker. This is normal. Typically, however, the sound should
appear to be detached from the loudspeakers.
A simple rule of thumb to follow is that focus will be achieved by placing
the speakers closer together or farther apart, and front to back depth
can be adjusted by the distance from the rear wall. Further, as the
system“breaks in”,thedepthandwidth ofthe soundspace will increase
and so will the “smoothness” of the sound.
3.2 Further adjustments
In some problematic rooms a resonance may develop at one or more
frequencies, that is unnatural to the music. By moving the speakers
closer to the front wall or farther from the front wall, the resonance may
be reduced at the listener’s position. You may have to place the
speakers asymmetrically in the room. Bass resonances are caused by
speakers exciting room modes, and these are generally symmetrically
distributed in the room.
There are no absolute hard and fast rules concerning problematic
rooms, so do not be afraid to experiment with speaker placement to
determine the best position of the speakers in your room.

ver 1.0
99
absolute fidelity
4The Refinement stage
After following the set-up guide above, you may not be completely
satisfied with the results. We share with you here some of our
observations in setting up theseloudspeakers.
4.1 One Change at a Time
One rule of thumb you should always keep in mind. Make one change
at a time! Do not, for instance, change position of the speakers and
make an adjustment to the amplifier all at once. Make each of these
changes separately and note the difference-by listening with each
adjustment, then make the next change.
4.2 Defining the Soundstage
A common problem we find with many set-ups is a tendency to
separate thespeakerstoofarfromeachother.Thisgivesanunnaturally
wide soundstage betweenthe two speakers, and creates problems
beyond the unnatural width of the center stage. The key problem is a
lack of soundstage information beyond the left and right sides of the
speakers.
If you find that the sound is not spacious enough or you are not getting
enough front to back depth, pull the speaker away from the front wall.
This is typically preferable to separating the two speakers too far, and
will almost always give you better depth and soundstage information. A
word of caution though: if you move the speakers too far from the front
wall you may lose the focus of the image.
4.3 Appropriate Mid-bass Balance
Another problem is a lack of mid-bass energy. In order for the
appropriate amount of mid-bass energy to be present, the speakers
should be close enough together to achieve proper "coupling" of the
midrangeandthemid-basscouplers.Couplingisdesirableinthelower
frequencies from the mid-bassondown. Thissimply means thatthe left
and right drivers "work together" as opposed to working separately.
If you find there isn't enough deep bass, you may need an optional
Genesis ServoSub. The G6.1e has good bass extension down to
48Hz, and rolls off gently below that. A ServoSub will extend this bass
response down to 18Hz.
Inordertoachievewhatthespeakeriscapableofwesuggestyoufocus
your efforts on a proper balance of soundstage elements that includes
informationbeyondthe leftandright sidesofthespeakers,fronttoback

ver 1.0
10
10
absolute fidelity
depthwellbehindthespeaker,excellentfocusofinstrumentsandvoices
with proper vertical information and mid bass fill.
AGenesisloudspeakersystemcorrectlysetup,canandshouldprovide
a soundstage that is wall to wall and with pinpoint focus, the speakers
disappearing completely on a recording containing such information.
4.4 Room Treatment
Noroomisperfect.Tooptimizeyoursonicpresentationitmaybehelpful
to treat your room. Here are some guidelines:
Front walls. This loudspeaker is a dipole and
therefore there is sound coming from both the
front and the back of the speaker. How the front
wall (the wall you face while listening) is treated
or not treated is important. Generally speaking,
the Genesis loudspeakers prefer a live (hard
reflective) front wall to a dead (soft absorbent)
front wall.
Bythese termswemeantheamount ofreflection
of sound. A typical wall of glass, brick, cement
or drywall material is a reflective surface. A
heavilycurtainedorsound-proofed wallwould be
considereda"deadwall"oranon-reflective wall.
A normal thin curtain across a window causes
only a small amount of absorption.
Sidewalls.Because the speakeris a dipoleit is
less sensitive tothe sidewalls. However, as a
rule of thumb it is a good idea to keep the
speaker as far away from thesidewalls as is
practical. In some rooms, it may be helpful to
add some dampingmaterialordiffuserpanels to
the point of first reflection. This is a point on the
sidewalls between the listener and the
loudspeaker. It is where the sound from the
loudspeaker first hits the sidewall, then bounces to the listener.
This reflection is undesirablebecause it is slightly delayed from the
original sound. This point on the sidewall can be easily determined
with the help of a second person and a mirror.
Sitting in your listening position, have an assistant hold a mirror up
on the sidewall. Move the mirror until you can see the tweeter. This
is the point of first reflection. A diffuser (see your audio dealer), an

ver 1.0
11
11
absolute fidelity
absorptive material or even a piece of furniture can help break up
this point of first reflection.
Rear wall. In many cases it will be unnecessary to do anything with
the wall behind your listening position. However, you may want to
experiment with diffusers or absorbers behind you for best sound.
Absorption behind the listener is usually beneficial.
4.5 Mastering the Refinements of the system
Fine tuning an audio system is an art that will take time and patience. It
can be one of the more rewarding learning experiences you will have in
the pursuit of music and its enjoyment.
Oneofthebestpiecesof advicewecanofferis thatyoutakeadvantage
ofyourear'sabilitytoidentifysimilaritiesinsound.Thisabilityisusefulin
fine-tuning your system because, if every recording you listen to has a
similarity of sound (too much or too little of a certain frequency for
instance), then you can be fairly certain that you have yet to perfect your
set-up. Keep at it, and remember to enjoy your music as you work on
perfectingyourset-up.
If you have any questions, feel free to contact us at Genesis. Our
website is the first place that you can look to for more information, but
you are welcome to either send us an email, or just give us a call!

ver 1.0
12
12
absolute fidelity
5The Genesis 6.1e Technology
5.1 Dipolar Configuration
Whatalotofpeopledon’trealizeisthattheroomisasbig(ifnotbigger),
a part of their music system as is the loudspeakers. At Genesis, we
strive to get the loudspeaker and the room to work well together and
hence, design loudspeakers that interact with the room, and have
enough of adjustment to make them work with most rooms in the world.
Allrooms havefloors, ceilingsandsidewalls thatdistort soundbecause
of lateral, early-arriving reflections. We aim to suppress undesirable
contribution by reflected sound from these four surfaces (which is why a
lotofpeople put sound absorbersor diffusers at thefirst reflection point
of the room). In order to do that with a majority of rooms, we make our
loudspeakers dipolar.
Dipolesradiatethesame,butout-of-phase,waveformfromthefrontand
rear in “push/pull” fashion. Thus, the sound waves from the front and
backof the speakerscancel outasthey radiatefrom thesidesandtops
of the speakers; which means that there is minimum radiation of sound
to the sidewalls of the room.
The G6.1e also uses the wall behind the speaker to give more depth to
the soundstage and “air” to the speaker without detail robbing room
reflections from the sidewalls. Hence, it has the advantages of omni-
directional speakers, without the disadvantages.
With fewer spurious reflections to confuse your hearing, the program
source emerges more clearly. Imaging is stable, sharply focused,
deeper, and spacious. Transients are clearer, and sharper.
5.2 The Transducers
The transducers in the 3-way G6.1e are all proprietary Genesis-
designed drivers manufactured to our exacting standards.
5.2.1 The Genesis Ribbon Tweeter
ReviewersintheaudiophilepresshaveoftenremarkedthattheGenesis
circular ribbon tweeter is the world’s best. It is a one inch circular planar
ribbondesigncraftedfromanextremelythinmembraneofKaptonwitha
photo-etchedaluminium“voicecoil”thatisamere0.0005inchthick.The
entire radiating structure has less mass than the air in front of it! That is
why it will reproduce accurately, frequencies beyond 35k Hz.
The result of this design is a driver that has a rapid and uniform
response to high frequencies and has the speed of the best

ver 1.0
13
13
absolute fidelity
ribbon/electrostatic designs, without the high distortion and poor
dispersion that is typically associated with them.
TheG6.1e uses twoof thesetweeters perchannel.One front-firing, and
the other rear-firing wired to the crossover out of phase to the front
tweeters, creating a dipole.
5.2.2 Titanium Midrange
We sometimes say that the midrange is a window into the mind of a
composerorasinger.Andindeed,themidrangeiswherethe“magic”is
in a well-recorded musical event.
The G6.1e uses a Genesis-designed proprietary 5 inch titanium coned
midrange to cover this critical frequency spectrum. Manufactured out of
one of the lightest and stiffest materials known, this low mass cone
driver is one of the best midrange transducers ever made with nearly
instantaneous transient response, enabling the G6.1e to sound lifelike
and effortless.
5.2.3 Mid-Bass Couplers
In order to create and deliver the spectacular dynamics and concert-
levellistening thatis availablein allGenesis 6-series loudspeakers, the
G6.1e incorporates two front-firing 6.5 inch metal cone mid-bass
couplers as woofers.
Madeofaluminum,thismetalconeisextremelylightandstiff.Thedriver
is hence capable of handling the huge dynamic range demands of the
system while maintaining extremely low coloration and excellent
transient response.
5.3 Crossover
At Genesis, we believe that the crossover is the brain of the
loudspeaker. In order to manage and maximize the performance of the
extensive complement of transducers used in Genesis loudspeakers,
we spend more money on the crossover than many other
manufacturers put in their entire speaker.
Each crossover is designed by computer modelling plus years of
knowledge and experience. The inductors are made for Genesis with
OFC copper windings. The capacitors used are also custom made for
Genesis, using high-quality polypropylene-film and tin-foil. The
crossover of each G6.1e weighs over five pounds (2.2kg)!
More importantly, the crossovers are designed with many, many hours
of music listening, and constant refining, tuning and tweaking of the

ver 1.0
14
14
absolute fidelity
circuit. Out of this comes the “magic” that is a Genesis designed
loudspeaker system. For example, by going the more expensive route
ofusingseveralsmallercapacitorsinparallelinsteadofasinglebigone,
transparency and musicality were improved.
5.4 Vibration-free Cabinet
Thecabinetwasdesignedforaesthetics,butwithanobsessiontosonic
quality, vibration control, structural strength, and rigidity.
The design had to be bounced around our Chief Scientist, a structural
furniture engineer, an interior designer, an architect, and our CEO who
supplied the final “eye” to get the angles right on the cabinets.
Consultants on veneers, glues, and a German consultant on CNC
machining were used in its development.
The cabinet required incredible
precision in manufacturing as the
cabinetis madeofcomplex curvesand
subtle angles that need to be joined
seamlessly and perfectly.
Forexample, thereisnot asingle right-
angledjointintheentireconstruction!In
order to achieve the optical illusion to
make the cabinet look slimmer than it
actually is, the sides of the cabinet are
sloped1degreetop tobottom,andalso
angled 3degrees front to back, and leans backwards by 5degrees.
Joints and braces had to be cut precisely at 1degree, 3degree, and
5degree angles.
The result is that the cabinet is not only beautiful, but exceedingly well
damped and vibration-free –contributing to a loudspeaker that is
extremely low in coloration. It uses subtle angles, complex curves, and
contrasting colors to transform a loudspeaker into a beautiful piece of
sculpture or musical instrument.
The structural principle used in the construction is this: when any
loudspeaker is operating, ALL the components of the speaker are set
into vibration to a larger or smaller extent. The goal of the cabinet is to
reduce this vibration to a minimum, distribute it, and damp it so that
there is no energy storage in the cabinet itself. This then eliminates the
boxy coloration that is evident in many loudspeakers.
Joinery on G6.1e Square Box

ver 1.0
15
15
absolute fidelity
In some parts of the cabinet where vibration would have been the
greatest, two inches (52mm) of multi-layer bonded MDF was used to
provide the damping, structural integrity, as well as a rigid platform for
thedrivers tobe located.Inother partsof thecabinet, extensive bracing
was carefully incorporated using 25mm slabs of MDF to eliminate
cabinet flex and panel resonance.
Incidentally, MDF was chosen as the material of choice for its damping
properties and its consistency in hardness, density and rigidity. It would
actually have been cheaper and easier to make the cabinet of solid
wood, but that would have been a compromise.
Genesis locates the mid-bass, midrange and high frequency
transducers on a gently sloping front. Constructed of two layers of
25mm MDF, this provides a damped, vibration-free structure to rigidly
locatethesecriticalelements.Thislocatesthetransducersintheperfect
environmentforthebestimagingandsoundstaging,andwiththe lowest
distortion.
Extensive bracing is also used to even further reduce vibrations. The
bracing is also directly coupled to the cabinet walls using tongue and
groove construction –the braces are not just glued in!
Thesidesofthecabinetalsogentlyslopetothevertical.Likeapyramid,
the shape of the cabinet makes it exceptionally stable. This stability
ensures that the cabinet is well-grounded (like a sumo wrestler J!) no
matter what surface you put it on. The shape of the cabinet effectively
putsthecenterofgravity ofthecabinet overtheheavy transformer in the
base.
The results of this obsession in cabinet design and construction is low
coloration, stable imaging, and a wide soundstage. It is also something
you can feel! By playing a loud piece of music, and running your
fingertips on the surface of the cabinet, you will feel very few places (if
any) where there is vibration. On the front baffle, there are no vibrations
at all around the critical region that is the mounting environment for the
tweeter and mid-range.
Try doing that on other loudspeakers which do not have as well
constructed cabinets, and you’ll understand why we are so proud of our
design and manufacturing.

ver 1.0
16
16
absolute fidelity
6Specifications
§Frequency Response: 48Hz to 36kHz, +/-3dB
§Sensitivity: 89 dB 1 watt 1 meter
§Min/Max Power (Tube): 75/500 watts per side
§Min/Max Power (Solid State): 100/1000 watts per side
§High Level Input Impedance: 4 ohms (Nominal)
§HF Transducers: Two Genesis 1” Circular Ribbon
Tweeters (front & rear)
§Midrange Transducers: One Genesis 5 “ titanium cone
midrange
§Bass Transducers: Two Genesis 6.5” aluminium
cone
§Controls: Upper Midrange Contour,
Tweeter level
§Inputs: High-level with 5-way binding posts
§Outputs: High-level with 5-way binding posts
§Dimensions: H 41 ¾ ” x W 10 ¼ ” x D 14”
§Weight: 79 lbs (36kg) per side
Table of contents
Other Genesis Speakers manuals

Genesis
Genesis 8200F User manual

Genesis
Genesis Helium 100 BT User manual

Genesis
Genesis 8200F User manual

Genesis
Genesis AMP-1 User manual

Genesis
Genesis 450XS User manual

Genesis
Genesis G6.1 User manual

Genesis
Genesis G2jr User manual

Genesis
Genesis 5.3 User manual

Genesis
Genesis G7.1p User manual

Genesis
Genesis G6.1sr User manual

Genesis
Genesis Helium 600 User manual

Genesis
Genesis G5.2 User manual

Genesis
Genesis G5.3 User manual

Genesis
Genesis HELIUM 800BT User manual

Genesis
Genesis 7.1 Petite User manual

Genesis
Genesis G6.1e User manual

Genesis
Genesis 5.3 User manual

Genesis
Genesis G6.1c User manual

Genesis
Genesis Gen 750 User manual

Genesis
Genesis 1.1 User manual