Genfine Purifier 32 User manual

GENFINE
Purifier 32
User Manual V1.3
GENFINE Biotech (Changzhou) Co., Ltd.

Contents
Chapter 1: Product Introduction ...............................................................................................................1
Product Name...................................................................................................................................1
Model ...............................................................................................................................................1
Intended Use ....................................................................................................................................1
Working Principle ............................................................................................................................1
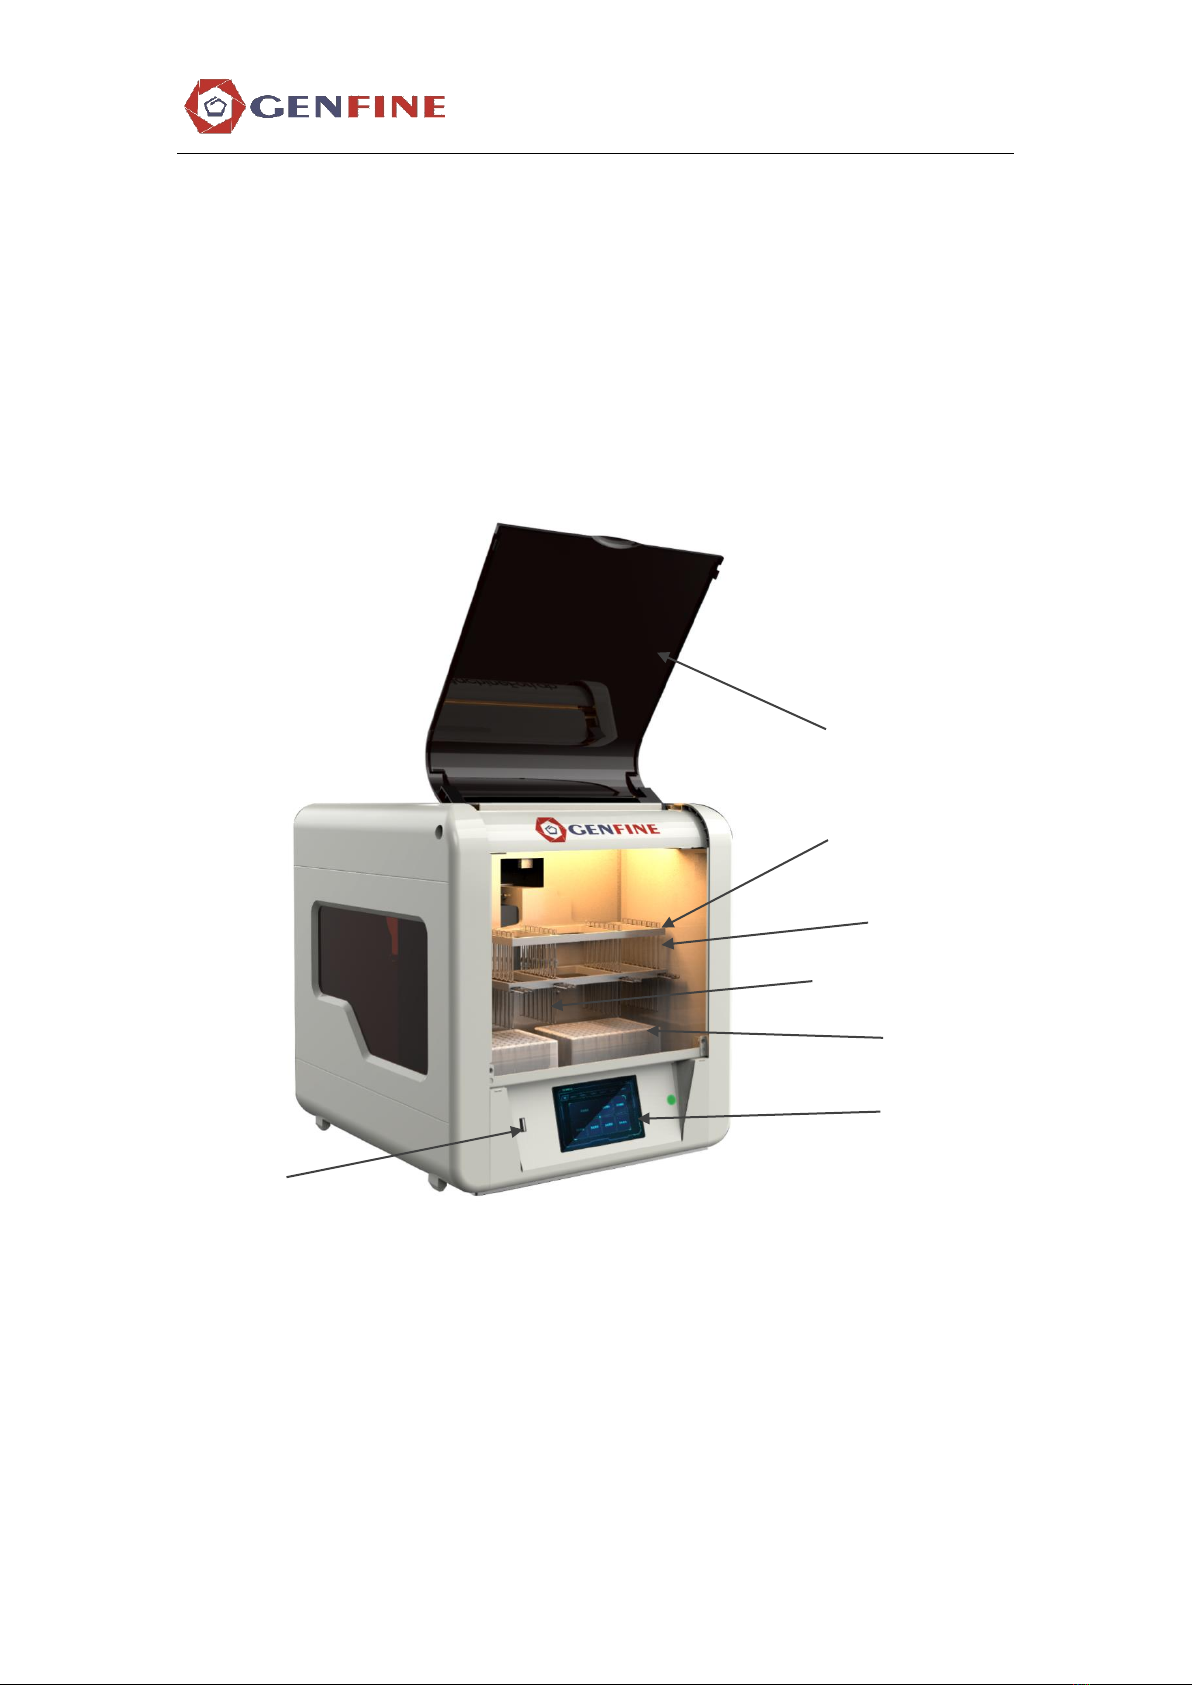
Chapter 2 Function Introduction...............................................................................................................2
Main .................................................................................................................................................2
Magnetic Bead Processing Principle................................................................................................4
Magnetic bead processing ................................................................................................................4
Bind magnetic beads ........................................................................................................................4
Release magnetic beads....................................................................................................................4
Rinse magnetic beads.......................................................................................................................5
Volume change in magnetic bead processing...................................................................................5
USB Port ..........................................................................................................................................5
Consumables ....................................................................................................................................5
Chapter 3 Installation and Packaging .......................................................................................................6
Delivery Check ................................................................................................................................6
Unboxing..........................................................................................................................................6
Integrity and Damage Check............................................................................................................6
Environment Requirement ...............................................................................................................7
Precautions and Restrictions ............................................................................................................7
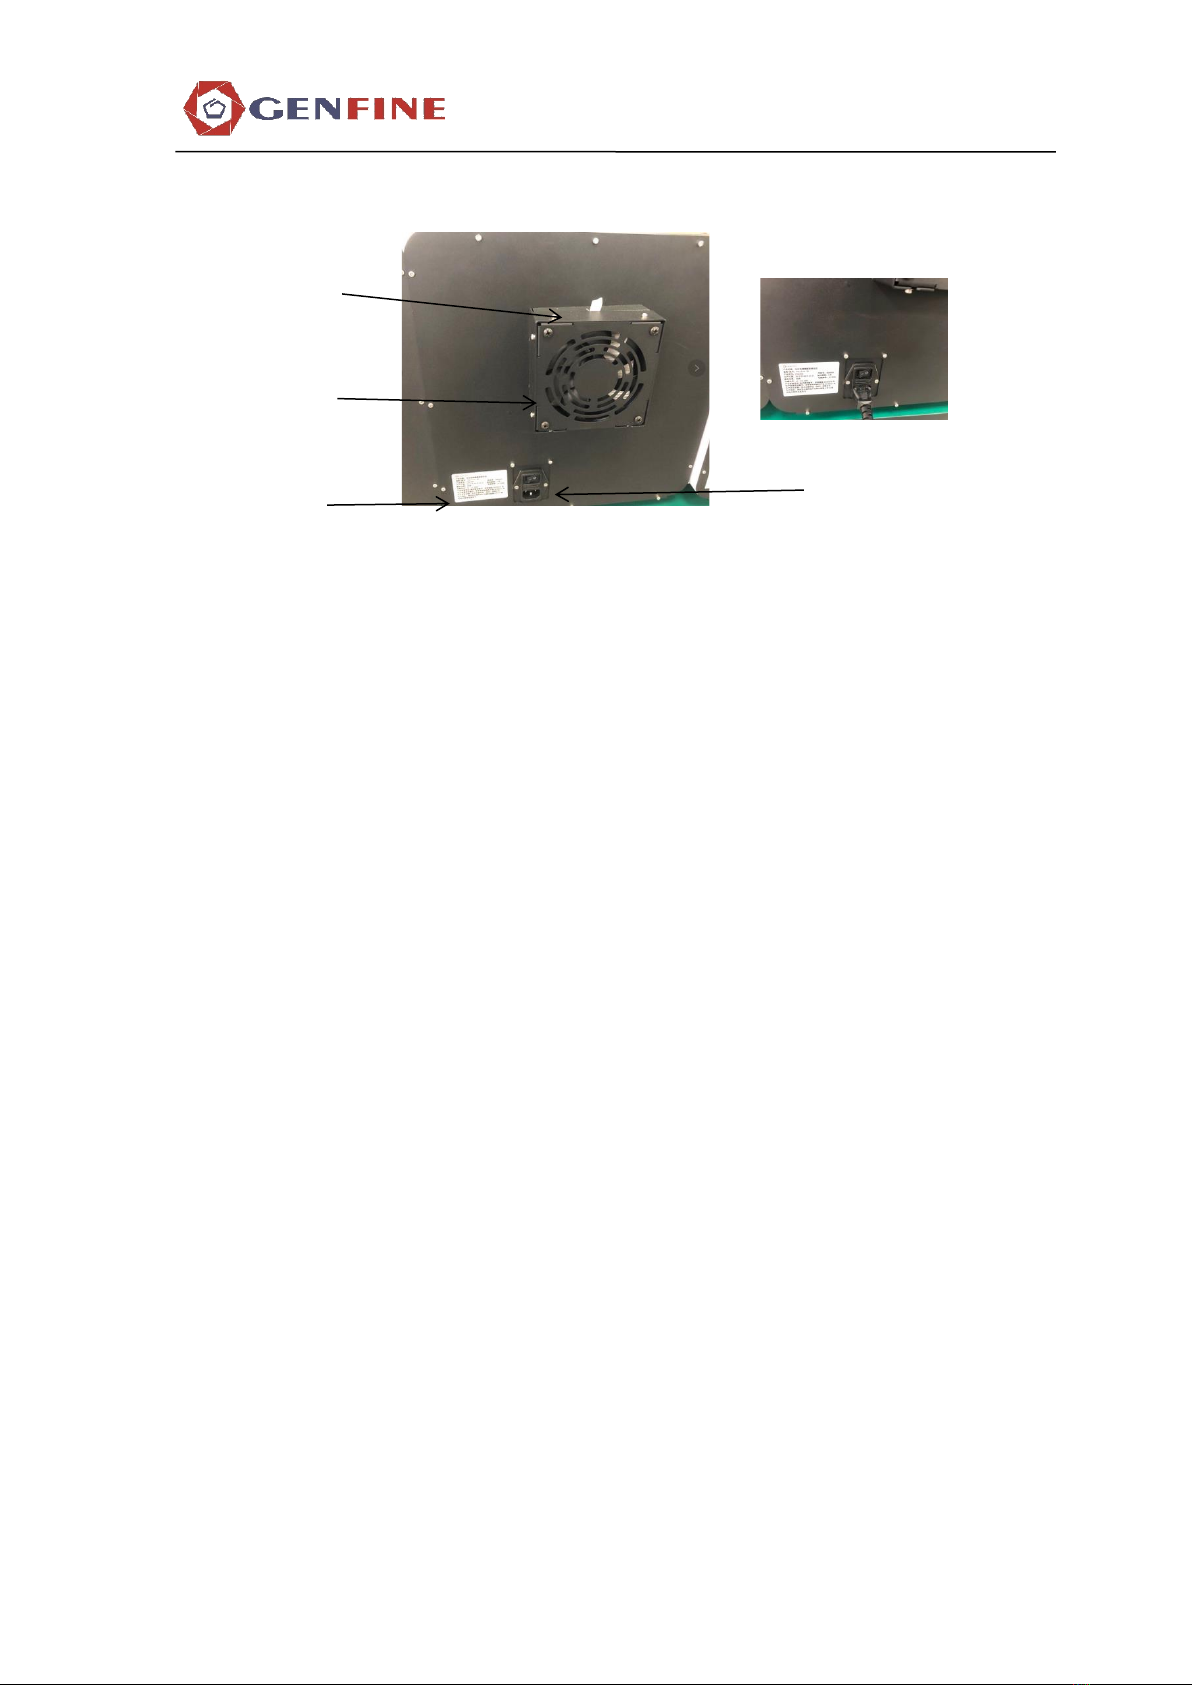
Installation Settings ..........................................................................................................................8
Power Connection ..........................................................................................................................10
Packaging Settings .........................................................................................................................10
Chapter 4 Instructions for Use................................................................................................................12
Starting...........................................................................................................................................12
Control Panel..................................................................................................................................12
Touch Screen..................................................................................................................................12
System Default ...............................................................................................................................12
Select File.......................................................................................................................................13
Run File..........................................................................................................................................13
Custom ...........................................................................................................................................14
Sign Up ..........................................................................................................................................14
Log in .............................................................................................................................................15
New Program Creation...................................................................................................................16
Program Details..............................................................................................................................16
Function Details .............................................................................................................................18
Settings...........................................................................................................................................20
Advanced Mode .............................................................................................................................20
Shutting Down ...............................................................................................................................21
Emergencies ...................................................................................................................................22
Chapter 5 Care and Maintenance............................................................................................................23
Platform Cleaning ..........................................................................................................................24

Magnetic Rods Cleaning ................................................................................................................24
Waste Disposal ...............................................................................................................................24
Decontamination Procedure ...........................................................................................................25
Packaging for repair .......................................................................................................................26
Service Contract .............................................................................................................................27
Disposal of the instrument .............................................................................................................27
Chapter 6 Technical Parameters .............................................................................................................29
General Parameters ........................................................................................................................29
Performance parameters.................................................................................................................29
Safety parameters...........................................................................................................................30
Compliance ....................................................................................................................................30
Chapter 7 Other information...................................................................................................................31
Production date ..............................................................................................................................31
Service life .....................................................................................................................................31
Components List ............................................................................................................................31
Interpretation of Graphics, Symbols and Abbreviations ................................................................31
Manual revision date ......................................................................................................................32
2021.01.29......................................................................................................................................32
Target customers ............................................................................................................................32
More information ...........................................................................................................................32
Safety and User Guide ...................................................................................................................32
Chapter 8 Manufacturer and Medical Device Information..................................................................34
Name of manufacturer....................................................................................................................34
Production address .........................................................................................................................34
Contact information .......................................................................................................................34
Production record certificate No. ...................................................................................................34
Medical device record certificate/technical requirement No..........................................................34
Chapter 9 Order Information ..................................................................................................................35
Purifier 32 ......................................................................................................................................35
List of accessories and consumables ..............................................................................................35
List of kits ......................................................................................................................................36
Appendix A Certificate of Decontamination ..........................................................................................37
Appendix B System Log ........................................................................................................................38

Page1of 38
Chapter 1:
Product Introduction
Product
Name
Automatic nucleic acid extractor
Model
Purifier 32
Intended Use
This instrument can be applied for the extraction and purification of
nucleic acid from different clinic samples. Purifier 32 is especially
used on research and tests by the personnel who have been trained
professionally. It is recommended that good laboratory practice
(GLP) should be followed to ensure the reliability of the analysis.
Refer to Chapter 6: Technical Parameters.
Working
Principle
The principle is magnetic beads adsorption method. Purifier 32
(Figure 1-1) is designed for automatic transfer and processing of
magnetic beads in standard microwell plates. The patented
technology of the Purifier 32 system is based on the use of
magnetic rods and microwell plates with disposable and specially
designed magnetic tip combs. The instrument may work without
any distribution or suction parts or devices. Samples and reagents,
including magnetic beads, are loaded into microwell plates
according to corresponding instructions. The program selected by
the user through the touch screen has been uploaded to the
instrument software. Purifier 32 software can be used to create and
run programs.
Figure 1-1. 32-Channel
Automatic Extractor

Page 2 of 38
Chapter 2
Function Introduction
Main
Components
It usually consists of a mechanical part and an electrical part. This
section shows the front and back views of Purifier 32.
Front View
See Figure 2-1 for the front view of Purifier 32.
Figure 2-1. Purifier 32 Front View
96 deep-well plate &
loading position
Magnetic tip comb holder
Magnetic rod
USB port
Sample chamber door
Touch screen
Magnetic tip comb

Page 3 of 38
Rear View
See Figure 2-2 for the rear view of Purifier 32.
Figure 2-2. Purifier 32 Rear View
Purifier 32 (Figure 2-1) has 2 microwell plate positions. The
magnetic tip combs match the microwell plate. During each step, the
microwell plate remains stationary and the only component that
moves is the magnetic head with magnetic tip comb and magnetic
rod. The magnetic head consists of two vertically moving platforms.
One is used for the magnetic rods and the other is used for magnetic
tip comb. The magnetic tip comb with 32 channels can process 32
samples at one time.
Prior to the start of program, samples and reagents are loaded into
microwell plate. The magnetic tip comb is placed on the correct
microwell plate and can be automatically loaded onto the moving
platform. According to the program, the microwell plate is placed in
the corresponding plate position on the plate.
The sample chamber door must be closed during operation. It can
protect the sample from environmental contaminants.
The working principle of the instrument is MPP technology (Figure
2-4). Different from other methods of magnetic bead purification for
liquids transfer, this method transfers magnetic beads between
microwell plates containing specific reagents. The magnetic beds are
transferred with the help of magnetic rods and the magnetic rods are
loaded with a specially designed disposable plastic magnetic tip
comb.
Filter
Fan
Label
Main
power
connection

Page 4 of 38
Magnetic
Bead
Processing
Principle
Figure 2- 3 MPP
Magnetic
bead
processing
Magnetic bead processing can be divided into four separate steps:
⚫Bind magnetic beads
⚫Release magnetic beads
⚫Rinse magnetic beads
⚫Concentration
Bind
magnetic
beads
In the magnetic bead binding process, the magnetic rod is
completely inside the magnetic tip comb. The magnetic rod and
magnetic tip comb move slowly up and down in the microwell plate
to collect the magnetic beads to the top of the magnetic tip comb.
After the magnetic rod and magnetic tip comb are bound with the
magnetic beads, they are lifted from the microwell plate and
transferred to the next microwell plate.
Release
magnetic
beads
After the magnetic beads are collected, the magnetic rod and
magnetic tip comb are lifted from the microwell plate together and
transferred to the next microwell plate containing the reagent. The
magnetic rod and magnetic tip comb are placed together and the
magnetic rod is lifted.
The magnetic beads are released by moving the magnetic tip comb
up and down at high speed, and all the magnetic beads are fully
mixed with the substrate of the next reaction.

Page 5 of 38
Rinse
magnetic
beads
Magnetic bead cleaning is a common and important process that
combines release and collection in a microwell plate filled with
cleaning solution.
In order to maximize cleaning efficiency, the magnetic rod and
magnetic tip comb are designed to have minimal liquid hanging
performance.
Volume
change in
magnetic
bead
processing
The solution volume of the former microwell plate can be larger
than that of the next microwell plate to achieve the purpose of
concentration (see Figure 2-5).
Figure 2-4 Concentration Process in Magnetic Bead Processing
USB Port
There is a USB port on the front panel for updating the software of
the touch screen and motherboard.
Consumables
See "Accessory and Consumables List" for details and ordering
information about Purifier 32's plastic consumables, such as
deep-well plates, magnetic tip comb, HEPA filters and UV lights.

Page 6 of 38
Chapter 3
Installation and Packaging
This chapter introduces the installation of Purifier 32
Delivery
Check
This section contains the procedures to be carried out upon receipt
of the instrument.
Unboxing
Move the packaged instrument to the operation site. To prevent
condensation of water vapor, the instrument should be left in its
protective, anti-static plastic packaging until the ambient
temperature is reached. Open Purifier 32 and accessories carefully,
with the arrow on the transport package upwards. Remove the
instrument from the package and place it on a horizontal surface.
Warning Purifier 32 weights about 22kg. If transporting without
package, please handle carefully. It is recommended that two
people move the equipment together and take appropriate
precautions to avoid injury.
When lifting the instrument, place the fingers on the bottom of both
sides and keep the back straight.
Please keep the original packing materials for future
transportation. The packing is designed to ensure safe
transportation and reduce damage in transit. The use of alternative
packaging materials may not achieve the effect. All instrument
related documentation provided by the manufacturer is retained for
future use.
Integrity and
Damage
Check
Check the packing list attached to the instrument according to the
order. Visually check the shipping packages, instruments and
accessories for possible transportation damage. If any parts are broken,
please contact the manufacturer in time.

Page 7 of 38
Environment
Requirement
When installing Purifier 32, avoid placing it in the places where
there is a lot of dust, vibration, strong magnetic field, direct sunlight
or ultraviolet radiation, airflow, high humidity or high temperature
fluctuation. Please place the instrument on a regular experiment
table to ensure that:
⚫The working area is flat, dry, clean and secure, with extra
space for accessories, cables, reagent bottles, etc;
⚫At least 10 cm of free space is provided for ventilation on the
table around the instrument;
⚫The ambient air is clean, free from corrosive steam, smoke
and dust;
⚫Ambient temperatures range from 10°C to 40°C;
⚫Humidity is low and condensation does not occur (relative
humidity is below 80%);
Care should be taken not to operate the instrument in an
environment with potentially harmful liquids or gases.
Precautions
and
Restrictions
⚫Always ensure that the laboratory power supply voltage meets
the specification on the label on the back of the instrument
(Figure 2-2);
⚫Do not smoke or eat or drink while using this device;
⚫Clean hands thoroughly after handling the buffer solution;
⚫Follow regular laboratory procedures for handling samples
that may be dangerous;
⚫Adhere to good laboratory practices and wear appropriate
protective clothing such as disposable gloves and laboratory
coat;
⚫Ensure that the working area is well ventilated;

Page 8 of 38
⚫Do not spill liquid inside or outside the device.
Caution Do not place the instrument near magnetic tapes, computer
discs or other magnetic storage devices, such as credit cards, as
they may be damaged by the strong magnetic field of the
instrument magnetic head.
Do not put the Purifier 32 magnetic head near the computer
monitor, as this may damage the monitor.
Warning The product has a strong permanent magnet. This product
should not be used by people wearing pacemakers or metal
prostheses. Prosthetic devices such as pacemakers or prostheses
may be affected or damaged by close contact with strong magnetic
fields.
Installation
Settings
Disassembly of set screw of magnetic rod holder Before the
main machine of the instrument is energized, it is necessary to use
an Allen wrench to remove the set screw of the magnetic rod
holder. If the instrument is energized without removing the set
screw of the magnetic rod holder, the instrument will be damaged.
Figure 3-1. Installation Diagram of Set Screw of Magnetic Rod Holder
Before
removing

Page 9 of 38
Figure 3-2.Schematic Diagram After Removing the Set Screw of
Magnetic Rod Holder
Installation of 96-well plate The circular bottom of the 96-well
plate with square hole and circular bottom just fits with the
concave clamping position of the heating tank; the heating tank is
located under the 2/6 and 8/12 vertical row holes of the 96-well
plate.
Figure 3-3. Installation of 96-well plate
Installation of magnetic tip comb The magnetic tip comb must be
inserted into the bottom of the card slot of the magnetic tip comb to
ensure that the magnetic rod is safely inserted into the magnetic tip
comb during the operation of the instrument.
Note: The reagent volume in the 96-well plate shall not exceed
1.2ml, otherwise the reagent will overflow when the magnetic rod is
shaken up and down.
After
Heating
strip
96 deep-well plate

Page 10 of 38
3-4. Effect Diagram after Installation of 96-Well Plate and
Magnetic Tip Comb
Power
Connection
Connect the power connector:
Warning Make sure that the power switch on the rear panel (Figure
2-2) is in the "O" position. Never connect an ungrounded power
outlet. Do not use any power cord other than the one provided by
the manufacturer.
1. Connect the power cord to the power connector and insert into
the instrument (Figure 2-2).
2. Connect the power supply to a properly installed,
well-grounded power outlet.
Packaging
Settings
Machine Set-Up Turn off the power and place the magnetic tip
comb and deep-well plate into the instrument to protect the
magnetic rod. Next tighten with the set screw (Figure 3-1). If the set
screw of the magnetic rod holder is not tightened, the magnetic rod
holder will move during transportation, which will damage the
instrument.

Page 11 of 38
Instrument Packaging Put the instrument in a bag, fix eight
corners with foam and put into a carton. Then put the carton into a
big packaging box, and seal the packaging box for direct
transportation.
3-5. Inside schematic diagram of packaging box

Page 12 of 38
Chapter 4
Instructions for Use
Starting
Before turning on Purifier 32, make sure that the voltage on the
label which is on the left bottom of the back panel (Figure 2-2)
matches the local voltage.
Warning Never operate the instrument on an ungrounded electrical
outlet.
Control
Panel
This section describes the control panel and internal software of
Purifier 32.
Touch Screen
The home page of the touch screen is shown below.
System
Default
Press Default button to display the file list preset in Purifier 32
software. These configuration files cannot be edited and deleted.
Click the Home button to return.

Page 13 of 38
Select File
Users can select any file in the table, for example, by clicking the
"DNA" button.
Detailed file is as shown in the figure. No step or parameter can be
edited and deleted.
Run File
Click “Run” to start file running.
Click “Pause” to pause file running.

Page 14 of 38
Click “Continue” to resume file running.
Click “Cancel” to stop and exit file running.
Custom
There is a custom function module on the home page. Users can
create and manage their own accounts, create, modify, save and
delete their own personal files.
Sign Up
Click “Sign up” to register an account

Page 15 of 38
Use the keyboard to enter a name and password. A password is not
required.
When the account is signed up, it will be displayed in the file list.
Log in
After the account is signed up, the user can directly log in the
original account.

Page 16 of 38
New
Program
Creation
After log in, a “Creat new program” button appears at the bottom of
the touch screen.
Click “Creat new program” to resume. The user can set the program
name, icon and brief description and then click “Next”.
Program
Details
This interface shows all details of the program, such as step and
time.
Click “Detail” to set a program.
Click “Delete” to delete a program.
Click “Back” to return to previous menu.

Page 17 of 38
The user can set and select relevant parameters in this interface.
The meaning of each button is as follows:
The current step is set to work in plate position 1
Set the function of the current step
Return to previous step
Enter the next step
Other manuals for Purifier 32
1
Table of contents
Other Genfine Ventilation Hood manuals
Popular Ventilation Hood manuals by other brands

JUNO
JUNO JDS3530B Instruction on mounting and use

ROBLIN
ROBLIN CUBIX Dimensions

Zephyr
Zephyr Siena Pro ZSP-E48BS Use, care and installation guide

KÜPPERBUSCH
KÜPPERBUSCH IKD9480.0E Instructions for use and installation

Brandt
Brandt BHY2353B Instruction on mounting and use

Grundig
Grundig GDKP 2460 B user manual