Genfine Purifier HT User manual

GENFINE
Purifier HT
User manual V2.1

1
Contents
Chapter 1 Product Introduction1.......................................................................................................3
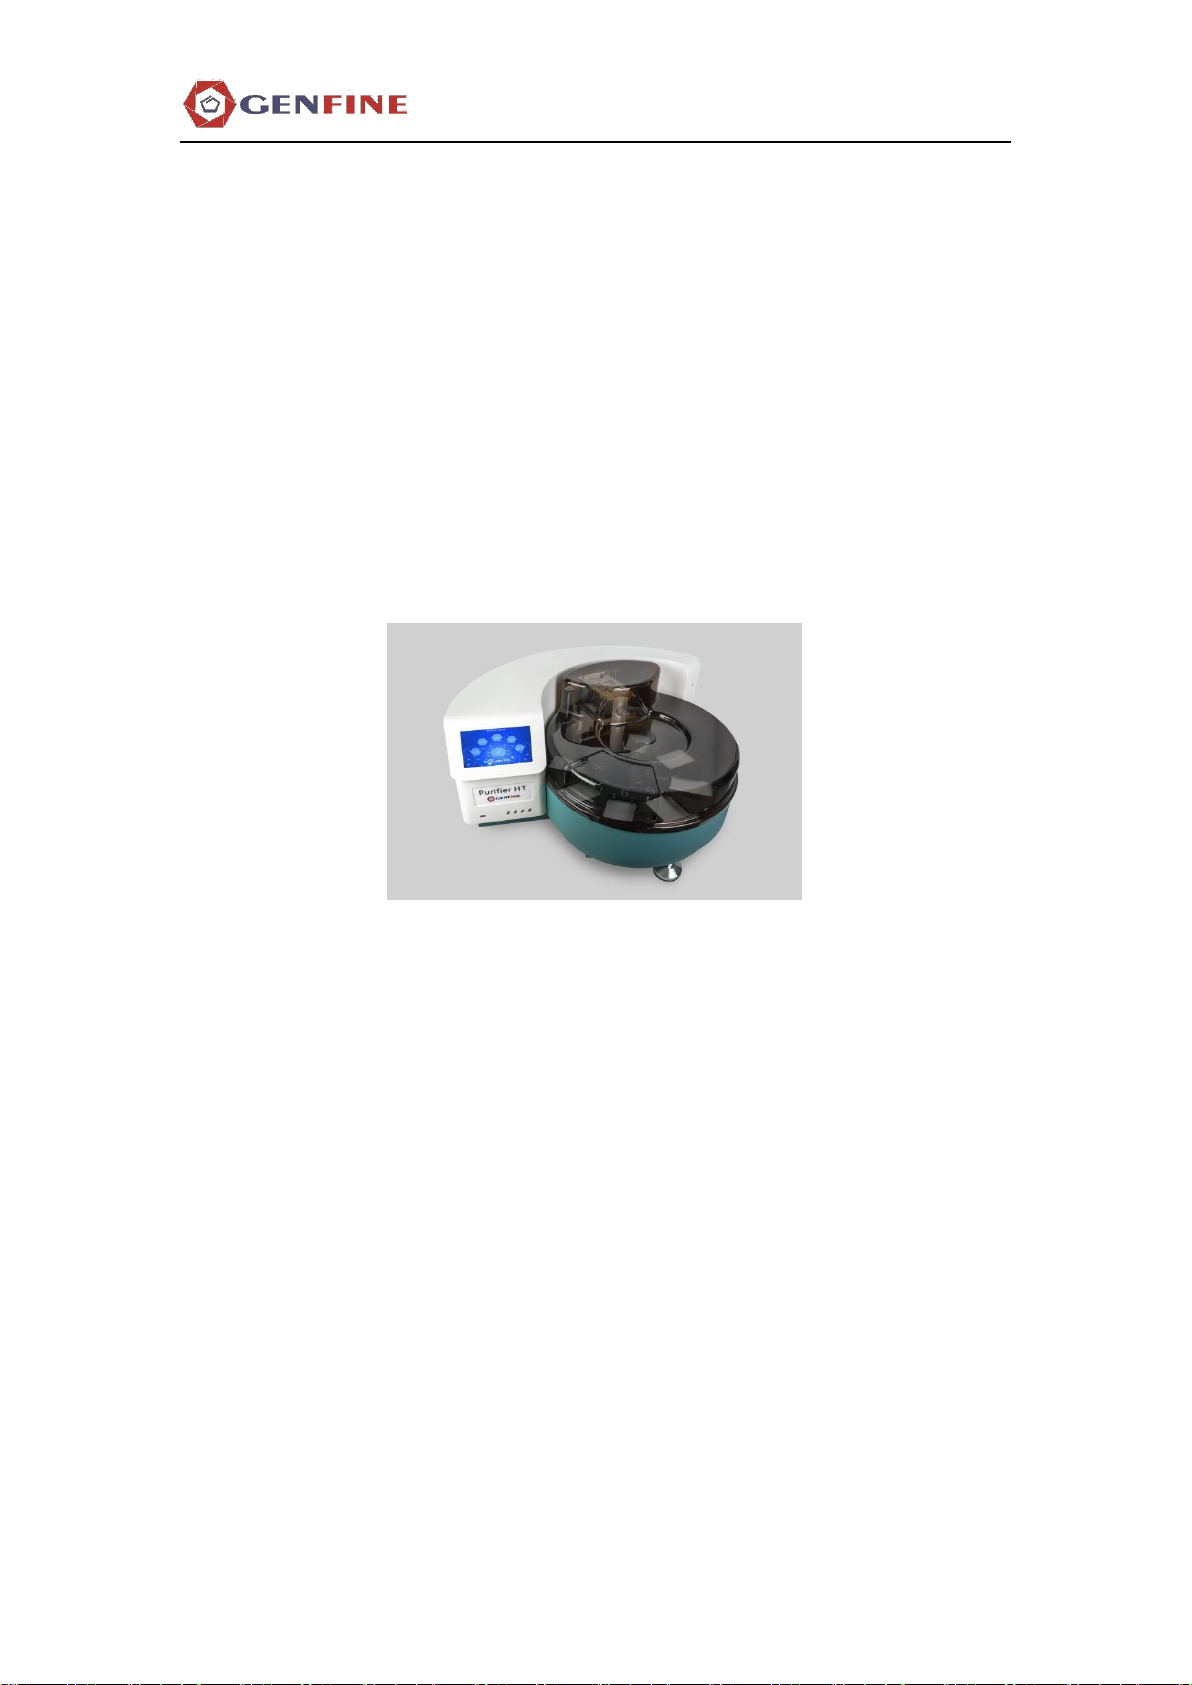
1.1 Product Name.....................................................................................................................3
1.2 Model ................................................................................................................................3
1.3 Intended use.......................................................................................................................3
Chapter 2 Function Introducion ........................................................................................................4
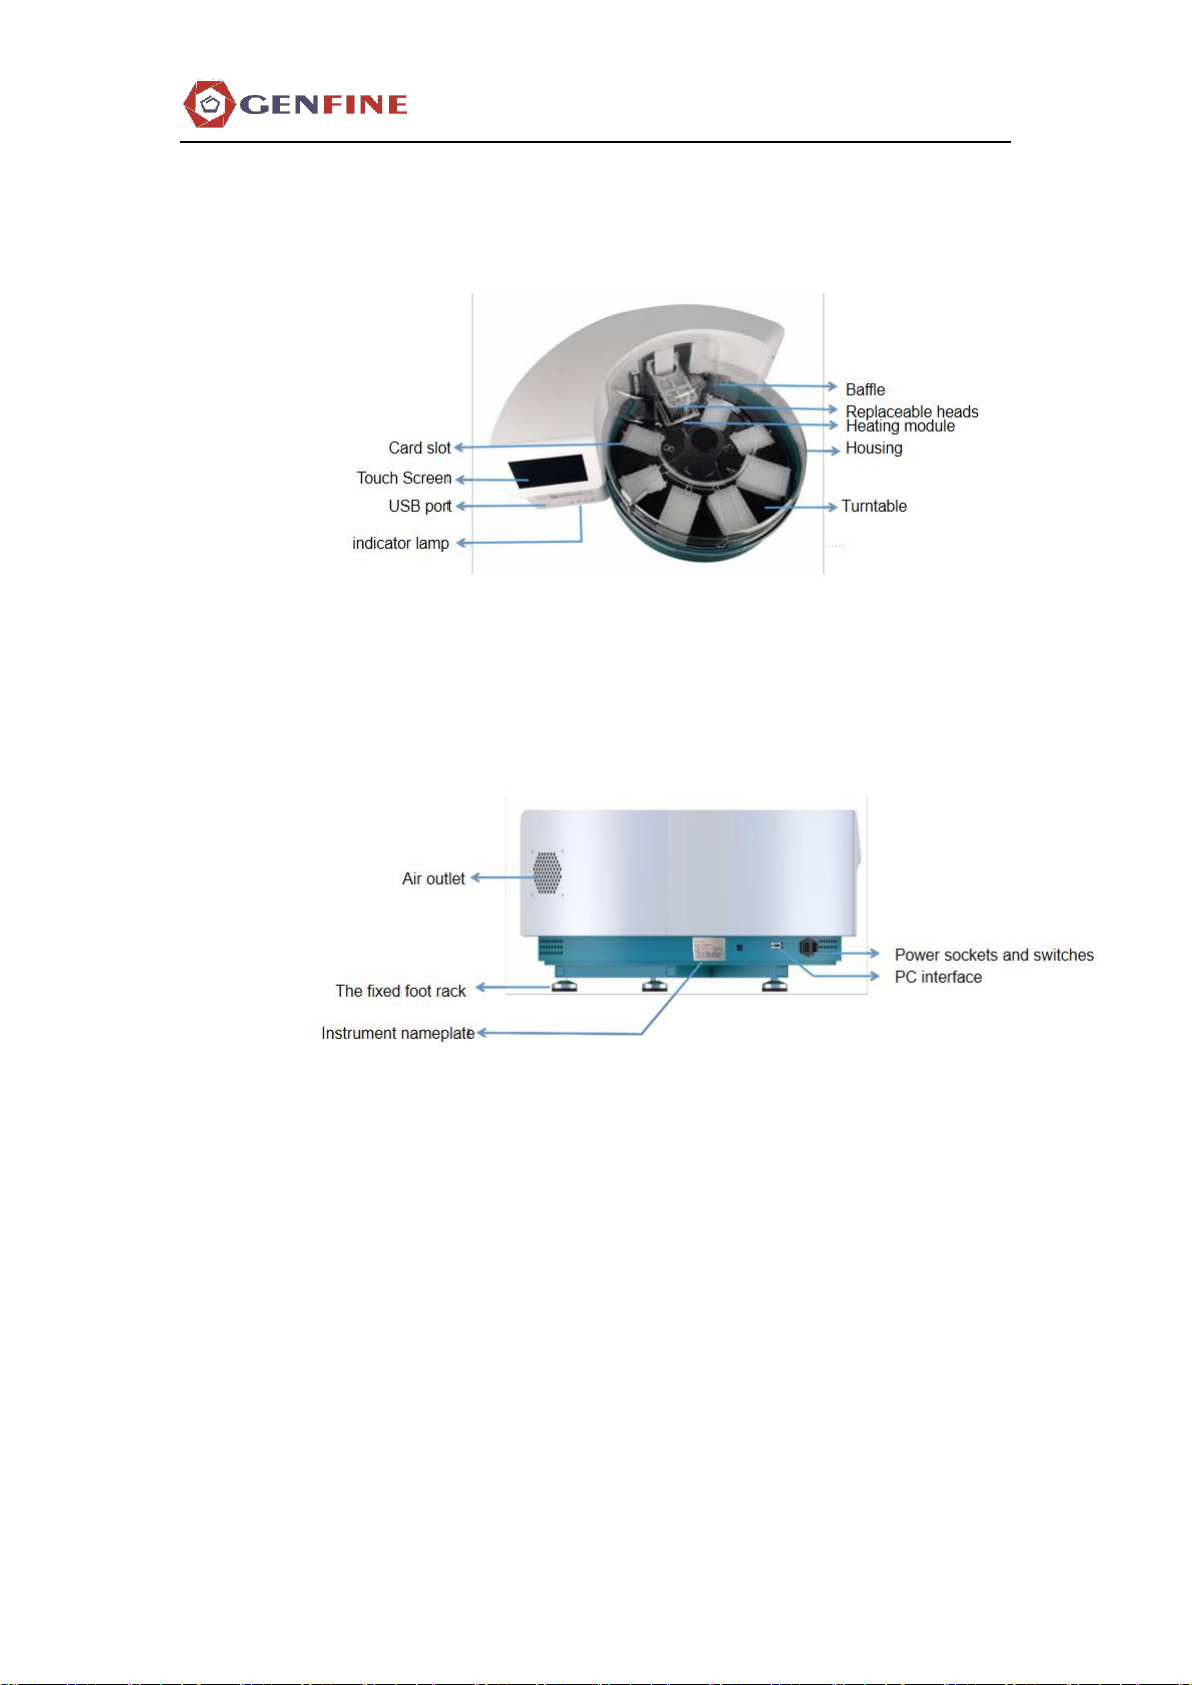
2.1 Main Components...............................................................................................................4
2.1.1 Front View.............................................................................................................4
2.1.2 RearView ...............................................................................................................4
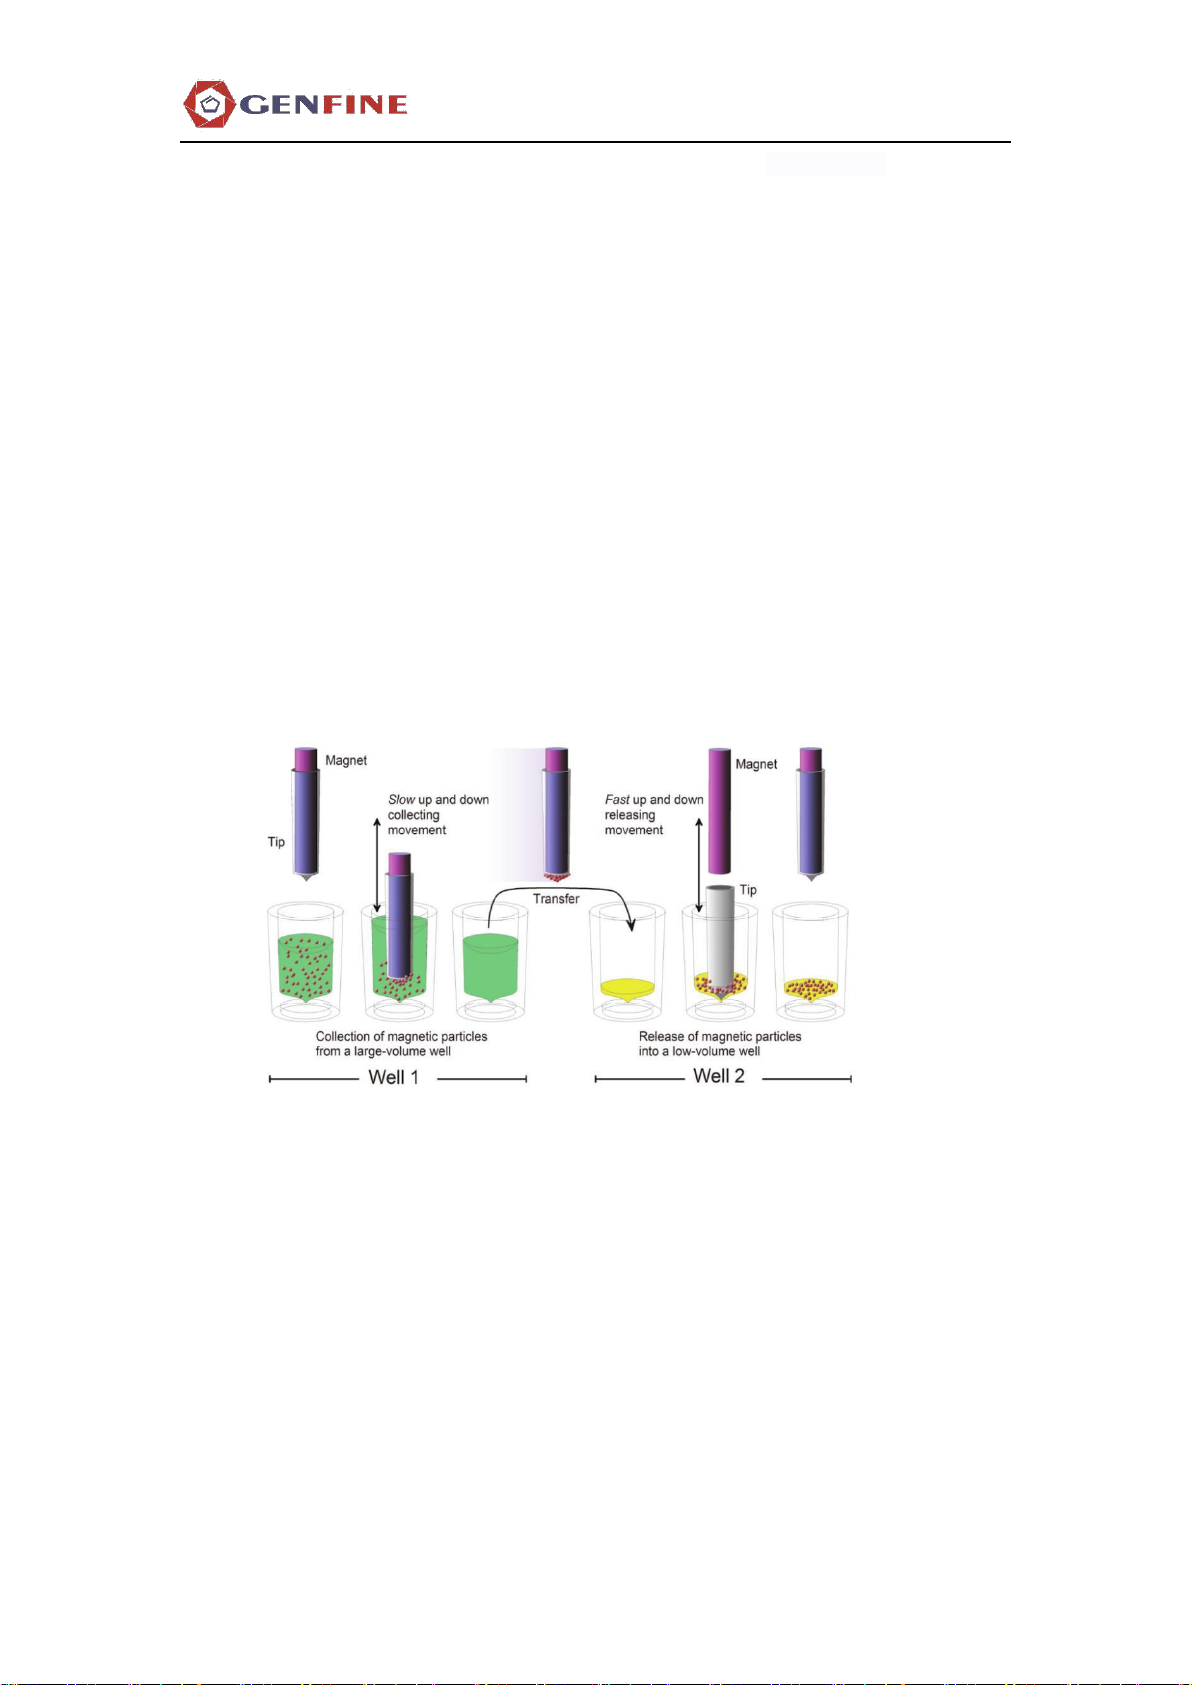
2.2 Working Principle...............................................................................................................5
2.3 USB Port.............................................................................................................................5
2.4 Consumables .....................................................................................................................5
Chapter 3 Installation ......................................................................................................................6
3.1 Delivery Check ..................................................................................................................6
3.1.1 Unboxing.................................................................................................................6
3.1.2 Integrity Check.........................................................................................................6
3.2 Environment Requirements................................................................................................6
3.3 Precautions........................................................................................................................6
3.4 Installtion Settings...............................................................................................................7
3.4.1 Power Connection....................................................................................................7
3.4.2 Operation Check ......................................................................................................7
Chapter 4 Instructions for Use...........................................................................................................8
4.1 Starting................................................................................................................................8
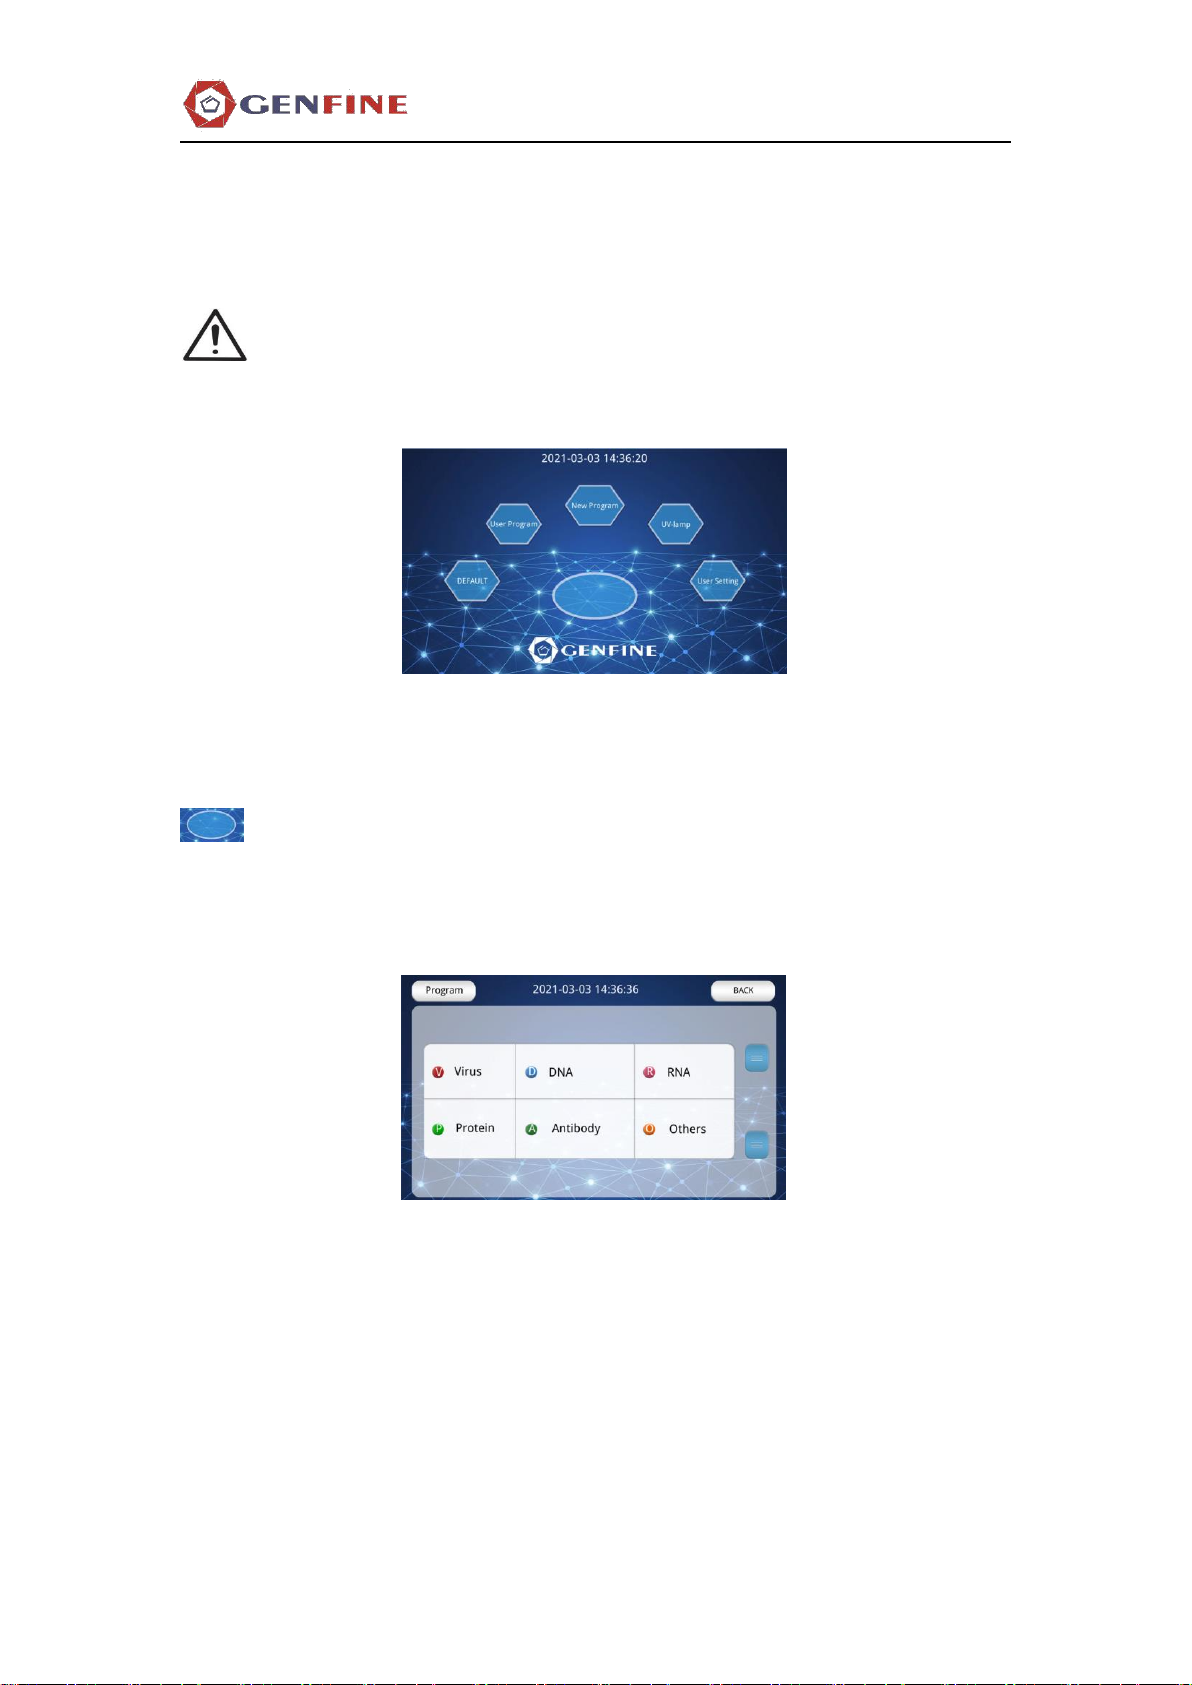
4.2 Programs .............................................................................................................................8
4.2.1 Home Screen...........................................................................................................8
4.2.2 Program Running....................................................................................................8
4.2.3 New Pogram Creation.............................................................................................9
4.2.4 User Settings ......................................................................................................12
4.2.5 UV Light Settings.................................................................................................12
4.3 Shutting Down .................................................................................................................12
4.4 Emergencies.....................................................................................................................13
Chapter 5 Care and Maintenance ....................................................................................................14
5.1 Instrument Maintenance....................................................................................................14
5.2 Cleaning...........................................................................................................................14
5.3 Magnetic Rods Cleaning..................................................................................................14
5.4 Waste Disposal.................................................................................................................14
5.5 Decontamination Procedure ............................................................................................14
5.5.1 Decontamination reagents Types...................................................................14
5.5.2 Decontamination Procedure ................................................................................15
5.6 Packaging for repair..........................................................................................................15
5.7 Service Contract...............................................................................................................15
5.8 System Log ......................................................................................................................15
5.9 Instrument Disposal.........................................................................................................15
Chapter 6 Technical Parameters......................................................................................................17

2
6.1 General Parameters..........................................................................................................17
6.2 Performance Parameters ..................................................................................................18
6.3 Safety Parameters.............................................................................................................18
6.4 Compliance......................................................................................................................19
6.5 Error code.........................................................................................................................19
Chapter 7 Other Information...........................................................................................................20
7.1 Product Date.....................................................................................................................20
7.2 Service life.......................................................................................................................20
7.3 Components List..............................................................................................................20
7.4 Interpretation of graphics.................................................................................................21
7.5 Manual revision date........................................................................................................21
7.6 Target customers..............................................................................................................21
7.7 More information.............................................................................................................21
7.8 Safety and User Guide .....................................................................................................21
Chater 8 Manufacturer and Medical Device Information...............................................................22
Chater 9 Order Information.............................................................................................................22
9.1 Purifier HT confiuration...................................................................................................23
9.2 List of Accessories and Consumabes...............................................................................23
9.3 List of Kits .......................................................................................................................23
Appendix A Certificate of Decontamination...................................................................................24
Appendix B System Log .................................................................................................................25

3
Chapter 1 Product Introduction
1.1 Product Name:
Purifier HT Automatic nucleic acid extractor
1.2 Model:
Purifier HT
1.3 Intended Use
Purifier HT
(
Figure
1-1)adopts the magnetic beads separation technology to achieve the
collection, release, transfer and incubation of the magnetic beads through the movement of the
magnetic rods and the magnetic tip combs. And by this, it can complete the entire nucleic acid
extraction process.
The instrument can be applied for the extraction and purification of nucleic acid from
different clinic samples. Purifier HT is especially used on research and tests by the personnel who
have been trained professionally. It is used for automatic transfer and processing of magnetic
beads in deep well plates. It is recommended that good laboratory practice (GLP) should be
followed to ensure the reliability of the analysis. Refer to Chapter 6: Technical Parameters.
Figure 1-1. Purifier HT

4
Chapter 2 Function Introduction
2.1 Main Components
2.1.1 Front View
Figure 2-1.Purifier HT Front view
2.1.2 Rear View
Figure 2-2. Purifier HT Rear View

5
Purifier HT (Figure2-1), The magnetic tip combs matches the deep-well Plate. The magnetic
head consists of two vertically moving platforms. One is used for the magnetic tip rods (24 or 96)
and the other is used for grasping the magnetic tip comb. During running, the magnetic tip comb
and the magnetic rods move vertically to complete the mixing of reagents and the adsorption and
release of magnetic beads.
There are 8 plate positions on the rotary table. Up to 8 pieces of 96/24 deep-well plates can
be placed simultaneously. Prior to the start of program, samples and reagents are loaded into deep-
well plate according to the extraction protocol. The magnetic tip comb is placed on the correct
deep-well plate and the deep-well plate is placed in the corresponding plate position on the rotary
table. During working, the base board start rotating and drive the corresponding deep well plate to
the right place which under the magnetic rods. The magnetic tip comb can be automatically loaded
onto the moving platform.
The door must be closed during operation. It can protect the sample from environmental
contaminants.
2.2 Working Principle
PurifierHT automatic nucleic acid extractor adopts magnetic beads separation technology (Figure
2-3). Different from other methods of magnetic bead purification for liquids transfer, this method
transfers the magnetic beads between deep-well plates containing specific reagents, and the magnetic rods
are loaded with a disposable magnetic tip comb. Through the separation of the magnetic rods and the
magnetic magnetic tip comb, the magnetic beads can be collected, released, transferred and incubated. It
can extract high quality nucleic acid from saliva, swab, dry blood spots, whole blood, serum, plasma,
animal and plant tissues. samples.
Figure 2-3. Diagram of working principle of the instrument
2.3 USB Port
There is a USB port on the front panel for importing and exporting programs.
2.4 Consumables
See "Accessory and Consumables List" for details and ordering information about Purifier
HT's consumables, such as deep-well plates, magnetic tip comb, and HEPA filters.

6
Chapter 3 Installation
3.1 Deliver Check
3.1.1 Unboxing
Move the packaged instrument to the operation site. To prevent condensation of water vapor, the
instrument should be left in its protective, anti-static plastic packaging until the ambient
temperature is reached room temperature. Open Purifier HT and accessories carefully. Remove the
instrument from the package and place it on a horizontal surface.
Caution
Be careful not to touch or loosen screws or parts specially specified in the
instruction manual. Otherwise, it may result in misplacement and invalidate the
instrument warranty.
Warning
Purifier HT weighs about 45kg, if transporting without package, please
handle carefully. It is recommended that two people move the equipment together
and take appropriate precautions to avoid injury.
Please keep the original packing materials for future transportation. The packing is designed to
ensure safe transportation and reduce damage in transit. The use of alternative packaging materials
may not achieve the effect. All instrument related documentation and accessories provided by the
manufacturer are retained for future use.
3.1.2 Integrity check
Check the integrity of the goods. Please check the complete documents and accessories with the
instrument according to the packing list. Visually check the shipping packages, instruments and
accessories for possible transportation damage. If any parts are broken, please contact the
manufacturer in time.
3.2 Environment Requirement
When installing Purifier HT, avoid placing it in the places where there is a lot of dust, vibration,
strong magnetic field, direct sunlight or ultraviolet radiation, airflow, high humidity or high
temperature fluctuation.
Please place the instrument on a regular experiment table to ensure that:
• The working area is flat, dry, clean and secure, with extra space for accessories, cables, etc;
• At least 10 cm of free space is provided for ventilation on the table around the instrument;
• The ambient air is clean, free from corrosive steam, smoke and dust;
• Ambient temperatures range from 5°C (41°F) to 40°C (104°F);
• Humidity is low and condensation does not occur (relative humidity is between 10% and 80%);
• Install the Purifier HT in a protected place where no one can step on or trip over the power cord,
and where it is easy to access the power cord when the plug needs to be removed;
•Care should be taken not to operate the instrument in an environment with potentially harmful
liquids or gases.
3.3 Precautions
• Always ensure that the laboratory power supply voltage meets the specification on the label on the
back of the instrument (Figure 2-2);
• Do not smoke or eat or drink while using this device;
• Clean hands thoroughly after handling the buffer solution;
• Follow regular laboratory procedures for handling samples that may be dangerous;
• Adhere to good laboratory practices and wear appropriate protective clothing such as disposable
gloves and laboratory coat;
• Ensure that the working area is well ventilated;
• Do not spill liquid inside or outside the device.
Caution
Do not place the instrument near magnetic tapes, computer discs or other
magnetic storage devices, such as credit cards, as they may be damaged by the
strong magnetic field of the instrument magnetic head.

7
Warning
Do not put the Purifier HT magnetic head near the computer monitor, as
this may damage the monitor.
The product has a strong permanent magnet. This product should not be
used by people wearing pacemakers or metal prostheses. Prosthetic devices
such as pacemakers or prostheses may be affected or damaged by close
contact with strong magnetic fields.
3.4 Installation Settings
This section describes the installation Setting that must be performed prior to operating or
relocating the instrument.
3.4.1 Power Connection
Warning
Make sure that the power switch on the rear panel (Figure 2-2) is in the
"O" position. Never connect an ungrounded power outlet. Do not use any power
cord other than the one provided by the manufacturer.
First connect the power cord to the power connector and insert into the instrument (Figure 3-
1). Next, connect the power supply to a properly installed, well-grounded power outlet.
Figure 3-1. Power cord connector
3.4.2 Operation Check
First turn on the instrument to "I". Instruments are initialized for testing and adjusting. The
display interface is the user management interface. It is recommended that have a check,
which use the maintenance program to verify proper instrument operation. If the check is
correct, you can continue to run on your own.

8
Chapter 4 Instructions for Use
4.1 Starting
Before turning on Purifier HT, make sure that the voltage on the label which is on the left bottom of
the back panel (Figure 2-2) matches the local voltage.
Warning Never operate the instrument on an ungrounded electrical outlet.
4.2 Programs
4.2.1 Home Screen
The default program displays a list of programs that are preset in the Purifier HT software and cannot
be edited or deleted. The user program is the program that the user edits and saves themselves, and
the user can edit and delete the user program according to the experiment needs. New program can
edit new programs. New programs can also be edited.
Display the current status of the instrument,“Empty”means the instrument is idle
condition,“Run”indicates that the instrument is running a program,“Check” indicates that
the instrument is in the state of power-on self-test.
4.2.2 Program Running
Click "User Program" to enter the program classification interface.
Users can select any file in the table, for example by clicking the "DNA" button to enter the list of
programs. Click the program you want to run, and click "Select" to enter the program details
interface.
The program detail interface displays the step number, board position number, item name, time,
volume, temperature and other parameters. After confirming that the program is correct, click
"Run" to run the program.

9
\
During the program running, the interface displays the total time and remaining time of the program.
Click "Pause" to pause the program.
Click “Continue” to resume running.
Click "Cancel", a dialog box will indicate whether to exit the current running program or not. Click
"Cancel" to continue running, and click "Confirm" to stop running. Customers should use this
function with caution.
4.2.3 New Program Creation
Click "New Program" on the main interface to create a new programs according to the customer’s
requirements. Enter the program name and select the program type. Click or “Back” to
return to the main screen. Click "Next" to enter the program editing interface.

10
Click "Add" to add steps after, click "Insert" to add steps before the selected step, and click
"Delete" to delete steps. Click "Edit" to set step parameters. Click "Back" to return to the main
screen.
Steps, parameters edition should be according to the actual situation to set the plate position, solution
volume and step options. The first step must be "Load", the last step must be "Unload". The liquid
volume should be set correctly. The instrument will identify the liquid level
according to the volume filled in. Click , to return to the program details. After setting, click
"Next" to enter the parameter setting interface.

11
The heating temperature and time are selected according to the requirements of the experiment. The
temperature setting range is 0-99°C, and the temperature can be switched. The entry position of
the deep-well plate is the position where the magnetic tip comb enter the deep-well plates for
mixing; 90% is recommended. High, medium and low vibration intensity are available. The
magnetic absorption position is the position where the magnetic rods enters the deep-well plate for
magnetic suction; 90% is recommended. There are two modes of magnetic absorption: one-step
magnetic absorption and step-by-step magnetic absorption. The chosen magnetic absorption time is
a cycle time, no less than 15 sec is recommended. Click "Done" when you're ready.
After setting the program, click "Save", and the "Program Saved" dialog box appears; the program
will be saved in the folder corresponding to the user's program.
Click "Setting" to enter the Plate position setting interface and place the Plate position. After the
instrument starts up and self-check, the position of Plate position 1 should be directly opposite to
the opening door. After placing one Plate, click "Next Plate" to enter the Next Plate position.
Click "Run" to run the program, and a dialog box will appear on the interface. Reconfirm that the
reagent plate and magnetic tip comb have been placed in the correct position, and click "Confirm"
to run the program. Click “Cancel” to return back to program details.

12
4.2.4 User Settings
The user can select "User Setting" on the main screen to set the parameters of Purifier HT. After
entering the user setting interface, the user can set the language, fan switch, light switch and prompt
tone switch. There are two modes of language: Chinese and English. "Factory Setting" is not
accessible to the users. if necessary, please to contact the manufacturer. If the user uses 24 magnetic
rods, you can click "P96 change to P24 " to switch to the 24-channel program.
4.2.5 UV Light Settings
Click "UV Sterilization" on the main interface to set UV disinfection, and set the time in the time
setting column. The remaining time is displayed as the time countdown. Click "Start" to start UV
disinfection. Click "Close" to stop UV disinfection.
4.3 Shutting Down
Turn off Purifier HT:
(1) Press the power switch (Figure 2-2) on the rear panel of the instrument to the OFF position to
turn off Purifier HT. It is recommended to turn off the instrument at night and on weekends.
(2) Wipe the surface of the instrument with a soft cloth or paper towel with distilled water, mild
detergent (SDS, sodium lauryl sulfate) or soap solution.
(3) If contaminated reagents have been spilled on the workbench, please clean them with 70%
ethanol or other disinfectants (see "Cleaning Procedures").
Warning
Remove the deep-well plate and magnetic tip comb that are used in the
instrument. Dispose of all deep-well plates and magnetic tip comb as biohazard waste.

13
4.4 Emergencies
If an abnormal situation occurs during operation, such as liquid spilling into the instrument, please
follow the steps below:
(1) Turn off the instrument immediately (Figure 2-3).
(2) Unplug the power plug.
(3) Implement appropriate corrective measures. But do not disassemble the instrument.
(4) If the corrective measures taken do not help, please contact authorized technical service or your
local agent.

14
Chapter 5 Care and Maintenance
5.1 Instrument Maintenance
In order to ensure the reliability of daily operations, please clean up the dust in time to prevent
liquid leakage. Do not use abrasive cleaners, as they may damage the paint surface.
It is recommended that you clean the surface of the instrument regularly to maintain its good
appearance. Wipe with a soft cloth dampened with warm water and neutral detergent. If necessary,
clean the outer surface of the instrument and the turntable with clean low-pressure compressed air, or a
cloth dampened with water or a mild detergent.
Although Purifier HT is made of high-quality materials, you must remove the spilled salt
solution, chemical solvent, acid or alkaline solution from the surface immediately to prevent damage
to the instrument.
Caution The painted surface can be cleaned with most laboratory cleaners. Do not
expose the surface to concentrated acid or ethanol for a long time to avoid damage.
The display, plastic door and surface can be cleaned with mild laboratory cleaners or
alcohol.
Waning If any surface is contaminated with biologically hazardous materials, it should
be cleaned immediately with a mild disinfectant solution. Do not autoclave any part of
the instrument.
5.2 Cleaning
Keep the surface of the platform clean to prevent dust and dirt from entering the instrument. At
least once a week, clean the surface of the turntable with a soft cloth or paper towel dampened with
ethanol, mild detergent (SDS, sodium lauryl sulfate) or soap solution. If contaminated reagent is
spilled out on the turntable, clean it with a cloth dampened with ethanol or mild detergent.
5.3 Magnetic Rods Cleaning
If necessary, soak the magnetic rods in alcohol, mild detergent (SDS) or soap solution, and
then wipe the magnetic rods finally.
5.4 Waste disposal
Follow the specific regulations of laboratories and the country for handling biological waste.
For the disposal of contaminants, please refer to the relevant local regulations.
Warning
The sample may be potentially contaminated. Dispose of disposable deep-
well plates, parafilm, magnetic tip comb, disposable gloves, syringes, and disposable
pipette tips as biohazardous waste.
5.5 Decontamination Procedure
If you have spilled out contaminant reagents, please perform a decontamination procedure.
Warning
The decontamination procedure should be carried out by authorized
trained personnel in a well-ventilated room, wearing disposable gloves, protective
glasses and clothing.
Follow regular laboratory procedures for decontamination. The decontamination instructions
provided with the reagents used should be followed. It is strongly recommended to perform a
complete decontamination procedure before transferring the instrument from one laboratory to
another, or before sending it to a repair service department.
5.5.1 Decontamination Reagent Types
70% ethanol

15
1%-3% VirkonTM solution
4% glutaraldehyde solution
Chloramine T
Microcde SQTM 1:64
4% DeconTM 90min
5.5.2 Decontamination Procedure
(1) Wear disposable gloves to protect yourself.
(2) Prepare the cleaning agent: 200ml 4% glutaraldehyde solution (or other reagents
recommended by the security officer).
(3) Empty the turntable.
(4) Turn off the power switch and disconnect the power cord.
(5) Use a cloth moistened with 70% ethanol to disinfect the outside of the instrument.
(6) Put the instrument in a big plastic bag. Make sure the front door is open.
(7) Put a piece of cloth soaked in glutaraldehyde solution in the plastic bag. Make sure
that the cloth does not touch the instrument.
(8) Seal the instrument in a plastic bag for at least 24 hours.
(9) Take the instrument out of the plastic bag.
(10) Clean the instrument with mild detergent.
(11) Use 70% ethanol to remove stains.
(12) After performing the decontamination procedure, attach a signed and dated
decontamination certificate on the transport package and attach it to the outside of the
package (see Appendix A: "Certificate of Decontamination").
5.6 Packaging for repair
If you need repair the instrument, Please package it following the guidelines below.
Caution
Before removing the instrument from the laboratory or performing any repair on
it, it must be thoroughly cleaned. When sending the instrument for repair, please remember:
(1) Inform the reason for repair.
(2) Decontaminate the instrument before hand. Pack the instrument according to its state before
disassembly.
(3) Use the original packaging to ensure that the instrument will not be damaged during
transportation. Any damage will incur additional service charges.
(4) Return the instrument (or other items) with a signed and dated decontamination certificate (see
Appendix A: "Certificate of Decontamination"). And attach it to the outside of the package.
(5) After you contact the local agent or the manufacturer's technical service department, please
specify the disfunction.
(6) Please refer to “Chapter 6” for more information on storage and transportation temperatures.
5.7 Service Contract
It is recommended that a service engineer trained by the manufacturer conduct a regular
maintenance and repair of the instrument every 12 months. This ensures that the product is properly
maintained and used without any problems.
5.8 Fill in the system log
System logs, including operation summary, maintenance procedures, error messages and other
useful information about system. These is very useful for proper maintenance of the system. Please
refer to Appendix B: "System Log". You can copy the form as many times as you need, but keep the
original blank form in the user manual.
5.9 Disposal of the instrument
If Purifier HT must be discarded, please follow the specific regulations of the laboratory
and the country for the treatment of biological waste. The disposal of the instrument is carried
out in accordance with the laws and regulations of the local authorities on the recycle of

16
electronic equipment and waste. Disposal procedures vary from country to country. For the
original packaging and packaging materials recycle, please cooperate with a recycler you are
familiar with.
Warning Disinfect the instrument before disposing of it. Please refer to
decontamination procedures.

17
Chapter 6 Technical Parameters
6.1 General Parameters
As part of our continuous product development plan, the manufacturer reserves the right to
change any parameters without prior notice.
Overall size
Device 840 mm(width)x685 mm(length) x420 mm(height)
Transport package
850 mm(width)x760 mm(length) x610mm(height)
Weight
Device about 41kg[±0.5g]
Transport package
about 75kg[±1kg]
Operating conditions
Operating temperature range + 5°C to + 40°C
Operating humidity range The maximum relative humidity is 80% when the
temperature is lower than 31℃,and the humidity
drops lineary to 50% at 40℃.
Transport condition
-40°C to +70°C,packed by transport package
Storage condition
-25°C to +50°C,packed by transport package
Main Power
100-240 Vac, 50/60 Hz
Power consumptio
n
Maximum 96 VA;10 VA spare
Heat dissipation
Maximum 328 BTU
Internal memory
about 500 files
File input
Use a computer or USB storage
Computer interface
RS232
General application
Run 10 times per day, run 250 days a year; 40 minutes of
files use medium running speed; room temperature
General parameter

18
6.2 Performance parameter
Performance parameter
Processing volume
20-1000ul (96 deep-well plate), 96 channel
magnetic rods
Capacity (sample per run)
Maximum 96
Collection efficiency of magnetic
beads
96 deep well plate, containing detergent
neutral cleaning solution, 2.8μm magnetic
beads, collect three times, at room
temperature, recovery rate ≥95%
Magnetic bead size
Average diameter>1um
Magnetic rod
96 Magnetic rod
Deep-well Plate type (disposable)
Micro 96 deep-well plate (20–1000 µl)*
Magnetic tip comb (polypropylene
disposable)
Four 96 deep-well plates with one comb
Heating
Heating temperature:
Accuracy of heating module:
from +10°C to 99°C, the device is at room
temperature
±1°C, maximum +75°C,the device is at
room temperature.
Display
7 "LCD, 870×1550 pixel color display
6.3 Safety parameters
Altitude maximum 2000m
Temperature +5°C to 40°C
Humidity The maximum relative humidity is 80% when the
temperature is lower than 31℃,and the humidity
drops linearly to 50% at 40℃.
AC power fluctuation Not more than ±10% of the marked voltage
The safety parameters include the following environmental conditions,
which must not exceed the regulations stated in the operating
conditions:

19
6.4 Compliance
6.5 Error code
P96 error code
P96 error type
Solution
X01
X axis photoelectric switch error
If the error is reported repeatedly
after restarting, contact the engineer.
X02
X axis motor error
If the error is reported repeatedly
after restarting, contact the engineer.
Z01
Z axis photoelectric switch error
If the error is reported repeatedly
after restarting, contact the engineer.
Z02
Z axis motor error
If the error is reported repeatedly
after restarting, contact the engineer.
M01
M axis photoelectric switch
error
If the error is reported repeatedly
after restarting, contact the engineer.
M02
M axis motor error
If the error is reported repeatedly
after restarting, contact the engineer.
H01
H axis photoelectric switch error
If the error is reported repeatedly
after restarting, contact the engineer.
H02
H axis motor error
If the error is reported repeatedly
after restarting, contact the engineer.
S01
S-axis photoelectric switch error
If the error is reported repeatedly
after restarting, contact the engineer.
S02
S axis motor error
If the error is reported repeatedly
after restarting, contact the engineer.
T03
Heating detection error
If the error is reported repeatedly
after restarting contact the engineer.
Purifier HT meets the following compliance:
YY0505-2005/IEC 60601-1-2:2001
GB4793.1-2007/IEC61010-2:2001
Table of contents
Other Genfine Ventilation Hood manuals
Popular Ventilation Hood manuals by other brands

Greenheck
Greenheck Centrifugal Roof Exhaust Fans NYB Brochure & specs

Schweigen
Schweigen TSH-900 installation guide

Gaggenau
Gaggenau VL 040/041 115 instruction manual

Fisher & Paykel
Fisher & Paykel 88433 installation instructions

Forza
Forza FH3011 Use & installation manual

ELICA
ELICA SERENDIPITY IX/A/90 Instruction on mounting and use

ELICA
ELICA LI2BAF Instruction on mounting and use

ELICA
ELICA Vega ST IX/F/60 Instruction on mounting and use

ELICA
ELICA Stripe Inox 60 Instruction on mounting and use

Smeg
Smeg KAT700HXE Instruction on mounting and use

Westinghouse
Westinghouse WRCG930SB Installation & user manual

Bertazzoni
Bertazzoni KI BI 120 NE A Use and maintenance instructions