Genius coralis M16-350-01A-ER-L User manual

• Press the “SETTING BUTTON” for 3 seconds on the motor (the motor will rotate half a turn forward and half
a turn back).
• Press the “P2” button on the remote control twice (remove battery cover to turn on).
• Press “UP” or “DOWN” on the remote control, corresponding to clockwise movement of the motor (if the
motor is on the right of the insect screen, press “DOWN”; if the motor is on the left, press “UP”). The motor
will rotate half a turn forward and half a turn back.
• The remote control is now interfaced with the motor.
ITA
REGOLAZIONE TERZA POSIZIONE (POSIZIONE INTERMEDIA)
AGGIUNGERE UN TELECOMANDO SUPPLEMENTARE
Dopo aver regolato il finecorsa superiore ed inferiore procedere, se necessario alla regolazione della
terza posizione o posizione intermedia. Tale procedura permette di stabilire una posizione in cui portare
automaticamente la tenda o zanzariera.
• Portare la tenda/zanzariera nella posizione intermedia desiderata.
• Premere una volta “P2” (sul retro del telecomando). Il motore ruota mezzo giro avanti e mezzo giro indietro.
• Premo “STOP” 1 volte. Il motore ruota mezzo giro avanti e mezzo giro indietro.
• La sequenza P2 STOP STOP.
• Per cancellare la terza posizione ripetere la sequenza P2 STOP STOP.
• Una volta settata la terza posizione, per portare la tenda in posizione, tenere premuto il tasto “STOP”.
• Premere una volta “P2” del telecomando già interfacciato con il motore (sul retro del telecomando). Il moto-
re ruota mezzo giro avanti e mezzo giro indietro.
• Premere una volta “P2” del telecomando già interfacciato con il motore (sul retro del telecomando).
• Premere una volta “P2” del NUOVO telecomando supplementare (sul retro del telecomando). Il motore ruota
mezzo giro avanti e mezzo giro indietro.
CANCELLARE FINE CORSA
• Premere una volta il tasto “P2” (sul retro del telecomando). Il motore ruota mezzo giro avanti e mezzo giro
indietro.
• Premere una volta il tasto “DOWN” del telecomando.
• Premere una volta il tasto P2 (sul retro del telecomando). Il motore ruota mezzo giro avanti e mezzo giro
indietro.
• Finecorsa cancellato.
CANCELLARE TELECOMANDO
• Premere una volta il tasto P2 (sul retro del telecomando). Il motore ruota mezzo giro avanti e mezzo giro
indietro.
• Premere una volta il tasto “STOP” del telecomando.
• Premere una volta il tasto P2 (sul retro del telecomando). Il motore ruota mezzo giro avanti e mezzo giro
indietro.
• Telecomando cancellato.
M16-350-01A-ER-L
ASSOCIATING THE FIRST REMOTE CONTROL WITH THE MOTOR
ADJUSTING LIMITS
• Put the insect screen in an intermediate position (more or less halfway up the window) using the “UP” or
“DOWN” and “STOP” buttons on the remote control.
• Press “P2” (on the back of the remote control) once. The motor will rotate half a turn forward and half a turn
back.
• Press the “UP” button on the remote control once.
• Press “P2” (on the back of the remote control). The motor will rotate half a turn forward and half a turn back.
• Position the insect screen at the upper limit with the “UP”, “DOWN” and “STOP” buttons on the remote
control.
• Once in the desired position, press “STOP” once.
• Press “STOP” 3 times; the motor will rotate half a turn forward and half a turn back.
• Position the insect screen at the bottom limit with the “UP”, “DOWN” and “STOP” buttons on the remote
control.
• Once in the desired position, press “STOP” once.
• Press “STOP” 3 times; the motor will rotate half a turn forward and half a turn back.
Important: charge the motor before using it. The motor is charged when the led on the charger turns green; it
will be red while charging.
Up button
Stop button
Down button
Setting button
Back
ENG
Setting button
Connected chargers
Setting button
Connected chargers
TIS-CO80IE/0_0615_DOY
Adjusting the motor
Regolazione motore
M16-350-01A-ER-L
CANCELLAZIONE COMPLETA
• Tenere premuto per 13 secondi “setting button”

• Premere “SETTING BUTTON” per 3 secondi sul motore (il motore ruota mezzo giro in avanti e mezzo giro
indietro).
• Premere 2 volte il tasto “P2” (per accedere rimuovere il coperchio della batteria) del telecomando.
• Premere il tasto “UP” o “DOWN” del telecomando, corrispondente al movimento orario del motore (se il
motore è messo a destra della zanzariera premere il tasto “DOWN”, se il motore è a sinistra della zanzariera
premere “UP”). Il motore ruota mezzo giro avanti e mezzo giro indietro.
• Telecomando interfacciato con il motore.
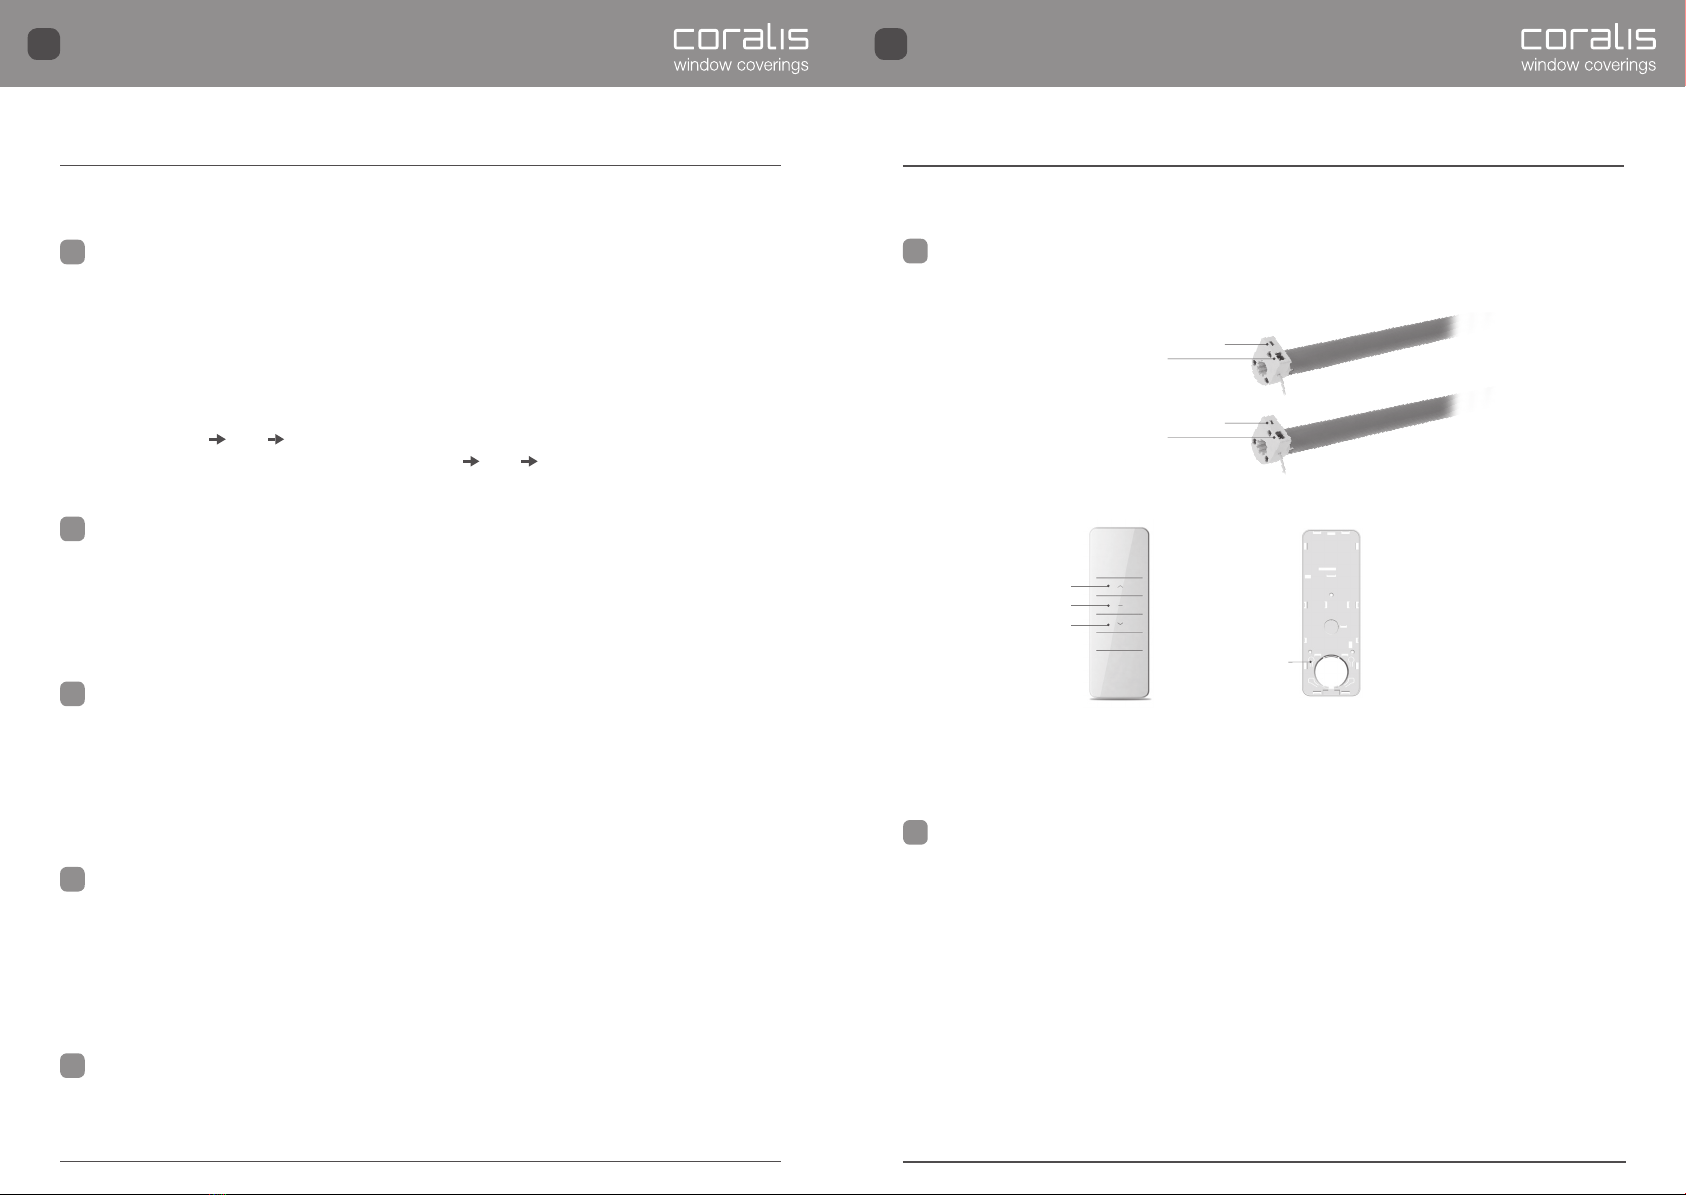
Setting button
Connettore
caricabatterie
Setting button
Connettore
caricabatterie
Regolazione motore
M16-350-01A-ER-L
ASSOCIARE IL PRIMO TELECOMANDO AL MOTORE
REGOLAZIONE FINE CORSA
ITA
• Portare la zanzariera in una posizione intermedia (più o meno a metà della finestra) utilizzando i tasti “UP” o
“DOWN” e “STOP” del telecomando.
• Premere una volta “P2” (sul retro del telecomando). Il motore ruota mezzo giro avanti e mezzo giro indietro.
• Premere una volta il tasto “UP” del telecomando.
• Premere una volta “P2” (sul retro del telecomando). Il motore ruota mezzo giro avanti e mezzo giro indietro.
• Porto nella posizione del fine corsa superiore la zanzariera con i tasti “UP” e “DOWN” e “STOP” del teleco-
mando.
• Arrivato nella posizione desiderata, premo una volta tasto “STOP”.
• Premo “STOP” 3 volte. Il motore ruota mezzo giro avanti e mezzo giro indietro.
• Porto nella posizione del fine corsa inferiore la zanzariera con i tasti “UP” e “DOWN” e “STOP” del teleco-
mando.
• Arrivato nella posizione desiderata, premo il tasto “STOP”.
• Premo “STOP” 3 volte. Il motore ruota mezzo giro avanti e mezzo giro indietro.
Importante: caricare il motore prima di utilizzarlo. Il caricatore ha un led. Quando diventa verde il motore è
carico. Durante la fase di carica del motore è rosso.
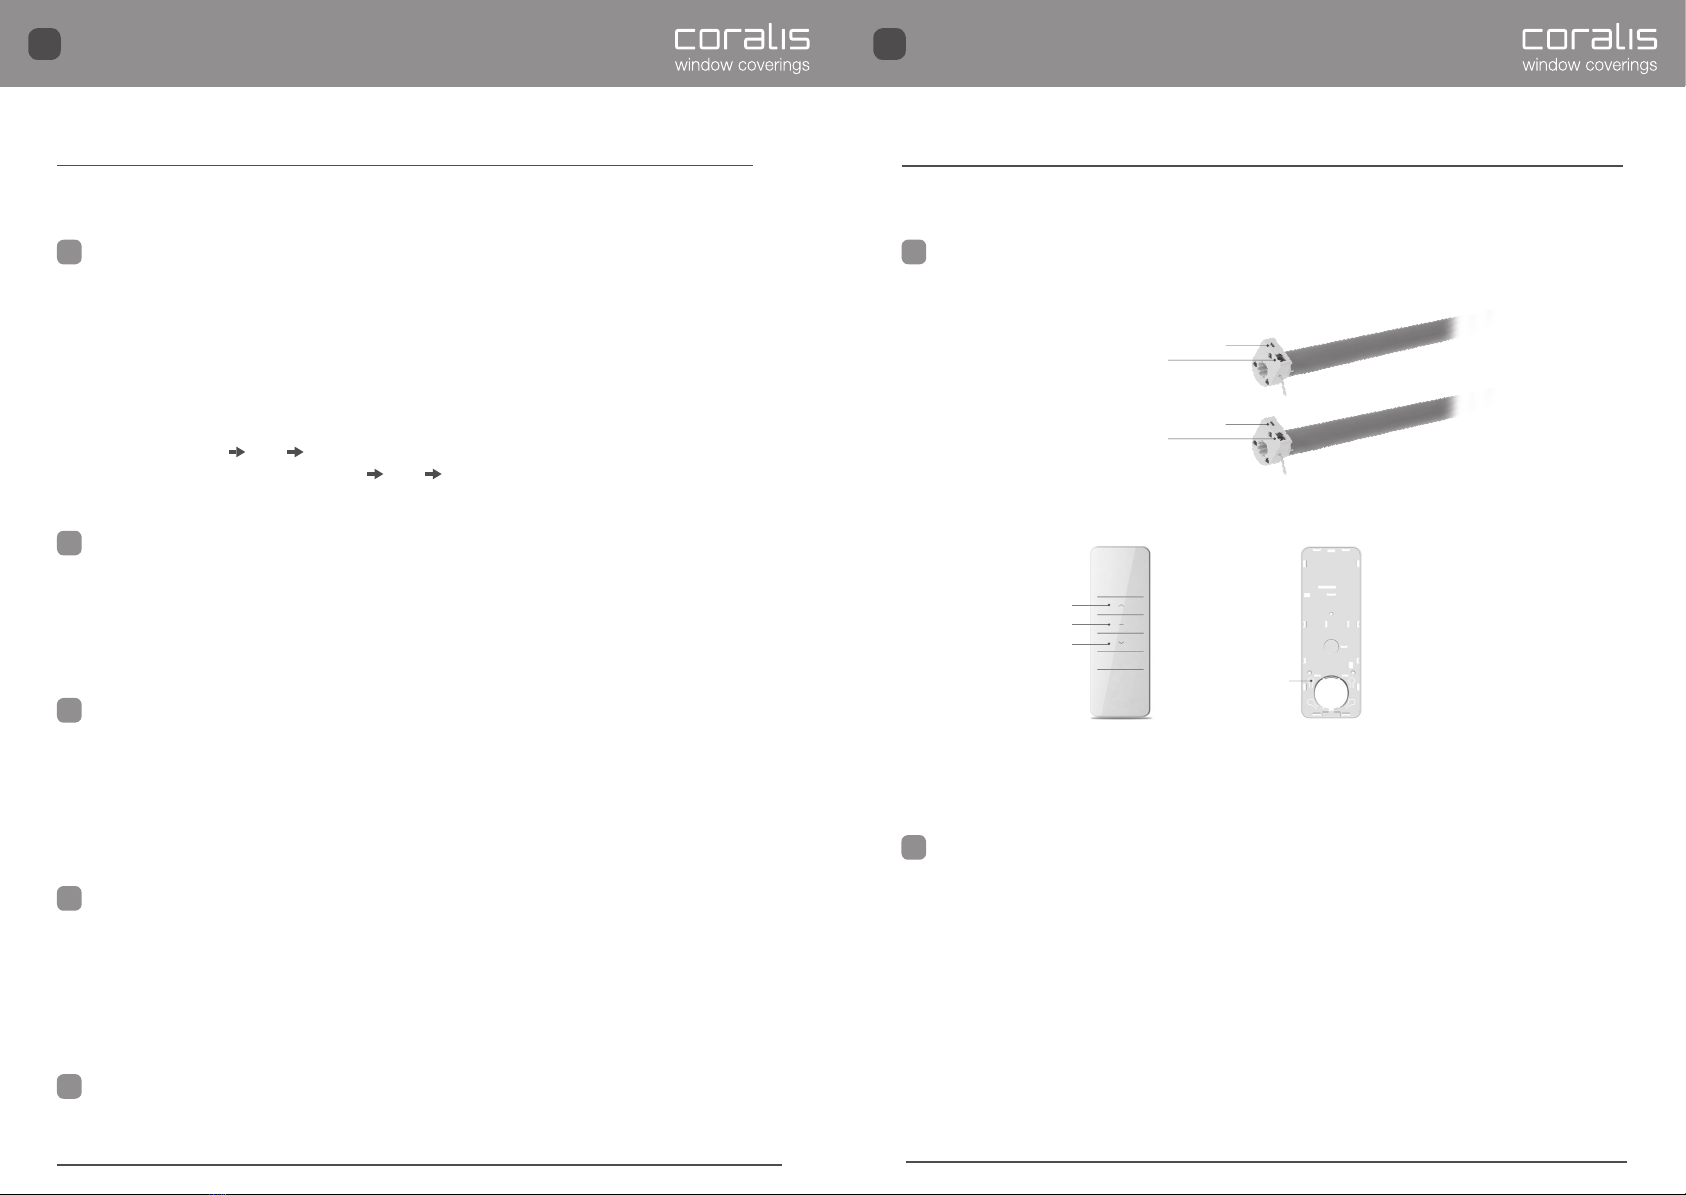
Pulsante Su
Pulsante Stop
Pulsante Giu
Pulsante di
impostazione
Back
ADJUSTING THE THIRD POSITION (INTERMEDIATE POSITION)
ADDING AN ADDITIONAL REMOTE CONTROL
After adjusting the upper and lower limits, proceed to set a third, intermediate position if necessary. This
procedure will allow you to establish an intermediate position in which the blind or insect screen may be
positioned automatically.
• Position the blind or insect screen in the desired intermediate position.
• Press “P2” (on the back of the remote control) once. The motor will rotate half a turn forward and half a turn
back.
• Press “STOP” once. The motor will rotate half a turn forward and half a turn back.
• The sequence is P2 STOP STOP.
• To cancel the third position, repeat the P2 STOP STOP sequence.
• Once you have set the third position, press “STOP” to put the blind in this position.
• Press “P2” on the remote control interfaced with the motor (on the back of the remote control) once. The
motor will rotate half a turn forward and half a turn back.
• Press “P2” on the remote control interfaced with the motor (on the back of the remote control) once.
• Press “P2” on the NEW additional remote control (on the back of the remote control) once. The motor will
rotate half a turn forward and half a turn back.
CANCELLING LIMITS
• Press “P2” (on the back of the remote control) once. The motor will rotate half a turn forward and half a turn
back.
• Press “DOWN” on the remote control.
• Press P2 (on the back of the remote control) once. The motor will rotate half a turn forward and half a turn
back.
• The limit is cancelled.
CANCELLING A REMOTE CONTROL
• Press “P2” (on the back of the remote control) once. The motor will rotate half a turn forward and half a turn
back.
• Press “STOP” on the remote control once.
• Press “P2” (on the back of the remote control) once. The motor will rotate half a turn forward and half a turn
back.
• The remote control is cancelled.
ENG
Adjusting the motor
M16-350-01A-ER-L
TOTAL CANCELLING
• Press “SETTING BUTTON” and hold it for 15 seconds.
Other Genius Engine manuals
Popular Engine manuals by other brands

Yanmar
Yanmar L-A series Service manual

Siemens
Siemens SIMOTICS S-1FL6 installation guide

Briggs & Stratton
Briggs & Stratton 120000 Operating and maintenance instructions

Becker
Becker P5-30-E18 Assembly and operating instructions

Sauer
Sauer S950R C/E Operator's manual

Hobbywing Technology
Hobbywing Technology XERUN-120A-V3.1 user manual

Mitsubishi
Mitsubishi 4G1 series Workshop manual

ASA Electronics
ASA Electronics DA VINCI 40 ST manual

Robin America
Robin America EHO25A Instructions for use

Briggs & Stratton
Briggs & Stratton 490000 - REV A Operator's manual

Bosch
Bosch Rexroth A2FM series instruction manual

Datsun
Datsun 240Z S30 series Service manual