genoQs Machines Nemo Parts list manual

Nemo Navigation Guide v1.44


Important Notice
The material in this document is copyright to genoQs Machines, and may not
be quoted or reproduced in any form without written permission from the
company.
LIMITED SOFTWARE WARRANTY POLICY
All the software provided with, or purchased especially for, genoQs Machines
products has been tested for functionality. genoQs Machines will make its
best efforts to correct reported software defects for future releases subject to
technical feasibility. genoQs Machines makes no warranty or representation
either expressed or implied with respect to the system's performance or fit-
ness for a particular purpose. In no event will genoQs Machines be liable for
direct or indirect damages arising from any defect in the software or its
documentation. Furthermore, genoQs Machines will not accept any liability
for any programs, sounds, audio recording or sequences stored in or used
with genoQs Machines products, including the cost of recovery of such data.
The warranties, remedies and disclaimers above are exclusive and take
precedence over all others, oral or written, express or implied, to the extent
permitted by law in the geographical area of the product's use. No employee
of genoQs Machines, agent, distributor or employee of an agent or distributor
is authorized to offer any variation from this policy.
WARNING!!
To prevent fire or shock hazard, do not expose this appliance to rain or mois-
ture.
!
WARNING: WHEN USING ELECTRIC PRODUCTS, BASIC PRECAUTIONS SHOULD ALWAYS
BE FOLLOWED, INCLUDING THE FOLLOWING:
WARNING
Pleas always use original power supply in dry location only. Nemo is designed to be used in a
standard household environment. Power requirements for electrical equipment vary from area to
area. Please ensure that your Nemo meets the power requirements in your area. If in doubt, con-
sult a qualified electrician or genoQs Machines.
120 VAC @ 60 Hz for USA and Canada
220~240 VAC @ 50 Hz for Europe
240 VAC @ 50 Hz for Australia

IMPORTANT SAFETY INSTRUCTIONS
1. Read these instructions.
2. Keep these instructions.
3. Heed all warnings.
4. Follow all instructions.
5. Do not use this apparatus near water.
6. Clean only with dry cloth.
7. Install in accordance with the manufacture's instructions.
8. Do not install near any heat sources such as radiators, heat register, stoves, or other apparatus
(including amplifiers) that produce heat.
9. Do not defeat the safety purpose of the polarized or grounding-type plug. A polarized plug has
two blades with one wider than the other. A grounding type plug has two blades and a third
grounding prong. The wide blade or the third prong are provided for your safety. If the provided
plug does not fit into your outlet, consult an electrician for replacement of the obsolete outlet.
10. Protect the power cord from being walked on or pinched particularly at plugs, convenience
receptacles, and the point where they exit from the apparatus.
11. Only use attachments/accessories specified by the manufacturer.
12. Use only with the cart, stand, tripod, bracket, or table specified by the manufacturer, or sold
with the apparatus. When a cart is used, use caution when moving the cart/apparatus combin-
ation to avoid injury from tip-over.
13. Unplug this apparatus during lightning storms or when unused for long periods of time.
14. Refer all servicing to qualified service personnel. Servicing is required when the apparatus has
been damaged in any way, such as power-supply cord or plug is damaged, liquid has been
spilled or objects have fallen into the apparatus, the apparatus has been exposed to rain or
moisture, does not operate normally, or has been dropped.
15. Do not expose this apparatus to dripping or splashing and ensure that no objects filled with
liquids, such as vases, are placed on the apparatus.
WARNING
THIS APPARATUS MUST BE EARTHED
IMPORTANT

FCC WARNING
This equipment has been tested and found to comply with the limits for a Class B digital device
pursuant to Part 15 of the FCC rules. These limits are designed to provide reasonable protec-
tion against harmful interference in a residential installation. This equipment generates, uses,
and can radiate radio frequency energy and, if not installed and used in accordance with the
instructions, may cause harmful interference to radio communications. However, there is no
guarantee that interference will not occur in a particular installation. If this equipment does
cause harmful interference to radio or television reception, which can be determined by turn-
ing the equipment off and on, the user is encouraged to try to correct the interference by one
or more of the following measures:
•Reorient or relocate the receiving antenna.
•Increase the separation between the equipment and receiver.
•Connect the equipment into an outlet on a circuit different from that to which the receiver is
connected.
•Consult the dealer or an experienced radio/TV technician for help.
AVIS POUR LES ACHETEURS CANADIENS DU NEMO
Le présent appareil numérique nʼément pas de bruits radioélectriques dépassant les limites
applicables aux appareils numériques de la Class B prescrites dans le Règlement sur le
brouillage radioélectrique édicté par le ministère des Communications du Canada.
This digital apparatus does not exceed the Class B limits for radio noise emissions from digital
apparatus set out in the Radio Interference Regulations of the Canadian Department of Com-
munications.
VENTILATION
Do not prevent the unitʼs ventilation, especially by placing the unit on soft carpet, in a narrow
space, or by placing objects on the unitʼs chassis—top, side, or rear panels. Always keep the
unitʼs chassis at least 10 centimeters from any other objects.
CHANGES OR MODIFICATIONS NOT EXPRESSLY APPROVED BY THE MANUFACTURER
FOR COMPLIANCE COULD VOID THE USERʼS AUTHORITY TO OPERATE THE EQUIP-
MENT.
COPYRIGHT NOTICE
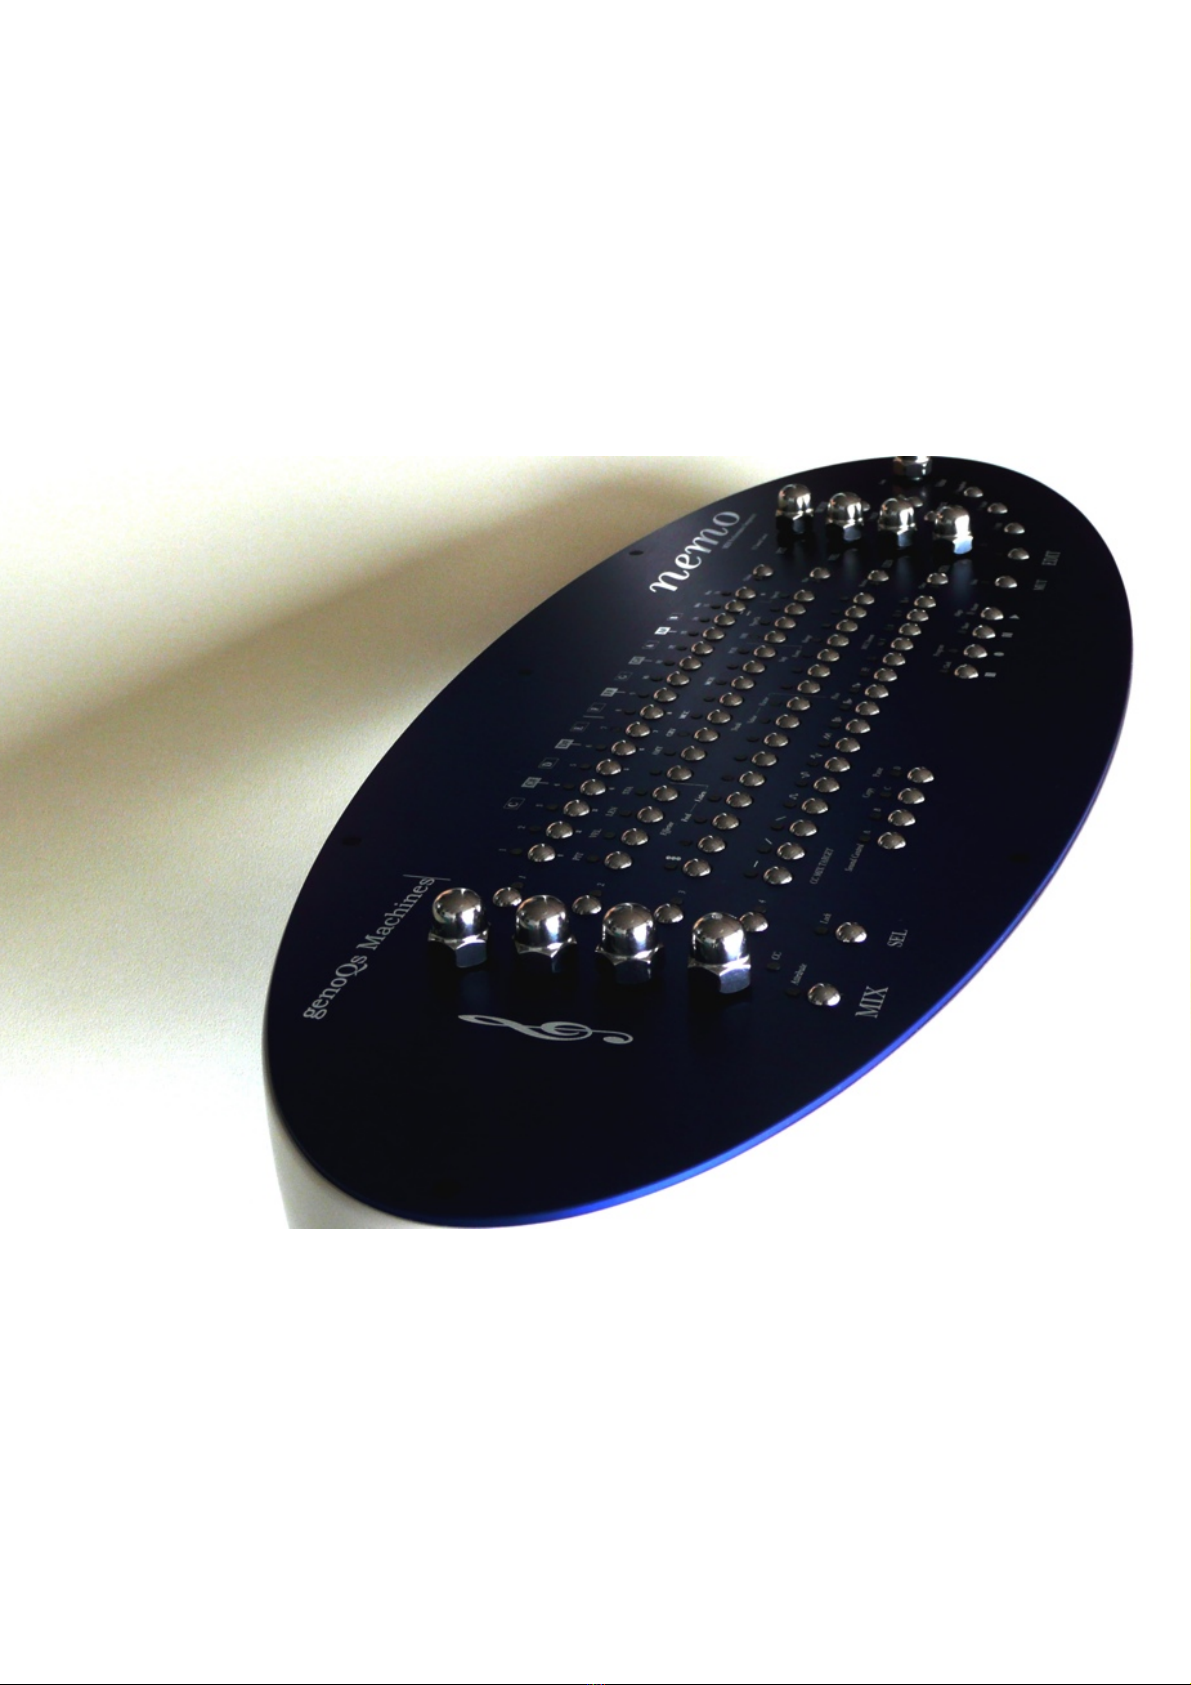
genoQs Machines Nemo is a computer-based device, and as such contains and uses software in ROMs.
This software, and all related documentation, including this Operatorʼs Manual, contain proprietary informa-
tion which is protected by copyright laws. All rights are reserved.
The software and its documentation is open source, and therefore may be copied, adapted, transferred or
modified to the extent permitted by the GPL - GNU Public License.


Introduction
Welcome, and sincere congratulations on the purchase of your new sequencer,
the genoQs Machines Nemo!
We proudly put in your hands a device built to drive your creativity and provide
you joy for years to come. Nemo is conceived as a living instrument with long-
lasting value, to help you search and discover new sonic territory, rewarding you
with an unequalled haptics experience.
We invite you to explore the capabilities of Nemo as you like and provide this
manual as a start-up guide. Herein, you will recognize many known terms and
concepts. However, others may be used slightly differently from what you would
expect and some may be entirely puzzling.
This is why we recommend that once you are over the first wave of pushing but-
tons, flashing lights and turning knobs you read this guide end-to-end carefully –
and we are aware that no-one likes to read the manual..
Taking a step back, we do appreciate the complexity that Nemo is able to pro-
vide. Don’t get intimidated! You will soon discover fast ways of operation to best
suit your style and preference, the comfort zone where you are most productive.
But remember that only few clicks away await things that you had never thought
of doing or achieving. This is what Nemo is about –at every stage and no matter
what -you are encouraged to experiment, explore and push the boundaries!
Please check our web site regularly for the latest news, so!ware and documentation at
http://www.genoqs.net
nemo -MIDI Performance Sequencer
Navigation Guide

nemo -MIDI Performance Sequencer
Navigation Guide

Table of contents
I Nemo at a glance!1
...........................................................................................Connectors and switches$1
..........................................................................................................The Nemo world$3
.........................................................................................................Navigation basics$4
...................................................................................................................................Grid$5
................................................................................................................................Pages$6
..............................................................................................................................Tracks$6
................................................................................................................................Steps$6
.........................................................................................................................Mutators$6
.......................................................................................................................Attributes$7
..........................................................Sound Control (CC MIX TARGET)Maps$7
.............................................................................................................The front panel$8
II First steps!1
...............................................................................................Connect and power-on$1
...........................................................................................................General controls$3
.................................................................................................Interface conventions$4
..................................................................................................Basic step operations$5
................................................................................................Basic track operations$7
............................................................................................................Track chaining$10
...................................................................................................Step real-time entry$11
......................................................................................................The MODE block$12
III Step mode!13
............................................................................................................Basic operation$13
............................................................................................................Step attributes$14
..............................................................................................................Step mutators$17
.............................................................................................................Step selections$18
IV Track mode!19
nemo -MIDI Performance Sequencer
Navigation Guide

...........................................................................................................Basic operation$19
..........................................................................................................Track attributes$20
............................................................................................................Track mutators$23
.........................................................................................................Track selections$26
.............................................................................................................Track chaining$27
..................................................................................................................Track speed$29
.........................................................................................................Track auxiliaries$30
V Page mode!31
............................................................................................................Basic operation$31
...........................................................................................................The MIX block$32
.........................................................................................Working with MIX maps$33
.......................................................................CC MIX maps and Sound Control$34
....................................................................................................................EDIT state$35
........................................................................................................Editor ATR state$36
......................................................................................................Editor MCC state$37
............................................................................................Page mutator functions$38
......................................................................................................................Snapshots$39
VI Grid mode!41
...........................................................................................................Basic operation$41
..........................................................................................................Page operations$42
................................................................................................................Page clusters$43
................................................................................................Page play parameters$44
VII Performance tools!45
...................................................................................................Working with pages$45
.................................................................................Working with step selections$47
........................................................................................................Grid-Track mode$48
VIII Musical tools!51
...................................................................................................................Step chords$51
Chord ground rules$51
Building chords$51
Strumming chords$52
nemo -MIDI Performance Sequencer
Navigation Guide

...........................................................................................................Step re-triggers$53
..............................................................................................................Musical scales$54
IX Advanced topics!57
.............................................................................................Virtual MIDI channels$57
..........................................................................Track attribute factors and flows$58
Working with attribute factors$58
..................................................................................................................Step events$60
................................................................................................................The Effector$62
The EFF mechanism$62
Playing the Effector$64
..................................................................................Note attribute computation$66
X MIDI IN!69
.............................................................................................Note stream recording$69
......................................................................MIDI Controller stream recording$71
...................................................................................................Step note recording$72
...................................................................................................Advanced recording$74
...........................................................................................Controller map learning$75
............................................................................................External force-to-scale$76
XI General tools!77
.........................................................................................................Utility functions$77
..................................................................................MIDI clock synchronization$78
....................................................................................Saving the instrument state$79
..................................................................Exporting memory content to MIDI$80
Contact!83
nemo -MIDI Performance Sequencer
Navigation Guide


I Nemo at a glance
This section provides an introduction to the concepts at the base of Nemo.
The impatient reader may come back to this section once confusion sets in
and nothing makes sense anymore.
Connectors and switches
The power supply
Nemo features an auto-sensing 110-240 Volt (50-60Hz)external
power supply so you can safely power it up in most countries without
extra adapters or converters. All you need is a cable that fits your
power outlet.
The power switch
To turn Nemo on and off, please use the black button labeled I/O on
the back panel of the machine.
Triggering a reset
Pressing the Record and ESC keys at the same time will trigger a re-
set of the machine, i.e. a reboot resetting it to the last saved state.
When performing a reset please make sure to keep the reset button
combination pressed for at least 3 seconds before releasing it.
MIDI connectors
Nemo features two MIDI ports, and each port has its own IN and
OUT connector, as found on the back side of the machine. They are
labeled accordingly with MIDI 1 and MIDI 2.
Lamp connector
The lamp connector on the back of the machine is designed to oper-
ate with any USB-powered lamp, as are often used with laptop com-
puters. Connect your preferred USB lamp to use Nemo in environ-
ments that demand it, or if (like us)you just simply like the effect!
USB connector
nemo -MIDI Performance Sequencer
I Nemo at a glance
1
Navigation Guide

For the time being, the USB connector on the back of Nemo should
be seen as something you should be only concerned with if you are
interested in development or change of the Nemo software. Future
software releases may use the USB connector to provide extended
interfacing capabilities to other USB devices.
nemo -MIDI Performance Sequencer
I Nemo at a glance
Navigation Guide
2

The Nemo world
In brief, the Nemo world consists of
•entities or objects
•attributes that are associated with them, and
•functions that modify those objects or their attributes.
This model allows for modifications of the objects in the most flexi-
ble manner and all in real time, with the sequencer running!
The Nemo object model
The master Nemo object is the GRID, which contains PAGES, each
of them containing TRACKS, which are made up of STEPS.
Each of these objects is associated with attributes and functions that
can operate upon them. The diagram depicts at a high level the Oc-
topus hierarchy of objects and their related attributes.
GRID
Force-to
Scale
Sound
Control A-D
PAGE 1
PAGE 64
Track 1
Track 4
Step 1
Step 16
The GRID
64 PAGES
256 TRACKS
4096 STEPS
Track 1
Track 4
Step 1
Step 16
Step 1
Step 16
Step 1
Step 16
Nemo hierarchy of objects and related attributes
PIT - Pitch offset
VEL - Velocity offset
LEN - Number of play steps
STA - Number of repetitions
PIT - Pitch offset
VEL - Velocity offset
LEN - Note length factor
STA - Start offset factor
POS - Relative position
DIR - Play direction
AMT - Randomization amount
GRV - Groove factor
MCC - MIDI Controller
MCH - MIDI Channel
Speed - Track tempo multiplier
PgmCh - Program Change
PIT - Pitch offset
VEL - Velocity offset
LEN - Step length
STA - Start offset
AMT - Amount of event
GRV - Step position certainty
MCC - MIDI Controller value
nemo -MIDI Performance Sequencer
I Nemo at a glance
3
Navigation Guide

Navigation basics
The Grid contains all Page objects and each Page is made up of
Tracks and Steps. Moving around this hierarchy tree is trivial: to jump
between leaves you can always go up a level and down again.
Additionally, in most situations direct paths are also provided, allow-
ing you to jump directly from one leaf to another.
Just as an example, assuming you are in the GRID mode, while edit-
ing you would double click the button of a page to zoom into it.
From there, i.e. Page mode, You would do the same to get further
down into a specific track or into a specific step.
Navigating back up the tree is only one click away, and will take you
directly to the selected level. Or simply use the ESC key to always get
to the PAGE level of your current page, arriving at a known starting
point.
Similarly, in Track mode, press the selector corresponding to the track
you would like to jump to. In Step mode, press and hold STEP and
press a grid button to jump to the step corresponding to the pressed
button.
nemo -MIDI Performance Sequencer
I Nemo at a glance
Navigation Guide
4

Grid
Nemo provides a total of 64 pages grouped in 4 banks of 16 pages
each, making up the GRID.
Visually a bank corresponds to one row of the matrix; hence a page
corresponds to one button of the matrix.
One page in each bank may play at any time, hence allowing you to
play up to 4 pages concurrently.
Note on MIDI data output
Depending on the number of concurrently active tracks and the den-
sity of the produced MIDI data, it is possible to overload the MIDI
stream. A more complete discussion of various system and MIDI
loading is found in the section on System Load Handling.
nemo -MIDI Performance Sequencer
I Nemo at a glance
5
Navigation Guide

Pages
One can think of Nemo's pages as track containers. The number of
tracks in a page is 4, with a default length of 16 steps each.
Musical structures longer than 16 steps are built by chaining tracks in
a page, such that chained tracks are played consecutively.
Musical structures shorter than 16 steps can be built by using skipped
steps in tracks, for example. More on this later.
However, the user may also build track chains within one page as de-
sired, effectively creating structures of length 1 to 64 steps.
This, combined with the ability to play up to 4 pages concurrently
and each of the 4 pages being part of a cluster of at most 16 consecu-
tive pages gives you a lot of freedom to create musical structures.
Tracks
If pages are Nemo's track containers, then tracks are the step con-
tainers. Apart from other attributes, each track has a locator associ-
ated with it which can be controlled independently from locators of
other tracks.
Steps
In Nemo steps are the smallest meaningful entities, for example notes
in a musical context. In track mode the individual steps of a selected
track can be modified across their available range of attributes.
Mutators
Entities or attributes of entities can be operated upon using mutators
(or functions), for example clear, randomize, modify, copy, paste, etc.
While the modify function is mapped directly to the knobs as de-
scribed in the operation mode section, the others are invoked by
pressing the appropriate mutator buttons.
nemo -MIDI Performance Sequencer
I Nemo at a glance
Navigation Guide
6

Attributes
All of the above entities of Nemo have attributes associated with
them. The range includes but is not limited to Velocity, Pitch, Length,
Start, Position, and others.
All attributes can be modified in real time, during play or stop. Their
semantics may differ across entities and not all attributes are applica-
ble to all entities. The attached table gives an overview of the entities
and their applicable attributes.
Page
Track
Step
VEL
+
+
+
PIT
+
+
+
LEN
+
+
+
STA
+
+
+
POS
+
+
DIR
+
AMT
+
+
GRV
+
+
MCC
+
+
MCH
+
Sound Control (CC MIX TARGET) Maps
The Sound Control Maps are assignments of CC functionality to the
Mixer knobs of Nemo.
You may use Sound Control Maps to freely assign MIDI Controllers
and their appropriate channels to the Mixer knobs, independently of
what is going on in the PAGE.
This allows for direct control of external sound sources.
nemo -MIDI Performance Sequencer
I Nemo at a glance
7
Navigation Guide

The front panel
The Nemo front panel consists of visual groups which we will name
here and to which we will refer in the course of this document. They
are explained in a left to right order.
MIX encoders
Each matrix row has a dedicated left rotary encoder –in the MIX
(Mixer)group.
SEL buttons
Rows have dedicated buttons in the SEL (Selector) group.
MATRIX
The MATRIX refers to the field of 16 x 4 buttons.
The buttons take on various functions, depending on the operating
mode of the sequencer. The most obvious one is probably, when ma-
trix rows represent tracks of 16 steps each.
Right below the matrix is the Sound Control Map field which deter-
mines the functionality of the MIX rotary knobs, as well as the
transport filed buttons that control the sequencer.
MUT buttons
Rows have dedicated buttons in the MUT (Mutator) group.
EDIT encoders
Rows have dedicated left rotary encoders in the EDIT (Editor)group.
nemo -MIDI Performance Sequencer
I Nemo at a glance
Navigation Guide
8
Table of contents
Other genoQs Machines Recording Equipment manuals