GEONAUTE ONchannel 710 User manual

CONTENTS
1 PRECAUTIONS FOR USE ................................................................................................................2
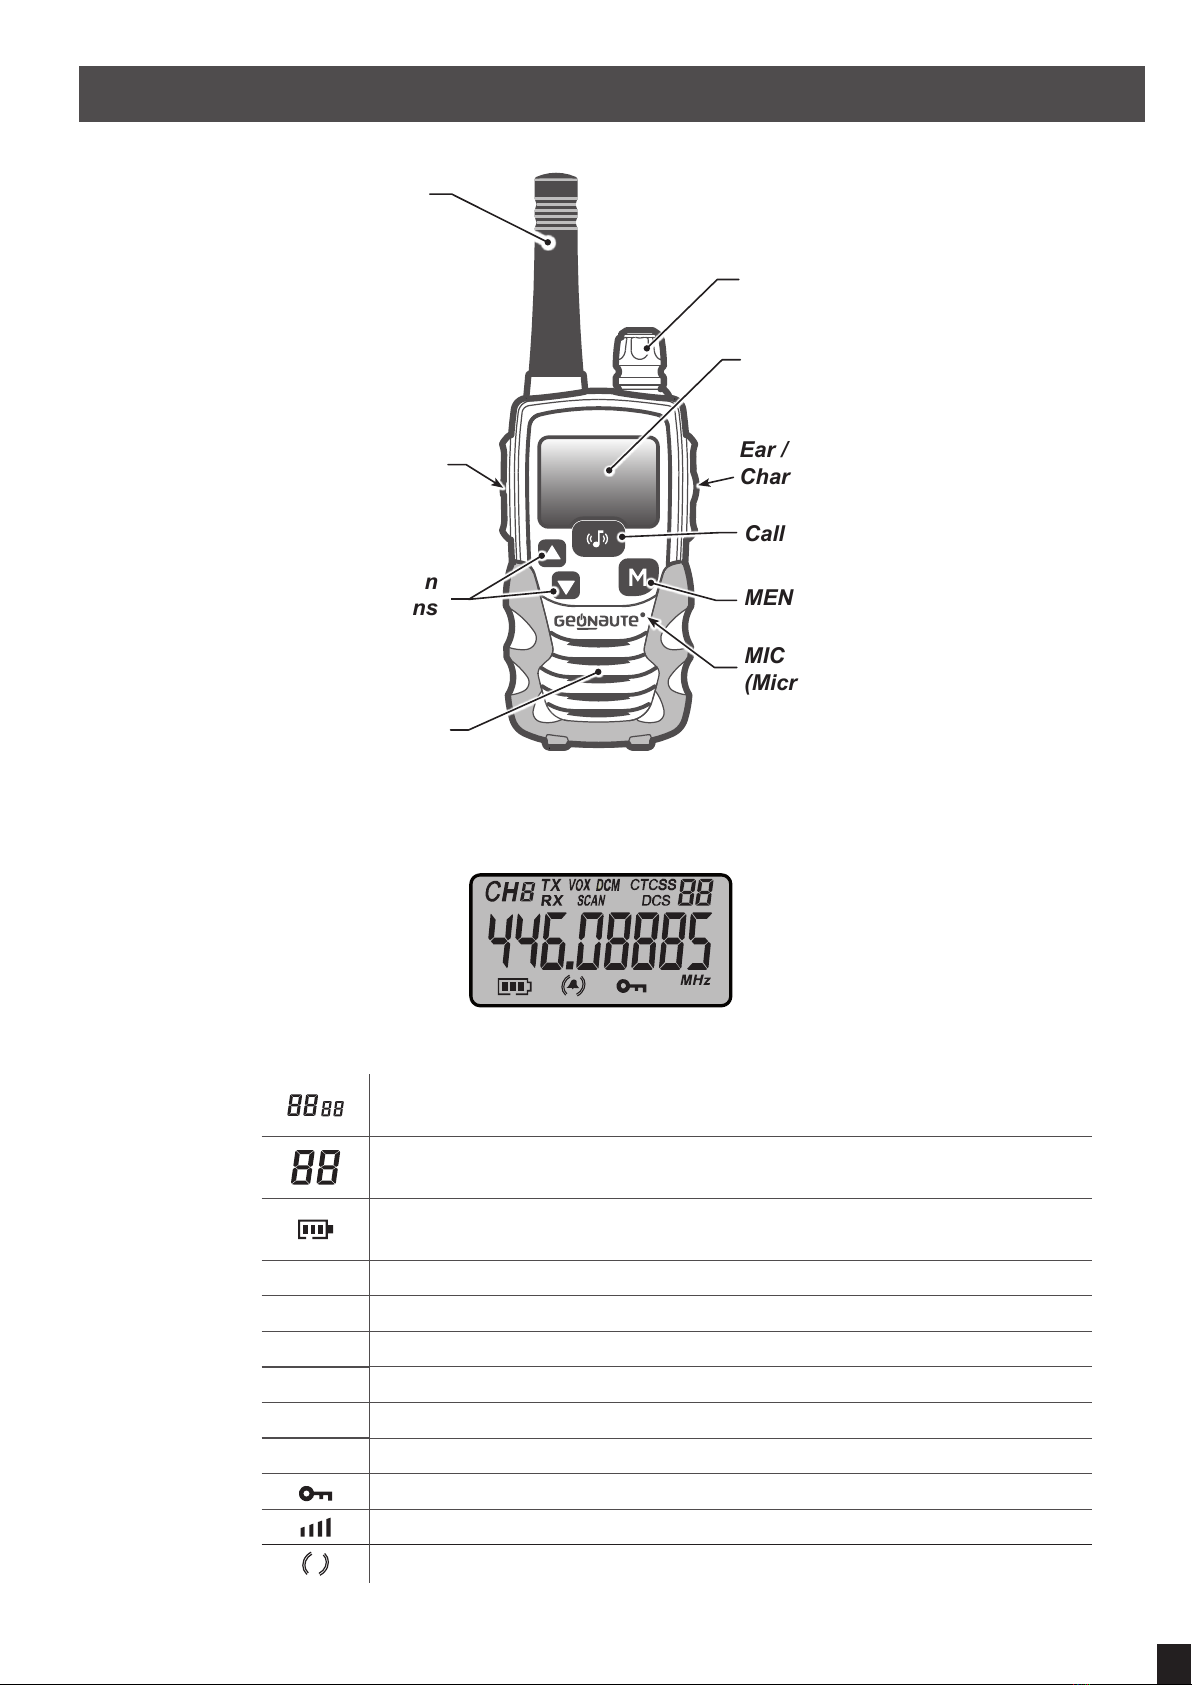
2 DESCRIPTION...................................................................................................................................3
3 INSTALLATION..................................................................................................................................4
3.1 Installing the Battery ...................................................................................................................... 4
3.2 Installing / removing the belt clip.................................................................................................. 4
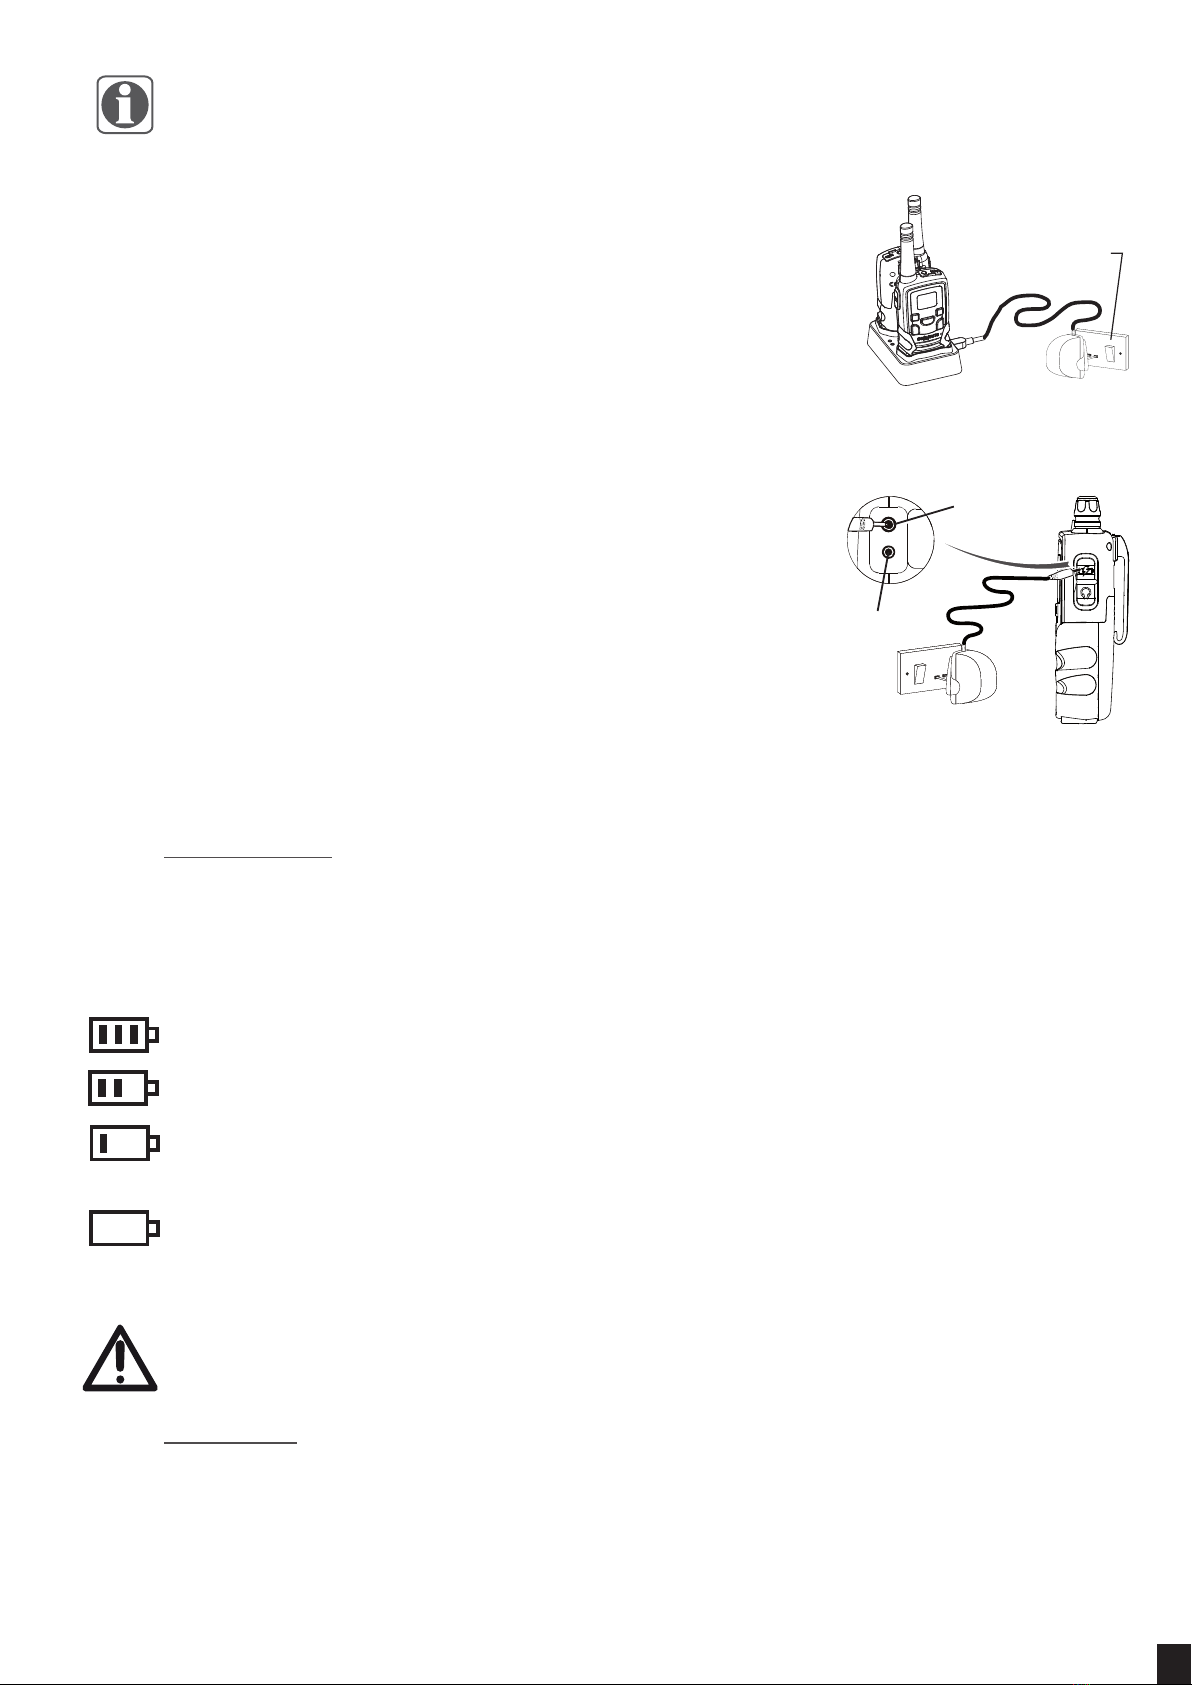
3.3 Charging the batteries.................................................................................................................... 4
4 OPERATION ......................................................................................................................................6
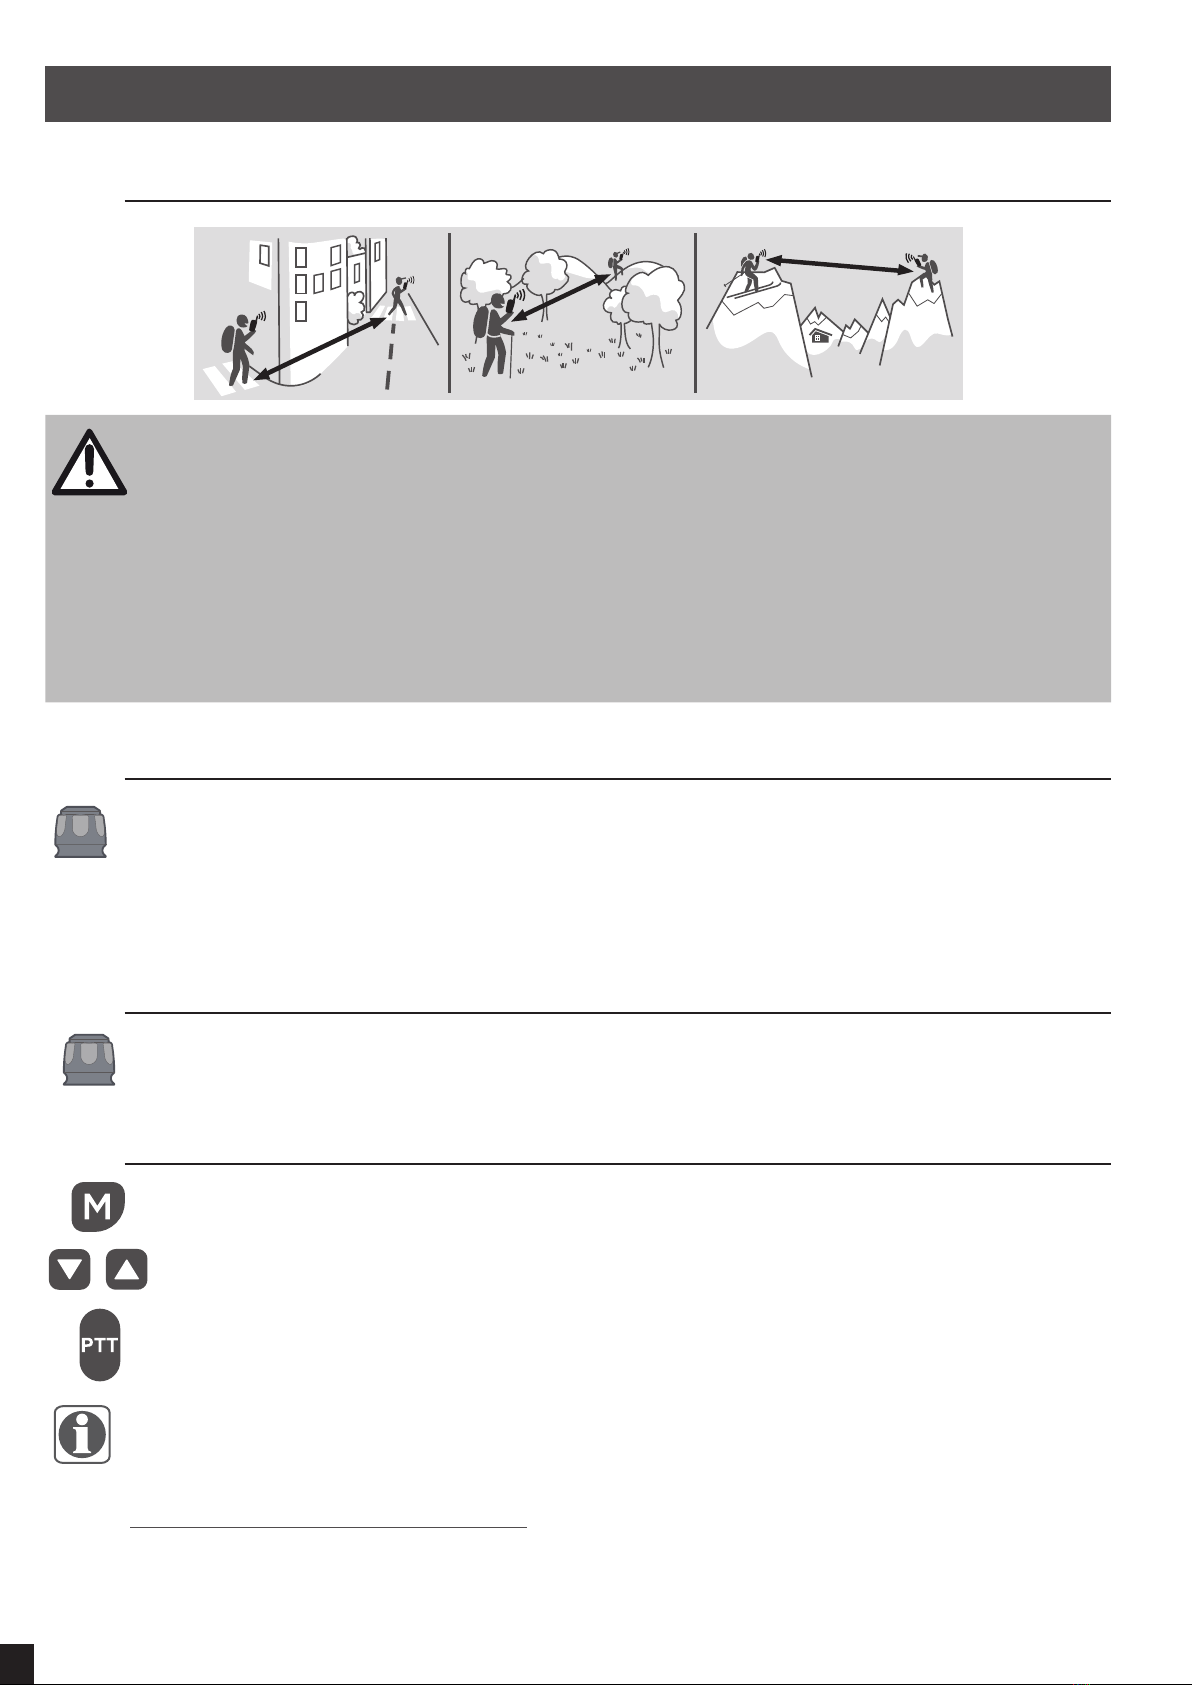
4.1 Transmission range........................................................................................................................ 6
4.2 Turning the unit On/Off................................................................................................................... 6
4.3 Adjusting the speaker volume....................................................................................................... 6
4.4 Changing Channels ........................................................................................................................ 6
4.5 Transmitting (sending a speech)................................................................................................... 7
4.6 Monitor............................................................................................................................................. 7
4.7 Setting the VOX (Voice Activated Sensitivity).............................................................................. 8
4.8 Activating the Auto channel scan ................................................................................................. 8
4.9 Vibrator and Call alert .................................................................................................................... 8
5 CALL-RING TONE.............................................................................................................................8
5.1 Selecting a Call-ring tone............................................................................................................... 9
5.2 Activating the Vibrator mode......................................................................................................... 9
5.3 Setting the Roger beep .................................................................................................................. 9
5.4 Setting the key tone On or Off....................................................................................................... 9
5.5 Setting the Dual Watch Mode ...................................................................................................... 10
6 AUXILIARY FEATURES ..................................................................................................................10
6.1 Key lock ......................................................................................................................................... 10
6.2 LCD screen back light .................................................................................................................. 10
6.3 Microphone/Earphone/Charge jack ............................................................................................ 10
7 ACCESSORIES ...............................................................................................................................11
7.1 Using the earpiece kit................................................................................................................... 11
7.2 Installing the elastic strap............................................................................................................ 11
8 TECHNICAL CHARACTERISTICS .................................................................................................11
8.1 Specications ............................................................................................................................... 11
8.2 Channel frequency table .............................................................................................................. 11
9 CE DECLARATION OF CONFORMITY ..........................................................................................12
10 WARRANTY.....................................................................................................................................12
11 RECYCLING ....................................................................................................................................12
12 CONTACT US ..................................................................................................................................12
EN ONchannel 710

x2
x2
x6 x2
x1
x1
x2
x2
x6 x2
x1
x1
x2
x2
x6 x2
x1
x1
x2
x2
x8 x2
x1
x1
x2
x2
x8 x2
x1
x1
x2
x2
x8 x2
x1
x1
x2
x2
x8 x2
x1
x1
x2
x2
x8
x2
x1
x1
x2
x2
x8 x2
x1
x1

2
1 PRECAUTIONS FOR USE
•
Pleasereadtheowner'smanualcarefullybeforeuse.Pleasekeeptheowner's
manualfortheentirelifeoftheproduct.
•Toreduceradiofrequencyexposurewhenusingthedevice,keepitatleast5cm
awayfromyourface.
•Donotallowbabiesoryoungchildrentogetnearthedevices.
•
Neveruseawalkie-talkiewithadamagedantenna.Iftheantennaisincontactwith
theskin,mildburnsmayresult.
•Whenusingthedeviceinavehicle,donotleaveitintheareaaboveanairbagor
intheairbagdeploymentareabecauseitcanbepropelledwithgreatforceand
causeseriousinjurytothevehicleoccupantsiftheairbagisdeployed.
•
Thedevicesaredesignedtobeusedintemperaturesrangingfrom-10°Cto+50°C
inclusive.
•
Ifthedevicesareusedinlowtemperatures,youmustusebatteriescapableof
standingupwelltolowtemperatures.PreferablyuselithiumorNiMHrechargeable
batteriesasalkalineandzincbatteriesperformverybadlyinlowtemperatures.
•Donotusethedevicesorchangethebatteriesinanexplosiveatmosphere.The
antennaorbatteriescanproducemicro-sparksorstaticelectricitywhichcanset
offexplosionscausingseriousinjuryandevendeath.
•Neverusethedeviceoutsideduringastorm.
•Donotusethedeviceintherain.
•
Ifthedevicegetswet,switchitoffandremovethebattery.Drythebattery
compartmentandleavethecoveropenforafewhours.Donotusethedevice
untilitiscompletelydry.
•Donotdismantletheproduct.Thiswillvoidthewarrantyandcouldcausedamage
orlossofwatertightness.
•Cleantheproductwithasoft,moistclothoracompressedaircanister.Neveruse
detergentsastheycouldcausedamagetothematerials.Donotrubthescreen
withanythingthatmightscratchit.
•Removethebatteriesbeforestoringthedeviceforaprolongedperiod.

3
2 DESCRIPTION
Antenna
PTT
(Push To Talk) button
PWR/Vol switch
Up/Down
buttons
MIC
(Microphone)
Ear / Mic /
Charge jack
Call button
MENU button
LCD screen
LCD screen
Speaker
Channel number.
Changes from 1 to 8 as selected by the user.
CTCSS code.
Changes from 1 to 38 as selected by the user.
Displays the Battery charge level.
When the bars are reduced, the battery needs recharging.
TX Displayed when at transmitting a signal.
RX Displayed when at receiving a signal.
DCM Displayed when Dual Watch function is ON.
DCS Displayed when Digital Code System is ON.
VOX Displayed when VOX is activated.
SC Displayed when PMR scanning the channels.
Displayed when the key lock is activated.
Displayed current speaker volume level.
Displayed when the vibrator function activated.

4
3 INSTALLATION
3.1 Installing the Battery
Ifthebeltclipisinstalled,
removeit.
Observe the proper battery polarity orientation when installing batteries.
Incorrect positioning can damage both the batteries and the unit.
3.2 Installing / removing the belt clip
Installing the Belt clip
Slidethebeltclipinto
theslotasshownin
gure.
INSERTING REMOVING Removing the Belt clip
PulluptheBelt
cliplatchfromthe
ONchannel710.
WhilepullingtheBelt
cliplatch,pushupthe
beltclipasshownin
gure.
3.3 Charging the batteries
Important: ReadtheseSafetyWarningsbeforeyouchargethebatteries.
WhenplacingtheONchannel710inthecharger,useonlythepowersupplyOnReal
providedtothismodelONchannel710.
Don’ttrytorechargenon-rechargeablebatteries.
Makesurethebatterycompartmentcoverissecurelylockedinplacewhenyouare
chargingthebatteries.
Disposeofusedbatteriessafelyandinawaythatwillnotharmtheenvironment.Never
trytoburnthemorputthemanywhere,theycouldgetburntorpunctured.
Don’tleavedeadbatteriesinyourONchannel710units.Theymightleakifyoudo.
Insertthesmallplugontheendofthemainsadaptorintothepower-inconnectionjackattheback
ofthedesktopcharger.
Plugthemainsadaptorintoa240VAC,50HzmainsocketwiththeswitchonthesocketsettoOff.
SwitchOnthemainsocket.

5
•TheONchannel710mustbechargedusingthemainsadaptorprovided.
•Usinganyotheradaptorwillresultinnon-compliancewithEN60950-1andwillinvalidate
anyapprovals&warranty.
PlacetheONchannel710unitsinthechargecradleinanuprightposition.
ThechargeLEDindicatorswilllightup.
Ittakesabout10hourstofullyrechargethebatteriesiftheyare
completelyrundown.
New batteries take up to 14 hours to fully charge.
Important:AlwaysturnoffthePMRunitswhencharging.Thiswillshortenthe
chargingtime.
Chargingthebatterybatteries(usingadaptor).
Liftthechargesocketcoverlocatedontherightsideofthe
handset.
Inserttheroundconnectorofthe9.0VDC/300mAadaptorinto
thechargejack.
Plugthemainsadaptorintoa240VAC,50Hzmainsocket
withtheswitchonthesocketsettoOff.Useonlythepower
supplyOnRealprovidedtothismodel.ThenswitchOnthe
mainsocket.
Charge jack
Mic/spk jack
3.3.1Batterymeter
ThebatterymeterislocatedintheleftcorneroftheLCDscreen.Itappearslikeabatterywiththree
barsinside.Theseindicatetheamountofpoweravailable.Whenthebatterylevelreachesitminimum
levelinPMRonmode,unitwillemittwobeeptonesandautomaticallytheunitwillpoweroff.
TheONchannel710candetectthebatterychargein4levels;
Batterychargeathighlevel.
Batterychargeatmediumlevel.
Batterychargeatlowlevel.Atthislevel,theONchannel710willemita"beep"soundfor
every10secondsinnormalmode.
Batterychargeatverylowlevel.Whenthebatterylevelreachitminimumlevelin
ONchannel710onmode,unitwillemittwo"beep"toneandautomaticallyturnoffthe
powerandproceedstowatchmode.
Important:Chargetheunitfor10-14hours.
Riskofexplosionifbatteryisreplacedbyanincorrecttype.Disposedofusedbatteries
accordingtotheinstructions.
3.3.2Batterylife
TheONchannel710hasabuiltinpowersavertomakethebatterieslastlonger.Butwhenyouarenot
usingtheunits,turnthemOfftoconservebatterypower.
main socket

6
4 OPERATION
4.1 Transmission range
500 M
10 KM
1.5 KM
Important safety warning:
ToreduceradiofrequencyexposurewhenyouareusingyourONchannel710,holdthe
unitatleast5cm(2inches)awayfromyourface.
NeveruseyourONchannel710outdoorsduringathunderstorm.
Don’tusetheONchannel710intherain.
IfyourONchannel710getswet,turnitoffandremovethebattery.Drythebattery
compartmentandleavethecoveroffforafewhours.Don’tusetheunituntilitis
completelydry.
KeeptheONchannel710outofreachbabiesandyoungchildren.
4.2 Turning the unit On/Off
To Turn On;
RotatethePower/VolbuttonclockwiseuntiltheLCDscreenturnsOnanddisplaythe
currentchannel.
To switch Off;
RotatethePower/VolbuttoncounterclockwiseuntiltheLCDscreenturnsblank.
4.3 Adjusting the speaker volume
RotatethePower/Volbuttontoincreaseordecreasethevolume.
4.4 Changing Channels
PresstheMenubuttononce,thecurrentchannelnumberashingontheLCDscreen.
PresstheUporDownbuttontoselectthedesiredchannel.Thechannelchangesfrom
1to8,orviceversa.
PressthePTTbuttontoconrmthesetting.
•Refertothe«ChannelTable»sectionofthisOwner’smanualfordetailedfrequencylisting.
4.4.1SettingtheCTCSSsub-channel
Eachchannelalsohas38sub-channelstoletyousetupgroupofuserswithinthesamechannelfor
moreprivatecommunication.Ifyouhavesetthesub-channel,youcanonlycommunicatewithother
PMRuserstunedtothesamechannelandsub-channel.

7
To turn the sub-channel function off:simplysetthesub-channelto0(zero).Youcancommunicate
withanyONchannel710usersettothesamechannelwhoalsoturnsoffthesub-channeloperation
(orwhosehaveunitdoesnothavethefeature).
PresstheMenubuttontwice,thecurrentCTCSSsub-channelnumberashingonthe
LCDscreen.
PresstheUporDownbuttontoselectoneofthe38CTCSSsub-channels.
PressthePTTbuttontoconrmthesetting.
4.4.2SettingtheDCS(AdvancedDigitalCode).
Eachchannelalsohas83digitalcodestoletyousetupgroupofusersformoresecuredprivate
communication.
PresstheMenubutton3times.DCScodeisblinkingontheLCDscreen.
PresstheUporDownbuttontoselectthedesiredDCScode.
PressthePTTbuttontoconrmtheDCSchannelsetting.
Transmitting and Receiving
TheONchannel710transmissionis«oneway-at-a-time.»Whileyouarespeaking,youcannot
receiveatransmission.
TheONchannel710isanopen-licenseband.Alwaysidentifyyourselfwhentransmittingonthe
samechannel.
4.5 Transmitting (sending a speech)
TheunitiscontinuouslyinthereceivemodewhentheunitisturnedOnandnottransmitting.Whena
signalisreceivedonthecurrentchannel,«RX»iconwillbedisplayedontheLCDscreen.
PressandholdthePTTbuttontotransmityourvoice.«TX»iconwillbedisplayedonthe
LCDscreen.
HoldtheunitinaverticalpositionwiththeMIC(Microphone)5cmawayfromthemouth.
WhileholdingthePTTbutton,speakintotheMIC(microphone)inanormaltoneof
voice.
ReleasethePTTbuttonwhenyouhavenishedtransmitting.
4.6 Monitor
YoucanusetheMonitorfeaturetocheckforweaksignalsonthecurrentchannel.
PressandholdtheMenuandDown button.
The"RX"iconwillbedisplayedontheLCDscreen.YourONchannel710willpickupsignals
onthecurrentchannel,includingbackgroundnoise.
PresstheMenubuttonagaintostopthechannelmonitoring.

8
4.7 Setting the VOX (Voice Activated Sensitivity)
In«VOX»mode,theONchannel710willtransmitasignalonlywhenitisactivatedbyyourvoiceor
othersoundsaroundyou.Theunitwilltransmitfurtherfor2secondsevenifyoustoptalking.
Thelevelof«VOX»sensitivityisshownbyanumberontheLCDscreen.Atthehighestlevel,the
unitswillpickupsofternoise(includingbackgroundnoise),atthelowestlevel,itwillpickuponlyquite
loudnoise.
PresstheMenubutton4times,"VOX"iconwillbedisplayedand"OFF"ashingon
theLCDscreen.
PresstheUpbuttontosettheVOXsensitivityintomaximumlevel(themaximumlevel
is"3").
TodeactivatetheVOXfunction,presstheDownbuttonuntil"OFF"appearsonthe
LCDscreen.
PressthePTTbuttontoconrmyoursetting."VOX"willsteadilyappearontheLCD
screenasalongastheVOXfeatureisactivated.
•VOXoperationisnotrecommendediftheONchannel710willbeusedinanoisyorwindy
environment.
4.8 Activating the Auto channel scan
Channelscanperformsearchesforactivesignalsinanendlessloopforall8channels,38CTCSS
codesandall83DCScodes.
PresstheMenubutton5times,"SC"iconwilldisplayonLCDscreen.
PresstheUporDownbuttontobeginscanningchannels.Whenanactivesignalis
detected,channelscanpausesontheactivechannel.
PresstheMenubuttonsixtimes,CTCSSashingontheLCDscreen.
PresstheUporDownbuttontobeginscanningtheCTCSSfrom1-38.
PresstheMenubuttonseventimes,DCSashingontheLCDscreen.
PresstheUporDownbuttontobeginscanningDCScode1-83.
PressthePTTbuttontoreturntostanbymode.
4.9 Vibrator and Call alert
YourONchanne710canalertyoutoincomingsignalbyemittinganaudiblecalltoneandvibration
signal.
5 CALL-RING TONE
YoucansendaCall-ringtonetootherPMRuserstogiveanalertthatyouwanttocommunicatewith
them.
PresstheCallbutton

9
Youwillheararingtoneforabouttwoseconds.«TX»iconappearsontheLCDscreen.Anyother
unitswithinthetransmittingrangeandtunedtothesamechannelandsub-channel(ifapplicable)will
heartheCall-ringtone.
5.1 Selecting a Call-ring tone
TheONchannel710isequippedwith15differenttypesofCallringtones.
PresstheMenubutton8times,the"C01"iconwilldisplayandashingontheLCD
screen.
PresstheUporDownbuttontoselectthedesiredcallringtone.
Arespectivecallringtonesoundwillbeplayedwhenchangingfromonetonetoanother.
PressthePTTbuttontoconrmyoursetting.
5.2 Activating the Vibrator mode
PresstheMenubutton9times,"1"ashingontheLCDscreen.
PresstheUporDownbuttontoactivatethevibratorfunction.
PressthePTTbuttontoconrmyour
setting.
•VibratorandCalltonecanbeactivatedatthe
same.
5.3 Setting the Roger beep
TheRogerbeepisatonewhichisautomaticallytransmittedwheneverthePTTbuttonisreleased.
Thisalertsthereceivingpartytoinformthatyouhaveintentionallyendedthetransmission,andyou
arenowinreceivemode.
PresstheMenubutton10times,the"ON"iconisblinkingontheLCDscreen.
PresstheUporDownbuttontoselecttheRogerbeepOn/Off.
PressthePTTbuttontoconrmyoursetting.
5.4 Setting the key tone On or Off
ThisfeatureallowstheONchannel710toemitaconrmationtoneafterpressingeachbutton.
PresstheMenubutton11times,the"ON"iconisblinkingontheLCDscreen.
PresstheUporDownbuttontoselectthekeytoneOn/Off.
PressthePTTbuttontoconrmyoursetting.

10
5.5 Setting the Dual Watch Mode
YourONchannel710iscapableofmonitoringtwochannels,thecurrentandanother(dualwatch)
channel.Iftheunitdetectsasignaloneitherchannel,itwillstopandreceivethesignal.
PresstheMenubutton12times,"DCM"iconwillbedisplayedwhile"OFF"ashing
ontheLCDscreen.
PresstheUporDownbuttontoselecttheDualWatchchannel(1-8,exceptthe
currentchannel).
ContinuepressingtheMenubuttontochangetheCTCSScode.
PresstheUporDownbuttontoselectthedesiredCTCSScode(1-38)
ContinuepressingtheMenubuttontochangetheDCScode.
PresstheUporDownbuttontoselectthedesiredDCScode(1-83)
PressthePTTbuttontoconrmyoursetting.
6 AUXILIARY FEATURES
6.1 Key lock
ThekeylockfeatureallowsusertodisabletheUp,DownandMenubuttonssothattheONchannel710
settingscouldnotbechangedaccidentally.
Toactivatethekeylockfeature,pressandholdtheMenubuttonuntilkeylock« »
iconappearsontheLCDscreen.
Todeactivatethekeylockfeature,pressandholdtheMenubuttonuntilkeylock« »
icondisappearsontheLCDscreen.
•ThePTT,andCALLbuttonswillremainfunctionalevenifthekeylockfeatureisactivated.
6.2 LCD screen back light
EverytimethePowerbuttonisopen(exceptCALLandPTT),theLCDscreenbacklightwillilluminate
for5seconds.
6.3 Microphone/Earphone/Charge jack
TheONchannel710isequippedwithanauxiliarymicrophone,earphone,andchargejacklocatedat
theoppositesideofPTTbutton.
•Youcanplugahandsfreekitintotheearset/micjackholeofyourradiohandset.Withhandsfree
kit,bypressingthePTTbuttonitwilltransmitandtalkwithotherradios.

11
7 ACCESSORIES
7.1 Using the earpiece kit
bip
Press and hold
•Whentheearphonekitisinstalled,themicrophoneandloudspeakeraredeactivated.
7.2 Installing the elastic strap
1
1
2
8 TECHNICAL CHARACTERISTICS
8.1 Specications
Channels Available 8channels.
CTCSS sub-channel 38foreachchannel.
DCS sub-channel 83foreachchannel.
TX 5%, RX 5%, Standby 90% 11hours.
Output power (TX) 0.5W.
Range Upto10Km(inopenspace).
8.2 Channel frequency table
Channel Frequency (MHz) Channel Frequency (MHz)
1446.00625 5446.05625
2446.01875 6446.06875
3446.03125 7446.08125
4446.04375 8446.09375

12
9 CE DECLARATION OF CONFORMITY
•
DECATHLONherebydeclaresthattheONchannel710devicecomplieswiththeessentialrequirements
andotherrelevantprovisionsofDirective1999/5/CE
•
DECATHLONherebydeclaresthattheONchannel710devicecomplieswiththeessentialrequirements
andotherrelevantprovisionsofDirective2006/95/CE.
Compliancewiththeserequiredconditionsisexpressedbythemarking:
TheCEdeclarationofconformityisavailableviathefollowinglink:https://www.geonaute.com/en/
ec-declaration-conformity
10 WARRANTY
DECATHLONguaranteestotheinitialpurchaserofthisproductthatitisfreefrommaterialor
manufacturingdefects.Thisproductisguaranteedfortwoyearsfromthedateofpurchase.Please
ensurethatyoukeeptheinvoiceasproofofpurchase.
Theguaranteedoesnotcover:
•Damageresultingfrommisuse,fromafailuretorespecttheprecautionsforuse,fromaccidents,
fromimpropermaintenanceorfromcommercialuseoftheproduct.
•DamageresultingfromrepairscarriedoutbypersonsnotauthorisedbyDECATHLON.
•Batteriesorcasingswhicharecrackedorbrokenorwhichshowsignsofimpacts.
•Theelasticstrap,whichissubjecttowearandtear.
Duringthewarrantyperiod,theitemwilleitherberepairedfreeofchargebyanauthorisedrepairservice
orreplacedfreeofcharge(dependingonthedistributor).
11 RECYCLING
The«crossed-outbin»symbolmeansthatthisproductandthebatteries
itcontainsmustnotbethrownawaywithgeneralhouseholdwaste.They
aresubjecttoaspecictypeofsorting.Pleasetakethebatteriesandyour
unusableelectronicproducttoanauthorisedcollectionpointforrecycling.This
treatmentofyourelectronicwastewillprotecttheenvironmentandyourhealth.
Disposeofyourbatteriesinaplacewheretheywillberecycled.
12 CONTACT US
Wewouldliketohearyourviewsonthequality,featuresanduseofourproductsat:
www.support.geonaute.com
Wewillreplyassoonaspossible.

Table of contents
Other GEONAUTE Two-way Radio manuals